Non sunroof roof skin swap - Back on the road!

Show off your pride and joy here

Moderator: martauto

appletree
E30 Zone Addict
E30 Zone Addict
Posts: 3482
Joined: Fri Jan 20, 2006 11:00 pm
Location: Retford

Sun May 04, 2014 3:58 pm

Not updated this for a while so have some progress to add.

Welded the inside section of the pass foot well, not quite th same as it was as the raised part is alittle large but it all fits and looks good.

Image


Last thing to do was weld across the top of the join, no pics of ths but after that
POR-15'd all area and then went over it with seam sealer.

Image

Next had a look at the drivers side, again no real rust showing but gave it a good going over with the knotted wheel and the was alittle lurking under the underseal so seeing as I'm now an expert at jacking points I cut the bad bit out and started again, no pics of the first bit as I was on a roll but I had to weld on a small bit of tab and then weld a plate on the outside.

Not my best welding :roll:

Image

Polished back and with the angle adjusted...

Image

Next section im starting on is the area behind the drivers side headlight, I pulled off the arch liner with some of the metal lip still attached.

Marked out ready to cut.

Image
Image
Image

You should never underestimate the predictability of stupidity

M42 Supercharged 285bhp + M3 6speed box
User avatar
TriggerFish
E30 Zone Regular
E30 Zone Regular
Posts: 507
Joined: Sat Jun 30, 2012 11:00 pm
Location: Aylesbury, Bucks

Sun May 25, 2014 9:42 pm

Good stuff this - all problems I'm in the midst of tackling, so quite good to see your approach (you're a bit ahead of me though, and I think I'll leave my roof until the winter and just give it to a body shop).

I was also planning on Deoxing the roof (and other bits) too. Seems an ideal solution to surface rust on big parts (like subframes) if it works.
appletree
E30 Zone Addict
E30 Zone Addict
Posts: 3482
Joined: Fri Jan 20, 2006 11:00 pm
Location: Retford

Mon May 26, 2014 3:27 pm

Deox gel works well but if it's not to bad to cut the metal though I've chopped it out.

Got a good bit to update on this thread but not had the time to write it out yet.
Image

You should never underestimate the predictability of stupidity

M42 Supercharged 285bhp + M3 6speed box
appletree
E30 Zone Addict
E30 Zone Addict
Posts: 3482
Joined: Fri Jan 20, 2006 11:00 pm
Location: Retford

Mon May 26, 2014 4:09 pm

Removed some underseal from inside to see where the rust had spread
Image
Started cutting out all the rusty bit so I could see what was what and made a plate to weld in.
Image
Tacking up on the outside
Image

Fully welded and polished back the outside, still got the inside to do.
Image
Notice anything missing?
Image
New toy!!!!
Image
Welded in the patch on the inside, what a ball ache that was welding at arm’s length not being able to see where I was feeding in the wire. Not polished yet
Image
Image
After sorting out an adaptor plug so I could get from 16amp 240 to a supply in the house we were off, after a bit of messing about with the settings on some scrap.
Image
Spot welded the patches together.
Image
Also got my order from BMW, all the plug and clips to fit the SE side skirts properly and the nuts and plugs to hold the ache liners in place, just need to find out where beardy mat got his square drill from to make the holes for the plugs”¦..;-)
Image
Also got the new cover for the petrol breather pipe.
Image
Picked up this non sunroof headlining off sweep and had a go at dyeing it with some VHT satin dye, I tried my valitors pride but it was too glossy.

Next to my sunroof headliner

Image
The VHT was still a little glossy but doesn’t look to bad out of direct sunlight.
Image
Image
Image

Hopefully have some more updates tomorrow as I’ve booked two days off work to try and get some progress made with it.
Image

You should never underestimate the predictability of stupidity

M42 Supercharged 285bhp + M3 6speed box
Craggy73
E30 Zone Newbie
E30 Zone Newbie
Posts: 177
Joined: Wed Dec 26, 2012 11:00 pm
Location: Cheshire, UK

Mon May 26, 2014 9:00 pm

Some nice repair work there. Wish mine was that neat.
Image
TheMeathead
E30 Zone Regular
E30 Zone Regular
Posts: 312
Joined: Thu Jun 04, 2009 11:00 pm
Location: Hastings, East Sussex

Tue May 27, 2014 12:02 am

you going non sunroof the appletree?
doing a great job so far btw :)
appletree
E30 Zone Addict
E30 Zone Addict
Posts: 3482
Joined: Fri Jan 20, 2006 11:00 pm
Location: Retford

Tue May 27, 2014 7:18 am

99% Ya, got a non sunroof roof cut off at the pillars so will need to seperate the skin from the roof buy cutting the spot welds from the back, as long as it separates ok I'll spot weld it back on how BMW did but that may well be in winter as I wouldn't mind having it on the road a bit this year.
Image

You should never underestimate the predictability of stupidity

M42 Supercharged 285bhp + M3 6speed box
appletree
E30 Zone Addict
E30 Zone Addict
Posts: 3482
Joined: Fri Jan 20, 2006 11:00 pm
Location: Retford

Wed May 28, 2014 6:43 pm

As promised, update from the last two days of work on the car.

Bit of POR-15 on the driver’s side behind the headlight.
Image

Welded on the tab for the arch liner, this is the bit I forgot to add into the plate when I made it, main due to the fact it wasn’t there to copy as it came off with the arch liner.

Image

Same problem on the pass side although not as bad, but same process as the other side.

Image

Cut out the bad

Image

Make a plate

Image
Image

Tacky, tacky, weldy, weldy

Image
Image

Next turned my attention to the rear, this hole came through after a good going over with the knotted wheel.

Image

There was a little rust on the rear panel which is what a cut out on the lower right, the bigger hole I had to cut out to gain access.

Image

Make a plate

Image

Welded the plate in but also cut out some more up the inside of the battery box, welding laid in the boot with my arms down the battery box and the screen pressed against my face was not fun!

Image

Bumper welded back in, had to cut some strips of meta the thickness of the blade I cut it out with so it all matched up right.
(had to re weld over them two fish eyes after a took that photo)

Image

Inside

Image

On to today

Seam sealered the front, know its a bit excessive but wanted to try and match the BMW sealer so it looks more original, I have some red paint to spray over it that's a good enough match for the bay once the sealers hardened off/

Drivers side

Image

Pas side

Image

Lastly I managed to get the tank breather assembly put back together an mounted, used all stainless fixings from a ”alocal supplier”a an lathered the job lot in wax oil!

Image

Finished off the welding on the driver side inner ache, managed to fill the small hole with some careful TIG action. Few coats of paint and it’ll be ready for the undercoating.

Image

Till next time”¦.
Image

You should never underestimate the predictability of stupidity

M42 Supercharged 285bhp + M3 6speed box
appletree
E30 Zone Addict
E30 Zone Addict
Posts: 3482
Joined: Fri Jan 20, 2006 11:00 pm
Location: Retford

Mon Jun 23, 2014 7:20 pm

Not had chance to update this thread for a while but I've been getting on again quite well.

The tank is now back up and mounted as is the rear subframe, trailing arms, springs, dampers diff and wheels so the car is now sat on the floor again.

Next to on the back end is try and adjust the rear trailing arms now I have the camber/toe adjustments available, also need to refit the rear brakes but I'm in the hands of Keri for that little lot :D

No pics but will get one next time I'm laid under it.

Minor problem with the diff hanger, possibly because the diff was a Z3 item, the cover seams to be touching the front mount but there is about a 5mm gap between the diff bush and the rear plate mount,its been that long since I took the old diff off i cant remember if there was a spacer but think I will be making one anyway.

Also have finished off the front arches and jacking points, first sprayed a bit of red over the under seal on the bit I repaired behind the front head light, think it came out OEM looking for a repair so was pleased with that.

Image

So on to the jacking points, i made some boxes like the original ones, but had an issue with the spot welder. As i used that much paint between the layers of paint the spot welder wouldnt work so I drilled and tapped a hole, cut down a bolt so it was only a few threads long with no head, screwed this in the welded around either end. Came out quite well.

Image

Image

Then it was onto the under sealing, I first seam sealed everything and then set about adding some sealant to the rear apron to try and recreate the OEM look, think this is nearly there but might need a bit more work yet.

Image

Then back to the front arches after an age of scrubbing the arches with TFR and degreaser to get them back to looking something like I masked up the springs, disks and hoses and gave under there a shot of the black stuff to.

Image

Image

Also put my head in the underseal whilst trying to see into the top of the arch to get in to every nook and cranny, had to wash my hair with thinners to get it out lol good job I don't smoke!

Image
Image

You should never underestimate the predictability of stupidity

M42 Supercharged 285bhp + M3 6speed box
Craggy73
E30 Zone Newbie
E30 Zone Newbie
Posts: 177
Joined: Wed Dec 26, 2012 11:00 pm
Location: Cheshire, UK

Mon Jun 30, 2014 8:16 pm

appletree wrote:Also put my head in the underseal whilst trying to see into the top of the arch to get in to every nook and cranny, had to wash my hair with thinners to get it out lol good job I don't smoke!
... and that you shaved off that afro :mad:
Image
appletree
E30 Zone Addict
E30 Zone Addict
Posts: 3482
Joined: Fri Jan 20, 2006 11:00 pm
Location: Retford

Mon Jul 14, 2014 9:51 pm

Update time
As I was doing a bit of prep work for fitting the driver’s side wing from looking from the inside I spied just tiny bit of rust on the spot weld for the little bracket for the brake hose, so had to set about and cut it out, this was a pain in the arse as because I checked the inner arch from the outside I had missed this bit and stone chipped the hole inside.
Cut out and patch made.
Image
Welded in with the bracket on.
Image
With the inner arch now restonechipped and the wing fitted I started to look at the front valance, once again found a few flakes of loose paint so gave both sides on the inside a quick brush over with the knotted brush on the grinder.
The paint came off easily almost like it wasn’t keyed on to the metal but the metal was good underneath.

It's been waxoil'd before which is what the yellow stuff is.. not rust .. for once
Image
Image
Rear subframe and tank is back on, made a fook up and fitted the tank without putting the wires for the pump above the tank in first and had to drop it all down again after having fitted the subframe again!
Still all fitted up no and looking sweet!
Image
Image
New bits from BMW!
Image
BMW don’t do these anymore, anybody know a supplier that does then cheaper than £2.75 each like on ebay, there for the heat shield over the backbox??
Image
Again small bubble starting the show here so cut a big piece out so I could get a drill in there with a small wheel on to remove the seam sealer to check for rust inside, luckily there was non.
Hole
Image
Now rust
Image
Spare bit from Sweeps breaker, Thanks Buddy!
Image
Welded back in the tab this overlap is what had trapped moisture and caused the rust bubble. It will be getting so prep and seal this time.
Image
Offered up, but was a little tight to wing body nut hole.
Image
Welded most of it back in but had to put a second patch in as the bit I cut out had to be shorted to match the lip and the vent cover, this left it a bit short so cut a bigger bit out so the welds weren’t to close together.
Image
Welded the extra patch in
Image
Splash of acid etch ready for a skim of filler.
Image

More to come, the scuttle is the last bit of body work to finish before I can start the roof.
Image

You should never underestimate the predictability of stupidity

M42 Supercharged 285bhp + M3 6speed box
appletree
E30 Zone Addict
E30 Zone Addict
Posts: 3482
Joined: Fri Jan 20, 2006 11:00 pm
Location: Retford

Fri Aug 01, 2014 8:02 pm

The scuttle is now finished, spent an age sanding it down, re priming and repeating the process but now I’m very happy with the results.
Few shots of it in primer

Image
Image
Image

Then on with the paint, unfortunately on the first pass the car/day/garage was to hot and the paint dried before it had chance to run and level out.

Image

This was then sanded back again and below are the end results after spraying it later in the day when it was cooler.

Image
Image
Image
Image

Obviously I need to give the area a polish and paint the wing retaining bolts and I will sort this soon but wanted to get under the wing waxoyld and the wing hung so I could then put the bumper back on.

Does anyone have the part number for the torx head bolt that is super slim and goes under the wing at the front onto the front valance???

Lastly over all shot of the car in the garage, feeling like I’m getting somewhere now!

Image


Also was looking through some old photos when i did the same job first time round before I really new about e30’s and how to fix them properly.

To be fair the bits I welded in first time weren't rusty it was because I didn't cut enough out something that I have done in over kill this time round
Image
Image
Going off for its respray back in 2006!
Image
Wish I knew then what I know now, and that I was going to keep it!
Image

You should never underestimate the predictability of stupidity

M42 Supercharged 285bhp + M3 6speed box
DanThe
E30 Zone Team Member
Posts: 28641
Joined: Sat Sep 10, 2005 11:00 pm
Location: Staffs
Contact:

Fri Aug 01, 2014 10:19 pm

Top work Matt 8)
Splondike
E30 Zone Addict
E30 Zone Addict
Posts: 2738
Joined: Sun Jan 09, 2005 11:00 pm
Location: Under my bonnet

Fri Aug 01, 2014 10:31 pm

Superb Matt, looks great :)
Mark.
appletree
E30 Zone Addict
E30 Zone Addict
Posts: 3482
Joined: Fri Jan 20, 2006 11:00 pm
Location: Retford

Fri Aug 01, 2014 10:58 pm

Thanks lads, finished painting inside the scuttle today and waxoyled both sides inside tonight so can re fit the grills and then sheet up the car and start doing the roof skin swap. Still have a few bits to finish off the under side but im getting there.

Dan did you manage to sort out that Z3 sender? Dont forget to PM me your paypal too. :D
Image

You should never underestimate the predictability of stupidity

M42 Supercharged 285bhp + M3 6speed box
DanThe
E30 Zone Team Member
Posts: 28641
Joined: Sat Sep 10, 2005 11:00 pm
Location: Staffs
Contact:

Fri Aug 01, 2014 11:02 pm

It went out today mate 8)
appletree
E30 Zone Addict
E30 Zone Addict
Posts: 3482
Joined: Fri Jan 20, 2006 11:00 pm
Location: Retford

Sat Aug 02, 2014 6:30 am

You star! :D
Image

You should never underestimate the predictability of stupidity

M42 Supercharged 285bhp + M3 6speed box
G-Bear
E30 Zone Squatter
E30 Zone Squatter
Posts: 1632
Joined: Wed Mar 12, 2008 11:00 pm
Location: Hertfordshire

Sat Aug 09, 2014 3:46 am

Top work appletree. Have read parts of this before. But couldn't sleep tonight so read through it all in the last half hour. Great progression, on both the car and your skill-set. The work on the scuttle is excellent.

Looking forward to seeing how the roof skin goes. :D
appletree
E30 Zone Addict
E30 Zone Addict
Posts: 3482
Joined: Fri Jan 20, 2006 11:00 pm
Location: Retford

Sat Aug 09, 2014 12:43 pm

Thanks G-bear, I've picked up the non sunroof skin form my dad's house last week so I can start looking at how to do it and I'm thinking I might do it more or less the same as X-works did it and cut the gutter lip off polish it flat and then fit the new skin and stitch weld them together as although I thought the skins were spot welded on the side on closer inspection it's only the front and rear that are slot welded, the side looks to be welded in a different method altogether looks abit like lots of spot welds but over lapped.

See how we go, might get chance to have a play later today. :D
Image

You should never underestimate the predictability of stupidity

M42 Supercharged 285bhp + M3 6speed box
appletree
E30 Zone Addict
E30 Zone Addict
Posts: 3482
Joined: Fri Jan 20, 2006 11:00 pm
Location: Retford

Sat Aug 09, 2014 10:21 pm

So as I said in the above post, I was lucky enough to finish work a bit earlier today so as the missus was also still at work decided to have a look at how to tackle the roof skin swop.

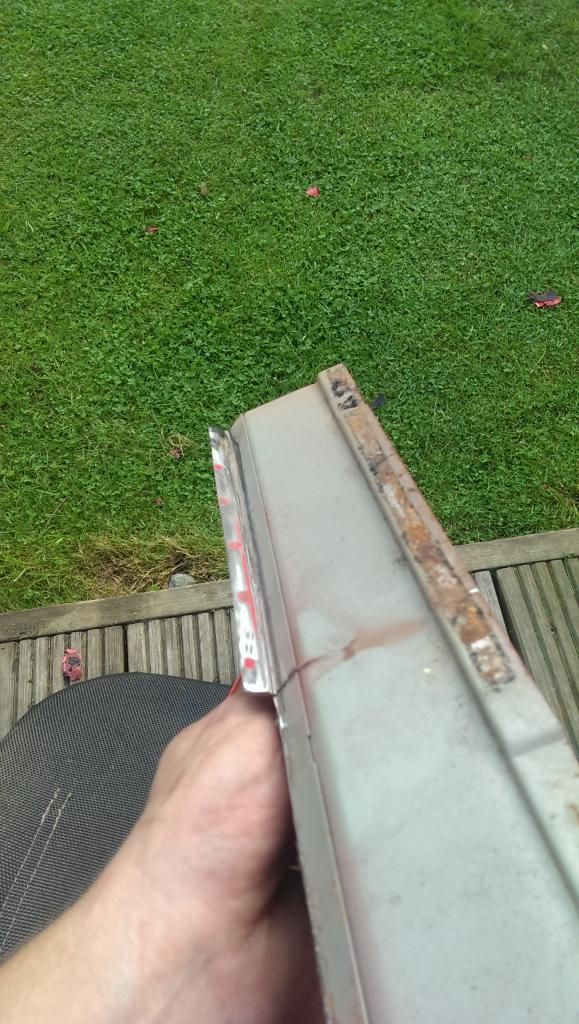
First of all after looking at the 4 roofs I have one on the car, one touring, one non sunroof and one IS there is two different styles of fitting the skin to the frame, three are the same but on the IS one the join in the gutter trim area is spot welded were as on the others it is different, think x-works called it roll welded but i could be making that up.

Hard to see but it looks like lots of spot welds but over lapped.

Image

My car, the non sunroof skin and the touring skin are the same as the above but the IS one I have is spot welded at 1”a or so spacing.

Either way that still means both of the ones I would be working with are ”aroll welded”a so I attacked the skin as though it was the real thing.

First thing was to cut a section out to play with.

Can you guess were my plates for the rest of the car came from?

Image

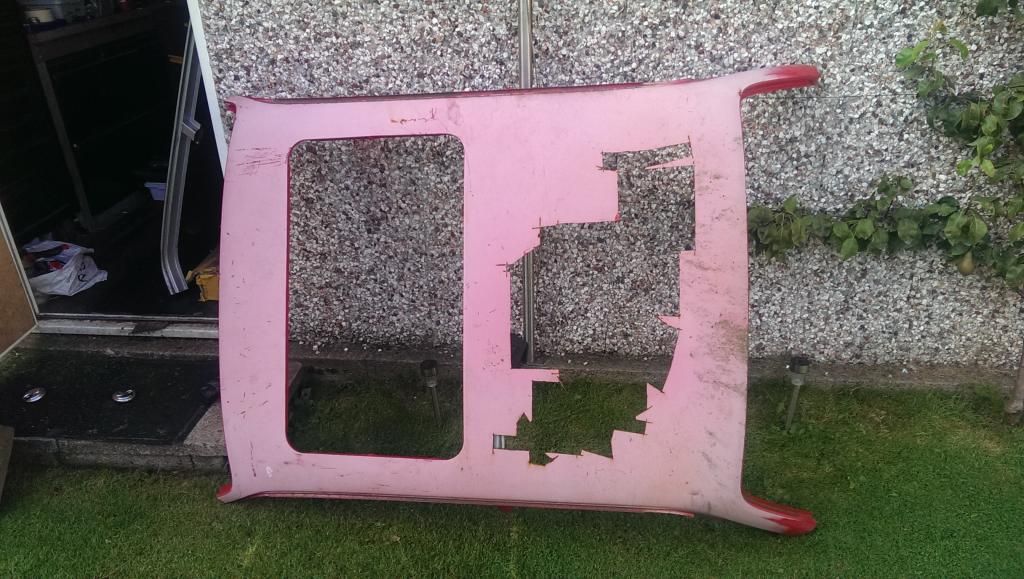
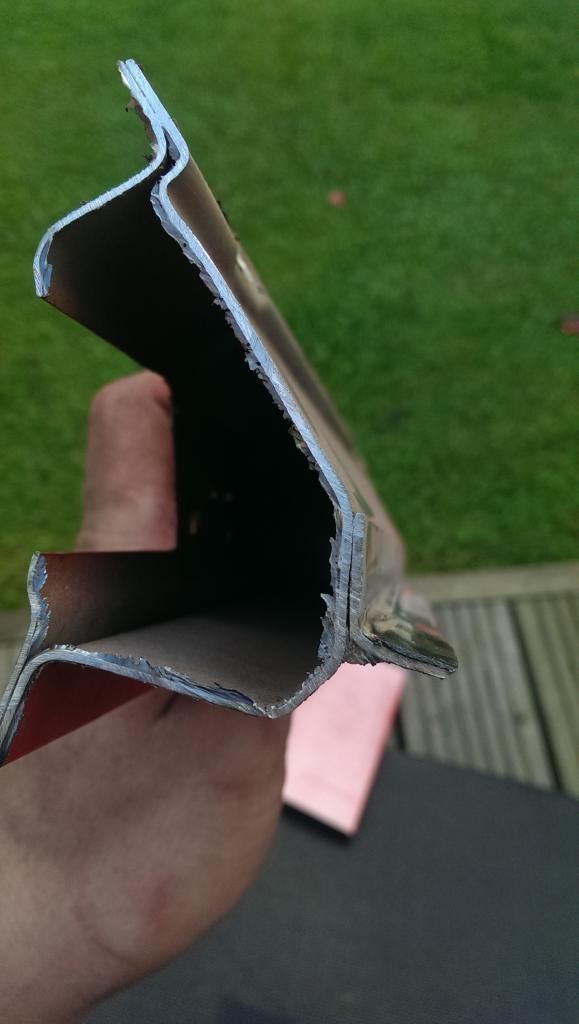
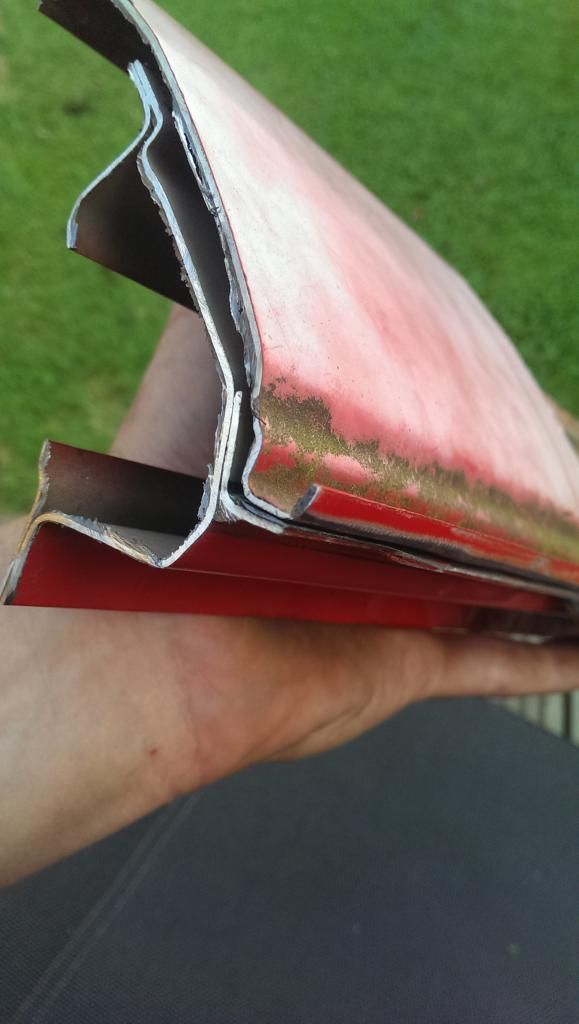
Section cut out and this is what you get.

Image
Image

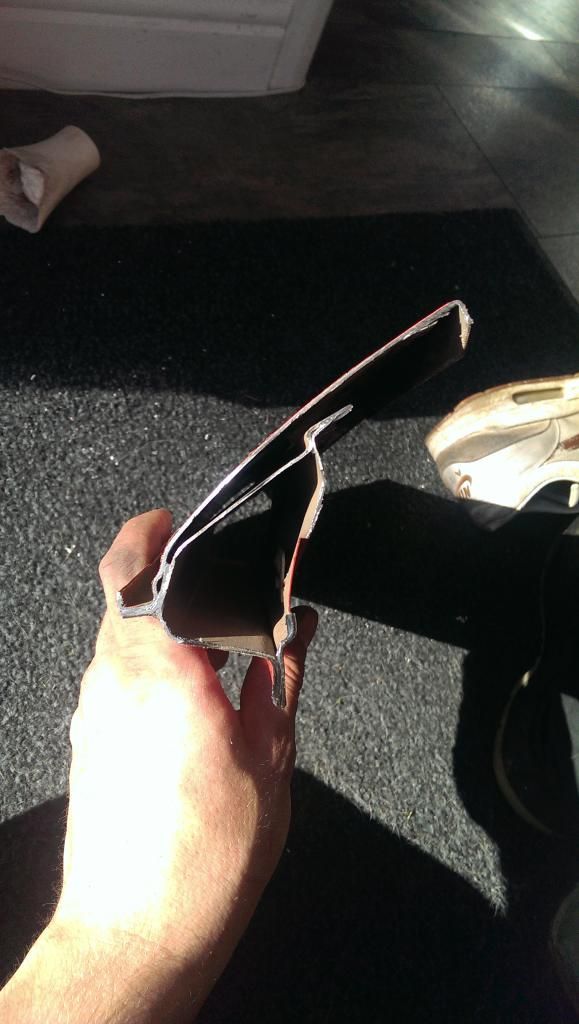
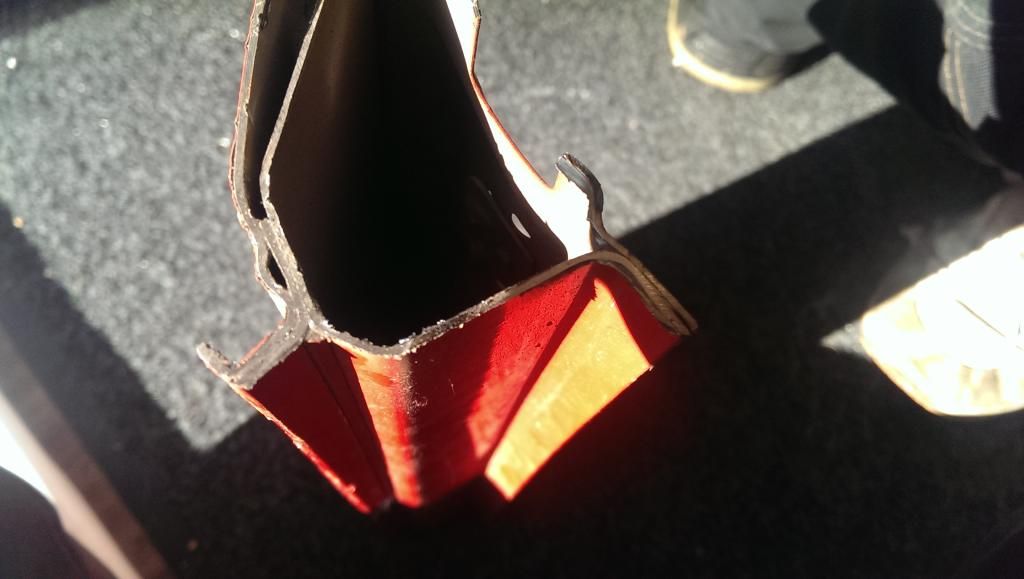
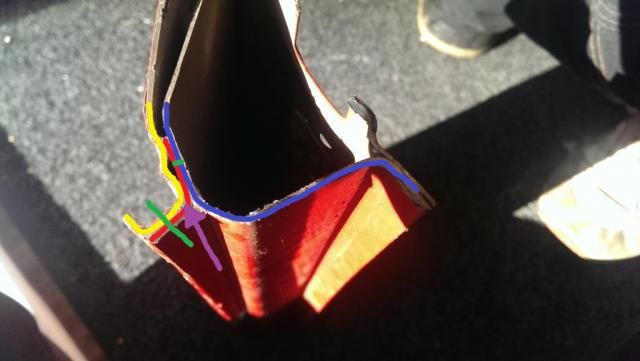
With colours to show the sections.
Green is to show the position of the spot/roll welds
Purple is to show the angle of grinding to remove the roof skin from the frame.

Image

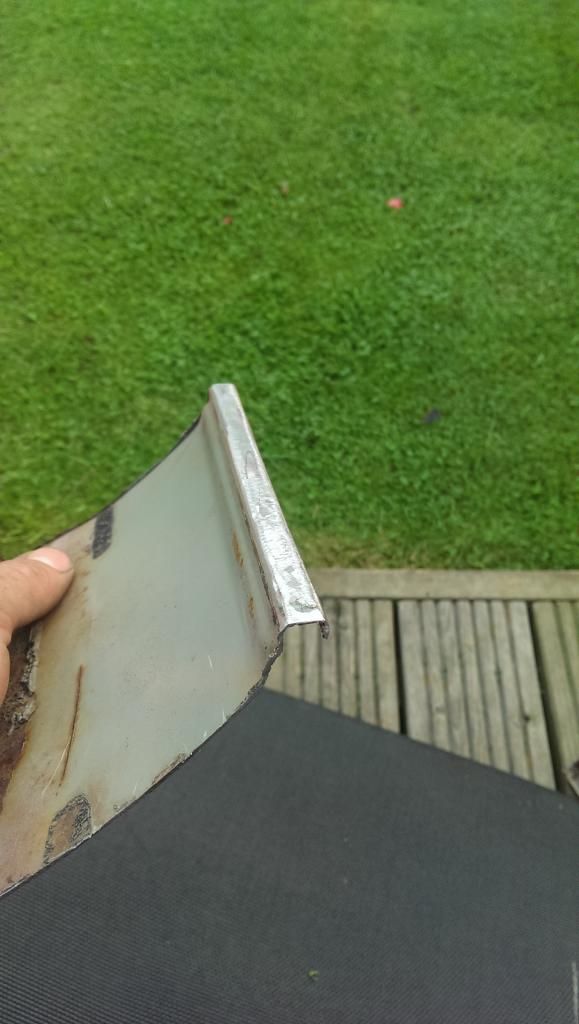
The frame once I’ve cut off the old skin and flatted down the gutter lip.

Image
Image

The bit of roof skin I saved without damaging it.
Image
Polished back
Image
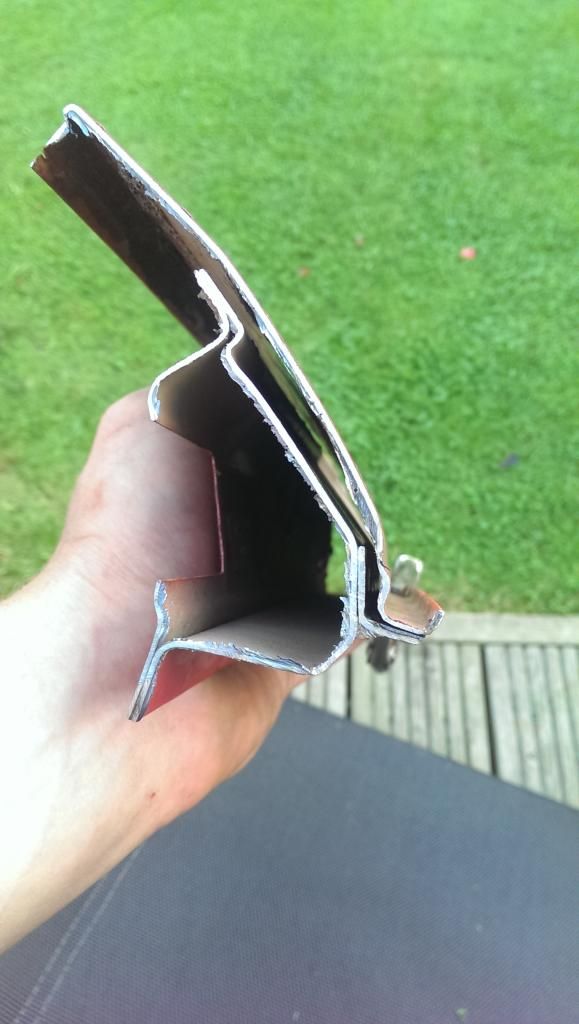
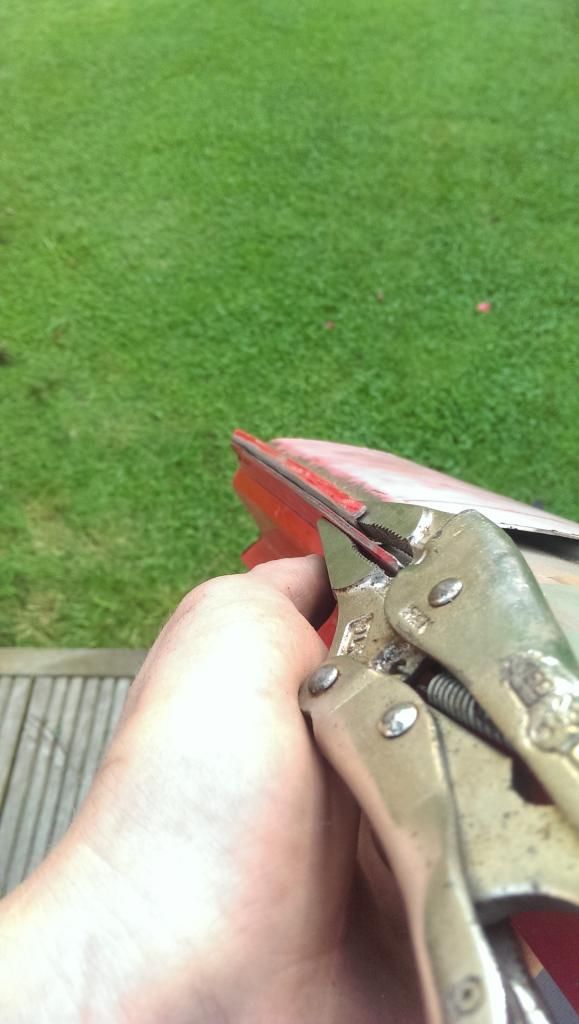
And an old and new bit clamped together, as you can see there is a little bigger gap between the roof frame and the skin this was how it was originally it’s just that this time you are looking down the panel rather than up it if that make sense.

Image
Image
Image

So basically I'm happy that I can do it and that its not to bigger job just time consuming, could have polished down the frame lip a bit more but the grinder flap disc I had was well worn down and for a trail it wasn't important, for the real job I have some sanding discs for a grinder backing plate which will get right in the corner and sand down the old lip.

There was also some odd stuff in the join between the spot welds sort of a bluey/ green colour of old copper with the constancy of wax, any ideas??

Also toying with the idea of making a gig to hold the skin while I work on it, something like a ply wood sheet with a big bag on then fill it with expanding foam to make a solid but softish support for it.

Again any input or idea welcomed
Image

You should never underestimate the predictability of stupidity

M42 Supercharged 285bhp + M3 6speed box
appletree
E30 Zone Addict
E30 Zone Addict
Posts: 3482
Joined: Fri Jan 20, 2006 11:00 pm
Location: Retford

Mon Aug 18, 2014 9:51 pm

After a good day out Gaydon I found a bit of motivation to get on and do some more on the roof.

I’ll let the pics do the talking as there’s not much to say really, two bits of metal were stuck together now there not, one I want one I don’t.

Started drilling out the spot welds.

Image
Mostly done, still managed to keep the roof holding its shape
Image
Image
Chopped rear the brace out
Image

On to the front, found this gasket scraper worked best for separating the two sheets of metal.

Image
Front all unpicked
Image

This is where it gets messy, the corners are all three layers with bits inter twined here and there so although it looks messy all the cuts were needed and were made in away I was sure I wouldn’t contact the roof skin.

The brazed section here has an extra bit connected to it.
Image

More bits out

Image
Image
Cut metal is sharp
Image
Image

Front section split

Image

Finished off at home

Bottom split

Image

Job done

Just needs some tidying up on the edges

Image

Image
Image
Image

You should never underestimate the predictability of stupidity

M42 Supercharged 285bhp + M3 6speed box
appletree
E30 Zone Addict
E30 Zone Addict
Posts: 3482
Joined: Fri Jan 20, 2006 11:00 pm
Location: Retford

Tue Sep 09, 2014 8:59 pm

Bit more progress to report.
More or less finished grinding back the non sunroof skin and etch primed the areas I’d ground/polished back.
Image
Image
Image

Also fitted my brand new arch liners, eagle eyed among you will notice the missing retainers for the top of the arch liners, I’ve not welded these back in as I’m not overly bothered about them and would rather not have damaged the inner arch under the bonnet.
Image
Image
Also had a good look at my roof and as I found on my spare roofs the ”aIS”a has a different weld on the roof gutter and is the same on mine in the way that its spot welded not ”aroll”a welded.
Which should mean separating the roof frame and my old skin should be easier..
I know there was a few stories of the IS being made in a different factory weather they were or not way would this seam and type of welding be different on the IS? Or is it a year thing?
Image
No going back now............

Image
Brace removed
Image
Image

Just need to take my time around the front and back now and make sure I don't cut through the roof frame. :(
Image

You should never underestimate the predictability of stupidity

M42 Supercharged 285bhp + M3 6speed box
User avatar
Neilios
E30 Zone Regular
E30 Zone Regular
Posts: 302
Joined: Sat Feb 23, 2013 11:00 pm
Location: Consett Co. Durham

Wed Sep 10, 2014 7:51 am

Nice work.
baggimodo
E30 Zone Regular
E30 Zone Regular
Posts: 379
Joined: Sun Nov 27, 2011 11:00 pm
Location: Coventry

Sun Sep 14, 2014 7:53 am

Superb efforts!
DanThe
E30 Zone Team Member
Posts: 28641
Joined: Sat Sep 10, 2005 11:00 pm
Location: Staffs
Contact:

Sun Sep 14, 2014 8:39 am

Great stuff :cool:
appletree
E30 Zone Addict
E30 Zone Addict
Posts: 3482
Joined: Fri Jan 20, 2006 11:00 pm
Location: Retford

Tue Sep 16, 2014 4:37 pm

Had another hour or so to spare the other day so cracked out the grinder again for another grinding session. Which resulted in the rear section of the roof being removed from around the rear screen area and on the corners back to the brazed joints.

Image

Image

Image

Same action on the front.
The reason the lips look a bit rough is due to the fact that rather than drill the spot welds out I ground them out whist gently seperating the two sections s as it got close to the end the spot welds pulled through leaving a rough raised edge but also ment that I didn't damage the bit of the car I wanted to keep in the best condition

Front screen
Image

Front corner
Image

Image

After abit of looking around I found this brazing set up second hand for sale on ebay at a reasonable price so picked it up.

Hopefully I'll be able to borrow the bottles from work and Appletree senior can come over and remove the last sections from the new skin and get the last bit of braze off the one on the car.

Image

I offered the brace up to see if it fitted ok, which it does, but I'm not sure of the correct position, my guess is inline with the door posts. If any body with a non sunroof can confirm this that would be great.

Brace clamped in place.

Image

Also been looking into spot weld through paints for when it all goes back togeather, the below 3M one looks ok and I have been impressed with 3M products in the past but if anybody has any experience or advise it would be great fully received. The only downside to the 3M one is it cant be painted over but then that shouldnt be a problem between two seams.

http://www.ebay.co.uk/itm/3M-Weld-Thru- ... 1089901094

Also after getting bored of grinding and wondering if i could have just repaired the old roof but without a screw driver to test for rust I thought why not see what else I could use which resulted in setting the roof up down the garden and shooting it with my other toy .177 HW100Kt which proved that I had gone down the correct route in changing the roof.

Image

Image
 
Last edited by appletree on Sat Sep 20, 2014 11:17 pm, edited 1 time in total.
Image

You should never underestimate the predictability of stupidity

M42 Supercharged 285bhp + M3 6speed box
appletree
E30 Zone Addict
E30 Zone Addict
Posts: 3482
Joined: Fri Jan 20, 2006 11:00 pm
Location: Retford

Sat Sep 20, 2014 5:31 pm

Few more pictures of today’s progress....
I was a bit worried about how the edge of the roof was going to come off from the gutter section as there was lot off spot welds and it was a little tight.
First of all I started off by cutting off the lip of the gutter trim and then polished the paint off gently to show up the spot welds.

Used this polishing wheel.

Image
Image

Tried grinding down the metal on the first two spot welds bout it wasn’t a brilliant way of doing it on this section. It worked ok with the grinder on the screen sections as the roof was thicker than the plate below however on the side sections the metal was thicker on the shelf section than on the roof or at least the same, it was also in a position that was much easier to work on so started with the spot weld drill bit.

Image

And repeat....

Image
Image

At the back the roof was only half on the shelf piece

Image

After the spot welds were weakened, NOT drilled all the way through as I didn’t want to mark the shelf underneath i used a pry bar to gently prize the wafer thin strip off metal from the shelf, worked a treat!

Image

Used the polishing wheel to remove all the old dried out sealer that went between the roof and the frame and then gave it a coat of etch on the top section.

Image

Image

Also decided to pull the car out of the garage and hoover it out as it was full of grinding dust and general sh1te.

Before
Image

After
Image

Also stripped and etch primed the brace bar for the roof

Image
Last edited by appletree on Sat Sep 20, 2014 11:21 pm, edited 1 time in total.
Image

You should never underestimate the predictability of stupidity

M42 Supercharged 285bhp + M3 6speed box
User avatar
gooseygander110
E30 Zone Regular
E30 Zone Regular
Posts: 407
Joined: Mon Feb 13, 2012 11:00 pm
Location: West Sussex
Contact:

Sat Sep 20, 2014 6:10 pm

This just awesome !!! Such patience and quality work 8) It is something which i have to tackle at some stage...... not sure to brace well and use my carbon roof or acquire a steel one :?
appletree
E30 Zone Addict
E30 Zone Addict
Posts: 3482
Joined: Fri Jan 20, 2006 11:00 pm
Location: Retford

Sat Sep 20, 2014 6:18 pm

Thanks gooseygander, the only thing that puts me off with a carbon roof is getting the joint and transition between the carbon roof and the A/C pillars to a god standard without a step unless it's a track car. Also do you paint the carbon, possible a automotive crime? Unless it's a track car or your going to set you stall out as non OEM then I think it will be a big statement . But still very cool :)
Image

You should never underestimate the predictability of stupidity

M42 Supercharged 285bhp + M3 6speed box
User avatar
gooseygander110
E30 Zone Regular
E30 Zone Regular
Posts: 407
Joined: Mon Feb 13, 2012 11:00 pm
Location: West Sussex
Contact:

Sun Sep 21, 2014 8:46 am

it is deffo a track focused car ......but enough of that .....your thread mate ........crack on !! 8)
appletree
E30 Zone Addict
E30 Zone Addict
Posts: 3482
Joined: Fri Jan 20, 2006 11:00 pm
Location: Retford

Sun Sep 21, 2014 8:44 pm

Shock of shocks today, looked for some weld through primer after people weren't recommending the 3M stuff so decided on the U-POL stuff, looked on ebay and if you went to the wrong seller a can was £27 and if you went to the cheapest ones you were looking at £16.99 + £4.99 deliver so just on the off chance Google'd it and Halfords of all places are doing it foe £11.49!

So went and picked a can up and another of etch primer... paid £25 for the primer when I was desperate the other sunday.

Image
Image

You should never underestimate the predictability of stupidity

M42 Supercharged 285bhp + M3 6speed box
appletree
E30 Zone Addict
E30 Zone Addict
Posts: 3482
Joined: Fri Jan 20, 2006 11:00 pm
Location: Retford

Thu Sep 25, 2014 10:01 pm

I took my roof skin to the body shop today for the guy to have a look at it and see if he thought it was good enough to use as there was alittle mark on it but the guy was happy it was in good enough condition to use and was sure it be perfect once he'd worked his magic on it so hes going to do a quote for me soon, i jokingly said I didn't want a roof full of filler to which he said "what like the escort" and proceded to show me a mk2 escort RS2000 ( I think ) that was in for some roof work after it had had the sunroof welded up at another body shop and since then the filler had sunk and been repaired twice buy them The reason.....10-12mm of filler above the sunroof streight on top shiney unkeyed black paint work, he said it was probably going to be unsavable... he also had a nice classic Ferrari in there.

Sorry no pics though...

This is the place its going though, about 100yrd from where I work, always here the Ferrari's and Lambs coming and going which is nice :D

http://www.autofinishers.co.uk/gallery.htm
Image

You should never underestimate the predictability of stupidity

M42 Supercharged 285bhp + M3 6speed box
appletree
E30 Zone Addict
E30 Zone Addict
Posts: 3482
Joined: Fri Jan 20, 2006 11:00 pm
Location: Retford

Sat Sep 27, 2014 10:36 pm

Bit more progress made yesterday


Ground down each bit of spot weld I'd left on the gutter rail.


Image


The polished it back, found abit of surface rust so treated that with my DeOx gel and polished back with the polishing wheel.


Image


While the rust remover was working I spot welded the brace in.

Image


Image


The coated the whole rail in spot weld thru primer.


Image


Overall view.


Image
Last edited by appletree on Sat Oct 04, 2014 4:53 pm, edited 1 time in total.
Image

You should never underestimate the predictability of stupidity

M42 Supercharged 285bhp + M3 6speed box
User avatar
RobWill116
E30 Zone Newbie
E30 Zone Newbie
Posts: 232
Joined: Mon May 27, 2013 11:00 pm
Location: Nottingham

Sat Sep 27, 2014 11:21 pm

Will be watching this one, great thread. I've discovered similar situation as yours in front footwell so will be keeping an eye on your progress to help me!
User avatar
Ashley1995
E30 Zone Newbie
E30 Zone Newbie
Posts: 91
Joined: Tue Jun 03, 2014 11:00 pm
Location: Surrey

Tue Oct 07, 2014 1:42 pm

Also fitted my brand new arch liners, eagle eyed among you will notice the missing retainers for the top of the arch liners, I’ve not welded these back in as I’m not overly bothered about them and would rather not have damaged the inner arch under the bonnet.
Image
Image

Couple of questions on this,
Where did you get these from? did this include the under-tray? did they come with new screws?
And how much are did they all cost?

Thanks mate!
Post Reply