
replacing front wing n doors
Moderator: martauto
-
jimbob29

- E30 Zone Regular

- Posts: 266
- Joined: Tue Apr 26, 2011 11:00 pm
- Location: isle of wight
is the front wing welded on?or just bolts?and how easy is it to removal drivers door n rear passenger door?is it a job i can do or best left for the garage?thought it might work out cheaper to replace rather than respray..
-
Ranchero
- E30 Zone Addict

- Posts: 2563
- Joined: Thu Sep 17, 2009 11:00 pm
The wing is bolted on. About seven 8mm bolts along the top, another at the bottom. Two 10mm on the inside wing by the door and another one ( I think) by the headlight. You'll need to remove the plastic arch liner also.
The doors are fairly simple aswell. Remove electronics plug, push off clips holding door pins in place, knock 3 pins out and lift door off.
The doors are fairly simple aswell. Remove electronics plug, push off clips holding door pins in place, knock 3 pins out and lift door off.

-
Sanchez
- Married to the E30 Zone
- Posts: 7578
- Joined: Sun Apr 17, 2005 11:00 pm
- Location: Sunny Scotland
Easy work if you no how to use a ratch and some spanners.
-
m8782538
- E30 Zone Squatter

- Posts: 1550
- Joined: Mon Feb 07, 2011 11:00 pm
- Location: Swindon
I have a to replace a wing too, not looking forward to it, especially since i found out i may need to take off the front bumper and headlamps etc to get to the bolt.
-
daimlerman
- **BANNED**
- Posts: 15968
- Joined: Mon Feb 27, 2006 11:00 pm
- Location: Grumpy Old Man
Front wings are held by a variety of fasteners,you will need to remove the bumper first.
Do not un-bolt the doors at the hinge mounts,seperate the door stop at it's clevis pin,un-plug the electrics,then remove the two 8mm bolts that act hinge pins and it will just lift off.
The gain in doing it this way is that the replacement door fitted in the same way,will line up perfectly.
Do not un-bolt the doors at the hinge mounts,seperate the door stop at it's clevis pin,un-plug the electrics,then remove the two 8mm bolts that act hinge pins and it will just lift off.
The gain in doing it this way is that the replacement door fitted in the same way,will line up perfectly.
Youth is wasted on the young.
-
Grrrmachine
- E30 Zone Wiki / Team Member

- Posts: 8043
- Joined: Sat Feb 09, 2008 11:00 pm
- Location: Warsaw, Poland
Also make sure you pick up a tube of seam sealer (NOT bathroom silicone sealant). Before the new wing is offered up and bolted, run a thick line of sealant along the top of the inner wing, all the way to the bulkhead. Then put the new wing on, and wipe up the excess sealant that gloops out.
To remove the bumper, you'll need a Torx T55 socket to undo the two big bolts underneath. That can be the hardest part. Then undo the screws inside the wheel arches holding on the sides of the bumper. Then, as you slide the bumper of its mounts, get ready to unclip the wiring plugs to the indicators; pull too hard on the bumper and you'll rip them out, and after 20 years you'll break the actual wires and have to fabricate your own solution.
Apart from that, it's a piece of cake.
To remove the bumper, you'll need a Torx T55 socket to undo the two big bolts underneath. That can be the hardest part. Then undo the screws inside the wheel arches holding on the sides of the bumper. Then, as you slide the bumper of its mounts, get ready to unclip the wiring plugs to the indicators; pull too hard on the bumper and you'll rip them out, and after 20 years you'll break the actual wires and have to fabricate your own solution.
Apart from that, it's a piece of cake.
-
m8782538
- E30 Zone Squatter
- Posts: 1550
- Joined: Mon Feb 07, 2011 11:00 pm
- Location: Swindon
oh joy, torx T55 socket, stupid question, what does one of those look like?????
Bumper - pain
Then the arch liner and then the actual wing which is easy enough.
Glad this is one of the last jobs i have to do, followed by the welding and trying to get the wheels off (for a refurb) and replace the brakes.
Also now HAVE to have this project finished by Christmas or its going to take at least another 12-18months ontop of the original 12mths for completion . total nightmare.
Bumper - pain
Then the arch liner and then the actual wing which is easy enough.
Glad this is one of the last jobs i have to do, followed by the welding and trying to get the wheels off (for a refurb) and replace the brakes.
Also now HAVE to have this project finished by Christmas or its going to take at least another 12-18months ontop of the original 12mths for completion
. total nightmare.-
Rav335uk
- E30 Zone Meets/Events Team

- Posts: 27978
- Joined: Wed Jan 19, 2005 11:00 pm
- Location: Mad mad mad
Torx socket


If you Got "Haters",Then your doing something Right!
CR24v??? Where's it all gone?? LOL
-
m8782538
- E30 Zone Squatter
- Posts: 1550
- Joined: Mon Feb 07, 2011 11:00 pm
- Location: Swindon
Thanks, have to go an invest in one of those then otherwise i'm not going to get very far.
-
Ranchero
- E30 Zone Addict
- Posts: 2563
- Joined: Thu Sep 17, 2009 11:00 pm
You wont need the torx socket if you've got chrome bumpers. 
-
Jozi
- E30 Zone Addict
- Posts: 3076
- Joined: Thu Nov 22, 2007 11:00 pm
- Location: Dublin, Ireland
Same stuff as used on the seams only in a tube or differnt stuff? I was going to run a bead of tiger seal on the underside when re-fitting the wingsGrrrmachine wrote:Also make sure you pick up a tube of seam sealer (NOT bathroom silicone sealant). Before the new wing is offered up and bolted, run a thick line of sealant along the top of the inner wing, all the way to the bulkhead. Then put the new wing on, and wipe up the excess sealant that gloops out.


-
Ranchero
- E30 Zone Addict
- Posts: 2563
- Joined: Thu Sep 17, 2009 11:00 pm
Am I right in thinking the sealant only goes on a very small section of the wing? The top edge nearest the scuttle?
-
Grrrmachine
- E30 Zone Wiki / Team Member
- Posts: 8043
- Joined: Sat Feb 09, 2008 11:00 pm
- Location: Warsaw, Poland
You run a bead of sealant along the edge where the bolts go in, so it runs all the way from the headlamp to the scuttle.
Not an E30, but it'll look like this, then you drop the wing on top of it:
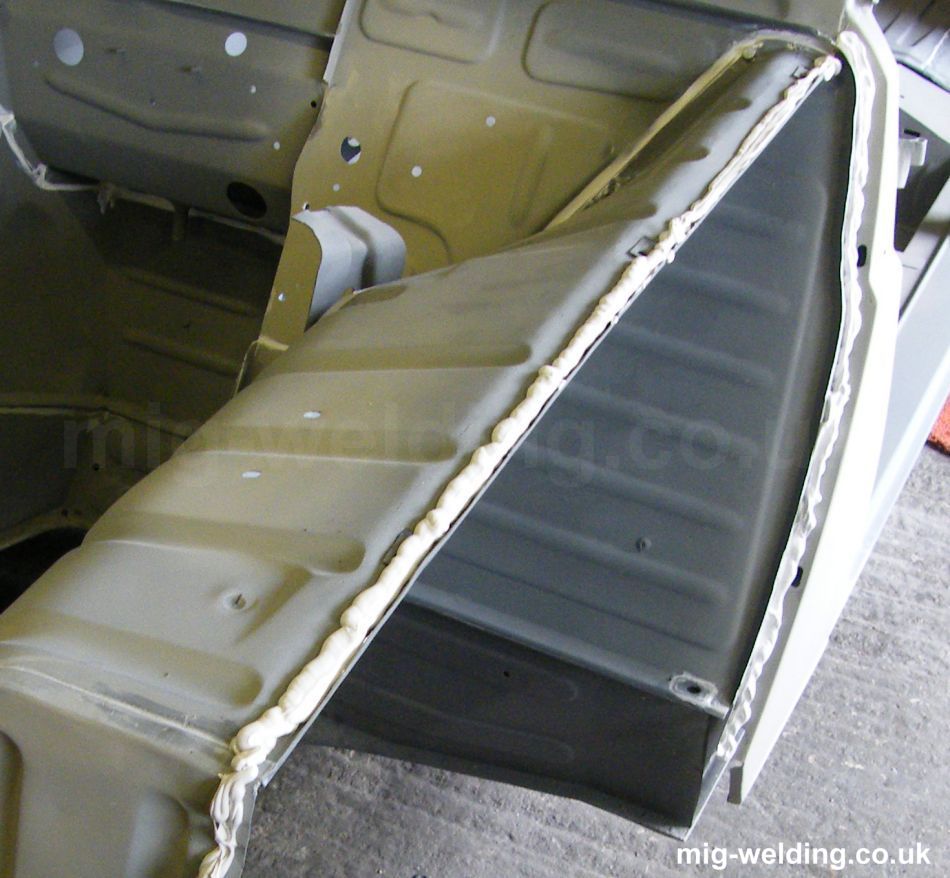
Not an E30, but it'll look like this, then you drop the wing on top of it:
-
Ranchero
- E30 Zone Addict
- Posts: 2563
- Joined: Thu Sep 17, 2009 11:00 pm
They wouldn't have come out of the factory like that though, would they?
-
nickso
- E30 Zone Addict
- Posts: 4396
- Joined: Sat Jul 23, 2005 11:00 pm
- Location: Go do that voodoo that you do so welllllllll!!
maybe not all the way down but certainly at the top.Ranchero wrote:They wouldn't have come out of the factory like that though, would they?

'88 e30 328i M52 track bint.
-
nickso
- E30 Zone Addict
- Posts: 4396
- Joined: Sat Jul 23, 2005 11:00 pm
- Location: Go do that voodoo that you do so welllllllll!!
Or some early facelifts.Ranchero wrote:You wont need the torx socket if you've got chrome bumpers.

'88 e30 328i M52 track bint.
-
Ranchero
- E30 Zone Addict
- Posts: 2563
- Joined: Thu Sep 17, 2009 11:00 pm
That's what I mean.nickso wrote:maybe not all the way down but certainly at the top.Ranchero wrote:They wouldn't have come out of the factory like that though, would they?
-
nickso
- E30 Zone Addict
- Posts: 4396
- Joined: Sat Jul 23, 2005 11:00 pm
- Location: Go do that voodoo that you do so welllllllll!!
I can't remember to be honest. MIne leak so I need to do it better or further next time.Ranchero wrote:That's what I mean.nickso wrote:maybe not all the way down but certainly at the top.Ranchero wrote:They wouldn't have come out of the factory like that though, would they?

'88 e30 328i M52 track bint.
-
Brianmoooore
- E30 Zone Team Member
- Posts: 49360
- Joined: Mon Jan 10, 2005 11:00 pm
If it's an early facelift car, the two bumper bolts will be 10mm (IIRC) female hex. bolts. Later facelift use T55 torx.
The only sealant used on an E30 wing is the exposed bead, a couple of inches long, at the rear corner of the bonnet opening. A bit of seam sealer right at the back, at the lowest point, isn't a bad idea as well.
The only sealant used on an E30 wing is the exposed bead, a couple of inches long, at the rear corner of the bonnet opening. A bit of seam sealer right at the back, at the lowest point, isn't a bad idea as well.