
Removing swirl marks from paint(now messing with composites)
Moderator: martauto
-
Turbo-Brown
- Boost Junkie
- Posts: 4705
- Joined: Tue Feb 15, 2005 11:00 pm
- Location: Aldershot, Hants
I've been buying it from East Coast Fibreglass Supplies as they're really helpful if you e-mail or phone them, and they're about the cheapest place I've found to supply the carbon cloth 
-
Turbo-Brown
- Boost Junkie
- Posts: 4705
- Joined: Tue Feb 15, 2005 11:00 pm
- Location: Aldershot, Hants
Good news everyone! The carbon fibre has arrived!
Hoping the weather will be good this evening so I can go and have a play.
I've prepped the sunroof panel with release agent already for the carbony fun!
Hoping the weather will be good this evening so I can go and have a play.
I've prepped the sunroof panel with release agent already for the carbony fun!
-
oakey
- E30 Zone Addict

- Posts: 4891
- Joined: Fri Feb 10, 2006 11:00 pm
- Location: Surrey
^ Its slightly worrying how excited you seem about this Alex 
Perhaps when you become a carbon fiber wizzz you could make a nice plenum to match the itbs?
Perhaps when you become a carbon fiber wizzz you could make a nice plenum to match the itbs?

-
Turbo-Brown
- Boost Junkie
- Posts: 4705
- Joined: Tue Feb 15, 2005 11:00 pm
- Location: Aldershot, Hants
Just been out and put a skin of carbon on the sunroof.
I carefully cut the corners so they'd fold reasonably well, then regretted that decision. Also, the fabric is understandably reluctant to move once it's been laid down in the resin so when you plonk it down off centre, it stays off centre
Anyway, got it wrapped around the edges reasonably well, tomorrow will tell if I've got a carbon fibred sunroof, or a carbon fibre sunroof
Looks absolutely beautiful though at the moment with the resin wet, distorted weave and all

Hopefully it can be persueded to part company with the panel underneath tomorrow!
-
d6dph
- Married to the E30 Zone
- Posts: 12435
- Joined: Sun Aug 14, 2005 11:00 pm
- Location: Tiptree. Essex
Turbo-Brown wrote:Good news everyone! The carbon fibre has arrived!

/\ I always get this pop into my head when I see "good news everyone"
Look forward to seeing the finished C/F panel

-
Turbo-Brown
- Boost Junkie
- Posts: 4705
- Joined: Tue Feb 15, 2005 11:00 pm
- Location: Aldershot, Hants
I can't wait to see if the carbon will come off the original sunroof!
Next question is, is there a better way of making the cloth go around sharp corners than selotape?
I know vac bagging would be the best option, but second to that.
Depending on the outcome of this, I'll be ordering enough stuff to do the boot next week........keeping the fingers crossed that it does release tomorrow!
-
march109
- Engaged to the E30 Zone
- Posts: 6632
- Joined: Sun Aug 20, 2006 11:00 pm
- Location: Bournemouth
Why are you so scared of vacuum bagging?
Heres what I use:
http://cgi.ebay.co.uk/ws/eBayISAPI.dll? ... 0039172574
And if they arn't big enough I butcher two bages to make one and seal with gaffer tape.
Books:
Fibreglass and other composite materials published by HPBooks
The Fibreglass manaul published by ??
How to build Fibreglass customs, hotrods and kit cars
and finally simplified airvcraft design for the home builder (small chapter on composites)
325i Tech 1 Touring, breaking.
2.5 high comp. M20, 3.64 LSD, Fully undersealed, Spax springs & Bilstein shocks, s/s exhaust, Alpina rep wheels and more.
2.5 high comp. M20, 3.64 LSD, Fully undersealed, Spax springs & Bilstein shocks, s/s exhaust, Alpina rep wheels and more.
-
Turbo-Brown
- Boost Junkie
- Posts: 4705
- Joined: Tue Feb 15, 2005 11:00 pm
- Location: Aldershot, Hants
It's not so much that I'm scared of it, it's just that I reckon something like a front wing would distort under the vacuum as they're quite thin and flimsy.
Could well be wrong on that so will have a look
Where'd you get your pump from Gareth?
Could well be wrong on that so will have a look
Where'd you get your pump from Gareth?
-
march109
- Engaged to the E30 Zone
- Posts: 6632
- Joined: Sun Aug 20, 2006 11:00 pm
- Location: Bournemouth
Who needs a pump?Turbo-Brown wrote:It's not so much that I'm scared of it, it's just that I reckon something like a front wing would distort under the vacuum as they're quite thin and flimsy.
Could well be wrong on that so will have a look
Where'd you get your pump from Gareth?
With the link I posted you just use a real life home spec vacuum cleaner, theyseal up a treat too as they are designed for clothes storage!
325i Tech 1 Touring, breaking.
2.5 high comp. M20, 3.64 LSD, Fully undersealed, Spax springs & Bilstein shocks, s/s exhaust, Alpina rep wheels and more.
2.5 high comp. M20, 3.64 LSD, Fully undersealed, Spax springs & Bilstein shocks, s/s exhaust, Alpina rep wheels and more.
-
Turbo-Brown
- Boost Junkie
- Posts: 4705
- Joined: Tue Feb 15, 2005 11:00 pm
- Location: Aldershot, Hants
Aaaaaaaah! Cunning
Do you use breather membranes and peel ply and all the other gubbins or just lay up and bag?
Do you reckon something flimsy like a wing or a door skin would bend in a vac bag though?
Do you use breather membranes and peel ply and all the other gubbins or just lay up and bag?
Do you reckon something flimsy like a wing or a door skin would bend in a vac bag though?
-
march109
- Engaged to the E30 Zone
- Posts: 6632
- Joined: Sun Aug 20, 2006 11:00 pm
- Location: Bournemouth
Yes I use a breather membrane, seems to help and allows for air flow to aid curing, If you are doing something flimsy its all down to what your moulding it off of, if that original piece is stiff enough then the vacuum just presurises the laminate to it and the original piece provides the strength until the laminate is dry and can be removed from the vacuum.
I've also done roofskins by using sand, mould is placed on the floor (if neccessary sand placed and shaped underneath to stop collapsing of the mould) Laminate over the mould and then breather sheets and a plastic sheet placed on top and then added pressure using the mass of the sand by burying it, wait until it cures and the plastic sheet is pulled off carefully so that all the sand is dragged off. And then pull up the laminate and mould together and seperate.
When vacuum bagging you will vac bag the mould too, imagine in this case your doing the boot skin you laminate it all up so you have the CF laminate curing on the boot and then place it all in the bag, breather sheet it and seal it up vacuum it so the prussure is increased the laminate would be forced (due to the vacuum) against the metal boot skin it would provide constant pressure uniformly along the shape, effectivly holding it down and stopping any area lifting or distorting, As if you were able to hold all the areas down as it cured yourself.
Does that make any sence or would pics help?
325i Tech 1 Touring, breaking.
2.5 high comp. M20, 3.64 LSD, Fully undersealed, Spax springs & Bilstein shocks, s/s exhaust, Alpina rep wheels and more.
2.5 high comp. M20, 3.64 LSD, Fully undersealed, Spax springs & Bilstein shocks, s/s exhaust, Alpina rep wheels and more.
-
Turbo-Brown
- Boost Junkie
- Posts: 4705
- Joined: Tue Feb 15, 2005 11:00 pm
- Location: Aldershot, Hants
That does indeed make sense dude
Pics are always good though if you've got some to post!
Released the CF from the sunroof this afternoon (phew, it came off!!)
Some bits of it are really well wetted out and have no air bubbles, whereas other bits are crap, so more attention needs paying to the whole area with the brush next time.
It's also very flexible so my plan of laying up another layer on the inside is out the window
So, we're back to mould making!
Need to find a way to get the fibreglass mould to faithfully follow the edge of the panel somehow, I wondered about perhaps draping a bin liner over the panel with weighted edges so that the natural spring of the glass doesn't make it lift off. I'm pretty sure that bin liners don't stick to the resin so that should peel off fairly easily to allow the laying up of further layers. Just been reading in my book that vac-bagging polyester can suck all the something out so it doesn't cure properly.
Just to get my carbon fix this weekend, I'm gonna have a go at making a little spoiler by laying up some 100mm wide cloth on a length of guttering to give it some curvature. Should be a laugh
-
march109
- Engaged to the E30 Zone
- Posts: 6632
- Joined: Sun Aug 20, 2006 11:00 pm
- Location: Bournemouth
Theres nothing stopping you adding another coat of resin to the outside now. Treat it like doing paint work,
ie: do one layer let it dry, do another layer let it dry, wet and dry paper it to flat it back if its thick and smooth enough for your liking then polish to a clear finish again and then protect with some form of clearcoat from an aerosol a UV filtered coating would be good too. If not paint on another coat of resin and repeat until desired thickness and uniform smoothness is achieved.
For strength cut a square of CF the size of inner sunroof skin (size and shape), lay either paper rope or string impregnated with resin in a criss-cross pattern on the inner side of the CF sunroof then cover the smaller CF sheet with resin and place resin side down over the criss-crossed paper rope or string, then roller it down, the inner side of the sunroof piece when dry will look like it has a honeycombe type pattern 'under its skin', I defy you to say it is now too weak.
325i Tech 1 Touring, breaking.
2.5 high comp. M20, 3.64 LSD, Fully undersealed, Spax springs & Bilstein shocks, s/s exhaust, Alpina rep wheels and more.
2.5 high comp. M20, 3.64 LSD, Fully undersealed, Spax springs & Bilstein shocks, s/s exhaust, Alpina rep wheels and more.
-
Turbo-Brown
- Boost Junkie
- Posts: 4705
- Joined: Tue Feb 15, 2005 11:00 pm
- Location: Aldershot, Hants
Gonna laminate another layer, just a small one onto the CF bit I've already made to see what kind of effect it has on the stiffness.
Have alse prepped the sunroof again so that it has a generous margin (well about 1.5") around it's edge. Have given the margin a couple of degrees of draft to make release easier and also to give something to stick the vac bagging materials to.
Found this place: http://www.svsp.co.uk/Shop%20Website/pa ... erials.htm which seem to sell the materials at reasonable prices, whadda we think?
-
march109
- Engaged to the E30 Zone
- Posts: 6632
- Joined: Sun Aug 20, 2006 11:00 pm
- Location: Bournemouth
That is very good pricing I've always just bodged it! At those prices it might be worth doing it properly. Sadly though vacuum bagging won't make the part much (if any) stronger thats all down to design and essentially thickness. With single skin parts its bestto just accept they will be flimsy, or alternativly go for double/triple skin or use reinforcements they will still be much lighter than the metal panels they replicate.
325i Tech 1 Touring, breaking.
2.5 high comp. M20, 3.64 LSD, Fully undersealed, Spax springs & Bilstein shocks, s/s exhaust, Alpina rep wheels and more.
2.5 high comp. M20, 3.64 LSD, Fully undersealed, Spax springs & Bilstein shocks, s/s exhaust, Alpina rep wheels and more.
-
Turbo-Brown
- Boost Junkie
- Posts: 4705
- Joined: Tue Feb 15, 2005 11:00 pm
- Location: Aldershot, Hants
The biggest attraction for me to the vaccing is getting the CF to go into tight corners.
I reckon a double skin should be stiff enough for the sunroof as it'll have a lip around it's periphery, and that a double skin with X-bracing will be enough for the bonnet and boot panels.
That said it's easy enough to add another layer if needs be I guess.
I reckon a double skin should be stiff enough for the sunroof as it'll have a lip around it's periphery, and that a double skin with X-bracing will be enough for the bonnet and boot panels.
That said it's easy enough to add another layer if needs be I guess.
-
Turbo-Brown
- Boost Junkie
- Posts: 4705
- Joined: Tue Feb 15, 2005 11:00 pm
- Location: Aldershot, Hants
Ah haaaa!
Looks a lot better this time around!
Lesson one learned today are that if you give the pattern reasonably large margins (40mm in this case) you can get Chopped Strand Mat (CSM) to make a sharp bend and stay down in the surface tension of the resin.
Second lesson is to keep a pair of scissors handy so that once you've laid down a sheet of CSM, you can cut and overlap bits which need to make tight compound curves. For example the corners of the sunroof can be made with two cuts each.
Lastly, I think due to the stiffness of the 300g/sqm CSM I used for the second layer, it was trying to lift just a little at the edges where it didn't really want to make the 90degree bend.
This was solved with a sheet of thin plastic, weighed down at the edges with old chair legs taped on
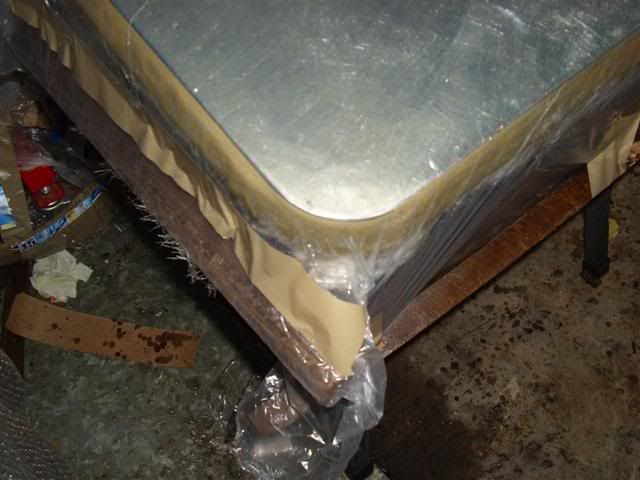
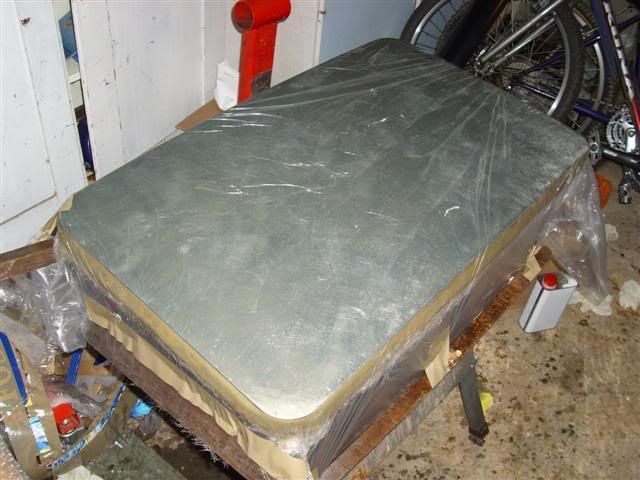
Plan tomorrow is to remove the plastic sheeting (I hope!) and then apply another two or three layers of 300g/sqm CSM.
Final lessons are that paddle rollers do an excellent job of getting air out of the laminate and that if you don't use a pot with a bloody hole in the bottom to clean brushes and things in, you won't end up with sticky hands
Looks a lot better this time around!
Lesson one learned today are that if you give the pattern reasonably large margins (40mm in this case) you can get Chopped Strand Mat (CSM) to make a sharp bend and stay down in the surface tension of the resin.
Second lesson is to keep a pair of scissors handy so that once you've laid down a sheet of CSM, you can cut and overlap bits which need to make tight compound curves. For example the corners of the sunroof can be made with two cuts each.
Lastly, I think due to the stiffness of the 300g/sqm CSM I used for the second layer, it was trying to lift just a little at the edges where it didn't really want to make the 90degree bend.
This was solved with a sheet of thin plastic, weighed down at the edges with old chair legs taped on
Plan tomorrow is to remove the plastic sheeting (I hope!) and then apply another two or three layers of 300g/sqm CSM.
Final lessons are that paddle rollers do an excellent job of getting air out of the laminate and that if you don't use a pot with a bloody hole in the bottom to clean brushes and things in, you won't end up with sticky hands
-
march109
- Engaged to the E30 Zone
- Posts: 6632
- Joined: Sun Aug 20, 2006 11:00 pm
- Location: Bournemouth
Oh dear you are having an adventure arn't you!
It is sooo easy most people regard composites as a black art and its all very simple, and year 8 art student could do it given the tools. Its good to see your coming on leaps and bounds.
It is sooo easy most people regard composites as a black art and its all very simple, and year 8 art student could do it given the tools. Its good to see your coming on leaps and bounds.
325i Tech 1 Touring, breaking.
2.5 high comp. M20, 3.64 LSD, Fully undersealed, Spax springs & Bilstein shocks, s/s exhaust, Alpina rep wheels and more.
2.5 high comp. M20, 3.64 LSD, Fully undersealed, Spax springs & Bilstein shocks, s/s exhaust, Alpina rep wheels and more.
-
Turbo-Brown
- Boost Junkie
- Posts: 4705
- Joined: Tue Feb 15, 2005 11:00 pm
- Location: Aldershot, Hants
Had to lift and reposition the tissue layer three times yesterday before it was central
I'm reasonably confident that this one will be a usable mould in which to make a half decent CF sunroof, and it's been an invaluable learning experience
-
Turbo-Brown
- Boost Junkie
- Posts: 4705
- Joined: Tue Feb 15, 2005 11:00 pm
- Location: Aldershot, Hants
Bloody hell it takes a long time to make a mould!
Just done another two layers of 300g stuff. Keep mixing JUST enough resin and getting it all done by the skin of my teeth, but there's no science to my calculations!
Today I thought, "right; two plies of 300g stuff means I need about 400g of resin".......which would be about right if each ply was 1sqm....but it's about half that!
Anyway, couple of layers of 400g stuff tomorrow plus some bracing and I reckon it'll be time to release it from the pattern
-
Turbo-Brown
- Boost Junkie
- Posts: 4705
- Joined: Tue Feb 15, 2005 11:00 pm
- Location: Aldershot, Hants
Wahey! That was easy!
Pulled the cardboard and sticky-tape margins off, had a very gentle lever at the old sunroof attachment points and out it popped!
Just gotta order up enough materials to get on with the business of CF sunroof making now
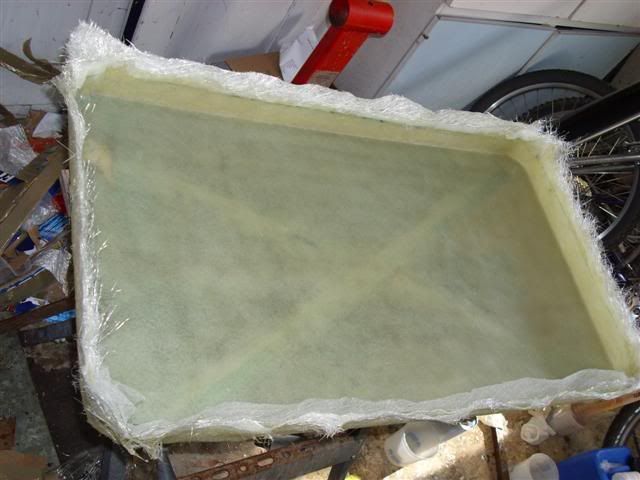
It's amazing how light and stiff the mould is! Despite the thickness of the layup it's still lighter than the standard panel!
Pulled the cardboard and sticky-tape margins off, had a very gentle lever at the old sunroof attachment points and out it popped!
Just gotta order up enough materials to get on with the business of CF sunroof making now
It's amazing how light and stiff the mould is! Despite the thickness of the layup it's still lighter than the standard panel!
-
march109
- Engaged to the E30 Zone
- Posts: 6632
- Joined: Sun Aug 20, 2006 11:00 pm
- Location: Bournemouth
Nice one, so the mould is done, time for some carbon wrongness now!
325i Tech 1 Touring, breaking.
2.5 high comp. M20, 3.64 LSD, Fully undersealed, Spax springs & Bilstein shocks, s/s exhaust, Alpina rep wheels and more.
2.5 high comp. M20, 3.64 LSD, Fully undersealed, Spax springs & Bilstein shocks, s/s exhaust, Alpina rep wheels and more.
-
Flozman
- E30 Zone Newbie

- Posts: 239
- Joined: Sat Jun 21, 2008 11:00 pm
- Location: Andover
This is a good thread, more updates please!
-
Turbo-Brown
- Boost Junkie
- Posts: 4705
- Joined: Tue Feb 15, 2005 11:00 pm
- Location: Aldershot, Hants
Cheers dude, will be starting work on the mould for the boot lid tomorrow if the weather's nice.
Will hopefully be getting some vacuum bagging materials together early next week so I can have a proper crack at making the carbon sunroof panel.
Will hopefully be getting some vacuum bagging materials together early next week so I can have a proper crack at making the carbon sunroof panel.
-
1an
- E30 Zone Addict
- Posts: 2384
- Joined: Sat Oct 28, 2006 11:00 pm
- Location: benfleet, essex
looking good Alex,
out of intrest how are you going to fit the carbon sunroof pannel? same way as you would a standard one?
out of intrest how are you going to fit the carbon sunroof pannel? same way as you would a standard one?

Audi S3 and Racing Puma track car.
-
Turbo-Brown
- Boost Junkie
- Posts: 4705
- Joined: Tue Feb 15, 2005 11:00 pm
- Location: Aldershot, Hants
I wanna ditch all of the opening mechanism and just bond the panel in.
Does pose the question of what to do with the hole in the head lining though
Does pose the question of what to do with the hole in the head lining though
-
1an
- E30 Zone Addict
- Posts: 2384
- Joined: Sat Oct 28, 2006 11:00 pm
- Location: benfleet, essex
ooo sounds exactly what i want to do, dont suppose you have any plans to make them to sell a couple?
Audi S3 and Racing Puma track car.
-
Turbo-Brown
- Boost Junkie
- Posts: 4705
- Joined: Tue Feb 15, 2005 11:00 pm
- Location: Aldershot, Hants
I think that if people were happy with the quality of what I'd made I'd be happy to sell them.
My standards are probably lower than the show car people though but we'll see when the time comes
My standards are probably lower than the show car people though but we'll see when the time comes
-
1an
- E30 Zone Addict
- Posts: 2384
- Joined: Sat Oct 28, 2006 11:00 pm
- Location: benfleet, essex
i would have one if you were to make some, im not to fussed on a show car piece as its for my track car,
look forward to seeing it all fitted.
look forward to seeing it all fitted.
Audi S3 and Racing Puma track car.
-
Turbo-Brown
- Boost Junkie
- Posts: 4705
- Joined: Tue Feb 15, 2005 11:00 pm
- Location: Aldershot, Hants
Aaaaargh! No free time!
Will finish the mould on Friday and then order the CF to make the first bootlid on the weekend
Will finish the mould on Friday and then order the CF to make the first bootlid on the weekend
-
Turbo-Brown
- Boost Junkie
- Posts: 4705
- Joined: Tue Feb 15, 2005 11:00 pm
- Location: Aldershot, Hants
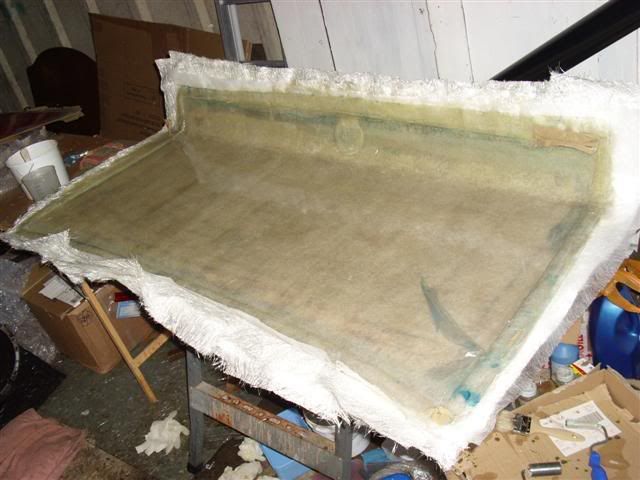
Ooh, it's not come out bad that!
So we now have both boot lid and sunroof moulds done and ready to fill with CF.
Speaking to the guys at East Coast Fibreglass, they said a good way to keep the cost down a little bit for no discernable difference in stiffness is to lay up a CF outer, a diolen middle and a CF inner.
Totally makes sense too as the diolen is just on the neutral axis of the sheet so it's only ever loaded in shear which is a nice easy force to deal with if you're a bit of material
Gonna order all the kit I need now
So that just leaves FIVE moulds to make
-
march109
- Engaged to the E30 Zone
- Posts: 6632
- Joined: Sun Aug 20, 2006 11:00 pm
- Location: Bournemouth
Good man, CF boot is my next project.
325i Tech 1 Touring, breaking.
2.5 high comp. M20, 3.64 LSD, Fully undersealed, Spax springs & Bilstein shocks, s/s exhaust, Alpina rep wheels and more.
2.5 high comp. M20, 3.64 LSD, Fully undersealed, Spax springs & Bilstein shocks, s/s exhaust, Alpina rep wheels and more.
-
Turbo-Brown
- Boost Junkie
- Posts: 4705
- Joined: Tue Feb 15, 2005 11:00 pm
- Location: Aldershot, Hants
Suspect you'll do an infinitely better job on your mould that I have. I didn't tape the edges all that well so they're a bit feathery.
Gonna layup a border of 50mm CF tape around the perimeter so the twill edges have something to hide behind.
Have been getting people's opinions (well, my housemates) on how it'll look by overlaying a couple of samples. I think it'll look quite cool myself...time will tell!
Gonna layup a border of 50mm CF tape around the perimeter so the twill edges have something to hide behind.
Have been getting people's opinions (well, my housemates) on how it'll look by overlaying a couple of samples. I think it'll look quite cool myself...time will tell!
-
march109
- Engaged to the E30 Zone
- Posts: 6632
- Joined: Sun Aug 20, 2006 11:00 pm
- Location: Bournemouth
I don't know about that, no workshop with the new flat and all now. So will have to use one of the spare rooms. Though it does make controlling the temperature easier, if a little smelly in the house.
325i Tech 1 Touring, breaking.
2.5 high comp. M20, 3.64 LSD, Fully undersealed, Spax springs & Bilstein shocks, s/s exhaust, Alpina rep wheels and more.
2.5 high comp. M20, 3.64 LSD, Fully undersealed, Spax springs & Bilstein shocks, s/s exhaust, Alpina rep wheels and more.
-
Turbo-Brown
- Boost Junkie
- Posts: 4705
- Joined: Tue Feb 15, 2005 11:00 pm
- Location: Aldershot, Hants
That said, epoxy (well West epoxy at any rate) smells like sugar puffs
It's gonna have to be SP 106 for the boot lid though I think as West don't actually say in their literature that you can use it on CF whereas SP specifically do!