Replacing Clutch
The Clutch fitted to each E30 is rated for a surprisingly high mileage; it's not uncommon to hear of cars still running their original clutches after twenty years of driving. But they all wear out eventually. Here's how to get that job done before it leaves you stranded.
Overview
The clutch is a sandwich mechanism between the engine and the drivetrain, allowing you to engage or disengage the gearbox so that you can change gears. It's a system of heavy duty springs and friction plates, and all of its components wear down over time until there's nothing left to grip the gearbox to the engine's flywheel. When that happens, the wheels won't turn no matter how much you rev the engine and worse, you risk scratching and damaging the flywheel.
That's why you need to change the clutch. But that means separating the gearbox from the engine, and on the E30 that's a particularly heavy duty job, no matter what engine you've got. You need to be physically fit to take this job on, and the tools required may be more than the home mechanic has available. If in doubt, pay a professional. If you have the engine removed from the car, then the job is a hundred times easier.
In this write-up we've documented a clutch change on an M20 engine, but the principle is the same for all E30 engines with manual gearboxes.
Tools
- Jack and jack stands
- 13mm, 17mm and 19mm sockets
- 10mm and 17mm spanners
- 11mm, 12mm and 16mm Torx sockets
- 6mm allen key or similar
- 8mm and 12mm threaded bar, cut into 6" lengths
- Flat screwdriver
The job is significantly easier if you have:
- Engine crane
- Clutch centring tool
Procedure
Gearbox Removal
Since we're going to be working under the car, you need the car raised as high as possible. While it would be fantastic to have a four-post lift, most of us don't have access to one. Ramps are the next best thing, but if all else fails then jack the car up as high as possible, using the relevant jacking points to lift and secure the car on your jack stands.
Open the bonnet. You need as much light as possible under the car, and this helps.
From under the car, we need to separate the gearbox from the rest of the drivetrain. This is done by undoing three bolts on the rubber guibo between the gearbox and the propshaft. You can leave the guibo attached to the gearbox, it doesn't matter, just use your 17mm spanner and socket to get them undone. Be ready for the propshaft to drop down, although it should hit the exhaust heatshields rather than your face. Push it out of the way.
Next find the clutch slave cylinder, which is located on the left side of the gearbox. It's held on to the gearbox with two 13mm bolts, and unbolting it means we won't need to bleed the clutch system afterwards. However, DO NOT press the clutch pedal after removing the cylinder. You will force the slave cylinder past its level of tolerance, and it will blow its seals, forcing you to replace both the slave and the master cylinder, and all the fluid.
Now find the gearbox switch plug for the reverse lights, and disconnect it. It's on the right side of the gearbox.
Then use a screwdriver to undo the circlips holding the gearshift rods to the selector mechanism. It's better to undo them at the gearbox end so that you don't have to deal with removing the shifter.
Once all that's done, the gearbox should be separated from the drivetrain.
The next step is to give you enough room to get the gearbox detached and away from the car. The most common method is to tilt and lift the engine so that the gearbox drops down; that means undoing the gearbox subframe (two 13mm nuts) as well as loosening or removing the engine from its mounts (two 17mm nuts). If you have a crane handy and can lift the engine, even better.
However you manage it, you need to get access to the bolts that are holding the gearbox to the engine. These should be:
- Two 19mm nuts at the top of the bellhousing
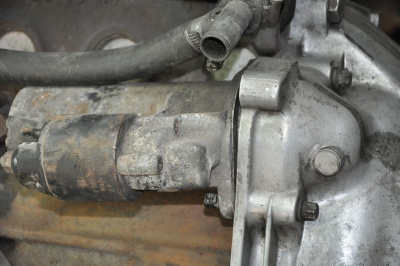
- Two 12mm Torx bolts with 13mm hex nuts holding on the Starter
- One 10mm hex nut
- Two 16mm Torx bolts
- Four 11mm Torx bolts
There are variations in what bolts are used to hold on each gearbox, so it's best to have a full set of both hex and torx sockets to hand.
Before you start, support the weight of the gearbox with your jack as you undo the bolts. The gearbox won't drop on you when the last bolt is removed, but you'll need something to carry the weight once everything's undone. When all the bolts are gone, tug firmly on the gearbox, or GENTLY use a pry-bar between the bell-housing and the engine to prise the two apart. Be ready for the gearbox to drop to the floor.
Clutch
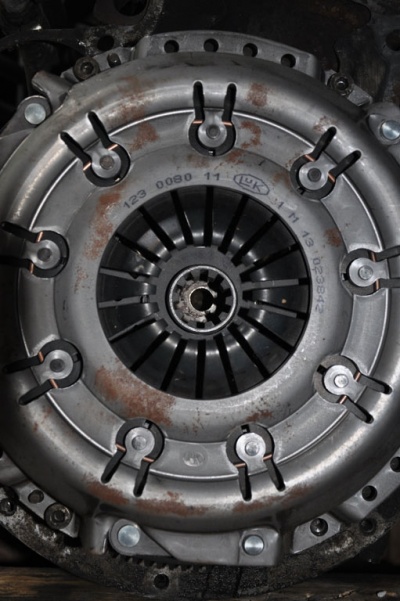
You should now be able to see the clutch in all its glory:
What you're looking at is the Pressure Plate: this is held on with six allen bolts, so get your allen key or socket and get them off.
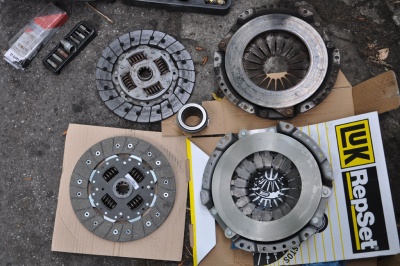
With the old parts removed, you can lay the components out against your new kit. You should have a Pressure Plate, a Clutch Disc and a Release Bearing. We've used a kit from LUK, but you can also use Sachs as an OEM manufacturer.
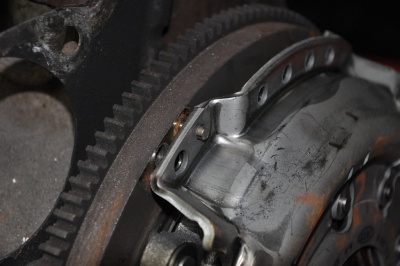
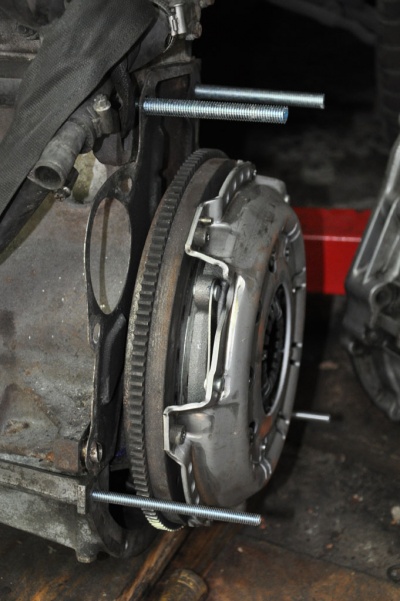
Take your pressure plate and clutch disc, and sandwich them together. Offer them up to the flywheel, and align the pressure plate holes to the pins on the flywheel like so:
You can also offer up the allen bolts and screw them in so that they're just holding, but don't tighten them up. Just make sure the pressure plate can't fall or slip.
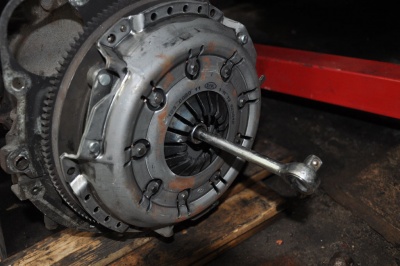
Now you need to centre the clutch plate. If you have the centring tool, then make use of it by offering it up and slotting its centre shaft into the middle of the flywheel.
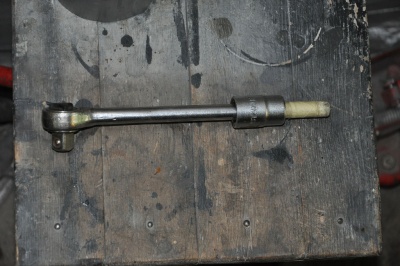
If you haven't got a clutch centring tool, you'll need to make one. The tip needs to be slim enough to fit into the middle of the flywheel, while the shaft needs to be fat enough to slot firmly into the middle of the clutch plate. I achieved this by using an old ratchet thickened with tape, and a 17mm socket slid over the top.
This worked like a charm, but is entirely dependent on your brand of tools. A fat bolt padded out with gaffer tape can work equally well.
Feed the tool into the clutch until the tip locks in place in the flywheel. This should pull the clutch plate into the centre, aligning it perfectly with the centre point of the clutch. If you're using a home-made tool you'll have to check with your eye that everything looks centred; if it's a few mm out then the gearbox will NOT go back on without a lot of swearing, so it's worth taking the time to get the plate aligned as well as possible.
If you're not sure on the accuracy of your tool, then offer the gearbox up to see if it will fit. Make sure the gearbox is in neutral, so that you can spin the output flange to line it up with the splines on the clutch plate. If you can't get the gearbox to slip smoothly into place, then you haven't aligned your clutch properly. If you have used the proper tool, then feel free to tighten up the pressure plate bolts.
Now don't jump the gun and fit the box yet. We still have to deal with the Release Bearing that came in our clutch kit.
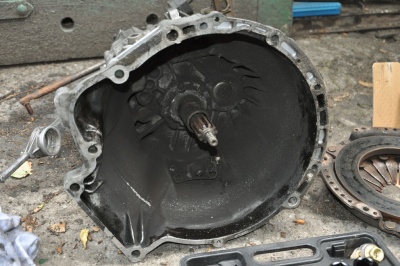
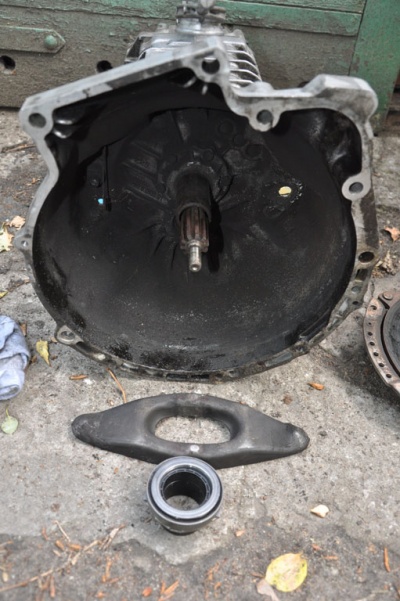
Looking at the inside of the gearbox bell housing, you should see the input shaft sounded by the dirt and debris that comes from a clutch wearing down over time. Pay attention to the little spring clip at the bottom of this picture (gearbox is resting on its side):
That spring clip carries one side of the Release Lever, which is what pushes the Release Bearing forwards and into the clutch Pressure Plate. The Release Lever is itself pushed on its other side by the slave cylinder. So before you refit the gearbox, swap over the Release Bearing by sliding it onto the input shaft, and make sure the Release Lever is properly located into its spring clip.
Gearbox Refitting
Once that's done, you need your muscles to get the gearbox back on. This is hard work even if you're working on the floor; gearboxes are heavy as well as bulky, so getting things lined up can be a real pain.
To make it easier, we've cut some threaded bar into rods, and screwed them gently into the existing bolt holes on the engine.
Two 12mm sections go into the top holes of the bell housing, and two 8mm sections go into the holes in the lower sump surround plate. By offering the gearbox up and onto these rods, we can let them carry the load while we make adjustments to ensure the gearbox will line up with the clutch and flywheel. This is especially useful if you're working underneath the car with the gearbox on your chest, and significantly reduces the chances of being crushed to death.
If everything goes to plan, the gearbox should easily slide up flush (with a little wiggling) to the engine block, ready to be bolted into place.
Finally, work around the bell-housing and refit the bolts you removed. This is where you need your torx sockets; if you try to tighten torx bolts with standard hex sockets, you'll just round off the bolts and make them useless, so invest in the proper tools for the job:
When everything's in place, don't forget to reattach all the ancillaries you took off. Here's a checklist:
- Starter Motor
- Clutch Slave Cylinder
- Reverse Light Switch
- Prop Shaft or Guibo nuts and bolts
- Gear shifter
Then reassemble the drivetrain in the order you removed it, and enjoy your new clutch!

