
325i Touring restoration "the wrong way around"
Moderator: martauto

This is getting WAY ahead of things, but I thought I'd pass it along anyway. When it comes time to re-attach all your exterior trim, you've got to be reeeeeaaaally careful attaching all the clips. The metal beltline clips especially have a nasty tendency to scrape paint off. When I re-trimmed my car after painting, I found that dipping ALL the clips in car wash liquid lubed things very nicely. No scraping! And it's gone the first time you wash the car. Thought I'd share.

-KDS in Vancouver ('88 325i Touring)
-
ian332isport
- E30 Zone Team Member

- Posts: 5380
- Joined: Wed Dec 22, 2004 11:00 pm
- Location: West Sussex
- Contact:
Same hereDanThe wrote:I use waxoil, it doesnt wash off
Actually, I've started using this stuff, and it seems much better than Waxoyl.
http://www.bilthamber.com/dynaxs50.html
Ian.
If it aint broke - Modify it...
-
Andy335Touring
- Married to the E30 Zone

- Posts: 7144
- Joined: Sun Jan 09, 2005 11:00 pm
- Location: Long Eaton,Nottingham
- Contact:
Cool, i think i remember seeing this colour before now thinking about it, like you say it's deeper than Estoril, not too keen on Estoril TBH.old_skool_2002 wrote:In the pictures it looks a bit like estoril does in the flesh albeit not as cold. If that makes sense. In reality the Interlagos is more of a red/purpley flip. It sounds daft, but it just looks like an M colourAndy335Touring wrote:How does it compair with Estoril(sp?) blue you get on a lot of E36 M3's ?
Unfortunately under flourescent lights and with the flash the camera doesn't do it justice.
Matt, I'm moved. That is going in my gravestone. I'm welling up! Seriously though - it's a pleasure.I read a lot of projects on a whole host of different forums, apart from the fact i have a keen interest with it being a Touring this has to be the best one i have ever read.
The quality of work, the fact you are doing the vast majority of it yourself, the speed its evolving and the detail and photo work is just spot on
Added to that you've helped me (and no doubt others) out with advice and supplies
Good work dude - this thread just gets better every time i read it
Matt
Cheers Simon,I'm lost for words, what a hero you are! But some questions from a novice if you don't mind?! Have they sprayed the sun roof, tail gate, doors, bonnet etc off the car? I've been told this by other people as it gives the sprayers a chance to get a better finish. So you did all the rust removal, welding before hand aswell, so all they had to do was was prep and paint right?
I would help if i could but the help you need is off more gifted folks on here!
That spray job looks simply superb as does the colour too. The way your going i can see a Gaydon finale if the funds keep coming.
I'd say you know it's a good job if the guys doing the work recon it's come out well! people who do the job day in day out rarely think at the end of the day that the job came out well enough for them to tell the customer!
Is the spray job costing big dollar or not? I'm interested because i'm building myself up to do this as you know!
Yes, painting panels off the car is THE best way to go about it. That way everything gets a nice even coat and is put back together to match nicely. To get a proper paintjob costs a lot of dinero. Simply because proper work takes a lot of time.
I have an old mate who is a good painter. He finished college/apprenticeship in the early 90's and has been through various companies looking for the "right job", and the fact is he only wants to do good work. However he is forced, due to the nature of his job, to turn out supermarket style insurance work. Which he hates because he is capable of so much more; given the time to do it. He offered to do mine but does not have the facilities at his own disposal to do it. This is why I went to these guys as I knew I would get what I wanted. Quality costs money.
This is getting WAY ahead of things, but I thought I'd pass it along anyway. When it comes time to re-attach all your exterior trim, you've got to be reeeeeaaaally careful attaching all the clips. The metal beltline clips especially have a nasty tendency to scrape paint off. When I re-trimmed my car after painting, I found that dipping ALL the clips in car wash liquid lubed things very nicely. No scraping! And it's gone the first time you wash the car. Thought I'd share.
Same here
Actually, I've started using this stuff, and it seems much better than Waxoyl.
http://www.bilthamber.com/dynaxs50.html
Ian.
Cheers guysSorry Ian, im just too council to use that,
Have you seen the price of the stuff
Id fill my sills with old engine oil first
I was going to use good old waxoyl, but looking at the spec for Ian's recommendation has got me convinced!
Anyhow. Not being one to let the side down I did some more bits and pieces today to keep the ball rolling. Firstly, I'm having a bit of a love affair with the brakes at the minute. So the VHT paint turned up in time for me to paint the servo. I didn't have a major passion for wrinkle finish paint on the servo but thought it was worth a try as a practice for the main event - the S50 rocker cover
This is the servo sandblasted and ready for paint - note the holes all masked up (don't sandblast anything that isn't masked up if you want it to work again internally)

and:

So, now for the VHT wrinkle finish - be sure to follow the instructions!

Really happy with the result.
Meanwhile, the fuel system had a bit of a look in.
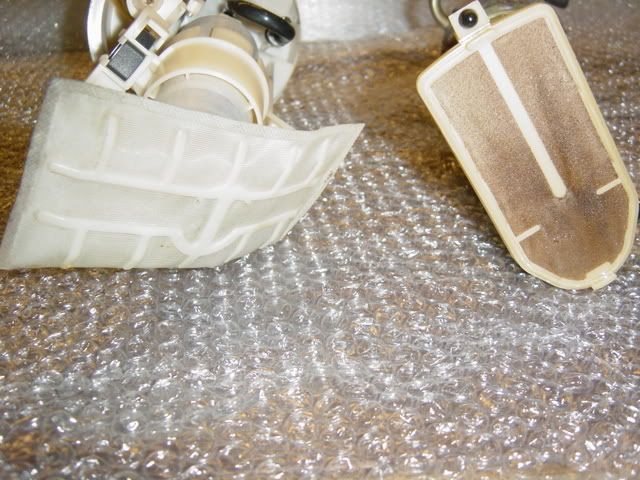
This is a picture of the E30 and E36 M3 fuel pumps in comparison: (E36 M3 on left)

The Idea is to transpose the E36 fuel pump which operates at 5 bar into the housing of the E30 frame and still be able to fit in the tank.
So a little modification will be in order to get it all to fit together nicely. Here you can see the E30 and E36 M3 fuel pumps stripped from their housings side by side (M3 is the larger - note: E36 M3 also has a much larger fuel intake and prefilter boot, my old E30 prefilter was filthy)

Prefilter size and condition - 60k miles E36 M3(left) versus E30 325 (right)
All stripped apart ready to be modified. Note, I took the original plugs out of the fuel unit so I could reweld and passivate the fuel unit when I've finished modifying and welding it up to take the new fuel pump arrangement.

More on the subframe bolts tomorrow when I can stay awake ....

he hasnt rebuilt it yet dude 
Likely to be BBS style 5 or something like thatWhat wheels where you thinking of using?
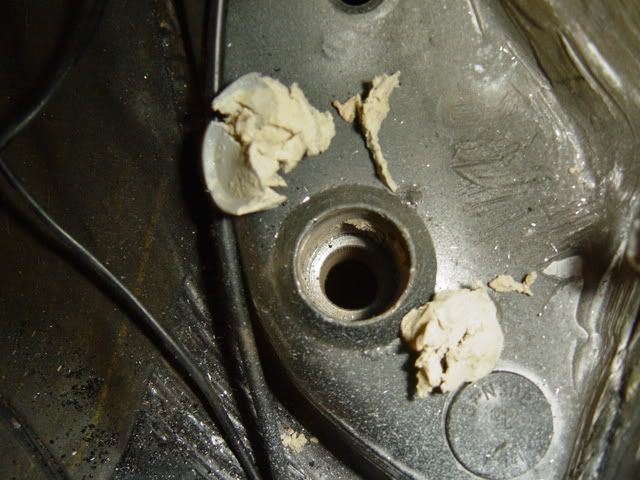
So, these subframe bolts. I forgot to take them out before the shell was painted and I have been reading on the zone lately that their has been a bit of confusion as to how exactly they are removed.
Firstly, way back in September, when I took the subframe out, the original bush carrier stuck on the bolt on one side whereas the other side snapped off in the recess - in the pic you can see the crumbled alloy remains of the bush in the cup. If you're using powerflex bushes or similar that are flat topped then this can stay where it is as long as it is flush. If you are using OEM bushes then it has to come out. In order to remove this you need to remove the bolts first.

Before beating the bolts to death, clear out the mastic in the bolt cups. I used a small pick:
Forget little hammers - even lump hammers. Use a 10lb sledge hammer like so:

A few good blows did the trick. I was replacing the bolts anyway otherwise I would have wound an old nut on the end to stop damaging the starting thread.
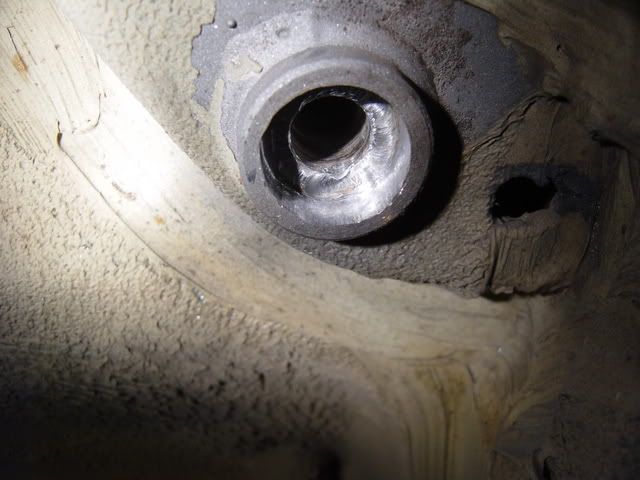
Now for removing the remains. I retired the Dremel and used an air die grinder with a tct bit:

The result:
This is the alloy bush inner from the other side. Note the cup is still intact on this one (left hand side is the top). Also, the bolt itself alongside. The bolts are only £2 each from BMW so hardly worth putting back in.

Dead easy really!

Sorry Maxfield, I'd forgotten that you had already picked the wheels 
Now you are official stylist to my resto how's about finding some very nice recaro front bucket seats (fat boy edition) for it. Don't forget we need to get matching cloth for the rears to be retrimmed in.

Now you are official stylist to my resto how's about finding some very nice recaro front bucket seats (fat boy edition) for it. Don't forget we need to get matching cloth for the rears to be retrimmed in.
I know of some recaro srds for sale same as in the evo sportold_skool_2002 wrote:Sorry Maxfield, I'd forgotten that you had already picked the wheels
Now you are official stylist to my resto how's about finding some very nice recaro front bucket seats (fat boy edition) for it. Don't forget we need to get matching cloth for the rears to be retrimmed in.
and just think BBS LMS would look so good on a touring

-
TouringMatt
- E30 Zone Camper

- Posts: 1188
- Joined: Mon Jan 10, 2005 11:00 pm
- Location: Not where i should be
Are these them?

If so then
Matt
If so then
Matt
not sure I like flat part between spokes or the centres on LM's, prefer RS or style 5, arent LM's super expensive aswell?, can get style 5's the cheapest I would go for them if value matters
-
jaistanley
- E30 Zone Addict
- Posts: 2517
- Joined: Tue Jan 18, 2005 11:00 pm
- Location: Coventry and Essex
I would DEFINITELY go for those Recaro SRDM's (the ones the same/similar to the Sport Evo seats). They suit the E30 Soooooo well and remain a little retro. Fitting newer/more modern seats can be a bit council estate IMO (especially if they aren't trimmed to match the rest of the car..) Fitting one dirty bucket seat to the drivers side is kinda cool too though.
Just thought I'd add the Jai Stanley dessign expertise to the mix
Jai
Just thought I'd add the Jai Stanley dessign expertise to the mix
Jai

This is probably the best E30 project ive seen. What makes it sooo great is that its all being done properly.
Your spending the time and money but when its finished its a brand new E30!
Love your project, if only you lived a bit closer
Keep it up
Your spending the time and money but when its finished its a brand new E30!
Love your project, if only you lived a bit closer
Keep it up
-
gareth
- E30 Zone Team Member
- Posts: 11009
- Joined: Tue Jan 11, 2005 11:00 pm
- Location: hastings, east sussex
i love that crinkle paint, soooooo retro! makes me think of MGB dashboards
if i ever tidy my engine up i'm using that on the rocker cover and inlet manifold... and anything else that i see!!!i've not even steam cleaned the 'new' M30 yet most unlike me
out of curiosity mr 2002 , have you restored many cars before? i'm guessing there is a tasty '02 lurking on your drive?
if i ever tidy my engine up i'm using that on the rocker cover and inlet manifold... and anything else that i see!!!i've not even steam cleaned the 'new' M30 yet
out of curiosity mr 2002 , have you restored many cars before? i'm guessing there is a tasty '02 lurking on your drive?
Sole founder of Fe2O3-12V it's a lifestyle

LSD rebuilding / modification services provided, PM for details
LSD rebuilding / modification services provided, PM for details
Nope, never restored a car before. My 2002 is pretty sweet, she was restored a couple of years ago and she still has the original carburettored M10 engine and 3 speed auto box. Saying that, you would be surprised - she's no slouch! I would love to drop an S14 in but she is so original it would ruin it. I take her out on weekends in the summer and she really turns heads as it is, why spoil it I guess?out of curiosity mr 2002 , have you restored many cars before? i'm guessing there is a tasty '02 lurking on your drive?
It's a shame you weren't nearby, I'd give you a free steam clean dude
I really don't know what these look likeI would DEFINITELY go for those Recaro SRDM's (the ones the same/similar to the Sport Evo seats). They suit the E30 Soooooo well and remain a little retro. Fitting newer/more modern seats can be a bit council estate IMO (especially if they aren't trimmed to match the rest of the car..) Fitting one dirty bucket seat to the drivers side is kinda cool too though.
This is probably the best E30 project ive seen. What makes it sooo great is that its all being done properly.
Your spending the time and money but when its finished its a brand new E30!
Love your project, if only you lived a bit closer
Keep it up
Thanks

Probably because they are !!buster wrote:those seats look good,very much look like m3 evo seats !
Give me a minute and i'll search the net are you getting them releathered because some 2nd hand ones from ebay would be cheaper??
they are very expensive, I if I were you id have all my touring sport seats for £100 and get a retrim
Right then!
Not had much time over the past few weeks so haven't got to do a lot at all. There have been a few minor developments however!
Firstly, I got the platework for the servo relocation finished and it has now been sent off to be yellow passivated. A few shots of the plates before I sent them off to be going on with:


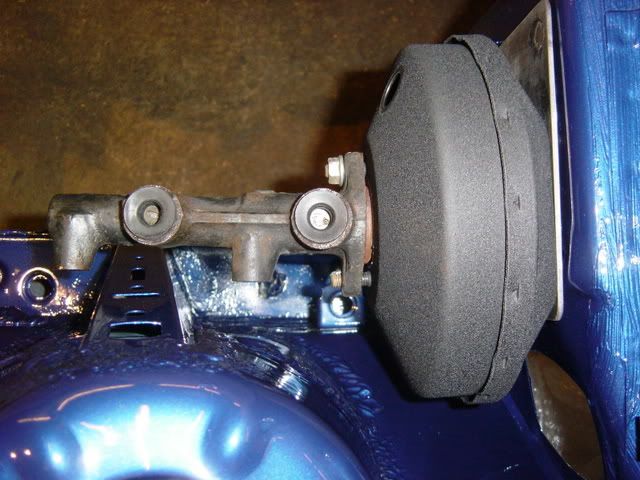
As you can see the servo has moved over exactly 57mm. The plates I have made are 3mm thick, one each side of the bulkhead with a custom made gasket at the front of the bulkhead. I don't have any CAD software for the plate design so if someone would like to volunteer their services I can email them a technical drawing and get a cad file made up for anyone who wants to copy the design.
The servo pivot bracket that bolts inside the bulkhead has also been modified and rewelded, this is a simple job and requires simple fabrication. Using this method doesn't interfere with the glovebox mechanism or sacrifise brake pedal travel.
So, to recap, I have used the Golf MKII servo with a customised E30 master cylinder, I'll post more pics of this up and edit this post with a complete rundown and more pictures of the brake redesign for anyone who's interested in doing it themselves.
Big thanks to my Brother 'out' Law, Jim. He made a 300 mile round trip journey to pick up the long awaited E30 M3 5 stud setup. He is a fellow zoner but rarely ever posts, But I know he'll be reading this
Here it is:
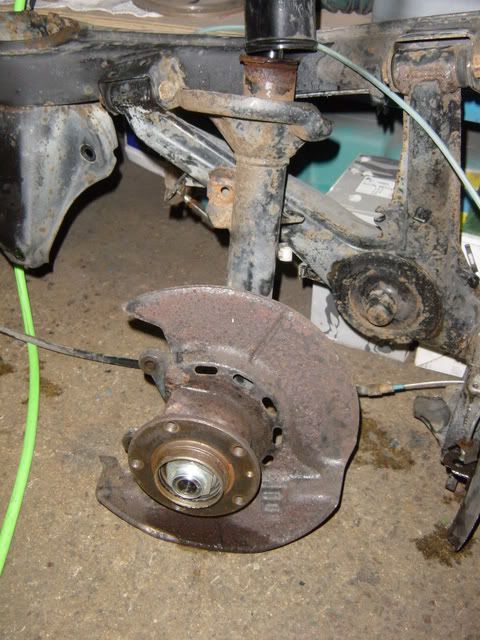

Time to take a step back and do everything to this setup that I did to the four stud setup at the start of this thread
This lot will be going for sale soon complete with all poly bushes, Black diamond discs, rebuilt calipers, bearings, everything. Ready to drop on a get back on the road in a weekend. If anyone is interested then drop me a PM.


Not had much time over the past few weeks so haven't got to do a lot at all. There have been a few minor developments however!
Firstly, I got the platework for the servo relocation finished and it has now been sent off to be yellow passivated. A few shots of the plates before I sent them off to be going on with:
As you can see the servo has moved over exactly 57mm. The plates I have made are 3mm thick, one each side of the bulkhead with a custom made gasket at the front of the bulkhead. I don't have any CAD software for the plate design so if someone would like to volunteer their services I can email them a technical drawing and get a cad file made up for anyone who wants to copy the design.
The servo pivot bracket that bolts inside the bulkhead has also been modified and rewelded, this is a simple job and requires simple fabrication. Using this method doesn't interfere with the glovebox mechanism or sacrifise brake pedal travel.
So, to recap, I have used the Golf MKII servo with a customised E30 master cylinder, I'll post more pics of this up and edit this post with a complete rundown and more pictures of the brake redesign for anyone who's interested in doing it themselves.
Big thanks to my Brother 'out' Law, Jim. He made a 300 mile round trip journey to pick up the long awaited E30 M3 5 stud setup. He is a fellow zoner but rarely ever posts, But I know he'll be reading this
Here it is:
Time to take a step back and do everything to this setup that I did to the four stud setup at the start of this thread
This lot will be going for sale soon complete with all poly bushes, Black diamond discs, rebuilt calipers, bearings, everything. Ready to drop on a get back on the road in a weekend. If anyone is interested then drop me a PM.
-
gareth
- E30 Zone Team Member
- Posts: 11009
- Joined: Tue Jan 11, 2005 11:00 pm
- Location: hastings, east sussex
that bracket looks the part! should be nice and stiff too! spanner wielding clearance next to the m/c looks tight but not as bad as a lot of new cars!!!
i'm looking forward to each new job i have now as my little brother was GIVEN a sandblasting booth (big enough for a wheel) during a clearout at his work!!! time for shiiiiny bits!!!! just need to get a plating tank now! all your shiny bits have got me all inspired!!!
i'm looking forward to each new job i have now as my little brother was GIVEN a sandblasting booth (big enough for a wheel) during a clearout at his work!!!
Sole founder of Fe2O3-12V it's a lifestyle
LSD rebuilding / modification services provided, PM for details
LSD rebuilding / modification services provided, PM for details
Hey Old Skool.
Nice.. how are you going to do the 5 stud for the rear?
And that rear subframe is the nuts!!! Nicely powder coated and drool worthy!!! Saw it in the flesh and its unbelievable.. its a shame that it's hidden under the car!
ot/ did you get my txt?
Nice.. how are you going to do the 5 stud for the rear?
And that rear subframe is the nuts!!! Nicely powder coated and drool worthy!!! Saw it in the flesh and its unbelievable.. its a shame that it's hidden under the car!
ot/ did you get my txt?
-
TouringMatt
- E30 Zone Camper
- Posts: 1188
- Joined: Mon Jan 10, 2005 11:00 pm
- Location: Not where i should be
Lookin good fella 
Cheers
Matt
Can sort the CAD file if you need, possible even fabricate them tooI don't have any CAD software for the plate design so if someone would like to volunteer their services I can email them a technical drawing and get a cad file made up for anyone who wants to copy the design.
Cheers
Matt
-
jaistanley
- E30 Zone Addict
- Posts: 2517
- Joined: Tue Jan 18, 2005 11:00 pm
- Location: Coventry and Essex
Sounds good... I can AutoCAD them up for you too if required.
I wouldn't mind buying a pair of plates if you're interested in selling some Mat...
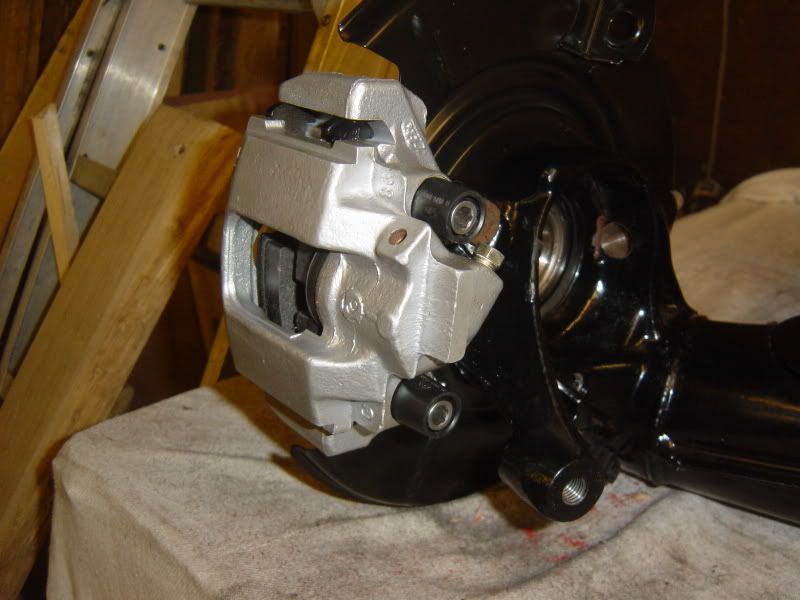
For the 5 stud swap on my S50 325i, I'm fitting the MCoupé rear trailing arms and diff. Gives 312mm ventilated disks, stiffer swingarms and uprated driveshafts. For the front I'm fitting E30M3 struts with hubcentric spacers that go behind E36M3 Evo brake disks and the E36 M3 calipers will bolt straight on. Also means E36 offset wheels are required all round. Hope this helps any?
Also, in that last photo, the master cylinder looks a little 'cranked' toward the centre of the car because of that box section on the turret. Is that because it's loose? If it fouls, have you thought about using an Audi master cylinder? It should fit the servo without mods (I think), is shorter and you can get them in 23.5mm or 25mm (for E30M3 calipers and in my case E36M3 calipers). On my current 318is I have E30M3 running gear and the standard E30 mastercylinder is too small, making the brakes feel very 'on/off' with loads of travel. You get used to it but ideally I'd want the same size as the M3.
Jai
I wouldn't mind buying a pair of plates if you're interested in selling some Mat...
For the 5 stud swap on my S50 325i, I'm fitting the MCoupé rear trailing arms and diff. Gives 312mm ventilated disks, stiffer swingarms and uprated driveshafts. For the front I'm fitting E30M3 struts with hubcentric spacers that go behind E36M3 Evo brake disks and the E36 M3 calipers will bolt straight on. Also means E36 offset wheels are required all round. Hope this helps any?
Also, in that last photo, the master cylinder looks a little 'cranked' toward the centre of the car because of that box section on the turret. Is that because it's loose? If it fouls, have you thought about using an Audi master cylinder? It should fit the servo without mods (I think), is shorter and you can get them in 23.5mm or 25mm (for E30M3 calipers and in my case E36M3 calipers). On my current 318is I have E30M3 running gear and the standard E30 mastercylinder is too small, making the brakes feel very 'on/off' with loads of travel. You get used to it but ideally I'd want the same size as the M3.
Jai
Last edited by jaistanley on Sun Feb 04, 2007 3:09 pm, edited 1 time in total.