
325i Touring restoration "the wrong way around"
Moderator: martauto

Cheers all! Things are going to have to slow down a little over the next couple of weeks because the gravy train has been derailed (ran out of cash  ) also need to get back to work!
Change of plan - It's going into the bodyshop on Thursday for painting! Hopefully all they have to do is a couple of coats of filler primer, base coat (colour) and lacquer, very little prep required. Which means I may very well be able to post up pics of the finished article by next weekend. Hmm...Fingers crossed!
This is where you need to apply gentle pressure to prise off the trims. The rear window glass needs to be cut out (if you have to remove them) this is better left to a pro who will use a stainless steel cutting wire (like a cheese wire). Try realoem.com to see and exploded diagram of how the trims fit to the body, that's what I should have done.
Good luck
To extra care when removing the trims asthey are very expensive to replace. £260 for all of them for both sides. Trust me, I know
Change of plan - It's going into the bodyshop on Thursday for painting! Hopefully all they have to do is a couple of coats of filler primer, base coat (colour) and lacquer, very little prep required. Which means I may very well be able to post up pics of the finished article by next weekend. Hmm...Fingers crossed!
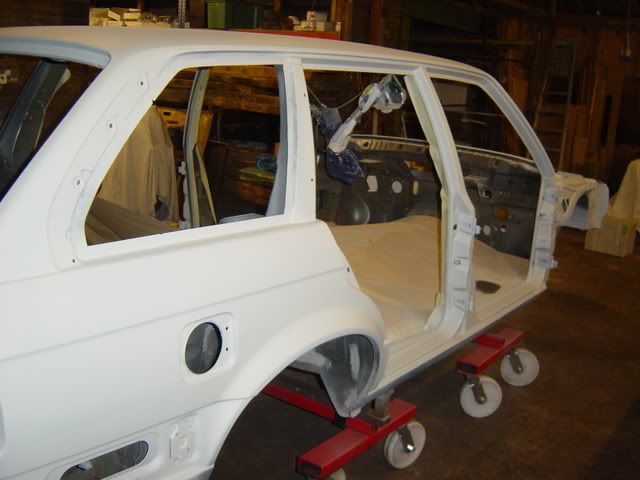
If you look at this pic you will see four holes to the left of the rear window and two to the right:One question if I may. How do you take off the trim around the rear side windows. Have to take mine of to fix rust
This is where you need to apply gentle pressure to prise off the trims. The rear window glass needs to be cut out (if you have to remove them) this is better left to a pro who will use a stainless steel cutting wire (like a cheese wire). Try realoem.com to see and exploded diagram of how the trims fit to the body, that's what I should have done.
Good luck
To extra care when removing the trims asthey are very expensive to replace. £260 for all of them for both sides. Trust me, I know


Had a panic today when I realised that I needed to do the servo modifications before the shell was painted 
I eventually found a servo from a local breaker last week who was intending to break the MkII Golf donor vehicle today, and he came through thankfully. So my devilish plan was to move the servo over 60mm from the original servo location. That combined with the decrease in diameter Golf servo should hopefully give me enough clearance to avoid cutting the plenum on the S50 engine.
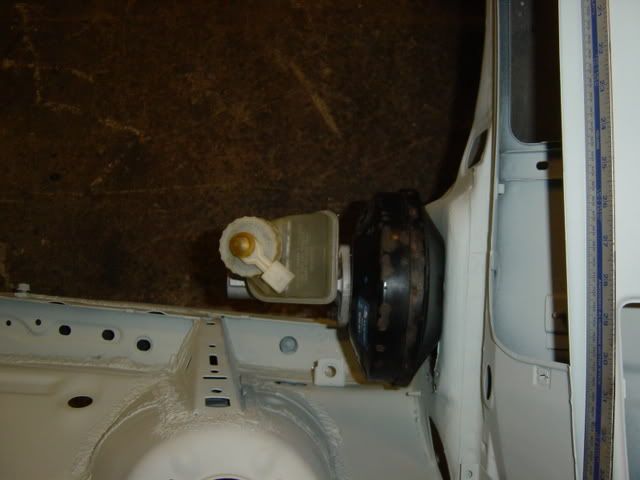
The standard ATE servo is 270mm in diameter. Here's what a standard 325i servo in OEM "position 1" looks like:

This is the Golf servo in "position 1", the servo is 180mm diameter:

And from above:
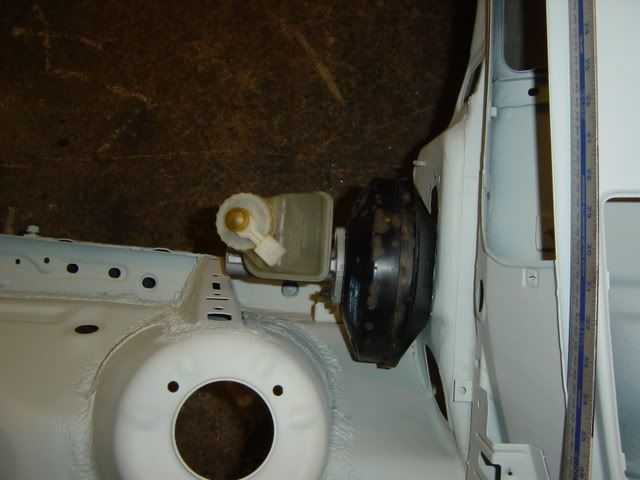
This is the new "position 2" moved over by 60mm, I checked on my "spare" E30, and this won't impinge on the glovebox:

And from above:
The new master cylinder is from a 1997 Polo 1.4, unfortunately I don't think it'll work as the connections are not M10x1 and the reservoir is a clip on type with very close ports so may be hard to find a more suitable reservoir. My intention was to find an Audi 200/V8 M/C like Buster has used but just can't find one....yet.
This is what it looks like inside:

I intend to make up a 4mm steel plate drilled to take the servo connections and cut the bulkhead section out completely and reweld into the bulkhead. Then all I need to do is lengthen the brake pull rod by 60mm and adjust the internal servo hanging bracket/pivot and I'm there. Hopefully all this will pay off when the engine goes in
Many thanks Buster!
I eventually found a servo from a local breaker last week who was intending to break the MkII Golf donor vehicle today, and he came through thankfully. So my devilish plan was to move the servo over 60mm from the original servo location. That combined with the decrease in diameter Golf servo should hopefully give me enough clearance to avoid cutting the plenum on the S50 engine.
The standard ATE servo is 270mm in diameter. Here's what a standard 325i servo in OEM "position 1" looks like:
This is the Golf servo in "position 1", the servo is 180mm diameter:
And from above:
This is the new "position 2" moved over by 60mm, I checked on my "spare" E30, and this won't impinge on the glovebox:
And from above:
The new master cylinder is from a 1997 Polo 1.4, unfortunately I don't think it'll work as the connections are not M10x1 and the reservoir is a clip on type with very close ports so may be hard to find a more suitable reservoir. My intention was to find an Audi 200/V8 M/C like Buster has used but just can't find one....yet.
This is what it looks like inside:
I intend to make up a 4mm steel plate drilled to take the servo connections and cut the bulkhead section out completely and reweld into the bulkhead. Then all I need to do is lengthen the brake pull rod by 60mm and adjust the internal servo hanging bracket/pivot and I'm there. Hopefully all this will pay off when the engine goes in
Many thanks Buster!
-
Brianmoooore

- E30 Zone Team Member

- Posts: 49358
- Joined: Mon Jan 10, 2005 11:00 pm
Try an E34 brake pull rod. I only moved my servo 25mm, and had to thread and shorten the E34 rod, but 60mm and it may not be far out at all at the standard length.
-
buster

- E30 Zone Addict

- Posts: 3779
- Joined: Sun Jan 09, 2005 11:00 pm
- Location: Near middlesbrough,Teesside
yes,i only had to remove a very small amount and i only moved mine 0.5"
With yours over that far you will probably be able to use the e30 master cylinder,but to use it you need to make a spacer for the actuator rod to go inside between the m/s and servo.See the m50 developments thread.
With yours over that far you will probably be able to use the e30 master cylinder,but to use it you need to make a spacer for the actuator rod to go inside between the m/s and servo.See the m50 developments thread.
-
e30325itourer
- E30 Zone Newbie

- Posts: 182
- Joined: Sun Jan 09, 2005 11:00 pm
- Location: belfast norn iron
this is a must for anyone restoring a touring amazing attention to detail you should get on to performance or total bmw 

THE ULTIMATE DRIVING MACHINE
I've been surfing this board for some time, but somehow never came across this restoration. I just spent the last hour reading through from the beginning. Fantastic! This is the sort of obsessive-compulsive job that I would do if I had more money, more time, waaaay more talent, and was borderline insane.
Can't wait to see the final result!
(p.s.: great colour choice)
Can't wait to see the final result!
(p.s.: great colour choice)

-KDS in Vancouver ('88 325i Touring)
As Brian stated, I am going to try an E34 pushrod first before modifying the E30 item. I've had a look at the spacer required for the E30 cylinder to fit the Golf servo and think I can go one better but we'll have to wait and see until the car comes back from the paintshop.
I have made some plates up which will help relocate the servo mounting and reinforce the area around the bulkhead:
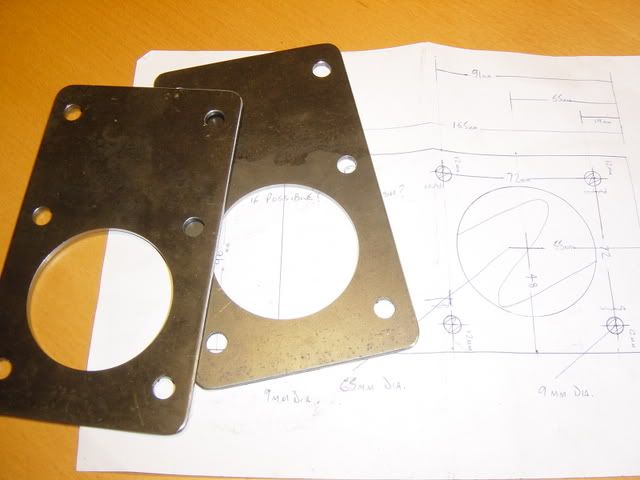
These will have a stud welded through the original part of the bulkhead hole and then be retained by the servo bolts themselves for additional strength. I'm trying to go about this in a way that can be replicated and look factory 'through and through'.
The servo operating pivot which bolots on the inside of the bulkhead also has to be moved over the equivalent amount. For this I am cutting and rewelding the top plate that bolts to the underside of the dashboard metalwork.
All this is really 'under development' but will be plated in goldy colour and finished like an OEM item. No butchery here!
I'm making templates and keeping drawings for all this. Maybe I could help do an article for the forum when it's all complete.
Meanwhile, I took the shell to the paintshop on a trailer, carefully loaded with the telehandler, by mois
I popped in there to drop the new sunroof panel in that had just come from Germany this morning and they had already started on the car. Well, to be fair, they had gone mental on it. It was nearly in bare metal again. All that primer I put on had been taken off ready for a high build coat. When I left I forgot to ask about taking pictures but they phoned me later on this afternoon and tasked ME to come in and take some if I wanted to. A bit of a surprise really! This was how far they had got with it this afternoon:


The 'Camo' look is the sealer coat on top of the primer, these are taken just after the car came out of the oven (I couldn't get there any faster to take the pictures). They resealed the engine bay seams with the spray on stuff aka BMW use and baked the car at 85 degrees C after it was primed just to cure it all. They have also redone all the wheelarches with the same stuff. The oven/spraybooth has an air operated ram that can varying the height of the car as it's being painted, it's also huge. They paint Bentleys from time to time so it has to be!
Now they tell me they are going to paint the entire shell black
Fair play these guys know there stuff. In the background you can see an early Lotus 15, they reckon it's worth 1.2 million
Been a while since I last posted so I guessed it was time for an update 
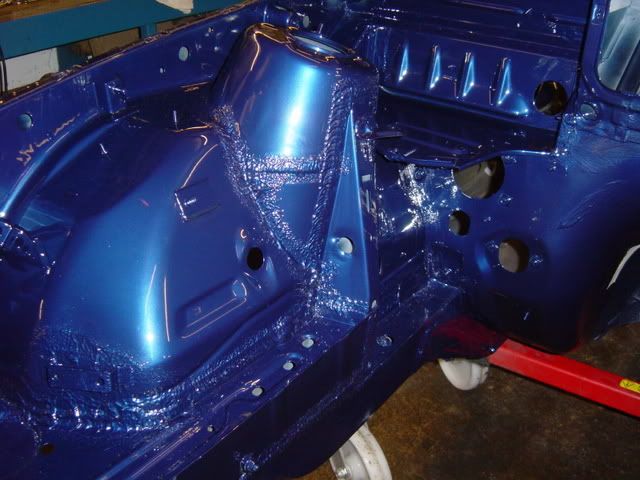
The shell is now painted and waiting to be flatted and polished before they'll let me have it back. The last coat of lacquer went down tonight and I was invited in to take some more pictures.
When I walked into the paint oven I was grinning like a Cheshire cat as you can imagine.

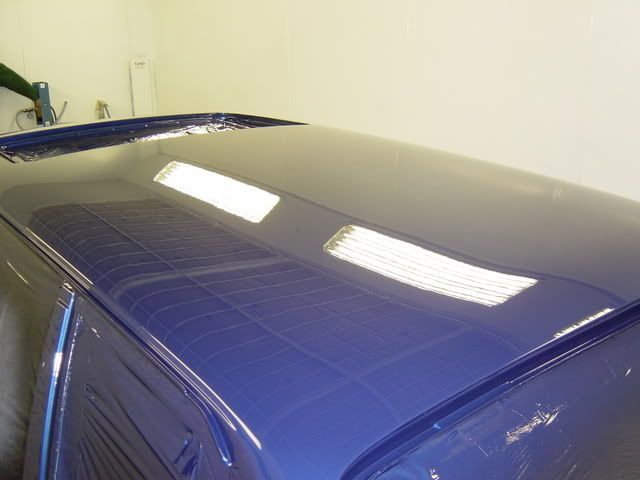
The pearl in the paint really gives it a nice tint. Just as importantly the painters are over the moon with the way it's come out
I think it's an awesome colour in it's own right and I think it will suit the look that I've got in mind for the car too.
Opinions???
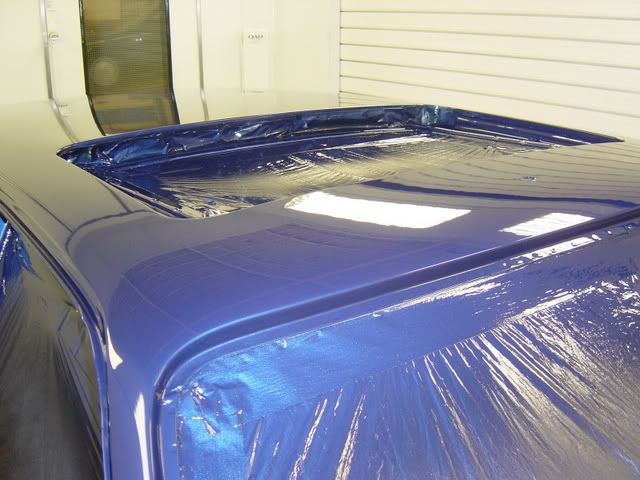
The shell is now painted and waiting to be flatted and polished before they'll let me have it back. The last coat of lacquer went down tonight and I was invited in to take some more pictures.
When I walked into the paint oven I was grinning like a Cheshire cat as you can imagine.
The pearl in the paint really gives it a nice tint. Just as importantly the painters are over the moon with the way it's come out
I think it's an awesome colour in it's own right and I think it will suit the look that I've got in mind for the car too.
Opinions???
Mmmm. Yum. And that's even before flat sanding/polishing! Paint always looks so fantastic fresh out of the booth, even before the masking comes off...
You realize, of course, that anything less than all brand-new trim will look nasty next to that perfect paint? Cha-ching!
You realize, of course, that anything less than all brand-new trim will look nasty next to that perfect paint? Cha-ching!
-KDS in Vancouver ('88 325i Touring)
-
Royalratch

- E30 Zone Addict
- Posts: 4921
- Joined: Sat Oct 21, 2006 11:00 pm
- Location: London
All new seals for everything too - don't want to put anything rotten on that!
Will be worth it tho...
Will be worth it tho...


You realize, of course, that anything less than all brand-new trim will look nasty next to that perfect paint? Cha-ching!
Yup, all new, no turning back nowAll new seals for everything too - don't want to put anything rotten on that!
It's coming home tomorrow so hopefully I can get a few bits back together this weekend and take some better pics.
-
Andy335Touring
- Married to the E30 Zone
- Posts: 7144
- Joined: Sun Jan 09, 2005 11:00 pm
- Location: Long Eaton,Nottingham
- Contact:
Very 
Which colour is it, from which type of car ?
Which colour is it, from which type of car ?
-
ian332isport
- E30 Zone Team Member
- Posts: 5380
- Joined: Wed Dec 22, 2004 11:00 pm
- Location: West Sussex
- Contact:
Dameon,
This is looking superb. It's going to be a pleasure helping to get this one running
Ian.
This is looking superb. It's going to be a pleasure helping to get this one running
Ian.
If it aint broke - Modify it...
Thanks Ian, I'm gonna need all the help I can get to make the best of the S50 and all the wiring. You and Buster, and the rest of the zone have already been of great help and I will go as far as to say that otherwise I probably wouldn't have considered it 
Before anyone says; yes, that colour code is right, the new colour codes are not just three digit numerical ones now apparently
anyone from the zone is welcome to pop in for tea and crumpets while she's "under construction" and when eventually finished I'll be attending some shows and sharing her.
The painter hopes it gets mag featured to add to his collection The only time a car of mine has ever featured in a magazine, it was in the classifieds
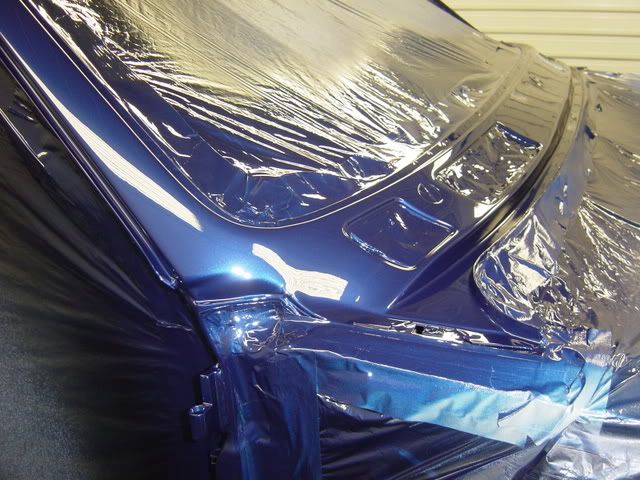
It's BMW Interlagos blue dude, BMW colour code A30 - the new colour for the Z4 M Coupe. I saw one in the dealer showroom last week and knew that was the colourVery
Which colour is it, from which type of car ?
No need for that matesimple deeeeeeeeeeelicious m8!! i envy you.
The painter hopes it gets mag featured to add to his collection
-
Andy335Touring
- Married to the E30 Zone
- Posts: 7144
- Joined: Sun Jan 09, 2005 11:00 pm
- Location: Long Eaton,Nottingham
- Contact:
How does it compair with Estoril(sp?) blue you get on a lot of E36 M3's ?
In the pictures it looks a bit like estoril does in the flesh albeit not as cold. If that makes sense. In reality the Interlagos is more of a red/purpley flip. It sounds daft, but it just looks like an M colourAndy335Touring wrote:How does it compair with Estoril(sp?) blue you get on a lot of E36 M3's ?
Unfortunately under flourescent lights and with the flash the camera doesn't do it justice.
Last edited by WillG on Fri Jan 19, 2007 5:10 pm, edited 2 times in total.
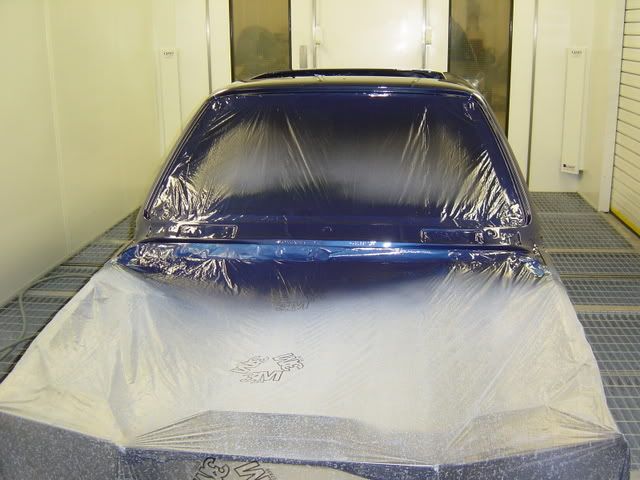
Well, she's back now. It took most of the afternoon to get it loaded and tied down to the trailer and bought back here as carefully as possible. It's tucked up nice and warm now and covered in the finest virgin 3m polythene
Just another pic to better show the colour and finish.
Now, where do I start?
Just another pic to better show the colour and finish.
Now, where do I start?

-
Simon13
- The longest resto in the world !
- Posts: 22697
- Joined: Mon Jan 10, 2005 11:00 pm
- Location: Camberley, Surrey don't u know
I'm lost for words, what a hero you are! But some questions from a novice if you don't mind?! Have they sprayed the sun roof, tail gate, doors, bonnet etc off the car? I've been told this by other people as it gives the sprayers a chance to get a better finish. So you did all the rust removal, welding before hand aswell, so all they had to do was was prep and paint right?
I would help if i could but the help you need is off more gifted folks on here!
That spray job looks simply superb as does the colour too. The way your going i can see a Gaydon finale if the funds keep coming.
I'd say you know it's a good job if the guys doing the work recon it's come out well! people who do the job day in day out rarely think at the end of the day that the job came out well enough for them to tell the customer!
Is the spray job costing big dollar or not? I'm interested because i'm building myself up to do this as you know!
Simon not sure how relevant this is but i have also experienced the same in a main dealership with a bodyshop. For example a car comes in needing 2 new doors and a side respraying on it. You supply them with the doors, the fit them up, make sure everything lines up etc etc. Then take them back off, spray them individually then spray the side of the car, then re attach the doors to the car. I think they were quite a good bodyshop and it seems the logical way of getting the best finish. This obviously costs a fair bit and hence 95% of jobs are insurance ones.
Old Skool - seriously bloody
Old Skool - seriously bloody
-
TouringMatt
- E30 Zone Camper

- Posts: 1188
- Joined: Mon Jan 10, 2005 11:00 pm
- Location: Not where i should be
I read a lot of projects on a whole host of different forums, apart from the fact i have a keen interest with it being a Touring this has to be the best one i have ever read.
The quality of work, the fact you are doing the vast majority of it yourself, the speed its evolving and the detail and photo work is just spot on
Added to that you've helped me (and no doubt others) out with advice and supplies
Good work dude - this thread just gets better every time i read it
Matt