
325i Touring restoration "the wrong way around"
Moderator: martauto

Not atall on the location thing, takes 15 min to get to quedegley from golden valley which is where I live so not bad atall, I used to work on the ashchurch mod camp its about the same as that. The car was just getting painted in tewkesbury but they said I could put it all back together there aswell so that a bonus otherwise I would be doing it outside on my drive.old_skool_2002 wrote:Hey WillG,
Thanks, I'm between Cheltenham and Tewkesbury. Hope you don't mind if I don't say exactly where.
Must a pain travelling up to Quedgeley everyday, but I guess the new motorway junction at 13 is a bonus.
Thankfully I'm doing mine at home so I can just nip out and have a go at the weekends. Lucky really, if I get fed up with it I can throw in the towel for the day and lock up behind me and it's all in the same place when I decide to have another go.
Update to follow shortly
How did the paintwork go dude?
Cars painted 2 pics I leaft before he finished so its only through doors


you can see how I am mounting the intercooler its quite fat and I had to do this so I didnt have to cut into bumper or plastic valance or loose a headlight.
-
EThreezero
- E30 Zone Camper

- Posts: 1008
- Joined: Mon Jun 20, 2005 11:00 pm
- Location: Central Caledonia
Waaaaaahhhold_skool_2002 wrote:Well, if only you were closer - there's room for another two in here dude

*******MERC E240 BREAKING..1998...LEATHER...ALL PARTS*******
-
EThreezero
- E30 Zone Camper
- Posts: 1008
- Joined: Mon Jun 20, 2005 11:00 pm
- Location: Central Caledonia
old_skool_2002 wrote:Besides, that touring of yours looks the tits (that means the gorgeous where I come from - no offence meant)
*******MERC E240 BREAKING..1998...LEATHER...ALL PARTS*******
mounting the intercooler
Hmmm....me thinks you use turbo to make car go faster master
Yikes, that's a thorough strip down for the paintwork. Nice to see that I'm not the only loony chucking cash at a tourer
Mods: we need a restoration category for nutters like us who are no good at Playstation games and a passion for shiny old BMW's
Last edited by old_skool on Sat Oct 21, 2006 8:41 pm, edited 1 time in total.
Hey Tiger,Waaaaaahhh What an offer When it comes to being a zone member or should i say when it comes to the un-poastable stuff and services available on the zone, i sometimes get pissed off with being away up here so far away from you all you genuine gents way doon there Cheers for even saying it dude im fillin up
Don't sweat, it still looks the tits to me
Besides Rome wasn't built in a day, if it was then they used Polish contractors
Don't fill up - No problemo, anytime you fancy coming down to the lower portion of the galaxy then look me up for a coffee, or a Budweiser. mmmmmmmmmm........bbbbeeeeeerrrrrrr...
Right then,
So - I'm sorry about last weeks shoddy post regarding progress. One thousand lashes for me
This week a few things have come together, namely, I have finished the rear calipers ( sounds like a minor achievement but they have taken some time) and also the diff.
I painted the calipers last week and left them to air dry and harden after the episode with my diesel powered paint oven - long story.
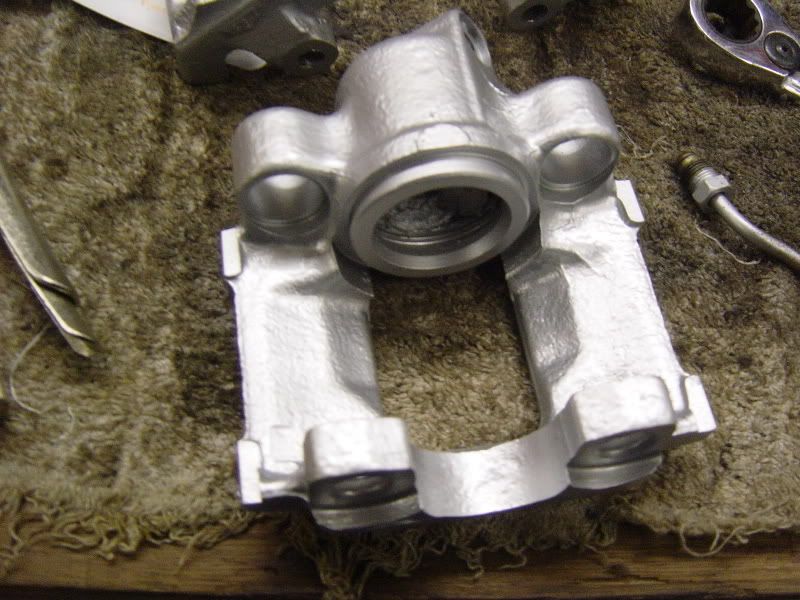
So the first job of the day was to relieve the threads of paint, sandblasting grit and 16 years of crud
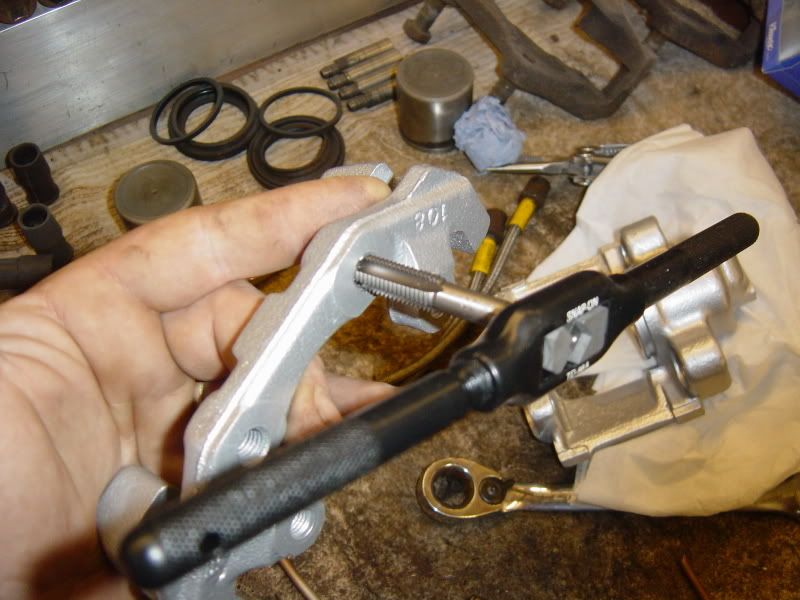
The threads, interstingly, are M10 x 1.5mm for the main caliper bolts, and M9 x 1.25 for the sliders. Bet you wanted to know that
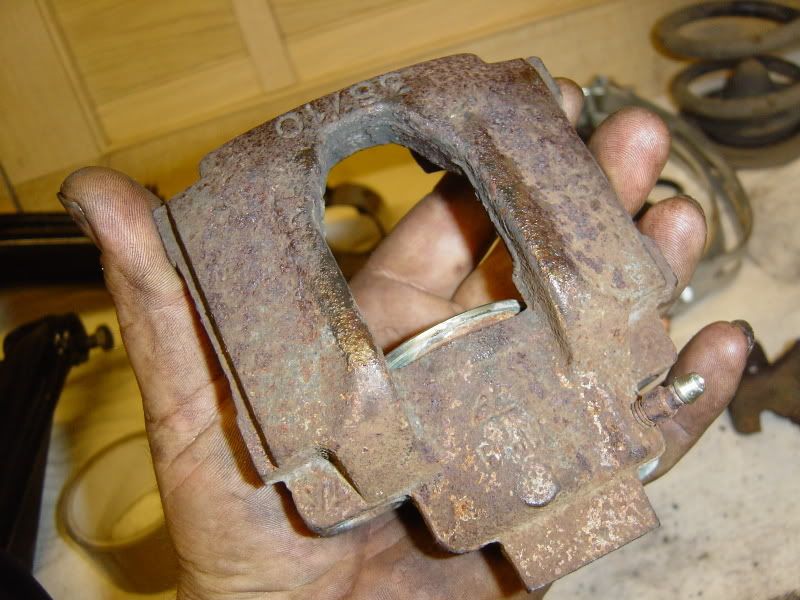
Unfortunately, the cleaning up didn't stop there. The calipers themselves need the seal grooves cleaning of all the hard baked brakedust and corrosion that has built up over the years otherwise new seals won't prove their point for long. My brother is a professional spanner handler and reckons I am mentally deranged to spend so much time on this sort os stuff. But a few moments with Mr. Dremel pay dividends:
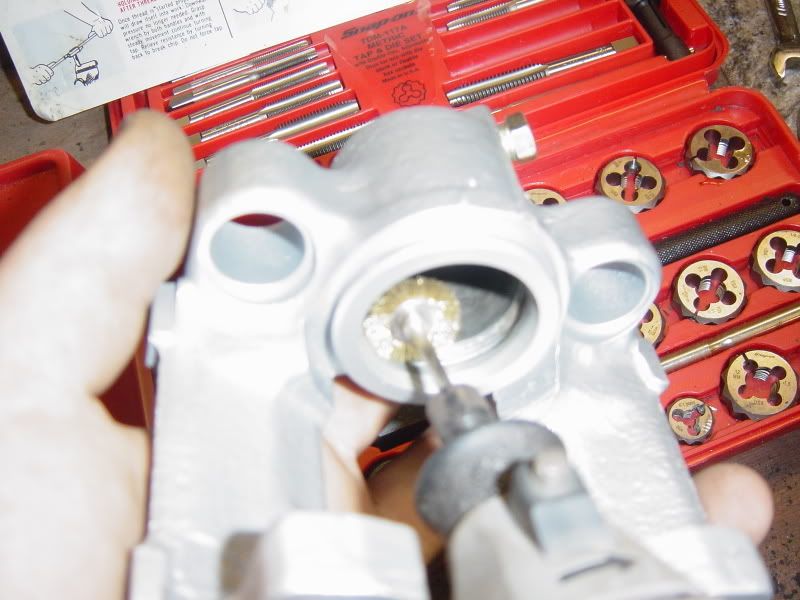
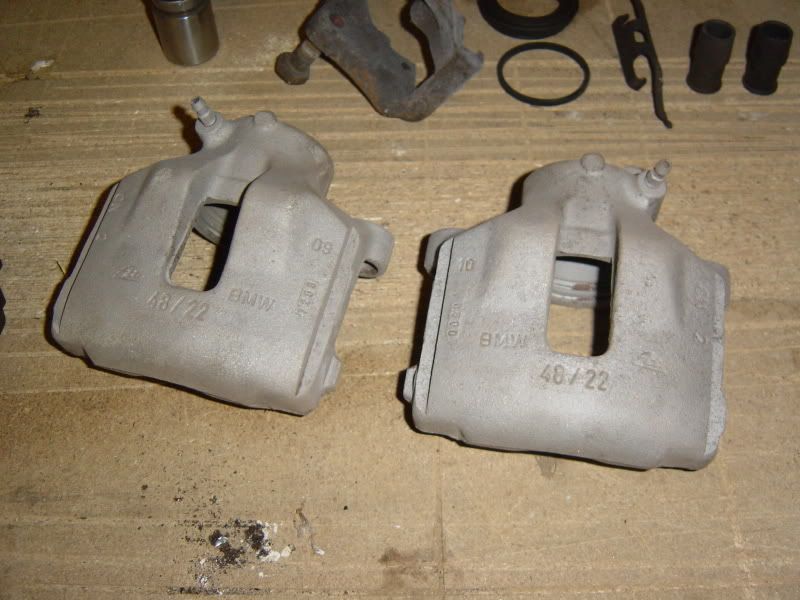
So, the calipers are ready for new seals. That leaves the pistons themselves. Beware, a piston may look shagged but a few minutes with some scotchbrite pad and a flat sanding block for the pad face can make all the difference.
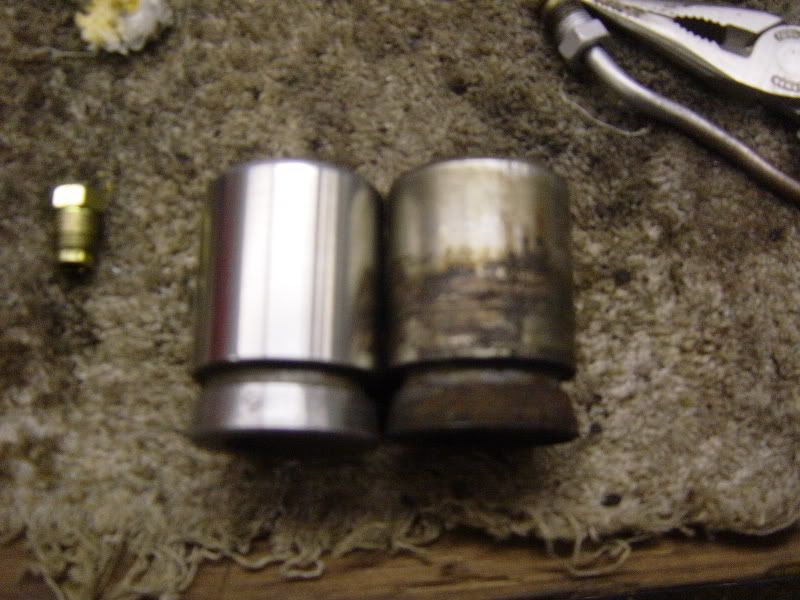
Sorry it's out of focus, not sure how to do macro photos but you get the idea.
Although the rear assembly isn't finished I though I'd try a dry run with the assembly just for the sake of a photo.
This is what the calipers looked like before
And the discs
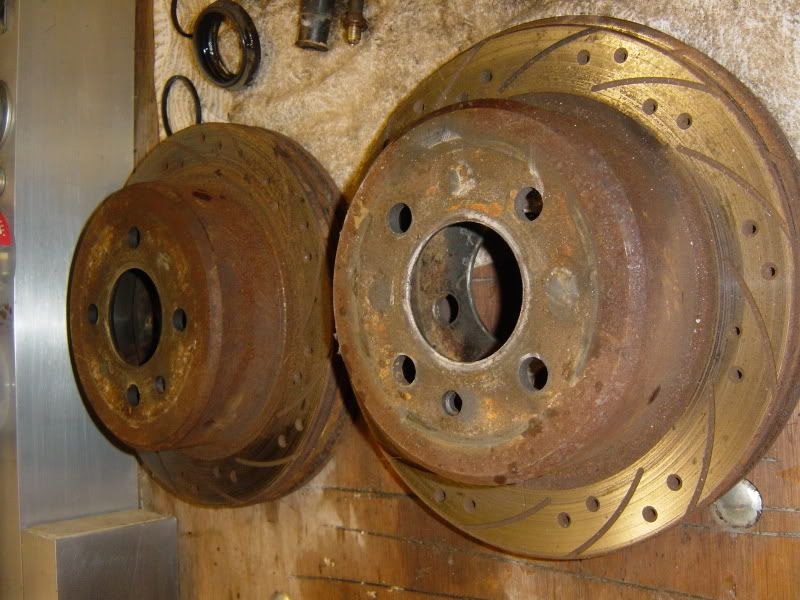
Well here's the difference

And,

More later
So - I'm sorry about last weeks shoddy post regarding progress. One thousand lashes for me
This week a few things have come together, namely, I have finished the rear calipers ( sounds like a minor achievement but they have taken some time) and also the diff.
I painted the calipers last week and left them to air dry and harden after the episode with my diesel powered paint oven
So the first job of the day was to relieve the threads of paint, sandblasting grit and 16 years of crud
The threads, interstingly, are M10 x 1.5mm for the main caliper bolts, and M9 x 1.25 for the sliders. Bet you wanted to know that
Unfortunately, the cleaning up didn't stop there. The calipers themselves need the seal grooves cleaning of all the hard baked brakedust and corrosion that has built up over the years otherwise new seals won't prove their point for long. My brother is a professional spanner handler and reckons I am mentally deranged to spend so much time on this sort os stuff. But a few moments with Mr. Dremel pay dividends:
So, the calipers are ready for new seals. That leaves the pistons themselves. Beware, a piston may look shagged but a few minutes with some scotchbrite pad and a flat sanding block for the pad face can make all the difference.
Sorry it's out of focus, not sure how to do macro photos but you get the idea.
Although the rear assembly isn't finished I though I'd try a dry run with the assembly just for the sake of a photo.
This is what the calipers looked like before
And the discs
Well here's the difference
And,
More later
-
Andy335Touring
- Married to the E30 Zone

- Posts: 7144
- Joined: Sun Jan 09, 2005 11:00 pm
- Location: Long Eaton,Nottingham
- Contact:
Cool, it's amazing how the parts bill racks up when your really thorough, like the slider allen bolts costing about 35 quid for a set(pair of calipers).
Which reminds me i need to order 4 bleed nipples as i had to mangle one of them to crack it open

Which reminds me i need to order 4 bleed nipples as i had to mangle one of them to crack it open
still loving this project mate
top quality the way it should be done
keep ip the good work
oh and if you do sell the front calipers and the trailing arms i may well be interested gimme a shout
Daz
top quality the way it should be done
keep ip the good work
oh and if you do sell the front calipers and the trailing arms i may well be interested gimme a shout
Daz
www.oldskoolfantasy.co.uk
in the shit,the one to blame,yeh its all my fault ;)
in the shit,the one to blame,yeh its all my fault ;)
Firsy dibs mate. Can't post part two of today's progress - gotta watch X factor, I'd rather go to the dentistoh and if you do sell the front calipers and the trailing arms i may well be interested gimme a shout
-
Andy335Touring
- Married to the E30 Zone
- Posts: 7144
- Joined: Sun Jan 09, 2005 11:00 pm
- Location: Long Eaton,Nottingham
- Contact:
No, but i've still got the old ones if any one wants to refurb them, not thats theres any thing wrong with them that a clean up wont sort, i got the new ones in before i started the job just incase the old ones were mankyold_skool_2002 wrote:
If you need sliders I've got shiny spare ones
-
Andy335Touring
- Married to the E30 Zone
- Posts: 7144
- Joined: Sun Jan 09, 2005 11:00 pm
- Location: Long Eaton,Nottingham
- Contact:
Well, as you know i had to mess about with the bearing to change the back plate on one side, well the other side is OK at the mo so i've not changed it, but now i've done one i know whats needed so if i have to do the other side it's not such a big deal.
The hand brake and the rear brakes are fine and bedded in, the wheel bearing is silent so i didn't damage it on re-fitting it thank god !
The main objective was to get the hand brake sorted for the MOT which is due soon.
The hand brake and the rear brakes are fine and bedded in, the wheel bearing is silent so i didn't damage it on re-fitting it thank god !
The main objective was to get the hand brake sorted for the MOT which is due soon.
-
Andy335Touring
- Married to the E30 Zone
- Posts: 7144
- Joined: Sun Jan 09, 2005 11:00 pm
- Location: Long Eaton,Nottingham
- Contact:
What, you mean my bodgy wood tools/etc ?
-
Andy335Touring
- Married to the E30 Zone
- Posts: 7144
- Joined: Sun Jan 09, 2005 11:00 pm
- Location: Long Eaton,Nottingham
- Contact:
LOL, ,wooden tools, this is copied from my other thread
_________________________________________________________
First off, i'd like to say thank you to all you folks that have helped me out as it's muchly appreciated !
After much sweat and bruised nucles/fingers the hubs off, one inner race removed from hub and the other inner and the outer have been removed from the trailing arm.
As it was a week day i couldn't get any one to help so i had to substitute the mate pulling on two levers idea for using the wheel nuts and some assorted junk.

I also made some thing to hold the socket in place so i could hit it with the sledge hammer, the hub would only move from the bearing with the wheel nuts bodge AND the sledge hammer, lump hammer is


The inner race that was stuck on the hub was a bugger because you can't get behind it to drive it off, i tried heating but it wouldn't budge so i Dremeled/ginded a grove through the race instead and it popped off easy.
Same goes for the outer race in the trailing arm, it wasn't budging with a lump hammer and socket. When i'd finished grinding a grove in the race i could easily just lever it out with a screw driver.
The hub and the remains of the old races.

Thats all i managed to do this afternoon, i've still got to replace the back plate and i'm waiting for the new bearing to come in, touch wood i can get it all sorted for the Donny show on Sunday.
_________________________________________________________________________________________________
Nearly there, new back plate and bearing fitted, i've got to sort the new shoes/discs/handbrake out and i've got to blead that brake line because the flexy pipe has to come off.
BTW, thats not rust, it's copper slip

_________________________________________________________________________________________________
This is another wooden tool for pulling the hub in to the bearing

_________________________________________________________________________________________________
A picy for referance
A = hub
B = inner bearing race(1 of 2)
C = outer bearing race

_________________________________________________________
First off, i'd like to say thank you to all you folks that have helped me out as it's muchly appreciated !
After much sweat and bruised nucles/fingers the hubs off, one inner race removed from hub and the other inner and the outer have been removed from the trailing arm.
As it was a week day i couldn't get any one to help so i had to substitute the mate pulling on two levers idea for using the wheel nuts and some assorted junk.
I also made some thing to hold the socket in place so i could hit it with the sledge hammer, the hub would only move from the bearing with the wheel nuts bodge AND the sledge hammer, lump hammer is
The inner race that was stuck on the hub was a bugger because you can't get behind it to drive it off, i tried heating but it wouldn't budge so i Dremeled/ginded a grove through the race instead and it popped off easy.
Same goes for the outer race in the trailing arm, it wasn't budging with a lump hammer and socket. When i'd finished grinding a grove in the race i could easily just lever it out with a screw driver.
The hub and the remains of the old races.
Thats all i managed to do this afternoon, i've still got to replace the back plate and i'm waiting for the new bearing to come in, touch wood i can get it all sorted for the Donny show on Sunday.
_________________________________________________________________________________________________
Nearly there, new back plate and bearing fitted, i've got to sort the new shoes/discs/handbrake out and i've got to blead that brake line because the flexy pipe has to come off.
BTW, thats not rust, it's copper slip
_________________________________________________________________________________________________
This is another wooden tool for pulling the hub in to the bearing
_________________________________________________________________________________________________
A picy for referance
A = hub
B = inner bearing race(1 of 2)
C = outer bearing race
Ok, part two!
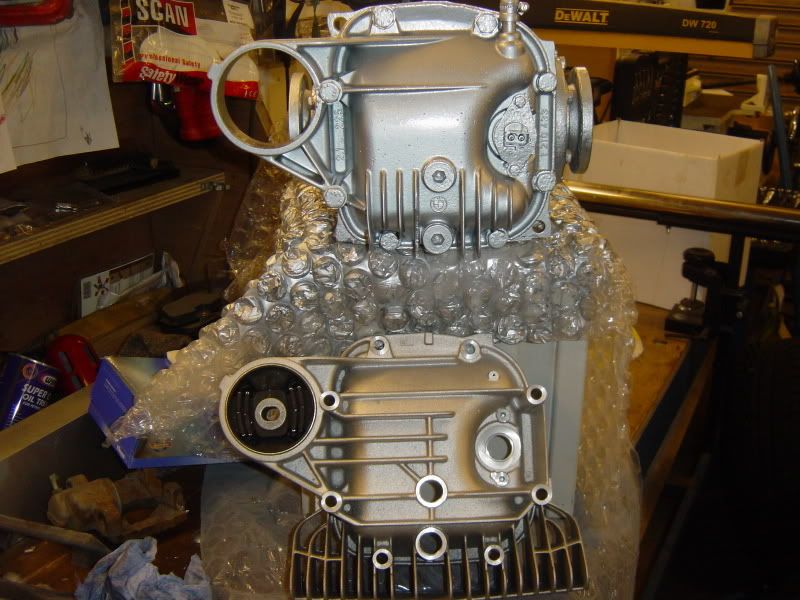
The diff is lacquered and nearly ready for refitting:
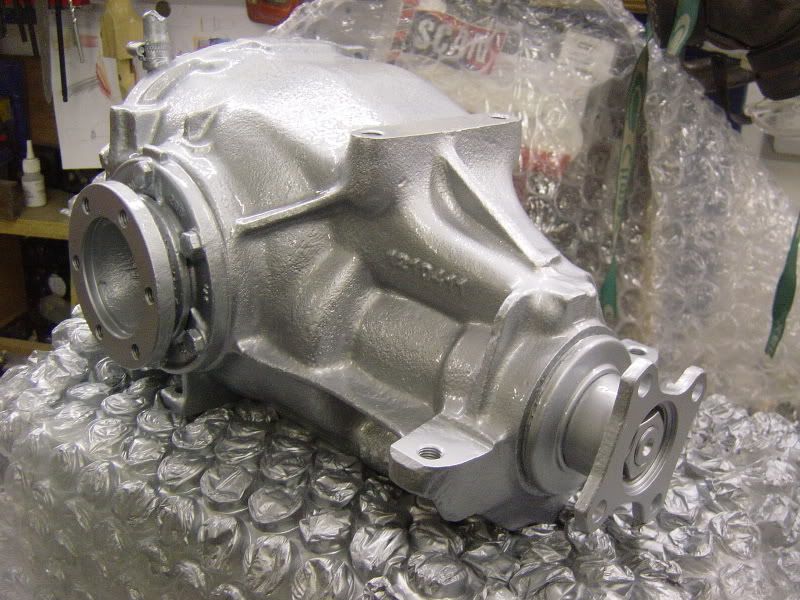
I decided that even though the diff was finally finished - it needed that something more. So I had a troll through the etk to find the mythical read diff cover used on other models. Trouble is, my memory is crap so I had to wing it a bit. I went to the local dealer who has a very very nice man in the parts dept. (Cheers Paul) and we came up with the rear cover for a Z3 M3 roadster...
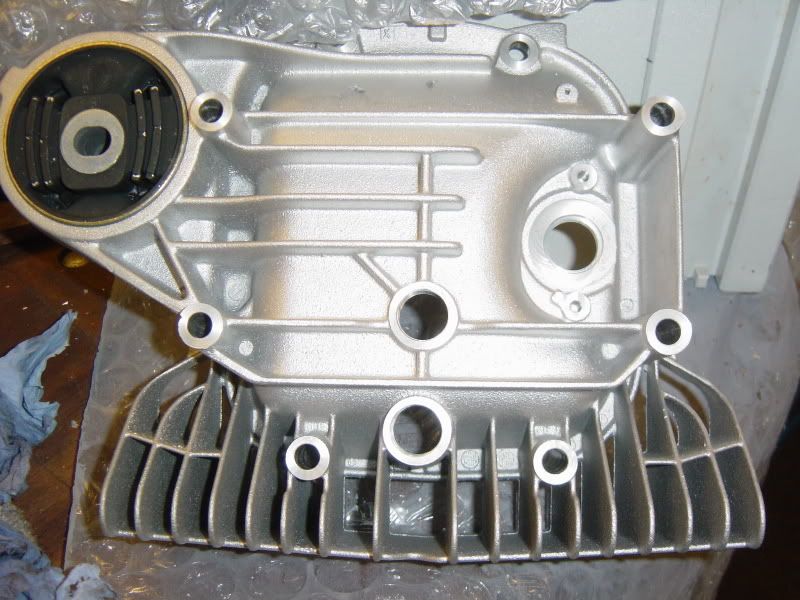
mmmmm.... lovely! The cover is identical in every way although the bolt lengths are different to cope with the added bulk to create the fins around the sides and rear. New bolts have been ordered and a new gasket and speed sensor mounting thingamygig.
Here's the rear of my existing LSD compared with the new cover.
Just to de mystify this for anyone who wants to do the rear cover - the cover is supplied from BMW bare, the only part supplied (fitted) is the bush which is much stronger than the standard E30 type. Don't know whether that's good or bad, but it is much stiffer.
So, I have ordered all the bits to fit the cover and hopefully next week I can install it.
Still no luck in finding an E46 M3 to use as a donor but there is hope. Next job is to finish and "quality control" what I have done and move on to the rear suspension. Inc. Roll bar mounts, trailing arm reinforcements and springs... Long way from finished yet
The diff is lacquered and nearly ready for refitting:
I decided that even though the diff was finally finished - it needed that something more. So I had a troll through the etk to find the mythical read diff cover used on other models. Trouble is, my memory is crap so I had to wing it a bit. I went to the local dealer who has a very very nice man in the parts dept. (Cheers Paul) and we came up with the rear cover for a Z3 M3 roadster...
mmmmm.... lovely! The cover is identical in every way although the bolt lengths are different to cope with the added bulk to create the fins around the sides and rear. New bolts have been ordered and a new gasket and speed sensor mounting thingamygig.
Here's the rear of my existing LSD compared with the new cover.
Just to de mystify this for anyone who wants to do the rear cover - the cover is supplied from BMW bare, the only part supplied (fitted) is the bush which is much stronger than the standard E30 type. Don't know whether that's good or bad, but it is much stiffer.
So, I have ordered all the bits to fit the cover and hopefully next week I can install it.
Still no luck in finding an E46 M3 to use as a donor but there is hope. Next job is to finish and "quality control" what I have done and move on to the rear suspension. Inc. Roll bar mounts, trailing arm reinforcements and springs... Long way from finished yet
Last edited by old_skool on Sat Oct 21, 2006 10:52 pm, edited 1 time in total.
-
Andy335Touring
- Married to the E30 Zone
- Posts: 7144
- Joined: Sun Jan 09, 2005 11:00 pm
- Location: Long Eaton,Nottingham
- Contact:
Looking good mate, i've got the Z3M dif bush but not the cover on mine
Andy, what's your opinion of the bush, was my old one knackered or is the Z3 item really that much stiffer?Looking good mate, i've got the Z3M dif bush but not the cover on mine
P.s. Does anyone know of an E46 3.2 SMG fitted into an E30 tourer?

-
Andy335Touring
- Married to the E30 Zone
- Posts: 7144
- Joined: Sun Jan 09, 2005 11:00 pm
- Location: Long Eaton,Nottingham
- Contact:
It's got less cut outs in the rubber and some metal reinforcements(sp?) so it should be stronger, i didn't fancy using polly bushs on mine as it's a road car

-
Andy335Touring
- Married to the E30 Zone
- Posts: 7144
- Joined: Sun Jan 09, 2005 11:00 pm
- Location: Long Eaton,Nottingham
- Contact:
Just make sure you have about two days free to read it all !!!!!!!maxfield wrote:Get readfing all the help you will ever need
http://forum.e46fanatics.com/showthread.php?t=359200
-
Simon
- E30 Zone Team Member

- Posts: 14939
- Joined: Sun Jan 09, 2005 11:00 pm
- Location: South Wales
- Contact:
I take it you missed my post on page 1 then!old_skool_2002 wrote:Ok, part two!
I decided that even though the diff was finally finished - it needed that something more. So I had a troll through the etk to find the mythical read diff cover used on other models. Trouble is, my memory is crap so I had to wing it a bit. I went to the local dealer who has a very very nice man in the parts dept. (Cheers Paul) and we came up with the rear cover for a Z3 M3 roadster...

No, but yea, but no but........get an M-coupe rear cover
Simon I did see that but I didn't realise that you meant a Z3M roadster. I took M coupe to mean a two door E36?
Either way, it's here now. Just got to get the bolts and other bits fit it up.
Ok, this morning I'm going to start makng the modified bits for the trailing arm mounts and the rear roll bar mountings. I'm making the steel work here but the roll bar to chassis mounts are going to be machined from aluminium.
This is a before pic of my work area
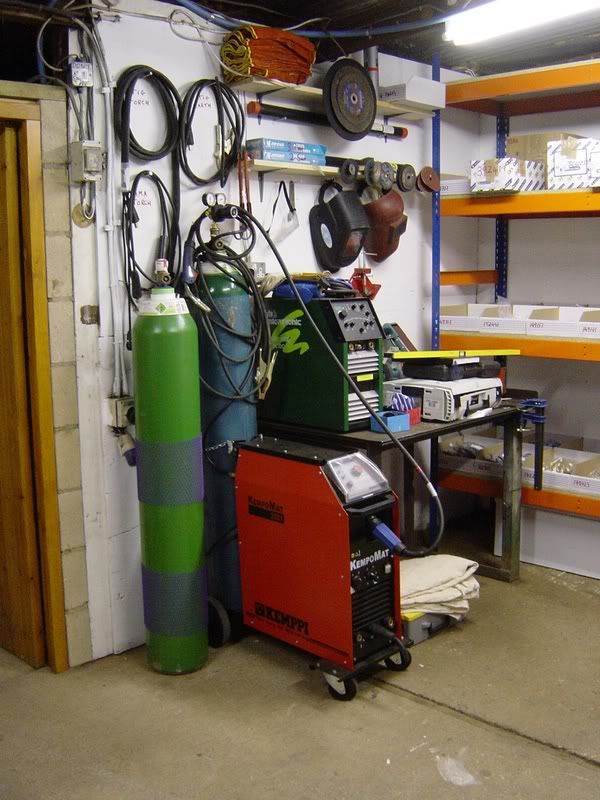
More photos tonight
This is a before pic of my work area
More photos tonight
very tidy setup you have there, this rear ARB is going to be intresting, will have to meet up when mines done, my car is next door to AMS/KTM motorcyles just round the corner from BMW dealers and race shack, welcome to have a look anytime
Cheers Will,
I know AMS well, haven't been to their new place yet though - thanks for the invite, I'll take you up on that. Maybe drop out to mine for a beer and have a look at my 'project' some time.
I know AMS well, haven't been to their new place yet though - thanks for the invite, I'll take you up on that. Maybe drop out to mine for a beer and have a look at my 'project' some time.
Change of plan this afternoon, promised to make a rocket launcher so the fabrication dept. had to be reassigned
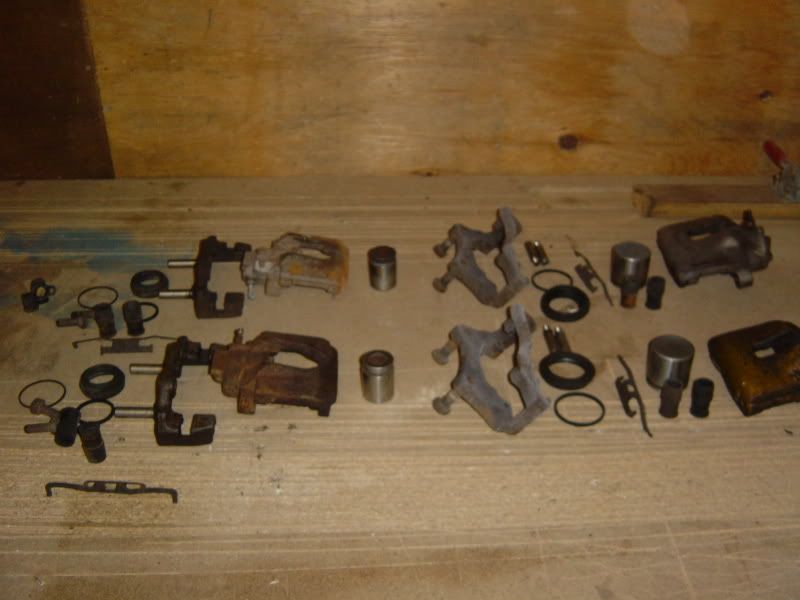
Had a little time left over and thought I would carry on with rebuilding the spare set of late type ATE 325 brakes that I've got left over. Maybe once they're rebult I can sell them on and put a little cash back in the project purse.
This is the entire component level detail of the front and rear setup (in glorius out of focus super mariovision):
More sandblasting in progress:
I have made some modifications to the sandblasting cabinet to make the whole process a little slicker. I had a revelation earlier when I blasted a caliper bracket. I had sprayed the bracket with WD40 last week to stop it rusting any more and when I went to reblast it today the crud comes away much easier. Even the leathery stuff thats normally tough to remove. I also rigged a dust extractor (bloody big hoover) to the air outlet on the cabinet and created a light vacuum inside. This keeps the visibility up when blasting and stops the cabinet from bellowing dust. With the extractor running on slow speed I can now see what I'm doing. I reckon all this has speeded up the process by 40%. Life's a learning curve.
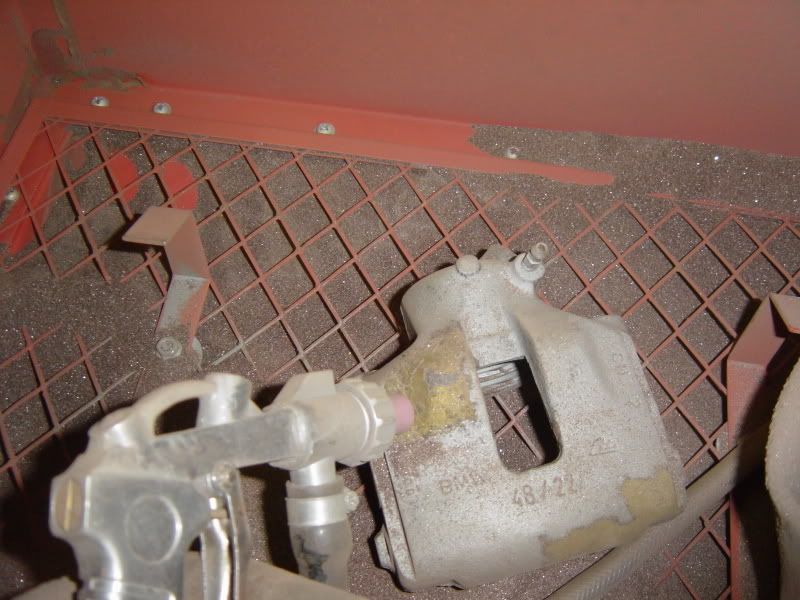
Two front calipers ready to prime:
So I'll get to paint all of this next week and will rebuild them as on the previous pages. When they're ready I'll post them up.
Other minor achievements today.
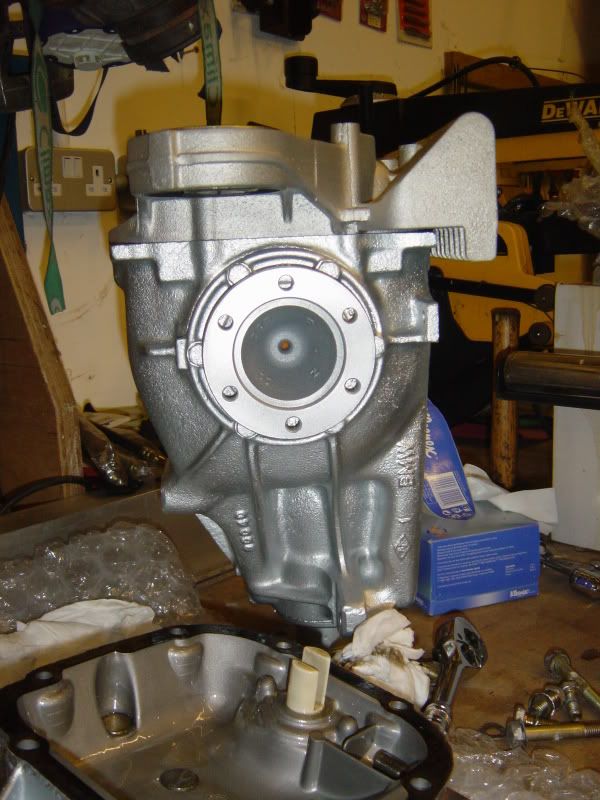
I removed the old diff cover. Didn't bother draining the oil - just stood the diff on it's nose for ten minutes first:
(going to need some more image hosting at this rate - how much can you squeeze on photobucket?)
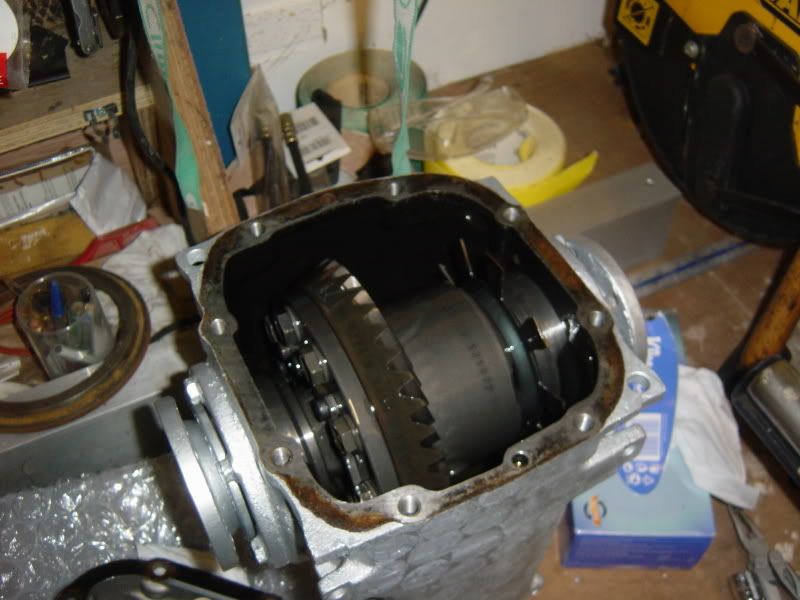
No visible signs of wear or debris inside
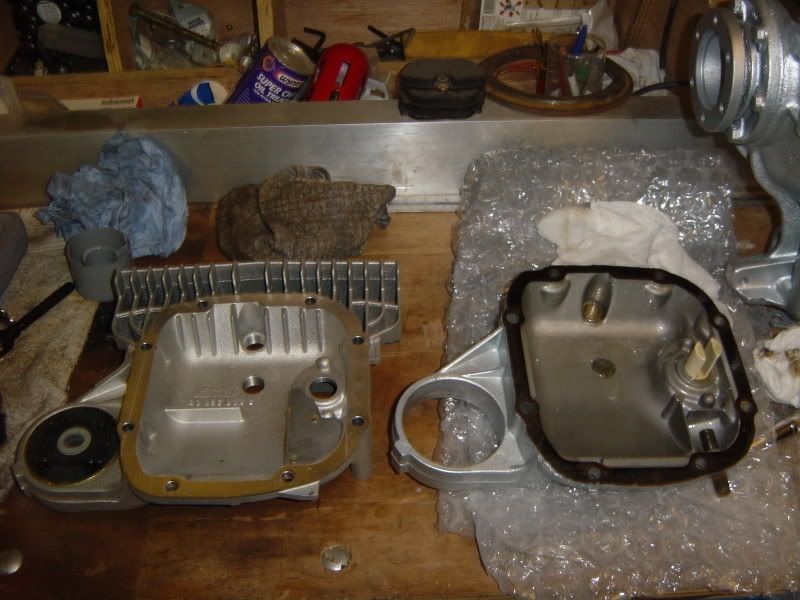
Note the breather is a different layout on the new cover
New cover roughly in place:
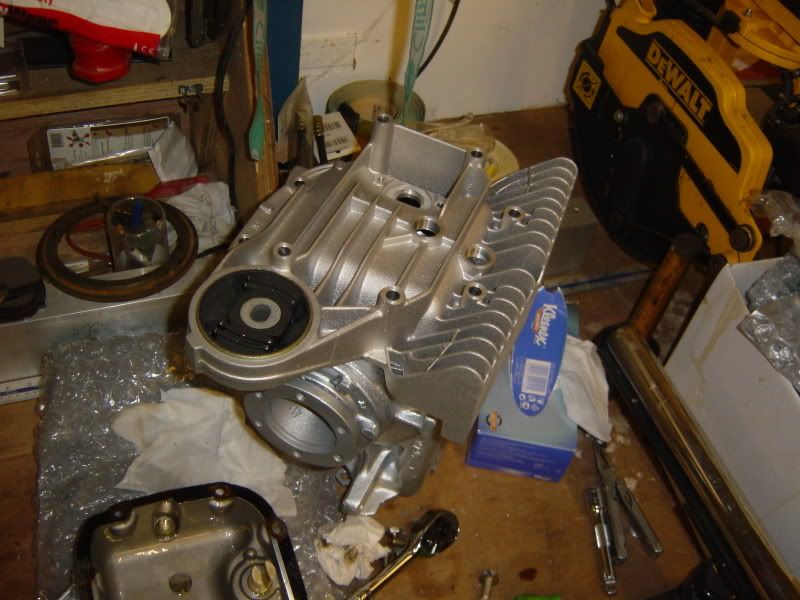
Side view of cover in fitted position - the cover sits 38mm lower then the original. Better watch out for sleeping policemen
Had a little time left over and thought I would carry on with rebuilding the spare set of late type ATE 325 brakes that I've got left over. Maybe once they're rebult I can sell them on and put a little cash back in the project purse.
This is the entire component level detail of the front and rear setup (in glorius out of focus super mariovision):
More sandblasting in progress:
I have made some modifications to the sandblasting cabinet to make the whole process a little slicker. I had a revelation earlier when I blasted a caliper bracket. I had sprayed the bracket with WD40 last week to stop it rusting any more and when I went to reblast it today the crud comes away much easier. Even the leathery stuff thats normally tough to remove. I also rigged a dust extractor (bloody big hoover) to the air outlet on the cabinet and created a light vacuum inside. This keeps the visibility up when blasting and stops the cabinet from bellowing dust. With the extractor running on slow speed I can now see what I'm doing. I reckon all this has speeded up the process by 40%. Life's a learning curve.
Two front calipers ready to prime:
So I'll get to paint all of this next week and will rebuild them as on the previous pages. When they're ready I'll post them up.
Other minor achievements today.
I removed the old diff cover. Didn't bother draining the oil - just stood the diff on it's nose for ten minutes first:
(going to need some more image hosting at this rate - how much can you squeeze on photobucket?)
No visible signs of wear or debris inside
Note the breather is a different layout on the new cover
New cover roughly in place:
Side view of cover in fitted position - the cover sits 38mm lower then the original. Better watch out for sleeping policemen