
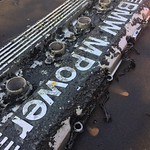
Something definitely could be done, but because it’s the top thread being too long, it means I will lose the caphead to install/remove them. I just don’t want to modify such a component at this stage of the build, so rather wait a week and get new!
S38B36 Laguna Touring
Moderator: martauto
-
lellis
- E30 Zone Regular

- Posts: 400
- Joined: Tue Sep 02, 2014 11:00 pm
- Location: Nottingham
S38 swapped E30 Touring - In Progress..
E36 318IS Coupe
E38 740i
Instagram: http://Instagram.com/bad_e30
Build Thread: viewtopic.php?f=25&t=272997
Youtube: https://www.youtube.com/c/BadE30

E36 318IS Coupe
E38 740i
Instagram: http://Instagram.com/bad_e30
Build Thread: viewtopic.php?f=25&t=272997
Youtube: https://www.youtube.com/c/BadE30
-
lellis
- E30 Zone Regular
- Posts: 400
- Joined: Tue Sep 02, 2014 11:00 pm
- Location: Nottingham
New ARP head bolts arrived, installed straight away using oem torque specs.

Over the years of trying to safely store these, they have been knocked about and swapped around so I have no idea on where they were from. Now the shims will have needed to be done anyway as new valves and seats. However the buckets were more important. After checking all bores and buckets diameter, I was happy that all were within spec and not an issue to mix.

With the intermediate head in place (no seals or sealant as it will be removed again). Installed everything ready for PTV clearance checks. Angle gauge made for incrementing.


Now waiting on my cam sprockets to come back from the machine shop. So lets carry on with other tasks.


Foam and glue removed. Picked up some fabric and adhesive, now the black sport headliner material is not available, so I went with alcantara, a bit unsure on how it will look..

Over the years of trying to safely store these, they have been knocked about and swapped around so I have no idea on where they were from. Now the shims will have needed to be done anyway as new valves and seats. However the buckets were more important. After checking all bores and buckets diameter, I was happy that all were within spec and not an issue to mix.
With the intermediate head in place (no seals or sealant as it will be removed again). Installed everything ready for PTV clearance checks. Angle gauge made for incrementing.
Now waiting on my cam sprockets to come back from the machine shop. So lets carry on with other tasks.
Foam and glue removed. Picked up some fabric and adhesive, now the black sport headliner material is not available, so I went with alcantara, a bit unsure on how it will look..
S38 swapped E30 Touring - In Progress..
E36 318IS Coupe
E38 740i
Instagram: http://Instagram.com/bad_e30
Build Thread: viewtopic.php?f=25&t=272997
Youtube: https://www.youtube.com/c/BadE30
E36 318IS Coupe
E38 740i
Instagram: http://Instagram.com/bad_e30
Build Thread: viewtopic.php?f=25&t=272997
Youtube: https://www.youtube.com/c/BadE30
-
lellis
- E30 Zone Regular
- Posts: 400
- Joined: Tue Sep 02, 2014 11:00 pm
- Location: Nottingham
RESPRAY UPDATES!!!
Very happy with the progress so far, paint guy sent me some pics of how it is going. I will be popping in to see him next week to discuss seam sealer styles and colour choices of trims.


Very happy with the progress so far, paint guy sent me some pics of how it is going. I will be popping in to see him next week to discuss seam sealer styles and colour choices of trims.
S38 swapped E30 Touring - In Progress..
E36 318IS Coupe
E38 740i
Instagram: http://Instagram.com/bad_e30
Build Thread: viewtopic.php?f=25&t=272997
Youtube: https://www.youtube.com/c/BadE30
E36 318IS Coupe
E38 740i
Instagram: http://Instagram.com/bad_e30
Build Thread: viewtopic.php?f=25&t=272997
Youtube: https://www.youtube.com/c/BadE30
-
lellis
- E30 Zone Regular
- Posts: 400
- Joined: Tue Sep 02, 2014 11:00 pm
- Location: Nottingham
ITB's: So I restored these individually years ago and wanted to redo some bits.


VAG coil conversion: R8 coils (will get black ones) genuine Bosch plugs and extenders.

Unfortunately the extenders are too short so I have ordered some longer ones to machine down until it works.
Hopefully the black coils will look less garish..

Getrag 260/6 refresh

Many hours of cleaning, new seals, plated hardware and a few coats of aluminium enamel

YouTube video for the process here:
VAG coil conversion: R8 coils (will get black ones) genuine Bosch plugs and extenders.
Unfortunately the extenders are too short so I have ordered some longer ones to machine down until it works.
Hopefully the black coils will look less garish..
Getrag 260/6 refresh
Many hours of cleaning, new seals, plated hardware and a few coats of aluminium enamel
YouTube video for the process here:
S38 swapped E30 Touring - In Progress..
E36 318IS Coupe
E38 740i
Instagram: http://Instagram.com/bad_e30
Build Thread: viewtopic.php?f=25&t=272997
Youtube: https://www.youtube.com/c/BadE30
E36 318IS Coupe
E38 740i
Instagram: http://Instagram.com/bad_e30
Build Thread: viewtopic.php?f=25&t=272997
Youtube: https://www.youtube.com/c/BadE30
-
lellis
- E30 Zone Regular
- Posts: 400
- Joined: Tue Sep 02, 2014 11:00 pm
- Location: Nottingham
Regarding the car respray progress? It's good. Here are some sneak peaks from the painter.


Less than a week to go before collection, I need to seriously hurry up and get my jobs done in the garage!!
Less than a week to go before collection, I need to seriously hurry up and get my jobs done in the garage!!
S38 swapped E30 Touring - In Progress..
E36 318IS Coupe
E38 740i
Instagram: http://Instagram.com/bad_e30
Build Thread: viewtopic.php?f=25&t=272997
Youtube: https://www.youtube.com/c/BadE30
E36 318IS Coupe
E38 740i
Instagram: http://Instagram.com/bad_e30
Build Thread: viewtopic.php?f=25&t=272997
Youtube: https://www.youtube.com/c/BadE30
-
rix313
- E30 Zone Team Member

- Posts: 4968
- Joined: Fri Oct 31, 2008 11:00 pm
- Location: Silverstone
-
e30newman

- E30 Zone Newbie

- Posts: 30
- Joined: Sat Jan 10, 2015 11:00 pm
Great job on the gearbox looks amazing, wish I had the patience!
-
lellis
- E30 Zone Regular
- Posts: 400
- Joined: Tue Sep 02, 2014 11:00 pm
- Location: Nottingham
Thanks! This whole project has been about patience, to be honest, the gearbox is the only thing I didn't actually take apart fully!
S38 swapped E30 Touring - In Progress..
E36 318IS Coupe
E38 740i
Instagram: http://Instagram.com/bad_e30
Build Thread: viewtopic.php?f=25&t=272997
Youtube: https://www.youtube.com/c/BadE30
E36 318IS Coupe
E38 740i
Instagram: http://Instagram.com/bad_e30
Build Thread: viewtopic.php?f=25&t=272997
Youtube: https://www.youtube.com/c/BadE30
-
lellis
- E30 Zone Regular
- Posts: 400
- Joined: Tue Sep 02, 2014 11:00 pm
- Location: Nottingham
The garage was looking tired after years of welding work on the underside, so it was time to have a big sort out and paint!


Slotted cam gears back from the machine shop

With those back i could carry on with the engine build. PTV clearances, hours of taking measurements of valve lift and PTV clearances at different crank angles and cam timing.

Eventually I ended up with this mess. What it shows is that I don't want to advance the exhaust cam too far..

As I had light springs on the front two valves to physically feel the amount of lift before contact, I needed to swap them back over.

Then it was time to rebuild it properly this time, o-rings and flange sealant

After many studs installed, I can now say that the 'long block' is completed!


Even though I have had the engine mocked up before, it looks so much better now as all the hardware is installed
Slotted cam gears back from the machine shop
With those back i could carry on with the engine build. PTV clearances, hours of taking measurements of valve lift and PTV clearances at different crank angles and cam timing.
Eventually I ended up with this mess. What it shows is that I don't want to advance the exhaust cam too far..
As I had light springs on the front two valves to physically feel the amount of lift before contact, I needed to swap them back over.
Then it was time to rebuild it properly this time, o-rings and flange sealant
After many studs installed, I can now say that the 'long block' is completed!
Even though I have had the engine mocked up before, it looks so much better now as all the hardware is installed
S38 swapped E30 Touring - In Progress..
E36 318IS Coupe
E38 740i
Instagram: http://Instagram.com/bad_e30
Build Thread: viewtopic.php?f=25&t=272997
Youtube: https://www.youtube.com/c/BadE30
E36 318IS Coupe
E38 740i
Instagram: http://Instagram.com/bad_e30
Build Thread: viewtopic.php?f=25&t=272997
Youtube: https://www.youtube.com/c/BadE30
-
lellis
- E30 Zone Regular
- Posts: 400
- Joined: Tue Sep 02, 2014 11:00 pm
- Location: Nottingham
More parts added to the engine which means it is practically ready to go (apart from the sump)


Another big tidy, for good reason.

The car is back!

Now let's get it in the sun.


And back to business, front end off for engine fitting.


Quick check of the exhaust manifold before sending it off for ceramic coating, more on that later.

Many sheets needed, doing it on my own.. No gearbox as it is just going in for the custom wiring harness measure up.

Engine in, now I remember how cool this looked in the unpainted bay, but this is on another level!


Started to organise the front end loom

With the engine harness measured up, engine came back out and now it is time to get it ready to drop in. Need to sort this sump!

Another big tidy, for good reason.
The car is back!
Now let's get it in the sun.
And back to business, front end off for engine fitting.
Quick check of the exhaust manifold before sending it off for ceramic coating, more on that later.
Many sheets needed, doing it on my own.. No gearbox as it is just going in for the custom wiring harness measure up.
Engine in, now I remember how cool this looked in the unpainted bay, but this is on another level!
Started to organise the front end loom
With the engine harness measured up, engine came back out and now it is time to get it ready to drop in. Need to sort this sump!
S38 swapped E30 Touring - In Progress..
E36 318IS Coupe
E38 740i
Instagram: http://Instagram.com/bad_e30
Build Thread: viewtopic.php?f=25&t=272997
Youtube: https://www.youtube.com/c/BadE30
E36 318IS Coupe
E38 740i
Instagram: http://Instagram.com/bad_e30
Build Thread: viewtopic.php?f=25&t=272997
Youtube: https://www.youtube.com/c/BadE30
-
martauto

- E30 Zone Team Member
- Posts: 6209
- Joined: Wed Aug 31, 2005 11:00 pm
- Location: leeds
Top draw every time mate 
Hell of a car
Something I wish I could have done but alas .............................
Mart.
Hell of a car
Something I wish I could have done but alas .............................
Mart.
Only the E46 cab left now.
Just got too old.
Just got too old.
-
fixedwheelnut
- E30 Zone Regular
- Posts: 909
- Joined: Sun Nov 20, 2005 11:00 pm
- Location: South East London
"Hubba, hubba" 
Top drawer work Liam love it!
Top drawer work Liam love it!
-
DanThe
- E30 Zone Team Member
- Posts: 28649
- Joined: Sat Sep 10, 2005 11:00 pm
- Location: Staffs
Looks like the sump has a date with an AC/DC tig welder 
-
lellis
- E30 Zone Regular
- Posts: 400
- Joined: Tue Sep 02, 2014 11:00 pm
- Location: Nottingham
Oh it’s going to be love at first sight!


S38 swapped E30 Touring - In Progress..
E36 318IS Coupe
E38 740i
Instagram: http://Instagram.com/bad_e30
Build Thread: viewtopic.php?f=25&t=272997
Youtube: https://www.youtube.com/c/BadE30
E36 318IS Coupe
E38 740i
Instagram: http://Instagram.com/bad_e30
Build Thread: viewtopic.php?f=25&t=272997
Youtube: https://www.youtube.com/c/BadE30
-
lellis
- E30 Zone Regular
- Posts: 400
- Joined: Tue Sep 02, 2014 11:00 pm
- Location: Nottingham
So it has been only a month since the last update, and scrolling through the thread, have I got some updating to do.
I may wander from consecutiveness here, but as there were so many different tasks going on at different times, it will be easier to show sections together.
So everything was removed and stripped for the paint, meaning it was time to start building it all back up, starting with the exterior.


Tailgate glass bonded on


The genuine mtech 2 spoiler went on, really like the look this adds to the rear.

My windscreen was more damaged than I remembered, so Russ from Ultimate Windscreens sourced a new blue tint screen!

The valance was put together, unfortunately even after spending a couple hours trying to get rid of the buckles around the lower section, it still wasn't perfect so the IS lip isn't the best fit..

Then moving onto the interior, the headliner had already been stripped but I had issues with the initial material, the next material never arrived but finally got some so it was time to finally get it sorted.


Unfortunately I don't seem to have pics of the 'finished' product. It was not a fun job, the material had good stretch but maybe the adhesive wasn't the best..

Carpets, always fancied dying them black, so the time came. Vacuum, wet vac and dye! A very satisfying task.


Whilst they were drying I could get the inside ready for the interior. Added the battery cable from the boot and washer pipe from the rear bottle to be used for the front.

The interior could then be put in place
Seats, now using the original to me rear bench, I purchased some not-so clean front seats to (nearly) match. I plan to do something a bit more fun in the future so for now a sport cloth look will suffice.
After a decent wet vac session these were drying in the sun ready to go in

I may wander from consecutiveness here, but as there were so many different tasks going on at different times, it will be easier to show sections together.
So everything was removed and stripped for the paint, meaning it was time to start building it all back up, starting with the exterior.
Tailgate glass bonded on
The genuine mtech 2 spoiler went on, really like the look this adds to the rear.
My windscreen was more damaged than I remembered, so Russ from Ultimate Windscreens sourced a new blue tint screen!
The valance was put together, unfortunately even after spending a couple hours trying to get rid of the buckles around the lower section, it still wasn't perfect so the IS lip isn't the best fit..
Then moving onto the interior, the headliner had already been stripped but I had issues with the initial material, the next material never arrived but finally got some so it was time to finally get it sorted.
Unfortunately I don't seem to have pics of the 'finished' product. It was not a fun job, the material had good stretch but maybe the adhesive wasn't the best..
Carpets, always fancied dying them black, so the time came. Vacuum, wet vac and dye! A very satisfying task.
Whilst they were drying I could get the inside ready for the interior. Added the battery cable from the boot and washer pipe from the rear bottle to be used for the front.
The interior could then be put in place
Seats, now using the original to me rear bench, I purchased some not-so clean front seats to (nearly) match. I plan to do something a bit more fun in the future so for now a sport cloth look will suffice.
After a decent wet vac session these were drying in the sun ready to go in
S38 swapped E30 Touring - In Progress..
E36 318IS Coupe
E38 740i
Instagram: http://Instagram.com/bad_e30
Build Thread: viewtopic.php?f=25&t=272997
Youtube: https://www.youtube.com/c/BadE30
E36 318IS Coupe
E38 740i
Instagram: http://Instagram.com/bad_e30
Build Thread: viewtopic.php?f=25&t=272997
Youtube: https://www.youtube.com/c/BadE30
-
lellis
- E30 Zone Regular
- Posts: 400
- Joined: Tue Sep 02, 2014 11:00 pm
- Location: Nottingham
Now to what I find the most fun, engine and bay,
I was waiting on the sump to be finished so engine bay time.
First was the Zircoflex foil, then putting back everything I made up from the full dry mock up I did before it went for paint.

Wheels, now I bought these a long while ago. As soon as they arrived I didn't like them, but kind of just forgot about them until I needed to get the tyres on.
big chunky tyres on 15's. Just a shame they're too dark and too modern..

The last update was about getting the sump welded after I made the pieces to shorten/widen it.
My friend offered to tackle this, which I think he regretted once he started.. But what a job he did, very grateful!

I could then make up a new windage/baffle, hard to see but due to the extra width, I added a baffle gate to hopefully limit the amount of oil sloshing into the area away from the pick up. Also the pick up was shortened by 25mm to accommodate the shortening of the sump.

I decided to do one last valve shim check before ordering replacements.

Now the engine can be fully built up. Rear crank seal on, lightened flywheel and clutch on etc.

What a sight this was!

Then before I got chance to really enjoy it, it was in the car.

Now from here, it was a blur. Not many pictures but a lot of progress.

All of a sudden the car was on a trailer ready to go to my friends car show!

I was waiting on the sump to be finished so engine bay time.
First was the Zircoflex foil, then putting back everything I made up from the full dry mock up I did before it went for paint.
Wheels, now I bought these a long while ago. As soon as they arrived I didn't like them, but kind of just forgot about them until I needed to get the tyres on.
big chunky tyres on 15's. Just a shame they're too dark and too modern..
The last update was about getting the sump welded after I made the pieces to shorten/widen it.
My friend offered to tackle this, which I think he regretted once he started.. But what a job he did, very grateful!
I could then make up a new windage/baffle, hard to see but due to the extra width, I added a baffle gate to hopefully limit the amount of oil sloshing into the area away from the pick up. Also the pick up was shortened by 25mm to accommodate the shortening of the sump.
I decided to do one last valve shim check before ordering replacements.
Now the engine can be fully built up. Rear crank seal on, lightened flywheel and clutch on etc.
What a sight this was!
Then before I got chance to really enjoy it, it was in the car.
Now from here, it was a blur. Not many pictures but a lot of progress.
All of a sudden the car was on a trailer ready to go to my friends car show!
S38 swapped E30 Touring - In Progress..
E36 318IS Coupe
E38 740i
Instagram: http://Instagram.com/bad_e30
Build Thread: viewtopic.php?f=25&t=272997
Youtube: https://www.youtube.com/c/BadE30
E36 318IS Coupe
E38 740i
Instagram: http://Instagram.com/bad_e30
Build Thread: viewtopic.php?f=25&t=272997
Youtube: https://www.youtube.com/c/BadE30
-
lellis
- E30 Zone Regular
- Posts: 400
- Joined: Tue Sep 02, 2014 11:00 pm
- Location: Nottingham
So what just happened? Pretty much all of the last two posts was done in 7 days, from a bare shell to a show ready car.. I set a silly deadline and actually hit it.
Yes it wasn't complete, but I was waiting on a few things to actually attempt an engine start.
After the show I had a few days to reset. But let's see how it went. Well I only got one pic of it parked up in its spot.

In the afternoon the weather improved so I was able to pull the car out and see it in the sunlight!


Then with the car back home, I could finally sit down and enjoy it!

Now with the car not being complete, I didn't want to throw too many unnecessary parts on when they would have had to come off again. Now that my brackets were back from plating I could install those bits meaning I can measure up for the final few hoses!


So what is left? Wiring, fluids and hoses. Insanely close now, crazy to think how far it has come in just the last couple weeks! Here's a pic to show the start of July
Yes it wasn't complete, but I was waiting on a few things to actually attempt an engine start.
After the show I had a few days to reset. But let's see how it went. Well I only got one pic of it parked up in its spot.
In the afternoon the weather improved so I was able to pull the car out and see it in the sunlight!
Then with the car back home, I could finally sit down and enjoy it!
Now with the car not being complete, I didn't want to throw too many unnecessary parts on when they would have had to come off again. Now that my brackets were back from plating I could install those bits meaning I can measure up for the final few hoses!
So what is left? Wiring, fluids and hoses. Insanely close now, crazy to think how far it has come in just the last couple weeks! Here's a pic to show the start of July
S38 swapped E30 Touring - In Progress..
E36 318IS Coupe
E38 740i
Instagram: http://Instagram.com/bad_e30
Build Thread: viewtopic.php?f=25&t=272997
Youtube: https://www.youtube.com/c/BadE30
E36 318IS Coupe
E38 740i
Instagram: http://Instagram.com/bad_e30
Build Thread: viewtopic.php?f=25&t=272997
Youtube: https://www.youtube.com/c/BadE30
-
The_Glory
- E30 Zone Regular
- Posts: 406
- Joined: Sun Feb 01, 2015 11:00 pm
- Location: Kyiv, Ukraine
Very cool result in such a short time!
-
lellis
- E30 Zone Regular
- Posts: 400
- Joined: Tue Sep 02, 2014 11:00 pm
- Location: Nottingham
So, what has gone on for the last couple months? Firstly I treated myself to a month off.
Then back to working on the car!
So it may look like a car but definitely isn't ready yet, time to tick off some jobs I didn't want to do before.. let's start underneath

When jacking it up onto the wheel stands, it put some crazy weight on the rear wheel, good to know how it looks under full load! May rub slightly..
See these ports? That's where I forgot to install the oil drain pipe before getting the engine in the car and manifolds on..

I tried for way too long to get it on without having to remove anything but I soon gave up.

Prop shaft, so I was told an e36 328i front with an e30 rear section would work, I was skeptical.. But for once, something went to plan! Just needs a quick clean up and paint job and it can go in permanently.

E30 325i shifter linkage with a DSSR. Once again, fits!
So that's an e34 m5 engine, e34 535i gearbox, e30 325i shifter linkage, e36 328i front prop shaft, z3 diff, e36 rear diff cover in an e30..

Custom wiring harness now made!


Going through the bulkhead below the servo, all nice and hidden. (battery live now has a grommet too)

Custom coolant hoses, so I searched and searched to try find some off the shelf hoses for my application, but nothing came close. So it was time to make my own, starting with getting the shape, using 45mm stainless pipe.

Welded up, added ends and vice grip.

Roose Motorsport to the rescue!

They're perfect.


This custom oil filter housing cap is great for adding oil temp and pressure sensors! These are for my Alpina reproduction gauge, more on that soon.

Brake, fuel and clutch lines all now in

Now some photos in the sun


Few more hoses to make, then it is time to start it!!
Then back to working on the car!
So it may look like a car but definitely isn't ready yet, time to tick off some jobs I didn't want to do before.. let's start underneath
When jacking it up onto the wheel stands, it put some crazy weight on the rear wheel, good to know how it looks under full load! May rub slightly..
See these ports? That's where I forgot to install the oil drain pipe before getting the engine in the car and manifolds on..
I tried for way too long to get it on without having to remove anything but I soon gave up.
Prop shaft, so I was told an e36 328i front with an e30 rear section would work, I was skeptical.. But for once, something went to plan! Just needs a quick clean up and paint job and it can go in permanently.
E30 325i shifter linkage with a DSSR. Once again, fits!
So that's an e34 m5 engine, e34 535i gearbox, e30 325i shifter linkage, e36 328i front prop shaft, z3 diff, e36 rear diff cover in an e30..
Custom wiring harness now made!
Going through the bulkhead below the servo, all nice and hidden. (battery live now has a grommet too)
Custom coolant hoses, so I searched and searched to try find some off the shelf hoses for my application, but nothing came close. So it was time to make my own, starting with getting the shape, using 45mm stainless pipe.
Welded up, added ends and vice grip.
Roose Motorsport to the rescue!
They're perfect.
This custom oil filter housing cap is great for adding oil temp and pressure sensors! These are for my Alpina reproduction gauge, more on that soon.
Brake, fuel and clutch lines all now in
Now some photos in the sun
Few more hoses to make, then it is time to start it!!
S38 swapped E30 Touring - In Progress..
E36 318IS Coupe
E38 740i
Instagram: http://Instagram.com/bad_e30
Build Thread: viewtopic.php?f=25&t=272997
Youtube: https://www.youtube.com/c/BadE30
E36 318IS Coupe
E38 740i
Instagram: http://Instagram.com/bad_e30
Build Thread: viewtopic.php?f=25&t=272997
Youtube: https://www.youtube.com/c/BadE30
-
fixedwheelnut
- E30 Zone Regular
- Posts: 909
- Joined: Sun Nov 20, 2005 11:00 pm
- Location: South East London
Absolutely love how you made your own mold's for the coolant hoses, top draw work Sir as usual
-
lellis
- E30 Zone Regular
- Posts: 400
- Joined: Tue Sep 02, 2014 11:00 pm
- Location: Nottingham
As always, way behind on this thread! Many updates on their way.
So it is time to go for the first start up, this proved to be probably the most challenging step so far.
First up, coolant pipes. So the upper heater matrix pipe fouled the airbox due to the upsweep, I decided to fabricate a new one which would be angled towards the block.


I then planned to do the valve shims, I measured all the gaps and ordered the required shims, only to be sent the incorrect diameter. This was a day before Guy, my tuning man was coming to wire in the ECU for start up.. Luckily he said he had a ton of spares and told me to leave the job until he arrives..

Working into the night, the oil cooler and piping was next. I went with an e28 m5 cooler has it is larger than the e34. This actually was extremely close to a bolt on solution, all I needed to do was adjust one of the securing tabs to mount to some existing mounting holes.

This HEL Performance adapter allowed me to use AN lines from the original housing, very snazzy.


The morning of 'start up' day.

Now for story time, as that day I didn't really document much as it was a mad rush.
So I did the valve shims, filled up the oil, connected up the starter and tried to jog the engine. Nothing from the starter, removed it, bench tested, nothing.. Now I bench tested this after restoring and it was operating as it should, luckily I had a spare so I threw that on for now.
Guy arrived and started on the wiring, in no time it was ready to go on the key. We connected up the vent gauge temporarily to get oil pressure.
His end worked perfectly, my end, not so.
We were getting no oil pressure, zilch, nada, 60 seconds worth of cranking..
Even though I have a pressure switch and sensor, we decided to remove and check for oil, bone dry at the filter housing.

Now I was worried, all that work done to the engine, rebuilt and modified the oil pump and sump etc..
Tried priming the filter housing, no joy. We called it a day and he left me to figure out what the hell has gone wrong.
I did some research and found some hazy info about the block having a drain port at the filter housing, but I wanted to see oil flow with my own eyes..
I removed the filter housing and cranked the engine, and finally, oil flow!

That was a huge relief, the oil pump was fine. So the oil filter housing was the culprit.
Bit of research later I discovered there is a housing drain valve which allows the oil to drain back into the block to aid with filter changes, I was told this has more than likely failed causing the oil to recirculate back into the block.
On the older m30 engines (which is the same block as the s38) the drain port is plugged. So I decided to do this..
Here is a pic I was sent

Vs mine

But by this time, due to cranking the engine so much without oil, I wanted to lubricate it before any more attempts.
I made up an adapter that threads into the pressure switch port and using a pump I fed oil through the engine until it came through the head.

With the block drain plugged, everything went back together and if by magic, we had oil pressure!

Now it isn't fixed, but it is working and my thinkings say it will not adversely affect the engine performance.
Back to trying to start it, that is another story in itself..
So it is time to go for the first start up, this proved to be probably the most challenging step so far.
First up, coolant pipes. So the upper heater matrix pipe fouled the airbox due to the upsweep, I decided to fabricate a new one which would be angled towards the block.
I then planned to do the valve shims, I measured all the gaps and ordered the required shims, only to be sent the incorrect diameter. This was a day before Guy, my tuning man was coming to wire in the ECU for start up.. Luckily he said he had a ton of spares and told me to leave the job until he arrives..
Working into the night, the oil cooler and piping was next. I went with an e28 m5 cooler has it is larger than the e34. This actually was extremely close to a bolt on solution, all I needed to do was adjust one of the securing tabs to mount to some existing mounting holes.
This HEL Performance adapter allowed me to use AN lines from the original housing, very snazzy.
The morning of 'start up' day.
Now for story time, as that day I didn't really document much as it was a mad rush.
So I did the valve shims, filled up the oil, connected up the starter and tried to jog the engine. Nothing from the starter, removed it, bench tested, nothing.. Now I bench tested this after restoring and it was operating as it should, luckily I had a spare so I threw that on for now.
Guy arrived and started on the wiring, in no time it was ready to go on the key. We connected up the vent gauge temporarily to get oil pressure.
His end worked perfectly, my end, not so.
We were getting no oil pressure, zilch, nada, 60 seconds worth of cranking..
Even though I have a pressure switch and sensor, we decided to remove and check for oil, bone dry at the filter housing.
Now I was worried, all that work done to the engine, rebuilt and modified the oil pump and sump etc..
Tried priming the filter housing, no joy. We called it a day and he left me to figure out what the hell has gone wrong.
I did some research and found some hazy info about the block having a drain port at the filter housing, but I wanted to see oil flow with my own eyes..
I removed the filter housing and cranked the engine, and finally, oil flow!
That was a huge relief, the oil pump was fine. So the oil filter housing was the culprit.
Bit of research later I discovered there is a housing drain valve which allows the oil to drain back into the block to aid with filter changes, I was told this has more than likely failed causing the oil to recirculate back into the block.
On the older m30 engines (which is the same block as the s38) the drain port is plugged. So I decided to do this..
Here is a pic I was sent
Vs mine
But by this time, due to cranking the engine so much without oil, I wanted to lubricate it before any more attempts.
I made up an adapter that threads into the pressure switch port and using a pump I fed oil through the engine until it came through the head.
With the block drain plugged, everything went back together and if by magic, we had oil pressure!
Now it isn't fixed, but it is working and my thinkings say it will not adversely affect the engine performance.
Back to trying to start it, that is another story in itself..
S38 swapped E30 Touring - In Progress..
E36 318IS Coupe
E38 740i
Instagram: http://Instagram.com/bad_e30
Build Thread: viewtopic.php?f=25&t=272997
Youtube: https://www.youtube.com/c/BadE30
E36 318IS Coupe
E38 740i
Instagram: http://Instagram.com/bad_e30
Build Thread: viewtopic.php?f=25&t=272997
Youtube: https://www.youtube.com/c/BadE30
-
lellis
- E30 Zone Regular
- Posts: 400
- Joined: Tue Sep 02, 2014 11:00 pm
- Location: Nottingham
So after oil pressure check, comes fuel pressure.
With a jerry cans worth of Esso's finest, I put the fuel pump fuse back in and attempted a prime.
Obviously that didn't go to plan.

The hard line to fuel rail o-ring was not seated correctly, annoyed I missed this as it looks so obvious now.
When I installed the lines, it was extremely tricky due to space constraints so I decided to remove the complete ITB unit and refit off the car.
The bracket which secures the o-ring was bent allowing it to sit misaligned, I straightened it, new paint and all back together.

We now had fuel pressure, time to go for start up.
If everything else I have dealt with wasn't enough, the engine decided to throw one last curveball and quite a significant one at that.
Fuel vapour was exhausting out the intake.. I initially thought injector timing, but you could actually feel the air being pushing out of the intake..
Now after a phone call to my wiring man, he asked 'are the cams timed the wrong way round?' Initially, I thought no? How could they be? I spent weeks getting the timing right, no one has questioned it so far either?
After more conversation I explained how I dialed in the overlap at TDC etc, showed him a pic and he saw the issue. I had timing it EXACTLY on the opposite stroke, so the overlap at TDC was the inlet closing and the exhaust opening, meaning the engine was running backwards..
I used this graph below to time the cams, but may have got the intake and exhaust the wrong way round..

Here shows my cams at TDC

And how they should be at TDC..

Luckily as I had already checked for PTV clearances, I knew there was no damage to the engine, only my ego.. It is my first engine build after all and I am not a mechanic!
So with my tail between my legs, I got on with setting it correctly, by rotating the crank 360deg I could set the overlap.
With that done, it was again time to attempt for start up.
After a bit of coughing and spluttering, I checked the timing with an ignition light and it was within the ballpark, so whilst on the phone to Guy, laptop in hand, he advised me on some adjustments to make to the injectors and I guess the next picture explains what happened next,,

I don't know how to add videos on here, so I have linked my YouTube video of the first start up below
With a jerry cans worth of Esso's finest, I put the fuel pump fuse back in and attempted a prime.
Obviously that didn't go to plan.
The hard line to fuel rail o-ring was not seated correctly, annoyed I missed this as it looks so obvious now.
When I installed the lines, it was extremely tricky due to space constraints so I decided to remove the complete ITB unit and refit off the car.
The bracket which secures the o-ring was bent allowing it to sit misaligned, I straightened it, new paint and all back together.
We now had fuel pressure, time to go for start up.
If everything else I have dealt with wasn't enough, the engine decided to throw one last curveball and quite a significant one at that.
Fuel vapour was exhausting out the intake.. I initially thought injector timing, but you could actually feel the air being pushing out of the intake..
Now after a phone call to my wiring man, he asked 'are the cams timed the wrong way round?' Initially, I thought no? How could they be? I spent weeks getting the timing right, no one has questioned it so far either?
After more conversation I explained how I dialed in the overlap at TDC etc, showed him a pic and he saw the issue. I had timing it EXACTLY on the opposite stroke, so the overlap at TDC was the inlet closing and the exhaust opening, meaning the engine was running backwards..
I used this graph below to time the cams, but may have got the intake and exhaust the wrong way round..
Here shows my cams at TDC
And how they should be at TDC..
Luckily as I had already checked for PTV clearances, I knew there was no damage to the engine, only my ego.. It is my first engine build after all and I am not a mechanic!
So with my tail between my legs, I got on with setting it correctly, by rotating the crank 360deg I could set the overlap.
With that done, it was again time to attempt for start up.
After a bit of coughing and spluttering, I checked the timing with an ignition light and it was within the ballpark, so whilst on the phone to Guy, laptop in hand, he advised me on some adjustments to make to the injectors and I guess the next picture explains what happened next,,
I don't know how to add videos on here, so I have linked my YouTube video of the first start up below
S38 swapped E30 Touring - In Progress..
E36 318IS Coupe
E38 740i
Instagram: http://Instagram.com/bad_e30
Build Thread: viewtopic.php?f=25&t=272997
Youtube: https://www.youtube.com/c/BadE30
E36 318IS Coupe
E38 740i
Instagram: http://Instagram.com/bad_e30
Build Thread: viewtopic.php?f=25&t=272997
Youtube: https://www.youtube.com/c/BadE30
-
lellis
- E30 Zone Regular
- Posts: 400
- Joined: Tue Sep 02, 2014 11:00 pm
- Location: Nottingham
Now with it started, I could now work on getting up to temp and driving (feels crazy to type that)
The prop shaft had been test fitted, so a lick of paint and new CSB, it was on.

More fancy Zircoflex Foil went on

Exhaust time! (or so I thought)
img]https://live.staticflickr.com/65535/549 ... 132a_c.jpg[/img]
After test fitting the system and modifying to suit, unfortunately during the final weld process the manifold warped so it required a quick chop and twist to align the exhaust.


Coolant in, time to attempt to run it up to temp. But here comes another issue..
There was no charging from the alternator, no battery light on the dash either. Suggesting the exciter circuit.

I checked all the wiring and it was ok, so removed the alternator for further investigation.
I stripped it down, checked the stator, rotor, diodes and regulator, all ok. But when bench testing, I could not get the alternator to excite and start charging.
I quickly purchased a new to me spare, bench tested all ok. So removed the stator/diode pack and swapped it into the original.

Whilst all this was going on, I kept on the wiring work and started on the front end loom.
Now with the fuse box relocation and rerouting the loom through the wing, this required a lot of extending, splicing and removing unneeded wires.
I started by getting all the wire colours for each plugs from the wiring diagrams on the zone wiki (god bless e30zone Wiki).
With my car not having an OBC, AC or headlight washers etc, this was extremely simple, just needed 12 wires overall.

Using the above info, I labelled all the pig tails I had (I cut the loom off about 6 years ago..)


Then got to work on extending them all, this was much more time consuming than I expected but after a few evenings work I had it all wrapped up and ready to go.


And it all worked! Had no fog lights at first, but that was due to no bulbs installed..

Do have an issue with the hazards not working (indicators do), I think it may be due to removing the old alarm system, I am not getting power to the switch, so more investigation required there.
Here is the video of the wiring process
The prop shaft had been test fitted, so a lick of paint and new CSB, it was on.
More fancy Zircoflex Foil went on
Exhaust time! (or so I thought)
img]https://live.staticflickr.com/65535/549 ... 132a_c.jpg[/img]
After test fitting the system and modifying to suit, unfortunately during the final weld process the manifold warped so it required a quick chop and twist to align the exhaust.
Coolant in, time to attempt to run it up to temp. But here comes another issue..
There was no charging from the alternator, no battery light on the dash either. Suggesting the exciter circuit.
I checked all the wiring and it was ok, so removed the alternator for further investigation.
I stripped it down, checked the stator, rotor, diodes and regulator, all ok. But when bench testing, I could not get the alternator to excite and start charging.
I quickly purchased a new to me spare, bench tested all ok. So removed the stator/diode pack and swapped it into the original.
Whilst all this was going on, I kept on the wiring work and started on the front end loom.
Now with the fuse box relocation and rerouting the loom through the wing, this required a lot of extending, splicing and removing unneeded wires.
I started by getting all the wire colours for each plugs from the wiring diagrams on the zone wiki (god bless e30zone Wiki).
With my car not having an OBC, AC or headlight washers etc, this was extremely simple, just needed 12 wires overall.
Using the above info, I labelled all the pig tails I had (I cut the loom off about 6 years ago..)
Then got to work on extending them all, this was much more time consuming than I expected but after a few evenings work I had it all wrapped up and ready to go.
And it all worked! Had no fog lights at first, but that was due to no bulbs installed..
Do have an issue with the hazards not working (indicators do), I think it may be due to removing the old alarm system, I am not getting power to the switch, so more investigation required there.
Here is the video of the wiring process
S38 swapped E30 Touring - In Progress..
E36 318IS Coupe
E38 740i
Instagram: http://Instagram.com/bad_e30
Build Thread: viewtopic.php?f=25&t=272997
Youtube: https://www.youtube.com/c/BadE30
E36 318IS Coupe
E38 740i
Instagram: http://Instagram.com/bad_e30
Build Thread: viewtopic.php?f=25&t=272997
Youtube: https://www.youtube.com/c/BadE30
-
lellis
- E30 Zone Regular
- Posts: 400
- Joined: Tue Sep 02, 2014 11:00 pm
- Location: Nottingham
With it running well, time to drive it (up and down my driveway)
Set up the cluster and wheel.

Quick tester throttle cable bracket made up

Bled the clutch, pain to do on your own without any proper equipment..
Then it was ready to move, once again no idea how to add videos so here is me showing the result

Clutch feels great, nothing seems amiss with the car yet!
Set up the cluster and wheel.
Quick tester throttle cable bracket made up
Bled the clutch, pain to do on your own without any proper equipment..
Then it was ready to move, once again no idea how to add videos so here is me showing the result
Clutch feels great, nothing seems amiss with the car yet!
S38 swapped E30 Touring - In Progress..
E36 318IS Coupe
E38 740i
Instagram: http://Instagram.com/bad_e30
Build Thread: viewtopic.php?f=25&t=272997
Youtube: https://www.youtube.com/c/BadE30
E36 318IS Coupe
E38 740i
Instagram: http://Instagram.com/bad_e30
Build Thread: viewtopic.php?f=25&t=272997
Youtube: https://www.youtube.com/c/BadE30
-
lellis
- E30 Zone Regular
- Posts: 400
- Joined: Tue Sep 02, 2014 11:00 pm
- Location: Nottingham
Now to finish off with some of the most recent update pictures


Time for the final bits before the MOT..
Time for the final bits before the MOT..
S38 swapped E30 Touring - In Progress..
E36 318IS Coupe
E38 740i
Instagram: http://Instagram.com/bad_e30
Build Thread: viewtopic.php?f=25&t=272997
Youtube: https://www.youtube.com/c/BadE30
E36 318IS Coupe
E38 740i
Instagram: http://Instagram.com/bad_e30
Build Thread: viewtopic.php?f=25&t=272997
Youtube: https://www.youtube.com/c/BadE30
-
Tzantushka

- E30 Zone Regular
- Posts: 464
- Joined: Sat Nov 24, 2018 4:18 am
- Location: Melbourne, Australia
I would love to see the MOT tester's reaction when they open the bonnet or get this thing on the hoist.

-
lellis
- E30 Zone Regular
- Posts: 400
- Joined: Tue Sep 02, 2014 11:00 pm
- Location: Nottingham
Hopefully they will be happy with it all, should be pretty simpleTzantushka wrote: ↑Sun Nov 09, 2025 4:07 amI would love to see the MOT tester's reaction when they open the bonnet or get this thing on the hoist.

S38 swapped E30 Touring - In Progress..
E36 318IS Coupe
E38 740i
Instagram: http://Instagram.com/bad_e30
Build Thread: viewtopic.php?f=25&t=272997
Youtube: https://www.youtube.com/c/BadE30
E36 318IS Coupe
E38 740i
Instagram: http://Instagram.com/bad_e30
Build Thread: viewtopic.php?f=25&t=272997
Youtube: https://www.youtube.com/c/BadE30
-
lellis
- E30 Zone Regular
- Posts: 400
- Joined: Tue Sep 02, 2014 11:00 pm
- Location: Nottingham
I guess it is time for the biggest update of the whole 9 year project..

This feels weird to say, but the e30 is on the road.
Let's just go through the last couple of weeks to how I got it to this position. So the last update was me taking it up and down the drive to check the clutch, but I had no brakes or power steering yet. Bleeding the whole system on my own wasn't the easiest of tasks, but starting from the furthest away it took a couple of goes to get a decent pedal.

The winter months are well and truly here, dark nights, wet days.. Progress was very tricky.

A little addition to the throttle cable bracket due to flex from the airbox, this will tie into the throttle bodies to help stop the fulcrum effect.

Usual satin black and zinc plated hardware treatment.

With the major work now completed in the engine bay, I was finally in a position to install the bonnet. This is on quick release pins so it can be removed easily without requiring adjustment.

The bonnet hides all that work I did in the engine bay, but keeps it incognito..


Need to add the insulation but due to the airbox I had to cut out the brace on the LHS. It may require shaping to suit. Best get the blue tack out.

Wipers can go on after a quick spruce up. I had to replace the wiper motor plug wiring as for some reason I cut the wires many years ago and lost the plug..

Installed the Alpina reproduction vent gauge, I don't know what I would do without these readouts, so handy to keep your mind at ease seeing all the numbers. I now have diff temp, oil temp, engine vacuum, oil pressure, coolant temp and voltage readouts.

Final check of all the lighting.

Quick string up to get the alignment at least half true. Nothing like a quick job 30 mins before my MOT..

The weather was not on my side today, but I was booked in and ready to go, no backing out now.

And then it was time to go, 30 minute drive to the MOT.. To say I was stressed is an understatement. I knew it wouldn't be a relaxed drive but it was flawless. Even though I trust my work, when I have took every single piece of this car to bits and rebuilt it myself, there will always be doubt that I did something wrong. At the end of the day I am not a mechanic and this is my first ever project but somehow, it all worked? (for now)

They let me join them to look underneath so I can note any leaks or issues. There are some small engine leaks but nothing serious, which is amazing.

After an hour round trip and an MOT certificate in hand, I gave the car its first ever wash.

First fill up completed, I forgot how small these cars are!

The weather was finally on my side for me to take the car for a proper drive, many checks in the bay just to make sure nothing is amiss.

This colour out in the open is something everyone needs to see in person, impeccable.


First impressions? Aggressive.
It is much louder than I had expected however I am currently missing a lot of interior bits (anything that wasn't required for an MOT). So the first task is to get that all back in.
The engine is mega, currently bedding in on a base map so 4k rpm limit and partial throttle but wow that is enough for me, you can feel it really start to wake up just before I have to let off, I honestly cannot imagine this at full tilt.
The suspension feel is better than I expected, but for now I need to spend more time in the car to understand it. It is stiff but in a good way. Super responsive but the purple tag rack is maybe too sensitive for me, I need to get the alignment sorted which will hopefully get rid of the twitchyness.
Just under 100 miles added now and so far no breakdowns, weird. Starting to enjoy the car rather than worry about it. But honestly I am still processing everything as it all came about rather quickly.
This feels weird to say, but the e30 is on the road.
Let's just go through the last couple of weeks to how I got it to this position. So the last update was me taking it up and down the drive to check the clutch, but I had no brakes or power steering yet. Bleeding the whole system on my own wasn't the easiest of tasks, but starting from the furthest away it took a couple of goes to get a decent pedal.
The winter months are well and truly here, dark nights, wet days.. Progress was very tricky.
A little addition to the throttle cable bracket due to flex from the airbox, this will tie into the throttle bodies to help stop the fulcrum effect.
Usual satin black and zinc plated hardware treatment.
With the major work now completed in the engine bay, I was finally in a position to install the bonnet. This is on quick release pins so it can be removed easily without requiring adjustment.
The bonnet hides all that work I did in the engine bay, but keeps it incognito..
Need to add the insulation but due to the airbox I had to cut out the brace on the LHS. It may require shaping to suit. Best get the blue tack out.
Wipers can go on after a quick spruce up. I had to replace the wiper motor plug wiring as for some reason I cut the wires many years ago and lost the plug..
Installed the Alpina reproduction vent gauge, I don't know what I would do without these readouts, so handy to keep your mind at ease seeing all the numbers. I now have diff temp, oil temp, engine vacuum, oil pressure, coolant temp and voltage readouts.
Final check of all the lighting.
Quick string up to get the alignment at least half true. Nothing like a quick job 30 mins before my MOT..
The weather was not on my side today, but I was booked in and ready to go, no backing out now.
And then it was time to go, 30 minute drive to the MOT.. To say I was stressed is an understatement. I knew it wouldn't be a relaxed drive but it was flawless. Even though I trust my work, when I have took every single piece of this car to bits and rebuilt it myself, there will always be doubt that I did something wrong. At the end of the day I am not a mechanic and this is my first ever project but somehow, it all worked? (for now)
They let me join them to look underneath so I can note any leaks or issues. There are some small engine leaks but nothing serious, which is amazing.
After an hour round trip and an MOT certificate in hand, I gave the car its first ever wash.
First fill up completed, I forgot how small these cars are!
The weather was finally on my side for me to take the car for a proper drive, many checks in the bay just to make sure nothing is amiss.
This colour out in the open is something everyone needs to see in person, impeccable.
First impressions? Aggressive.
It is much louder than I had expected however I am currently missing a lot of interior bits (anything that wasn't required for an MOT). So the first task is to get that all back in.
The engine is mega, currently bedding in on a base map so 4k rpm limit and partial throttle but wow that is enough for me, you can feel it really start to wake up just before I have to let off, I honestly cannot imagine this at full tilt.
The suspension feel is better than I expected, but for now I need to spend more time in the car to understand it. It is stiff but in a good way. Super responsive but the purple tag rack is maybe too sensitive for me, I need to get the alignment sorted which will hopefully get rid of the twitchyness.
Just under 100 miles added now and so far no breakdowns, weird. Starting to enjoy the car rather than worry about it. But honestly I am still processing everything as it all came about rather quickly.
S38 swapped E30 Touring - In Progress..
E36 318IS Coupe
E38 740i
Instagram: http://Instagram.com/bad_e30
Build Thread: viewtopic.php?f=25&t=272997
Youtube: https://www.youtube.com/c/BadE30
E36 318IS Coupe
E38 740i
Instagram: http://Instagram.com/bad_e30
Build Thread: viewtopic.php?f=25&t=272997
Youtube: https://www.youtube.com/c/BadE30
-
martauto
- E30 Zone Team Member
- Posts: 6209
- Joined: Wed Aug 31, 2005 11:00 pm
- Location: leeds
Full credit to you sir, absolute special car mate.
Mart.
Mart.
Only the E46 cab left now.
Just got too old.
Just got too old.
-
rix313
- E30 Zone Team Member
- Posts: 4968
- Joined: Fri Oct 31, 2008 11:00 pm
- Location: Silverstone
Blows my little brain this thing dude. Congratulations.
-
Cypriotgeeza

- E30 Zone Addict

- Posts: 3046
- Joined: Sat Apr 04, 2009 11:00 pm
- Location: Under a bonnet somewhere..
Amazing car mate, I didn't realise you had a project thread on here as I've been watching your progress on Instagram  I need to sit down one day with a pot of tea and go through it!
Can I ask a silly Q,
Do you ever have any issues uploading pics on here ? I try to upload 2/3 and it disconnects me from E30 zone and says site not reached I cant imagine how you uploaded so many without issue?
Can I ask a silly Q,
Do you ever have any issues uploading pics on here ? I try to upload 2/3 and it disconnects me from E30 zone and says site not reached
Check my M30 build threads:
Project Frankenstein: viewtopic.php?f=25&t=194154
Headgasket: viewtopic.php?f=55&t=165704
Clutch issues: viewtopic.php?f=55&t=172482
Instagram: www.instagram.com/Cypriotgeeza
Project Frankenstein: viewtopic.php?f=25&t=194154
Headgasket: viewtopic.php?f=55&t=165704
Clutch issues: viewtopic.php?f=55&t=172482
Instagram: www.instagram.com/Cypriotgeeza
-
e30newman
- E30 Zone Newbie
- Posts: 30
- Joined: Sat Jan 10, 2015 11:00 pm
Unreal mate, congrats on getting it all sorted.
-
lellis
- E30 Zone Regular
- Posts: 400
- Joined: Tue Sep 02, 2014 11:00 pm
- Location: Nottingham
haha yes! done it for years and even I enjoy a little scroll through from time to time.Cypriotgeeza wrote: ↑Sun Jan 04, 2026 8:09 amAmazing car mate, I didn't realise you had a project thread on here as I've been watching your progress on Instagram
Can I ask a silly Q,
Do you ever have any issues uploading pics on here ? I try to upload 2/3 and it disconnects me from E30 zone and says site not reached
I upload the pics to Flickr then share the BB code onto here, trim off some of the link etc. Never had an issue doing it this way, it just takes longer than usual..
S38 swapped E30 Touring - In Progress..
E36 318IS Coupe
E38 740i
Instagram: http://Instagram.com/bad_e30
Build Thread: viewtopic.php?f=25&t=272997
Youtube: https://www.youtube.com/c/BadE30
E36 318IS Coupe
E38 740i
Instagram: http://Instagram.com/bad_e30
Build Thread: viewtopic.php?f=25&t=272997
Youtube: https://www.youtube.com/c/BadE30
-
lellis
- E30 Zone Regular
- Posts: 400
- Joined: Tue Sep 02, 2014 11:00 pm
- Location: Nottingham
Me too man, me too
Still feels weird seeing it 'complete'
S38 swapped E30 Touring - In Progress..
E36 318IS Coupe
E38 740i
Instagram: http://Instagram.com/bad_e30
Build Thread: viewtopic.php?f=25&t=272997
Youtube: https://www.youtube.com/c/BadE30
E36 318IS Coupe
E38 740i
Instagram: http://Instagram.com/bad_e30
Build Thread: viewtopic.php?f=25&t=272997
Youtube: https://www.youtube.com/c/BadE30
-
lellis
- E30 Zone Regular
- Posts: 400
- Joined: Tue Sep 02, 2014 11:00 pm
- Location: Nottingham
So we are 450 miles into this car now, through the winter too..
I do enjoy it but there are definitely a few things to sort/improve.
Regarding teething problems:
I had a coolant pipe blow off after a drive, just needed a reseating on the sauge. Caused a right mess in the bay though!

My oil cooler gave in and dropped a couple litres of oil out in a 10 minute drive, it was an e28 m5 cooler so this has been replaced with a Setrab cooler

The car felt super twitchy on the road, so decided to check the alignment and add some castor offset bushes to try help the self centring.

The gear selector bush mount which attaches to the trans tunnel worked loose and the selector was sitting on the prop shaft..
But all these were easy fixes, the only big one is the valve stem seals, or at least suspected valve stem seals.. I am getting a lot of smoke 30 seconds after start up, and oil spray at the back of the car. The head was rebuilt by a company many years ago, so I think the lack of lubrication over the years has stiffened the seals. There is no oil in the catch tank so that clears the piston rings from being the issue, i think. Unfortunately this issue means I have delayed the dyno day. Due to the s38's design, the intermediate head/cam tray has to come off to do this, so it is a bit more involved than a usual engine. But I am yearning for some extra revs now!
Some other bits I need to sort but doesn't stop it driving include:
The brake lights stay on, need to adjust the switch
The heater from the fans works every so often
Central locking doesn't work, also when you close the boot you need the key to open it again
The sunroof needs adjusting as the cables are slightly out of sync
The rev gauge shows double ish the rpm as it is a 4cyl plug, not 6cyl.
The coolant temp creeps up in traffic, sits about 75-80 when driving the has reached 95 in traffic, bit too high for my liking. Think I need to change the fan to a pull fan with a cowling. I have the digital readouts on the cluster, but the standard gauge doesn't work as I have the wrong temp sensor in.
The rear wheels rub the arches under load, so I need thinner spacers.
However that is enough moaning, let me go through the last month.
The oil cooler was replaced early January, so a few test runs were done


Starting off strong with Bicester Sunday Scramble, I brought the car to Bicester in August last year but it wasn't complete. So for this had to be the first show I drove to. Here is a pic from August, at the time I thought it was near complete, how wrong I was!
Then January


I was so surprised at how great the reception was, quite overwhelming in all honesty. Met some great people too.
A lot of cleaning required in between drives..

And many fill ups.

Next was BMW Car Club meet at Great Northern Classics in Derby. Pulled a few strings to get the front row seat

Now February weather has been atrocious. I got out yesterday to run some errands but even with no rain, the roads were all flooded!
I do enjoy it but there are definitely a few things to sort/improve.
Regarding teething problems:
I had a coolant pipe blow off after a drive, just needed a reseating on the sauge. Caused a right mess in the bay though!
My oil cooler gave in and dropped a couple litres of oil out in a 10 minute drive, it was an e28 m5 cooler so this has been replaced with a Setrab cooler
The car felt super twitchy on the road, so decided to check the alignment and add some castor offset bushes to try help the self centring.
The gear selector bush mount which attaches to the trans tunnel worked loose and the selector was sitting on the prop shaft..
But all these were easy fixes, the only big one is the valve stem seals, or at least suspected valve stem seals.. I am getting a lot of smoke 30 seconds after start up, and oil spray at the back of the car. The head was rebuilt by a company many years ago, so I think the lack of lubrication over the years has stiffened the seals. There is no oil in the catch tank so that clears the piston rings from being the issue, i think. Unfortunately this issue means I have delayed the dyno day. Due to the s38's design, the intermediate head/cam tray has to come off to do this, so it is a bit more involved than a usual engine. But I am yearning for some extra revs now!
Some other bits I need to sort but doesn't stop it driving include:
The brake lights stay on, need to adjust the switch
The heater from the fans works every so often
Central locking doesn't work, also when you close the boot you need the key to open it again
The sunroof needs adjusting as the cables are slightly out of sync
The rev gauge shows double ish the rpm as it is a 4cyl plug, not 6cyl.
The coolant temp creeps up in traffic, sits about 75-80 when driving the has reached 95 in traffic, bit too high for my liking. Think I need to change the fan to a pull fan with a cowling. I have the digital readouts on the cluster, but the standard gauge doesn't work as I have the wrong temp sensor in.
The rear wheels rub the arches under load, so I need thinner spacers.
However that is enough moaning, let me go through the last month.
The oil cooler was replaced early January, so a few test runs were done
Starting off strong with Bicester Sunday Scramble, I brought the car to Bicester in August last year but it wasn't complete. So for this had to be the first show I drove to. Here is a pic from August, at the time I thought it was near complete, how wrong I was!
Then January
I was so surprised at how great the reception was, quite overwhelming in all honesty. Met some great people too.
A lot of cleaning required in between drives..
And many fill ups.
Next was BMW Car Club meet at Great Northern Classics in Derby. Pulled a few strings to get the front row seat
Now February weather has been atrocious. I got out yesterday to run some errands but even with no rain, the roads were all flooded!
S38 swapped E30 Touring - In Progress..
E36 318IS Coupe
E38 740i
Instagram: http://Instagram.com/bad_e30
Build Thread: viewtopic.php?f=25&t=272997
Youtube: https://www.youtube.com/c/BadE30
E36 318IS Coupe
E38 740i
Instagram: http://Instagram.com/bad_e30
Build Thread: viewtopic.php?f=25&t=272997
Youtube: https://www.youtube.com/c/BadE30