Ultimate guide to replacing vertical window seals on the convertible

Need technical Q/A then you're in the right place

Moderator: martauto

Post Reply
User avatar
Tzantushka
E30 Zone Regular
E30 Zone Regular
Posts: 457
Joined: Sat Nov 24, 2018 4:18 am
Location: Melbourne, Australia

Sun Feb 02, 2020 11:17 am

Like many E30 cabby owners, I was getting tired of dust, noise & leaks between the front and rear windows.
After 32 years the vertical seal between the two windows was terrible.
In fact, the LHS one was missing and had been replaced with some self-adhesive felt.

Image

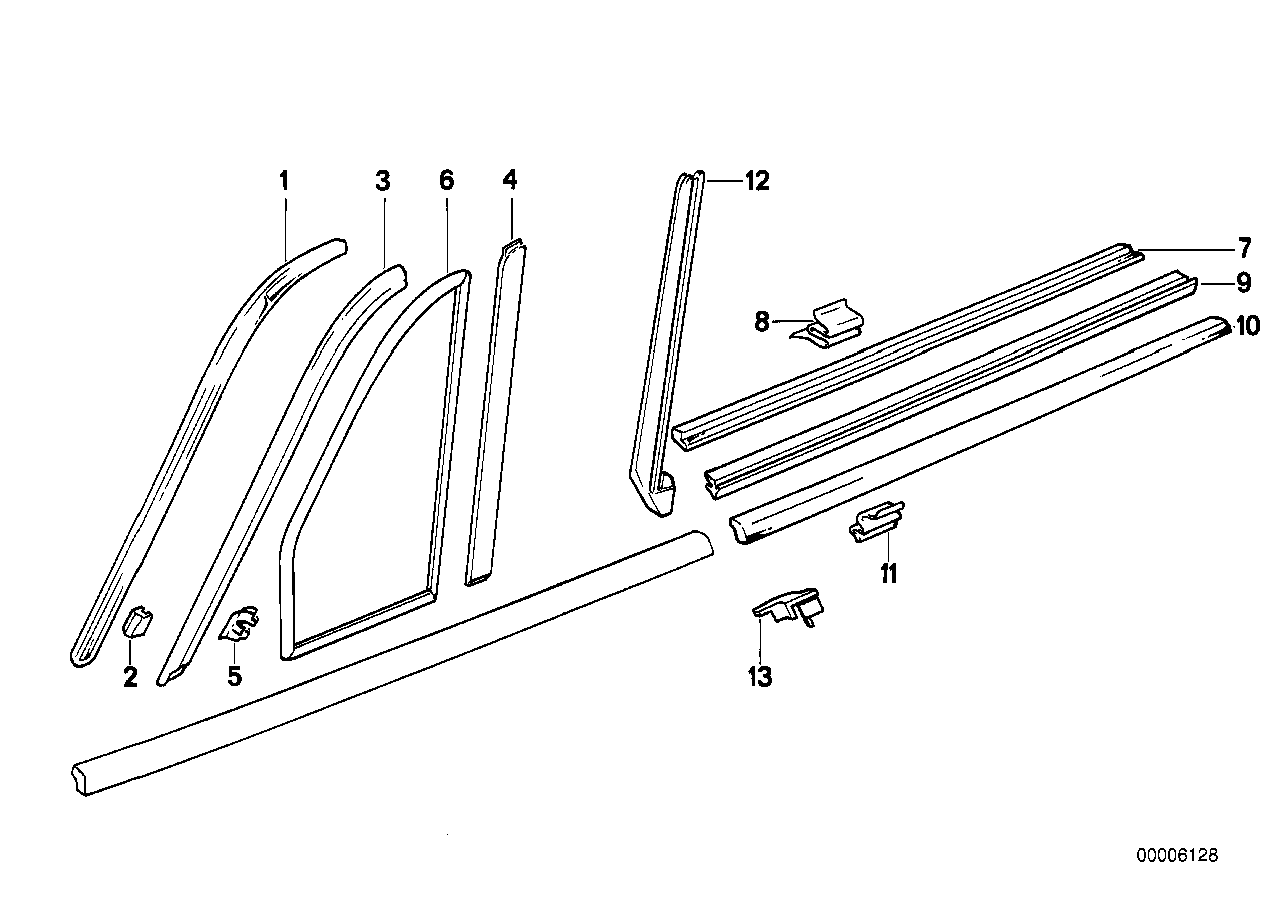
Real OEM lists these as Gasket Left & Right (part #12 in this diagram)
Warning – they’re not cheap!
But a good investment for another couple of decades if you're going to hang onto your car.

There’s a lot of misinformation on the interwebs about these gaskets.
No, the rubber seal is not epoxied or glued in place
No, you don’t have to buy the rubber seal as part of the rear window
They can be replaced in under an hour each side - and no need to remove the rear window or rear interior panels as some people think.

Here’s a quick comparison between old & new.

Image

Image

Image

The felt wears away and then the rubber part wears and shrinks.


TO REPLACE:

1. Open the door, gently peel off part of the door seal and remove the 5mm expanding plastic rivet from the door jam gasket

Image

Wind the window down...
There's a small plastic shaft in the rivet that you can either:
i. Push in from the front (and lost forever in the window well)
ii. Push out from the back (awkward, but you can catch the shaft and reuse)
I went with i) as it’s cheap to buy a replacement ( p/n 51161881149)

Image

2. Remove the lower door jam gasket
Gently lift up and out, being careful not to damage the gasket
Have a look where things clip in!
May need to clean the area depending on filth levels.


3. Slide out the old window gasket downwards
Or in my case scrape off the old felt

Image

(3M adhesive remover made quick work of it)
Don’t use anything metal as you’ll scratch the anodised aluminium window support.


4. Slide in the new seal from the base
Pushing from the bottom and guiding from the top.

Image

These seals are expensive, so don’t tear then trying to drag from the top.

Push it home at the base & check the top of the seal sits flush.

Image

5. Refit lower door jam gasket & expanding rivet
Ensuring it’s clipped over the top of the door jam panel and under the rubber interior and exterior weather strip trim.

Image

Done.

Image
User avatar
paultv
E30 Zone Squatter
E30 Zone Squatter
Posts: 1541
Joined: Mon Apr 21, 2014 11:00 pm
Location: Auf dem Schnee: Germany

Sun Feb 02, 2020 10:10 pm

You dont mention part number 51361933495
Part 13 on the drawing.

This is a tiny plastic cap that fits into and over the rubber seal at the top of the window effectively closing the rubber moulding against water ingress.

Paul :-)
4th May 1990 325i Convertible.

BMW E30 Cabriolet Best Mod Ever:

https://bmwe30cabriolet-wdm.blogspot.com/
User avatar
Tzantushka
E30 Zone Regular
E30 Zone Regular
Posts: 457
Joined: Sat Nov 24, 2018 4:18 am
Location: Melbourne, Australia

Mon Feb 03, 2020 4:04 am

paultv wrote:
Sun Feb 02, 2020 10:10 pm
You dont mention part number 51361933495
Part 13 on the drawing.

This is a tiny plastic cap that fits into and over the rubber seal at the top of the window effectively closing the rubber moulding against water ingress.

Paul :-)
Oh yes, if yours is missing - You'll need that!
Mine was attached to the aluminium window support so all good. :)
Gert_8
Married to the E30 Zone
Posts: 11304
Joined: Mon Dec 08, 2008 11:00 pm
Location: In your back passage faster than a rat up a drainpipe!

Mon Feb 03, 2020 10:33 am

Superb. I have been looking for a solution to this problem for yonks! Thanks very much. My cab only needs this doing on the driver's side.
Image
PONY, 2013 - "Anyway span 360 degrees hitting the kerb and giving the old man two fingers as I was spinning like Michael Schumacher would
User avatar
wobblewoo
E30 Zone Newbie
E30 Zone Newbie
Posts: 40
Joined: Mon Aug 18, 2014 11:00 pm
Location: Hornchurch
Contact:

Wed Jun 29, 2022 3:04 pm

Excellent and usefully visual guide. Just ordered the parts and i may regret saying this but looks like a fairly simple job. Thanking you OP.
User avatar
Tzantushka
E30 Zone Regular
E30 Zone Regular
Posts: 457
Joined: Sat Nov 24, 2018 4:18 am
Location: Melbourne, Australia

Thu Jun 30, 2022 1:33 pm

no problems - glad to help.
Gert_8
Married to the E30 Zone
Posts: 11304
Joined: Mon Dec 08, 2008 11:00 pm
Location: In your back passage faster than a rat up a drainpipe!

Thu Jun 30, 2022 1:34 pm

wobblewoo wrote:
Wed Jun 29, 2022 3:04 pm
Excellent and usefully visual guide. Just ordered the parts and i may regret saying this but looks like a fairly simple job. Thanking you OP.
How much were they in Pounds?
Image
PONY, 2013 - "Anyway span 360 degrees hitting the kerb and giving the old man two fingers as I was spinning like Michael Schumacher would
Gert_8
Married to the E30 Zone
Posts: 11304
Joined: Mon Dec 08, 2008 11:00 pm
Location: In your back passage faster than a rat up a drainpipe!

Mon Aug 22, 2022 12:09 pm

My driver's side seal had perished and I was under the impression that the entire post needed to be replaced. That always put me off.

Thanks to Tzantushka for this thread. :cool:

I replaced both of my window seals this weekend! :D

My observations are that the push rivet cannot be removed easily,, so just push the pin in and lose it, then replace it with a new one.

part number 51361933495 are not really required as they are salvageable, but I had ordered these for both sides and replaced them too.

Thanks again, brilliant advice and guidance! :clap: :clap:
Image
PONY, 2013 - "Anyway span 360 degrees hitting the kerb and giving the old man two fingers as I was spinning like Michael Schumacher would
User avatar
Tzantushka
E30 Zone Regular
E30 Zone Regular
Posts: 457
Joined: Sat Nov 24, 2018 4:18 am
Location: Melbourne, Australia

Mon Aug 22, 2022 1:10 pm

Gert_8 wrote:
Mon Aug 22, 2022 12:09 pm

Thanks again, brilliant advice and guidance! :clap: :clap:
No worries champ.
This is one of the parts that help keep things water tight.
Post Reply