
Some one who dares not to use leather....top marks mate and those pics are superb.
Mart.
E30 M3 number 2. 04/09/22 Engine build.
Moderator: martauto
-
martauto

- E30 Zone Team Member

- Posts: 6209
- Joined: Wed Aug 31, 2005 11:00 pm
- Location: leeds
Only the E46 cab left now.
Just got too old.
Just got too old.
-
bss325i
- E30 Zone Team Member
- Posts: 24532
- Joined: Sat Jan 20, 2007 11:00 pm
- Location: London/Surrey
And so it begins....
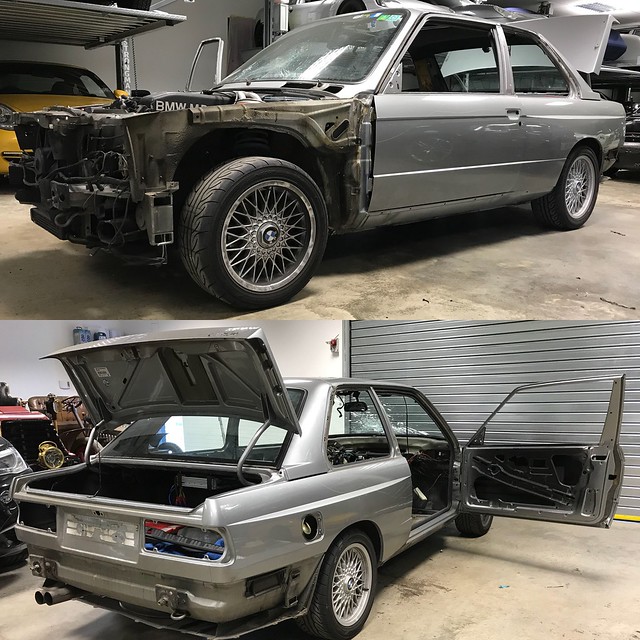
Started to strip it down for a full bare metal repaint and tend to any corrosion along the way.
Many brand new parts have been ordered for it from BMW including
Both front wings
Bonnet
Both bumpers
Sunroof panel
Sport evo rear spoiler
Front and rear screens
Windscreen had a massive crack in it from what felt like a rock hitting it chasing some one through pflanzgarten, when i was taking it apart i whacked it and just shattered.
More to follow over the next few weeks, did want it done in time for Gaydon but thats not going to happen.
-
bss325i
- E30 Zone Team Member
- Posts: 24532
- Joined: Sat Jan 20, 2007 11:00 pm
- Location: London/Surrey
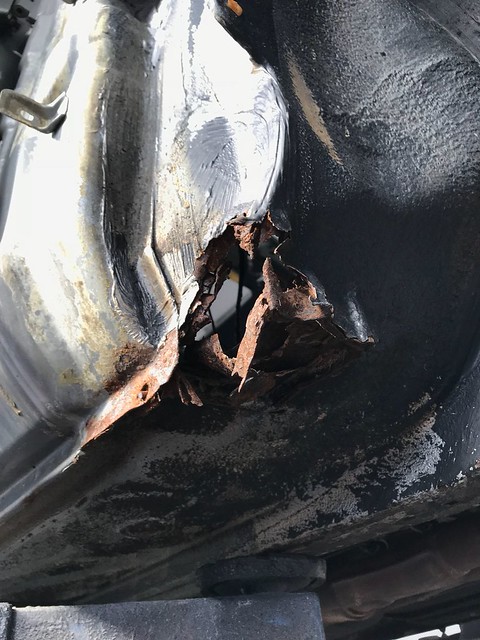
Some of the rust that started in the usual place of the front floors. Sections cut from a rust free car provided repair sections as these cannot be bought new.
Much the same on the other side.
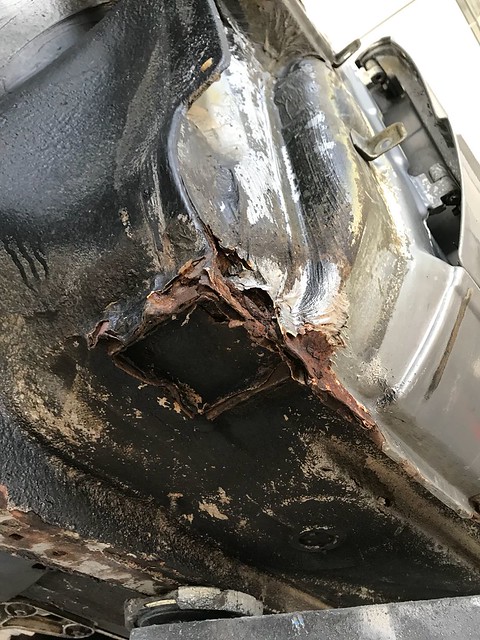
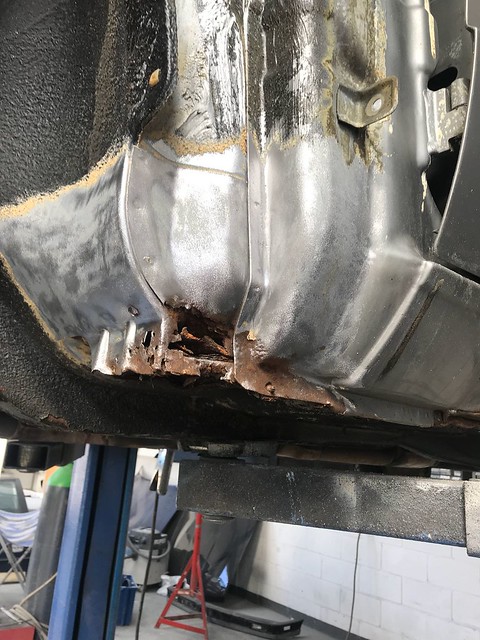
Previous damaged for being poorly jacked up.
-
BMG

- E30 Zone Regular

- Posts: 439
- Joined: Mon Jun 27, 2005 11:00 pm
- Location: south east
Yeah, mine has exactly the same rust. Always good to see an E30 getting some love.
-
ah

- E30 Zone Addict

- Posts: 2518
- Joined: Mon Mar 10, 2008 11:00 pm
- Location: surrey
Judging buy your sport Barry if this turns out as good or better,you'll end up with a couple of tasty cars !
Born on the 23 April 1990 320i Alpinweiss ll kabriolett! (SOLD BUT NOT FORGOTTEN !)
-
TurtleDesignTech
- E30 Zone Regular
- Posts: 250
- Joined: Tue Sep 15, 2015 11:00 pm
- Location: Hampshire
Project looks great Barry. Looking forward to the final result.
I may have to get my car resprayed a few years down the road.
I understand that by doing a bare metal respray you can see all the bare metal for any spots of corrosion. However are their any disadvantages?
How much does a good quality bare metal respray cost these days?
In theory; if you took all out all of the drivetrain, engine, subframes etc from the underside, could you paint strip the underside of the car too? If so what would be the best product to apply afterwards?
I know Johnathan Ward/ICON 4x4 who restores and modifies old Land Cruisers uses "heat cured polyurea", but that is on truck chassis. There must be something better than 3M Polyurethane or stinky old Waxoyl to use on a freshly prepared underbelly?
-
Speedtouch
- Old Skooler

- Posts: 14100
- Joined: Tue Feb 14, 2006 11:00 pm
- Location: Canterbury
Not many bodyshops would actually do a 'bare metal' respray, unless strictly necessary, since the existing paint if in reasonable condition and flatted off makes a good primer/base coat.
Theoretically, a bare metal respray as you suggest, would show any signs of corrosion, however, once the shell is bare-metalled, unless it's rust-treated or painted very quickly, it will inevitably surface-rust, hence why some firms go in for an acid dip or media-blasting to remove all paint then immediately etch-prime a bare shell (which is expensive, in itself).
Assuming you want all the door shuts, and A/B/C pillars, etc. done, you would be looking at a price of at least £2,000, and of course, if you want literally the whole shell bare-metalled and resprayed including engine bay, boot, etc., then the price would depend on how much prep work you did yourself, i.e., in removing any trim, drivetrain components, glass, etc.
Price would also depend on whether you stick to the original colour or decide on a complete change of colour.
///M aurice
ECU Upgrade EPROM Chips, £40 posted within the UK. Note these are not Zone chips.
viewtopic.php?f=6&t=279421
ECU Upgrade EPROM Chips, £40 posted within the UK. Note these are not Zone chips.
viewtopic.php?f=6&t=279421
-
bss325i
- E30 Zone Team Member
- Posts: 24532
- Joined: Sat Jan 20, 2007 11:00 pm
- Location: London/Surrey
The advantage of taking it back to bare metal other than checking for any corrosion is that previous repairs and paint can cause issues for the new paint later on down the line such as sinkage, cracking etc so getting rid of any old paint means it will go back to how it was done originally, primer (or E-coat) - base colour - lacquer instead of multiply layers of old filler, primer, paint and lacquer.
Obviously bare metal panels are not going be left bare long enough for any corrosion to start.
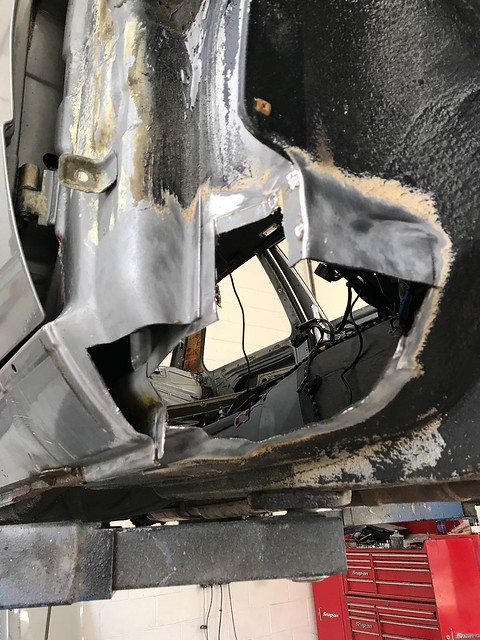
Along with the aforementioned new panels i have decided to replace the front panel as well due to it being quite scabby in various places and would make a nicer job just replacing the whole panel.
As for cost, not cheap! But as with many things you get what you pay for and ive seen plenty of cheap (and not so cheap) resprays that look awful close up.
I have stripped the car myself and will refit it afterwards but even with that labour cost saved with the new panels and various other new parts it will end up being over £10k.
Nothing wrong with 3M pollyurethene for the under side and this is exactly what will be used to do local repairs to under side of mine and the condition of the majority of it doesn't warrant stripping the whole underside to bare metal as the only corrosion is where the car has been incorrectly jacked by previous idiots.
Obviously bare metal panels are not going be left bare long enough for any corrosion to start.
Along with the aforementioned new panels i have decided to replace the front panel as well due to it being quite scabby in various places and would make a nicer job just replacing the whole panel.
As for cost, not cheap! But as with many things you get what you pay for and ive seen plenty of cheap (and not so cheap) resprays that look awful close up.
I have stripped the car myself and will refit it afterwards but even with that labour cost saved with the new panels and various other new parts it will end up being over £10k.
Nothing wrong with 3M pollyurethene for the under side and this is exactly what will be used to do local repairs to under side of mine and the condition of the majority of it doesn't warrant stripping the whole underside to bare metal as the only corrosion is where the car has been incorrectly jacked by previous idiots.
-
magpie
- Old Skooler
- Posts: 28035
- Joined: Sun Jun 29, 2008 11:00 pm
- Location: Consett,Durham.
Maurice trying to teach a granny how to suck eggs , i hope this doesn't turn into a debate .

m52 b30 stroker 6-speed 318is Galvanizer
m42 touring
+ a yard full of scrap turds
-
TurtleDesignTech
- E30 Zone Regular
- Posts: 250
- Joined: Tue Sep 15, 2015 11:00 pm
- Location: Hampshire
Thanks for your indepth responses Maurice and Barry.
My parents recently purchased a mini-4x4 new and I was surprised how little underseal it came with from the factory. Since they want to drive it up the mountains in Europe during the winter (i.e. salt, mud, slush) we agreed it needed some proper underseal.
I went ahead and gave the whole underside a decent smothering with the 3M stuff - after spending what seemed like a whole day masking off. I know Brian swears by it.
Since you have experience with 3M polyurethane, how long does it last on a daily driven car?
-
bss325i
- E30 Zone Team Member
- Posts: 24532
- Joined: Sat Jan 20, 2007 11:00 pm
- Location: London/Surrey
Interesting post!TurtleDesignTech wrote:Thanks for your indepth responses Maurice and Barry.
My parents recently purchased a mini-4x4 new and I was surprised how little underseal it came with from the factory. Since they want to drive it up the mountains in Europe during the winter (i.e. salt, mud, slush) we agreed it needed some proper underseal.
I went ahead and gave the whole underside a decent smothering with the 3M stuff - after spending what seemed like a whole day masking off. I know Brian swears by it.
Since you have experience with 3M polyurethane, how long does it last on a daily driven car?
For some time BMW have been applying less and less underseal from factory Whicjh started with the E46 era of car and got less and less as time has gone on to the point when the underside is just bare E-coat panels and Sean sealer on panel joins only.
I’ve seen E8x E9x and E60’s that are 10-12 year old and the undersides are riddled with nasty surface rust that will end up turning Intl holes....
Sadly modern BMW’s (and all brands) are built to be recycled after 10 years.
Something I’ve said for some time now is that if I ever bought a brand new or fairly new BMW to keep for a long time, all compenents removed from the underside such as axels, fuel tank and lines etc the 3M bag seal the lot.
It wil last for many years if applied correctly.
Last edited by bss325i on Thu Aug 09, 2018 9:28 pm, edited 1 time in total.
-
bmwe30mtech
- Engaged to the E30 Zone
- Posts: 5288
- Joined: Thu Feb 03, 2005 11:00 pm
That’s really interesting about newer BMWs Barry, I too had noticed less underseal, but had assumed the coating was improved enough to make them as good/better than the older cars - it seems not!
Excellent repair work, I love threads like this. Which bodyshop is carrying out the work?
Excellent repair work, I love threads like this. Which bodyshop is carrying out the work?
1988 M3 EvoII, Macau Blue/EvoII trim
1989 325i Sport M Tech II, Diamond Black/Black leather
1989 325i Sport M Tech II, Diamond Black/Black leather
-
bss325i
- E30 Zone Team Member
- Posts: 24532
- Joined: Sat Jan 20, 2007 11:00 pm
- Location: London/Surrey
The one that does all of our restoration work at BMR Performance.bmwe30mtech wrote:Excellent repair work, I love threads like this. Which bodyshop is carrying out the work?
http://176.32.230.18/impactbodywork.co.uk/
-
TurtleDesignTech
- E30 Zone Regular
- Posts: 250
- Joined: Tue Sep 15, 2015 11:00 pm
- Location: Hampshire
Thanks for your insight Barry.
-
bss325i
- E30 Zone Team Member
- Posts: 24532
- Joined: Sat Jan 20, 2007 11:00 pm
- Location: London/Surrey
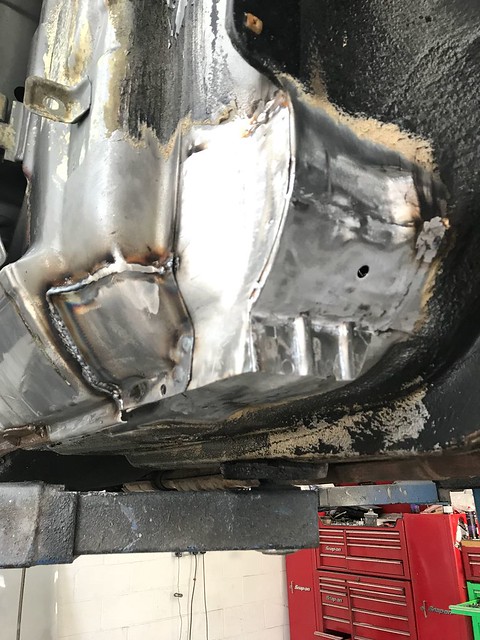
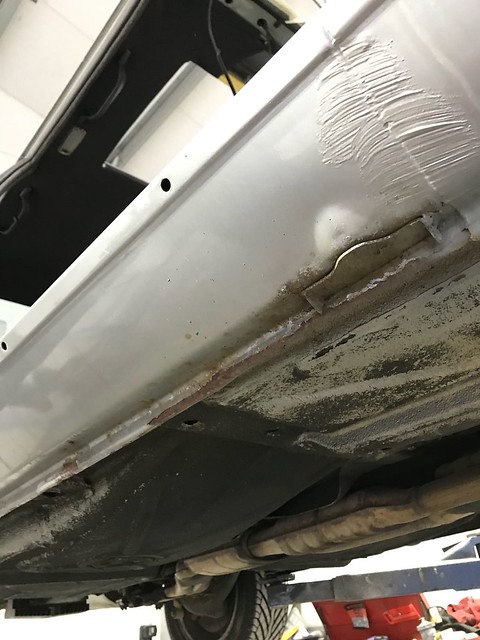
Bodyshop update time as its been a while.
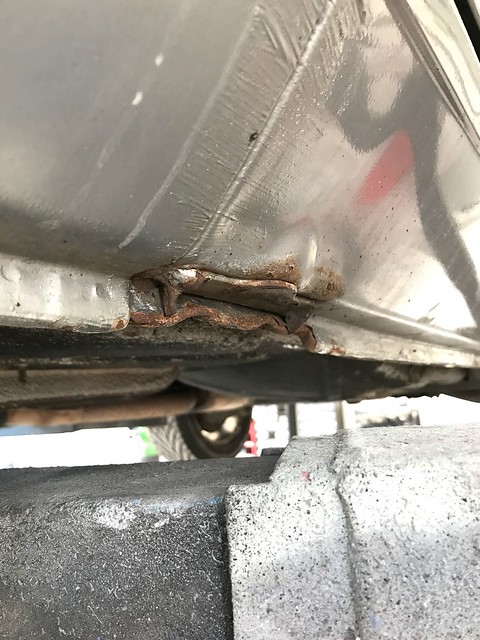
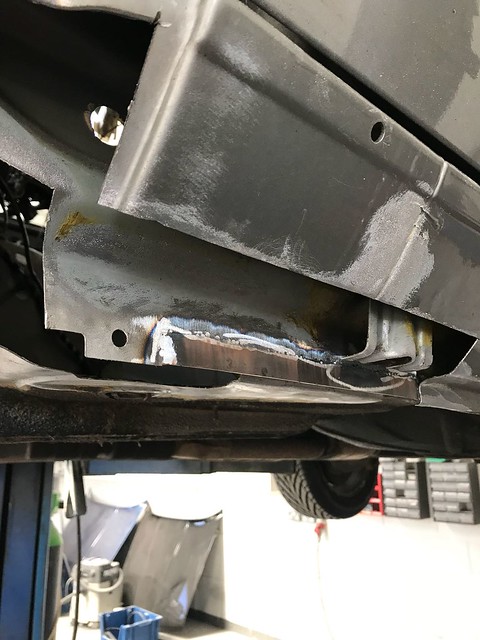
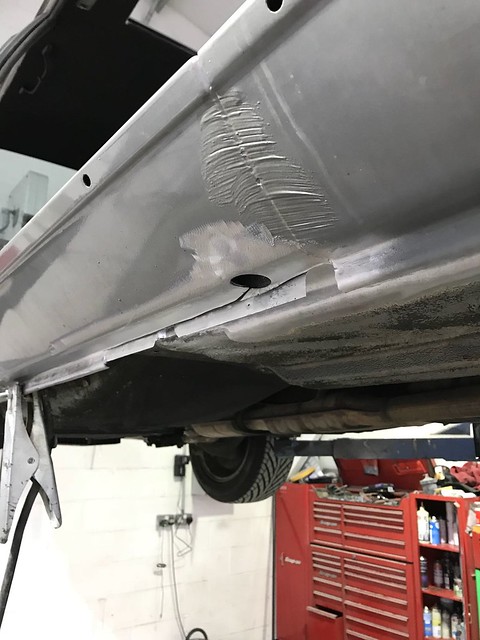
Right rear sill looking a bit scabby


Cut open to reveal some sneaky rust
Cleaned up and repaired.
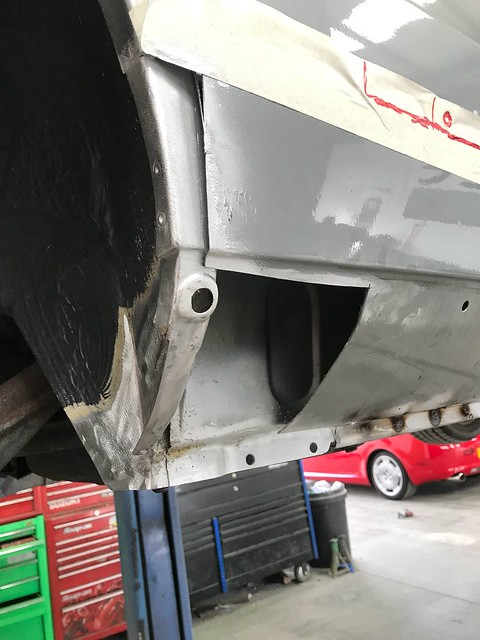
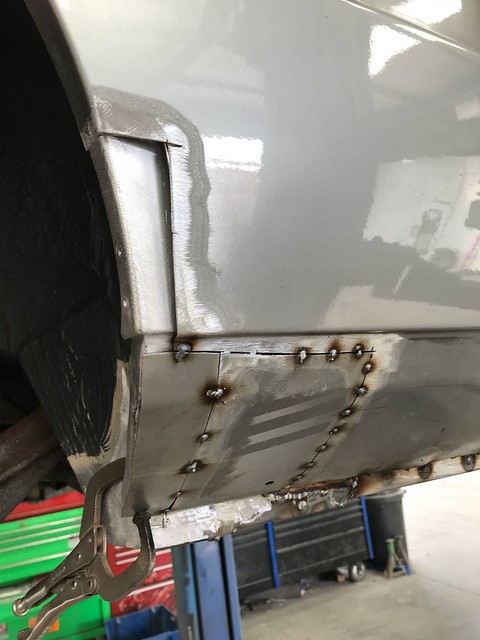
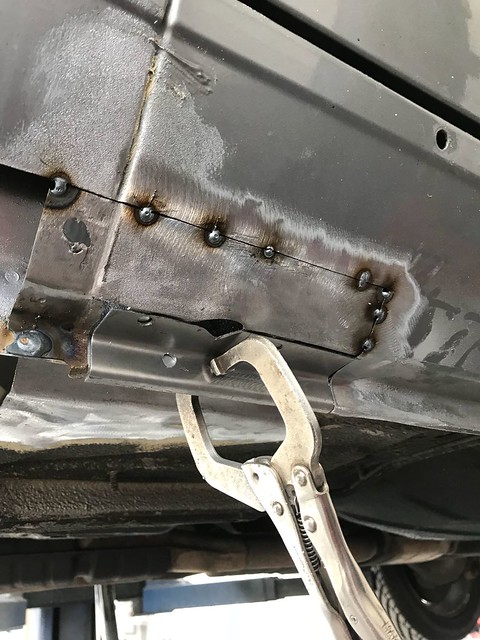
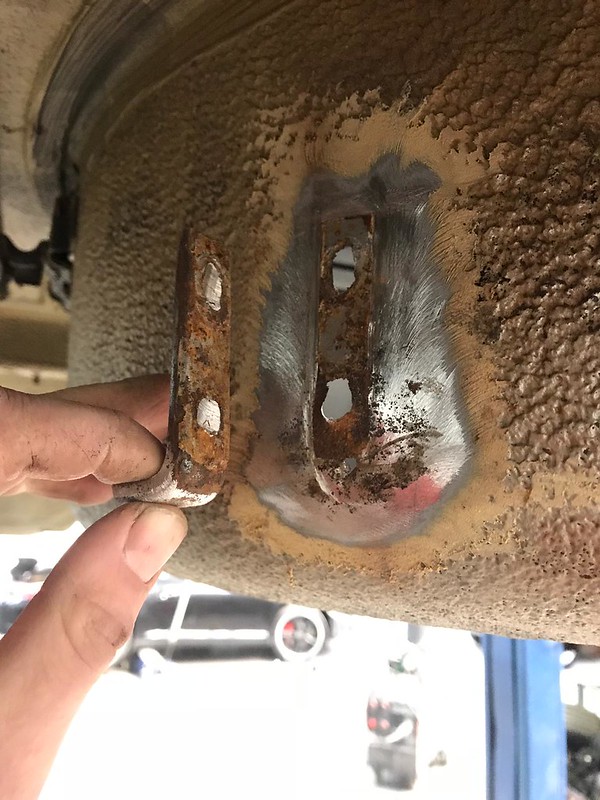
Further along the same sill, previous damage from being jacked up poorly needed repairing.

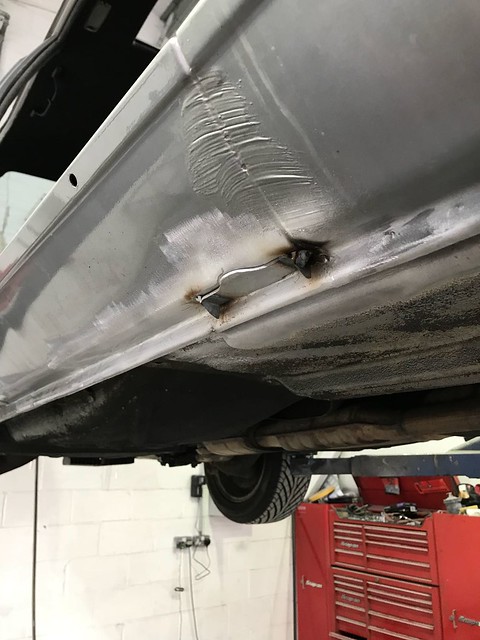
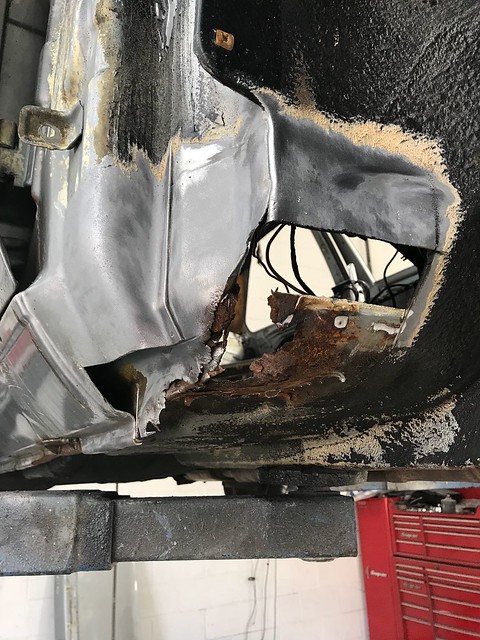
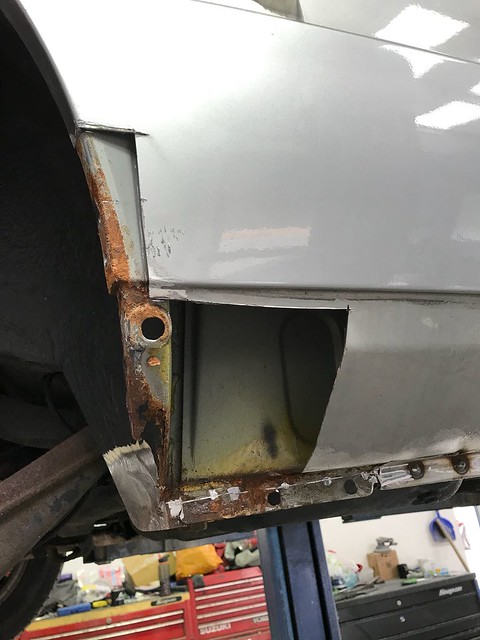
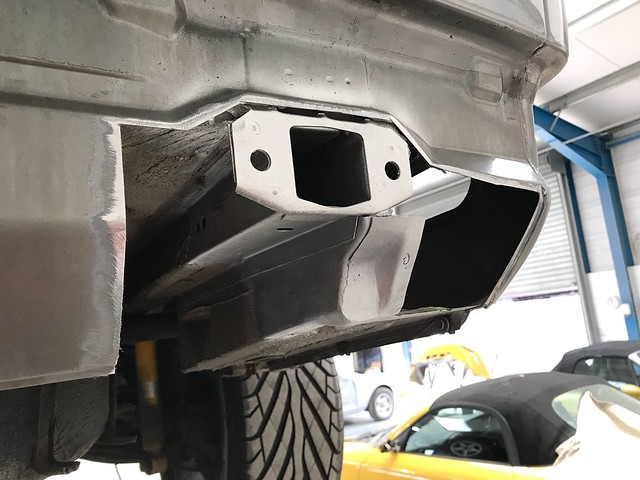
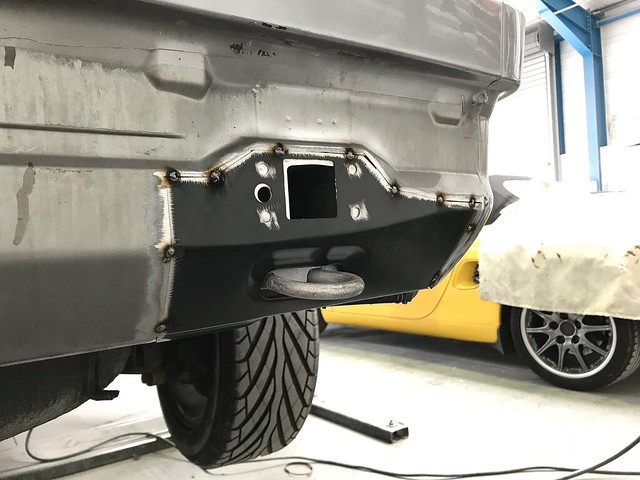
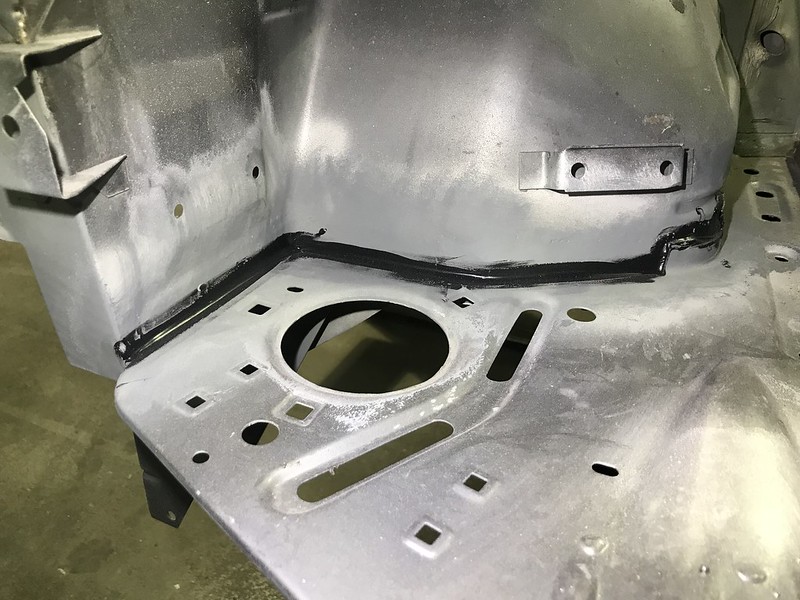
The rear tow eye area had a few small scabs so we thought it best to cut a section of the the rear panel off to have a look inside, glad we did!
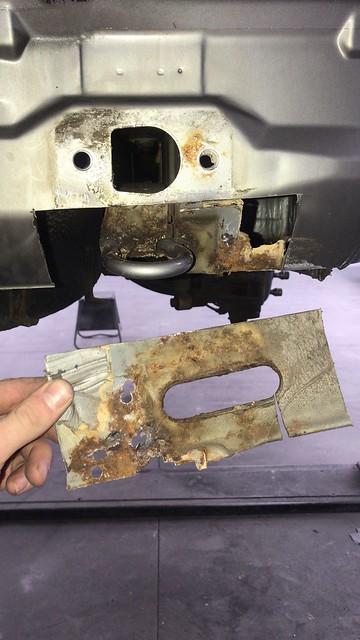
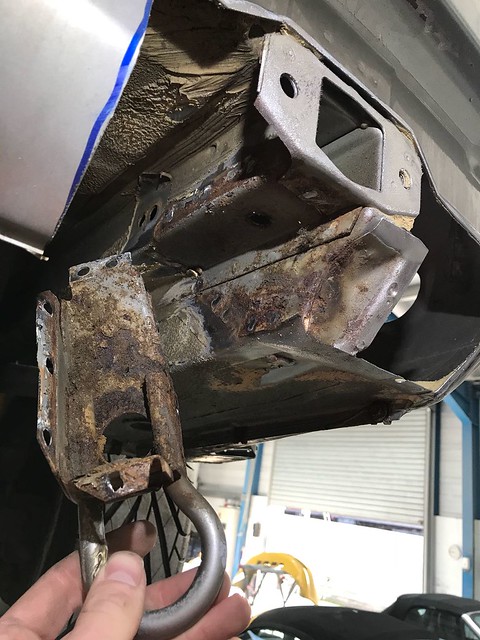
Tow eye cut off and cleaned up before being welded back on


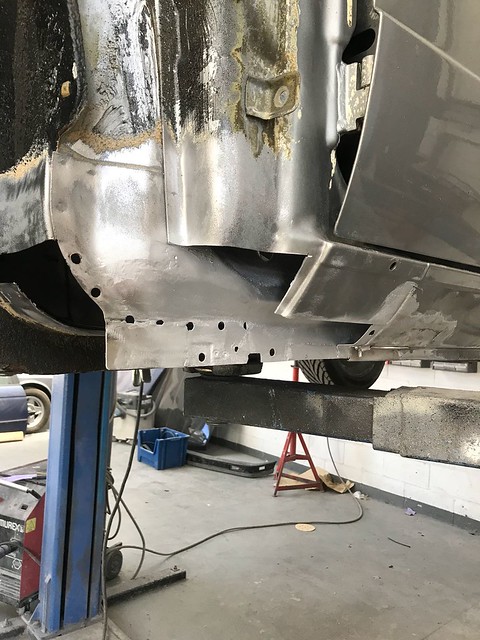
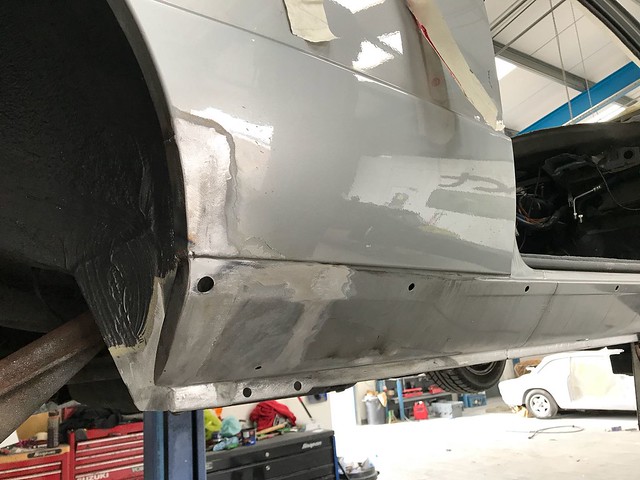
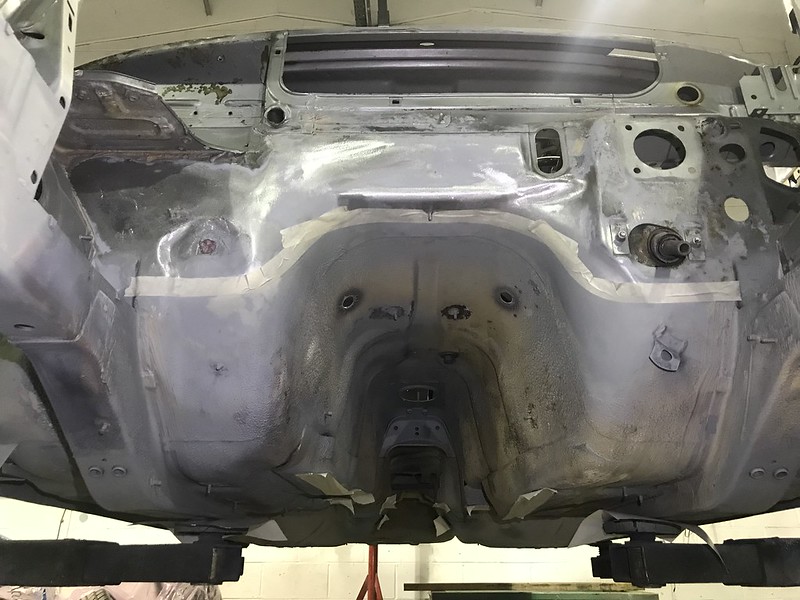
Front panel cut off, poor thing looking sorry for itself!
New front panel welded on and trial fit of new wings, bonnet and bumper

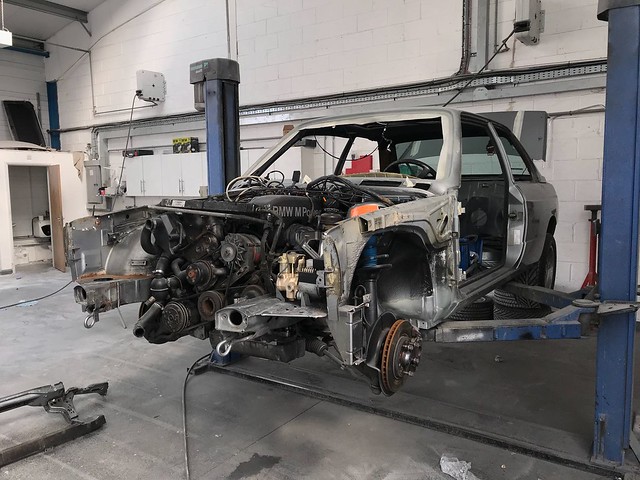
Its now looking like the engine, gearbox and everything else is going to come out.
From what was going to be some minor rust repair, a repaint has now turned in to a full blown resto.
Didn't think it would go this far but i should know more than anyone how these things can snow ball with E30's.
In for a penny and all that!
Right rear sill looking a bit scabby
Cut open to reveal some sneaky rust
Cleaned up and repaired.
Further along the same sill, previous damage from being jacked up poorly needed repairing.
The rear tow eye area had a few small scabs so we thought it best to cut a section of the the rear panel off to have a look inside, glad we did!
Tow eye cut off and cleaned up before being welded back on
Front panel cut off, poor thing looking sorry for itself!
New front panel welded on and trial fit of new wings, bonnet and bumper
Its now looking like the engine, gearbox and everything else is going to come out.
From what was going to be some minor rust repair, a repaint has now turned in to a full blown resto.
Didn't think it would go this far but i should know more than anyone how these things can snow ball with E30's.
In for a penny and all that!
Last edited by bss325i on Thu Sep 06, 2018 11:31 pm, edited 1 time in total.
-
magpie
- Old Skooler
- Posts: 28035
- Joined: Sun Jun 29, 2008 11:00 pm
- Location: Consett,Durham.
this will be epic ... your ocd will take over 
m52 b30 stroker 6-speed 318is Galvanizer
m42 touring
+ a yard full of scrap turds
-
BMG
- E30 Zone Regular
- Posts: 439
- Joined: Mon Jun 27, 2005 11:00 pm
- Location: south east
Your body shop does nice work, looks like its in good hands. What was up with the front panel to remove and replace ?
-
bss325i
- E30 Zone Team Member
- Posts: 24532
- Joined: Sat Jan 20, 2007 11:00 pm
- Location: London/Surrey
Lots of scabs and surface rust inside the box sections so it made sense to make a nicer repair by replacing it.BMG wrote:Your body shop does nice work, looks like its in good hands. What was up with the front panel to remove and replace ?
-
martauto
- E30 Zone Team Member
- Posts: 6209
- Joined: Wed Aug 31, 2005 11:00 pm
- Location: leeds
Well on it`s way already Mick !!magpie wrote:this will be epic ... your ocd will take over
Great to see all of this done properly.
Mart.
Only the E46 cab left now.
Just got too old.
Just got too old.
-
BMG
- E30 Zone Regular
- Posts: 439
- Joined: Mon Jun 27, 2005 11:00 pm
- Location: south east
How's the underside look , any areas of failed underseal to remove or repair ?bss325i wrote:Lots of scabs and surface rust inside the box sections so it made sense to make a nicer repair by replacing it.BMG wrote:Your body shop does nice work, looks like its in good hands. What was up with the front panel to remove and replace ?
-
bss325i
- E30 Zone Team Member
- Posts: 24532
- Joined: Sat Jan 20, 2007 11:00 pm
- Location: London/Surrey
Yes plenty of little bits here and there.BMG wrote:How's the underside look , any areas of failed underseal to remove or repair ?bss325i wrote:Lots of scabs and surface rust inside the box sections so it made sense to make a nicer repair by replacing it.BMG wrote:Your body shop does nice work, looks like its in good hands. What was up with the front panel to remove and replace ?
Thats why the bodyshop have asked me to fully strip the shell of everything now.
I should have just done it in the first place to be honest.
-
bss325i
- E30 Zone Team Member
- Posts: 24532
- Joined: Sat Jan 20, 2007 11:00 pm
- Location: London/Surrey
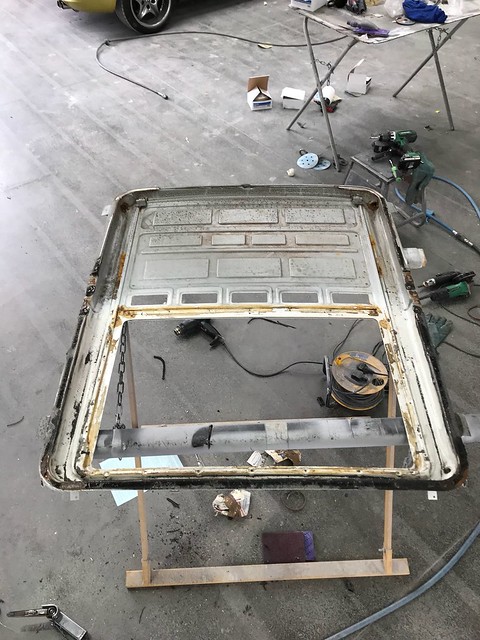
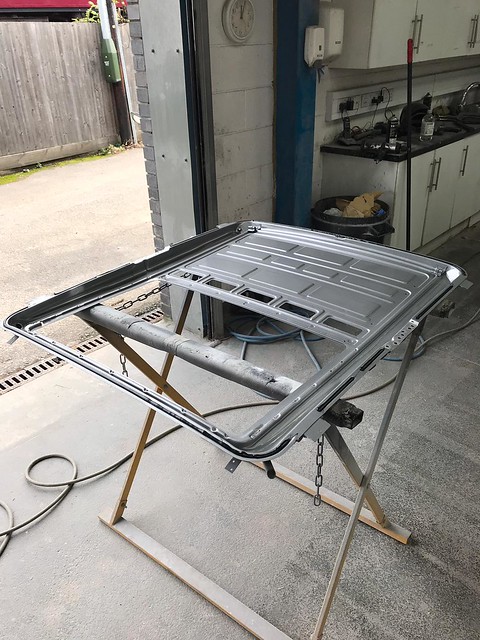
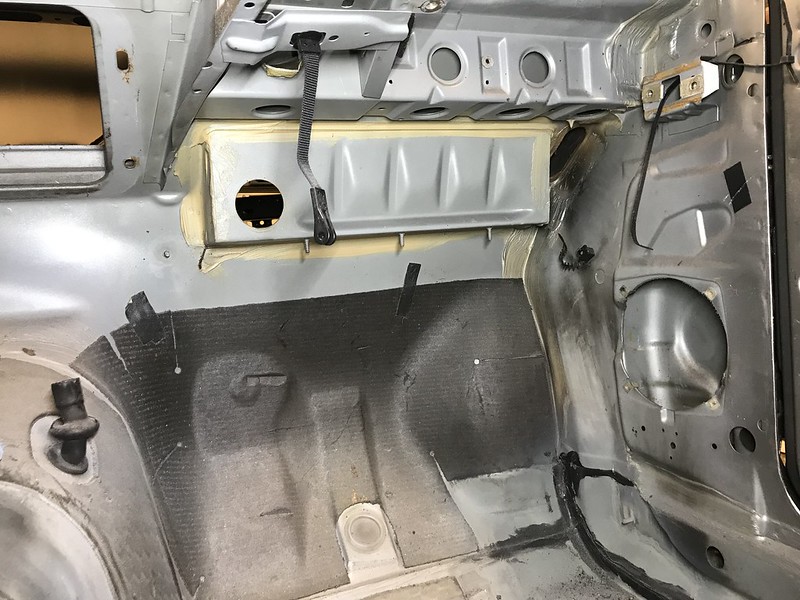
The Sunroof tray is one of the E30 bodies well known rust traps due to it being a collection point of moisture and virtually zero protection with only a light dusting of paint on the tray and bare E-coat on the inside of the outer roof skin.
Upon close inspection there were signs of of surface corrosion starting in the M3 so this needed to be addressed now as left to fester it would spread to the outer skin and perforate it meaning a new skin or a tricky repair.
As new sunroof trays are NLA a whole used roof with virtually no corrosion was purchased (from brutus on here) and after the outer skin was cut away i was left with the donor tray pictured above.
This was then blasted back to bare metal then etch primed although i forgot to get a pic of it.
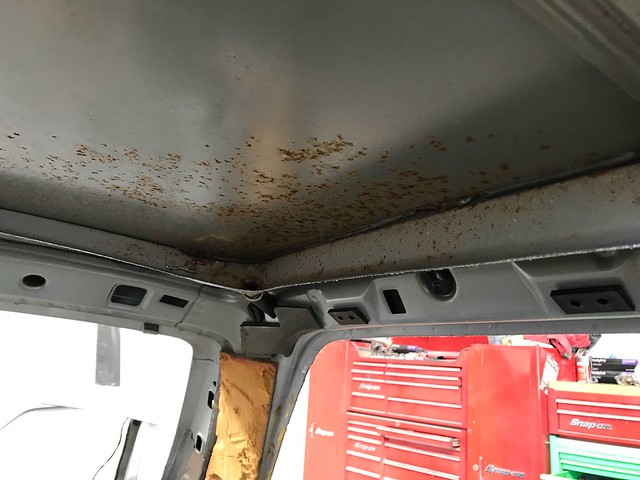
With my old sunroof try cut away you can see the extent of the surface corrosion in the pics above.
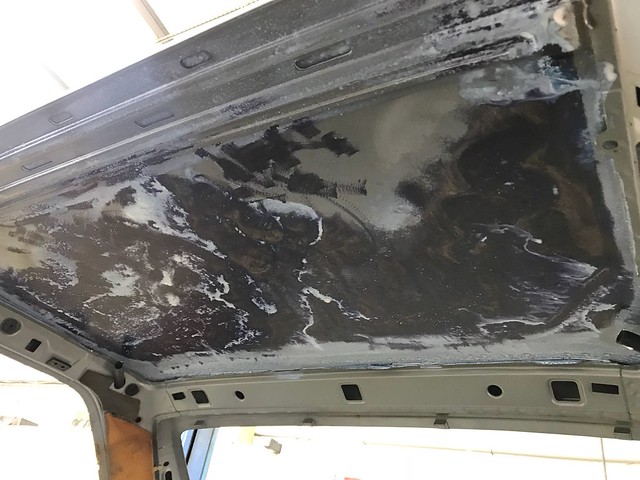
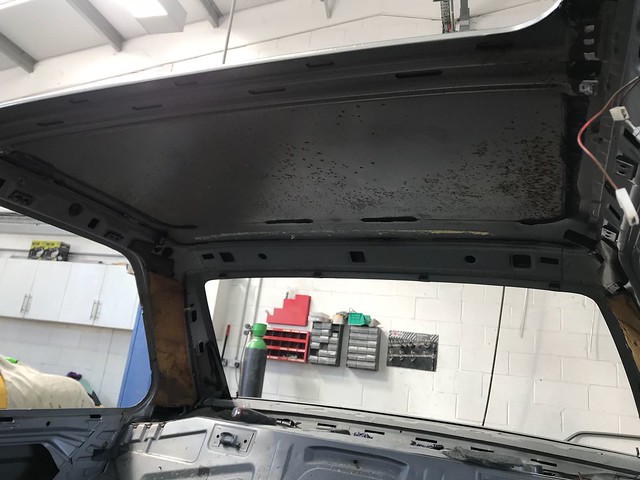
Inside of the skin was ground back to bare metal and a rust neutraliser used.
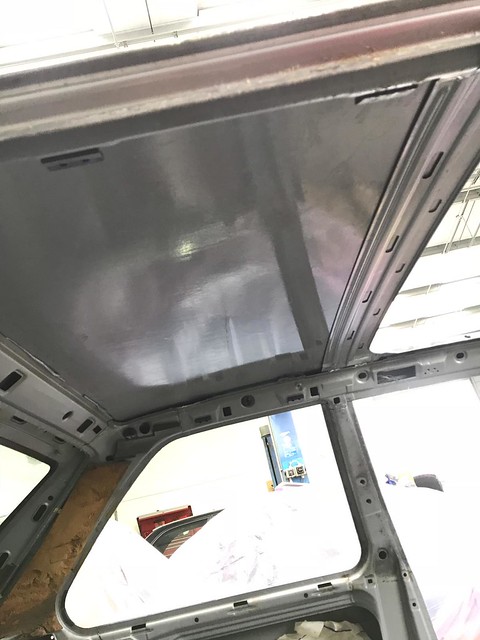
Inside of the roof skin primed and painted in Lachs silver.
Sunroof tray primed and painted in Lachs silver.


Bonded and welded into place as per factory but now fully painted inside and out so with some cavity wax applied when the body resto is complete will mean this area will be much more protected than when it was originally made.
Next step will be to remove the engine, gearbox, axles etc to tackle the underside.
-
TurtleDesignTech
- E30 Zone Regular
- Posts: 250
- Joined: Tue Sep 15, 2015 11:00 pm
- Location: Hampshire
Good work Barry. Makes me wonder now what my sunroof tray looks like.
-
Tedswagon
- E30 Zone Addict
- Posts: 2195
- Joined: Sun Nov 23, 2008 11:00 pm
- Location: Edinburgh
Amazing work.
Can you let me know if the same upgrade fits a standard e30 or just m3?
"......The well proven upgrade of 25mm master cylinder from an E32 750i was also fitted which has improved pedal feel......"
Can you let me know if the same upgrade fits a standard e30 or just m3?
"......The well proven upgrade of 25mm master cylinder from an E32 750i was also fitted which has improved pedal feel......"
E30 316i auto coupe build thread here viewtopic.php?f=25&t=273035
-
magpie
- Old Skooler
- Posts: 28035
- Joined: Sun Jun 29, 2008 11:00 pm
- Location: Consett,Durham.
nice update 
m52 b30 stroker 6-speed 318is Galvanizer
m42 touring
+ a yard full of scrap turds
-
brutus
- E30 Zone Squatter

- Posts: 1620
- Joined: Thu Mar 26, 2015 11:00 pm
- Location: east london
this looks epic !
MANY e30 PARTS FOR SALE.
( all models available )
& parts /glass for e21, e28, e34, e36,e39,e46
318i baur 1986 auto.
( all models available )
& parts /glass for e21, e28, e34, e36,e39,e46
318i baur 1986 auto.
-
BMG
- E30 Zone Regular
- Posts: 439
- Joined: Mon Jun 27, 2005 11:00 pm
- Location: south east
Excellent stuff - someone else getting in ever deeper in to an M3 rebuild and resulting financial pain. 
-
martauto
- E30 Zone Team Member
- Posts: 6209
- Joined: Wed Aug 31, 2005 11:00 pm
- Location: leeds
-
bss325i
- E30 Zone Team Member
- Posts: 24532
- Joined: Sat Jan 20, 2007 11:00 pm
- Location: London/Surrey
Much progress has been made with IIB so its time for a big update.

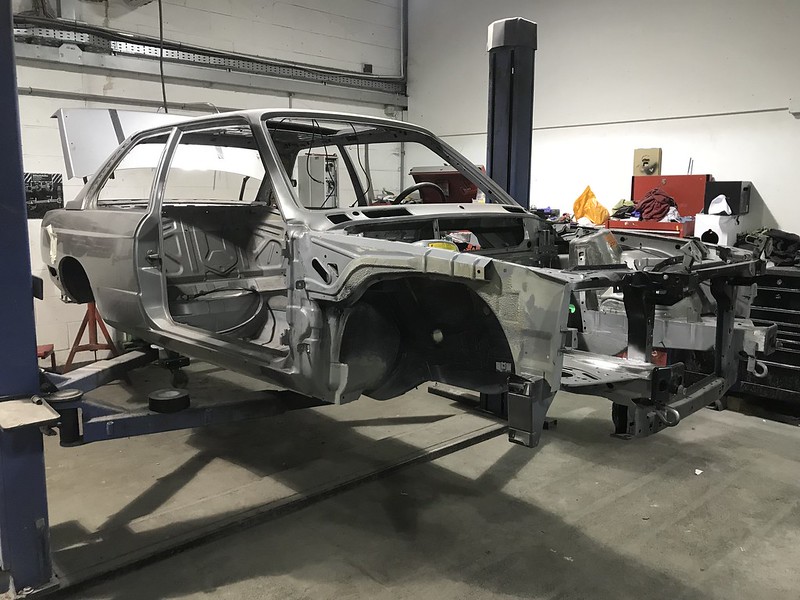
As work progressed at the bodyshop it was decided that there was no point messing about so i got the car recovered back to my workshop so i could remove all the remaining parts such as the engine and gear box, all brake and fuel pipes, fuel tank, complete body loom and every last clip, fitting and grommet from the engine bay and underside.
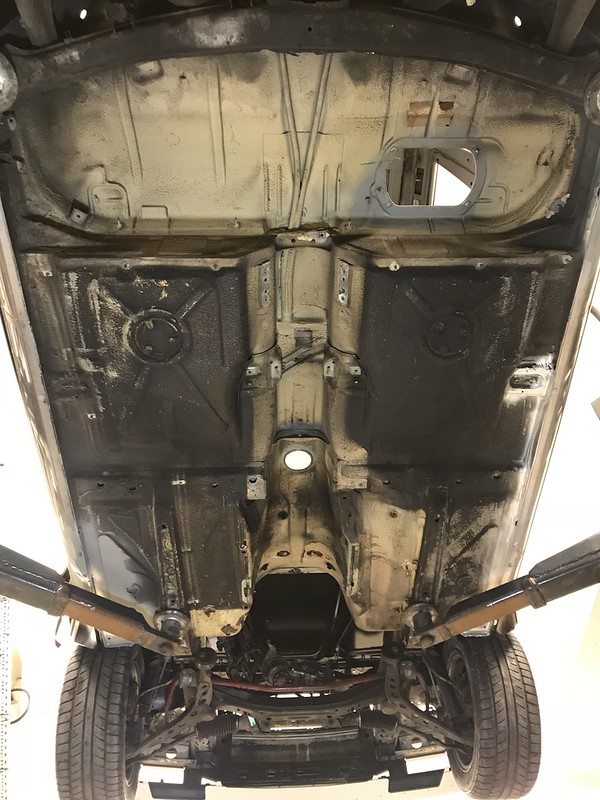

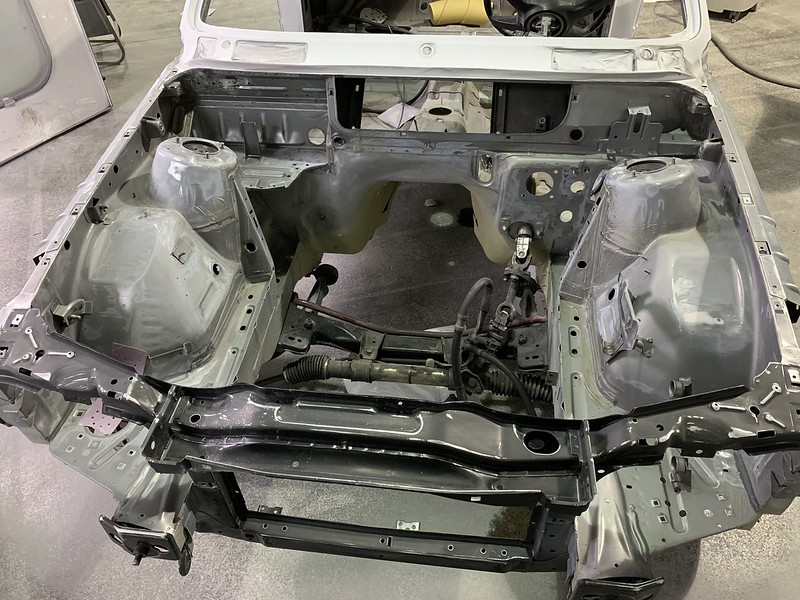
Underside with all but the axles removed. In pretty good shape with a lot of the original beige underseal visible.
The underside came up well after careful cleaning to reveal more of the beige underseal and the black paint in the wheel arches as per original factory finish.

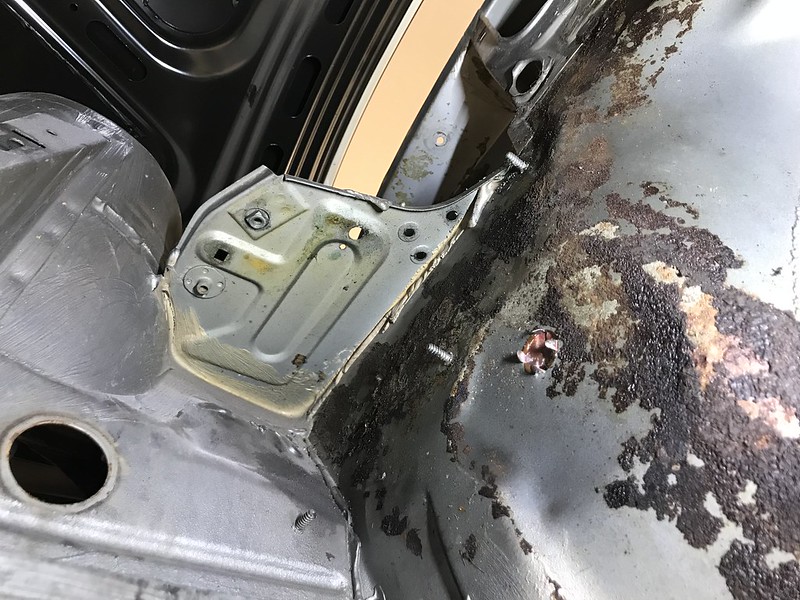
After removing the bulkhead sound insulation i was a little startled initially as it looked covered in surface rust at first glance but the majority of it was just some of the reverse side of the insulation that had stuck to the metal bulkhead, this just scraped off easily to reveal a solid bulkhead.
The inside of the bulkhead in excellent shape.
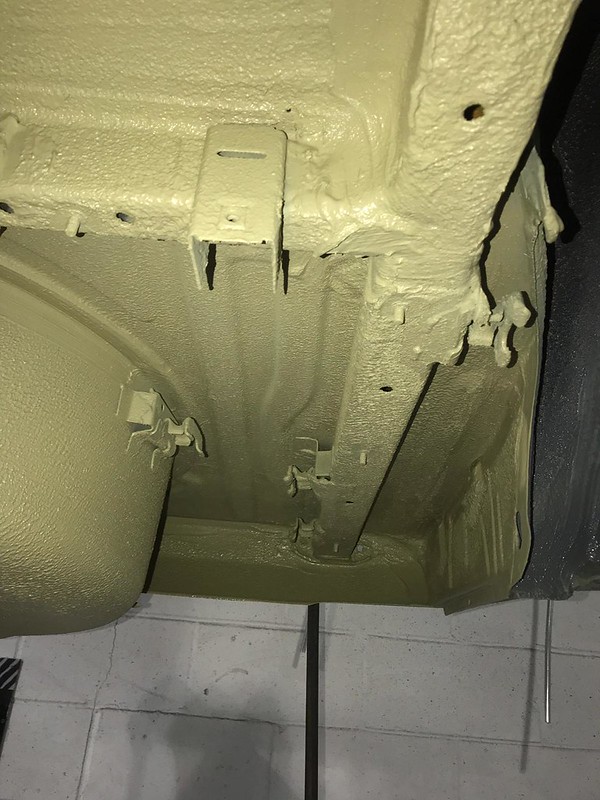
Back at the bodyshop with both axles removed.
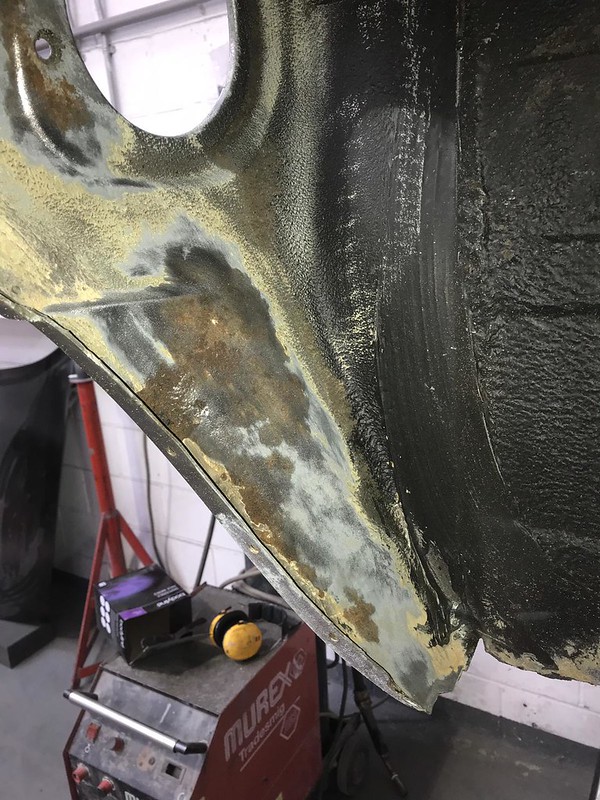
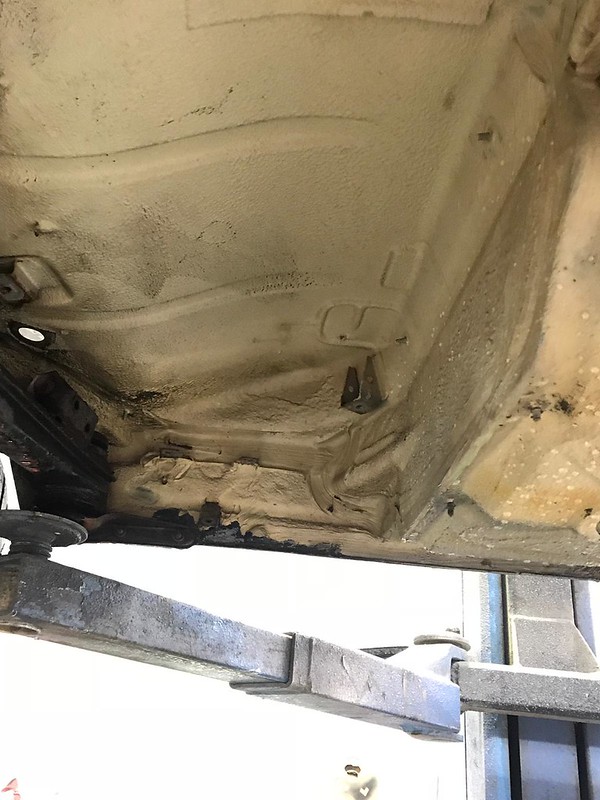
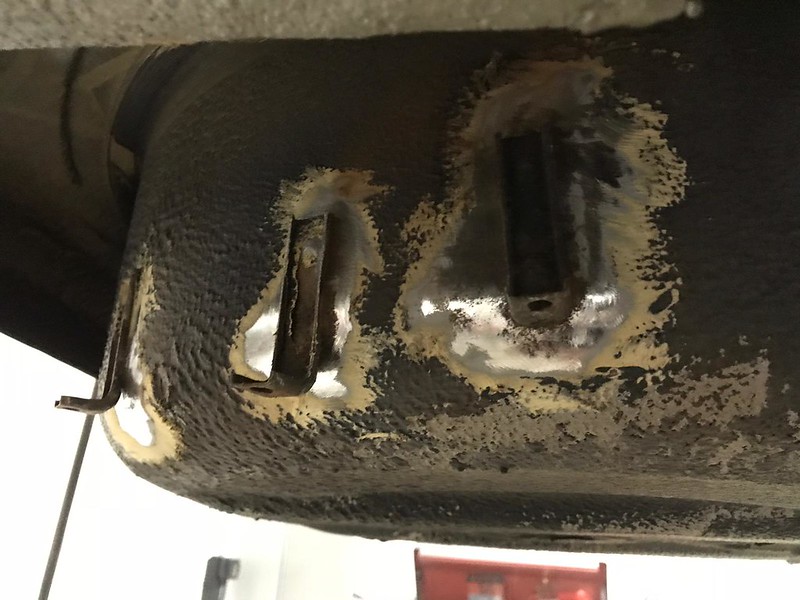
A thorough inspection of inside the wheel arches and underside for any crusty bits or loose underseal meant grinding it back to metal to repair any corrosion however minor.
After repairs were completed and corrosion cleaned, areas were etch primed then 3M spray sealed.

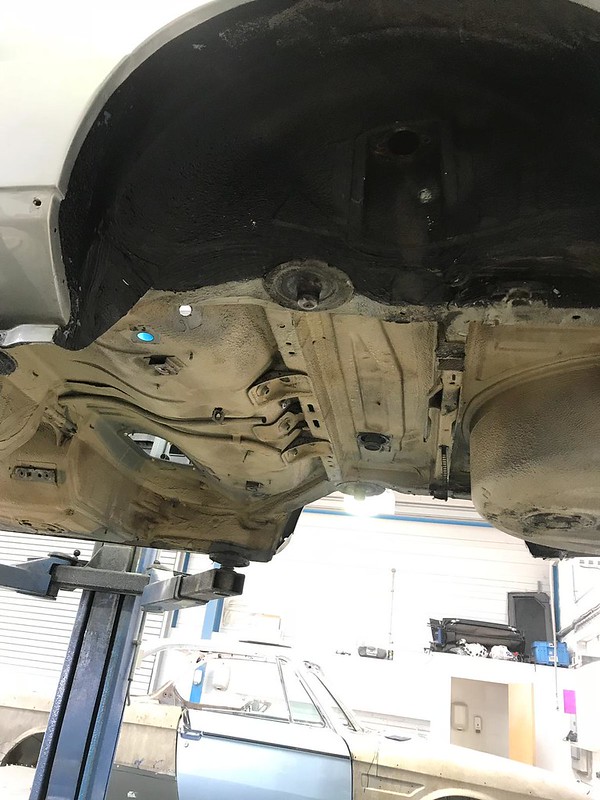
Various brackets removed, repaired and cleaned before going back on.

Some of the areas repaired and the bulkhead cleaned up of that insulation residue.
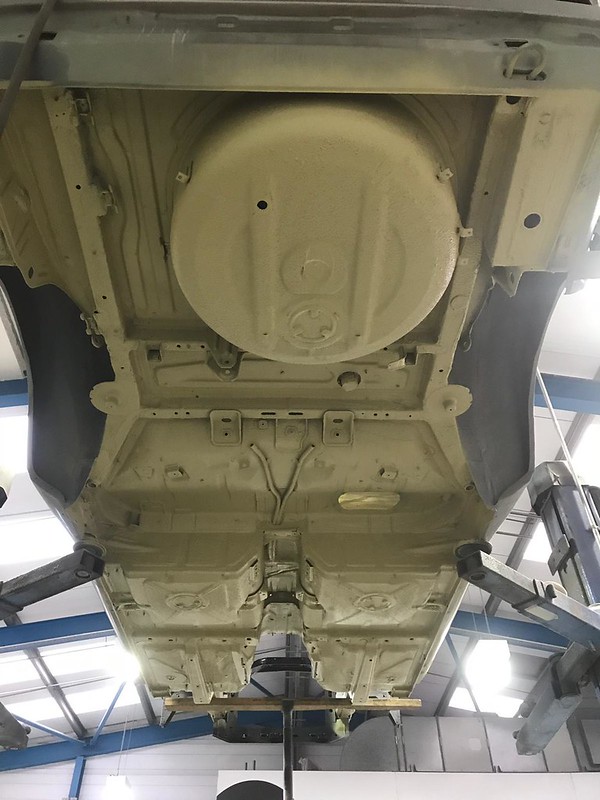
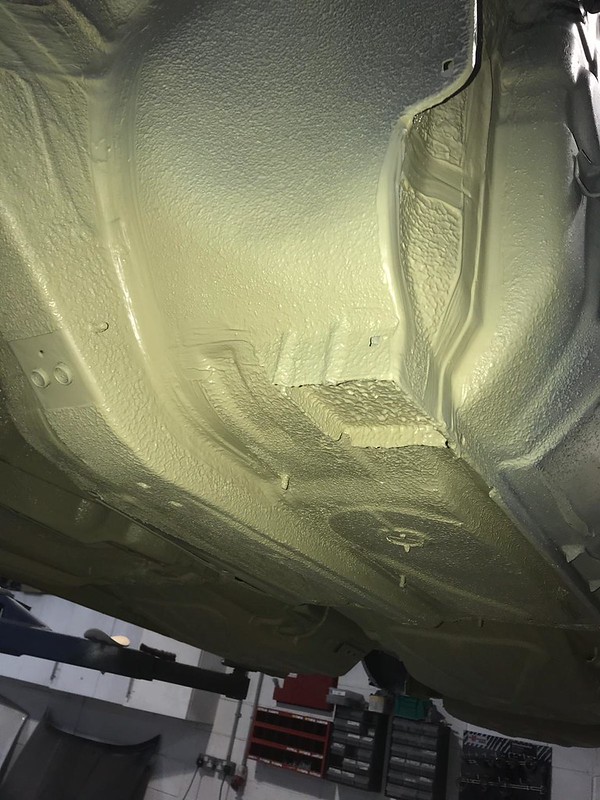

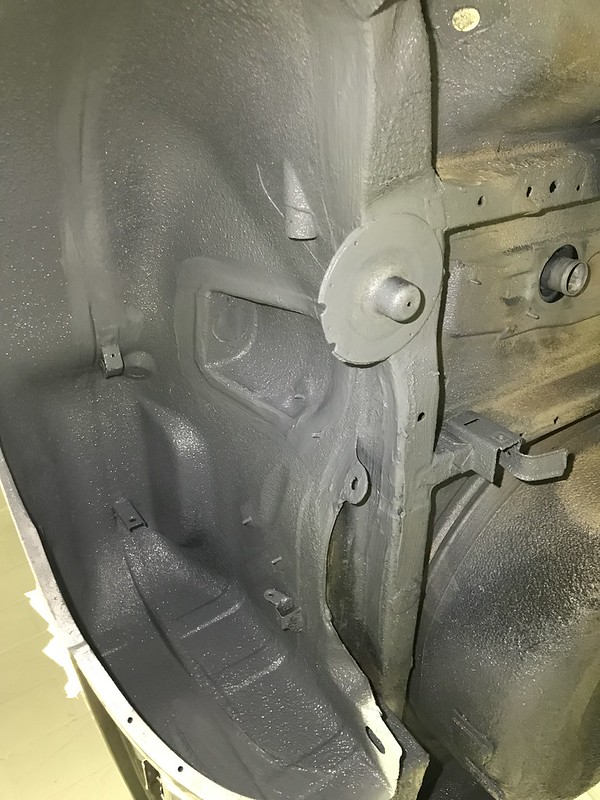
Underside completely painted in beige colour matched to the original factory sealer, wheel arches blown in matt black as per factory.
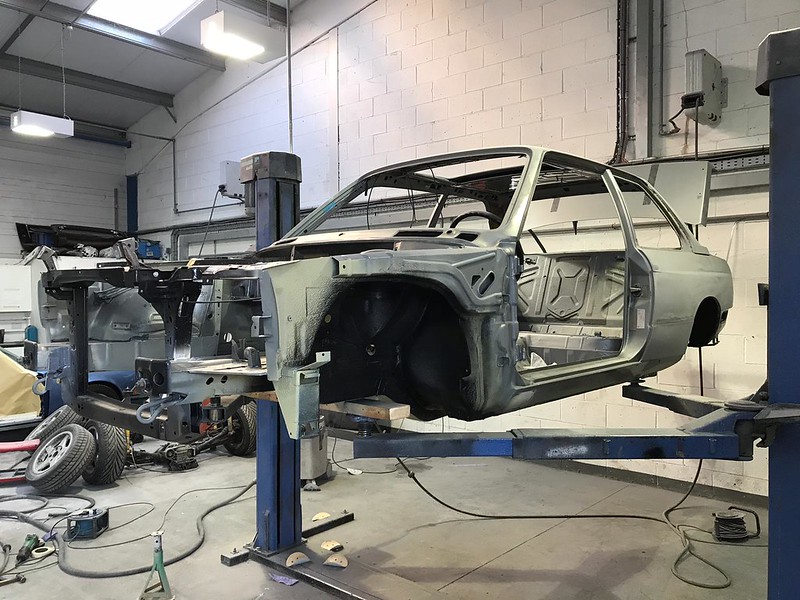
All underside and wheel arch repairs completed and how the shell looks now, work has started on bare metaling the top side of the shell as......
This is why the panels need to be taken back to bare metal, several layers of old paint would just mean trouble for the new paint with sinkage, cracking etc.
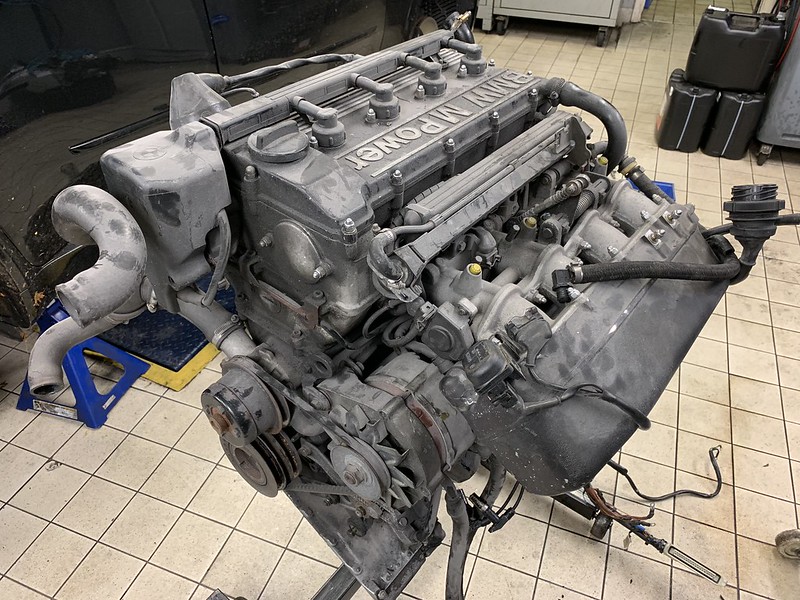
As the engine is now out i got it on a stand to start work on it.
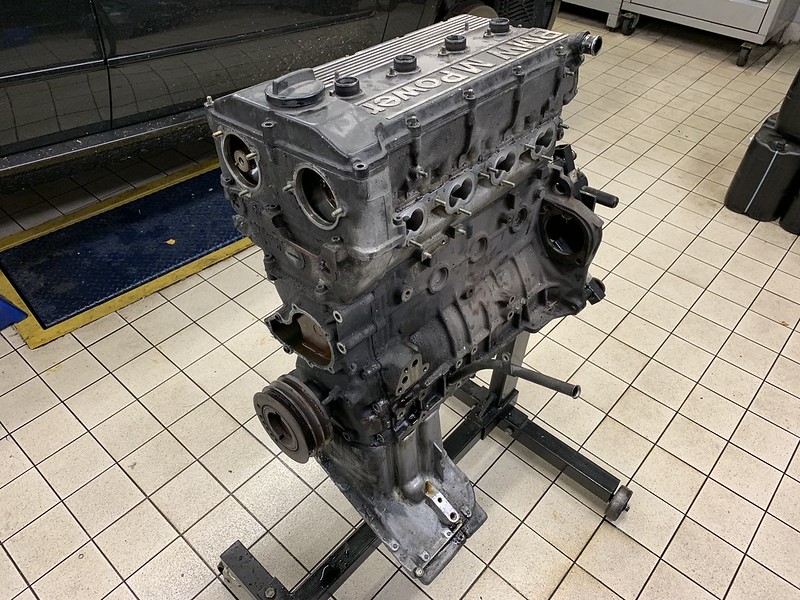
Stripped to a bare block and head for all the ancillaries and throttle bodies to be improved cosmetically.

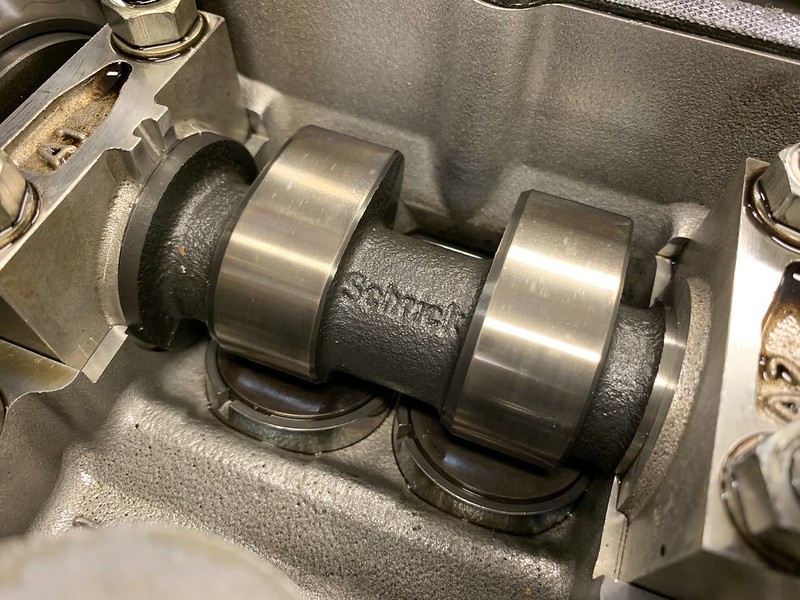
Still spotlessly clean internally and seeing as it was rebuilt by BBR approximately 60k miles ago and makes good power im undecided wether to completely strip it but the minimum it will get are a set of rod bearings and ARP rod bolts as well as replacing the Schrick 264 cams for the 284/272 ones i have for it.
As work progressed at the bodyshop it was decided that there was no point messing about so i got the car recovered back to my workshop so i could remove all the remaining parts such as the engine and gear box, all brake and fuel pipes, fuel tank, complete body loom and every last clip, fitting and grommet from the engine bay and underside.
Underside with all but the axles removed. In pretty good shape with a lot of the original beige underseal visible.
The underside came up well after careful cleaning to reveal more of the beige underseal and the black paint in the wheel arches as per original factory finish.
After removing the bulkhead sound insulation i was a little startled initially as it looked covered in surface rust at first glance but the majority of it was just some of the reverse side of the insulation that had stuck to the metal bulkhead, this just scraped off easily to reveal a solid bulkhead.
The inside of the bulkhead in excellent shape.
Back at the bodyshop with both axles removed.
A thorough inspection of inside the wheel arches and underside for any crusty bits or loose underseal meant grinding it back to metal to repair any corrosion however minor.
After repairs were completed and corrosion cleaned, areas were etch primed then 3M spray sealed.
Various brackets removed, repaired and cleaned before going back on.
Some of the areas repaired and the bulkhead cleaned up of that insulation residue.
Underside completely painted in beige colour matched to the original factory sealer, wheel arches blown in matt black as per factory.
All underside and wheel arch repairs completed and how the shell looks now, work has started on bare metaling the top side of the shell as......
This is why the panels need to be taken back to bare metal, several layers of old paint would just mean trouble for the new paint with sinkage, cracking etc.
As the engine is now out i got it on a stand to start work on it.
Stripped to a bare block and head for all the ancillaries and throttle bodies to be improved cosmetically.
Still spotlessly clean internally and seeing as it was rebuilt by BBR approximately 60k miles ago and makes good power im undecided wether to completely strip it but the minimum it will get are a set of rod bearings and ARP rod bolts as well as replacing the Schrick 264 cams for the 284/272 ones i have for it.
-
martauto
- E30 Zone Team Member
- Posts: 6209
- Joined: Wed Aug 31, 2005 11:00 pm
- Location: leeds
Great up-date and what a car !!
Mart.
Mart.
Only the E46 cab left now.
Just got too old.
Just got too old.
-
x-works
- E30 Zone Regular
- Posts: 332
- Joined: Thu Mar 10, 2005 11:00 pm
- Location: Ireland
Great read. 
-
bab-91
- Married to the E30 Zone
- Posts: 7174
- Joined: Thu Jan 06, 2011 11:00 pm
- Location: Northern Ireland
The Internet - It has proven to be worthless, and is nothing but a repository for perverts.
IG - bab91
IG - bab91
-
TurtleDesignTech
- E30 Zone Regular
- Posts: 250
- Joined: Tue Sep 15, 2015 11:00 pm
- Location: Hampshire
Good update. Was wondering how you were going to do the underside. 
-
bss325i
- E30 Zone Team Member
- Posts: 24532
- Joined: Sat Jan 20, 2007 11:00 pm
- Location: London/Surrey
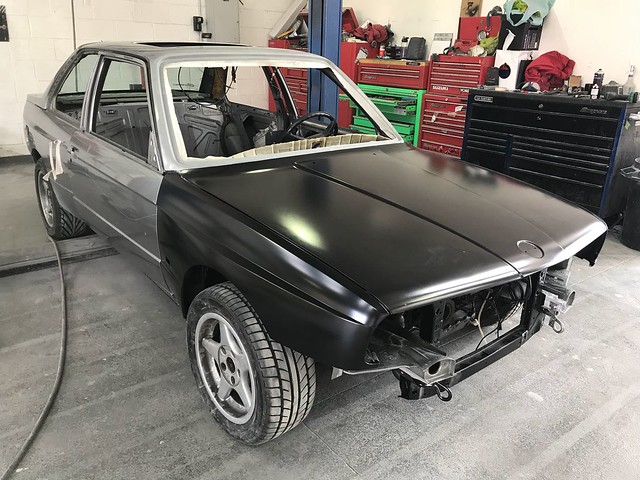
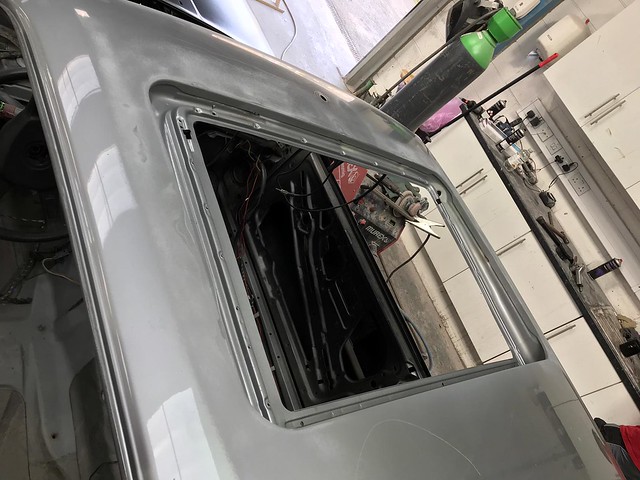
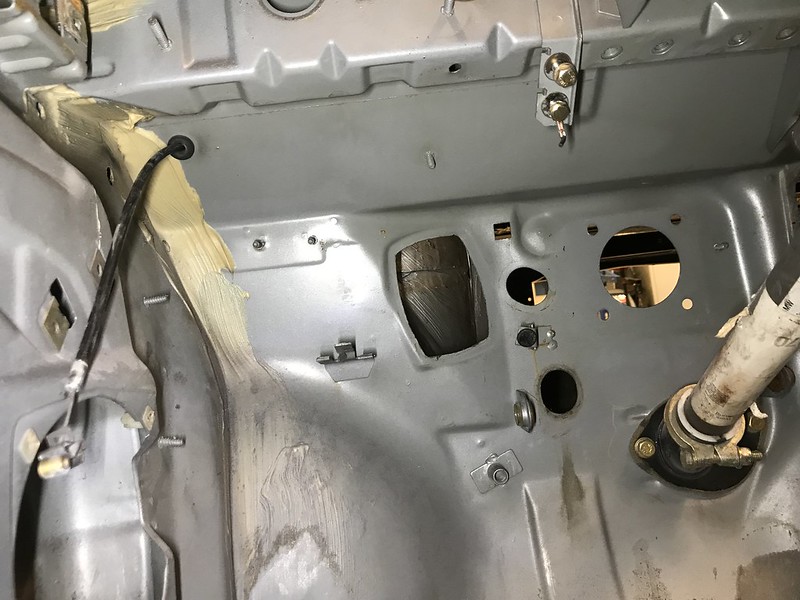
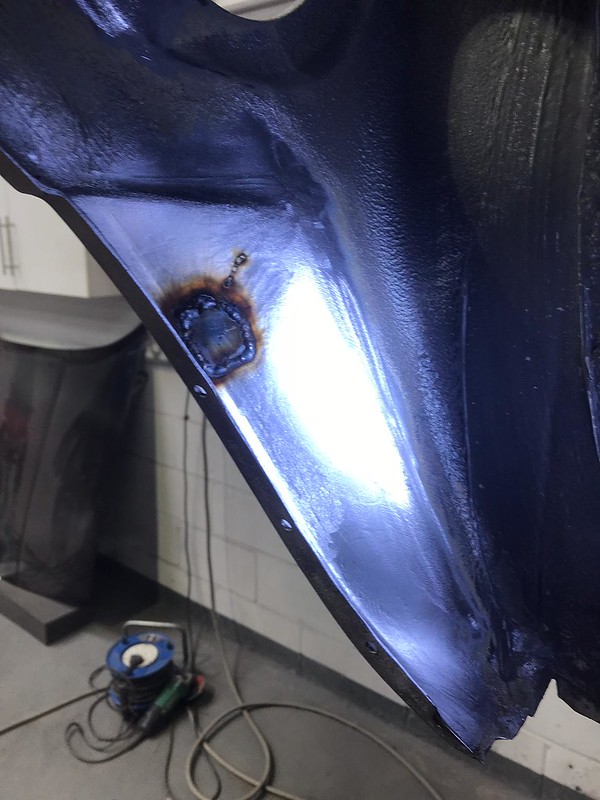
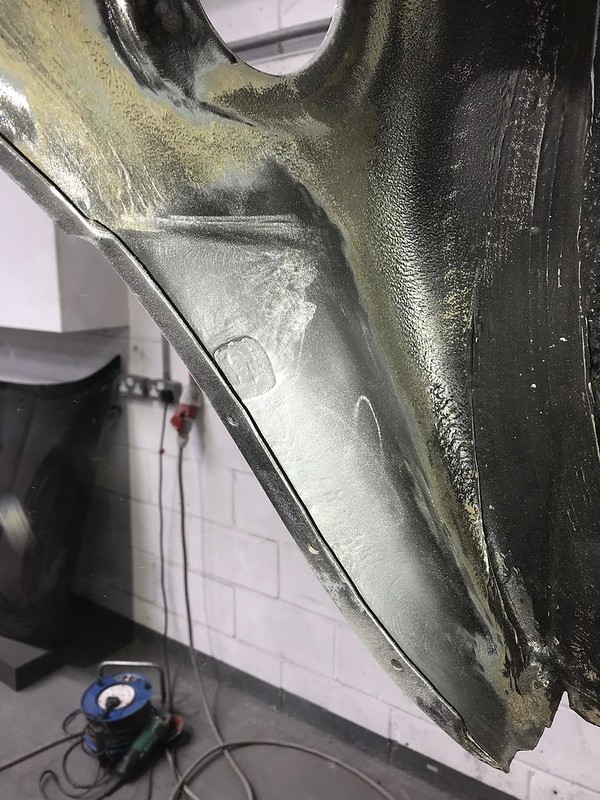
Getting closer and closer now! The engine bay mid prep.
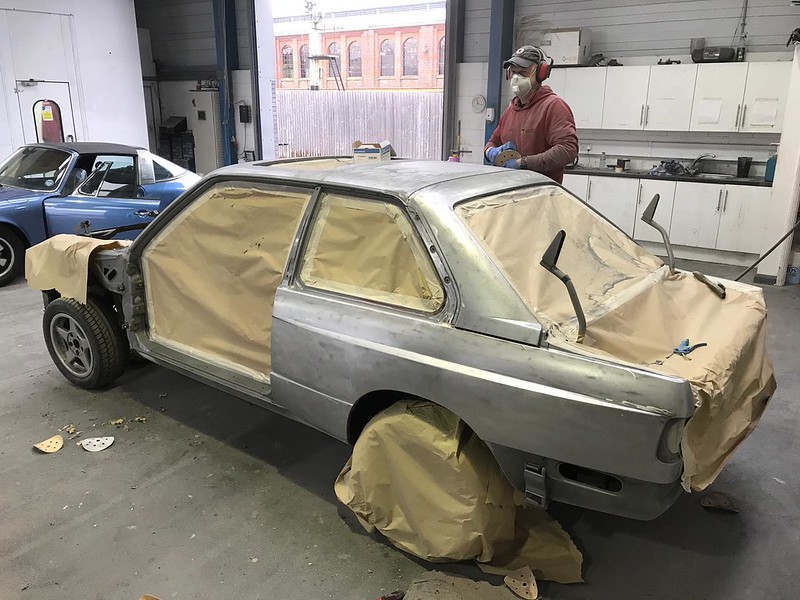
All of the remaining panels not being replaced now in bare metal to get rid of the multiple layers of previous paint.

Etch primed.
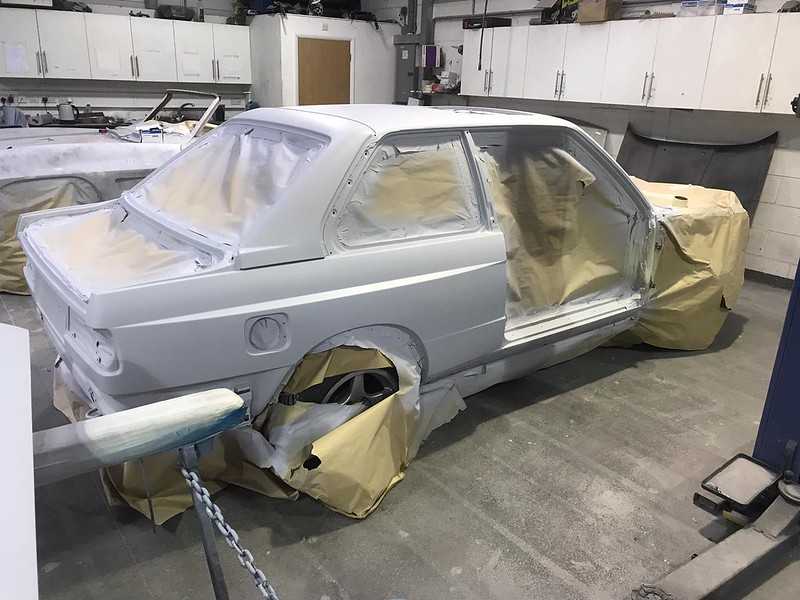
High build primed.
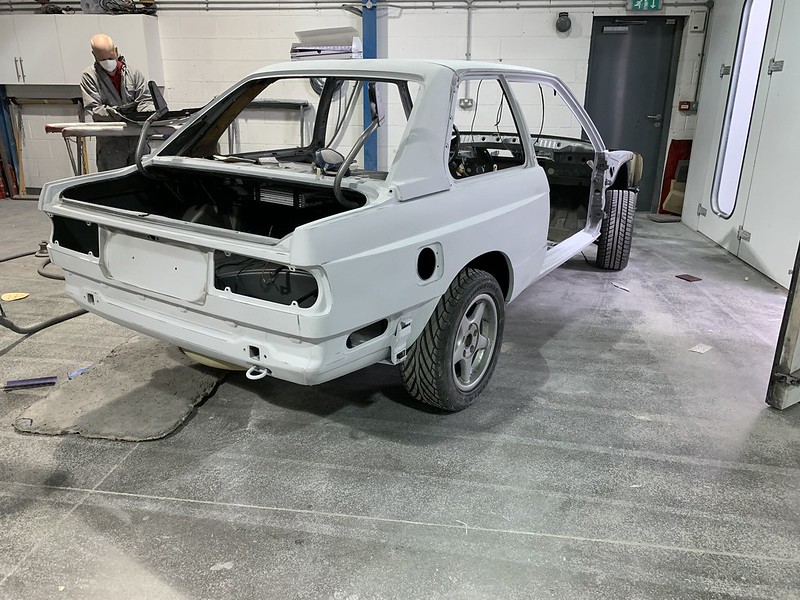
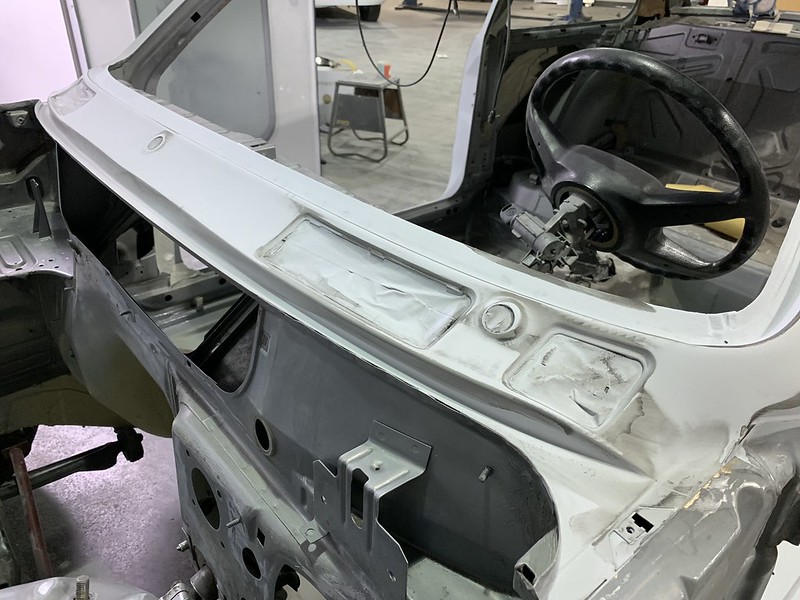
The arduous task of blocking down the primer to get a perfect surface for the base and lacquer.
Painting is imminent!
-
aimlessrock
- E30 Zone Squatter
- Posts: 1821
- Joined: Sun Dec 06, 2009 11:00 pm
- Location: Manchester
wow- love it Barry
E30 320i Convertible (1989)
190 Mercedes (1988)
"there is nothing more expensive than a cheap E30"
190 Mercedes (1988)
"there is nothing more expensive than a cheap E30"