
Seriously, NZ is #1 on my places to see... It would be nice to take in the Targa Tasmania rally with the M3 or try one of those famous nine walks you have (with the M3!)... maybe go check out that hill in Hawkes Bay, you know: Taumatawhakatangihangakoauauotamateapokaiwhenuakitanatahu.. I hear its nice..
'91 318iS minor resto.. ;-)
Moderator: martauto
-
Split_S
- POR 15 junkie
- Posts: 529
- Joined: Sun Jun 16, 2013 11:00 pm
- Location: Canada
You'll need someone to take care of all those nice cars for you by then! 
Seriously, NZ is #1 on my places to see... It would be nice to take in the Targa Tasmania rally with the M3 or try one of those famous nine walks you have (with the M3!)... maybe go check out that hill in Hawkes Bay, you know: Taumatawhakatangihangakoauauotamateapokaiwhenuakitanatahu.. I hear its nice..
Seriously, NZ is #1 on my places to see... It would be nice to take in the Targa Tasmania rally with the M3 or try one of those famous nine walks you have (with the M3!)... maybe go check out that hill in Hawkes Bay, you know: Taumatawhakatangihangakoauauotamateapokaiwhenuakitanatahu.. I hear its nice..
-
Split_S
- POR 15 junkie
- Posts: 529
- Joined: Sun Jun 16, 2013 11:00 pm
- Location: Canada
NOTE: I've completed ALL pages of the thread - all pics are back and I've added a couple here and there...
-
Split_S
- POR 15 junkie
- Posts: 529
- Joined: Sun Jun 16, 2013 11:00 pm
- Location: Canada
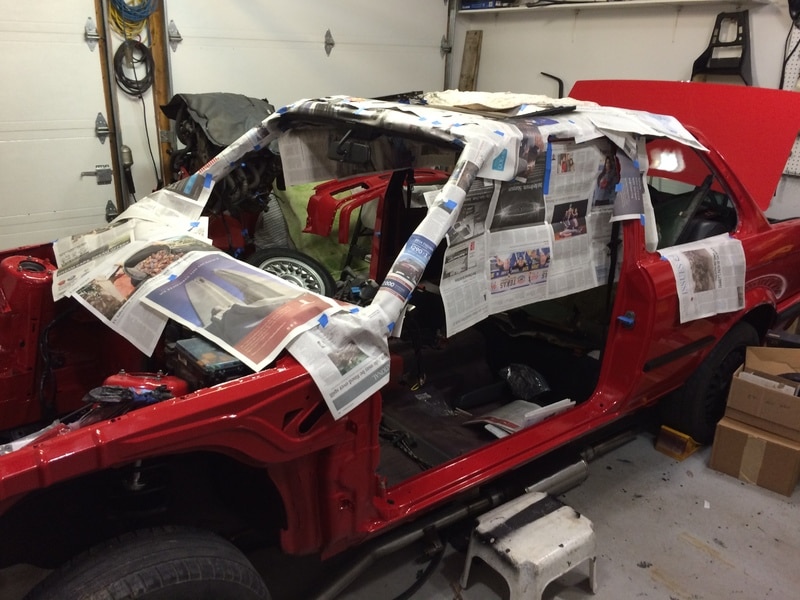
Sometime in the middle of this I've also plugged away at the cabin.. It's weird as there is so much to do, I have to try to figure out what is the best order to do it in...
The dash area is still scaring me..so I'll avoid that for a while...

The sunroof fabric was loose so I tackled that instead...

Using a bit of automotive glue I glued the edges and tightened everything up...

As you can see from all those clothespegs Im the one who does the laundry around here...
The dash area is still scaring me..so I'll avoid that for a while...
The sunroof fabric was loose so I tackled that instead...
Using a bit of automotive glue I glued the edges and tightened everything up...
As you can see from all those clothespegs Im the one who does the laundry around here...
-
Split_S
- POR 15 junkie
- Posts: 529
- Joined: Sun Jun 16, 2013 11:00 pm
- Location: Canada
I was going to straighten out the rear speakers Id installed backwards as so many of you helpful gents let me know...
but...I didn't...

I DID decide to change the color of my headliner however..

Yes. Black and red go good together.. Blotchy stained tan SUCKS... So off I went like a drunken sailor to a whorehouse..

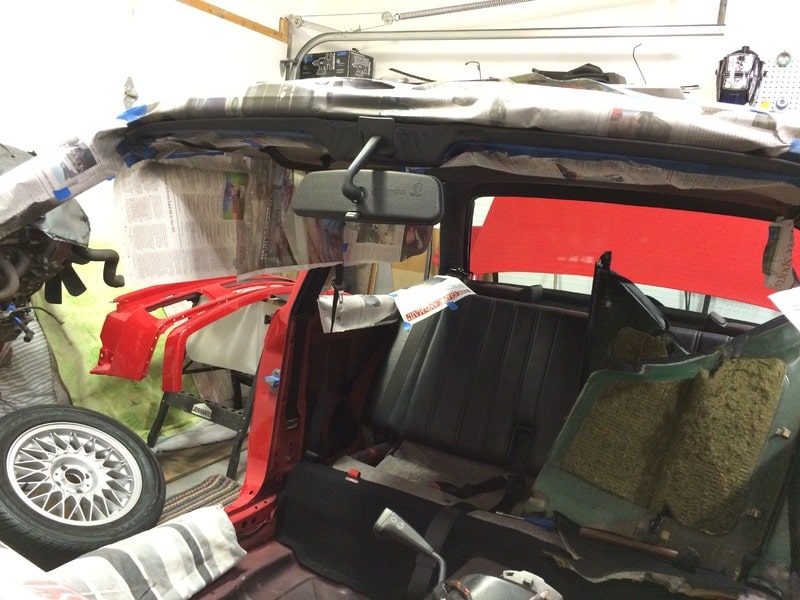

Painted some odds and ends while I was at it...

And finally the headliner...
A bit of sag on the sunroof as the panel isn't installed yet but overall I think it all looks pretty nice...

but...I didn't...
I DID decide to change the color of my headliner however..
Yes. Black and red go good together.. Blotchy stained tan SUCKS... So off I went like a drunken sailor to a whorehouse..
Painted some odds and ends while I was at it...
And finally the headliner...
A bit of sag on the sunroof as the panel isn't installed yet but overall I think it all looks pretty nice...
Last edited by Split_S on Fri Mar 22, 2019 9:44 pm, edited 1 time in total.
-
Split_S
- POR 15 junkie
- Posts: 529
- Joined: Sun Jun 16, 2013 11:00 pm
- Location: Canada
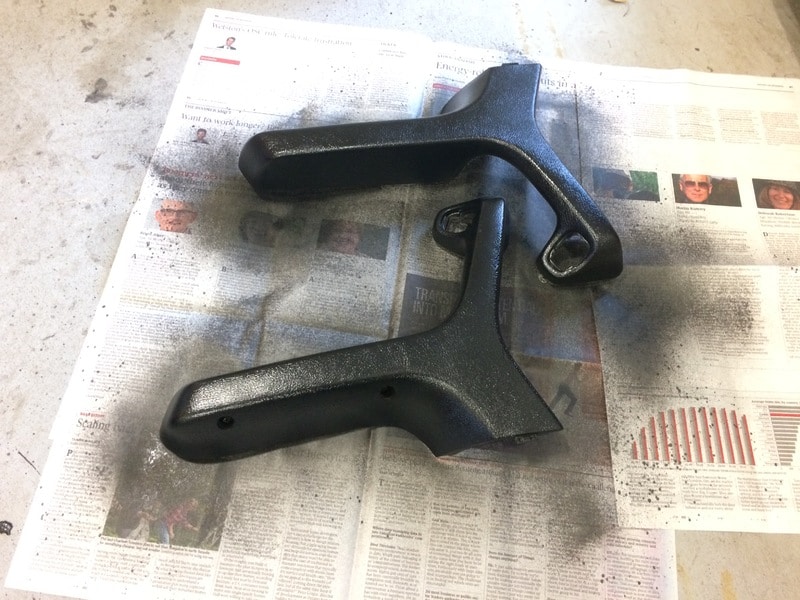
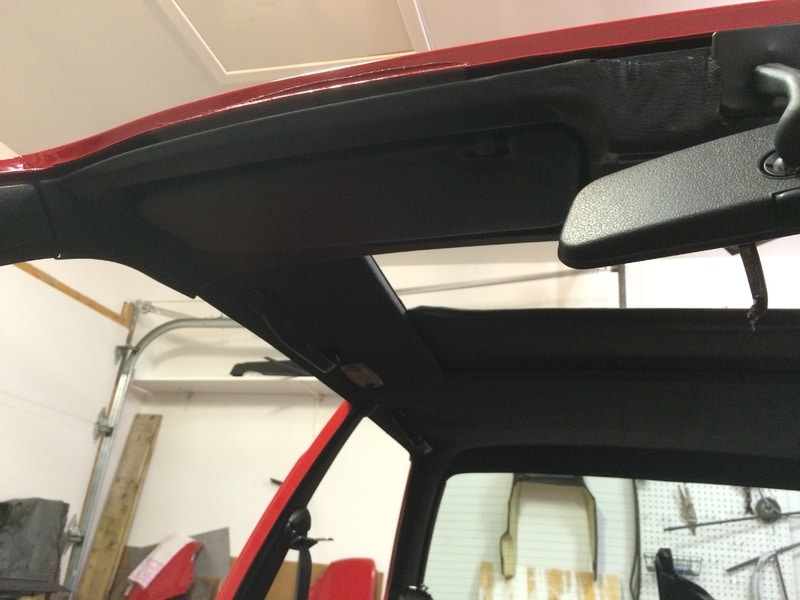
I also removed the A pillar covers and fixed them up...
These are easy to break and are pricey...
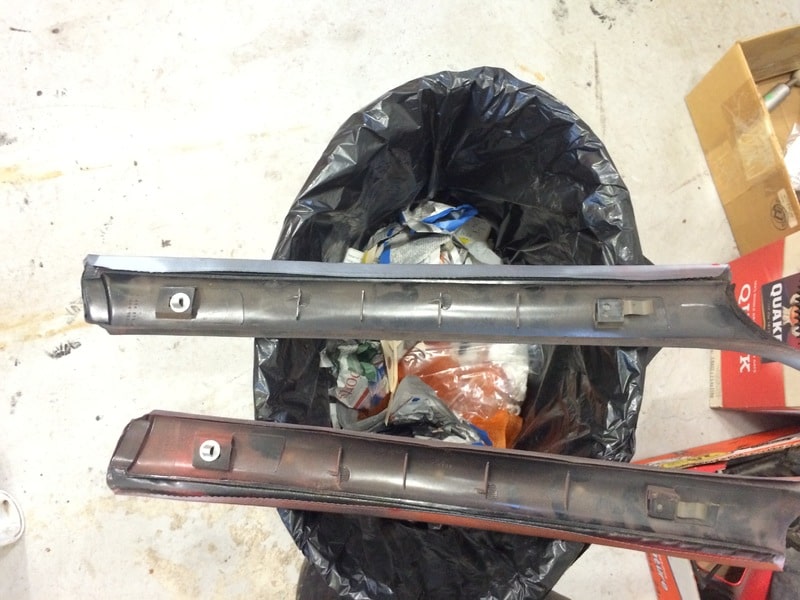
So if you have to remove them this is how you do it:
First remove your glareshields.. two screws for each.This will loosen up the headliner near the top of the A pillar..
See the knobby thing below? This is located near the top of the A pillar.. Gently pull the cover outwards (towards the center of the car) at this point. You will feel it pop out from the pillar.

Next you will gently slide the cover upwards along the pillar a few centimeters (2") as you pull the headliner down slightly for it to clear... This will allow the clip you see below to slide free of where it is clipped into the A pillar..

If you do the above you WILL NOT break them.
Regluing...

Here they are repainted and ready to go back in...

These are easy to break and are pricey...
So if you have to remove them this is how you do it:
First remove your glareshields.. two screws for each.This will loosen up the headliner near the top of the A pillar..
See the knobby thing below? This is located near the top of the A pillar.. Gently pull the cover outwards (towards the center of the car) at this point. You will feel it pop out from the pillar.
Next you will gently slide the cover upwards along the pillar a few centimeters (2") as you pull the headliner down slightly for it to clear... This will allow the clip you see below to slide free of where it is clipped into the A pillar..
If you do the above you WILL NOT break them.
Regluing...
Here they are repainted and ready to go back in...
Last edited by Split_S on Fri Mar 22, 2019 9:45 pm, edited 1 time in total.
-
Jesus325iTouring
- Frog freak !

- Posts: 11356
- Joined: Sun Jan 09, 2005 11:00 pm
- Location: Omnipresent!
Top work as always 

X5 V8 for thrills, CRV for chills, Range Rover P38 V8 for sooooo much aggravation...
-
Daz666

- E30 Zone Newbie

- Posts: 112
- Joined: Thu Dec 13, 2007 11:00 pm
Epic thread and fantastic work
Thanks for sorting the pictures, it's much appreciated. Your work provides me with motivation to get on with mine and also a very useful insight into what I am faced with!
Thanks
Thanks for sorting the pictures, it's much appreciated. Your work provides me with motivation to get on with mine and also a very useful insight into what I am faced with!
Thanks
-
Split_S
- POR 15 junkie
- Posts: 529
- Joined: Sun Jun 16, 2013 11:00 pm
- Location: Canada
You're welcome... Glad you enjoyed the thread so far...Shame to have put all that effort into it only to lose all those nice pics! Damn imageshack!! 
-
hennared323i
- Old Skooler
- Posts: 2350
- Joined: Wed Jul 25, 2007 11:00 pm
Not from mewillnz wrote:After all the effort, both in the cars and in restoring your photos, I have decided the thread deserves to be stickied... any objections from anyone???
-
Split_S
- POR 15 junkie
- Posts: 529
- Joined: Sun Jun 16, 2013 11:00 pm
- Location: Canada
Considering I started this thread just over 2 years ago a total newbie with no e30 nor mechanical experience Im honored the thread is being stickied to say the least...
I hope some find inspiration to start their own resto or motivation to finish one already started.
Thanks again guys - I'll try my best not to screw things up from here on!
I hope some find inspiration to start their own resto or motivation to finish one already started.
Thanks again guys - I'll try my best not to screw things up from here on!
-
Split_S
- POR 15 junkie
- Posts: 529
- Joined: Sun Jun 16, 2013 11:00 pm
- Location: Canada
Back in the garage...
I took a moment to reassess the dash area:

I STILL wasn't feeling brave enough to tackle that mess....

I took a moment to reassess the dash area:
I STILL wasn't feeling brave enough to tackle that mess....
Last edited by Split_S on Mon Jan 25, 2016 6:42 pm, edited 1 time in total.
-
Split_S
- POR 15 junkie
- Posts: 529
- Joined: Sun Jun 16, 2013 11:00 pm
- Location: Canada
So I did a quick clean and repaint of the glove compartment..
Before..
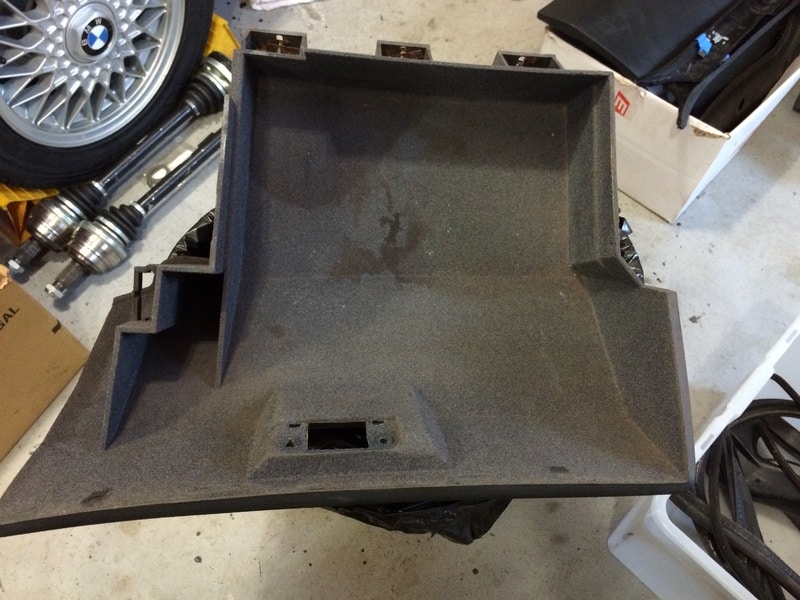
After..

I've also been trying to take some decent pictures of the headliner but they come out looking like CRAP honestly..
This is the best I could manage considering my feeble photographic skills...

The flash creates a bit of white reflection where there isn't any.. me thinks it looks much better than the stained tan that came before...
Before..
After..
I've also been trying to take some decent pictures of the headliner but they come out looking like CRAP honestly..
This is the best I could manage considering my feeble photographic skills...
The flash creates a bit of white reflection where there isn't any.. me thinks it looks much better than the stained tan that came before...
Last edited by Split_S on Fri Mar 22, 2019 9:45 pm, edited 1 time in total.
-
Split_S
- POR 15 junkie
- Posts: 529
- Joined: Sun Jun 16, 2013 11:00 pm
- Location: Canada
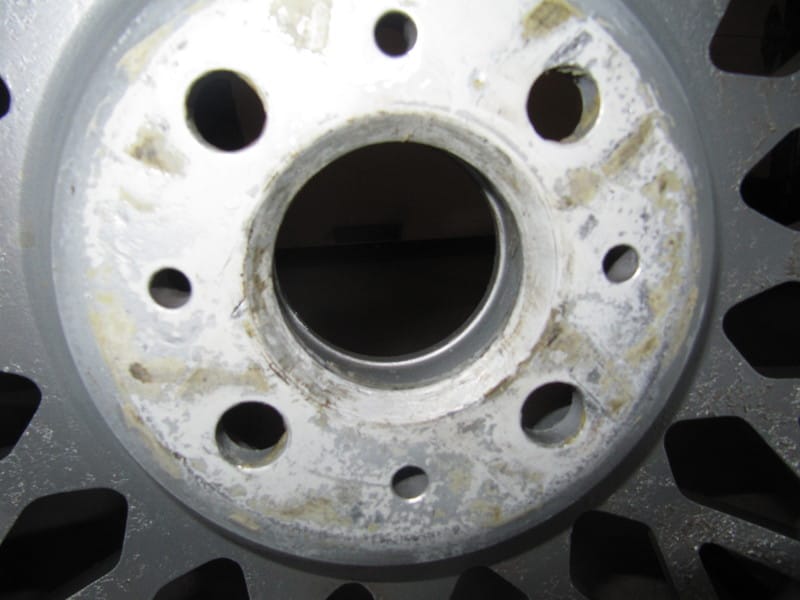
In between all this I ran into an interesting problem with the wheels Id bought off another e30 enthusiast back in May..
He had 4 of these, BMW BBS Style 5, all refinished with new rubber:
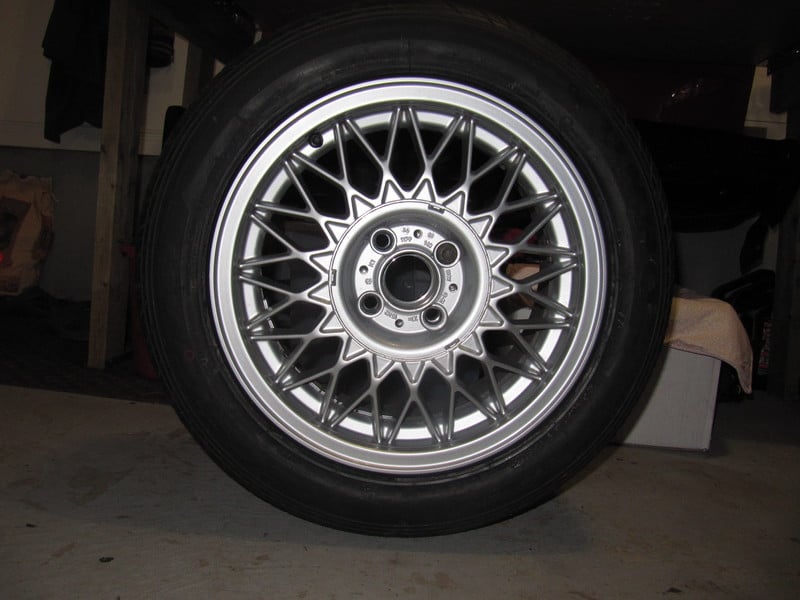
Classic e30 rims... I thought "Great! Im good to go!"
So I paid cash and set them aside while I worked on the sanding of the car for the next 5 months...
When I finally put them on I realized I wasnt as good to go as I had thought..


Did you spot the trouble spot??
Seems the offset was different.. If you didn't know it let me tell you BMW used several different offsets for the same wheel style.. These were ET41: 41mm offset from center. For most e30's with this wheel style the offset is ET30 = 30mm..
Live and learn right?
The solution?

oh, and Ebay.
To make up for the 11mm difference I purchased 12mm spacers (there are no 11mm spacers..)
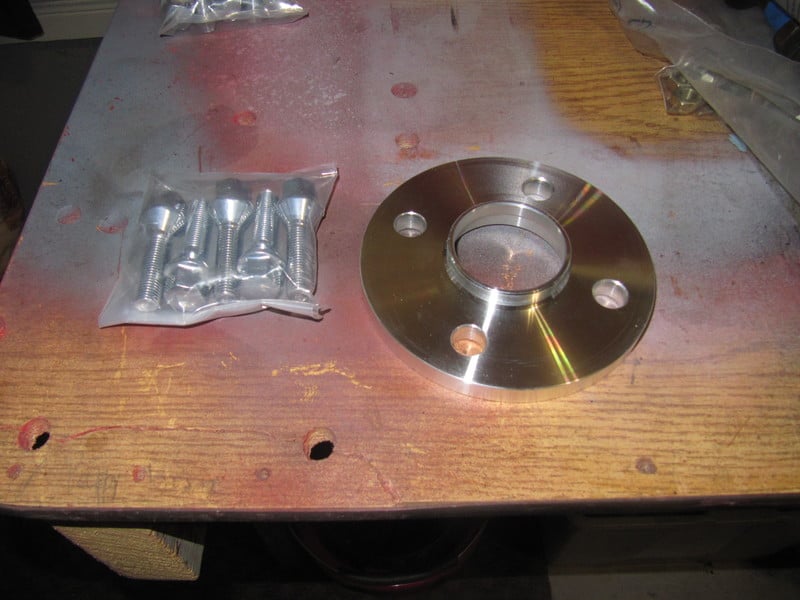
These have the center bore at 57.1mm which is standard e30 diamater for the hub:

The outer flange is also 57.1mm to accept a standard BMW/BBS wheel..

They install flush to the face of the wheel: You should put a light coating of copper grease to prevent corrosion and binding between the spacer and the wheel and the hub. Im not as I will be disassembling these a few more times before Im done...
Like so.. You can also see the standard lug vs. the longer one needed as supplied with the spacer...

Once mounted they corrected the offset and the front wheels now sit where they "should"..

The rear wheel clearance is fine and actually look alright but I may yet put spacers on them as well..
Here is a link (German) for all BMW wheel styles and offsets..
http://felgenkatalog.auto-treff.com/
Now I can go to bed a little less dumb than when I woke up this morning!
:Dc
He had 4 of these, BMW BBS Style 5, all refinished with new rubber:
Classic e30 rims... I thought "Great! Im good to go!"
So I paid cash and set them aside while I worked on the sanding of the car for the next 5 months...
When I finally put them on I realized I wasnt as good to go as I had thought..
Did you spot the trouble spot??
Seems the offset was different.. If you didn't know it let me tell you BMW used several different offsets for the same wheel style.. These were ET41: 41mm offset from center. For most e30's with this wheel style the offset is ET30 = 30mm..
Live and learn right?
The solution?
oh, and Ebay.
To make up for the 11mm difference I purchased 12mm spacers (there are no 11mm spacers..)
These have the center bore at 57.1mm which is standard e30 diamater for the hub:
The outer flange is also 57.1mm to accept a standard BMW/BBS wheel..
They install flush to the face of the wheel: You should put a light coating of copper grease to prevent corrosion and binding between the spacer and the wheel and the hub. Im not as I will be disassembling these a few more times before Im done...
Like so.. You can also see the standard lug vs. the longer one needed as supplied with the spacer...
Once mounted they corrected the offset and the front wheels now sit where they "should"..
The rear wheel clearance is fine and actually look alright but I may yet put spacers on them as well..
Here is a link (German) for all BMW wheel styles and offsets..
http://felgenkatalog.auto-treff.com/
Now I can go to bed a little less dumb than when I woke up this morning!
:Dc
Last edited by Split_S on Fri Mar 22, 2019 9:46 pm, edited 2 times in total.
-
ElReyes
- E30 Zone Newbie
- Posts: 0
- Joined: Wed Nov 25, 2015 11:00 pm
That's annoying.
Looking good though.
Looking good though.
-
Split_S
- POR 15 junkie
- Posts: 529
- Joined: Sun Jun 16, 2013 11:00 pm
- Location: Canada
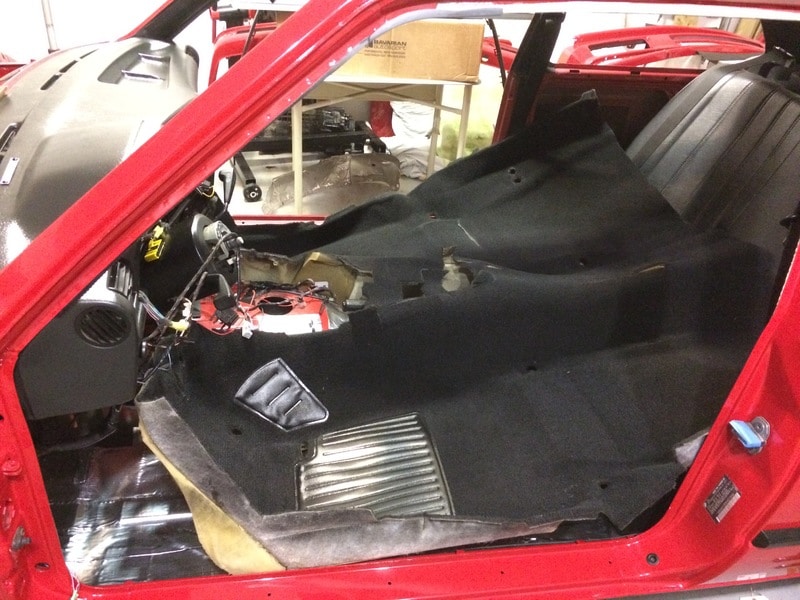
Finally feeling brave I decided it was time to get the dash in.
I started by routing the wires across and where required pinning them down with the fasteners...
Now, how many people have this problem? Two crack-free e30 dashes.. which to choose??

The best one of course!
So, of course, I did this alone.. but its much easier a deux as the french say...


Getting this over the steering mount is the tricky part.. Its all pretty fragile and you just have to be careful...
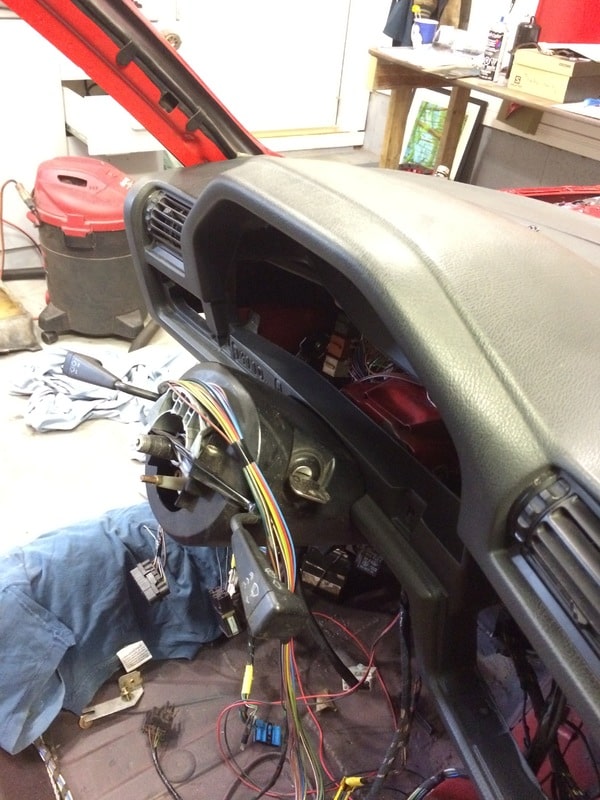

I almost forgot the support column but I put it in loosely as I will be getting the carpet in eventually...

What a bloody mess...

I had prepared all the wiring beforehand and that helped tremendously...

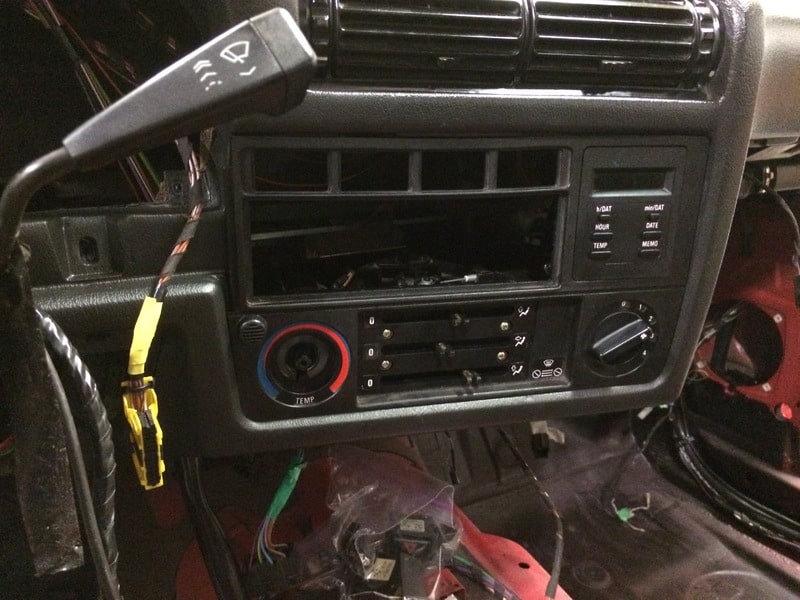

In and trim back on...

Last little step was to swap the VIN plate... saves some explaining with the law later on...
Thank the sweet lord!!
Next up: Chimney flashing for the e30 lover...seriously...
No, Im not soft in the head..
I started by routing the wires across and where required pinning them down with the fasteners...
Now, how many people have this problem? Two crack-free e30 dashes.. which to choose??
The best one of course!
So, of course, I did this alone.. but its much easier a deux as the french say...
Getting this over the steering mount is the tricky part.. Its all pretty fragile and you just have to be careful...
I almost forgot the support column but I put it in loosely as I will be getting the carpet in eventually...
What a bloody mess...
I had prepared all the wiring beforehand and that helped tremendously...
In and trim back on...
Last little step was to swap the VIN plate... saves some explaining with the law later on...
Thank the sweet lord!!
Next up: Chimney flashing for the e30 lover...seriously...
No, Im not soft in the head..
Last edited by Split_S on Fri Mar 22, 2019 9:47 pm, edited 1 time in total.
-
Split_S
- POR 15 junkie
- Posts: 529
- Joined: Sun Jun 16, 2013 11:00 pm
- Location: Canada
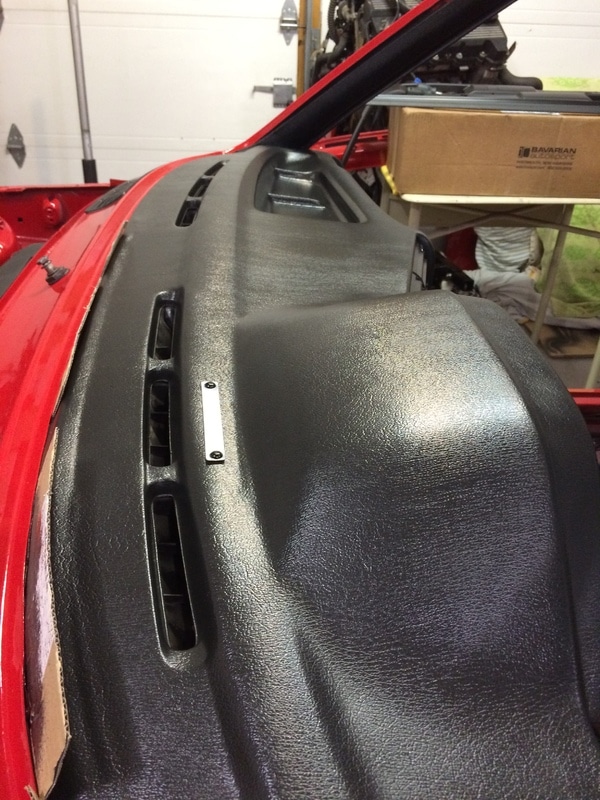
With the herculean task of jamming the dash back in place my attention now turned to sound insulation...
I could have bought a few rolls of dynamat and set myself back many hundreds of dollars but I opted to buy the exact same thing at my local big box store and pay about 90% less...

Its simply tar with a aluminium liner used for chimney flashing... love the name: "RESISTO!"
Cut out a strip..

Quickly apply a little heat...

Press and/or roll it on...
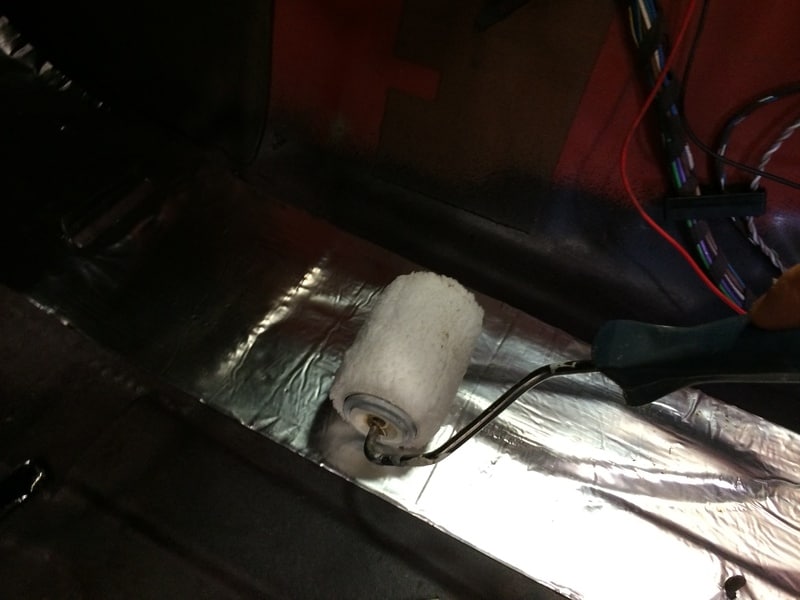
Nice...


I used three rolls and I doubt they added up to a kilo in weight.. . total cost under 50$ cdn...
Guess I will go find that carpet that must be lying around somewhere and see if I can get it in....
I could have bought a few rolls of dynamat and set myself back many hundreds of dollars but I opted to buy the exact same thing at my local big box store and pay about 90% less...
Its simply tar with a aluminium liner used for chimney flashing... love the name: "RESISTO!"
Cut out a strip..
Quickly apply a little heat...
Press and/or roll it on...
Nice...
I used three rolls and I doubt they added up to a kilo in weight.. . total cost under 50$ cdn...
Guess I will go find that carpet that must be lying around somewhere and see if I can get it in....
Last edited by Split_S on Fri Mar 22, 2019 9:48 pm, edited 1 time in total.
-
Split_S
- POR 15 junkie
- Posts: 529
- Joined: Sun Jun 16, 2013 11:00 pm
- Location: Canada
Didn't some 18th century philosopher say that life is meaningless without suffering?
He must have been working on fitting a dash into an e30....
He must have been working on fitting a dash into an e30....
-
BMG
- E30 Zone Regular

- Posts: 439
- Joined: Mon Jun 27, 2005 11:00 pm
- Location: south east
Good work. Isn't there a rubber seal that goes on the leading edge of the dash up against the windscreen cowl ?
-
Split_S
- POR 15 junkie
- Posts: 529
- Joined: Sun Jun 16, 2013 11:00 pm
- Location: Canada
I think you mean the windscreen glazing (rubber seal)...
I will be putting in a new windshield and glazing shortly... There is no other seal. There is an inner rubber liner that covers the inside of the dash area... it's kind of like sound proofing...
I will be putting in a new windshield and glazing shortly... There is no other seal. There is an inner rubber liner that covers the inside of the dash area... it's kind of like sound proofing...
-
BMG
- E30 Zone Regular
- Posts: 439
- Joined: Mon Jun 27, 2005 11:00 pm
- Location: south east
I'll freely admit I'm on dodgy ground here going on memory from pulling apart my car about 8 years ago. But you may at least answer a question for me if I'm wrong, but i have a rubber strip I labeled as for the leading edge of the dash ( like a U channel seal ) to mate up and seal where it butts up to the screen area. Very high probability I'm wrong, but which will leave me 4 ft rubber seal I have no idea where it goes then.
-
Split_S
- POR 15 junkie
- Posts: 529
- Joined: Sun Jun 16, 2013 11:00 pm
- Location: Canada
It is different for the M3 as the windscreen was glued and the flange was over twice as wide as it is on regular e30s..
The part you are referring to is # 6 in this diagram:
http://www.realoem.com/bmw/enUS/showpar ... Id=51_0277
You had me worried that I'd forgotten something!!
The part you are referring to is # 6 in this diagram:
http://www.realoem.com/bmw/enUS/showpar ... Id=51_0277
You had me worried that I'd forgotten something!!
-
BMG
- E30 Zone Regular
- Posts: 439
- Joined: Mon Jun 27, 2005 11:00 pm
- Location: south east
That's it. Sorry ! Has helped me out though.
-
Kedge
- Old Skooler
- Posts: 7702
- Joined: Thu Jan 13, 2005 11:00 pm
- Location: Leicestershire
Only just come across this thread for the first time tonight (killing time on a night shift  ). Awesome work, almost making me want to do another one
I to am a POR 15 fan, used it on various parts of my E30 build, and also using it on my Mk1 Golf at the moment. Just today I used the clear coat on some aluminium parts for the first time, so looking forward to see how that looks when I get back to the garage in a couple of days.
I to am a POR 15 fan, used it on various parts of my E30 build, and also using it on my Mk1 Golf at the moment. Just today I used the clear coat on some aluminium parts for the first time, so looking forward to see how that looks when I get back to the garage in a couple of days.
-
Split_S
- POR 15 junkie
- Posts: 529
- Joined: Sun Jun 16, 2013 11:00 pm
- Location: Canada
Thanks! I hope you do take on another one!
Glad to hear you also use Por-15.. I think its a great product.. but I think the mods have poked fun at me by labeling me a "Por 15 junkie".. I think "Awesome e30 savior" or something along those lines would be more appropriate!
Glad to hear you also use Por-15.. I think its a great product.. but I think the mods have poked fun at me by labeling me a "Por 15 junkie".. I think "Awesome e30 savior" or something along those lines would be more appropriate!
-
Split_S
- POR 15 junkie
- Posts: 529
- Joined: Sun Jun 16, 2013 11:00 pm
- Location: Canada
With the sound insulation in place and the dash area wiring "sorted" (read: untangled as best as I could figure) I went looking for my resto'd carpet which, conveniently, was laying on top of the snowblower...
She had been like this...

But got her looking like so...

I remember 50 million years ago when I removed her, it was a "challenge" to get her out... I was hoping getting her back in would be easier...
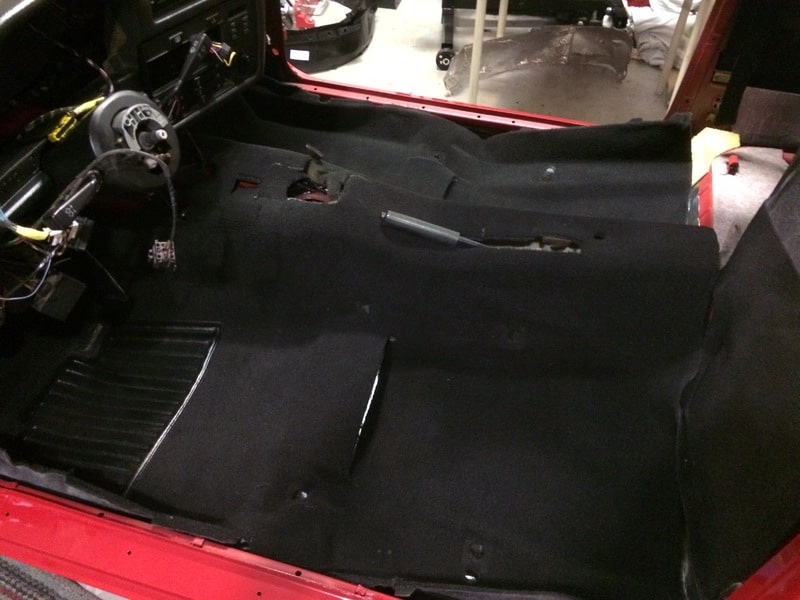
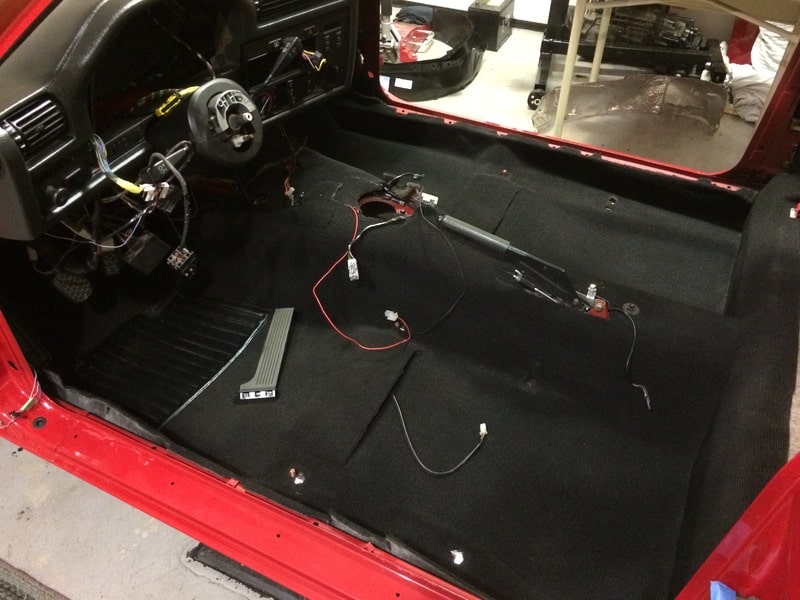
Oh, crap! That was too easy.. I must have done SOMETHING wrong...
She had been like this...
But got her looking like so...
I remember 50 million years ago when I removed her, it was a "challenge" to get her out... I was hoping getting her back in would be easier...
Oh, crap! That was too easy.. I must have done SOMETHING wrong...
Last edited by Split_S on Fri Mar 22, 2019 9:49 pm, edited 1 time in total.
-
Kedge
- Old Skooler
- Posts: 7702
- Joined: Thu Jan 13, 2005 11:00 pm
- Location: Leicestershire
It is an easy job if you do it without the heater box fitted, or as in your case have cut out the section of carpet that runs under it.
Does looks so much better dyed black!
Does looks so much better dyed black!
They're just being blinkered over the quality of POR15 products, it's not yet a particularly well known brand over here.Split_S wrote:Thanks! I hope you do take on another one!
Glad to hear you also use Por-15.. I think its a great product.. but I think the mods have poked fun at me by labeling me a "Por 15 junkie".. I think "Awesome e30 savior" or something along those lines would be more appropriate!
-
Split_S
- POR 15 junkie
- Posts: 529
- Joined: Sun Jun 16, 2013 11:00 pm
- Location: Canada
Warning:
The following post contains images some viewers may find offensive and/or disturbing. Viewer discretion is advised.
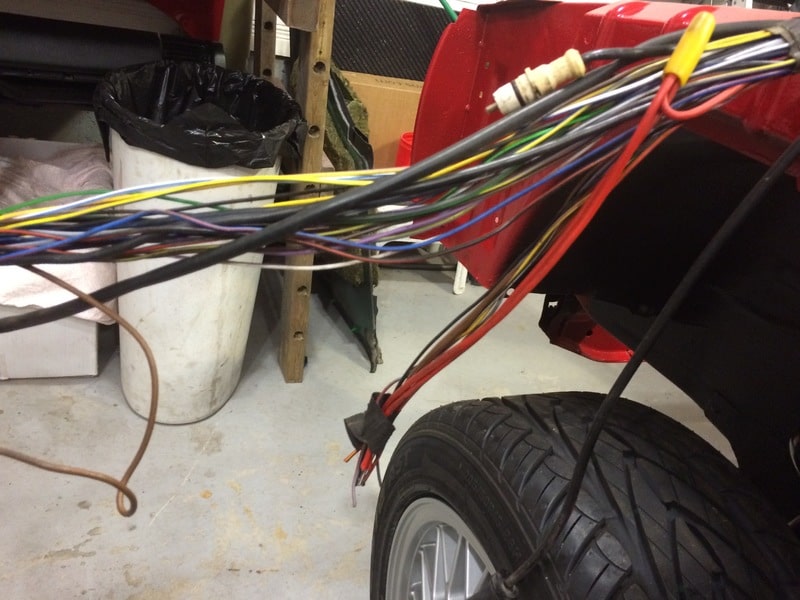
Yup. Wiring loom!
63 million years ago...

The horror...

Look! Someone's cut them ALL!
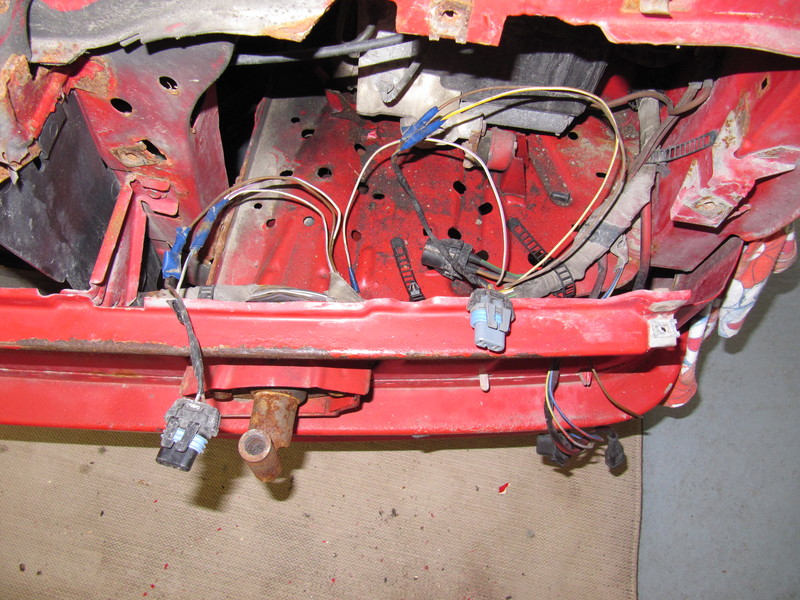
Uggh...
It was all so bad I put the whole thing in a garbage bag, taped it up and its been WAITING for me ever since...

The following post contains images some viewers may find offensive and/or disturbing. Viewer discretion is advised.
Yup. Wiring loom!
63 million years ago...
The horror...
Look! Someone's cut them ALL!
Uggh...
It was all so bad I put the whole thing in a garbage bag, taped it up and its been WAITING for me ever since...
Last edited by Split_S on Fri Mar 22, 2019 9:49 pm, edited 1 time in total.
-
Split_S
- POR 15 junkie
- Posts: 529
- Joined: Sun Jun 16, 2013 11:00 pm
- Location: Canada
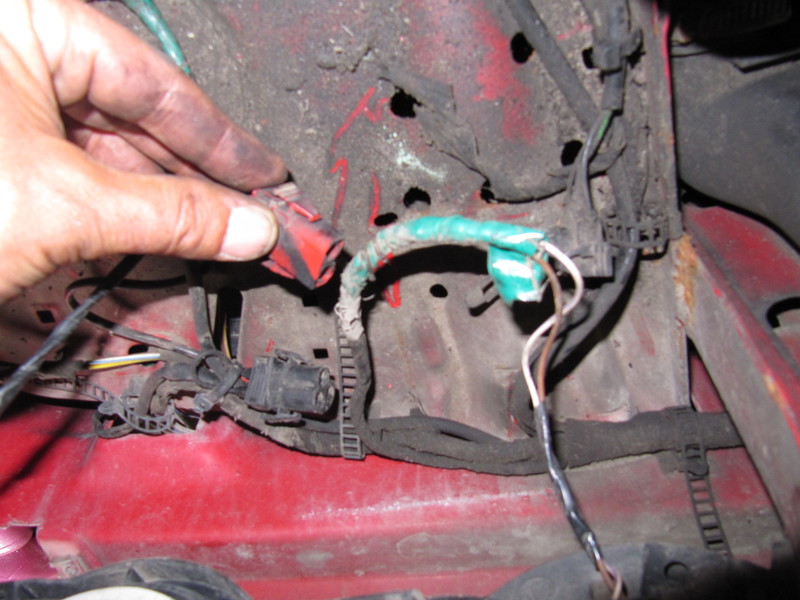
As it couldn't be avoided any longer, I opened the bag up and decided to deal with the inevitable...


Where the ABS got cut out...


The whole thing was full of grease, oil, dirt, wiring falling apart, broken connectors and a few "mystery wires"...
I steadied my nerve and got out the only tool I knew of to deal with this devil's breakfast...

Where the ABS got cut out...
The whole thing was full of grease, oil, dirt, wiring falling apart, broken connectors and a few "mystery wires"...
I steadied my nerve and got out the only tool I knew of to deal with this devil's breakfast...
Last edited by Split_S on Fri Mar 22, 2019 9:50 pm, edited 1 time in total.
-
Split_S
- POR 15 junkie
- Posts: 529
- Joined: Sun Jun 16, 2013 11:00 pm
- Location: Canada
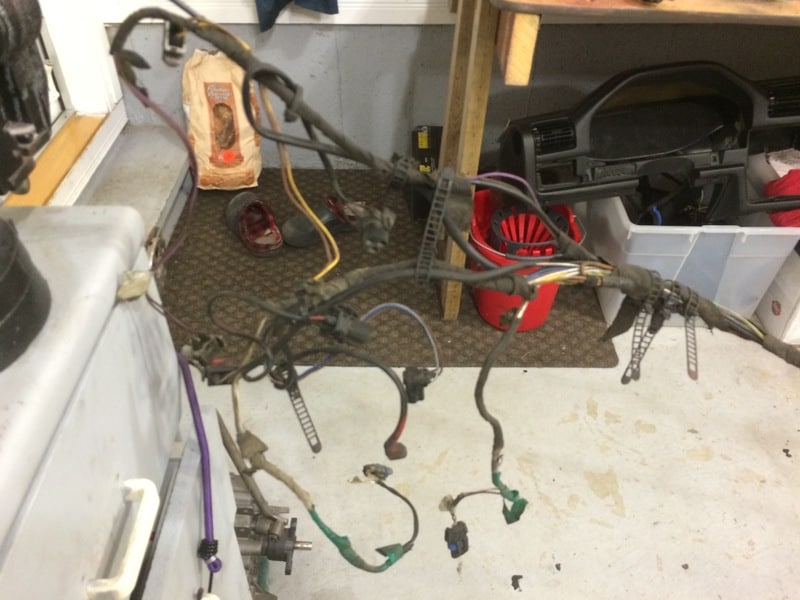
All the old tape was removed, every wire was cleaned, every connector fixed or replaced. It was a long drawn out affair but I knew this would be a source of more than a few problems if I didn't do it right the first time.
I had done the same to the part of the loom in the cabin. I had to cut out an old alarm system, figure out what went where and clean and re-tape but atleast the wiring wasn't soaked in 25 years worth of oil and crud...
While working on the engine bay part of the loom I also got things ready for its re-installation....
-
Split_S
- POR 15 junkie
- Posts: 529
- Joined: Sun Jun 16, 2013 11:00 pm
- Location: Canada
So you want to fit an iS lip?? Here's how..
Order these: 10 to be exact..

Put them in these holes..

Like so..


You will need to tap down these little holder pins.. Go slowly..

the clip is now locked in place..

Proof...

Place your lip in position, here you see the center marking point.. line it up..
Get the edges equally in position and slowly push the lip into the clips equally..

That amigo's is the cat's meow... that wiring loom you see on the right is another story....

Order these: 10 to be exact..
Put them in these holes..
Like so..
You will need to tap down these little holder pins.. Go slowly..
the clip is now locked in place..
Proof...
Place your lip in position, here you see the center marking point.. line it up..
Get the edges equally in position and slowly push the lip into the clips equally..
That amigo's is the cat's meow... that wiring loom you see on the right is another story....
Last edited by Split_S on Fri Mar 22, 2019 9:51 pm, edited 1 time in total.
-
Kedge
- Old Skooler
- Posts: 7702
- Joined: Thu Jan 13, 2005 11:00 pm
- Location: Leicestershire
I feel your pain, I really need to renew the wiring loom on my Mk1 Golf whilst doing an engine bay refresh and engine swap, just seem to be finding excuses to leave it for a later date 
-
Jon_Bmw
- Dangerous when thinking

- Posts: 7606
- Joined: Tue Jan 11, 2005 11:00 pm
- Location: Salisbury
I really like all the work going into this. Excellent documentation of the progress as well, and readable dialect!
My only criticism would be that I am not a fan of painting plastics, seats, headlining etc. I just cannot see it lasting, and if/once it has peeled it is going to look a bit naff?
Cannot fault the skill and enthusiasm with the vast majority though!! Rather you than me etc etc!
My only criticism would be that I am not a fan of painting plastics, seats, headlining etc. I just cannot see it lasting, and if/once it has peeled it is going to look a bit naff?
Cannot fault the skill and enthusiasm with the vast majority though!! Rather you than me etc etc!