'91 318iS minor resto.. ;-)

Doing a minor build / restoration or an epic one, post it here

Moderator: martauto

Split_S
POR 15 junkie
Posts: 529
Joined: Sun Jun 16, 2013 11:00 pm
Location: Canada

Fri Dec 11, 2015 9:42 pm

Im starting to keep bankers hours on this rebuild!!

Next logical step in the rebuild was to tackle the rear brakes.. Lately Ive done A LOT of brake jobs (M3, 320, mother's Acura, father's Ford, sister's Hyundai..) and to be honest the e30's brakes are quite a bit different.

I basically lived the FULL RANGE of human emotions fitting the rear LH parking brake and brake. With that done it took 10 MINUTES to do the RH rear brakes. That includes removing the tire and reinstalling it. Who can figure these things out? Not me.. :?

In order not to bore you too much I will combine both to show the general gist of the thing so that anyone smarter than me (99.9% of you) will have an easy time of it.

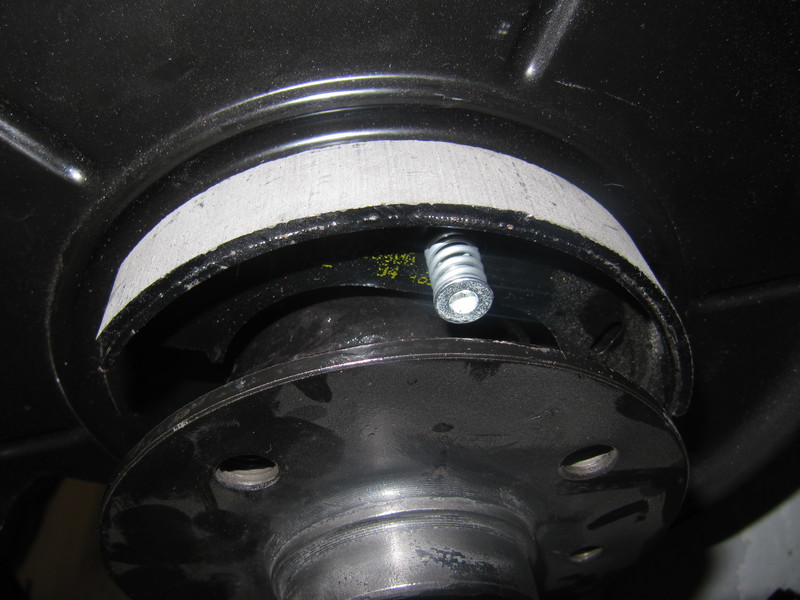
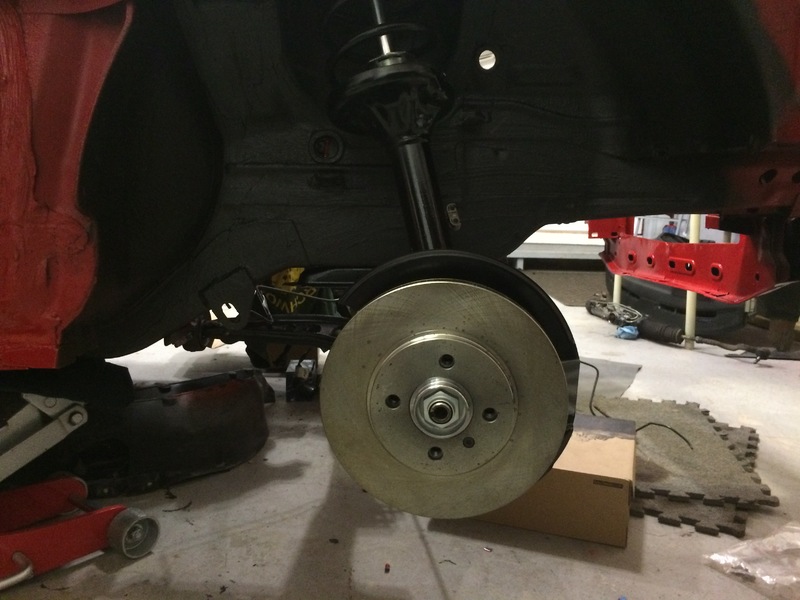
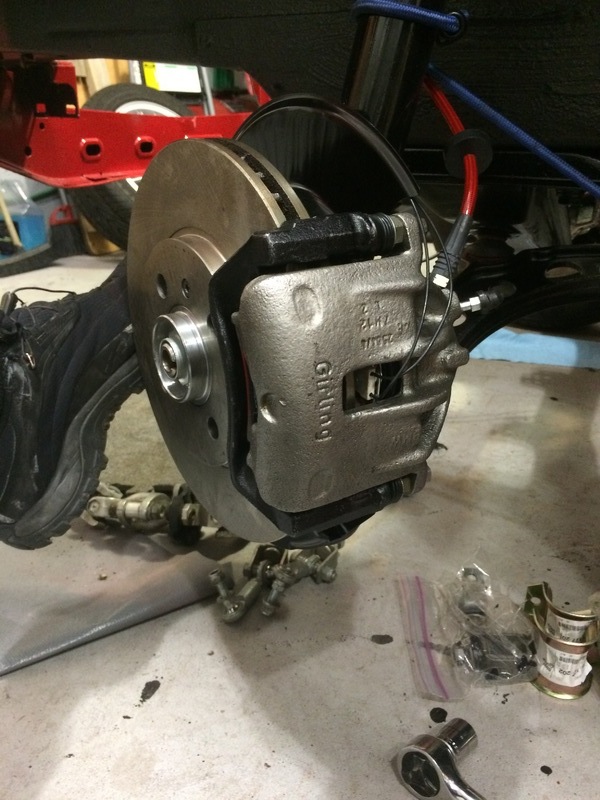
First thing I did was grind clean the edge of the hub as it was a complete b*tch to remove the wheel with it painted - looks pretty but that extra 1/10th of a mm of paint makes a BIG difference...
Image

Next I spent a good while finding all the parts Id purchased years ago when I started this insane project..

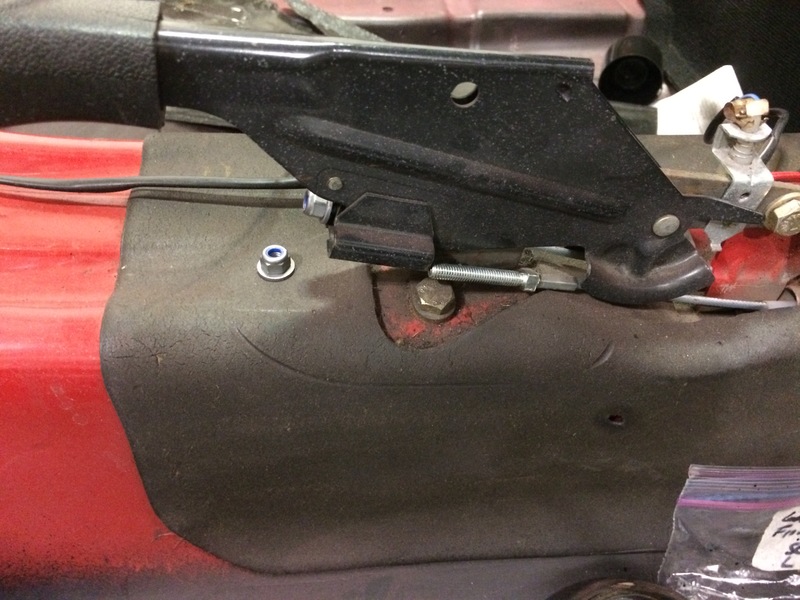
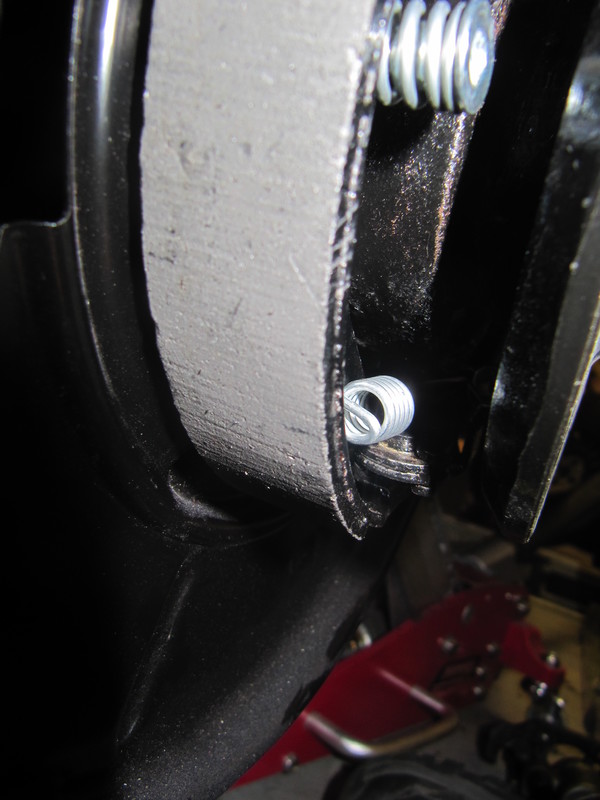
Here is the parking brake refurb kit.. The springs and adjuster are purchased separately, the pads come as a complete set (for both wheels). The piece on the bottom is the expanding lock - it connects to your parking brake cable and I ordered a new one as I had one missing. Each rear wheel will need what you see below (disk brake cars!):

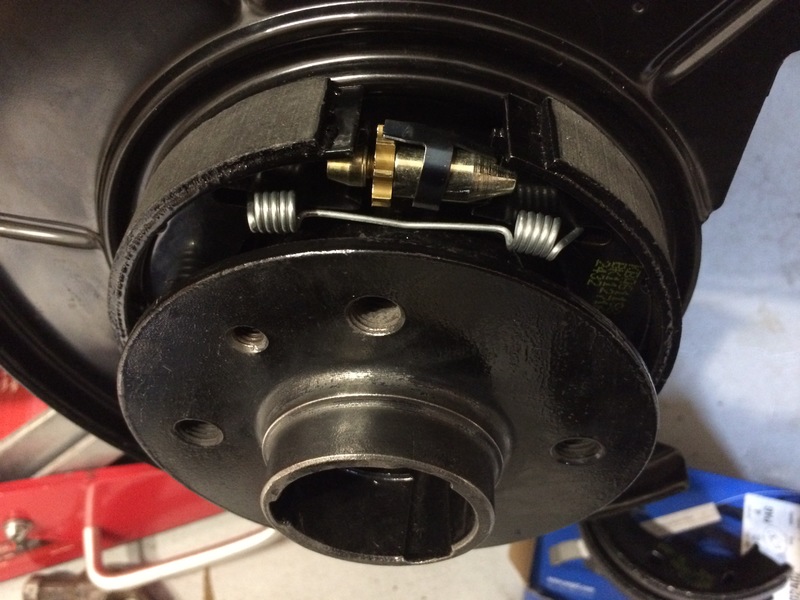
IMPORTANT: Note the indents on the pads..the large ones go towards the top the narrow ones towards the bottom as shown..
Image

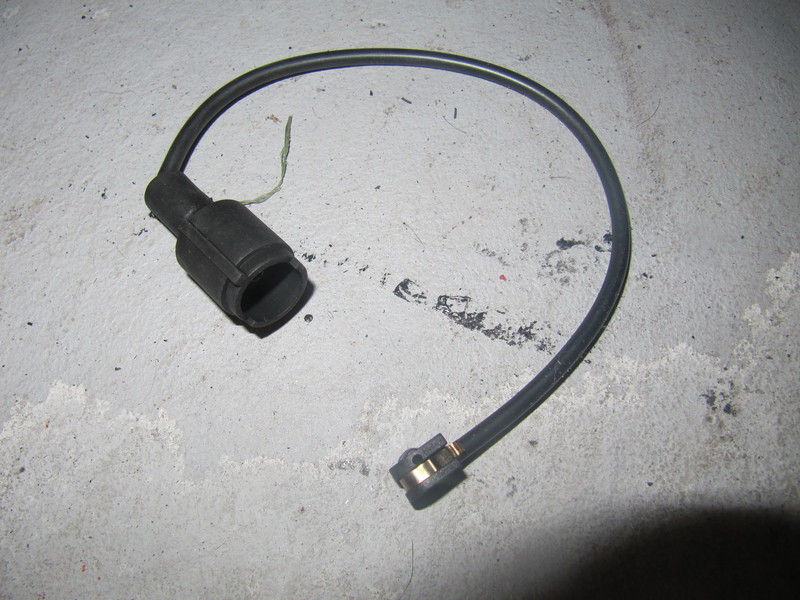
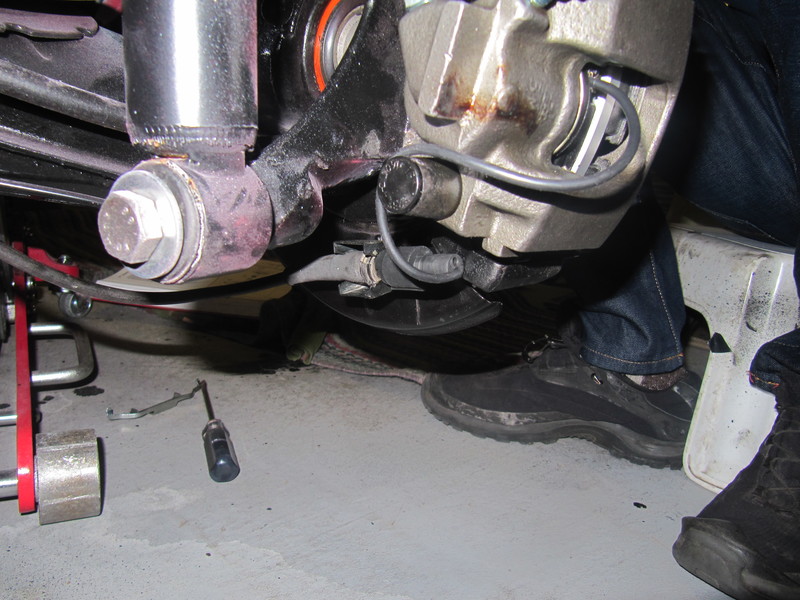
The RH rear wheel will also need the brake wear sensor..
Image
Last edited by Split_S on Fri Mar 22, 2019 9:38 pm, edited 2 times in total.
Split_S
POR 15 junkie
Posts: 529
Joined: Sun Jun 16, 2013 11:00 pm
Location: Canada

Fri Dec 11, 2015 10:04 pm

Im starting from a clean slate so I had nothing to remove.. :D You may not be so lucky...

First thing when installing a new parking brake is to find the hole into which you will fit the spring and pin that will hold your brake pads in place..

Here is a crappy picture of one:
There are two on the dust shield located at about the 10 o'clock and 3 oclock positions..
Image

Now, if you have a particular God you believe in you will pray to HIM/HER. Do this. Being an atheist, I of course struggled through the next step... :D

With your thumb, hold the pin with the spring on it and try to insert it in the hole (through the pad of course!). It will be a VERY tight fit and will only go in if put in perfectly.. The trick is to just put enough pressure for the flange head of the pin to clear.. This will HURT your thumb IMMENSELY. Have an allen key at the ready to push and turn in the pin once its cleared through the hole.. Confused?

Here is one installed...
Image

Now if you manage to install the second one, you can fit the expanding lock.. :D

It should have a little pin you will use to connect it to the parking brake cable.. Its shown in this pic..

Image

Its a good idea to loosen the tension on your parking brake cables prior to trying this.. It **MAY** make it easier.. :roll:

A pic of what I mean..
Image
Last edited by Split_S on Fri Mar 22, 2019 9:38 pm, edited 2 times in total.
Split_S
POR 15 junkie
Posts: 529
Joined: Sun Jun 16, 2013 11:00 pm
Location: Canada

Fri Dec 11, 2015 10:18 pm

With a bit of slack on the cable you will have better access to the loop you need to fit the expanding lock and its pin through...

Image

Here is me struggling...
Image

Once you get the pin through both, place the expanding locks two indents into the indents of the parking brake shoes.. These will be the NARROW ones..

All done...
Image
jimbom30cab
Tech 1 freak
Posts: 7634
Joined: Mon Oct 12, 2009 11:00 pm
Location: in the garage

Fri Dec 11, 2015 10:27 pm

Looking good !
Split_S
POR 15 junkie
Posts: 529
Joined: Sun Jun 16, 2013 11:00 pm
Location: Canada

Fri Dec 11, 2015 10:48 pm

With that in, fit the adjuster in the top indents and place the retaining springs in place..

Image

There are two retaining springs (the LONG ones). One is curved the other is not.. The curved one goes on top, to be placed under the adjuster and the straight one on the bottom along the expanding lock..

You can see them clearly here...
Image

Place one end in the made-for-just-this hole of the pad..

Image

Using a pick with a 90 degree curved end pull the other end into the opposite hole.. It WILL be fairly difficult.. VERY difficult if you're a complete PANSY... :D

For the top one, be careful of its orientation, place it so the curve allows the adjuster to turn.. Make sure they are fully in too...
Image

Image

Do the same with the bottom one.. and the parking brake setup is done..

Image

This pic shows how the adjuster is adjusted.. Nice eh?

Image

What you want to do now is put the disk back on and tighten up the nut on the parking brake cable you loosened. About 7-8 threads showing is good.. Then turn the disk and listen if the pads are rubbing. Adjust the adjuster (downwards motion expands it outward - if not its the opposite!!) until the pads JUST rub and then back off a bit.

That's it. 8)
Last edited by Split_S on Fri Mar 22, 2019 9:39 pm, edited 1 time in total.
jimbom30cab
Tech 1 freak
Posts: 7634
Joined: Mon Oct 12, 2009 11:00 pm
Location: in the garage

Fri Dec 11, 2015 11:18 pm

....you make it look so easy....


I wish !!!!
User avatar
Brianmoooore
E30 Zone Team Member
Posts: 49353
Joined: Mon Jan 10, 2005 11:00 pm

Fri Dec 11, 2015 11:48 pm

Split_S wrote:
What you want to do now is put the disk back on and tighten up the nut on the parking brake cable you loosened. About 7-8 threads showing is good..
It's VERY important that you don't tighten the nuts on the handbrake lever enough to start moving the expander. Best to leave them right on the ends of the thread until the shoes are adjusted at the hubs on the star wheel, then tighten them so that you get both wheels to lock with the lever on about five clicks.
Split_S
POR 15 junkie
Posts: 529
Joined: Sun Jun 16, 2013 11:00 pm
Location: Canada

Sat Dec 12, 2015 12:40 am

jimbom30cab wrote:....you make it look so easy....


I wish !!!!
Well, I have to say it is WAY easier when everything is shiny new... I had a much harder time with the M3 as the dust plate holes were pretty bashed up and it required a lot of ingenuity on my part to get the pads to hold... All these parts are pretty inexpensive so getting new stuff is fun and makes things easier!

Calipers and pads next!!

Oh, the excitement! :roll:
Split_S
POR 15 junkie
Posts: 529
Joined: Sun Jun 16, 2013 11:00 pm
Location: Canada

Sat Dec 12, 2015 12:57 am

Brianmoooore wrote:
Split_S wrote:
What you want to do now is put the disk back on and tighten up the nut on the parking brake cable you loosened. About 7-8 threads showing is good..
It's VERY important that you don't tighten the nuts on the handbrake lever enough to start moving the expander. Best to leave them right on the ends of the thread until the shoes are adjusted at the hubs on the star wheel, then tighten them so that you get both wheels to lock with the lever on about five clicks.
I purchased FEBI cables and with about 7-8 threads showing after tightening the nut there was no expander movement. Other cables may have slightly differing lengths which may make your experience different. Great point though!
A bmw manual I referenced said 3-4 clicks max to lock up the wheels.. I imagine anything close to that is good as long as it DOES lock up.. It will require more clicks to lock the wheels as the pads wear....
As I've done it she locks up at 2 clicks and doesn't rub. So Im happy.
User avatar
BMG
E30 Zone Regular
E30 Zone Regular
Posts: 439
Joined: Mon Jun 27, 2005 11:00 pm
Location: south east

Sat Dec 12, 2015 1:55 am

I learnt something new. Had no idea one of the springs has a little bend in it. I've been shoving them back in any old how on various BMWs of mine for years. Must correct this if i ever get around to rebuilding my car.
User avatar
Brianmoooore
E30 Zone Team Member
Posts: 49353
Joined: Mon Jan 10, 2005 11:00 pm

Sat Dec 12, 2015 11:17 am

Split_S wrote: It will require more clicks to lock the wheels as the pads wear....
It will indeed, although the only wear on the shoes should be as a result of the three monthly maintenance procedure*, since they normally only act as clamps once the car is stationary. This wear MUST be taken up at the hub adjusters, not at the handbrake lever, which should never be adjusted again. If the cable length is adjusted instead of the hubs, the shoes will initially only contact at one point, which will get you through the impending MOT test, but the effectiveness will drop off rapidly afterwards, and each shoe will eventually wear to two differing radii, rendering them scrap.

*Every three months, drive at 25 MPH, pull the handbrake lever up until you can feel up it just beginning to bite, then pull it up one more notch and drive for 400m before releasing it - it's in your handbook.
Split_S
POR 15 junkie
Posts: 529
Joined: Sun Jun 16, 2013 11:00 pm
Location: Canada

Sat Dec 12, 2015 10:25 pm

When I was a young guy driving around in my Honda the handbrake was my preferred method for cornering!

Thanks for the input Brian - you're absolutely right, as usual!
Split_S
POR 15 junkie
Posts: 529
Joined: Sun Jun 16, 2013 11:00 pm
Location: Canada

Fri Dec 18, 2015 9:59 pm

Calipers were next..

I had these rebuilt right at the very beginning of the resto..They've been sitting in their boxes for quite a while!

Carrier first..
Image

No need for me to compress the piston, it was already done..
Slotted the pads in with anti-squeal already on..
Image

Place the caliper over the disk..so easy...
Image

PS requires the brake pad wear sensor...

Image

Pops in right there...
Image

That plastic cap holds the brake pad wear sensor where it connects to the line from the car.
Image

Temporarily routed.. There is a clip which I dont have which is used to hold the cable at that point.. I will get it..
Image

Press on the anti-rattle clips and that's it..
Image

Image

The bottom sure is dusty.. Got to clean that crap off...

Fronts are next...

Image
Last edited by Split_S on Fri Mar 22, 2019 9:40 pm, edited 1 time in total.
Split_S
POR 15 junkie
Posts: 529
Joined: Sun Jun 16, 2013 11:00 pm
Location: Canada

Thu Jan 07, 2016 6:10 pm

Front brakes..

This was new for me.. E30 brakes are a wee bit different from newer BMs and the M3.. Still I think I figured them out..

Rebuilt calipers..
Image

Image

and new pads.
Image

Not sure I'll need it but anti-squeal applied..
Image

Standard rotor.. boring but effective...
Image

I must have done something wrong because it was TOO easy to assemble the front brakes...

Carrier first.. 2 17mm bolts...thats it...
Image

Image

Pads first.. This took me a while to figure out...
Image

and the ONE new bolt for the caliper (takes two but its meant to swivel, so just replace the one you remove)
Image

Caliper next.. brake line screwed in first...
Image

On and brake pad wear sensor in place...
Image

Image

Make a mess as you repeat it all on the other side...
Image

BORING stuff I know... apologies...

ABS delete brake bending FUN up next...

:D
Last edited by Split_S on Fri Mar 22, 2019 9:41 pm, edited 1 time in total.
Gert_8
Married to the E30 Zone
Posts: 11304
Joined: Mon Dec 08, 2008 11:00 pm
Location: In your back passage faster than a rat up a drainpipe!

Thu Jan 07, 2016 7:28 pm

Not boring at all. Thank you! :D
Image
PONY, 2013 - "Anyway span 360 degrees hitting the kerb and giving the old man two fingers as I was spinning like Michael Schumacher would
Split_S
POR 15 junkie
Posts: 529
Joined: Sun Jun 16, 2013 11:00 pm
Location: Canada

Wed Jan 13, 2016 8:02 pm

With the front and rear brakes in I turned my attention to the lack of brake lines in the front.

I love brake line bending.. Very ZEN when it goes well.. Not so much when it doesn't...

Bottom one is the old front right brake line...
Image

Get the specialists tools out...
Image

Couple them together and match the bends..
Image

Image

Getting close..
Image

In place..
Image

I set that aside and turned my attention to the rear brake line and the bends it was going to require to match it up to the brake balancer.. This part tortured me when I did this on the M3 (of course the engine was still in place!)

Image

That rear brake line is over 3 meters long and I had to get it right the first time.. So I used a length of electrical wiring to get the rough form..

Image

Happy, I hoped for the best and started bending..

Image

:D

Next was to figure out my ABS DELETE brake line jigsaw...
Last edited by Split_S on Fri Mar 22, 2019 9:42 pm, edited 1 time in total.
Split_S
POR 15 junkie
Posts: 529
Joined: Sun Jun 16, 2013 11:00 pm
Location: Canada

Wed Jan 13, 2016 8:37 pm

With the rear line to the brake balancer done I now had to reinstall the brake booster and MC to get the dimensions right for the ABS delete lines I had to create..

So..
Image

Image

At this point I haven't reconnected anything in the cabin as Im not sure if I will need to remove them again to fit the engine.. I dont think I will need to remove them but who knows...

To be 100% I also installed the throttle bracket and power steering and charcoal canister brackets...

Image

Image

With all the stuff that could get in the way I started bending..
I did it the hard way as I used pre-flared piping which was stupid really since I purchased a bubble flare kit the works great... Go figure... :?

Once bent they were painted...
Image

Installed.. (I may have said a few bad words getting it all to fit..)

Image

Image

With all those shiny new brake lines showing I realized the MC looked pretty shoddy..

So..

Image

Nice...
Image

Dont put in the rubber gaskets on the MC like in this pic..
Image

Instead put them on your new MC reservoir like this..THEN press it into the MC.. Ask me how I know this... :?

Image

Image

With that the brakes are done. I will find out later if I did them right once she is filled with brake fluid and the engine is running..

It's going to be a while... :roll:
Last edited by Split_S on Fri Mar 22, 2019 9:43 pm, edited 1 time in total.
Split_S
POR 15 junkie
Posts: 529
Joined: Sun Jun 16, 2013 11:00 pm
Location: Canada

Wed Jan 13, 2016 9:34 pm

You're right it would work.. I thought of it honestly but I didn't want to risk contaminating the MC in any way so I went about it the other way and it worked a treat too..

Im sure I was being overly anal!! :D
User avatar
Daz666
E30 Zone Newbie
E30 Zone Newbie
Posts: 112
Joined: Thu Dec 13, 2007 11:00 pm

Wed Jan 13, 2016 9:38 pm

Awesome work, I've just found this. Any chance you can fix the pictures earlier in the thread so I can start from the beginning?
Split_S
POR 15 junkie
Posts: 529
Joined: Sun Jun 16, 2013 11:00 pm
Location: Canada

Wed Jan 13, 2016 10:07 pm

Unfortunately for me I AM working on it...

It's a miserable mountain of work.... :cry:
Split_S
POR 15 junkie
Posts: 529
Joined: Sun Jun 16, 2013 11:00 pm
Location: Canada

Thu Jan 14, 2016 1:24 am

X-works posted and said HE would do it... :D

I've just finished up to page 6.. Good God Ive got to get to page 11... :mad:
Split_S
POR 15 junkie
Posts: 529
Joined: Sun Jun 16, 2013 11:00 pm
Location: Canada

Thu Jan 14, 2016 1:55 pm

Big Freeze?? It's -18C this morning!! Too late..

Work on the iS is progressing nicely I must say... Im actually a little behind on my posts...

I haven't received the engine yet and its kind of holding me up at this point as most of the stuff I need to do from now on is better done with the engine in place...

I hear you about repopulating the pics.. I spent 2 hours last night and got 1.5 pages done.. Why Im bothering I've no idea! :?
jimbom30cab
Tech 1 freak
Posts: 7634
Joined: Mon Oct 12, 2009 11:00 pm
Location: in the garage

Thu Jan 14, 2016 2:26 pm

Looking forward to more pics :) Best resto thread on here :)
Split_S
POR 15 junkie
Posts: 529
Joined: Sun Jun 16, 2013 11:00 pm
Location: Canada

Thu Jan 14, 2016 9:37 pm

Thanks jimbob... you're always too kind with your posts!

Just a note for those who haven't been able to read the thread from the beginning due to lost links for the pics... all pic's UP to page 8 have been relinked and now appear... Its exhausting for me as I feel Im redoing this resto all over again! Four pages of lost pics to go.. :P

I hope to have page 8 done tonight....
Split_S
POR 15 junkie
Posts: 529
Joined: Sun Jun 16, 2013 11:00 pm
Location: Canada

Fri Jan 15, 2016 8:23 pm

willnz wrote:
Split_S wrote:To be honest having the whole setup on the rotiserrie is the ONLY way to go'
but I did remove the original laying on my back with the car up on jack stands so if some of you are stuck to do it that way, my sympathies!! Wink
Not too difficult if you have one of these in your shed.. :) (excuse the mess.. 8O )

Image
Slaving over the pic repopulating and I see this! Somehow it didn't register the first time!!!

Is this REALLY your shed?? With all those goodies??

When can I come over??? :D
Split_S
POR 15 junkie
Posts: 529
Joined: Sun Jun 16, 2013 11:00 pm
Location: Canada

Fri Jan 15, 2016 10:01 pm

You're in New Zealand right? That's about 14500kms from here...

Ok..

I'll be over around 10am tommorow?

Have some tea ready...


:D
KW355
E30 Zone Regular
E30 Zone Regular
Posts: 266
Joined: Sat Mar 29, 2014 11:00 pm
Location: Birmingham

Fri Jan 15, 2016 10:52 pm

Great thread !

I have been using it for reference / inspiration for my own rear suspension overhaul which I am in the middle of.
If you are removing the hubs / changing the rear wheel bearings anyway I found it much easier to build up the handbrake mechanism first then pull the hub on with a bit of 20mm threaded bar, it only took 10 minutes and I did not need to disconnect the handbrake.
Also I fitted the beam first and left it low on the bolts and then fitted the trailing arms and then the diff. It is a bit awkward but much more manageable if you want to do it on your own.


Split_S wrote:With that in, fit the adjuster in the top indents and place the retaining springs in place..

Image

There are two retaining springs (the LONG ones). One is curved the other is not.. The curved one goes on top, to be placed under the adjuster and the straight one on the bottom along the expanding lock..

You can see them clearly here...
Image

Place one end in the made-for-just-this hole of the pad..

Image

Using a pick with a 90 degree curved end pull the other end into the opposite hole.. It WILL be fairly difficult.. VERY difficult if you're a complete PANSY... :D

For the top one, be careful of its orientation, place it so the curve allows the adjuster to turn.. Make sure they are fully in too...
Image

Image

Do the same with the bottom one.. and the parking brake setup is done..

Image

This pic shows how the adjuster is adjusted.. Nice eh?

Image

What you want to do now is put the disk back on and tighten up the nut on the parking brake cable you loosened. About 7-8 threads showing is good.. Then turn the disk and listen if the pads are rubbing. Adjust the adjuster (downwards motion expands it outward - if not its the opposite!!) until the pads JUST rub and then back off a bit.

That's it. 8)
:D :D
Split_S
POR 15 junkie
Posts: 529
Joined: Sun Jun 16, 2013 11:00 pm
Location: Canada

Sat Jan 16, 2016 1:15 am

kw355:
Thanks amigo.. Hearing that makes all the effort of putting this thread together worth it.. It's how I got started too...
As for the suspension setup, Ive done it a couple of times now and the BEST way is to have a helping hand! Your way sounds like it would work too!!
:D
Split_S
POR 15 junkie
Posts: 529
Joined: Sun Jun 16, 2013 11:00 pm
Location: Canada

Sat Jan 16, 2016 1:20 am

willnz wrote:Bring the M3..

Funny you should say that.. Just this morning I had a guy from AUSTRALIA on his honeymoon here in Quebec (for real!) who dropped by (thanks to the thread) and we spent the morning going over the rebuild and of course I brought him over to see the M3. His reaction reminded me yet again how special that car is.. He was in absolute awe and was so bloody thankful for letting him see it and sit in it it was almost funny!

I'll bring it if I retire there... deal? Just 16 years to go...


8)
Post Reply