
Non sunroof roof skin swap - Back on the road!
Moderator: martauto
-
appletree
- E30 Zone Addict

- Posts: 3482
- Joined: Fri Jan 20, 2006 11:00 pm
- Location: Retford
Came from BMW, all parts have individual part numbers so no under tray, not including screws or clips. Arch liners are £37.35 each B51.71.1.942.807 / B51.71.1.942.808, front guards are £10.63 each B51.71.1.972767/B51.71.1.962.768 I got the screws of eBay under body clips/screws

You should never underestimate the predictability of stupidity
M42 Supercharged 285bhp + M3 6speed box
-
Ashley1995

- E30 Zone Newbie

- Posts: 91
- Joined: Tue Jun 03, 2014 11:00 pm
- Location: Surrey
Thanks pal! Will order some for mine I think 
-
appletree
- E30 Zone Addict
- Posts: 3482
- Joined: Fri Jan 20, 2006 11:00 pm
- Location: Retford
Should add the numbers are only for a facelift car.
You should never underestimate the predictability of stupidity
M42 Supercharged 285bhp + M3 6speed box
-
Ashley1995
- E30 Zone Newbie
- Posts: 91
- Joined: Tue Jun 03, 2014 11:00 pm
- Location: Surrey
That's fine mine is a facelift 
-
appletree
- E30 Zone Addict
- Posts: 3482
- Joined: Fri Jan 20, 2006 11:00 pm
- Location: Retford
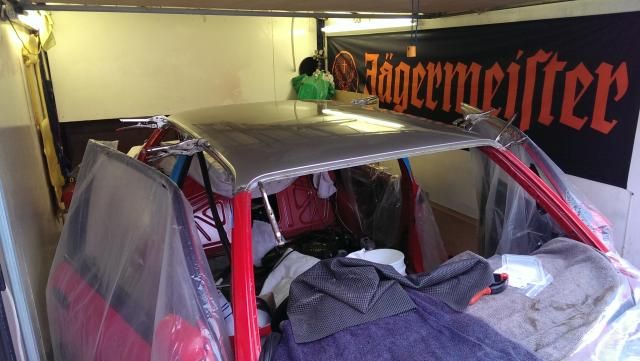
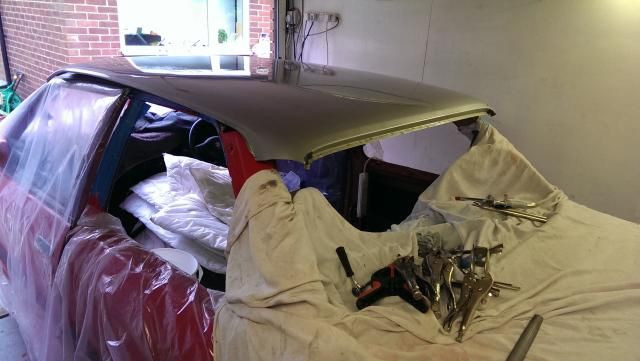
Appletree senior came over today to lend a hand with the final fitment of the roof skin, today was a very repetitive task of offer up, die grind back a bit, offer up and repeat but it paid off with a almost perfect fitting roof skin.
Pics from the days efforts
first of all I ground off these tabs as these are still on the car as they are spot welded to the roof frame.

removed
Started at the rear C pillars.
Big Phil, watching over proceedings
Rear sorted - over view
Theres not really a gap its just the black pen I was using to mark were to remove material that makes it look that way.
Rear pass side
Rear drivers side
Then on to the fronts
Front pass side
Front drivers side
More or less fitted and ready for welding, just need to take it off again and prep the underside of the roof skin and the roof frame with POR-15 then jobs a goodun!
Also fitted my new exhaust heat shield today with THE MOST EXPENSIVE bits of shitty tin nuts i have ever bought £2.85 each! for a bit of pressed tin, but at least its right, these are NLA from the dealer but the part number does come up on ebay with these.
Could always have welded my roof on like this like a new mini!
maybe that's how they came up with the idea!
Pics from the days efforts
first of all I ground off these tabs as these are still on the car as they are spot welded to the roof frame.

removed

Started at the rear C pillars.

Big Phil, watching over proceedings

Rear sorted - over view

Theres not really a gap its just the black pen I was using to mark were to remove material that makes it look that way.
Rear pass side

Rear drivers side

Then on to the fronts
Front pass side

Front drivers side

More or less fitted and ready for welding, just need to take it off again and prep the underside of the roof skin and the roof frame with POR-15 then jobs a goodun!

Also fitted my new exhaust heat shield today with THE MOST EXPENSIVE bits of shitty tin nuts i have ever bought £2.85 each! for a bit of pressed tin, but at least its right, these are NLA from the dealer but the part number does come up on ebay with these.

Could always have welded my roof on like this like a new mini!

You should never underestimate the predictability of stupidity
M42 Supercharged 285bhp + M3 6speed box
-
paulbart12

- E30 Zone Newbie
- Posts: 16
- Joined: Tue Nov 27, 2012 11:00 pm
- Location: Somerset
Very good thread! I admire your skills, keep up the good work! Its nice to see it being done and not being stripped.
-
appletree
- E30 Zone Addict
- Posts: 3482
- Joined: Fri Jan 20, 2006 11:00 pm
- Location: Retford
Cheers Paul, I'm in to deep with this car there's no way I'll ever get back what I put in it even though it would break well but that will never be on the cards while there's still dealers selling parts or still good ones on the road to rob bits from. I'll just keep playing with it and making it better, better than spending it on playing golf I suppose..... Lol
I'd not touched the car for about two weeks untill I did this last update and was really feeling a bit unmotivated as the last bits to do now are the little fiddley bits that make all the difference but take ages to do. But we're getting there..
I'd not touched the car for about two weeks untill I did this last update and was really feeling a bit unmotivated as the last bits to do now are the little fiddley bits that make all the difference but take ages to do. But we're getting there..
You should never underestimate the predictability of stupidity
M42 Supercharged 285bhp + M3 6speed box
-
appletree
- E30 Zone Addict
- Posts: 3482
- Joined: Fri Jan 20, 2006 11:00 pm
- Location: Retford
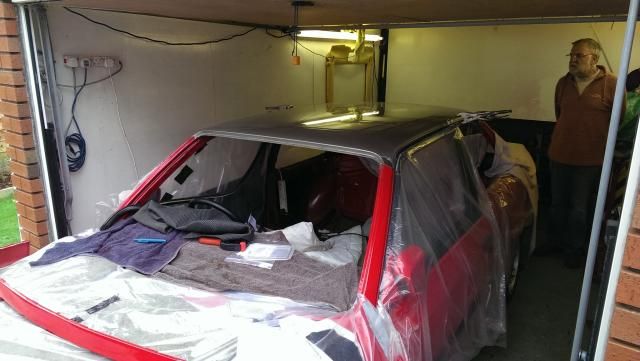
More work done in preparation for the fitting of the roof on tuesday.
Yesterday I masked up and painted the inside of the roof and roof frame with POR-15 and then removed the masking and sprayed the weld thru primer over the lip the roof sits on.
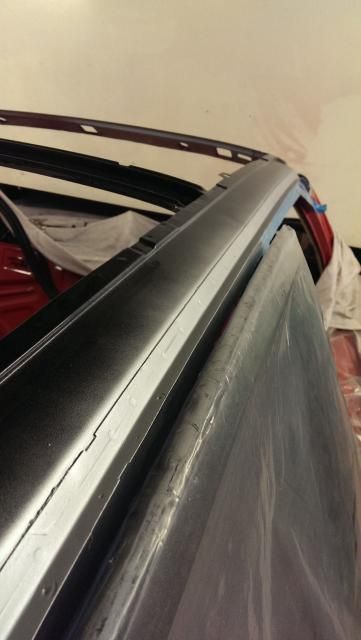
Looking forward to Tuesday now as the plan is to have the C-pillars welded up and then spot weld the gutters and around the screens but then will probably have to do the A-pillars another day
Yesterday I masked up and painted the inside of the roof and roof frame with POR-15 and then removed the masking and sprayed the weld thru primer over the lip the roof sits on.


Looking forward to Tuesday now as the plan is to have the C-pillars welded up and then spot weld the gutters and around the screens but then will probably have to do the A-pillars another day
You should never underestimate the predictability of stupidity
M42 Supercharged 285bhp + M3 6speed box
-
appletree
- E30 Zone Addict
- Posts: 3482
- Joined: Fri Jan 20, 2006 11:00 pm
- Location: Retford
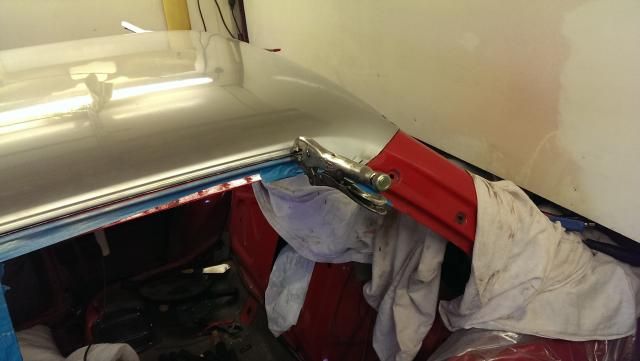
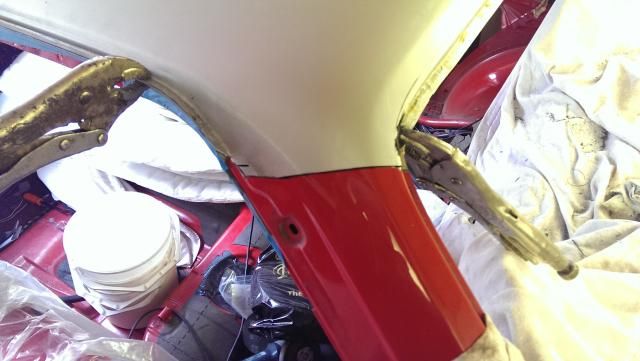
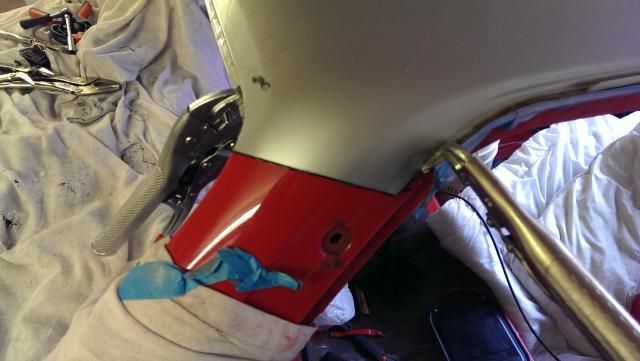
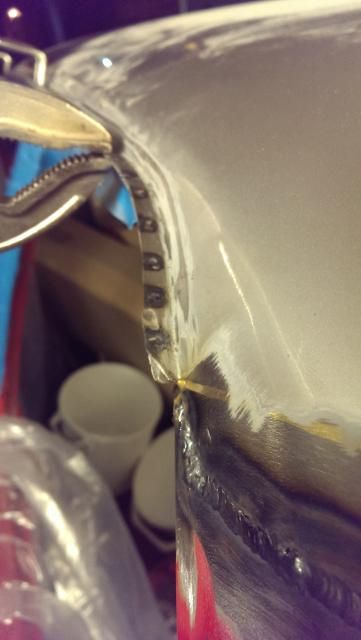
Well the C pillars are done,
The man of the moment came round and after a couple of tests on spare bit of roof off we went.
First off a couple of tacks here and there were the line was perfect and then a very minor amount of manipulation and weld the rest up.
Lovely lines...
Tuther side...

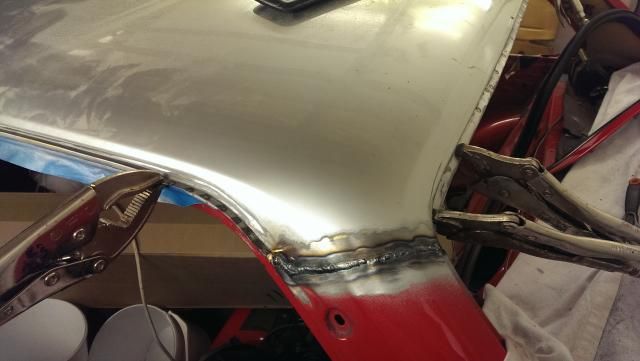
Welded up, Chris did a spot on job, its fully penetrated but then filled on top so I've got some weld to polish back but is going to be minimal either way.
Next a quick go with the spot welder along the rear screen edge and on the back edge of the gutter trim.
It works a treat, the weld thru primer is spot on and works well in both TIG and Spot use so that's good. only minor problem was that the machined electrodes I made up for the spot welded to fit inside the gutter trim were just a tiny bit to large to fit in the holders of the spot welder so my dad has taken these to turn them down to fit as I'm away with work now until Friday. but really pleased with how its going so far.
The man of the moment came round and after a couple of tests on spare bit of roof off we went.
First off a couple of tacks here and there were the line was perfect and then a very minor amount of manipulation and weld the rest up.


Lovely lines...


Tuther side...


Welded up, Chris did a spot on job, its fully penetrated but then filled on top so I've got some weld to polish back but is going to be minimal either way.

Next a quick go with the spot welder along the rear screen edge and on the back edge of the gutter trim.
It works a treat, the weld thru primer is spot on and works well in both TIG and Spot use so that's good. only minor problem was that the machined electrodes I made up for the spot welded to fit inside the gutter trim were just a tiny bit to large to fit in the holders of the spot welder so my dad has taken these to turn them down to fit as I'm away with work now until Friday. but really pleased with how its going so far.


You should never underestimate the predictability of stupidity
M42 Supercharged 285bhp + M3 6speed box
-
DanThe
- E30 Zone Team Member

- Posts: 28647
- Joined: Sat Sep 10, 2005 11:00 pm
- Location: Staffs
Tig-tastic
For some reason I thought you would be undoing and redoing the brazing on the pillars
For some reason I thought you would be undoing and redoing the brazing on the pillars
-
appletree
- E30 Zone Addict
- Posts: 3482
- Joined: Fri Jan 20, 2006 11:00 pm
- Location: Retford
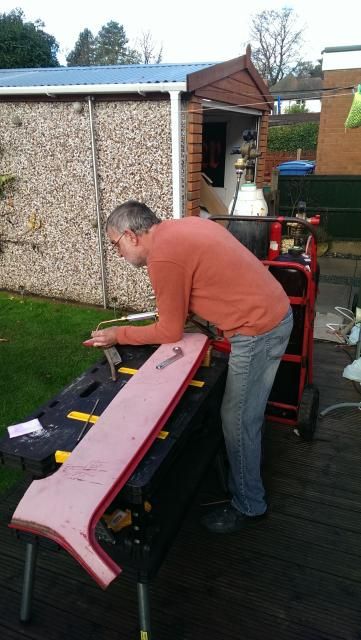
In a perfect world with a new skin from BM I may have held out for brazing but there's a couple if reasons why we did it this way.
I will be having brazing on the A pillars but was advised by the body shop to do it with MIG or TIG the way I've done it on the C pillars, also Chris has been doing TIG every day for 15+ years and Dad who will be brazing the A pillars hasn't done it for abit so we were abit werry of learning again on a one shot job as such, especially on the C pillars where there is quite a large section that's visible.
I have got a spare section of A pillar to have a practice on but didn't have a rear.
Lastly as the skin lips under the C pillar the braze has gone between the lips so couldn't be cut out and would probably take quite abit of heat to get it all melted enough to pull out and then the same on the skin, we just didn't want to have warped anything with all the heat.
You should never underestimate the predictability of stupidity
M42 Supercharged 285bhp + M3 6speed box
-
HILL
- E30 Zone Newbie
- Posts: 52
- Joined: Thu Apr 26, 2007 11:00 pm
Hi,
Could you provide the product details for the carpet dye , that's a brilliant result , my 325i Sport requires the same treatment....hope you can assist.
James
Could you provide the product details for the carpet dye , that's a brilliant result , my 325i Sport requires the same treatment....hope you can assist.
James
-
appletree
- E30 Zone Addict
- Posts: 3482
- Joined: Fri Jan 20, 2006 11:00 pm
- Location: Retford
You should never underestimate the predictability of stupidity
M42 Supercharged 285bhp + M3 6speed box
-
appletree
- E30 Zone Addict
- Posts: 3482
- Joined: Fri Jan 20, 2006 11:00 pm
- Location: Retford
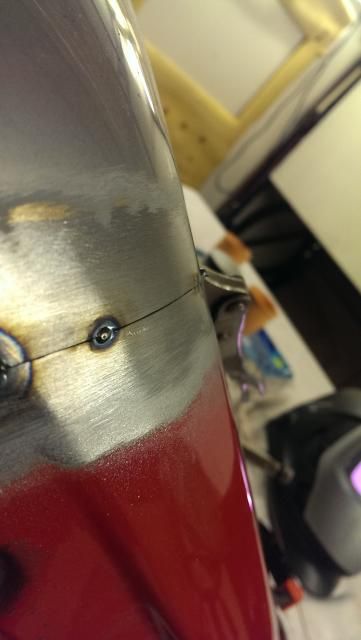
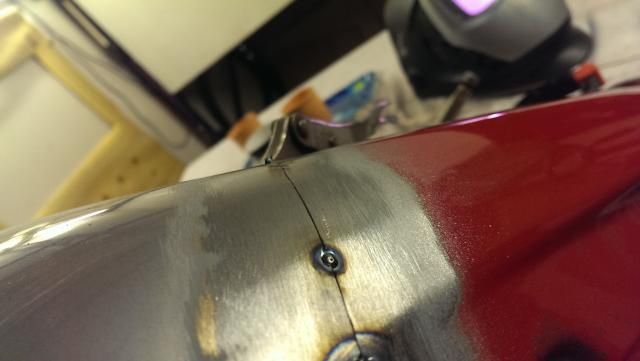
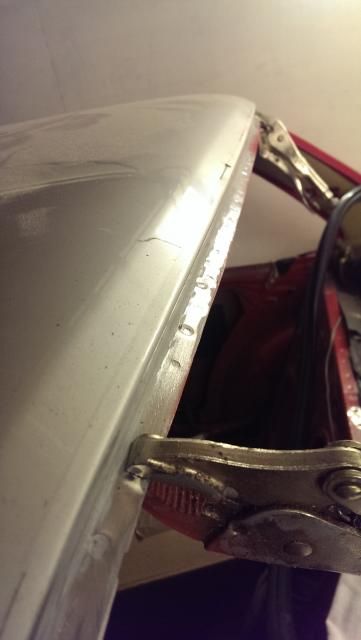
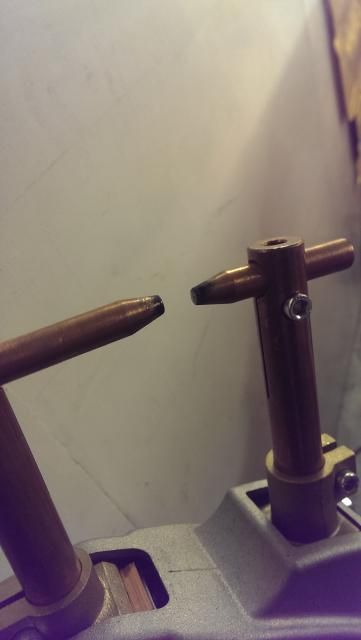
I normally get up about 6.30 and since the clocks changed my body still hasn't cought up so at 5.30 this morning I was lated in bed wide awake thinking about the car and what todi next so thought fook it i may as well get up and do abit, so with a brew in hand, I set about spot welding the skin on using some specially turned electrodes dad machined up for me.
We used plain solid copper bar as apposed to the correct tungsten copper rod normally used but it worked well.
Here are the elctrodes after 160+ spot welds.
Without counting I was within 2 welds of each side 86 pass side and 84 the drivers side.
Pass side
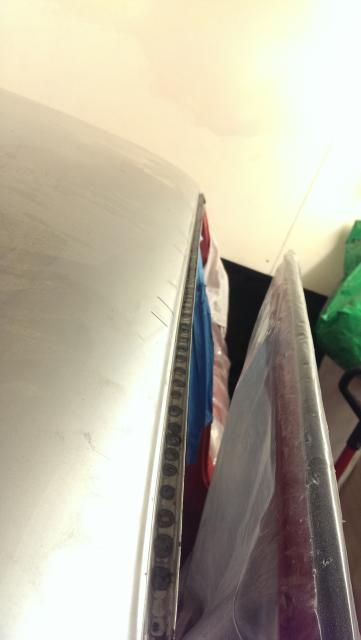
Drivers side
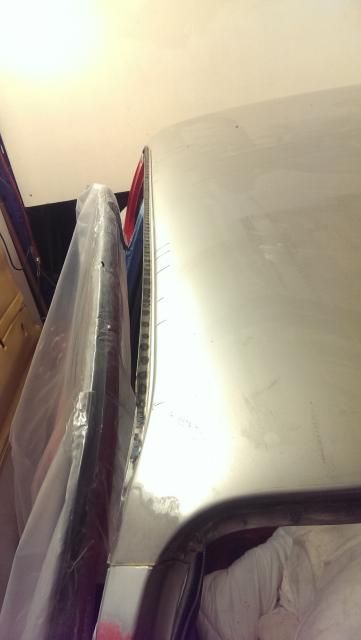
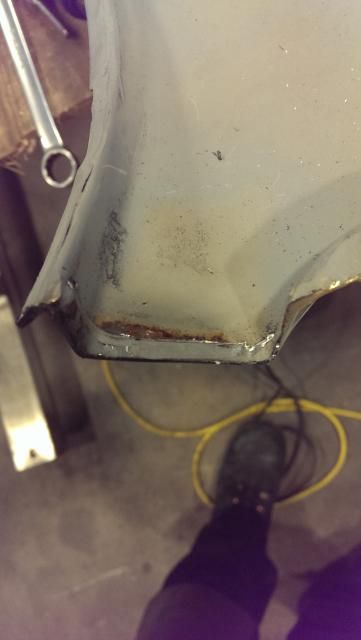
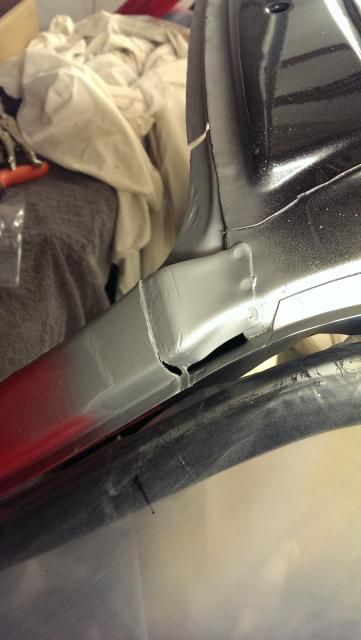
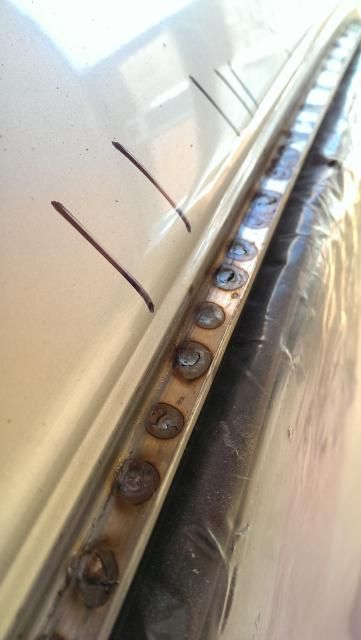
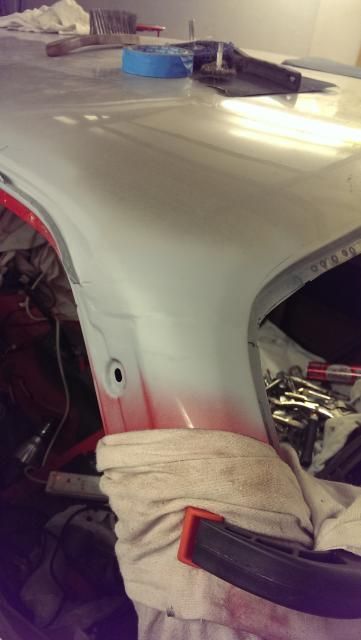
Unfortunately due to the skin being seperated from the old roof and then polished with a sanding pad in a grinder to remove the old cars frame some sections of the skin were thinhher than others and so a couple of the spot welds burnt through, shown by the black lines so I will touch these in with TIG and I think I will still stich along thr edge just for piece of mind.
We used plain solid copper bar as apposed to the correct tungsten copper rod normally used but it worked well.
Here are the elctrodes after 160+ spot welds.

Without counting I was within 2 welds of each side 86 pass side and 84 the drivers side.
Pass side

Drivers side

Unfortunately due to the skin being seperated from the old roof and then polished with a sanding pad in a grinder to remove the old cars frame some sections of the skin were thinhher than others and so a couple of the spot welds burnt through, shown by the black lines so I will touch these in with TIG and I think I will still stich along thr edge just for piece of mind.
You should never underestimate the predictability of stupidity
M42 Supercharged 285bhp + M3 6speed box
-
Jarno
- E30 Zone Newbie
- Posts: 127
- Joined: Sun May 27, 2012 11:00 pm
- Location: Hyvinkää
I'm not sure I read/understood this properly but..As for re placing the tray I’ve been thinking that rather than weld the new tray in I’m going to make a clamping arrangement as, as far as I can see there is no way of rust proofing the area above the weld once it’s in place as it is almost touching the roof skin.
So a good bit of work done but a bit sad at what I’ve found, shame really as the car is in really good shape in all the other areas , especially the back arches, I’m never going to sell this car so it will be getting sorted properly.
Have you considered using panel bonding adhesive in that area? Not having to weld means you don't burn off paint from a hard-to-get-to area. And the adhesive makes an air/water tight seam. I use 3M 8115 for these jobs.

-
appletree
- E30 Zone Addict
- Posts: 3482
- Joined: Fri Jan 20, 2006 11:00 pm
- Location: Retford
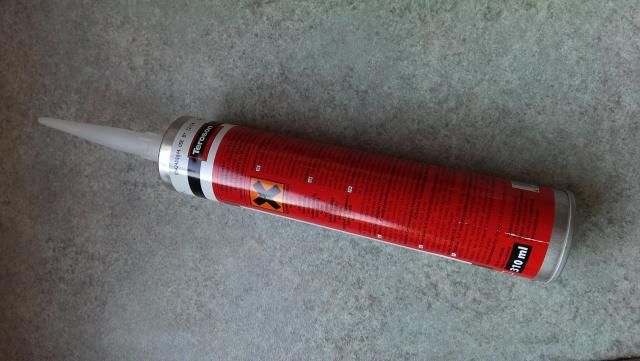
The clamping arrangement was for the sunroof tray which is no longer needed as I've fitted the non sunroof skin but thanks for the info, do you think the binding stuff would be better than tiger seal for bonding the skin to the frame on the inside? The skin is spot welded to the frame but there was originally some black sealant type gear between the skin and the frame on the inside.
You should never underestimate the predictability of stupidity
M42 Supercharged 285bhp + M3 6speed box
-
Jarno
- E30 Zone Newbie
- Posts: 127
- Joined: Sun May 27, 2012 11:00 pm
- Location: Hyvinkää
Body sealant and panel adhesives serve totally different purposes. The former makes seams watertight, the latter atttaches pieces together strongly enough that they can bear loads. That 3M stuff is 2 component stuff and becomes very hard. In some (many) areas the sealing stuff used should remain somewhat elastic.appletree wrote:The clamping arrangement was for the sunroof tray which is no longer needed as I've fitted the non sunroof skin but thanks for the info, do you think the binding stuff would be better than tiger seal for bonding the skin to the frame on the inside? The skin is spot welded to the frame but there was originally some black sealant type gear between the skin and the frame on the inside.
I forgot what you asked
BTW, very thorough and nice looking work!
-
appletree
- E30 Zone Addict
- Posts: 3482
- Joined: Fri Jan 20, 2006 11:00 pm
- Location: Retford
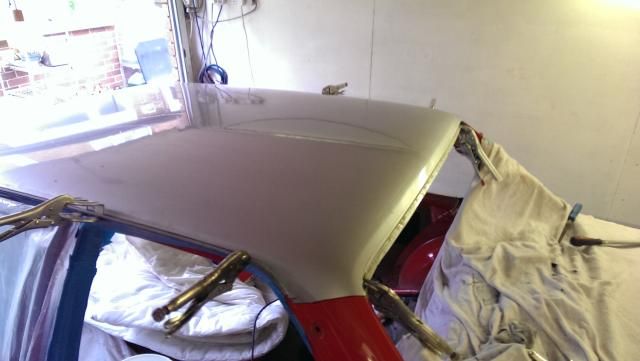
Today's efforts
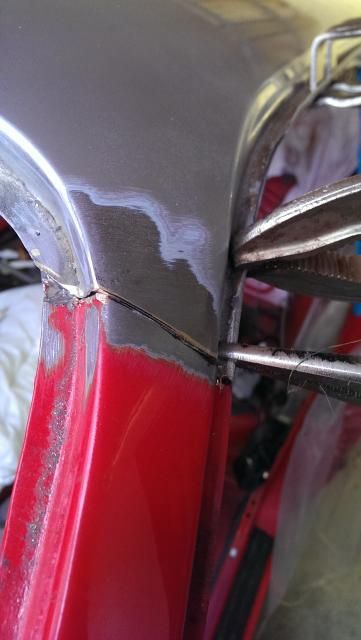
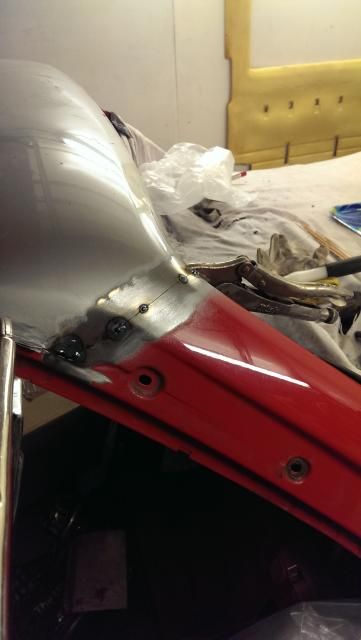
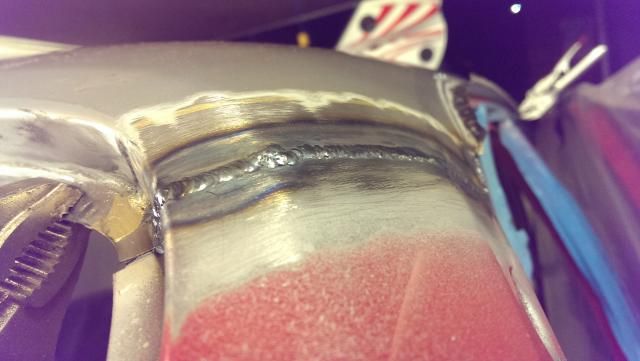
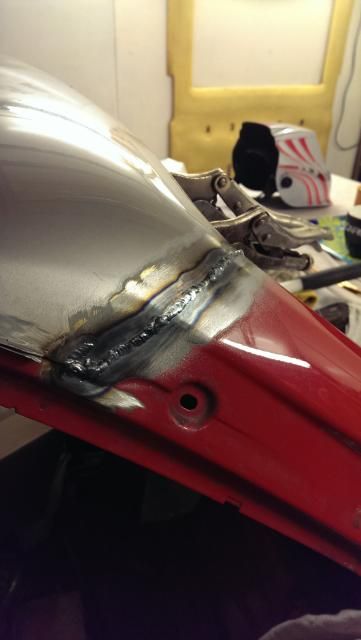
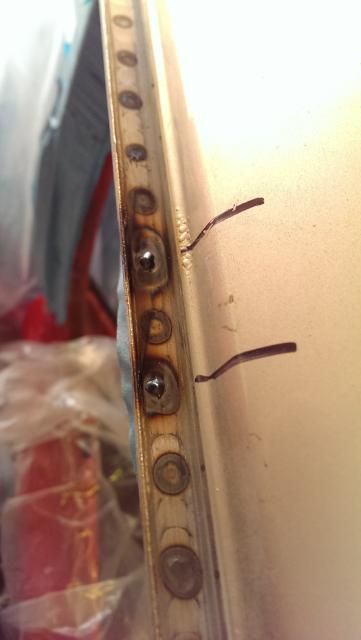
Welded up some of the spot welds that had burnt through or weren't quite perfect.
Before - black lines show spots to touch in , this area had a few todo.
After
Polished back and acid etch primed
Also decided to stitch weld inn the seams in a couple of places for piece of mind.
Also polished up the welds on the C pillars and gave them a lick of etch just to keep them rust free and see what they looked like.

And abit of paint
Till next time
Welded up some of the spot welds that had burnt through or weren't quite perfect.
Before - black lines show spots to touch in , this area had a few todo.

After

Polished back and acid etch primed

Also decided to stitch weld inn the seams in a couple of places for piece of mind.

Also polished up the welds on the C pillars and gave them a lick of etch just to keep them rust free and see what they looked like.


And abit of paint

Till next time
You should never underestimate the predictability of stupidity
M42 Supercharged 285bhp + M3 6speed box
-
appletree
- E30 Zone Addict
- Posts: 3482
- Joined: Fri Jan 20, 2006 11:00 pm
- Location: Retford
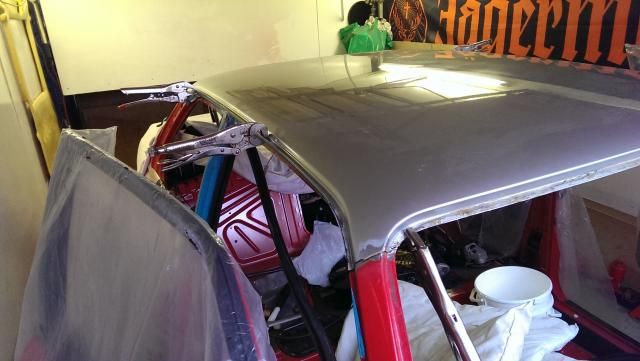
So today became a day off for me after a week in Glasgow so asked dad if he thought we could have a look at finishing the roof skin off and brazing in the A pillars which he was happy to do.
I picked up the bottles from work only to find some numpty had left the gas bottles turned on and only the oxygen had any left in it in so nipped back to work and swapped the bottle for a new knew one and off we went.
First things first alittle practice on a spare skin I had.
Then on to the real thing
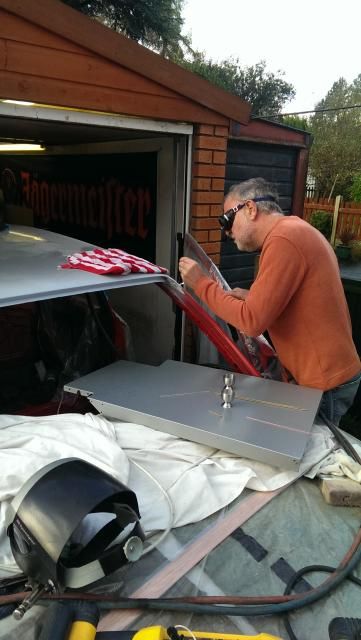
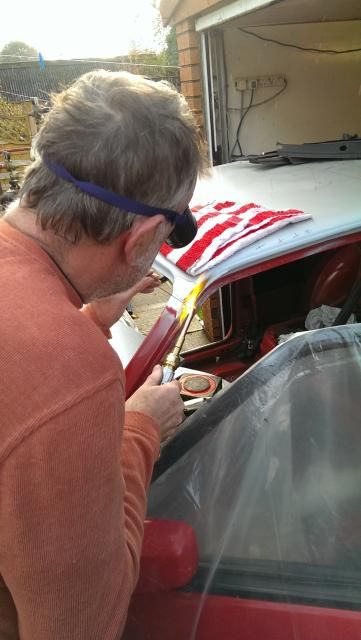
I haven't ended up with much of the after brazing pictures as we just cracked on with it, but here are a few after the braze had been polished back and had a coat of etch primer.
Thing left to do are
Clean up welds inside
etch and wax ooil vthe inside of the roof skin
Bond skin to frame with loctite p2200
pait the roof
Paint inside around the edges
So getting there and most of the dangerous or costly bits have been done came out ok.
I picked up the bottles from work only to find some numpty had left the gas bottles turned on and only the oxygen had any left in it in so nipped back to work and swapped the bottle for a new knew one and off we went.
First things first alittle practice on a spare skin I had.

Then on to the real thing


I haven't ended up with much of the after brazing pictures as we just cracked on with it, but here are a few after the braze had been polished back and had a coat of etch primer.


Thing left to do are
Clean up welds inside
etch and wax ooil vthe inside of the roof skin
Bond skin to frame with loctite p2200
pait the roof
Paint inside around the edges
So getting there and most of the dangerous or costly bits have been done came out ok.
Last edited by appletree on Sat Nov 08, 2014 5:48 am, edited 2 times in total.
You should never underestimate the predictability of stupidity
M42 Supercharged 285bhp + M3 6speed box
-
jimbom30cab
- Tech 1 freak
- Posts: 7634
- Joined: Mon Oct 12, 2009 11:00 pm
- Location: in the garage
bloody good work there. respect !
-
appletree
- E30 Zone Addict
- Posts: 3482
- Joined: Fri Jan 20, 2006 11:00 pm
- Location: Retford
Thanks Jim, it's been hard work and time consuming but I don't think a body shp would have put as much effort is as what we have on this job and if they did I wouldn't like to hazard a guess at the cost. I would guess it's taken me a week to do if you add up all the hours here and there.
You should never underestimate the predictability of stupidity
M42 Supercharged 285bhp + M3 6speed box
-
sweep
- Married to the E30 Zone
- Posts: 10112
- Joined: Sat Mar 15, 2008 11:00 pm
- Location: spares & repairs in sheffield
Fantastic matt.
-
goosiegander
- Zonegoose
- Posts: 2544
- Joined: Sun Nov 19, 2006 11:00 pm
- Location: East Anglia
+1 Respect!

-
bss325i
- E30 Zone Team Member
- Posts: 24536
- Joined: Sat Jan 20, 2007 11:00 pm
- Location: London/Surrey
Top work!
-
appletree
- E30 Zone Addict
- Posts: 3482
- Joined: Fri Jan 20, 2006 11:00 pm
- Location: Retford
Thanks lads pleased you approve, cant wait to get some paint on it now and get it on the road next year.
Currently running with no brakes at the minute though after I sold the old WMS set up and the rears went in the spare parts pile, hoping for a development on this front next week though.
Currently running with no brakes at the minute though after I sold the old WMS set up and the rears went in the spare parts pile, hoping for a development on this front next week though.
You should never underestimate the predictability of stupidity
M42 Supercharged 285bhp + M3 6speed box
-
appletree
- E30 Zone Addict
- Posts: 3482
- Joined: Fri Jan 20, 2006 11:00 pm
- Location: Retford
Small update
The tube of Loctite 9200 bonding I ordered turned up and I have been round thd roof and bonded it down in all the correct places, no pic as yet but will update later. ...
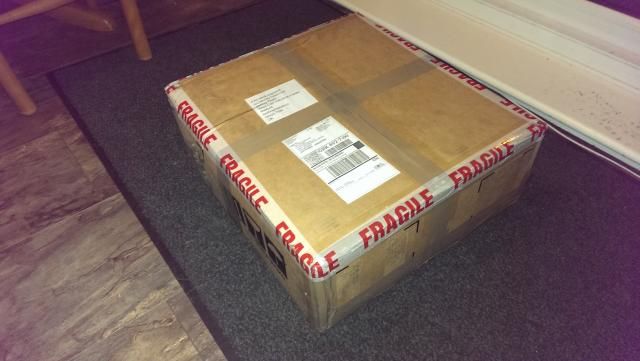
Also this box arrived, but whats in it? Any guesses?
The tube of Loctite 9200 bonding I ordered turned up and I have been round thd roof and bonded it down in all the correct places, no pic as yet but will update later. ...

Also this box arrived, but whats in it? Any guesses?

You should never underestimate the predictability of stupidity
M42 Supercharged 285bhp + M3 6speed box
-
sweep
- Married to the E30 Zone
- Posts: 10112
- Joined: Sat Mar 15, 2008 11:00 pm
- Location: spares & repairs in sheffield
Come on then.......what is it 
-
appletree
- E30 Zone Addict
- Posts: 3482
- Joined: Fri Jan 20, 2006 11:00 pm
- Location: Retford
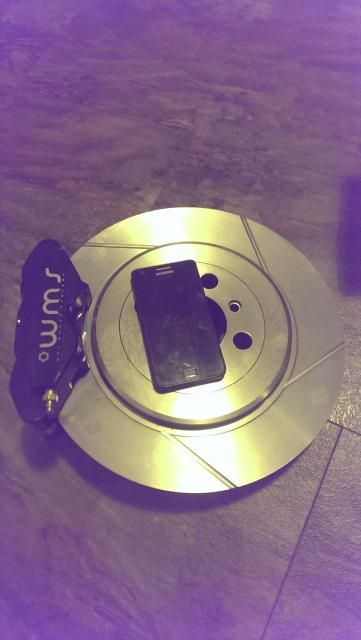
My new brakes!
298.5mm fronts 290mm rears.
Bigger than my dinner plate
298.5mm fronts 290mm rears.

Bigger than my dinner plate

You should never underestimate the predictability of stupidity
M42 Supercharged 285bhp + M3 6speed box
-
retroboyo
- E30 Zone Regular

- Posts: 459
- Joined: Mon Oct 30, 2006 11:00 pm
Some serious skills there, nice to see
-
Jozi
- E30 Zone Addict
- Posts: 3076
- Joined: Thu Nov 22, 2007 11:00 pm
- Location: Dublin, Ireland
Don't know how I missed this until now! Some balls to change the roof skin but it looks like you took your time and came out with a proper good job!
Them brakes are on my list as well
Them brakes are on my list as well

-
spook
- League two here we come !!!
- Posts: 7587
- Joined: Sat Aug 19, 2006 11:00 pm
- Location: portsmouth
Top skills,awesome stuff mate

-
Demlotcrew
- E30 Zone Team Member
- Posts: 13329
- Joined: Mon Dec 20, 2004 11:00 pm
- Location: East Anglia
Nice work on the sunroof skin!

-
appletree
- E30 Zone Addict
- Posts: 3482
- Joined: Fri Jan 20, 2006 11:00 pm
- Location: Retford
spook wrote:Top skills,awesome stuff mate
Thanks, just awaiting a call from the painter with a quote but looking like if the quotes good then it will be going in week comensing 1st of December.Demlotcrew wrote:Nice work on the sunroof skin!
You should never underestimate the predictability of stupidity
M42 Supercharged 285bhp + M3 6speed box
-
appletree
- E30 Zone Addict
- Posts: 3482
- Joined: Fri Jan 20, 2006 11:00 pm
- Location: Retford
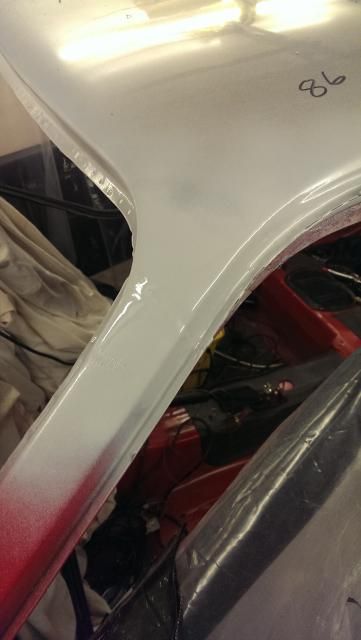
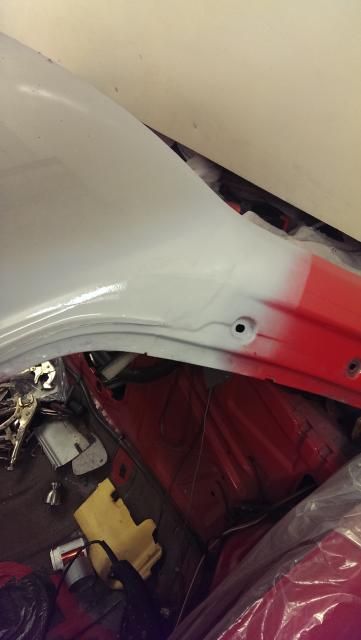
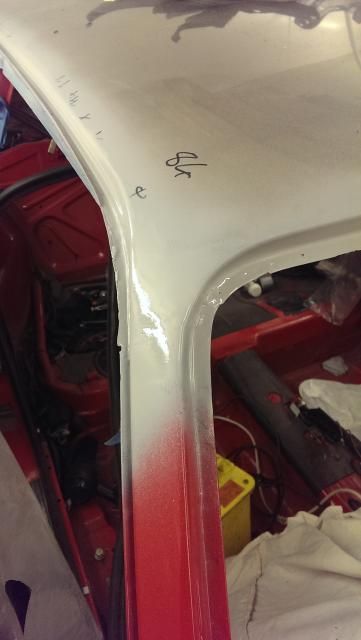
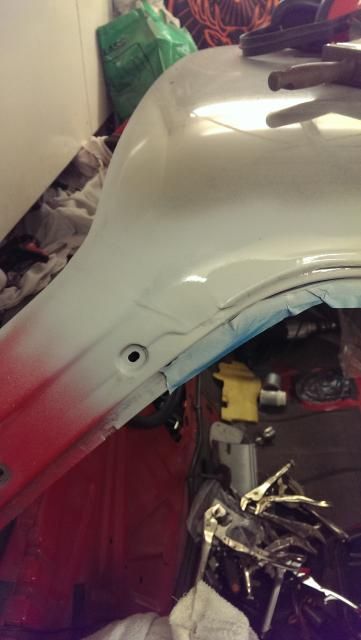
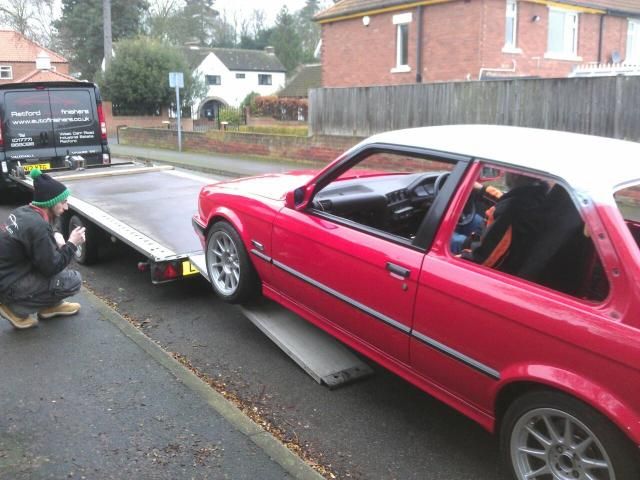
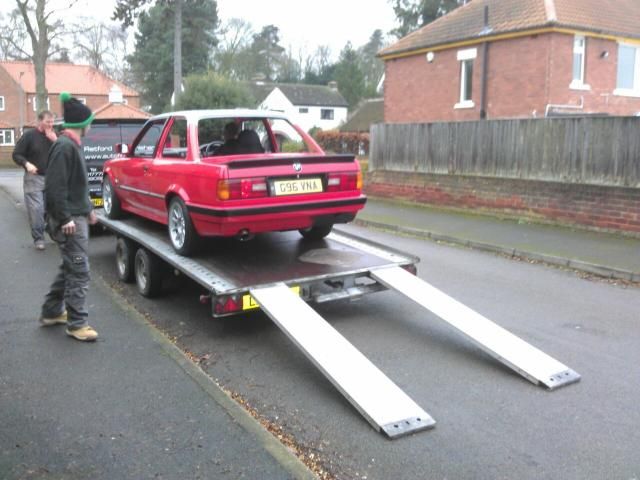
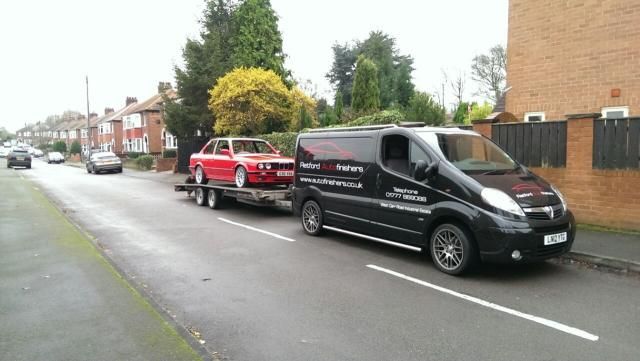
The car got picked up today and has gone for paint with a view to being back before Christmas which will be good as our lass is working over some of it so I can go and rebuild it in the garage.
I was at work so big thanks to mum and dad for coming round and loading it up with the painters.
Few pics
Anyone know if you can split the wing mirrors down at the joint? What's the best way to strip them down for spraying?
I was at work so big thanks to mum and dad for coming round and loading it up with the painters.
Few pics


Anyone know if you can split the wing mirrors down at the joint? What's the best way to strip them down for spraying?
You should never underestimate the predictability of stupidity
M42 Supercharged 285bhp + M3 6speed box
-
Paul_D
- E30 Zone Newbie
- Posts: 48
- Joined: Fri Oct 23, 2009 11:00 pm