When I first started to look into E30's it was a toss up between a Touring and a saloon, went for latter first time round. But pleased I went for a Touring this time four years on.
There's a few bits that need attention on the body, shall take a closer look (skirts and bumpers off, carpets up) hopefully this week. Overall feels pretty solid to drive..
There's a niggle here and there that I shall try to work out from flossing through the technical pages and wiki on here. The speedo had gone, which was a broken wire to the sensor on the diff, got a temporary fix on that but need to get it sorted properly.
I love my IS but the M20 makes it such a different feeling car, I'm loving the extra 2 pots. So the rotting IS has been squeezed into my sisters garage for now. Whilst I enjoy my new toy..
Last edited by G-Bear on Sat Jul 19, 2014 1:23 pm, edited 6 times in total.
^I'm going to try and keep both. The IS needs a fair bit of work. For now I'm going to concentrate on the Touring then pull the other out of the garage in a while... Got to learn to weld first..
Well over a year has gone by since I posted this thread.. thought I’d update it. Nothing major (or interesting probably) really just fixing problems as they arise and keeping it road legal to pass its MOT.
Put new belts in to cure a squealing sound.
From what I can remember, shortly after a couple of months owning the car the clutch slave gave up on me on Henlys corner at 7am which was well received by morning traffic..
So that was one of the first jobs. Bought a new slave and master cylinder, along with a braded hose. Deliberated over whether to use BMW parts or from ECP. After a bit of research on here, I bit the bullet and went for OEM”¦ Even with zone discount the two cylinders came some £260, which put a lump in my throat. That lump got bigger once I got an email back from meatballs on here quoting me about £60 for the two. He had been away when I got in touch and replied after my purchase from BMW”¦
Just to note meatballs on here no longer can offer zone discounts LINK”¦ so don’t bother him..
The job wasn’t as fiddly as I had thought it was going to be. The only bit that took a while and my paticence was getting the top bolt back on the slave once in situ.
Followed this guide for putting the clutch fluid into the system.
[youtube][/youtube]
Also gave this a good clean.. which I found satisfying..
Anyway that was sorted. Then decided to fix the gentle drip that was coming from that was coming from the oil filter housing.
Although not hugely common, the culprit of leaks from this area usually comes from a perished gasket that holds a thermostat on the housing.
I had away with that ”˜UNIPART’ oil filter too, and an oil change.
Got a gasket kit from the dealers for not a lot of money, about £13 (part number 11429059338).
Below is the old gasket, with spring and thermostat, along with the new gasket kit.
Was a bit of a fiddly job getting it all back in. Using a ”˜G’ clamp (or similar) was a huge help. I put the process up in the wiki pages”¦
”¦ Also promised Kedge a write up of replacing the clutch master and slave cylinder at the time”¦ still haven’t got round to it”¦ noticed last time I checked that there were a few grey patches in the current wiki write up, so if I can still remember what I did: I’ll finish that write up (.. sorry Kedge).
I replaced the reverse switch on the gearbox as I was tired of reversing in the dark with no light, the decision was cemented when I reversed into the porch wall back at the flat..
That was all done back in November 2012..
Winter passed. During Christmas, I bought parts for a service off Meatballs on here. Then in March, finally got the car up on stands and gave the car a bit of a service.
This included..
New oil.
New oil filter.
New air filter element.
New fuel filter.
New timing belt, tensioner and spring.
New water pump.
Rad flush and new coolant.
New plugs.
New wiper blades.
New sump and coolant plugs for the block.
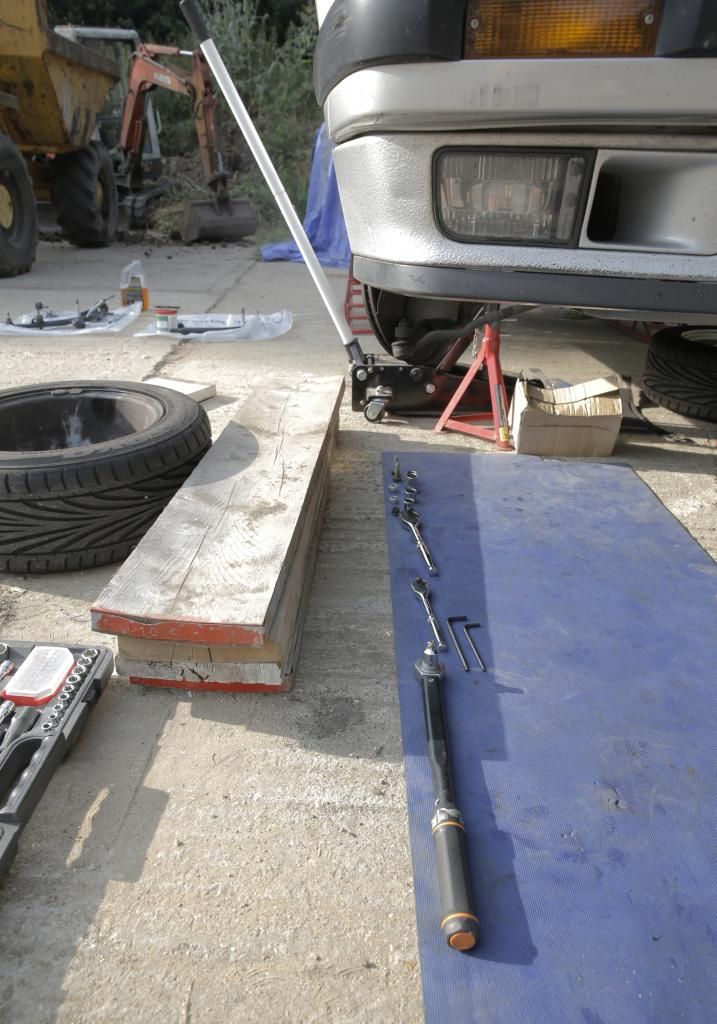
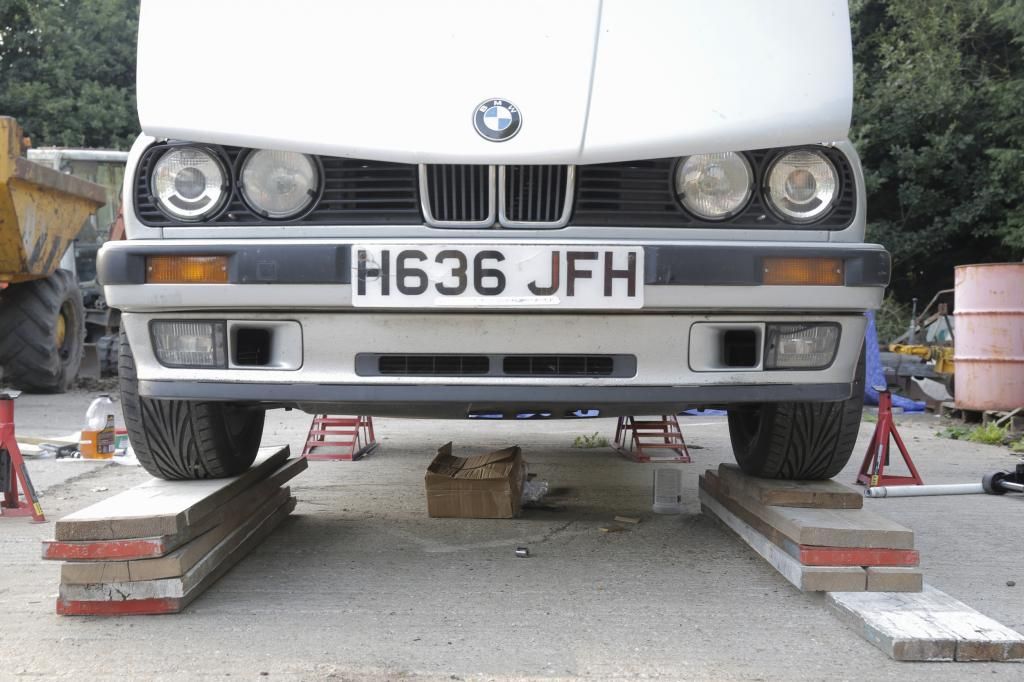
So to get to the timing belt; off with the rad, then pretty much everything in the below pic that sits at the front of the engine.. Fan, coolant hoses (coolant obviously), distributor, rotor arm and various bits of housing.
Whilst attempting to remove the (reverse) nut that’s houses the fan, I found a short sharp blow of a mallet to the spanner wasn’t enough to free it. So I used a length of bar (a wall brace in this instance). Bolted it to the pulley behind the fan, turned the pulley so that the bar pinched against the chassis (putting cardboard between bar and chassis to protect the chassis) and with that the nut securing the fan wound off with ease. Note that in the below pic the fan was already removed.. I couldn’t be arsed to bolt the fan back on just for the benefit of the photo.. so you just have to use your imaginations”¦
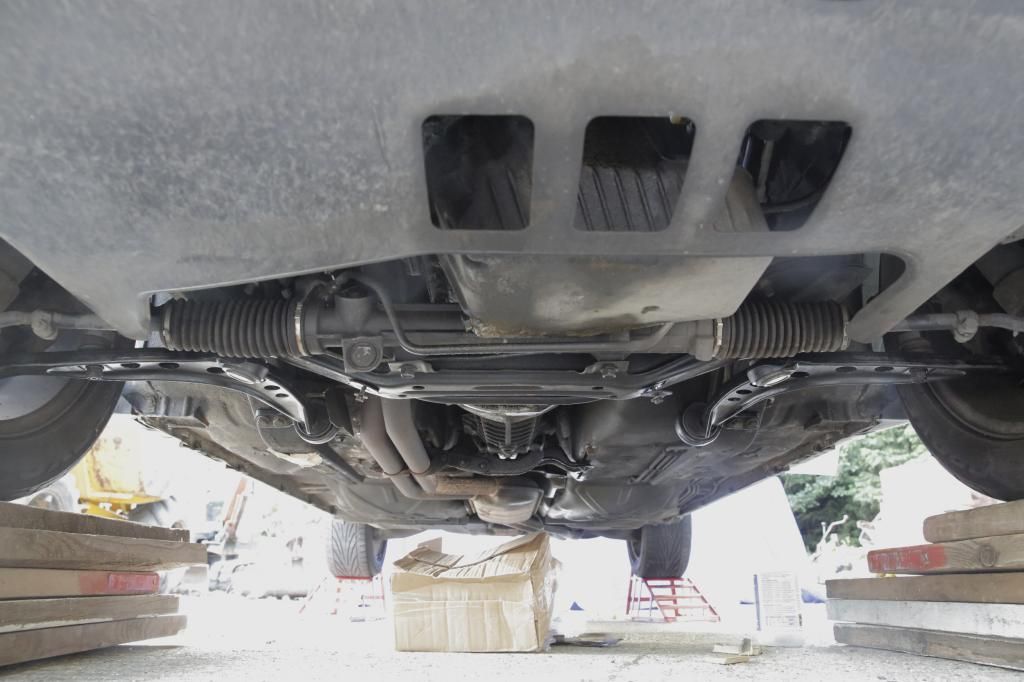
The drain plug for the engines coolant is in a pig of a position, had to strategically place myself under the car so coolant didn’t empty all over me.. I might devise some kind of funnel, hose and stiff wire configuration next time.
Well, I was lucky with the timing belt. The current one at the time had several gashes and chips along the edges, and had shown signs of rubbing up against the housing. So a new one was due. Does the belt tend to move from side to side on the pulley? Or was it just put on with lack of care? I think I might know the answer as whoever fitted that belt also left out the pin and spring for the tensioner.. Probably pinged across the garage never to be found again. This discovery was on a on the Saturday before Easter, so I had to wait till Tuesday to get on the phone to the boys at Spire BMW (sure they used to be called Scotthill.. sounds much more macho than ”˜Spire’)to order a new retaining pin.
This caused a bit of a set back, but in the mean time I changed the spark plugs, fuel filter, cleaned the engine and ABS sensors in an attempt put out the light that comes up on the dash.
Also put in new ”˜D’ plugs, and cam seal in the head, along with a new gasket for the rocker cover.
Once everything was put back together, torqued up correctly and new coolant was put in, although I followed combined instructions from the wiki guide and Andyboy’s E30 bible; I came across trouble fully bleeding the system. I wasn’t getting any hot air inside from the blowers. In the end, after a little help from Maggspower and Andyboy on here. I put the front of the car up on ramps loosened the top coolant hose at the bulkhead to the nearside of the engine; this released trapped air in the system. Once coolant started to come out I tighten it back up. Topped up the coolant at the reservoir. Started up the engine, bled and topped up, whilst taking the revs up every so often until only fluid came out the bleed nipple on the thermostat. Checked inside the car to feel lovely warm air coming out of the blowers.
Timing belt changes and other bits of work on engines was all new to me so I was pretty chuffed”¦:D
At some point I sourced the cause of my ABS light that came on in the dash. The light would come on with the electrics, then go out and come on again shortly after the car was in motion. This indicated that the fault laid either in one of the sensors or in the wiring to them from the ECU.
I found the fault by disconnecting all but one sensor and drove the car. If the light on the dash came on, that sensor is sending a signal to the ABS and is good. Repeated this with each sensor to discover any that don’t cause the ABS light to come on. Since the ABS has no movement signal input other than from each wheel sensor, if only a bad sensor (or one with a fault in the wire connected to it) is connected the module can’t tell that the car is moving and the fault light won’t come on. It needs signals from each sensor at each wheel to fault on the missing signals from any other wheel”¦ if that all makes sense.. Obviously that will only single out which of the four systems is playing up. It could be the sensor, connections or wires itself.
With this test the n/s front seemed to be the culprit. Upon further inspection, the wire that looped round in the arch just before the sensor had a series of cracks, so I figured that was the cause.
Then a couple of months passed. With the MOT looming, conscious of a leaking steering rack and the absence of a tail pipe on the exhaust I set to work on these two.
Before I started I collected this little lot from the dealers and left me some £60 lighter”¦
Nuts, bolts, washers and clips for steering rack, UJ’s, engine mounts, subframe, track rods and some bits I might have forgotten.
I had purchased an E46 067 rack, custom pipes and linkage from DanThe. Also bought some E34 UJ’s.
I had bought a Dremel shortly before which came to great hand for the job. From what I remember I had to file down one of the arms slightly (left in pic below) on the linkage to allow for the crossed centre piece with the bearings to fit.. can’t remember (it was 6 months back) if that was for the E30 or E34 part.. you’ll work it out when you’re there”¦ if you’re going there.
Also gave it a bit of a buff with the dremel (my new mate Little D..)
Anyway after a bit of head scratching and fiddling about that went all back together. When pinching the caps with bearings back in, be careful not to squeeze them too tight, you can feel that they bind a bit. I had to pull mine out and do them again for this reason.
Then moved onto the rack. Pictured below is old and new. Along with fresh Lemforder dust boots and track rod arm assemblies..
When putting the parts together for the rack, was quite looking forward to the rather minor but satisfying task of putting on and bending the tabs of the retaining washers for the track rod assemblies. But to my disappointment found that the notch for the washer tab wasn’t on the E46 rack. So I put a dab of medium thread look on instead.
Fitted and plumbed in”¦
I did have a fresh powder coated front sub-frame to put in.. I had planned to re-fresh all bushes, control arms etc, but the MOT was calling and I didn’t have enough cash to buy it all. So for now, I only changed what was needed. Sounds silly but I wanted it all fresh at the same time so held back for now on what I could.
Fitting the rack was one of my most testing jobs on the car”¦ Purely because of the weather, whilst prepping the rack under shelter, rainfall was gathering momentum at a very soggy rate. I walked out with the rack cradled in my arms to find a small river passing around my car. Not deterred I figured if I keep the bonnet down technically I’m under cover and should be fine.. WRONG.. as I lie there on my back with the rack on me like a weight lifting bar, that gully you see in the pic above between the axle stands was supplying enough water to keep my head and back drenched, then all the water from the front of the car was steadily dripping off the bumper and valance saturating my torso and pants. Obviously leaving my legs exposed to the full brunt of what the skies had to offer.
Once it was all put in position and secured I scampered off to seek proper shelter and dry off.
The weather eventually tamed down. I had to loosen off most bolts in order to jig the rack about to fit the new linkage and UJ’s, but all went in relatively straightforward. I also fitted the recommended Escort Mexico Burton engine mounts. Torqued up everything correctly and put fresh power steering fluid in.
I’m sure most of you are aware but I must pay credit to DanThe’s craftsmanship of those hoses, they’re built to a great standard, as are the linkages. Well executed.
After all that, next on the list was the exhaust. The current exhaust consisted of OEM front section and some cheap looking aftermarket rear section. Once I pulled it off (out came little man mr D again) the rear box had rust round both brackets and was blowing from several holes.
I decided to go for Eberspacher which is said to be of OEM quality but about half the price of what BMW might charge. I fluffed the part number and got one for an E36 first attempt.
Then got on the phone Meatballs at Euro Car Parts and sorted the right part number for me”¦ Thanks Meatballs.. was pleased with build quality of the new exhaust especially compared to the st!tty one I pulled off.
If you’re keen to get the same exhaust. The Part number from ECP is 705110417. It was around £190. ECP usually show a cheaper Eberspacher (part number 705112027) for about £150 but have been told this one isn’t as good a quality.
I have a hot cold approach to buying from the dealer or from a motor factor (non oem). On this occasion I had decided to let my hair down and buy some exhaust brackets from my local shop. They still cost me £30 (which is much less than BMW. I was a bit deflated by the quality of them. But kept smiling until the weld on the bracket broke just as I had it all strapped up. So off it came for a welding.
Also treated a bit of surface rust I found on the inside of the rear valance, whilst the exhaust was off and sprayed it with some Hammerite. I’m sure that isn’t a long fix, but I have plans for the car in that respect next year.
Whilst the rack and exhaust was getting sorted. I posted my throttle body to Maggspower to get bored and cleaned. Again, another man of a high skill-set. Very helpful and full of knowledge too.
The finished item highlighted the tatty state of the rest on my engine bay”¦ But I’m a long way away from thinking about shiny things like that..
Whilst removing the TB I had to cut through the vacuum hose that ran to the brake servo as it was stuck fast.
Had to order all of that hose, at I think around the cost of £30”¦
To use this much”¦
I’m sure I could have got the hose from a motor factors for cheaper..
Whilst removing the TB, the hose that ran to the bottom of the thermostat came away, further inspection revealed that the feed for that hose had fully gammed/rusted over and sealed off.
So Byron added a decent thermostat housing to the order. Whilst researching if it was a common fault for the housing to clog up like mine. I discovered that a lot of people delete the feed of coolant to the TB, bypassing it by running a hose straight from the back of the engine block to the stat housing. The cooling wasn’t really needed in the UK’s climate. So this is what I did. Byron liquid welded the feeds on the TB for me too.
Which in hindsight would be better solution.. So one day might do this.
I couldn’t see any other way of getting the thermostat out without removing the whole intake manifold. So new gaskets from the dealers all round when everything went back in, along with a fresh thermostat.
Also cleaned the ICV and TPS with carb cleaner and all electrical contacts with contact cleaner. Note to self and others who might read this. Wear goggles”¦ Whilst cleaning all this, with the very first spray of cleaner; it went straight in the ICV and straight back out into my eye, which burnt”¦ a lot.. a lesson learnt.. I’m getting old and sensible from now on and its most welcomed..
I think with the combination of a cleaned out ICV and TPS, bored TB and new exhaust, it made for a very smooth running engine, which goes through the revs nicely and improved idling.
After all that.. Off the car went for it’s MOT and tracking”¦
It failed.
They said they didn’t bother with the tracking as the drop links and lollypop bushes were so shot.
So popped down to ECP and collected some Lemforder Mondeo rear drop links to replace my front droplinks. This isn’t a performance upgrade it’s just more of a durable system. It has two ball joints per unit as opposed to one ball joint and a bush.
The old ones were a sod to pull off.. Had to take the whole control arm out, put it in a vice and hammer them out.
Not having much money to dispose of I bought some cheap lollypop bushes, to keep the car on the road. Theses weren’t an MOT fail but they needed replacing in order to get the tracking done. As mentioned before I do plan to renew all bushes next summer. So shall treat the car to new control arms and M3 bushes then.
These will do for now and probably won’t last longer than a year or so”¦
Managed to get the bushes on the lollypops most of the way in a vice, but was starting to bend the vice handle.. which wasn’t mine. So I popped into a mechanics up the road, where they finished them off with a press. Offered them beer money but they wouldn’t accept, so got them pressed in for free”¦ what a nice man.
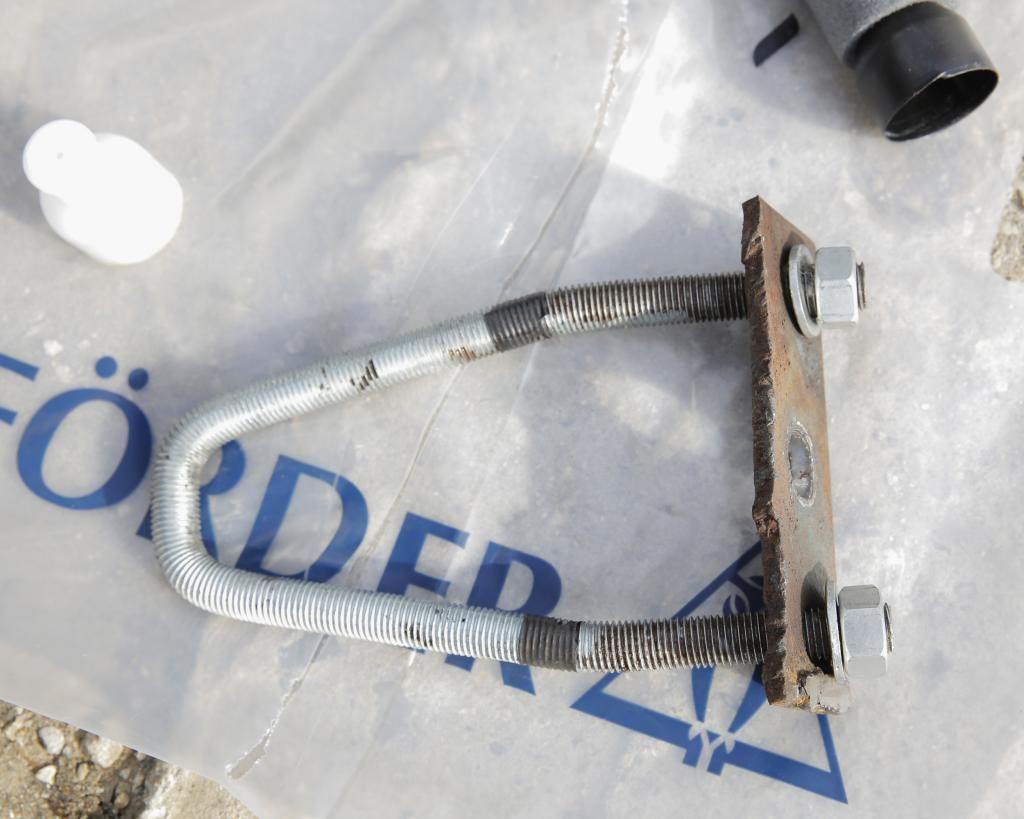
Then got some threaded bar, nuts, washers and a metal plate to make this device to pull the bushes onto the control arms.
The fog light switch was easy enough, just pulled the unit out of the dash and replaced it with the one from my other (more) rotten E30. This was the cause of the light not illuminating on the dash cluster and the actual rear fog lights (and front fogs..which was an added bonus) them selves. Great, two more ticked off the fail MOT list.
The next thing to have a go at was the brakes. They failed on several things. I figured/hoped an overhaul of the calipers and a change of discs, pads and shoes would do the trick.
Picked this seal kit up from a company called Bigg Red. It was about £50, which catered for all four calipers. Each kit consists of an O-ring, dust boot and circlip for the piston. Bushes and caps (I think the caps are only needed for ATE calipers) for the slide pins and a bleed nipple cap.
Just make sure you get the right kit. Your calipers will either be made by ATE or Girling. They require a different kit. You can find out by taking off the wheel, the brand should be stamped on the calliper. ATE have allen key bolts, Girling use 13mm bolts on their callipers.
I found I had Girling up the front and ATE at the rear. I think I read somewhere that all touring rears are made by ATE perhaps as they’re said to be bigger.
To overhaul the calipers I followed the wiki pages and x-works thread”¦
To begin with I used this camping pump for air beds to tease the pistons out..
Got this far, and then the pump gave up on me; the lid kept blowing off the top.
Popped down Halfords to get a foot pump, which did the job nicely”¦
I wrapped the nozzle of the pump in insulation tape to help make a better seal and simply twisted it into the thread of the caliper..
The surfaces of the piston and inside the caliper weren’t too bad, but there were a few build-ups of rust, which I guess had more effect on the performance of the brakes than I would have thought? Passed the wire brush over the outside surfaces of the caliper, gave everything a good clean, followed with a wet and dry rub down of the piston and were it is housed in the caliper. One last overall rinse, a clean out of the bleed screw, left to dry and they were ready to be put back together.
Sadly didn’t get any pics of the process, but its well documented in in x-works build thread and the wiki pages. The only fiddly bit was housing the dust boot onto the caliper whilst keeping it wrapped round the piston. From what I remember the method of a blast of air only would probably only work with compressed air, I couldn’t get a short sharp enough blast from the foot pump.
It took a few tries; as well as my patients, but I got there eventually.
Doesn’t look much but there’s one cleaned up, rubbed down, fresh rubbers and ready to go..
The second as usual was easier, these were the front calipers which are trickier putting back together than the rears..
If I had time and with a little more research, I would have liked to cleaned the caliper better, perhaps with electrolysis and give a coat of paint. Oh well this was enough for the MOT, like I said before; I’m trying to put any shinny activity to one side for now.
Was pleased to see the plates weren’t in too bad-a-state..
This one may need a little more attention.. In the future I hope to replace all bearings so will clean these up better then..
I had better pads and discs for the front off my other E30, so popped those on too..
The next day was a Sunday and by 9am I had this little lot off the rear”¦
Discs, pads, calipers and handbrakes shoes. Note the absents of one handbrake assembly. I left that one on for reference when putting the other back together.
Again, I followed the guides in the wiki pages and x-works’ thread. All cleaned up with new rubber..
The rears were so much easier to pull apart and put back together.
Treated myself to new rear discs, pads and handbrake shoes..
The four copper washers in the pic below hold the pin and spring, which secure the handbrake brake shoes to the hub. Was quite smug to find these retaining washers at the local motors factors (good old Midnight Motors.. they practically never close), but not so smug once I realized the slots in them were too small..
So out came Little Mr D again to cut the slots bigger..
One handbrake assembly back together.
Gave the springs and the cylinder a good clean and a coat of copper grease.
Those retaining springs were a pain to get in the first time round.. the other side went in a bit easier once a method was devised (of which I have forgotten now..)
Once that was all over.. a quick cup of tea, then put everything else back on”¦
Bled the system and adjusted the handbrake, now it was pretty much ready to go back for its re-test.
Ran some waxoil into the arch lips and heated up the metal to let the wax get deeper.
At this point.. my lady bear appeared. Like a magpie was lured in by the shiny, glittery properties of a pot of copper grease.. so she gave the discs a quick coating.. obviously only the surface in contact with the wheels.
Then I gave the car the best clean I could in the dark ready for its re-test in the morning.
Well after all that hard work I was pleased to be told that it passed.
They must have missed the ABS light on the dash, as I was still waiting for a replacement sensor in the post.
Happy with the news I got on the phone to my dear lady bear and we quickly organized a road trip holiday round Cornwall to celebrate. Racked up some 1200 miles all of which I smiled through every mile..
That pretty much brings me up to speed with were the car is at now..
About a month ago I bought two new tyres and took two used ones off another set of wheels that were in good nick. Swapped these over with the current cracked ones giving me four Toyo Proxes T1R’s all round.
This made a huge improvement with the handling. Also seems to have cured a droning/vibrating sound that pulsated from under the car whilst driving on motorways. I thought it might have been a knackered prop bearing, but it seems to have gone with the tyre change.
So plans in the near future is to change the rear top mounts as they’re permanently squeak at me. At the same time I hope to address a rusty hole that I found in one of the rear arches. Shall take out the expansion tank and fuel filler cover thing too to assess any other rusty joys. Whilst on the subject I found more rust inside in the o/s rear pocket, so shall hunt more for rust in the boot. It appears that a new rear panel may have been let in at some point and fear that the quality of the work may have caused more corrosion.
I checked the roof for rust from the sunroof opening when I bought it but feel a more thorough inspection is in order. Although from the outside the jacking points appear in good order, I have seen what horrors can be hidden, so shall peel back the carpets for a better inspection too.
Whilst working on the front brakes I took the arch liner out. Other than mud and grit 6 inches high filled up inside each of the arches, they were all okay once I removed all the crud and gave them a waxoiling. The front of the front inner arches are rusting in the usual places (I was aware of this when I bought it).
I know with all these turds rust is the key thing to address before anything else. But most of the work was necessary to keep it road legal and any expensive parts I put on can be pulled off and put on another if needs be.
Plus I had great time doing it all. So in my eyes its not wasted either way.
So once these bits are done. The plan over the next year.. in-between organizing and getting married and more decorating”¦:
I hope to check the last few areas for rust and fix accordingly. If that all goes to plan. I would then like to strip as much as I can from underneath, starting from the rear, take back all underseal, sort any rust, re-underseal and the overhaul most things bar the engine under the car”¦
New..
Bushes all round.
Brake and fuel lines if needed.
Braided flexi brake hoses.
Prop Bearing.
Clutch if needed (whilst I’m there).
Drive shafts if need.
Control arms.
Shocks and springs.
Wheel bearings.
Inspect the fuel tank.
I know it’s a lot of work and it might not happen, what with other things in my life that I have to balance in. But that’s the loose plan and I’m willing to have a crack at it.
Mainly have been collecting some parts for the Touring.
Today stripped the boot out. To get to the knackered rear top mounts and to also hunt and address some rust.
I'm pretty sure there has been a new rear panel let in at some point and sadly the job wasn't done too well. There's signs of rust running along the seams especially in the o/s rear pocket. Haven't had a great look around yet, as I only had a few hours to spare.
Really great read, I like the way you're going about this!
I've got myself a cheap Touring project in a pretty ratty state that I'll no doubt end up doing most of the stuff to that you've done to yours, so it's great to see a well written account of the work you've done
Right then”¦. Carried on yesterday pulling bits out of the boot on the hunt for rot”¦. and had success..
Nearside rear pocket.
Upon clean up I’m temped to remove that bracket at the bottom in order to get to all the rot. I can’t quite remember, is it there solely to house a plastic tray, I have all the bits boxed up at home so couldn’t check.
Once I had removed the rear bumper, this little treat was under it. It was blistering and took a fair whack on a screwdriver but I managed to get a hole out of it.
So far this was the only other bit I managed to poke through. Rust can be quite generous with a bit of persuasion..
I knew that there was a bit here as the corner of the box was starting to separate like puff pastry on the underside. Upon closer inspection it seems this has had a patch welded in prior to my ownership of the car.
I assume that someone put that grey stuff in to seal the drain holes..? I’ve noticed on a couple of build threads there’s some sort of plastic drain (?) plug present in this box section, a quick look of RealOEM.com didn’t shed any light on the matter. Was this originally on all E30 models?
None of this I could get a hole out of..
Where the boot floor pan meets the rear panel doesn’t look too bad to me..
Like I said, I’m sure it’s new rear panel (although I’m no expert nor professional) these spot welds seem to have an after factory layout pattern.
I noticed on a lot of the seams rust is showing through,. How would I address this? I assume that the rust is likely to be set in deep into the seam.
Note the bucket on standby in the corner.
And up here, which has prompted me to get the roof lining off too.
This looked like tired waxoil of some sort, but would want to pull it out for a fresh coat to go in. Looks like its going to be a bugger fitting my chubby hands down in there.
I think water has been getting in behind these on either side. There was a rusty trail running down the plastic light cluster on the inside, it lines up with the seams too. Also there is rust on the inside here on a little shelf above the rear clusters on each side.
Excuse my ugly mug, you can just about see the rot that I mean in the pic below.
So this has all been a bit more deflating than I thought. However, its fixable”¦ or at least I want to have a go. However the problem I currently have is that the car needs to stay on the road currently (it’s a daily). And to do this properly, I would be temped to have that whole rear panel off (this is my un-professional input only), to clean up underneath.
It can come off the road for a bit now (a week or so) but really I can’t afford to give it anymore time. I was planning to get another car for my girlfriend and I in July time, and get cracking on the touring then, hopefully taking it off the road for a while so I can get really stuck in.
So what repairs do I do for now? Do I cut out the holes, patch up and treat what other rust for now as best I can, in attempt to slow it down? Or am I kidding myself. I think really I need to check other main areas for rust, in my head really it’s the roof that’ll be the deal breaker anything else I feel I’ll have a pop at.(I’m sure I’ll eat those words. What are anyone else’s thoughts?
Just to end on a more fluffy point with less rust; This is Blaze, he’s kept me company throughout all my sulks, struggles and triumphs whilst working on the car so far. Although he looks menacing and only three legged; he does have a forth leg and is the softest most cuddly German Sheppard I’ve met..
Nice work there G. Looks like it's worth putting the work into it but can't help on advising on the rust really, other than I'd always get someone else other than me to sort it..
Very nice unmolested-looking car. Where I live those are becoming bit rare.
Multiply the amount of rust you see by two, then multiply that by 3. Then you'll be close to the truth. <- formula applies to E30 1982-'93 , all models.
The conditon of the brake caliper cylinder wall isn't important, because the sealing surface is piston side-gasket. Nothing "touches" the cylinder wall so to speak. In short, replacing the piston + every rubber part is the way to go when repairing calipers.
You wont be able to get the rust out of the seams without separating them, which would be a pointless IMO, as it all looks pretty solid, wire wheel in a drill to get the seam sealer off and most of the surface rust, then get some of polstas fave gear in there, FERTAN I believe its called
Then its a case of some high quality primer and a squirt of paint, anywhere you cant get too just hammer it with waxoil, it will soak into the rust and once its hardened into wax will keep the air/water away
That black crap in the arch is underseal, a vile bodging substance
what id do-
get the whole area clean
take back the wells and them areas with the holes and on the outside, and the whole lower outside, so all the towing eye area etc is all exposed, its possible that if it was a new rear panel the stone chip areas might not of been done too great- the paint finish looks a bit flat, get it sorted, pockets and holes welded where needed, and re paint the outside
the seams- get the trusty fertan and and carefully fill the gaps with it using an artist brush, re apply after a couple of days, then just use pre mixed touch up paint from paints 4u
the other tiny spots like by hinges etc etc, just sand down, jelonite, then, or just fertan, and touch up paint, using a bit of primer where neeeded
fertan converts then prevents rust, so in them seam joins it will just attack and convert rust back to good metal, and leave it solid , if you use anything heavier that eats the rust, it might leave it weak and you cant really get to it, then just keep an eye on it all
in them inner arch areas- if the outer arches are lovely, once the rest is done- just spray a load of fertan in there, re apply 2 days later, then waxoyl it all and the pockets etc a few days later
then when you pu the rubber seals over the seams- give it a good thick load of wax over the seam before the seal, i use the gold tin simoiz caranuba wax from halfords £7.99 , and just put it on by hand quite thick smeared all over the lip- thats a good practise for using under all the rubber seals - bonnet, doors, etc
Bump wrote:Nice work there G. Looks like it's worth putting the work into it but can't help on advising on the rust really, other than I'd always get someone else other than me to sort it..
Cheers
Easy bump. Cheers for the advise... I won't be using you to sort the rust then . But wouldn't mind popping down to see your touring soon.
DanThe wrote:You wont be able to get the rust out of the seams without separating them, which would be a pointless IMO, as it all looks pretty solid, wire wheel in a drill to get the seam sealer off and most of the surface rust, then get some of polstas fave gear in there, FERTAN I believe its called Very Happy
Then its a case of some high quality primer and a squirt of paint, anywhere you cant get too just hammer it with waxoil, it will soak into the rust and once its hardened into wax will keep the air/water away
Thanks for the sound advise. So am I right in thinking in theory, if I keep the moister and air off already corroded metal, it should't progress? This isn't the start of a bodge fest for this filthy turd; just more out of curiosity..
Cheers Jarno for the comments and the bit quoted below..
Jarno wrote:The conditon of the brake caliper cylinder wall isn't important, because the sealing surface is piston side-gasket. Nothing "touches" the cylinder wall so to speak. In short, replacing the piston + every rubber part is the way to go when repairing calipers.
I want to have a go at electrolysis at some point so perhaps the callipers will get some more attention and some new pistons to if they do
@ polsta - Thanks for all of your information, some useful bits.
Been a few months since I last updated this thread. Not much has happened in that time. I got married in May and it seemed everything else went on pause in the months leading up.
Took it in for its MOT this week. It failed on a few bits... So back in the yard.
Hope to get some work started this weekend, so should have some more pics and words up soon..
It's up in the air ready for some work.. Nothing too exciting but it will be progress none the less.. [/URL][/img]
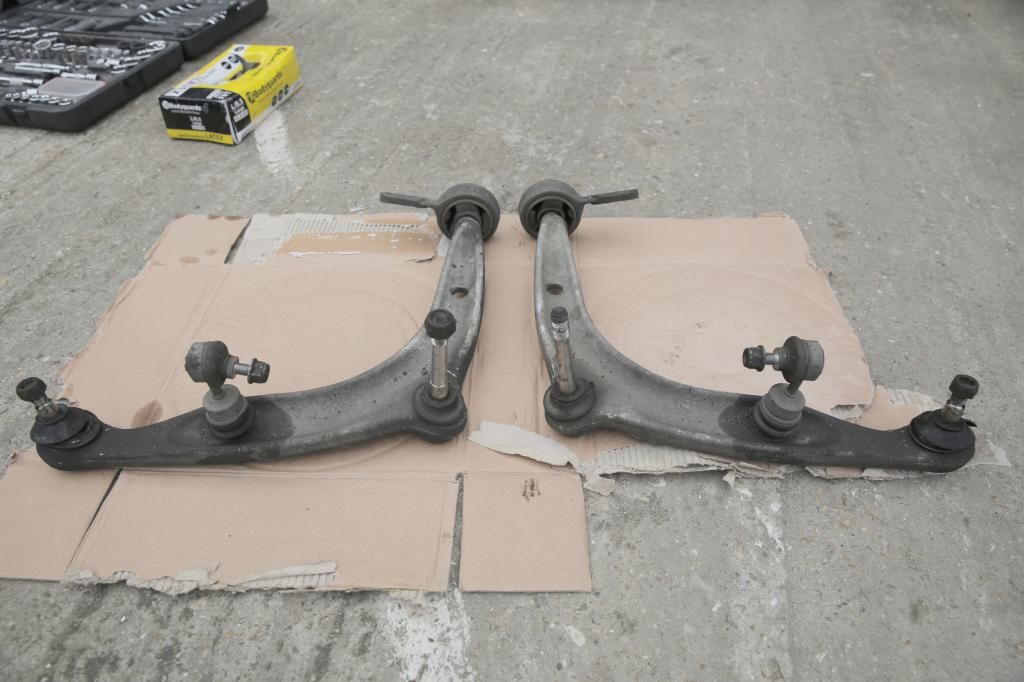
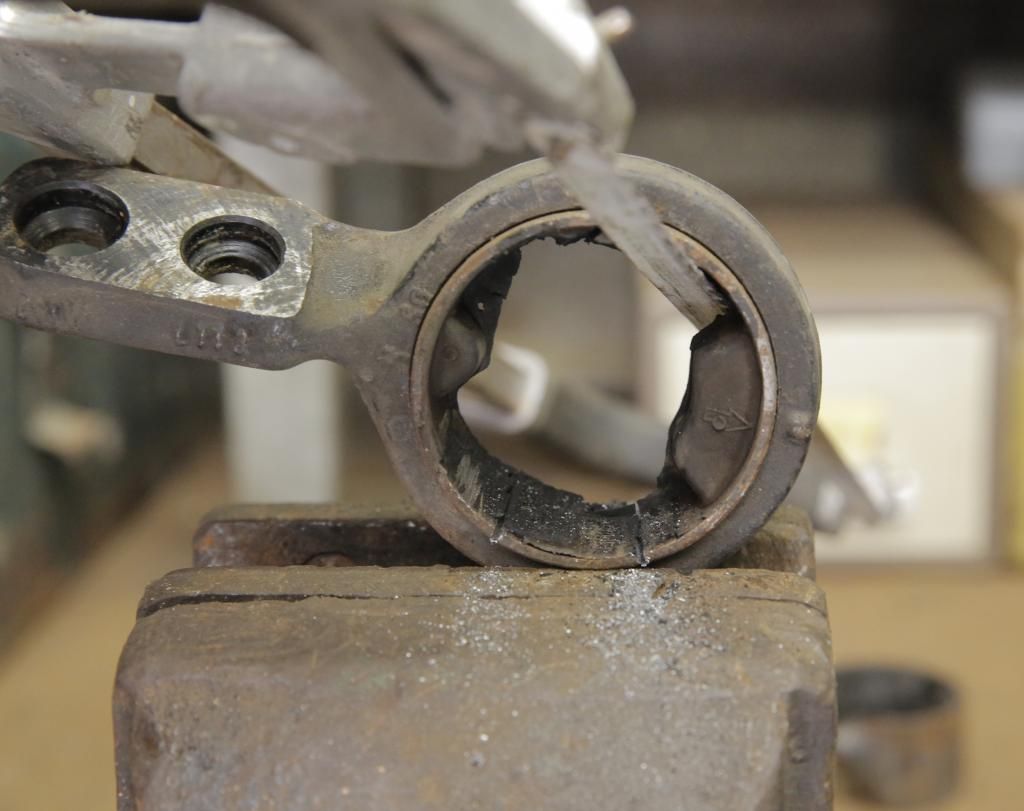
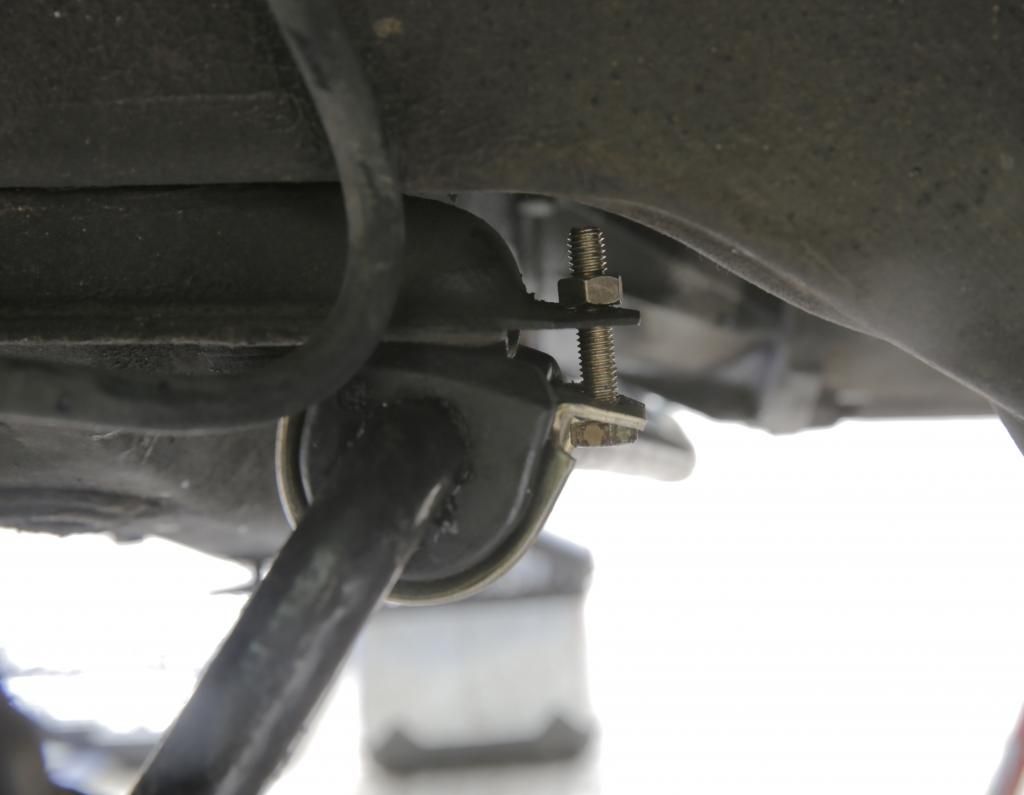
One of the two major failings from the test were the control arms”¦ they were deemed ”adangerous”a on the print out. The car does handle like a shed on ice currently so I guess their description was quite accurate.
As you can see, these look tired and overdue a binning. In fact they looked almost as bad last year when I had them off but finances were tight. I wouldn’t be surprised if they were the originals, they looked to be the aluminium type.
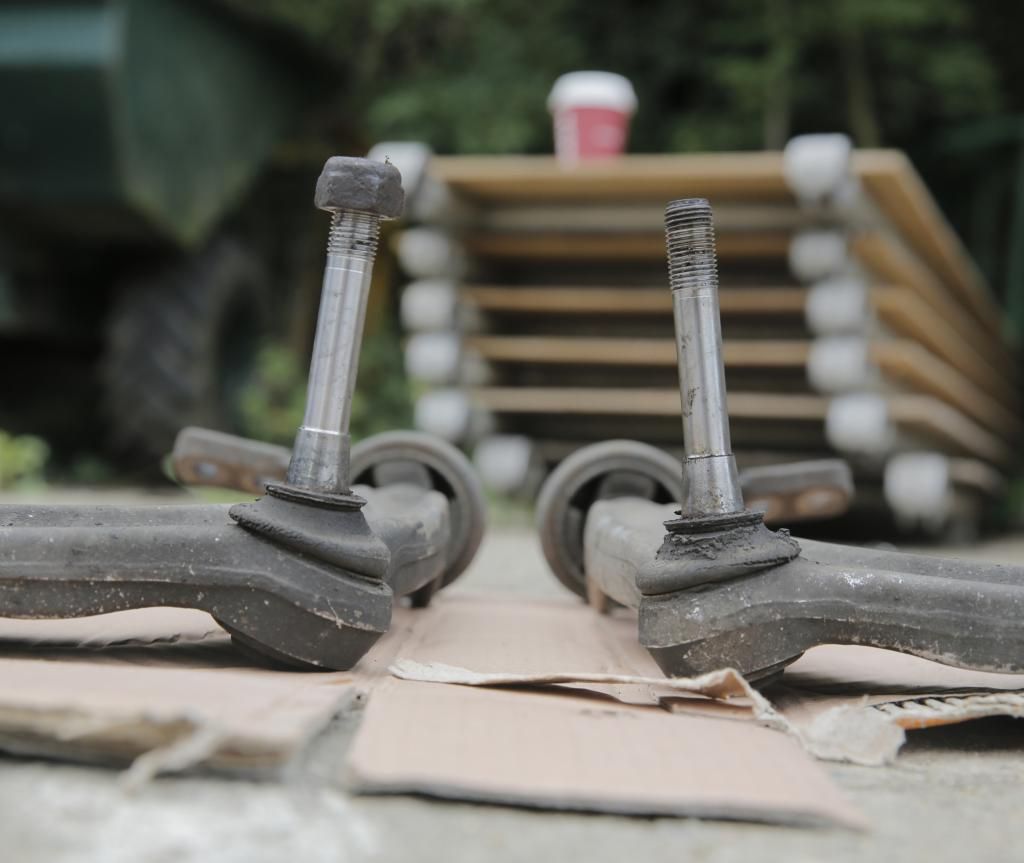
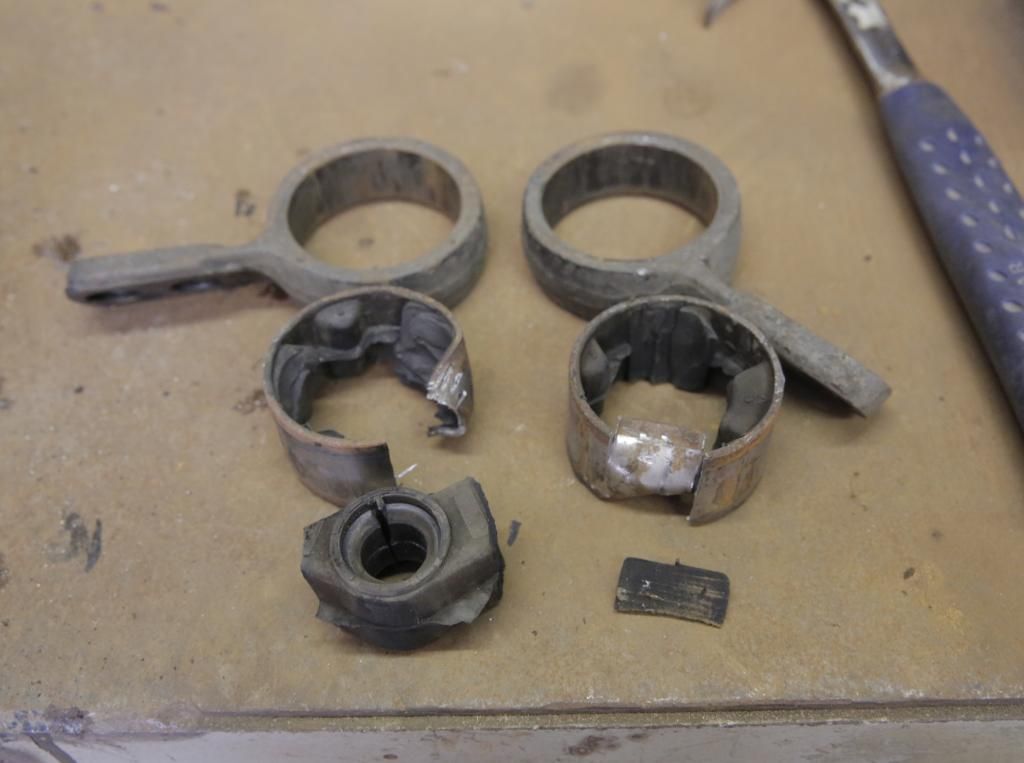
Pulled these bushes off like so”¦
I did say these cheap bushes would only be on for a year, but I had kind of hoped they would have been coming off with everything else from under the car”¦ Oh well I guess sometimes plans have to go wayward
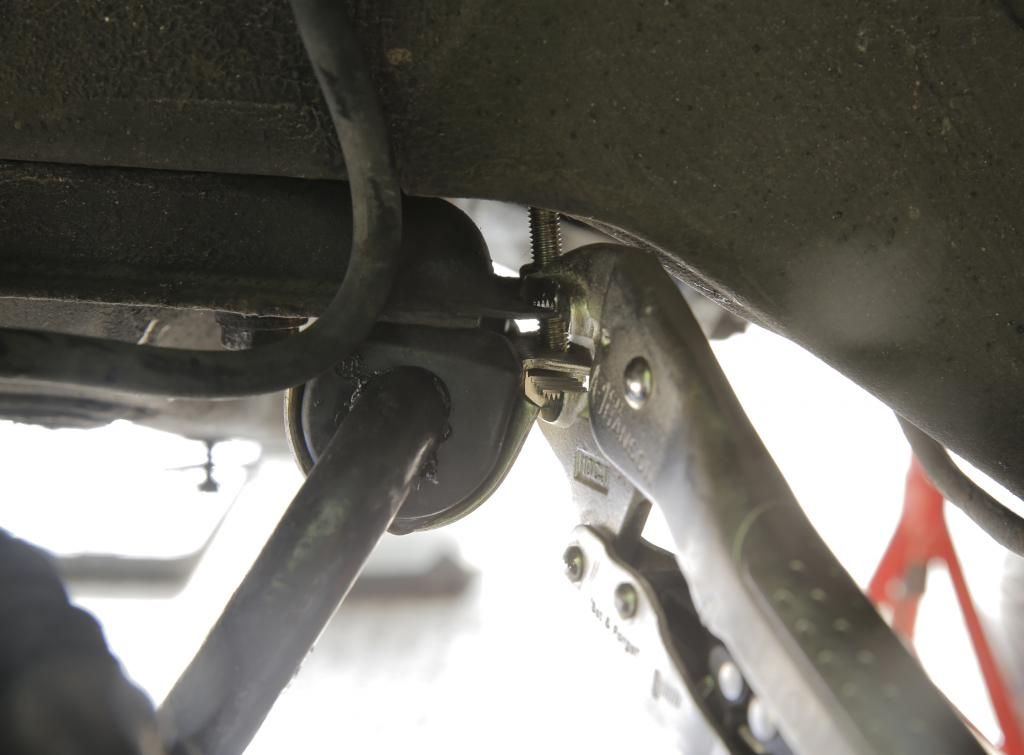
Removing the bushes from the lollipops this time, I made two cuts (instead of one) about an inch apart, which made for a lot less hammering to get them out.
I gave the lollipops a rub down sprayed them with a few coats of zinc primer and the some satin hammerite. I’m not too precious about them, but thought I might as well give them a bit of a spruce up. I guess powder coating would have been the best option.
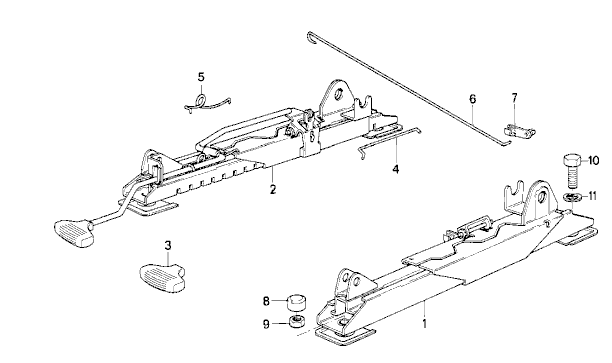
Another fail was the seat. The slide mechanism didn’t work, which was simply to replace a little broken plastic clip, number 7 in the diagram below
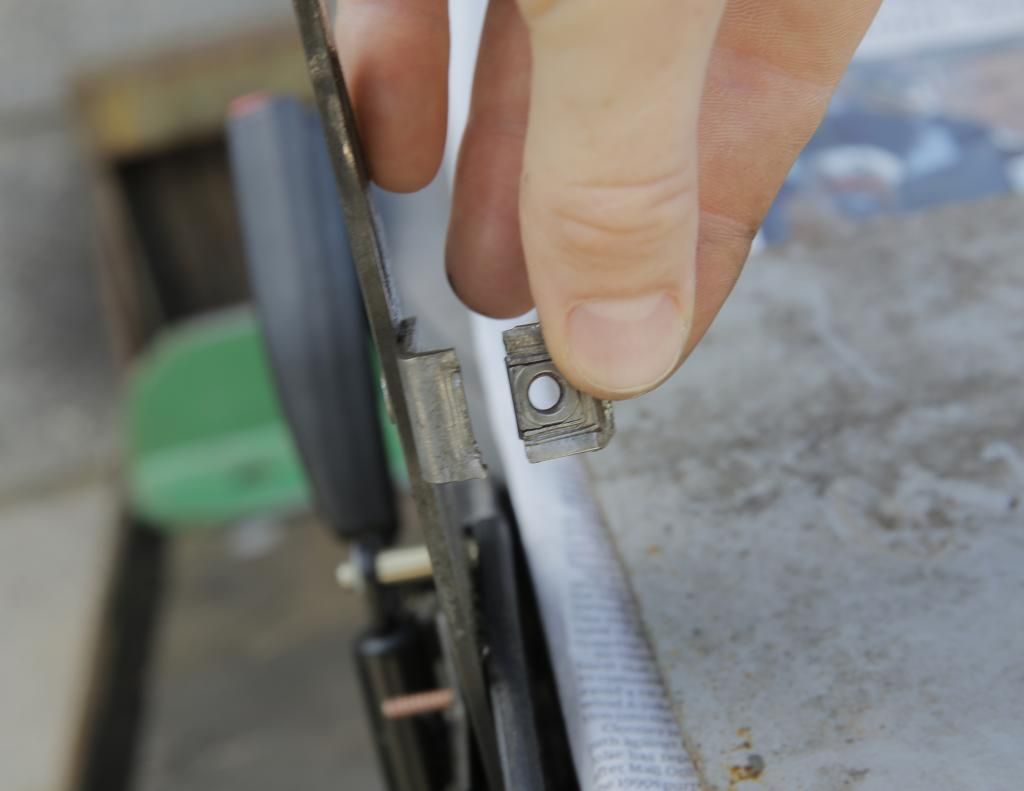
Also the back had come loose which I assumed would be a broken tab that holds it in place.
Just like this”¦
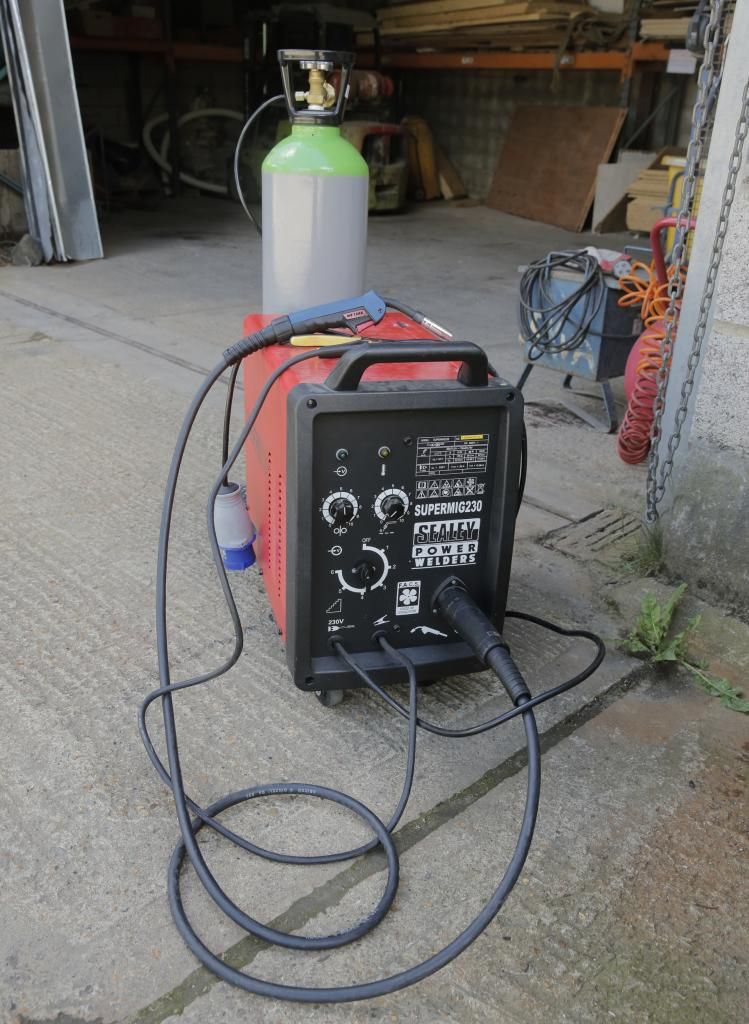
So out came the welder.
My brother-in-law and I went halfs on this. It’s a bit of a beast for bodywork repair, however my brother-in-law wanted it for thicker gauges of steel, so it was a good comprise that met both our requirements. This was its first job, not the biggest but I was pleased to finally wheel it out and fire it up.
All prepped and ready to go”¦
I got too greedy and tried for one last tack at the top, and blew through the metal.. Oh well, it seems to have taken strong enough.
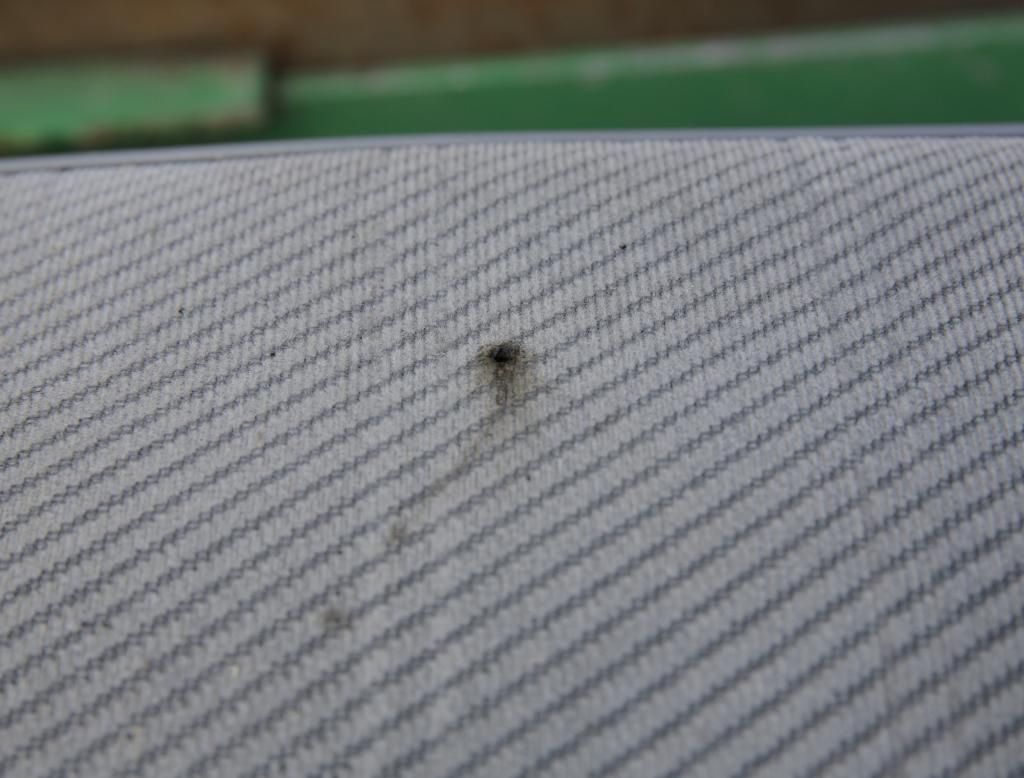
Also, sadly that final weld threw a big lump of molten metal onto the exposed base of my seat. A lesson learnt for being lazy. Not too fussed as the material is frayed anyway and I aim to get some better seats in there eventually. Just looks like the result of adolescent hash smoking activities.
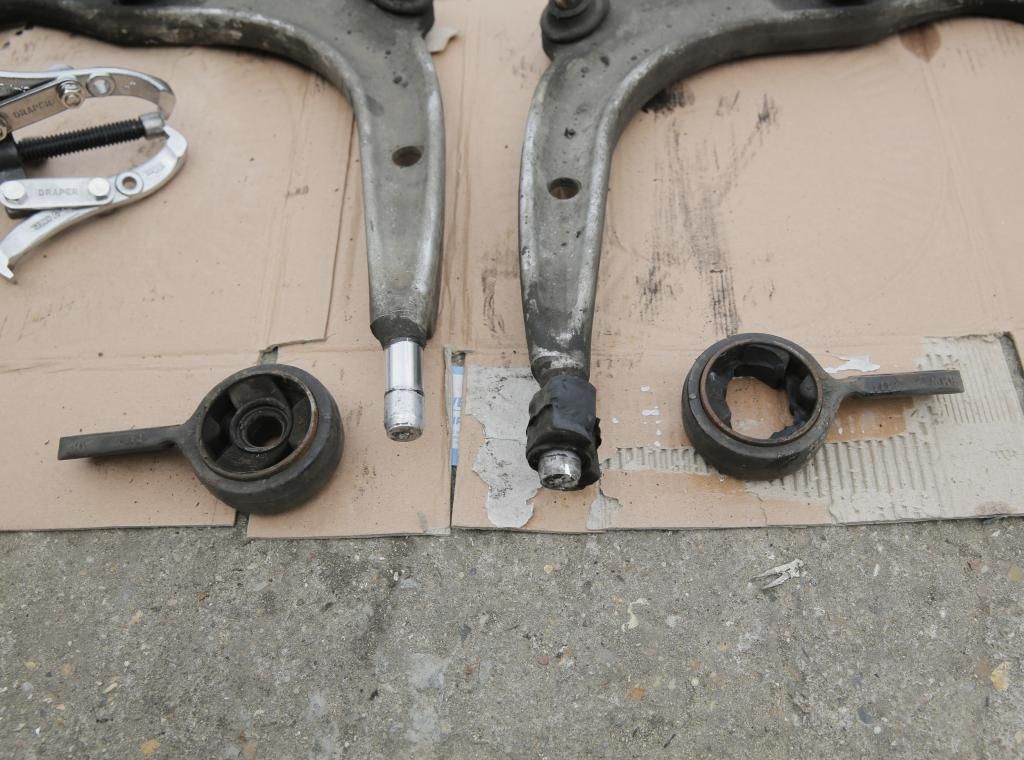
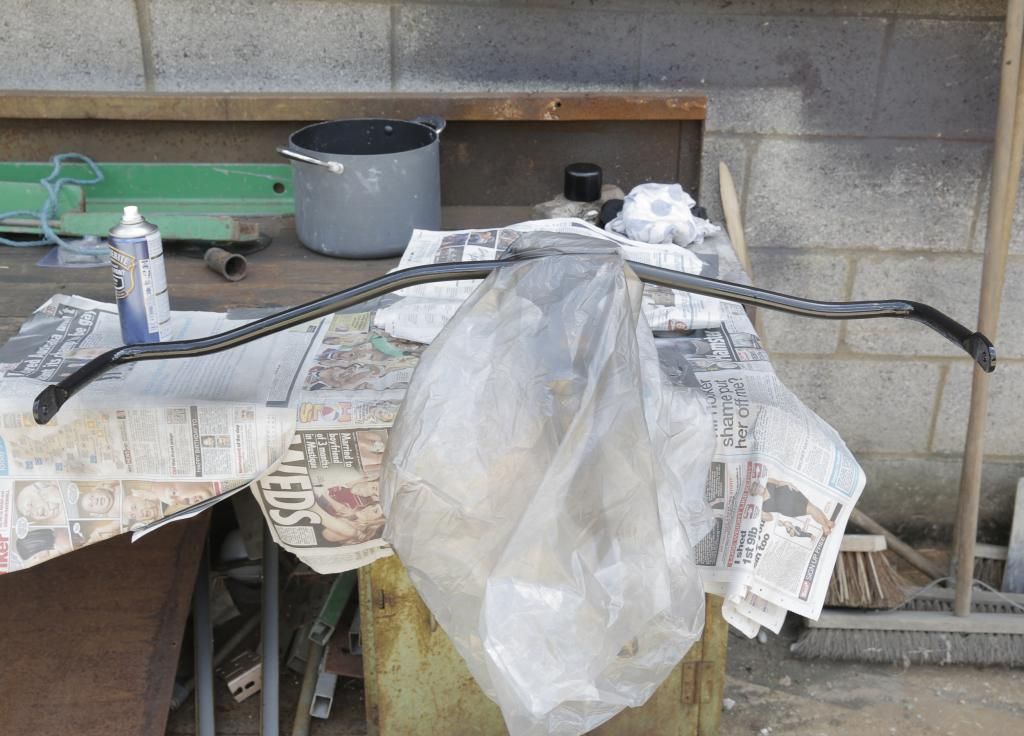
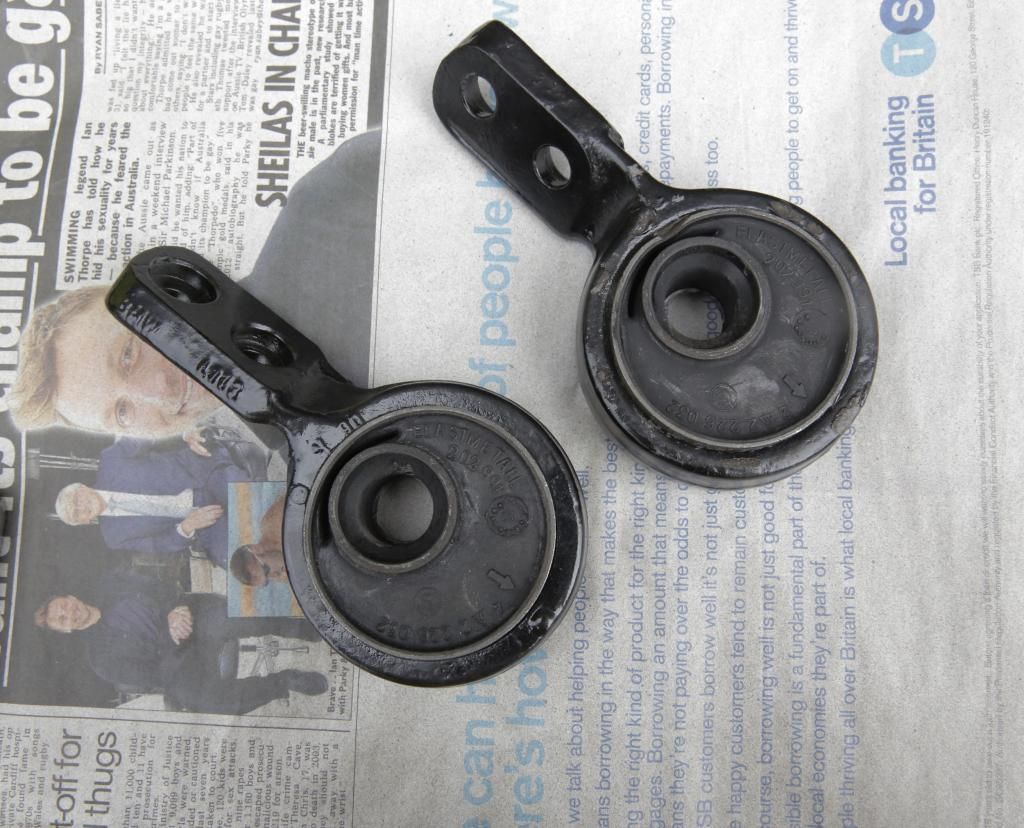
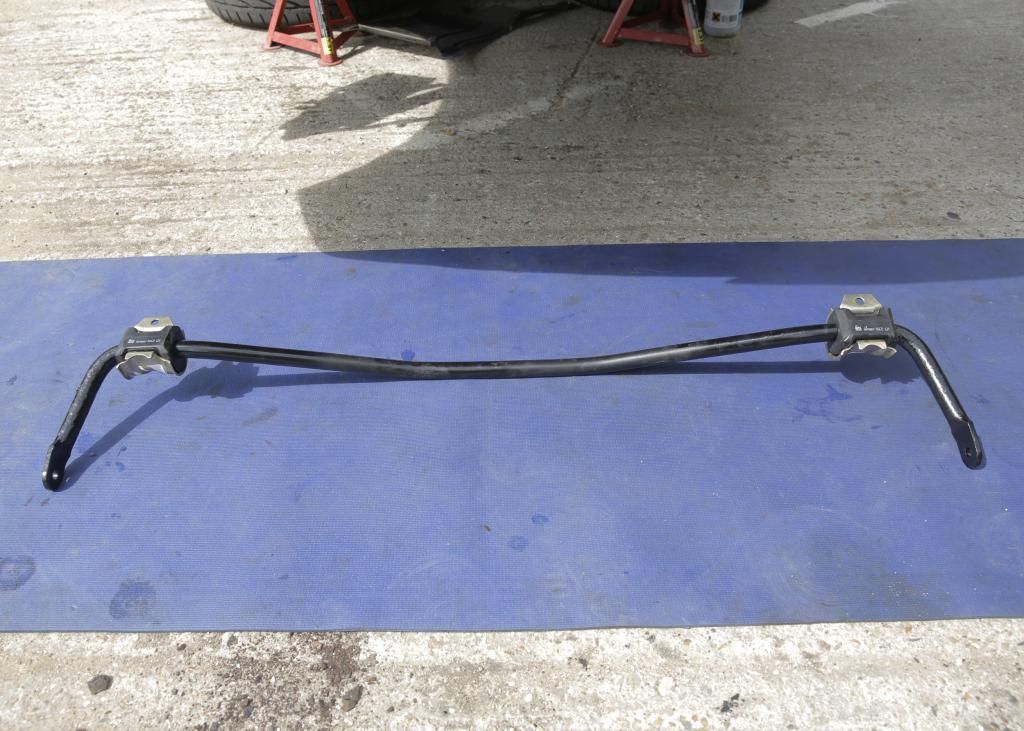
Seeing as I will have replaced most front bushes, I figured I might as well put in new ARB bushes, the bar itself had corroded where the bushes were. So I ground it back either end and gave them several coats of hammerite. This is a temporary fix. I’ll get this power coated along with sub-frames and such when it all gets pulled off.
New M3 bushes ready to go in.
Was a bit bummed with these. Took them up the road to get pressed in at a local garage. He caught the corner of one bush and pressed the other slightly out of line.. I did only give him a bit of beer money for his time having noticed the dinged bush at the time but was disheartened once I had got back and noticed the other was out of line.
I checked on here if this could cause issues and the general conscientious seemed that it wouldn’t effect the geometry of the steering/suspension enough to be concerned”¦ although I’m still quietly grumbling about this.
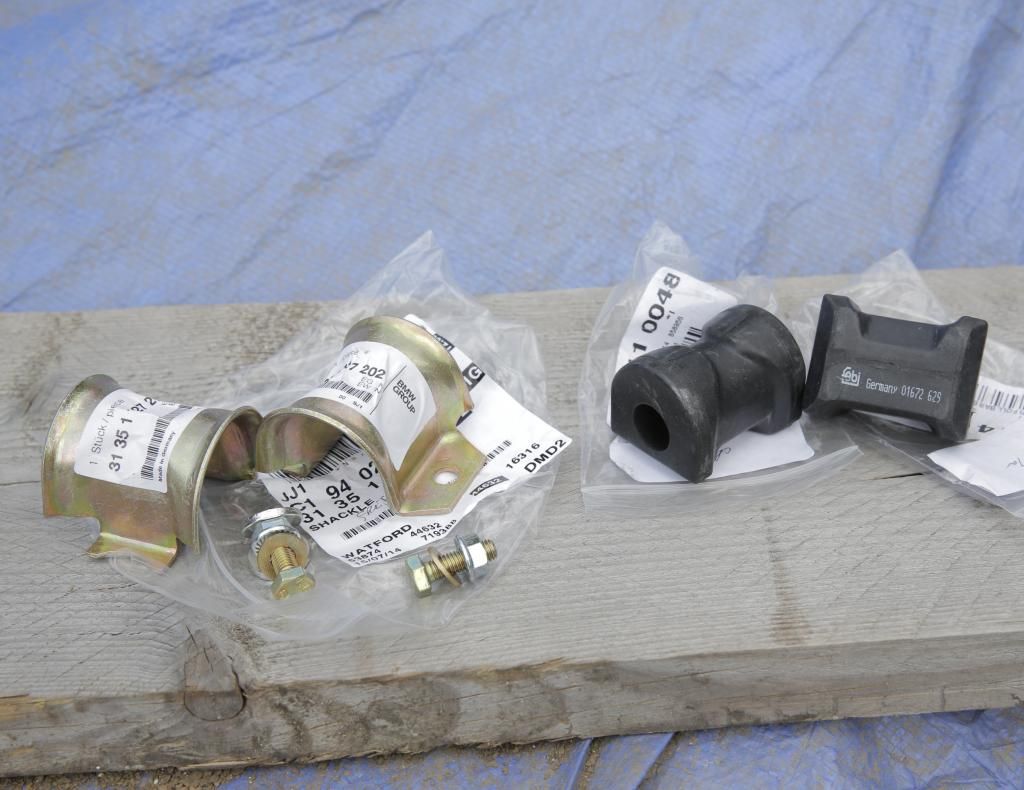
My new ARB bushes arrived. I couldn’t find stock of Lemforder anywhere so I got Febi, which I believe is OEM quality anyway. I also collected some new brackets from the dealers.
Ready to go back in”¦
I was struggling to get it all back into the sub-frame to begin with. After a quick search, I stoll Daimlerman’s method of a longer bolt to begin with to help house it back,
then mole-griping it, whilst putting in the smaller bolt, like so...
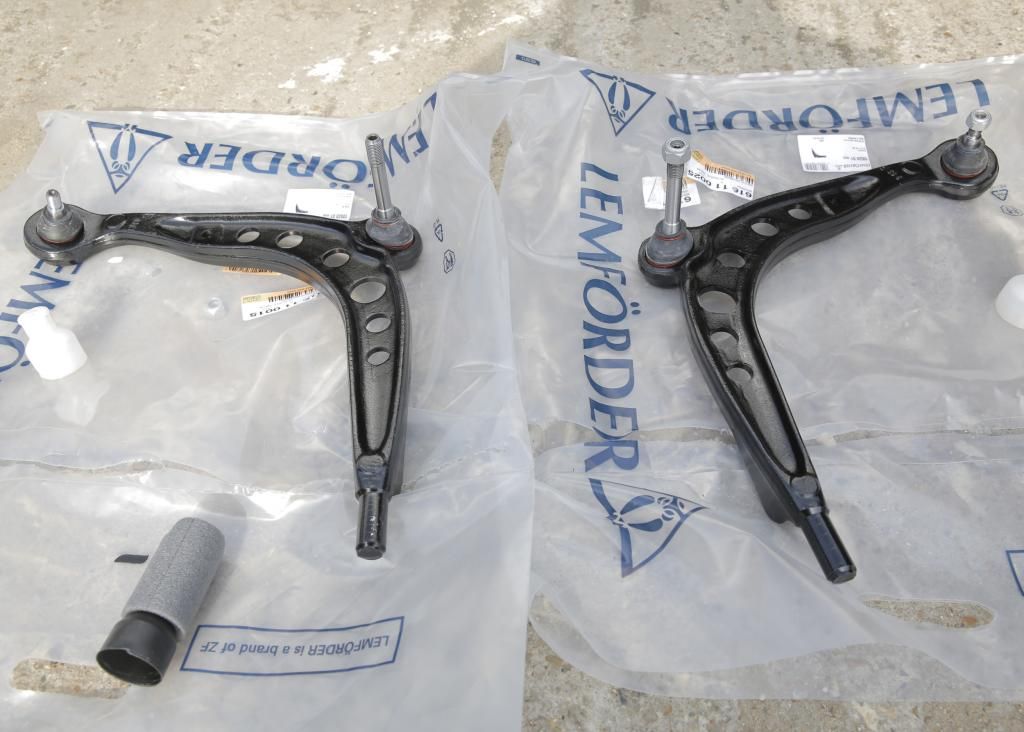
Next up were new Lemorder control arms.. which I had sitting in my steadily growing stash of new parts for the touring.
So the procedure next is to lube up the bushes for the back of the control arms, push them back on, fit the control arms, re-attaching the ARB, put the wheels back on and have the car sat back on the ground all in 20 minutes in order for the lollipop bushes to set in the correct position”¦ Well I figured/hoped it could do one side at a time, which would buy me time..
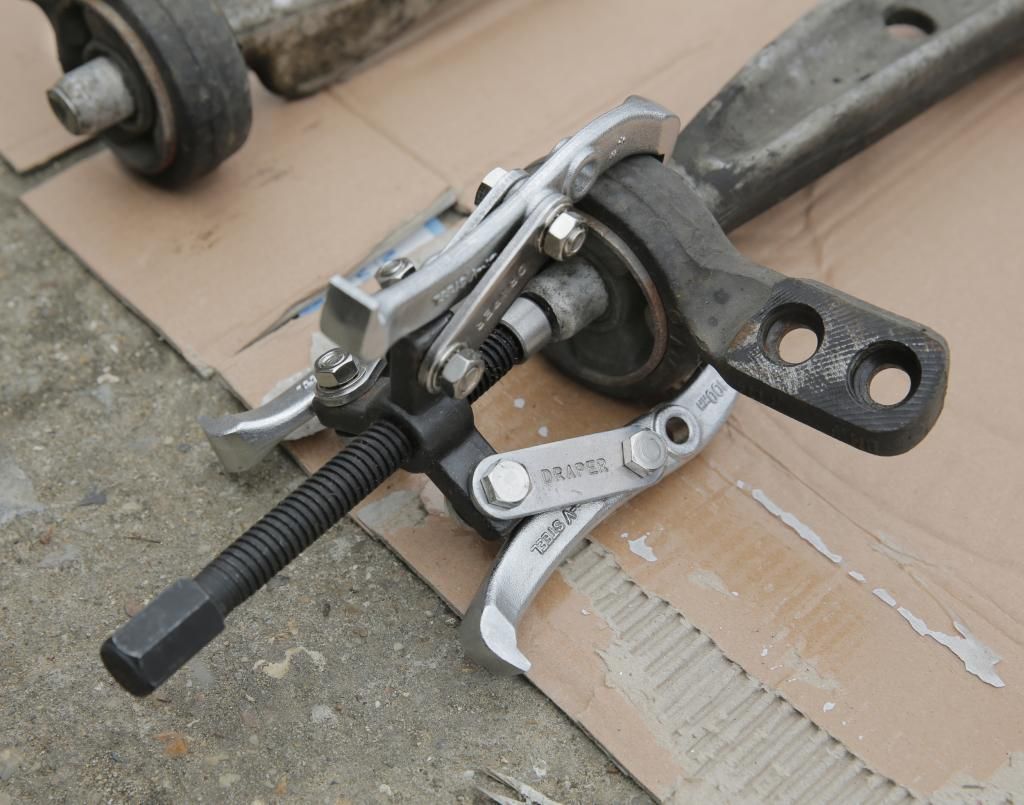
I dusted off this device from last year to push the bushes onto the control arms.
Then laid everything out carefully in the right place, so I could run a smooth operation within my set timescale, had the jack ready to lift and then drop the car, even had the torque settings memorized in my head..
Of course none of the next bit went according to plan. I used car shampoo and a lubricant. Once that was over the pin of the control arm and bush, it was also all over my rubber-gloved hands. Trying to get my home made bush pusher proved slippery to get in place, I then kicked most of my carefully laid out tools in a clumsy flurry. I ignored the order that the Bentley manual suggests for installing these control arms and went straight for the both ball joints instead, this in turn made it very difficult to then get the lollipop brackets back into the chassis of the car given the angle whilst its raised. I was curled up under the car in what felt like the recovery position, teaming with sweat and angry words, trying to get this all back in. Then I realized I would need the jack to pinch the ball joints to wind the nuts back on, so my plan of having it ready to lift the car became foiled.
I had the right hand side back on the ground”¦ well, scafboards in about 31 minutes (yes I time it).
The other side went a lot smoother.. I dried the sweet and grubby tears from eyes. This time put the control arm in a vice to help aid slippery hands, I only didn’t do this the first time round as the vice was a 30 second sprint from where the car was.. The left hand side was wheeled up and on scafboards in a modest 18 minutes..
And this is how its been sat for the last few days.
Since then I’ve been thinking and have come to two options.. The car still needs some attention to the handbrake along with a few small bits for it to pass its MOT. Although I haven’t stripped the rear brakes yet to check, as it had new pads, shoes and discs a year back, I’m guessing it will need new handbrake cables. Knowing this is a pig of a job. I’ve got until Tuesday to fix it or I’ll have to pay for a full re-test. The tax is also due at the end of the month and I had hoped to have this car off the road and getting started on an overhaul of its underside in a month or so. Before I do that, I have to finish breaking an IS of mine, which is hopefully going to fund the rest of the new parts for the Touring and sell my wife’s none running Patrol. All three of these cars are at the same place, so I want to shift the two cars before I start on the Touring.
So my two options are”¦
1. Sort the handbrake, probably pay for a second test, tax it
and keep the Touring on the road.
2. SORN the Touring, get the other two cars sold and start earlier than planned on the Touring.
I just wanted to have everything bought and ready for the touring before I started striping it. But I guess the kick up the arse is what I need to get things moving forward. My only worry is time as I’m on borrowed land and don’t want to pi$$ anyone off.


 [/URL][/img]