
Not sure on the headlights though mate.
M30 install into calypso cab. Back on the road :)
Moderator: martauto
-
leeparkes
- Married to the E30 Zone

- Posts: 9535
- Joined: Thu Jan 03, 2008 11:00 pm
- Location: Black country
Looks fresh Jim. 
Not sure on the headlights though mate.
Not sure on the headlights though mate.
Cypriotgeeza wrote:I done both my mates in my old 318is
felt so proud,even tried it with a E30 325i and got put in my place..
-
jimbom30cab
- Tech 1 freak
- Posts: 7631
- Joined: Mon Oct 12, 2009 11:00 pm
- Location: in the garage
thanks mate, i really like the anal eyes, they make me look younger
-
leeparkes
- Married to the E30 Zone
- Posts: 9535
- Joined: Thu Jan 03, 2008 11:00 pm
- Location: Black country
Good call then. 
Cypriotgeeza wrote:I done both my mates in my old 318is
felt so proud,even tried it with a E30 325i and got put in my place..
-
jimbom30cab
- Tech 1 freak
- Posts: 7631
- Joined: Mon Oct 12, 2009 11:00 pm
- Location: in the garage
BUMMER!
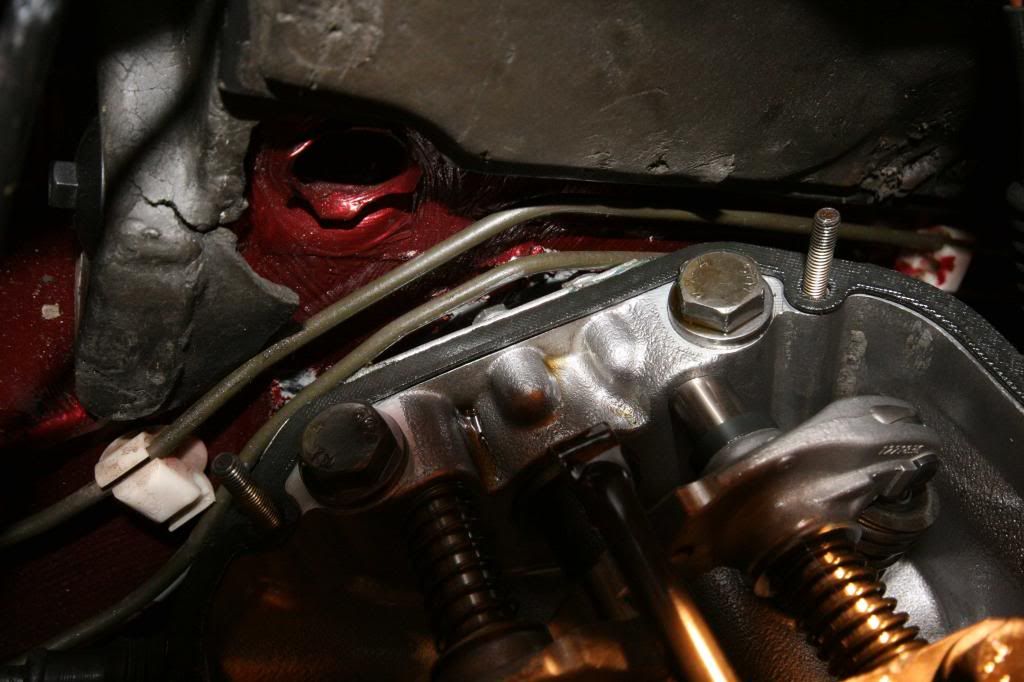
I've got an oil leak and it looks like its coming from the back of the head
looks like gasket part number 11 here is leaking and quite a bit unfortunately
I got it on the ramps today and had a good look with a decent torch and I could see where the oil is coming from
looks like the gasket is damaged and I guess I over tightened the plate when fitting
http://www.realoem.com/bmw/showparts.do ... g=11&fg=15
so i'm hoping I can take the rad out, disconnect the exhaust, prop and gearbox mounts plus a few other bits. Then lift it up take out the engine rubber mounts bring it right forward and as low at the front as I can get which should I hope open the gap at the rear enough to gain access.
don't really want to take the cylinder head off unless I really have to
just my luck !!
my centre bearing is making a right screeching noise also so will remove the prop whilst there
what a pain !!
-
jimbom30cab
- Tech 1 freak
- Posts: 7631
- Joined: Mon Oct 12, 2009 11:00 pm
- Location: in the garage
Delete all that, there was oil bubbling up out the oil pressure switch, the actual inside part where the electrical connection is.
Should I be worried, other than changing the switch?
Should I be worried, other than changing the switch?
-
walinsky
- E30 Zone Newbie

- Posts: 106
- Joined: Sun Nov 14, 2010 11:00 pm
- Location: Holland
Clean your injector that sits right below.
The same failing sensor killed mine as it was soaked in oil
The same failing sensor killed mine as it was soaked in oil
-
johnl320
- E30 Zone Addict
- Posts: 3124
- Joined: Mon Jan 10, 2005 11:00 pm
- Location: Hampshire
No, seen a couple start to do that, just get a new onejimbom30cab wrote:Delete all that, there was oil bubbling up out the oil pressure switch, the actual inside part where the electrical connection is.
Should I be worried, other than changing the switch?
-
jimbom30cab
- Tech 1 freak
- Posts: 7631
- Joined: Mon Oct 12, 2009 11:00 pm
- Location: in the garage
Thanks John
Got a list of all the little things that need doing now so going to take a day off next week and
Change the prop centre brg
Change the lolly pop bushes
Gearbox oil change
Engine oil change
Fit new oil pressure switch
Change cam cover
Fit new TPS on BBTB
Change oil canister housing gasket
Think I'll be confident then to press the car into daily use whilst the daily is off the road for an engine change.
-
jimbom30cab
- Tech 1 freak
- Posts: 7631
- Joined: Mon Oct 12, 2009 11:00 pm
- Location: in the garage

so we've got new lolly pop bushes now and I swear it feels better, the old ones were completely shot
replaced the ATF in the GB with EP80/90
Engine oil and filter as i'ts done a 1000 miles now but it came out looking new still - hey ho
changed the centre bearing and hurray all the annoying screeching noises have stopped and she now sounds like a proper car with a nice exhaust note.
also replaced the oil canister gasket which seems to have done the trick and stopped the weap of oil.
And the new oil pressure switch has cured that leak also.
All the idleing problems I had have now gone away
I've got a couple of little rattles to sort and then i'll make a start on the new rear suspension set up with a taller diff as this 4.1 is doing my head in !!!
-
TPS
- E30 Zone Team Member

- Posts: 13119
- Joined: Fri Mar 06, 2009 11:00 pm
- Location: Hampshire
Looking good Jim

1991 325i Touring Alpine White II
1994 318i Touring Sterling Silver
-
jimbom30cab
- Tech 1 freak
- Posts: 7631
- Joined: Mon Oct 12, 2009 11:00 pm
- Location: in the garage
thanks mate, it sounds much better now, do you think it needs another TPS test drive ??
-
jimbom30cab
- Tech 1 freak
- Posts: 7631
- Joined: Mon Oct 12, 2009 11:00 pm
- Location: in the garage
Couple more pics
Normal left BBTB right, the difference is noticeable but only just

all a bit tight back here
happy with that

swapped the black cam cover for a silver one

Normal left BBTB right, the difference is noticeable but only just

all a bit tight back here

happy with that

swapped the black cam cover for a silver one

-
leeparkes
- Married to the E30 Zone
- Posts: 9535
- Joined: Thu Jan 03, 2008 11:00 pm
- Location: Black country
Do you have sound deadening in the tunnel Jim?jimbom30cab wrote:
all a bit tight back here
The reason i ask is the elephant trunk is missing, if its not there water will run behind the sound deadening and start to fester.
Good work btw.
Cypriotgeeza wrote:I done both my mates in my old 318is
felt so proud,even tried it with a E30 325i and got put in my place..
-
jimbom30cab
- Tech 1 freak
- Posts: 7631
- Joined: Mon Oct 12, 2009 11:00 pm
- Location: in the garage
Right, I started the rear end refurb today, when I say started I mean lay everything out on the garage floor with a print out of realoem and pondered "where the fooook all this goes is beyond me"
The list of bits needed is long and looking expensive

The list of bits needed is long and looking expensive

-
jimbom30cab
- Tech 1 freak
- Posts: 7631
- Joined: Mon Oct 12, 2009 11:00 pm
- Location: in the garage
Lee, I removed all the sound proofing. In a way I wish I hadn't now as the engine would have sit fitted ok, but would have been touching...oh well, can't hear much with the roof down anyway.
cheers
cheers
-
jimbom30cab
- Tech 1 freak
- Posts: 7631
- Joined: Mon Oct 12, 2009 11:00 pm
- Location: in the garage
Made a start today with stripping down the rear end
Disconnected all the connections but this brake disc had a totally mullered allen bolt this was the only way I could get the disc off, can't believe some brain dead fitter put it back in, oh well. good news is the stud came out quite easy.


Plan is to put some extra large axle stands on the rear chassis and then drop the rear beam with diff fitted
-
TPS
- E30 Zone Team Member
- Posts: 13119
- Joined: Fri Mar 06, 2009 11:00 pm
- Location: Hampshire
That disk is knackered!
1991 325i Touring Alpine White II
1994 318i Touring Sterling Silver
-
jimbom30cab
- Tech 1 freak
- Posts: 7631
- Joined: Mon Oct 12, 2009 11:00 pm
- Location: in the garage
yer, I knackered it with the grinder to get the allen bolt out, it was the only way mate
-
jimbom30cab
- Tech 1 freak
- Posts: 7631
- Joined: Mon Oct 12, 2009 11:00 pm
- Location: in the garage
Rear beam is off, took a bit of jiggling but not too bad


I've got this really bad rattling noise and have tracked it down to this large washer type thing which is just between the circlip and the bearing which I've pulled back a bit here
is it supposed to be fixed to the centre bearing or just rattle about ??


I've got this really bad rattling noise and have tracked it down to this large washer type thing which is just between the circlip and the bearing which I've pulled back a bit here
is it supposed to be fixed to the centre bearing or just rattle about ??

-
mcbonio
- E30 Zone Squatter

- Posts: 1868
- Joined: Sun Feb 12, 2012 11:00 pm
You mullered that disc good Jim. LOL. You just need a hammer and centre punch and just tap the outer head of the locating screw anti clockwise, it backs out dead easy.
-
jimbom30cab
- Tech 1 freak
- Posts: 7631
- Joined: Mon Oct 12, 2009 11:00 pm
- Location: in the garage
I”˜ve not updated this for a while but now the works all done here are a few piccies of the job
The rust here was fairly easy to remove with the little grinding disc on the dremmel followed by some anti rust gel and then the whole lot got a couple of coats of black smoothrite and then some underseal

Basically everything on that rear beam was stripped down and boxed up for blasting, the wishbones and rear beam were powder coated in black also.

When back from the powder coaters I popped it all into a garage local where a good bloke there called John changed the wishbone bushes and beam bushes for me.
The original diff was a 4.1 which was just daft with the M30 so I obtained this 3.46 from our man Mick (magpie) and spent ages removing the crusty rust and giving it 2 coats of smoothrite. It’s the diff from that silver 323 breaker by the way.

When fitting the wishbones and beam I bought all new bolts and nuts to the same spec as OEM

All the brake pipes were really rusty so I made up some ones and replaced the rubber flexi pipes with Goodrich pipes
Also the old turn was treated to a new petrol filler rubber hose

I didn’t do anything to the springs as they were in good nick and the shocks were new

The rear ARB bushes, drop links, brackets, nuts and bolts were all replaced


These heat shield hangers were totally crusty, looks like they had no rust proof from the factory at all, they were cheap from the stealers and look nice in gold IMO


Not much fun lying on the cold garage floor !!

Jobs you wish you’d never started ! for me the list is headed up by ”areplacing the CV boots”a what a pig of a job, and that’s just getting hold of replacement ones, I had a nightmare and in the end bought them from BMW but they were bl00dy expensive I thought.
In this photo the output shaft has come out of the diff, it’s surprisingly easy to pull in and out, I think my seal is duff

Shame I don’t seem to have any photos of re-building the handbrake shoes. Must admit though I bought all new springs and the retaining spring clips in the end, painted them gold of course
These callipers were well rusty but a vapour blast bought them up like new, I’ve painted them gold smoothrite and also bought a new seal kit from ebay (biggred)


There must be a million other bits and bobs I had to replace like all the little plastic clips on the beam and wishbones etc etc, anyway I worked through it all spreading the cost over as many months as I could”¦.and eventually is was all back fitted and the list of things to do got smaller
1. tighten up the hub nuts
2. tighten up the drive shaft flange bolts
3. bleed the brakes
4. test drive
so, last few pics, I used the pressure bleeder which worked really well and made a pig of a job quite easy in the end, actually I really enjoyed this a lot more than I thought I would !!
pipe and a jam jar each corner, priming the jam jar with half full of brake fluid

Pressure bleeding set up, very easy to use. Must get those front callipers painted gold now !!

When done, I rolled her out for the first time in a few months and it felt quite an occasion !!

I’ve got the temp wheels on at the moment as I picked up these from zone legend B7 recently. They have been re--furbished now along with the caps and finished in powder coated metallic silver


I took the turd out for a quick test drive and the brakes are very firm and work well. The 3.46 makes the car so so so much more drivable now, and i'm well pleased with how it drives.
All in all this summs about 4 months on and off work, I just need to wait a month or 2 to save up for some new rubber, then the cabbie is all ready for the spring Happy days
The rust here was fairly easy to remove with the little grinding disc on the dremmel followed by some anti rust gel and then the whole lot got a couple of coats of black smoothrite and then some underseal

Basically everything on that rear beam was stripped down and boxed up for blasting, the wishbones and rear beam were powder coated in black also.

When back from the powder coaters I popped it all into a garage local where a good bloke there called John changed the wishbone bushes and beam bushes for me.
The original diff was a 4.1 which was just daft with the M30 so I obtained this 3.46 from our man Mick (magpie) and spent ages removing the crusty rust and giving it 2 coats of smoothrite. It’s the diff from that silver 323 breaker by the way.

When fitting the wishbones and beam I bought all new bolts and nuts to the same spec as OEM

All the brake pipes were really rusty so I made up some ones and replaced the rubber flexi pipes with Goodrich pipes
Also the old turn was treated to a new petrol filler rubber hose

I didn’t do anything to the springs as they were in good nick and the shocks were new

The rear ARB bushes, drop links, brackets, nuts and bolts were all replaced


These heat shield hangers were totally crusty, looks like they had no rust proof from the factory at all, they were cheap from the stealers and look nice in gold IMO


Not much fun lying on the cold garage floor !!

Jobs you wish you’d never started ! for me the list is headed up by ”areplacing the CV boots”a what a pig of a job, and that’s just getting hold of replacement ones, I had a nightmare and in the end bought them from BMW but they were bl00dy expensive I thought.
In this photo the output shaft has come out of the diff, it’s surprisingly easy to pull in and out, I think my seal is duff

Shame I don’t seem to have any photos of re-building the handbrake shoes. Must admit though I bought all new springs and the retaining spring clips in the end, painted them gold of course
These callipers were well rusty but a vapour blast bought them up like new, I’ve painted them gold smoothrite and also bought a new seal kit from ebay (biggred)


There must be a million other bits and bobs I had to replace like all the little plastic clips on the beam and wishbones etc etc, anyway I worked through it all spreading the cost over as many months as I could”¦.and eventually is was all back fitted and the list of things to do got smaller
1. tighten up the hub nuts
2. tighten up the drive shaft flange bolts
3. bleed the brakes
4. test drive
so, last few pics, I used the pressure bleeder which worked really well and made a pig of a job quite easy in the end, actually I really enjoyed this a lot more than I thought I would !!
pipe and a jam jar each corner, priming the jam jar with half full of brake fluid

Pressure bleeding set up, very easy to use. Must get those front callipers painted gold now !!

When done, I rolled her out for the first time in a few months and it felt quite an occasion !!

I’ve got the temp wheels on at the moment as I picked up these from zone legend B7 recently. They have been re--furbished now along with the caps and finished in powder coated metallic silver


I took the turd out for a quick test drive and the brakes are very firm and work well. The 3.46 makes the car so so so much more drivable now, and i'm well pleased with how it drives.
All in all this summs about 4 months on and off work, I just need to wait a month or 2 to save up for some new rubber, then the cabbie is all ready for the spring
Last edited by jimbom30cab on Sat Nov 16, 2013 8:47 pm, edited 1 time in total.
-
Duke137
- Married to the E30 Zone
- Posts: 7207
- Joined: Sat Aug 29, 2009 11:00 pm
That's some nice work, fresh powdercoated scrap is a lovely sight 
Do us all a favour and please sack of those headlights though, I know it's your car but they really are awful
Do us all a favour and please sack of those headlights though, I know it's your car but they really are awful
How do you pronounce 'either'? I say 'either', but some say 'either'. Either is correct.
-
jimbom30cab
- Tech 1 freak
- Posts: 7631
- Joined: Mon Oct 12, 2009 11:00 pm
- Location: in the garage
Thanks Duke, sorry but i like the lights !!
-
Rav335uk
- E30 Zone Meets/Events Team

- Posts: 27978
- Joined: Wed Jan 19, 2005 11:00 pm
- Location: Mad mad mad
£.46 will give you a nice lazy motorway cruize...

If you Got "Haters",Then your doing something Right!
CR24v??? Where's it all gone?? LOL
-
jimbom30cab
- Tech 1 freak
- Posts: 7631
- Joined: Mon Oct 12, 2009 11:00 pm
- Location: in the garage
Yer, it does mate, i took it out today for a nice drive and at 70mph it was sitting at 2600 revs, which is just perfect. Everything worked as it should so well pleased with that. Just got to get some new tyres so any recommends would be most appreciated.
-
mcbonio
- E30 Zone Squatter
- Posts: 1868
- Joined: Sun Feb 12, 2012 11:00 pm
Nice work Jim,
It's a nice feeling knowing all the bits are nice and fresh..!
It's a nice feeling knowing all the bits are nice and fresh..!
-
jimbom30cab
- Tech 1 freak
- Posts: 7631
- Joined: Mon Oct 12, 2009 11:00 pm
- Location: in the garage
Well got home today and it was good to find these all done
I used a company on line called Event Tyres, you get web discounted tyres fitted at your location, great idea really i mean why waste an hour at protyre when you can get them done at work or home.
The customer service was excellent, the fitter called me when he arrived talked me though his job sheet and promised he would take great care of the wheels and then called me when the job was done and talked a lot again. There was not one single spec of dust even of the wheels when he was done - a really nice bloke also
I went for Falkens in the end.


The car's pretty much done now so going to take a few days off whilst i wait for the 318auto to get back from the spray shop
-
jimbom30cab
- Tech 1 freak
- Posts: 7631
- Joined: Mon Oct 12, 2009 11:00 pm
- Location: in the garage
I've been having a lot of fun with this car, especially in the wet !! I did have a cracked water hose but managed to get home and now it's all replaced and i changed the water pump at the same time whilst the system was down.
Just enjoying driving it at the moment and have no real plans for this apart from enjoying it
Just enjoying driving it at the moment and have no real plans for this apart from enjoying it
-
manse73
- E30 Zone Camper

- Posts: 1109
- Joined: Sat Mar 20, 2010 11:00 pm
- Location: in a town near you
Was he a zoner with a 325 sport with every factory option from new.jimbom30cab wrote:Well got home today and it was good to find these all done
I used a company on line called Event Tyres, you get web discounted tyres fitted at your location, great idea really i mean why waste an hour at protyre when you can get them done at work or home.
The customer service was excellent, the fitter called me when he arrived talked me though his job sheet and promised he would take great care of the wheels and then called me when the job was done and talked a lot again. There was not one single spec of dust even of the wheels when he was done - a really nice bloke also
I went for Falkens in the end.
The car's pretty much done now so going to take a few days off whilst i wait for the 318auto to get back from the spray shop
bruv chariots rule
-
jimbom30cab
- Tech 1 freak
- Posts: 7631
- Joined: Mon Oct 12, 2009 11:00 pm
- Location: in the garage
Hi Everyone
I've decided to replace my engine loom and had a few issues getting one
basically it's like rocking horse poo trying to find a manual loom and I've only see a couple for sale in the last 2 years, both of which had the x25 plug from the later e34s.
Finding a manual loom with the c101 plug was impossible.
So I decided to fit an M20 loom instead, the good thing about these is they are cheap and plentiful.
Here is my guide after just doing this
All you need is a complete M20 loom from a facelift car so it should be Motronic 1.3
Other bits:
Soldering kit
some heat shrink
a bit of wire, few different grades
First of all you need to take the injector plugs out of the M20 fuel rail loom. This is a bit tricky as you have to muller the plastic housing to get them out
Then test fit on your M30 injectors.
You will see that there isn't quite enough stretch in the wires for it to fit so you need to cut and lengthen a couple of wires. cut, add wire, solder together, heatshrink.
The pulse sensor and crank sensor sockets are on the other side of the engine with the M30 but luckily the sensor cables all are long enough to reach.
Same story with the oil pressure connection, reaches fine
The AFM connector is a bit short, so you need to cut back about 6 inches of the cable protective cover and thread the connector under the inlet manifold and up so it appears in the middle of the gap between the inlet manifold and cylinder head.
The same goes for the connection to the TPS, cut back some of the cable loom protector and thread that up along with the AFM
The alternator as 2 connections, the large one fits fine. The smaller one on the M20 loom as a ring connector which is too small. Also the smaller one is a very tight fit, so you have to cut the connector off anyway to replace it with a larger ring, you might as well lengthen it by about 3 or 4 inches also.
The starter motor smaller 2 connectors need changing also. The M20 loom as ring connectors but the M30 starter has top and bottom spade connectors so they need removing and spades (female) soldering on.
The diagnostic socket sits nicely by the oil filter housing.
The oil level sensor plugs in perfect as does the ICV.
You can see that I put the round connector which joins the main loom to the fuel injector loom in the large loom hole, fits nice but just needs a little file down to get the lid on ok.
Coil connection and battery connections are perfect as they are in the same place as the M20 cars.
The relays , here you have 2 options, eigher fit them in the usual place on the 6 pot e30s or move them forward to the bulkhead. I did the later as my car is a 4 pot donor so I'm going to try to fit them in the usual 4 pot relay housing in the bulkhead plastic loom thingy
Here is a few pics
M20 injector connector housing, with loom removed

test fitting the M20 injector loom

here you can see the TPS and AFM connectors, the ICV is plugged in also.


new small alternator connector made up

here you can see how I positioned the fuel rail loom large circle connector


more details to follow
-
jimbom30cab
- Tech 1 freak
- Posts: 7631
- Joined: Mon Oct 12, 2009 11:00 pm
- Location: in the garage
So third time lucky with the M30 enigne.
Took the new lump out, found the reason for the 60psi compression, piston rings were knackered:

So built a new lump from all the good bits. Took it back to bare block and Rob honed the all bores out before we put it all back together and into the cab


And she runs very well, so happy days

We did all that in 32 hours working solid apart from about 3 hours in the pub and 7 in bed
-
Bristol_Jer
- E30 Zone Addict
- Posts: 2523
- Joined: Thu Sep 24, 2009 11:00 pm
- Location: Bristol, UK
Nice one Jim, glad you've got it all sorted!
-
jimbom30cab
- Tech 1 freak
- Posts: 7631
- Joined: Mon Oct 12, 2009 11:00 pm
- Location: in the garage
Well, everything is back and it drives nice
Couldn't have done it without help from Rob, thanks mate, you are a TOP guy

Couldn't have done it without help from Rob, thanks mate, you are a TOP guy


-
Cypriotgeeza

- E30 Zone Addict
- Posts: 3046
- Joined: Sat Apr 04, 2009 11:00 pm
- Location: Under a bonnet somewhere..
Wow, i just read through all 20 pages of this and what a build thread!
Seems not every M30 build thread is plain sailing (pardon the pun ) and other people have problems like i have encountered
  lol
lol
Top thread mate! Hope i share the joy when mines all (finally) finished like you have mate!

Seems not every M30 build thread is plain sailing (pardon the pun
Top thread mate! Hope i share the joy when mines all (finally) finished like you have mate!
Check my M30 build threads:
Project Frankenstein: viewtopic.php?f=25&t=194154
Headgasket: viewtopic.php?f=55&t=165704
Clutch issues: viewtopic.php?f=55&t=172482
Instagram: www.instagram.com/Cypriotgeeza
Project Frankenstein: viewtopic.php?f=25&t=194154
Headgasket: viewtopic.php?f=55&t=165704
Clutch issues: viewtopic.php?f=55&t=172482
Instagram: www.instagram.com/Cypriotgeeza