budget touring trackday/drift project

Log / show off your build here.

Moderator: martauto

shedrool83
Old Skooler
Old Skooler
Posts: 4395
Joined: Thu May 10, 2007 11:00 pm
Location: Dundee Scotland

Tue Dec 31, 2013 2:27 pm

Was going to sell/break this through lack of use, but after sticking it on ebay and getting endless numpties emailing me i thought why not track it.

Image

So today i finally plucked up the courage to start stripping it out.

Image

Image

Image

No rust issues to sort out which is good as any where taking care of a few years ago when i bought it.


The car is already running an m52b28 and is fully poly bushes .
Brakes are standard but have a full s/s braided hose kit fitted.

Suspension wise its on 40/40 spax springs bilstein rear shocks and boge front inserts.
Hardly ideal so will get saving for a proper setup.

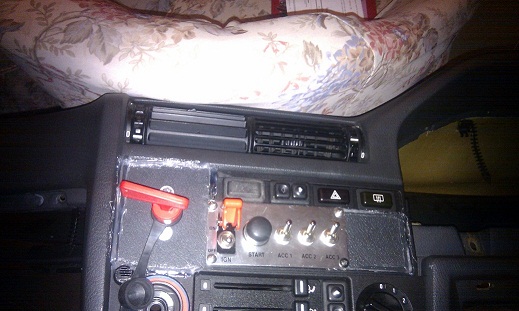
Basically i,m looking to fit a bucket seats with harnesses , cage, hydraulic handbrake and a engine cut off/start panel for now and see what like.
Not looking for a full blown racecar just something i can drive to a track and have fun safely.


Any advice would be greatly appreciated as this is my first attempt at anything like this , and looking through the build threads it can get expensive lol
Image
User avatar
buzz6353
E30 Zone Regular
E30 Zone Regular
Posts: 274
Joined: Sat Mar 19, 2005 11:00 pm
Location: Stirling,Scotland

Tue Dec 31, 2013 2:48 pm

only 10 kg of sound deadening to go Jake.....
User avatar
Mikey_Boy
E30 Zone Regular
E30 Zone Regular
Posts: 996
Joined: Sun Mar 16, 2008 11:00 pm
Location: Cheshire - trying to avoid the bling!

Tue Dec 31, 2013 2:48 pm

Good man!! Very best of luck with the build.. My only pieces of advice are to take your time and don't scrimp on safety - best race seats, cage and harnesses you can afford and don't forget a fire extinguisher as well. You can get rid of that sunroof with all its mechanism and save a bit of weight from the top of the car and also use a heat gun and scraper to get rid of the sound proofing stuck to the inside of the body shell - that saves a good bit of weight as well.

Suspension choices are many - most on here have an opinion - also, I would avoid welded diffs if you can - a well set up LSD is a joy..

Have fun!!

:thumb:
shedrool83
Old Skooler
Old Skooler
Posts: 4395
Joined: Thu May 10, 2007 11:00 pm
Location: Dundee Scotland

Tue Dec 31, 2013 3:06 pm

Mikey_Boy wrote:Good man!! Very best of luck with the build.. My only pieces of advice are to take your time and don't scrimp on safety - best race seats, cage and harnesses you can afford and don't forget a fire extinguisher as well. You can get rid of that sunroof with all its mechanism and save a bit of weight from the top of the car and also use a heat gun and scraper to get rid of the sound proofing stuck to the inside of the body shell - that saves a good bit of weight as well.

Suspension choices are many - most on here have an opinion - also, I would avoid welded diffs if you can - a well set up LSD is a joy..

Have fun!!

:thumb:
Sound proofing will be going .

Was thinking about the sunroof ,whats the easiest way to fill the hole ?I want to avoid painting if i can.

Got a spare diff sitting atm so just going to weld that to see how things go.Can always get a proper lsd if i hooked and plenty track time.

Fire extinguisher system is a good shout as that had slipped my mind.
Image
User avatar
Mikey_Boy
E30 Zone Regular
E30 Zone Regular
Posts: 996
Joined: Sun Mar 16, 2008 11:00 pm
Location: Cheshire - trying to avoid the bling!

Tue Dec 31, 2013 5:13 pm

There are several options - you can carefully remove the existing outer skin panel from the sunroof and find a way to bond that into the hole. There are carbon fibre panels that can be bonded into the sunroof hole, but that might go against your title of a budget build!! winkeye

There are other more crude ways of filling hole by means of ally panels and rivets that I have seen, none of which are pretty!!
shedrool83
Old Skooler
Old Skooler
Posts: 4395
Joined: Thu May 10, 2007 11:00 pm
Location: Dundee Scotland

Tue Dec 31, 2013 5:38 pm

Removing the sunroof panel skin tacking it in and sealing it up seems to best option to me.
Image
milescook
E30 Zone Camper
E30 Zone Camper
Posts: 1283
Joined: Thu Jan 13, 2011 11:00 pm
Location: The 'bran of Cwm
Contact:

Tue Dec 31, 2013 8:35 pm

Take a look about half way down:

http://www.e30zone.net/modules.php?name ... sc&start=0

Mine was done using a few welds and some sealant.
The story so far... http://www.cookracing.co.uk/

Also please help the race budget by watching some videos :) https://www.youtube.com/cookracinguk
shedrool83
Old Skooler
Old Skooler
Posts: 4395
Joined: Thu May 10, 2007 11:00 pm
Location: Dundee Scotland

Wed Jan 01, 2014 11:26 am

That looks ideal thanks
Image
pac1982
Engaged to the E30 Zone
Posts: 5330
Joined: Fri Mar 07, 2008 11:00 pm
Location: isle of wight

Wed Jan 01, 2014 11:39 am

i need a few trim bits for my touring if your selling the bits you've stripped out?
Image

1991 BMW E30 318i Neon Design Convertible (Sold)
1990 BMW E30 325i Touring (Sold)
1990 BMW E30 318IS (Sold)
1990 BMW E30 316i (RIP)
shedrool83
Old Skooler
Old Skooler
Posts: 4395
Joined: Thu May 10, 2007 11:00 pm
Location: Dundee Scotland

Wed Jan 01, 2014 12:46 pm

pac1982 wrote:i need a few trim bits for my touring if your selling the bits you've stripped out?
Pm me what your after .
Image
shedrool83
Old Skooler
Old Skooler
Posts: 4395
Joined: Thu May 10, 2007 11:00 pm
Location: Dundee Scotland

Thu Jan 02, 2014 4:27 pm

Sound proofing removed.

Image

Image

Sunroof cassette out and sunroof panal skin in with a few tack welds

Few dents etc in the roof/sunroof panel but hay ho.

Image

Found a bit of rust under the sound proofing at the rear seat area so will need to plate that .

Image

The green bag is half full of sound proofing can believe how much it weighs.

Next the dash will be coming out along with any wires i dont need.
Image
User avatar
tomislav
E30 Zone Squatter
E30 Zone Squatter
Posts: 1633
Joined: Thu Nov 29, 2007 11:00 pm
Location: Faversham, Kent

Thu Jan 02, 2014 5:01 pm

Danthe, for all your trackday needs! :thumb:
'Assumption is the mother of all f**k ups'
G-Bear
E30 Zone Squatter
E30 Zone Squatter
Posts: 1632
Joined: Wed Mar 12, 2008 11:00 pm
Location: Hertfordshire

Sat Jan 04, 2014 6:53 pm

Nice work. Have developed a keen attraction to track car builds of late. The zone feels like it's been reborn to me..
shedrool83
Old Skooler
Old Skooler
Posts: 4395
Joined: Thu May 10, 2007 11:00 pm
Location: Dundee Scotland

Sun Jan 05, 2014 2:05 pm

Today saw the dash , electric windows and door looms removed.

Looking at the electric window body loom it seems to go to the rear lights and god knows what else.

Is the only way to remove this is to open up the loom and remove the wires i dont need or am i missing something.

Basically i only want the bare minimal working for mot purposes.
Image
Demlotcrew
E30 Zone Team Member
Posts: 13329
Joined: Mon Dec 20, 2004 11:00 pm
Location: East Anglia

Sun Jan 05, 2014 2:19 pm

The electric window loom and central locking are taped together, the wires you see going towards the rear are for the boot solenoid, doors etc.

You can pull all this out in one big go without disturbing any other systems in the car.

Unless its a late touring, it should all be separated from the main chassis loom and you can quickly cut it all out in sections.

Andrew
Last edited by Demlotcrew on Sun Jan 05, 2014 2:55 pm, edited 1 time in total.
shedrool83
Old Skooler
Old Skooler
Posts: 4395
Joined: Thu May 10, 2007 11:00 pm
Location: Dundee Scotland

Sun Jan 05, 2014 2:52 pm

Its an h reg so not to late .
I'll have another look .


Thanks
Image
shedrool83
Old Skooler
Old Skooler
Posts: 4395
Joined: Thu May 10, 2007 11:00 pm
Location: Dundee Scotland

Sun Jan 05, 2014 4:48 pm

Spot on
Pulled it all back down the pass side un hooked the relay off the accessory thingy, through its over the drivers side and pulled that side out to along with the interior lights.

Have a one loom left down the drivers side wit 4 wires in it which i take is the fuel pump.
I had to cut these 4 as my alarm seemed to be connected to it .The alarm will be coming out to so will properly need help sorting the wires out afterwards.


Thanks demlotcrew
Image
Sanchez
Married to the E30 Zone
Posts: 7578
Joined: Sun Apr 17, 2005 11:00 pm
Location: Sunny Scotland

Sun Jan 05, 2014 5:13 pm

Sounds like speedy progress as ever Jake.
Image
shedrool83
Old Skooler
Old Skooler
Posts: 4395
Joined: Thu May 10, 2007 11:00 pm
Location: Dundee Scotland

Sun Jan 05, 2014 5:22 pm

Sanchez wrote:Sounds like speedy progress as ever Jake.
It will slow down now Peter i have to buy stuff lol.
Image
Demlotcrew
E30 Zone Team Member
Posts: 13329
Joined: Mon Dec 20, 2004 11:00 pm
Location: East Anglia

Sun Jan 05, 2014 8:01 pm

No the one down the drivers side will most likely be the rear door switch and fuel flap solenoid, the fuel pump is in the main chassis harness.

Andrew
LondonTom
E30 Zone Camper
E30 Zone Camper
Posts: 1431
Joined: Sat Apr 19, 2008 11:00 pm

Mon Jan 06, 2014 8:26 pm

Don't remove the heater - my car is bloody freezing!!

Just had to buy an aftermarket electric version :roll:
shedrool83
Old Skooler
Old Skooler
Posts: 4395
Joined: Thu May 10, 2007 11:00 pm
Location: Dundee Scotland

Mon Jan 06, 2014 9:33 pm

The heater and dash are staying like i hate being cold.
Image
DanThe
E30 Zone Team Member
Posts: 28641
Joined: Sat Sep 10, 2005 11:00 pm
Location: Staffs
Contact:

Mon Jan 06, 2014 10:01 pm

Check out his location! I wouldnt have thought the heater would be coming out for a second :D
shedrool83
Old Skooler
Old Skooler
Posts: 4395
Joined: Thu May 10, 2007 11:00 pm
Location: Dundee Scotland

Mon Jan 06, 2014 10:04 pm

Your right Dan i aint the hottest up here.
Image
shedrool83
Old Skooler
Old Skooler
Posts: 4395
Joined: Thu May 10, 2007 11:00 pm
Location: Dundee Scotland

Mon Jan 13, 2014 7:00 am

Alarm has now been removed and the car starts .Tought i would have issue but it was pretty easy actually.


All wire i can remove is now out.

Image

Next is to source 45mm cds for the cage.
Image
milescook
E30 Zone Camper
E30 Zone Camper
Posts: 1283
Joined: Thu Jan 13, 2011 11:00 pm
Location: The 'bran of Cwm
Contact:

Mon Jan 13, 2014 8:46 am

Well done for not taking out the heater controls! When I took my dash out I though I had to disconnect the whole lot. Cure broken clips and ongoing heater knob issues :( With the dash out are you going to put a battery isolator switch in?

Image

I actually got rid of the sound / heat proofing below the windscreen too. If you do, if you want to reclaim some pennies take it out carefully (rather than rip it out like me...) as people are buying this stuff!
The story so far... http://www.cookracing.co.uk/

Also please help the race budget by watching some videos :) https://www.youtube.com/cookracinguk
shedrool83
Old Skooler
Old Skooler
Posts: 4395
Joined: Thu May 10, 2007 11:00 pm
Location: Dundee Scotland

Mon Jan 13, 2014 10:04 am

I have made a metal panel ( like rix iirc) that sits between the dash and the tunnel .
I haven't decided where everything is going yet.
Thinking of getting a panel with engine start and fuel pump switch aswell .
Image
shedrool83
Old Skooler
Old Skooler
Posts: 4395
Joined: Thu May 10, 2007 11:00 pm
Location: Dundee Scotland

Mon Jan 13, 2014 5:02 pm

Can someone advise my on tubing for the cage .

I can get my hands on 42mm and 48mm cds .
From my searches i see 45mm is common but i wondering will 42mm be ok or should i go for the 48mm?
Image
rix313
E30 Zone Team Member
Posts: 4947
Joined: Fri Oct 31, 2008 11:00 pm
Location: Silverstone
Contact:

Mon Jan 13, 2014 6:20 pm

FIA spec cages are made from 45mm, so a 48mm would probably be overkill. Most budget cages are 38mm. I'd have said 42mm would be just fine.
shedrool83
Old Skooler
Old Skooler
Posts: 4395
Joined: Thu May 10, 2007 11:00 pm
Location: Dundee Scotland

Mon Jan 13, 2014 6:58 pm

Thanks Rix i'll go 42mm then .
Image
shedrool83
Old Skooler
Old Skooler
Posts: 4395
Joined: Thu May 10, 2007 11:00 pm
Location: Dundee Scotland

Sat Jan 25, 2014 4:59 pm

Wee update

Bit of rust found and cut out today

Image


Roll cage is bought and being collected by the courier on Monday.
Image
shedrool83
Old Skooler
Old Skooler
Posts: 4395
Joined: Thu May 10, 2007 11:00 pm
Location: Dundee Scotland

Tue Jan 28, 2014 7:25 pm

Floor painted and cage sitting in place.

Image


Image

Image

I was a bit disappointed when the cage arrived tbh.
I thought it was a full cage but due to me not asking the seller enough questions and asking for front pictures i'll live with it.

I have tube sitting so i'll add the front sections and add a few more brace pieces here and there.
Image
shedrool83
Old Skooler
Old Skooler
Posts: 4395
Joined: Thu May 10, 2007 11:00 pm
Location: Dundee Scotland

Sat Feb 01, 2014 3:55 pm

Front section of cage nearly finished.
Made a bit of a hash on the passenger side it's a bit to far away from the a pillar .

Seats should be here on Tuesday and hoping to get the dash cut and back in tomorrow.


Image

Image
Image
shedrool83
Old Skooler
Old Skooler
Posts: 4395
Joined: Thu May 10, 2007 11:00 pm
Location: Dundee Scotland

Sun Feb 02, 2014 3:36 pm

Dash back in and made a panel for the switches.

Image

Image
Image
rix313
E30 Zone Team Member
Posts: 4947
Joined: Fri Oct 31, 2008 11:00 pm
Location: Silverstone
Contact:

Sun Feb 02, 2014 11:59 pm

Looks familiar :D
Post Reply