
Hi folks, can anyone show me the correct routing for the oil pressure sensor wiring. Mine is in a bit of a mess and it is just hanging unsupported and a bit close to the exhaust.
Thanks
M20 oil pressure sensor wiring
Moderator: martauto
-
Kedge
- Old Skooler

- Posts: 7698
- Joined: Thu Jan 13, 2005 11:00 pm
- Location: Leicestershire
It routes across the front of the block. Depending which engine & year will depend on exactly how it does it, later M20s I know have proper plastic guides.
-
jimf

- E30 Zone Regular

- Posts: 627
- Joined: Mon Mar 10, 2008 11:00 pm
Can the plastic guides be fitted to the earlier M20's? If anyone can ahoy me a pic it would be greatly appreciated.

-
FinalD
- E30 Zone Camper

- Posts: 1098
- Joined: Wed Apr 25, 2012 11:00 pm
- Location: Bristol
http://www.realoem.com/bmw/showparts.do ... g=11&fg=10
no. 15 on the pic
PN 11141716133 - 'cover'
The wiring runs through that cover the top of the water pump and below the dissy cap.
I'll be taking my engine apart tonight so can get some pics on my cable routing, but that is the part.
no. 15 on the pic
PN 11141716133 - 'cover'
The wiring runs through that cover the top of the water pump and below the dissy cap.
I'll be taking my engine apart tonight so can get some pics on my cable routing, but that is the part.
1988 325i Cabriolet - Gone.
-
Kedge
- Old Skooler
- Posts: 7698
- Joined: Thu Jan 13, 2005 11:00 pm
- Location: Leicestershire
Yes but you'll also need the facelift upper timing belt cover which has the slots cutout which the guide clips into.jimf wrote:Can the plastic guides be fitted to the earlier M20's? If anyone can ahoy me a pic it would be greatly appreciated.
So from that link FinalD posted you'd need #1, #14 x 2 and #15.
-
jimf
- E30 Zone Regular
- Posts: 627
- Joined: Mon Mar 10, 2008 11:00 pm
FinalD: a pic or two would be very helpful thanks.
That real OEM pic might have just answered another question a asked last week. No.11 in the diagram is a position indicator and I have that plug dangling loose with no home.
That real OEM pic might have just answered another question a asked last week. No.11 in the diagram is a position indicator and I have that plug dangling loose with no home.
-
FinalD
- E30 Zone Camper
- Posts: 1098
- Joined: Wed Apr 25, 2012 11:00 pm
- Location: Bristol
Crank position sensor (no. 11) looks like this: http://www.autobahnbmwparts.com/catalog/12141720852.jpg
I can get some better shots of mine but I can't see it being the loose wire you have as it is a thick cable with a big plug and a big sensor on.

I can get some better shots of mine but I can't see it being the loose wire you have as it is a thick cable with a big plug and a big sensor on.
1988 325i Cabriolet - Gone.
-
Kedge
- Old Skooler
- Posts: 7698
- Joined: Thu Jan 13, 2005 11:00 pm
- Location: Leicestershire
The one in the pic in RealOEM isn't the CPS, not sure what it is but I think it's from the earlier M20s with the flywheel sensors. It clips to the lower timing belt cover with should have a 3 pronged clamp fitted. See the part on the far left in this pic;
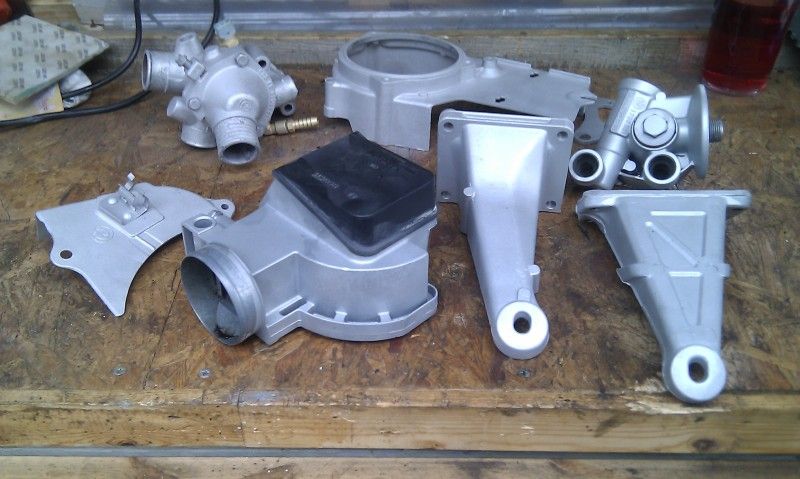
I've not got anything fitted there now I've converted to M1.3.
This link has a pic of my CPS sensor now its M1.3 http://www.e30zone.net/e30zonewiki/inde ... ion_Sensor
I've not got anything fitted there now I've converted to M1.3.
This link has a pic of my CPS sensor now its M1.3 http://www.e30zone.net/e30zonewiki/inde ... ion_Sensor
-
jimf
- E30 Zone Regular
- Posts: 627
- Joined: Mon Mar 10, 2008 11:00 pm
Ok, thanks guys, just looked similar in that pic.
-
FinalD
- E30 Zone Camper
- Posts: 1098
- Joined: Wed Apr 25, 2012 11:00 pm
- Location: Bristol

That is the facelift CPS on mine.
http://finaldecap.co.uk/images/E30Resto/22012013/
Images in the above link 1046-1056 show the wiring routing & cover and the belt cover as they are on mine. I do actually have a spare belt and wiring cover buried in my parts, should you wish to 'upgrade' if you can use them.
1988 325i Cabriolet - Gone.
-
jimf
- E30 Zone Regular
- Posts: 627
- Joined: Mon Mar 10, 2008 11:00 pm
Wow, you've been having fun then! Thank you very much for taking the time to sort the pics out for me. I'll get back to you about the cover when I have had another look at my own engine.