I'm planning to document EVERY type of engine swap from the Wiki; FROM M10, M40, M42 and M20 TO M20, M30, M42, and M5x.
What I really need are photos; lots of them. If you have a thread (or know of one) where people documented their engine swap, stick it here. I need to know all the specific ins and outs of going from one engine to another.
I've only done an M20-M20 swap myself, so all help is appreciated.
Wiki Engine Swap pages
Moderator: martauto
-
Grrrmachine
- E30 Zone Wiki / Team Member

- Posts: 8043
- Joined: Sat Feb 09, 2008 11:00 pm
- Location: Warsaw, Poland
'89 325i Touring | Touring Resto Thread | In-Dash Screen install
-
Grrrmachine
- E30 Zone Wiki / Team Member
- Posts: 8043
- Joined: Sat Feb 09, 2008 11:00 pm
- Location: Warsaw, Poland
*tumbleweed*
'89 325i Touring | Touring Resto Thread | In-Dash Screen install
-
leeparkes
- Married to the E30 Zone

- Posts: 9538
- Joined: Thu Jan 03, 2008 11:00 pm
- Location: Black country
Ill do a M30 one for you.
Ill use the pics from my thread and there's lots of em, also in there's quite an indepth post on how to tune a M30 ill add that to it too.
http://www.e30zone.net/modules.php?name ... 16&start=0
Give me a couple of days.
Ill use the pics from my thread and there's lots of em, also in there's quite an indepth post on how to tune a M30 ill add that to it too.
http://www.e30zone.net/modules.php?name ... 16&start=0
Give me a couple of days.
Last edited by leeparkes on Tue Sep 18, 2012 5:15 pm, edited 1 time in total.
Cypriotgeeza wrote:I done both my mates in my old 318is
felt so proud,even tried it with a E30 325i and got put in my place..
-
leeparkes
- Married to the E30 Zone
- Posts: 9538
- Joined: Thu Jan 03, 2008 11:00 pm
- Location: Black country
This is bits from my own thread, pics from others info from the M30 sticky and stuff ive learnt over the years. Ill update/edit it over the next few days
Right,
Engine.
Best engine to use is from an E34/32, 535i/735i. from around 88 onwards.
This later engine had bigger valves, better management etc.. but it does have low compression compared to the earlier E28 engines and in return slightly less power, a head skim will sort this out.
Standard E34/32 is 211bhp with 220 lbft, a 1mm head skim will give 220bhp with 238 lbft.
Earlier engines were 220hp
If you do go for an earlier engine you will have to blank the coolant pipe at the back of the head and im certain the sump is different too, it can be done but much easier to use the late engine.
Lets presume your using an E34/32 engine,
the only custom part needed is the engine mounts, everything else is OEM bolt on parts and if you start with a 325i this swap is very simple to do.
Basic parts list to get it in a 325i
M30 engine & gearbox
Custom engine mounts
Electric fan
E34 throttle cable
The rest you already have.
Basic Parts list to get in ANY E30.
M30 engine & gearbox
Custom engine mounts
E30 M20 rubber mounts
E30 325i exhaust
E30 M20 radiator <must be in good conition, (prefered choice is E28 535i rad)
E30 325i gear linkages
E30 325i manual prop
E30 325i gearbox flange
E30 M20 matrix hose (or E28 T piece)
E34 throttle cable
Electric fan
Those lists are to just get the engine in and useable, upgrades like larger bore exhaust, bigger rad etc can be added later on.
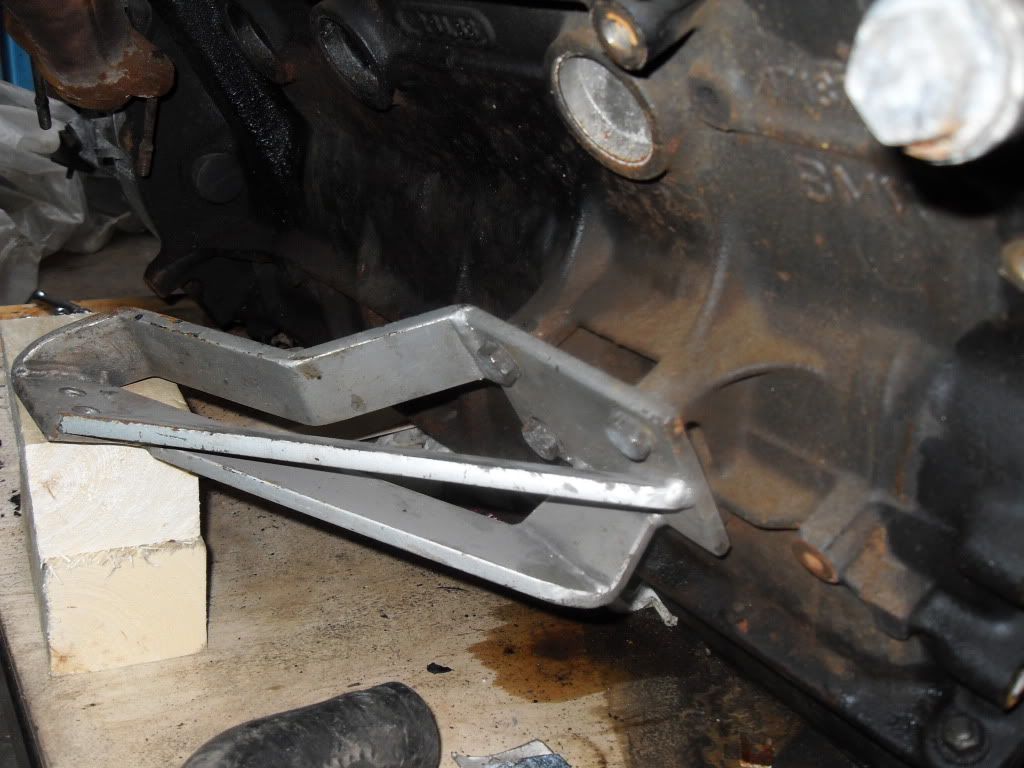
Custom mounts.
.de mounts can be used at roughly £140, & let you bolt the engine straight in. or you can get virtually the same item from me at £100 delivered.
You can have a go at making your own but you must get the engine perfect in the bay, the M30 is a big engine!
First of all it needs to be dead centre in the bay, then get it sitting at the right angle, then get it at the right height so it doesnt hit the crossmember but then you also need to make sure you can shut the bonnet, then you need to get it pushed back.
Custom mounts.

Fitted

You can use standard M20 rubber mounts with them or anything 50mm thick.
Im using Landrover V8 mounts with a spacer to get them up to 50mm, they are good and strong (cheap too) other alternatives are the uprated M20 ones from Burton motorsport.
Link?
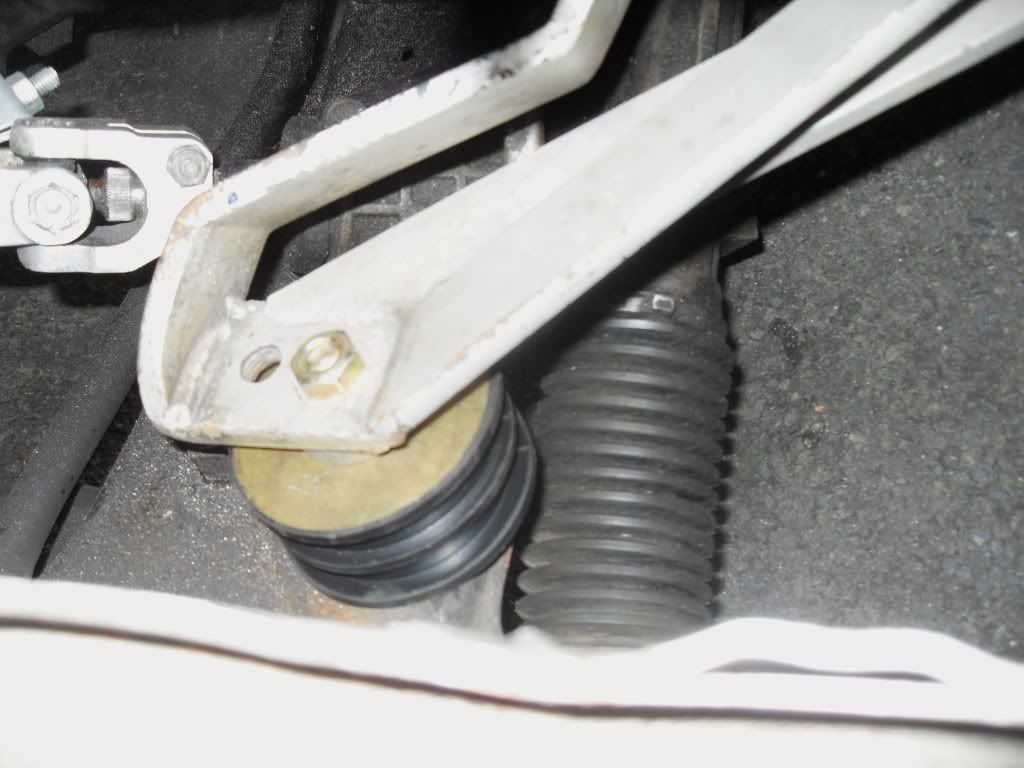
There are 2 positions on the mounts.
I'd recommend using those that place the engine furthest back (position 3). You may have clearance issues with the bulkhead in postion 3 (some dont) if you do you can massage the bulkhead with a mallet just where the head sits,dont bash too much as the brake linkage sits behind it.
If you use the furthest forward position, you'll have virtually no room for a radiator, as well as worse weight distribution.
This is position 3
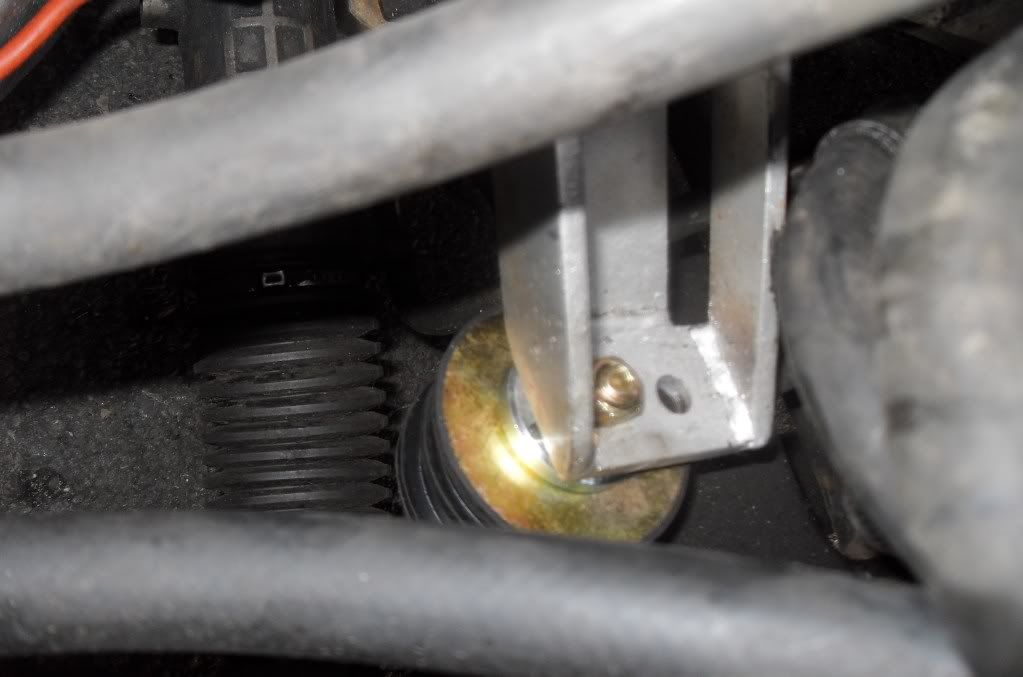
Clearance to E28 535i radiator in position 3


Gearbox.
All M30 manual gearboxes will fit a late engine, not all M30 gearboxes fit earlier engines.
Clutch/flywheel.
If you are using the M30 gearbox you can use the standard dual mass flywheel and matching clutch or use an E28 M30 (or any M30 of the same era) flywheel which is single mass and much lighter.
E28 535i = 10KG
E28 525i = 7.5KG
You can use 'any' single mass M30 240mm friction plate but must use a 3.5 pressure plate to handle the power.
Aftermarket single mass flywheels are available which can use the dual mass clutch, BBB do them
To round up E28 flywheels are lighter than E34 ones, so go for one of these if you can! You'll need the clutch to match (the E34 cluch won't work with an E28 fly for example) - I'd certainly recommend a new clutch while it's out & easy to change...
The M30 gearbox bolts to the shell using standard E30 gearbox crossmember and standard gearbox mounts.
An E30 325i gear linkage is needed to make the gear lever stick up in the right place...
M20 or M30 clutch slave cylinder can be used.
M10 gearbox...............
Prop
1: E30 M3 prop. This has the correct flange to bolt to the E30 diff & M30 box.
2: E36 328i prop with centre bearing mod.
3: Custom prop can be had for around £100
4: Gearbox flange swap - you can swap the flange on the back of an M30 box for one from a M20 325i, please note it must be 325i as for some reason the 320i is different. Then a M20 325i manual prop can be used.
Popular choice is number 4 as its easily available and can cope with the torque.
Wiring.
Using the M30 engine loom, some minor modifications are needed... Temp sensor - the brown temperature sensor on the M30 block will need swapping for an E30 M20 item.
Facelift wiring mods (these apply to those with a facelift shell) - the engine will run without doing them, but for everything to function correctly (rev counter etc), the following are needed;
You need to swap pins in the M30 loom, or cut wires.
Pin 3 (black and white) and pin 8 (black and purple).

To get the electric windows and sunroof to work with the doors shut and for the heater blower to work at all you need to connect the black and green wire from pin 15 on the E30 C101 to a suitable earth on the body (mine is on the bonnet roller guide)
Power distribution block - there is a power distribution block on the E32/34 loom, near the ECU, that needs a direct live feed to it.
Coil will need to be moved to the suspension tower so the wires reach, also it give more room for the airbox

There are a few details of the later C101 (25 pin) being used here...
http://www.e30zone.net/modules.php?name ... highlight=
ECU
The standard E32 / E34 ECU should be used although M20 ECU's will work with the M30 eprom chip fitted inside.
The M30 loom will allow it to be fitted under the dash, but getting all of the connectors through the bulkhead is a PITA! The loom is also slightly short - you have to rotate the ECU 180 degree to allow it to bolt in place.
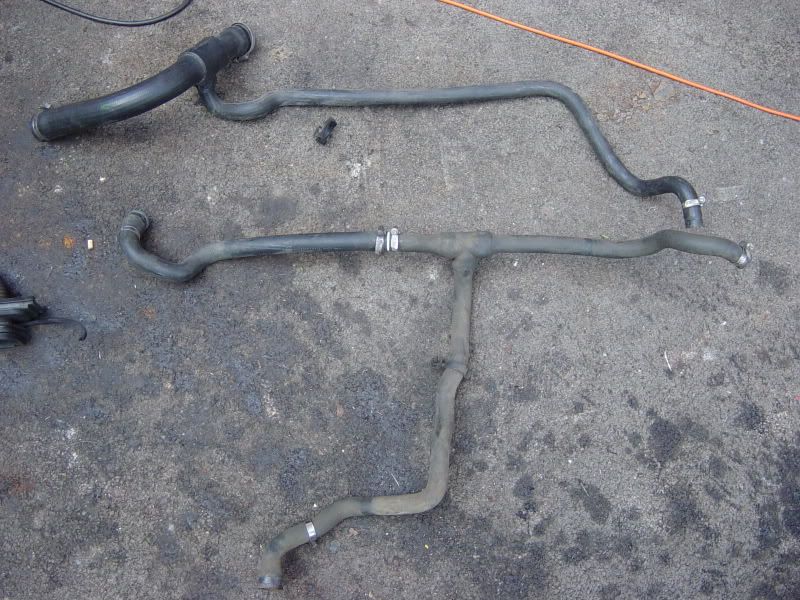
Plumbing
You'll need an E32/E34 top hose, with the built-in T-piece to the heater matrix. This T-piece goes to the bottom connecton on your heater matrix.
You need another T-piece to go in the pipe from the thermostat housing to the header tank (from an E28; BMW part number # 11 53 1 272 866). You can then connect from here to the top connection on your heater matrix.
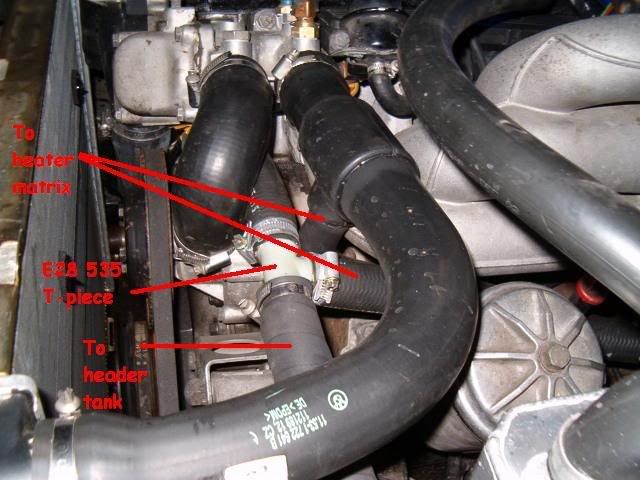


Or use a mixture of M20/M30 hoses to make the T piece up, front half M30, rear half with it already having the T to take off to the header.
Header tank.
If you've got a pre-facelift shell, you'll need to move your header tank - the stock location is in the way of the air intake. A facelift m20 header tank sits nicely on the nearside wing - you'll need to extend the level sensor wiring round to it. It can obviously stay where it is if you're starting with a facelift m20 shell, It is possible to use the M30 one and fix to the bulkhead but there is really no need as standard E30 works fine.
Radiator.
You can use a standard E30 radiator - a new 325i rad will do the job but a M30 is a big engine in a small E30 engine bay and heat is an issue so a bigger radiator is preferable.
An E28 m535i radiator is loads bigger than an E30 rad and fits perfectly. There are even unused holes in the shell that you can bolt it up to.
If using the E28 rad you will need an E28 bottom hose to reach the lower bottom stub or extend the original E34 one like this.

An E34 535i radiator can also be used but it must be non aircon type, aircon rads wont fit between the chassis rails.
To mount the E34 radiator you can use the standard 325 bottom plastic 'cup' mount on the right hand side and another right hand side one on the left hand side, riveted to the body as it doesn't clip in quite perfectly. The radiator sits in this like it was made to measure!
The crankshaft pulley will be very close to the radiator whichever you use. Unless you're keeping the M30 aircon setup (& I very much doubt you are!), you can chop the air conditioning belt drive part of the pulley off, simply by running an angle grinder down the middle of the 'V', it removes the spot welds and the two halves fall away.
Fan
You wont fit a viscous in there so electric is the way forward, there will be details elsewhere in the Wiki/e30zone if i find a link ill post it up.
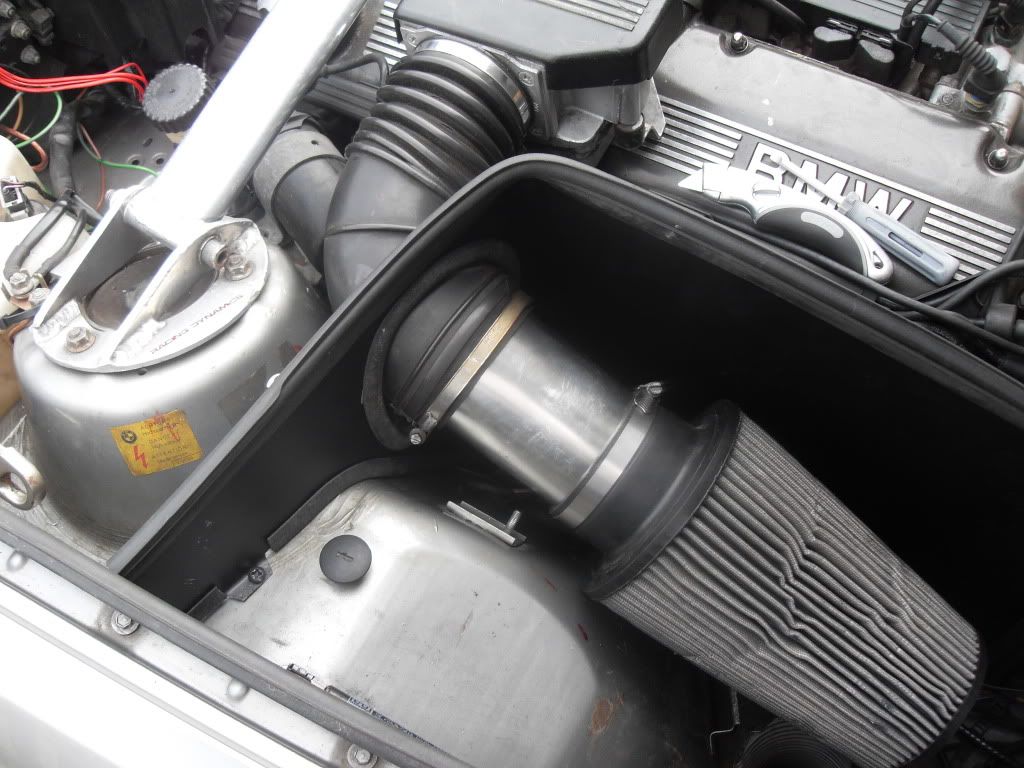
Airbox
The E32/E34 airbox fits just fine in the E30 bay. It's got a built in heat shield too - a distinct bonus as it sits above the exhaust manifold... Aftermarket options are out there and if you go down that route make sure its shielded from the heat.
To fit the standard airbox you will need to move the washer bottle. An alternative bottle can be fitted to the E30 airbox mount or the standard location - an E34 non-intensive bottle is a nice fit also a 324td washer bottle (p/n 6166 1385 280) is ideal.
Standard M30 airbox with E34 wash bottle.

After market filter with air tight heat shield and E36 washer bottle.
Throttle cable.
The M20 throttle cable is too short - use one from an E32/E34 - about £15 brand new from BMW or off your donor.
PAS.
Use the M30 PAS pump with M20 hoses.
Exhaust/manifolds
The issue here is clearance to the steering coupling with none E34 manifolds.
An E28 manifold is apparently a nightmare in this respect, & the E32 item (with a flexible coupling in the front section) would also have needed lots of work. The E34 item fits perfect and clears the standard rack.

E34 downpipes can be used, usually cut off before the front box.
Some minor custom work will be needed to get from here to the back of the car.
An easy fix is to cut the M30 downpipes just after the gearbox then cut an M20 325i system slightly longer and slide it into the M30 downpipes.
M30 pipes ID 50mm, M20 ID 46mm so its a perfect fit with no welding required.
Chopped E34 downpipes.

Chopped 325 downpipes.

325 downpipes clamped into the E34 pipes.

Perfect choice is a system that is 50mm pipes straight through as BMW intended but a 325i system will do the job just fine.
Fitting an E36 rack.
Apart from the obvious when fitting a quicker rack, ie spacers, different hoses etc..With an E36 rack the pinion is closer to the manifold so it needs cutting and moving closer to the block by circa 20mm.
The rear manifold clears fine but its the long front manifold that needs modding.
The route i went down was cut the flange off the manifold then put some new pipe in angled towards the engine.


Mocked up and cut to size.


Manifold welded up.

With a slight kink to get it closer to the engine (manifold upside down)

Straight line through to show how much its bent over compared to standard.

Mocked up on the engine, cant really see in the pic but theres about 20-25mm clearance to the linkage.


There you go.
----------------------------------------------------
Tuning a M30
Taken from here http://www.m535i.org/officers/ra/article.html
High power M30
The best way I have found to get a lot of NORMALLY ASPIRATED power out of an M30 is to do the following.
There are many places and wishes from where one can start. People may have Alpina or Hartge motors to start with, or want to keep as much of the original head/block as possible to have a 'numbers matching' car.
The pathway to a high-power M30 depends on the end-goal. The 3.5 liter racing motors in the 70s produced nearly 400 bhp, but are anything but streetable. Whereas the last incarnation of the production M30 had 208 bhp (US) and was a very smooth operator in the 3600 lb E32s.
For the purposes of this article, we will divide the ”˜horsepower goals’ into 4 divisions: 210-240, 240-260, 260-280, and 280+. 210-240 bhp is a reasonably easily achievable goal without a large outlay of cash.
A few options include the following:
Options for 210-240 bhp range:
Start with a euro B34 high compression motor or a B35 motor. Modifications include: Headers and full dual 2”a exhaust, B35 intake manifold with port matching, larger throttle body, 19 lb-hr injectors, updated chip. Reasonable estimate of power is 230-240 bhp. Hartge and Alpina were able to get this type of power using Motronic and L-jet in the 80s, keeping the stock displacement. Other options include a MAF. Similar figures can be obtained from a M30 B35, albeit probably not quite as high due to lower compression ratio. 230 bhp is a reasonable estimate in terms of bolt-on modifications for a B34 HC or B35 motor. The best that a B34 low-compression motor can do with simply bolt-on modifications (chip, exhaust, intake, injectors) is perhaps about 200-210 bhp. The problem is that upgrading the cam will not benefit you due to the low compression.
Typical costs (estimated total: under $2000):
Header: $500 + additional fitment work downstream
B35 intake manifold: $200
Chip: $200 (new)
Injectors: $250 (new)
MAF: $600-1000 (new, est.)
Options for 240-260 bhp:
This range of power effectively requires head work, and preferably a bump in compression ratio. Ideally the compression ratio would be 9.5:1 or higher (the euro B34 already has 10:1, but the B35 has 9.0:1). Running a stock chip on either the Motronic 1.0 from the euro B34 or the Motronic 1.3 (recommending the 179 ECU) is probably reasonable if your compression ratio bump on the B35 is only to 9.5:1. Headwork ought to include the standard larger intake values (47mm) and preferably the exhaust valves (to 38mm). A camshaft is a must, preferably 284 degree Shrick or equivalent. Replacement of valvetrain components is always recommended. Porting and polishing the head is also recommended. At this point the B35 intake is recommended, although Alpina claimed 254 bhp using the holder style intake. Headers are a must, as are dual 2”a exhaust all the way. MAF conversion is a good option, as are big-bore throttle body. Note, both Alpina and Hartge used >10:1 compression to get over 250 bhp. And Alpina used Motronic 1.1/1.3 on its later motors with 254-260 bhp.
Typical costs (estimated total: $5000-$7000):
Header: $500 + additional fitment work downstream
B35 intake manifold: $200
Chip: $200 (new)
Injectors: $250 (new)
MAF: $600-1000 (new, est.)
Camshaft: $400 (custom grind)
Head work: $2000-3000 (see Top End Performance website)
Pistons: $1000 (see JE Custom pistons)
Wiring harness and ECU: $400 (used, estimated)
Throttle body: $200 (service, based on Big Coupe Group list)
Options for 260-280 bhp:
On top of what was said above, now’s the time to consider a full B35 intake, 47/39mm valves, increased displacement, dual 2.25”a exhaust and headers, big bore throttle bodies, 24 lb-hr injectors, and FI system updates/modifications that can include going to a newer Motronic, custom chips, MAFs, or other options. Over 10:1 compression is a must in these cases. Reworked combustion chamber shapes, a la Alpina, can also be considered in this case.
Typical costs (estimated total: $7500-$10,000+):
Header: $500 + additional fitment work downstream (more than $1000)
B35 intake manifold: $200
Chip: $200 (new)
Injectors: $250 (new)
MAF: $600-1000 (new, est.)
Camshaft: $400 (custom grind)
Head work: $3000-4000 (see Top End Performance website)
Pistons: $1000 (see JE Custom pistons)
Wiring harness and ECU: $400 (used, estimated)
Throttle body: $200 (service, based on Big Coupe Group list)
Tuning services: varies
Suggestions for 280 bhp+:
On top of the above: increased displacement and mild stroking, reworked combustion chambers, individual throttle bodies. At this point, 10.5:1 compression is probably required, as well as custom-tuned FI system. MAFs are highly recommended.
Typical costs (estimated total: $10,000+):
Boring motor: $400-600 (estimated)
ITBs: $600 for adapters, $500 per pair of ITBs, estimated $600-800 in additional components (fuel rail, plenum, etc)
”˜Clean sheet’ option:
However, for the purposes of this whitepaper, we will assume to start off with an M30 B35 motor, and build a streetable, reliable, but high horsepower M30. Let’s take for example the E34 535i, or a late E24 635CSi. Concentrating on the block, there is not much you can do with stroking, but there is a lot you can do to bore the motor. There is the option of using a 3.8 S38B38 crank, or machining your own custom crank to stroke a motor. However, an M30 already develops boatloads of torque, so the better option in this case is to bore it to increase displacement and thereby concentrate on making more horsepower rather than torque. The options to boring are basically anything between 92 and 94.5mm (S38 B38 specs). It is known that the S38 B38 had some cylinder wall thickness issues, so maxing out at around 94mm bore is probably preferable. Of course you can use 93.4mm and keep a stock BMW dimension (e.g. S38 B36 specs). Therefore, Custom JE forged pistons that raise the compression to at least 10:1 and have a 94 mm bore. Raising compression is going to be a function of fuel use and head work. If you're using a B35 head and premium fuel, you can probably safely raise compression to around 10.5:1 (Alpina had these ratios in the mid-80s, but with a highly reworked combustion chamber.). If fuel quality is a question, or you don't want to be too aggressive, then 10.2:1 to 10.4:1 is a very reasonable compression ratio for these motors, especially if you are using a piano-top style piston profile as opposed to the heavily reworked Alpina style cylinder heads and pistons. However, the stock Motronic 1.3 will ping if you bump the compression by 1.5 points, therefore you will need to retard the timing that BMW built into the 1.3 with 9:1 compression.
Recommended Top End Performance can get JE Custom piston with Total Seal Rings which are far better than BMW's rings with just about any shape and compression ratio you want. They have blueprints and records and can do anything you want. Now, radius the con rods as that will increase strength. Of course I suggest using new con rods bushings and bearings. Custom, strengthened, and lightened con rods are available from Top End, should you go this route. Use the stock 86 mm stroke crank, but have it cross drilled and rifle bored, if you can. This will increase low end oil pressure and also the life of your rod end bearings which is a good thing because you will be making a lot of power. Now, you start to assemble the bottom end. Pistons, rods, crank. Then you get to the oil pump. You need to use an E28 oil pump because without it, you will not be able to bolt on the E28 oil pan which is necessary to clear the subframe in an E28 or E24 (that is if you're starting with a E34 or E32 engine). Now you have the bottom end built. I suggest using a lightened flywheel also from Top End Performance. 15lbs is light enough and an M5 clutch should do you. There have been people who’ve gone for 12 lb or lighter flywheels with success, albeit these are non-AC equipped cars. The later Motronics can probably handle the idle better too if you go for that light a flywheel.
Now that you have the bottom end together, it is time to work on the top end. Let me just say, that with the bore increase you will have a 3.58L motor. Also please don't forget it is important to use the E28 motor mounting arms so you can bolt the block to the subframe. I also suggest using 2 of the left side motor mounts from an M5 as they are stronger than the stock units (or the M535i mounts as those should be the same). Be sure you do not ”˜He-Man’ torque them, as this will shear the rubber mounts. Speaking of torque specs, it is vitally important that one follows them! Do not under any circumstances over or under torque critical fasteners such as on a motor. Always follow the BMW torque specs.
As for the head, use a stock B35 head to start. It’s now time to invest in machine shop experience, and begin by skimming it to make sure it is flat. Port and polish it, and also do a three angle valve job ”“ most engine builders who specialize in older BMWs and race motors can effectively do this service. Depending on what cam you are running you might want larger valves but I think that the 47 mm intake and 38 mm exhaust are just fine (although 47mm / 39mm will do you well too). Top End Performance again has loads of experience here and can make custom stainless steel valves for you. Anything larger than 47 / 39 will require custom valve seats and more headwork to get them to fit correctly. New guides, seats, etc. are a must. Then radius the (new) rockers which will give them added strength for the extra duration and lift of the cam. Now I suggest using Metric Mechanic progressive rate valve springs (Edit: the dual valve springs from MM are no longer available, and thus we'd recommend going with dual valves springs that Top End sources) and also their head oiling upgrade kit (which is a crimped oil sprayer bar to improve oiling a the cam). You can use titanium retainers if you like, depending on the RPM you’re expecting out of the motor this might be more or less beneficial. You can use pretty much any cam you want, but I suggest not going below a 280. Using a Shrick cam design (284 or 292) on a custom grind is preferable. Top End can provide these, as well as almost any other good engine shop with experience in BMW motors. An adjustable cam gear will let you advance and retard your cam for better performance or better economy. This might be particularly useful in final tuning.
For the head gasket, I believe you can use the early big six, with the 93.4mm bore gasket, but I would suggest getting a custom one with a solid metal ring in it so that you have less chance of blowing the gasket. These are again available at almost any good custom engine builder shop specializing in BMWs (e.g. Top End). MLS gaskets have also been recommended, but have a strict requirement for surface finish RA. Cometic have a good product that works well with older motors, particularly M30s.
On to the intake and exhaust... For the intake I would suggest starting with the E34 M30 B35 intake, and then port match it to the head. Extrude-hone will cost a pretty penny, but will give you the maximum flow possible out of the stock casting. As for the exhaust, custom headers are in order that have 1 1/2" ID primaries that go into dual 2" collectors at minimum. Custom track pipe to mate up with the collectors and I'd recommend an E28 M5 exhaust if possible. These exhaust dimensions are basically the minimum you can run...although it'd be preferable to run something slightly larger. A good tuning book (e.g., A. Graham Bell's "Four Stroke") should offer some insight into a custom exhuast. You should also be able to use the E24 M30 b35 intake bracket to support the intake to the block.
There are two options for a individual throttle body system. The first is to attempt to retrofit the M5 intake system. This requires at a minimum fabricating adapters from the head to the M5 intake runners. It also requires investigating the choice of fuel rail, as the M88 or S38 rail and FPR will not clear the t-stat housing on the M30. Similarly, the TPS switch will have to clear the t-stat housing. To do this the adapters have to be angled so as to point the intake runners above/below the t-stat housing and rad hose. The other option is to get the Weber DCOE adapter brackets from Redline Weber (Redline Weber part # 99004 094). The castings aren’t that great, so porting and polishing them is a must. However, 40mm or 45mm Weber fuel injection ITBs can then be bolted onto these. Again, one of the flanges near the t-stat housing has to be shaved a bit to clear, and I have not verified if the TPS switch will clear the t-stat housing and rad hose, but this looks to be more a ”˜bolt-in’ solution. Additionally you’ll need a custom intake plenum. http://www.jameng.com and http://www.twminduction.com are both good sources for the ITB components, as well as Top End Performance can order anything from Redline Weber.
Fuel system and engine management: Use either custom engine management (Megasquirt, etc.) or Motronic 1.3 out of the late '88 and '89 E24, along with the engine harness. Update the ECU to #179 (#150 is Motronic 1.1). This is because the Motronic unit will then mount in the same place as the one currently in the car, and Motronic 1.3 is adaptive enough to run this motor well. It is necessary to retard the timing a bit as the 1.3 was set by BMW with 9:1 compression, although this seems to be an issue (pinging that is) at lower rpm, high load conditions, for engines with ~9.8:1 compression or higher. I would then suggest a dyno day and a custom burnt chip. As for fuel system, I suggest running Mustang 24 lbs/hr injectors at minimum at 3.0 bar, but depending on your fuel requirements you may need to up that to 27 or 30 lb/hr. The Bosch Motronic 1.3 in limp-home (open loop) mode with the 179 ECU and 24 lb-hr injectors runs my (Chris’s) engine around 11.8-13.0:1 AFR, or very rich. Idle is right around 14-14.5:1, and off-idle there is no hesitation. And the 3000 - 3500 rpm range is butter smooth. Cam seems to ”˜come on’ around 3700 rpm, although after 100 miles of break in I’ve not yet gotten past 4000 rpm, nor gotten past a throttle.
I would also suggest using a big bore throttle body because you will need as much air as possible. On this note, a Mass Air Flow Sensor conversion is in order as it will give the engine management more precise readings and also will be less of a restriction, in theory. There are and have been a number of options for MAF conversions for Motronic systems. However, it is important to note that a MAF will not in and of itself improve outright power, given similar flow conditions at wide open throttle vs an AFM. That isn't to say a well operating AFM isn't good as is - one has to remember that BMW used a AFM on the euro M5/M6 to great effect to get 286bhp. The E34 M5 3.6 increased power to 310 bhp, but included improvements to the head, increased displacement, a more complex intake resonance system, and better engine management system with O2 sensor feedback, all on top of going to a MAF. And the improvement was only 24 bhp. Alpina also got 260 bhp (DIN I believe, at the crank) out of their B10 3.5 liters using an AFM. The conclusion is that, in theory, a well operating MAF will provide better on/off throttle smoothness, and part throttle improvements. If you have a well operating AFM, unless one goes to standalone fuel injection system, it is not necessary to get a MAF. But in theory, a well operating MAF can provide some improvements over a AFM.
With regards to cone filters, their maintenance IS A MUST. Never leave a K&N or similar filter un-oiled. However, a stock air filter system works just as fine as well. Lots of work can be done here to 'dress up the engine bay' since a cone filter in and of itself will not do you much good in terms of power. Additionally, an oiled filter fitted too close to a MAF will ruin it in short order.
As for oiling system, I would try to run the euro E28 oil filter canister and housing because I would never run this motor without an oil cooler, which BMW's bolt on approach here will work just fine.
Rob and myself have built an engine very similar to the 'clean sheet' recommendations we have written above. These are a summary of the results as of October 2007:
Engine rebuilt with following specs:
Ӣ M30 B35 out of E24
Ӣ 10.45:1 custom JE forged pistons, total seal rings
Ӣ M90 head gasket
Ӣ Bored to 93.4mm (3535cc total)
Ӣ New con rod bushings, bearings, main bearings, etc; rods and pistons balanced to within 0.7 grams of each other
Ӣ 15 lb Top End Performance flywheel
Ӣ Larger, stainless steel valves (47mm / 39mm)
Ӣ Ported and polished intake and exhaust ports
Ӣ 3-angle valve job; new seats, new seals, etc.
Ӣ Metric Mechanic peened rocker arms
Ӣ 294 deg custom ground cam (Top End Performance, style 290MM)
Ӣ Dual valve springs, titanium valve retainers
Ӣ All new valvetrain components
Ӣ Hartge Headers (yet to be installed)
”¢ Custom, dual 2.25”a exhaust with high-flow catalytic converters (yet to be installed)
”¢ Motronic 1.3, with custom burnt chip (Mark D’Sylva)
Future project tasks (as of October 2007):
”¢ Custom tuning with Mark D’Sylva using EPROM emulator and Innovates DAQ, once engine is broken in
Ӣ Finish custom exhaust
Ӣ No full dyno sheets until engine is fully broken in! (A 3000-mile process)
Updates:
Dec 2007: Mark D'Sylva has burned an equivalent of an Alpina B10 3.5 chip for the motor and we have installed it to great effect. The fueling maps are spot on (as shown above). And we will be letting the motor run closed loop as soon as the data logging systems are in place. The response in the engine is very smooth and progressive so far up to the 4500 rpm break-in imposed rev limit (we only have 300 miles so far on the motor). The ignition timing is far more retarded than the stock chip, although we have gotten on the verge of pinging at 2000 rpm-3000 rpm in 4th and 5th gear at higher loads going up hills (not fuel ping, but timing ping, as you can tell the chip is trying to advance the timing under the load and conditions). Nonetheless the engine can be driven around on a 'normal' basis and the chip works very well. Idle is at 1000 rpm upon initial installation. More updates to follow after the 300 mile break-in service (valve adjustment, oil change, etc).
Jan 2008: The 300 mile break-in service was complete. Motor is now running closed loop (O2 sensor connected). The idle is a but lumpy, but better than before the valve adjustment, and not unexpected with the cam and lack of headers. Also the Evap valve is operating and I needed to close off the supply hose since I have no evap cannister on my car. Fueling is spot on. It's noticeable how the ECU is learning/adapting as I drive the car more.
Jun 2008: Installed the knock sensor (Knock Link) to monitor pinging. Pinging under load can be heard/measured in higher gears (3rd, 4th, 5th), when leaning on the throttle from 2000 rpm on. Basically I figure that at >75% or >80% throttle, in those conditions, the timing is too advanced. Fueling has been spot-on since O2 sensor has been connected.
Nov 2008: Innovates LM-2 has been installed and now I can collect data. Engine has 600 miles on it - yes, I know, but I've been far too busy with work since the summer. I did an acceleration test run through 3rd gear on the street, short shifting at 5000-5500 rpm. With a 3.73 diff, and OD gearbox, I hit 60 mph at about 4250 rpm in 3rd gear. During the test, I only accelerated to about 80% throttle, since I was on the verge of pinging in 3rd gear. 1st and 2nd were not full throttle, but hard to say exactly what percentage.
Dec 2008: Replaced spark plugs from W8LRC to W8DC at 600 miles. Old plugs seemed to be operating within temp range, but some cylinders had some carbon/ash deposits that had not burned off - combination of rich running and cold starting, I figure, from the lack of use/driving the car saw over the summer/fall of 2008. Have purchased a chip emulator and will test a few custom files that will have backed off the timing to see if I can get the pinging to stop under high load conditions in the upper gears. 700 miles on motor so far...500 miles to go until the 1200 mile service to be done in January.
Sep 2009: In the spring of 2009, while having the engine in for it's valve adjustment and oil change, it was noticed that the intake rear rocker shaft was misaligned. Further investigation revealed that the wrong shaft was installed, and the head had to be removed and reassembled. In addition, the MLS was leaking slightly from the front edge on the exhaust side. This was replaced with a stock BMW M90 head gasket (actually a thicker one, as I wanted to lower the compression from the 10.6:1 to 10.45:1 to help the pinging). Car was finished in June, and I drove it on a 500 mile trip in September to finish the break-in. Oil consumption was 1/2 quart, plus the addition of another 1 quart in the process to refill all the head crevices from the engine rebuild. More data was collected, and it is possible to hit full throttle in 1st, 2nd, and 3rd in most cases. 4th and 5th still pings. AFM voltage indicates I'm getting near full flap open at 6200 rpm. I also replaced the spark plugs with the W7DCs, since the W8DCs indicated they were running too hot, and I needed to get a colder plug. That is unsurprising since Alpina ran the W7s in their B9s and B10s. Motor has 1450 miles on it now.
Written by Rob Anderson '01 (Edit: Chris Graff '06, ”˜07, '08
Some results on engine conversion
Based in large part on our discussion about engine building, I'm very pleased w/ the results of my b34-b35 combo.
Running the older Motronic I produced 206 hp and 219 ft lbs with the new motor. The old stock (w/ JimC) motor, on the same dyno 18-20 months earlier was 156/164 as I recall.
Torque comes on around 3400 and lasts thru peak HP at 6200. Shifting at peak drops me into the torque band and all's well.
Dyno done late '02
M30 Oil Cooler Information
The M5 and M535i have oil coolers, even the Euro 535i has an oil cooler, so why doesn't mine? Well it does now. I spent a lot of time looking into putting in a oil cooler. The one main problem I ran into was the fact that no aftermarket housing would bolt onto the block. This means that the oil filter housing has to be replaced with one from one of the previously mentioned cars, and M635csi and M6 and Euro 635csi(post '82). These are not very easy to come by and are very expensive from BMW.
I was able to find a used housing off of an M5 and then started at a cooler. I orignially purchased a Euro 635csi cooler and lines. This cooler fit in to the car, but the lines did not come close to fitting. I then looked into replacing the lines with ones from a US M5, but I found that the design of the M5 cooler is different than that of the Euro 635csi. I then looked into getting a cooler from an M5, but those aren't easy to find. So I found that a 524td has the same oil cooler as an M5!! But the coller lines are not the same. I looked into what lines to use. I thought that I might be able to use a Euro 535i or M535i line, but since I have the big US bumpers, they won't fit.
I then looked into what car has US bumpers, and an oil cooler. The only car is the US M5. Then with a quick check of part numbers, I found that the US M5 has diffferent lines than any other 5 series. I also was able to find an M5 that I was able to look at and found that behind the airdam the US valance was still fully intact. This gave me the confidence to purchase the expensive M5 oil cooler lines and install the cooler. The installation was fairly simple, but required the removal of the aux. cooling fan, and the front grills. The lines were the first things to go into the car, and require the bending of a small tab from the lower valence down. Once the lines were in, I placed the oil cooler in the car. I had to make custom brackets to hold the cooler, but once that was done, everything bolted together. I made sure to put oil into the cooler before I bolted everything together so that I didn't have a lack of oil pressure when I started the car. Now the car has a cooler and I see lower oil and water temperatures.
Written by Rob Anderson '01
M30 B35 and B34 Cylinder Head Differences
There were a few major difference between the early B34 engine (3430cc engine found on the E23, E24, and E28, between the dates of 1982 and 1988, depending on model) and the B35 engine (3430cc engine found on E24, E32, and E34 models between the dates of 1987 and 1993, depending on model). The following photos show the B34 and the B35 engine cylinder head and intake ports. The basic differences between the B34 and the B35 engine are as such:
B34 combustion chamber volume: 58 cubic centimeters
B35 combustion chamber volume: 65 cubic centimeters
B35 camshaft: 264 degree. Same as the B34 high compression (euro) engine.
B35 inlet valve is 47mm instead of the B34's 46mm.
Inlet port size is much larger on the B35, with better line of sight.
The photos show the difference in the combustion chamber volume and shape. There is more "scavenging"; or volume around the inlet and exhaust valves in the B35 head. Also the B35 head has smaller ledge/overlap at the edge of the head over the piston. Note the distance between the headgasket edge and the edge of the combustion chamber.
B34 Engine Picts:
B35 Engine Picts:
Comparisons
The pistons on the B34 engine are either an 8:1 low-compression piston, or a 10:1 high compression piston. The 8:1 pistons have a deep dish, and are cleary recognizeable. The 10:1 pistons have a dome, with a grand-piano-esque shape. These are shown below. The B35 engine has 9:1 compression pistons, where the shape of the dome is much better for combustion characteristics. The edges are pushed up, while the center of the piston remains lower. This allows the combustion chamber shape to be much more rounded, and thus with the differently shaped head allows for better combustion, squish, and swirl characteristics.
Right,
Engine.
Best engine to use is from an E34/32, 535i/735i. from around 88 onwards.
This later engine had bigger valves, better management etc.. but it does have low compression compared to the earlier E28 engines and in return slightly less power, a head skim will sort this out.
Standard E34/32 is 211bhp with 220 lbft, a 1mm head skim will give 220bhp with 238 lbft.
Earlier engines were 220hp
If you do go for an earlier engine you will have to blank the coolant pipe at the back of the head and im certain the sump is different too, it can be done but much easier to use the late engine.
Lets presume your using an E34/32 engine,
the only custom part needed is the engine mounts, everything else is OEM bolt on parts and if you start with a 325i this swap is very simple to do.
Basic parts list to get it in a 325i
M30 engine & gearbox
Custom engine mounts
Electric fan
E34 throttle cable
The rest you already have.
Basic Parts list to get in ANY E30.
M30 engine & gearbox
Custom engine mounts
E30 M20 rubber mounts
E30 325i exhaust
E30 M20 radiator <must be in good conition, (prefered choice is E28 535i rad)
E30 325i gear linkages
E30 325i manual prop
E30 325i gearbox flange
E30 M20 matrix hose (or E28 T piece)
E34 throttle cable
Electric fan
Those lists are to just get the engine in and useable, upgrades like larger bore exhaust, bigger rad etc can be added later on.
Custom mounts.
.de mounts can be used at roughly £140, & let you bolt the engine straight in. or you can get virtually the same item from me at £100 delivered.
You can have a go at making your own but you must get the engine perfect in the bay, the M30 is a big engine!
First of all it needs to be dead centre in the bay, then get it sitting at the right angle, then get it at the right height so it doesnt hit the crossmember but then you also need to make sure you can shut the bonnet, then you need to get it pushed back.
Custom mounts.
Fitted
You can use standard M20 rubber mounts with them or anything 50mm thick.
Im using Landrover V8 mounts with a spacer to get them up to 50mm, they are good and strong (cheap too) other alternatives are the uprated M20 ones from Burton motorsport.
Link?
There are 2 positions on the mounts.
I'd recommend using those that place the engine furthest back (position 3). You may have clearance issues with the bulkhead in postion 3 (some dont) if you do you can massage the bulkhead with a mallet just where the head sits,dont bash too much as the brake linkage sits behind it.
If you use the furthest forward position, you'll have virtually no room for a radiator, as well as worse weight distribution.
This is position 3
Clearance to E28 535i radiator in position 3
Gearbox.
All M30 manual gearboxes will fit a late engine, not all M30 gearboxes fit earlier engines.
Clutch/flywheel.
If you are using the M30 gearbox you can use the standard dual mass flywheel and matching clutch or use an E28 M30 (or any M30 of the same era) flywheel which is single mass and much lighter.
E28 535i = 10KG
E28 525i = 7.5KG
You can use 'any' single mass M30 240mm friction plate but must use a 3.5 pressure plate to handle the power.
Aftermarket single mass flywheels are available which can use the dual mass clutch, BBB do them
To round up E28 flywheels are lighter than E34 ones, so go for one of these if you can! You'll need the clutch to match (the E34 cluch won't work with an E28 fly for example) - I'd certainly recommend a new clutch while it's out & easy to change...
The M30 gearbox bolts to the shell using standard E30 gearbox crossmember and standard gearbox mounts.
An E30 325i gear linkage is needed to make the gear lever stick up in the right place...
M20 or M30 clutch slave cylinder can be used.
M10 gearbox...............
Prop
1: E30 M3 prop. This has the correct flange to bolt to the E30 diff & M30 box.
2: E36 328i prop with centre bearing mod.
3: Custom prop can be had for around £100
4: Gearbox flange swap - you can swap the flange on the back of an M30 box for one from a M20 325i, please note it must be 325i as for some reason the 320i is different. Then a M20 325i manual prop can be used.
Popular choice is number 4 as its easily available and can cope with the torque.
Wiring.
Using the M30 engine loom, some minor modifications are needed... Temp sensor - the brown temperature sensor on the M30 block will need swapping for an E30 M20 item.
Facelift wiring mods (these apply to those with a facelift shell) - the engine will run without doing them, but for everything to function correctly (rev counter etc), the following are needed;
You need to swap pins in the M30 loom, or cut wires.
Pin 3 (black and white) and pin 8 (black and purple).
To get the electric windows and sunroof to work with the doors shut and for the heater blower to work at all you need to connect the black and green wire from pin 15 on the E30 C101 to a suitable earth on the body (mine is on the bonnet roller guide)
Power distribution block - there is a power distribution block on the E32/34 loom, near the ECU, that needs a direct live feed to it.
Coil will need to be moved to the suspension tower so the wires reach, also it give more room for the airbox
There are a few details of the later C101 (25 pin) being used here...
http://www.e30zone.net/modules.php?name ... highlight=
ECU
The standard E32 / E34 ECU should be used although M20 ECU's will work with the M30 eprom chip fitted inside.
The M30 loom will allow it to be fitted under the dash, but getting all of the connectors through the bulkhead is a PITA! The loom is also slightly short - you have to rotate the ECU 180 degree to allow it to bolt in place.
Plumbing
You'll need an E32/E34 top hose, with the built-in T-piece to the heater matrix. This T-piece goes to the bottom connecton on your heater matrix.
You need another T-piece to go in the pipe from the thermostat housing to the header tank (from an E28; BMW part number # 11 53 1 272 866). You can then connect from here to the top connection on your heater matrix.
Or use a mixture of M20/M30 hoses to make the T piece up, front half M30, rear half with it already having the T to take off to the header.
Header tank.
If you've got a pre-facelift shell, you'll need to move your header tank - the stock location is in the way of the air intake. A facelift m20 header tank sits nicely on the nearside wing - you'll need to extend the level sensor wiring round to it. It can obviously stay where it is if you're starting with a facelift m20 shell, It is possible to use the M30 one and fix to the bulkhead but there is really no need as standard E30 works fine.
Radiator.
You can use a standard E30 radiator - a new 325i rad will do the job but a M30 is a big engine in a small E30 engine bay and heat is an issue so a bigger radiator is preferable.
An E28 m535i radiator is loads bigger than an E30 rad and fits perfectly. There are even unused holes in the shell that you can bolt it up to.
If using the E28 rad you will need an E28 bottom hose to reach the lower bottom stub or extend the original E34 one like this.
An E34 535i radiator can also be used but it must be non aircon type, aircon rads wont fit between the chassis rails.
To mount the E34 radiator you can use the standard 325 bottom plastic 'cup' mount on the right hand side and another right hand side one on the left hand side, riveted to the body as it doesn't clip in quite perfectly. The radiator sits in this like it was made to measure!
The crankshaft pulley will be very close to the radiator whichever you use. Unless you're keeping the M30 aircon setup (& I very much doubt you are!), you can chop the air conditioning belt drive part of the pulley off, simply by running an angle grinder down the middle of the 'V', it removes the spot welds and the two halves fall away.
Fan
You wont fit a viscous in there so electric is the way forward, there will be details elsewhere in the Wiki/e30zone if i find a link ill post it up.
Airbox
The E32/E34 airbox fits just fine in the E30 bay. It's got a built in heat shield too - a distinct bonus as it sits above the exhaust manifold... Aftermarket options are out there and if you go down that route make sure its shielded from the heat.
To fit the standard airbox you will need to move the washer bottle. An alternative bottle can be fitted to the E30 airbox mount or the standard location - an E34 non-intensive bottle is a nice fit also a 324td washer bottle (p/n 6166 1385 280) is ideal.
Standard M30 airbox with E34 wash bottle.
After market filter with air tight heat shield and E36 washer bottle.
Throttle cable.
The M20 throttle cable is too short - use one from an E32/E34 - about £15 brand new from BMW or off your donor.
PAS.
Use the M30 PAS pump with M20 hoses.
Exhaust/manifolds
The issue here is clearance to the steering coupling with none E34 manifolds.
An E28 manifold is apparently a nightmare in this respect, & the E32 item (with a flexible coupling in the front section) would also have needed lots of work. The E34 item fits perfect and clears the standard rack.
E34 downpipes can be used, usually cut off before the front box.
Some minor custom work will be needed to get from here to the back of the car.
An easy fix is to cut the M30 downpipes just after the gearbox then cut an M20 325i system slightly longer and slide it into the M30 downpipes.
M30 pipes ID 50mm, M20 ID 46mm so its a perfect fit with no welding required.
Chopped E34 downpipes.
Chopped 325 downpipes.
325 downpipes clamped into the E34 pipes.
Perfect choice is a system that is 50mm pipes straight through as BMW intended but a 325i system will do the job just fine.
Fitting an E36 rack.
Apart from the obvious when fitting a quicker rack, ie spacers, different hoses etc..With an E36 rack the pinion is closer to the manifold so it needs cutting and moving closer to the block by circa 20mm.
The rear manifold clears fine but its the long front manifold that needs modding.
The route i went down was cut the flange off the manifold then put some new pipe in angled towards the engine.
Mocked up and cut to size.
Manifold welded up.
With a slight kink to get it closer to the engine (manifold upside down)
Straight line through to show how much its bent over compared to standard.
Mocked up on the engine, cant really see in the pic but theres about 20-25mm clearance to the linkage.
There you go.
----------------------------------------------------
Tuning a M30
Taken from here http://www.m535i.org/officers/ra/article.html
High power M30
The best way I have found to get a lot of NORMALLY ASPIRATED power out of an M30 is to do the following.
There are many places and wishes from where one can start. People may have Alpina or Hartge motors to start with, or want to keep as much of the original head/block as possible to have a 'numbers matching' car.
The pathway to a high-power M30 depends on the end-goal. The 3.5 liter racing motors in the 70s produced nearly 400 bhp, but are anything but streetable. Whereas the last incarnation of the production M30 had 208 bhp (US) and was a very smooth operator in the 3600 lb E32s.
For the purposes of this article, we will divide the ”˜horsepower goals’ into 4 divisions: 210-240, 240-260, 260-280, and 280+. 210-240 bhp is a reasonably easily achievable goal without a large outlay of cash.
A few options include the following:
Options for 210-240 bhp range:
Start with a euro B34 high compression motor or a B35 motor. Modifications include: Headers and full dual 2”a exhaust, B35 intake manifold with port matching, larger throttle body, 19 lb-hr injectors, updated chip. Reasonable estimate of power is 230-240 bhp. Hartge and Alpina were able to get this type of power using Motronic and L-jet in the 80s, keeping the stock displacement. Other options include a MAF. Similar figures can be obtained from a M30 B35, albeit probably not quite as high due to lower compression ratio. 230 bhp is a reasonable estimate in terms of bolt-on modifications for a B34 HC or B35 motor. The best that a B34 low-compression motor can do with simply bolt-on modifications (chip, exhaust, intake, injectors) is perhaps about 200-210 bhp. The problem is that upgrading the cam will not benefit you due to the low compression.
Typical costs (estimated total: under $2000):
Header: $500 + additional fitment work downstream
B35 intake manifold: $200
Chip: $200 (new)
Injectors: $250 (new)
MAF: $600-1000 (new, est.)
Options for 240-260 bhp:
This range of power effectively requires head work, and preferably a bump in compression ratio. Ideally the compression ratio would be 9.5:1 or higher (the euro B34 already has 10:1, but the B35 has 9.0:1). Running a stock chip on either the Motronic 1.0 from the euro B34 or the Motronic 1.3 (recommending the 179 ECU) is probably reasonable if your compression ratio bump on the B35 is only to 9.5:1. Headwork ought to include the standard larger intake values (47mm) and preferably the exhaust valves (to 38mm). A camshaft is a must, preferably 284 degree Shrick or equivalent. Replacement of valvetrain components is always recommended. Porting and polishing the head is also recommended. At this point the B35 intake is recommended, although Alpina claimed 254 bhp using the holder style intake. Headers are a must, as are dual 2”a exhaust all the way. MAF conversion is a good option, as are big-bore throttle body. Note, both Alpina and Hartge used >10:1 compression to get over 250 bhp. And Alpina used Motronic 1.1/1.3 on its later motors with 254-260 bhp.
Typical costs (estimated total: $5000-$7000):
Header: $500 + additional fitment work downstream
B35 intake manifold: $200
Chip: $200 (new)
Injectors: $250 (new)
MAF: $600-1000 (new, est.)
Camshaft: $400 (custom grind)
Head work: $2000-3000 (see Top End Performance website)
Pistons: $1000 (see JE Custom pistons)
Wiring harness and ECU: $400 (used, estimated)
Throttle body: $200 (service, based on Big Coupe Group list)
Options for 260-280 bhp:
On top of what was said above, now’s the time to consider a full B35 intake, 47/39mm valves, increased displacement, dual 2.25”a exhaust and headers, big bore throttle bodies, 24 lb-hr injectors, and FI system updates/modifications that can include going to a newer Motronic, custom chips, MAFs, or other options. Over 10:1 compression is a must in these cases. Reworked combustion chamber shapes, a la Alpina, can also be considered in this case.
Typical costs (estimated total: $7500-$10,000+):
Header: $500 + additional fitment work downstream (more than $1000)
B35 intake manifold: $200
Chip: $200 (new)
Injectors: $250 (new)
MAF: $600-1000 (new, est.)
Camshaft: $400 (custom grind)
Head work: $3000-4000 (see Top End Performance website)
Pistons: $1000 (see JE Custom pistons)
Wiring harness and ECU: $400 (used, estimated)
Throttle body: $200 (service, based on Big Coupe Group list)
Tuning services: varies
Suggestions for 280 bhp+:
On top of the above: increased displacement and mild stroking, reworked combustion chambers, individual throttle bodies. At this point, 10.5:1 compression is probably required, as well as custom-tuned FI system. MAFs are highly recommended.
Typical costs (estimated total: $10,000+):
Boring motor: $400-600 (estimated)
ITBs: $600 for adapters, $500 per pair of ITBs, estimated $600-800 in additional components (fuel rail, plenum, etc)
”˜Clean sheet’ option:
However, for the purposes of this whitepaper, we will assume to start off with an M30 B35 motor, and build a streetable, reliable, but high horsepower M30. Let’s take for example the E34 535i, or a late E24 635CSi. Concentrating on the block, there is not much you can do with stroking, but there is a lot you can do to bore the motor. There is the option of using a 3.8 S38B38 crank, or machining your own custom crank to stroke a motor. However, an M30 already develops boatloads of torque, so the better option in this case is to bore it to increase displacement and thereby concentrate on making more horsepower rather than torque. The options to boring are basically anything between 92 and 94.5mm (S38 B38 specs). It is known that the S38 B38 had some cylinder wall thickness issues, so maxing out at around 94mm bore is probably preferable. Of course you can use 93.4mm and keep a stock BMW dimension (e.g. S38 B36 specs). Therefore, Custom JE forged pistons that raise the compression to at least 10:1 and have a 94 mm bore. Raising compression is going to be a function of fuel use and head work. If you're using a B35 head and premium fuel, you can probably safely raise compression to around 10.5:1 (Alpina had these ratios in the mid-80s, but with a highly reworked combustion chamber.). If fuel quality is a question, or you don't want to be too aggressive, then 10.2:1 to 10.4:1 is a very reasonable compression ratio for these motors, especially if you are using a piano-top style piston profile as opposed to the heavily reworked Alpina style cylinder heads and pistons. However, the stock Motronic 1.3 will ping if you bump the compression by 1.5 points, therefore you will need to retard the timing that BMW built into the 1.3 with 9:1 compression.
Recommended Top End Performance can get JE Custom piston with Total Seal Rings which are far better than BMW's rings with just about any shape and compression ratio you want. They have blueprints and records and can do anything you want. Now, radius the con rods as that will increase strength. Of course I suggest using new con rods bushings and bearings. Custom, strengthened, and lightened con rods are available from Top End, should you go this route. Use the stock 86 mm stroke crank, but have it cross drilled and rifle bored, if you can. This will increase low end oil pressure and also the life of your rod end bearings which is a good thing because you will be making a lot of power. Now, you start to assemble the bottom end. Pistons, rods, crank. Then you get to the oil pump. You need to use an E28 oil pump because without it, you will not be able to bolt on the E28 oil pan which is necessary to clear the subframe in an E28 or E24 (that is if you're starting with a E34 or E32 engine). Now you have the bottom end built. I suggest using a lightened flywheel also from Top End Performance. 15lbs is light enough and an M5 clutch should do you. There have been people who’ve gone for 12 lb or lighter flywheels with success, albeit these are non-AC equipped cars. The later Motronics can probably handle the idle better too if you go for that light a flywheel.
Now that you have the bottom end together, it is time to work on the top end. Let me just say, that with the bore increase you will have a 3.58L motor. Also please don't forget it is important to use the E28 motor mounting arms so you can bolt the block to the subframe. I also suggest using 2 of the left side motor mounts from an M5 as they are stronger than the stock units (or the M535i mounts as those should be the same). Be sure you do not ”˜He-Man’ torque them, as this will shear the rubber mounts. Speaking of torque specs, it is vitally important that one follows them! Do not under any circumstances over or under torque critical fasteners such as on a motor. Always follow the BMW torque specs.
As for the head, use a stock B35 head to start. It’s now time to invest in machine shop experience, and begin by skimming it to make sure it is flat. Port and polish it, and also do a three angle valve job ”“ most engine builders who specialize in older BMWs and race motors can effectively do this service. Depending on what cam you are running you might want larger valves but I think that the 47 mm intake and 38 mm exhaust are just fine (although 47mm / 39mm will do you well too). Top End Performance again has loads of experience here and can make custom stainless steel valves for you. Anything larger than 47 / 39 will require custom valve seats and more headwork to get them to fit correctly. New guides, seats, etc. are a must. Then radius the (new) rockers which will give them added strength for the extra duration and lift of the cam. Now I suggest using Metric Mechanic progressive rate valve springs (Edit: the dual valve springs from MM are no longer available, and thus we'd recommend going with dual valves springs that Top End sources) and also their head oiling upgrade kit (which is a crimped oil sprayer bar to improve oiling a the cam). You can use titanium retainers if you like, depending on the RPM you’re expecting out of the motor this might be more or less beneficial. You can use pretty much any cam you want, but I suggest not going below a 280. Using a Shrick cam design (284 or 292) on a custom grind is preferable. Top End can provide these, as well as almost any other good engine shop with experience in BMW motors. An adjustable cam gear will let you advance and retard your cam for better performance or better economy. This might be particularly useful in final tuning.
For the head gasket, I believe you can use the early big six, with the 93.4mm bore gasket, but I would suggest getting a custom one with a solid metal ring in it so that you have less chance of blowing the gasket. These are again available at almost any good custom engine builder shop specializing in BMWs (e.g. Top End). MLS gaskets have also been recommended, but have a strict requirement for surface finish RA. Cometic have a good product that works well with older motors, particularly M30s.
On to the intake and exhaust... For the intake I would suggest starting with the E34 M30 B35 intake, and then port match it to the head. Extrude-hone will cost a pretty penny, but will give you the maximum flow possible out of the stock casting. As for the exhaust, custom headers are in order that have 1 1/2" ID primaries that go into dual 2" collectors at minimum. Custom track pipe to mate up with the collectors and I'd recommend an E28 M5 exhaust if possible. These exhaust dimensions are basically the minimum you can run...although it'd be preferable to run something slightly larger. A good tuning book (e.g., A. Graham Bell's "Four Stroke") should offer some insight into a custom exhuast. You should also be able to use the E24 M30 b35 intake bracket to support the intake to the block.
There are two options for a individual throttle body system. The first is to attempt to retrofit the M5 intake system. This requires at a minimum fabricating adapters from the head to the M5 intake runners. It also requires investigating the choice of fuel rail, as the M88 or S38 rail and FPR will not clear the t-stat housing on the M30. Similarly, the TPS switch will have to clear the t-stat housing. To do this the adapters have to be angled so as to point the intake runners above/below the t-stat housing and rad hose. The other option is to get the Weber DCOE adapter brackets from Redline Weber (Redline Weber part # 99004 094). The castings aren’t that great, so porting and polishing them is a must. However, 40mm or 45mm Weber fuel injection ITBs can then be bolted onto these. Again, one of the flanges near the t-stat housing has to be shaved a bit to clear, and I have not verified if the TPS switch will clear the t-stat housing and rad hose, but this looks to be more a ”˜bolt-in’ solution. Additionally you’ll need a custom intake plenum. http://www.jameng.com and http://www.twminduction.com are both good sources for the ITB components, as well as Top End Performance can order anything from Redline Weber.
Fuel system and engine management: Use either custom engine management (Megasquirt, etc.) or Motronic 1.3 out of the late '88 and '89 E24, along with the engine harness. Update the ECU to #179 (#150 is Motronic 1.1). This is because the Motronic unit will then mount in the same place as the one currently in the car, and Motronic 1.3 is adaptive enough to run this motor well. It is necessary to retard the timing a bit as the 1.3 was set by BMW with 9:1 compression, although this seems to be an issue (pinging that is) at lower rpm, high load conditions, for engines with ~9.8:1 compression or higher. I would then suggest a dyno day and a custom burnt chip. As for fuel system, I suggest running Mustang 24 lbs/hr injectors at minimum at 3.0 bar, but depending on your fuel requirements you may need to up that to 27 or 30 lb/hr. The Bosch Motronic 1.3 in limp-home (open loop) mode with the 179 ECU and 24 lb-hr injectors runs my (Chris’s) engine around 11.8-13.0:1 AFR, or very rich. Idle is right around 14-14.5:1, and off-idle there is no hesitation. And the 3000 - 3500 rpm range is butter smooth. Cam seems to ”˜come on’ around 3700 rpm, although after 100 miles of break in I’ve not yet gotten past 4000 rpm, nor gotten past a throttle.
I would also suggest using a big bore throttle body because you will need as much air as possible. On this note, a Mass Air Flow Sensor conversion is in order as it will give the engine management more precise readings and also will be less of a restriction, in theory. There are and have been a number of options for MAF conversions for Motronic systems. However, it is important to note that a MAF will not in and of itself improve outright power, given similar flow conditions at wide open throttle vs an AFM. That isn't to say a well operating AFM isn't good as is - one has to remember that BMW used a AFM on the euro M5/M6 to great effect to get 286bhp. The E34 M5 3.6 increased power to 310 bhp, but included improvements to the head, increased displacement, a more complex intake resonance system, and better engine management system with O2 sensor feedback, all on top of going to a MAF. And the improvement was only 24 bhp. Alpina also got 260 bhp (DIN I believe, at the crank) out of their B10 3.5 liters using an AFM. The conclusion is that, in theory, a well operating MAF will provide better on/off throttle smoothness, and part throttle improvements. If you have a well operating AFM, unless one goes to standalone fuel injection system, it is not necessary to get a MAF. But in theory, a well operating MAF can provide some improvements over a AFM.
With regards to cone filters, their maintenance IS A MUST. Never leave a K&N or similar filter un-oiled. However, a stock air filter system works just as fine as well. Lots of work can be done here to 'dress up the engine bay' since a cone filter in and of itself will not do you much good in terms of power. Additionally, an oiled filter fitted too close to a MAF will ruin it in short order.
As for oiling system, I would try to run the euro E28 oil filter canister and housing because I would never run this motor without an oil cooler, which BMW's bolt on approach here will work just fine.
Rob and myself have built an engine very similar to the 'clean sheet' recommendations we have written above. These are a summary of the results as of October 2007:
Engine rebuilt with following specs:
Ӣ M30 B35 out of E24
Ӣ 10.45:1 custom JE forged pistons, total seal rings
Ӣ M90 head gasket
Ӣ Bored to 93.4mm (3535cc total)
Ӣ New con rod bushings, bearings, main bearings, etc; rods and pistons balanced to within 0.7 grams of each other
Ӣ 15 lb Top End Performance flywheel
Ӣ Larger, stainless steel valves (47mm / 39mm)
Ӣ Ported and polished intake and exhaust ports
Ӣ 3-angle valve job; new seats, new seals, etc.
Ӣ Metric Mechanic peened rocker arms
Ӣ 294 deg custom ground cam (Top End Performance, style 290MM)
Ӣ Dual valve springs, titanium valve retainers
Ӣ All new valvetrain components
Ӣ Hartge Headers (yet to be installed)
”¢ Custom, dual 2.25”a exhaust with high-flow catalytic converters (yet to be installed)
”¢ Motronic 1.3, with custom burnt chip (Mark D’Sylva)
Future project tasks (as of October 2007):
”¢ Custom tuning with Mark D’Sylva using EPROM emulator and Innovates DAQ, once engine is broken in
Ӣ Finish custom exhaust
Ӣ No full dyno sheets until engine is fully broken in! (A 3000-mile process)
Updates:
Dec 2007: Mark D'Sylva has burned an equivalent of an Alpina B10 3.5 chip for the motor and we have installed it to great effect. The fueling maps are spot on (as shown above). And we will be letting the motor run closed loop as soon as the data logging systems are in place. The response in the engine is very smooth and progressive so far up to the 4500 rpm break-in imposed rev limit (we only have 300 miles so far on the motor). The ignition timing is far more retarded than the stock chip, although we have gotten on the verge of pinging at 2000 rpm-3000 rpm in 4th and 5th gear at higher loads going up hills (not fuel ping, but timing ping, as you can tell the chip is trying to advance the timing under the load and conditions). Nonetheless the engine can be driven around on a 'normal' basis and the chip works very well. Idle is at 1000 rpm upon initial installation. More updates to follow after the 300 mile break-in service (valve adjustment, oil change, etc).
Jan 2008: The 300 mile break-in service was complete. Motor is now running closed loop (O2 sensor connected). The idle is a but lumpy, but better than before the valve adjustment, and not unexpected with the cam and lack of headers. Also the Evap valve is operating and I needed to close off the supply hose since I have no evap cannister on my car. Fueling is spot on. It's noticeable how the ECU is learning/adapting as I drive the car more.
Jun 2008: Installed the knock sensor (Knock Link) to monitor pinging. Pinging under load can be heard/measured in higher gears (3rd, 4th, 5th), when leaning on the throttle from 2000 rpm on. Basically I figure that at >75% or >80% throttle, in those conditions, the timing is too advanced. Fueling has been spot-on since O2 sensor has been connected.
Nov 2008: Innovates LM-2 has been installed and now I can collect data. Engine has 600 miles on it - yes, I know, but I've been far too busy with work since the summer. I did an acceleration test run through 3rd gear on the street, short shifting at 5000-5500 rpm. With a 3.73 diff, and OD gearbox, I hit 60 mph at about 4250 rpm in 3rd gear. During the test, I only accelerated to about 80% throttle, since I was on the verge of pinging in 3rd gear. 1st and 2nd were not full throttle, but hard to say exactly what percentage.
Dec 2008: Replaced spark plugs from W8LRC to W8DC at 600 miles. Old plugs seemed to be operating within temp range, but some cylinders had some carbon/ash deposits that had not burned off - combination of rich running and cold starting, I figure, from the lack of use/driving the car saw over the summer/fall of 2008. Have purchased a chip emulator and will test a few custom files that will have backed off the timing to see if I can get the pinging to stop under high load conditions in the upper gears. 700 miles on motor so far...500 miles to go until the 1200 mile service to be done in January.
Sep 2009: In the spring of 2009, while having the engine in for it's valve adjustment and oil change, it was noticed that the intake rear rocker shaft was misaligned. Further investigation revealed that the wrong shaft was installed, and the head had to be removed and reassembled. In addition, the MLS was leaking slightly from the front edge on the exhaust side. This was replaced with a stock BMW M90 head gasket (actually a thicker one, as I wanted to lower the compression from the 10.6:1 to 10.45:1 to help the pinging). Car was finished in June, and I drove it on a 500 mile trip in September to finish the break-in. Oil consumption was 1/2 quart, plus the addition of another 1 quart in the process to refill all the head crevices from the engine rebuild. More data was collected, and it is possible to hit full throttle in 1st, 2nd, and 3rd in most cases. 4th and 5th still pings. AFM voltage indicates I'm getting near full flap open at 6200 rpm. I also replaced the spark plugs with the W7DCs, since the W8DCs indicated they were running too hot, and I needed to get a colder plug. That is unsurprising since Alpina ran the W7s in their B9s and B10s. Motor has 1450 miles on it now.
Written by Rob Anderson '01 (Edit: Chris Graff '06, ”˜07, '08
Some results on engine conversion
Based in large part on our discussion about engine building, I'm very pleased w/ the results of my b34-b35 combo.
Running the older Motronic I produced 206 hp and 219 ft lbs with the new motor. The old stock (w/ JimC) motor, on the same dyno 18-20 months earlier was 156/164 as I recall.
Torque comes on around 3400 and lasts thru peak HP at 6200. Shifting at peak drops me into the torque band and all's well.
Dyno done late '02
M30 Oil Cooler Information
The M5 and M535i have oil coolers, even the Euro 535i has an oil cooler, so why doesn't mine? Well it does now. I spent a lot of time looking into putting in a oil cooler. The one main problem I ran into was the fact that no aftermarket housing would bolt onto the block. This means that the oil filter housing has to be replaced with one from one of the previously mentioned cars, and M635csi and M6 and Euro 635csi(post '82). These are not very easy to come by and are very expensive from BMW.
I was able to find a used housing off of an M5 and then started at a cooler. I orignially purchased a Euro 635csi cooler and lines. This cooler fit in to the car, but the lines did not come close to fitting. I then looked into replacing the lines with ones from a US M5, but I found that the design of the M5 cooler is different than that of the Euro 635csi. I then looked into getting a cooler from an M5, but those aren't easy to find. So I found that a 524td has the same oil cooler as an M5!! But the coller lines are not the same. I looked into what lines to use. I thought that I might be able to use a Euro 535i or M535i line, but since I have the big US bumpers, they won't fit.
I then looked into what car has US bumpers, and an oil cooler. The only car is the US M5. Then with a quick check of part numbers, I found that the US M5 has diffferent lines than any other 5 series. I also was able to find an M5 that I was able to look at and found that behind the airdam the US valance was still fully intact. This gave me the confidence to purchase the expensive M5 oil cooler lines and install the cooler. The installation was fairly simple, but required the removal of the aux. cooling fan, and the front grills. The lines were the first things to go into the car, and require the bending of a small tab from the lower valence down. Once the lines were in, I placed the oil cooler in the car. I had to make custom brackets to hold the cooler, but once that was done, everything bolted together. I made sure to put oil into the cooler before I bolted everything together so that I didn't have a lack of oil pressure when I started the car. Now the car has a cooler and I see lower oil and water temperatures.
Written by Rob Anderson '01
M30 B35 and B34 Cylinder Head Differences
There were a few major difference between the early B34 engine (3430cc engine found on the E23, E24, and E28, between the dates of 1982 and 1988, depending on model) and the B35 engine (3430cc engine found on E24, E32, and E34 models between the dates of 1987 and 1993, depending on model). The following photos show the B34 and the B35 engine cylinder head and intake ports. The basic differences between the B34 and the B35 engine are as such:
B34 combustion chamber volume: 58 cubic centimeters
B35 combustion chamber volume: 65 cubic centimeters
B35 camshaft: 264 degree. Same as the B34 high compression (euro) engine.
B35 inlet valve is 47mm instead of the B34's 46mm.
Inlet port size is much larger on the B35, with better line of sight.
The photos show the difference in the combustion chamber volume and shape. There is more "scavenging"; or volume around the inlet and exhaust valves in the B35 head. Also the B35 head has smaller ledge/overlap at the edge of the head over the piston. Note the distance between the headgasket edge and the edge of the combustion chamber.
B34 Engine Picts:
B35 Engine Picts:
Comparisons
The pistons on the B34 engine are either an 8:1 low-compression piston, or a 10:1 high compression piston. The 8:1 pistons have a deep dish, and are cleary recognizeable. The 10:1 pistons have a dome, with a grand-piano-esque shape. These are shown below. The B35 engine has 9:1 compression pistons, where the shape of the dome is much better for combustion characteristics. The edges are pushed up, while the center of the piston remains lower. This allows the combustion chamber shape to be much more rounded, and thus with the differently shaped head allows for better combustion, squish, and swirl characteristics.
Cypriotgeeza wrote:I done both my mates in my old 318is
felt so proud,even tried it with a E30 325i and got put in my place..
-
leeparkes
- Married to the E30 Zone
- Posts: 9538
- Joined: Thu Jan 03, 2008 11:00 pm
- Location: Black country
I think im done. 
The only thing im unsure of is what prop and gear linkages are used with a M10 gearbox set up but ill try and find out.
Also if anyone has any other info ive missed out let me know.
The only thing im unsure of is what prop and gear linkages are used with a M10 gearbox set up but ill try and find out.
Also if anyone has any other info ive missed out let me know.
Cypriotgeeza wrote:I done both my mates in my old 318is
felt so proud,even tried it with a E30 325i and got put in my place..
-
Grrrmachine
- E30 Zone Wiki / Team Member
- Posts: 8043
- Joined: Sat Feb 09, 2008 11:00 pm
- Location: Warsaw, Poland
That is a SUPERB amount of info. I'll transfer it over to the Wiki asap.
'89 325i Touring | Touring Resto Thread | In-Dash Screen install
-
Bristol_Jer
- E30 Zone Addict
- Posts: 2523
- Joined: Thu Sep 24, 2009 11:00 pm
- Location: Bristol, UK
I've got quite a few photos in my m30 build thread here: http://www.e30zone.net/modules.php?name ... c&t=188044 If they are any help to the guide as well
-
Grrrmachine
- E30 Zone Wiki / Team Member
- Posts: 8043
- Joined: Sat Feb 09, 2008 11:00 pm
- Location: Warsaw, Poland
Right, the Wiki now has two Engine Swap pages:
http://www.e30zone.net/e30zonewiki/inde ... Swap_-_M42
http://www.e30zone.net/e30zonewiki/inde ... Swap_-_M30
as well as the detailed M5x write-up:
http://www.e30zone.net/e30zonewiki/index.php/M5x
Is it worth knocking out an M20 swap page for the four-pot crowd? Also, is there a decent thread covering an S50, S52 or even S60 installation, and how that might be different to M5x?
'89 325i Touring | Touring Resto Thread | In-Dash Screen install
-
gooner1

- Out humping Reindeer
- Posts: 13280
- Joined: Fri Apr 14, 2006 11:00 pm
- Location: Northampton.For my sins.
Most definitely. Please.Grrrmachine wrote:Right, the Wiki now has two Engine Swap pages:
http://www.e30zone.net/e30zonewiki/inde ... Swap_-_M42
http://www.e30zone.net/e30zonewiki/inde ... Swap_-_M30
as well as the detailed M5x write-up:
http://www.e30zone.net/e30zonewiki/index.php/M5x
Is it worth knocking out an M20 swap page for the four-pot crowd?