my 1972 vw camper resto (long term project! )

General car chat - NO SELLING !!!

Moderator: martauto

Post Reply
User avatar
harry_p
Engaged to the E30 Zone
Posts: 5313
Joined: Thu Oct 12, 2006 11:00 pm
Location: norfolk

Thu Aug 25, 2011 10:44 pm

the story so far, cut and pasted from another forum...


Hmm, it seems i have a bit of a project on my hands.

A 1972 dormobile conversion baywindow vw camper! I think i might be fully booked for the next couple of years.

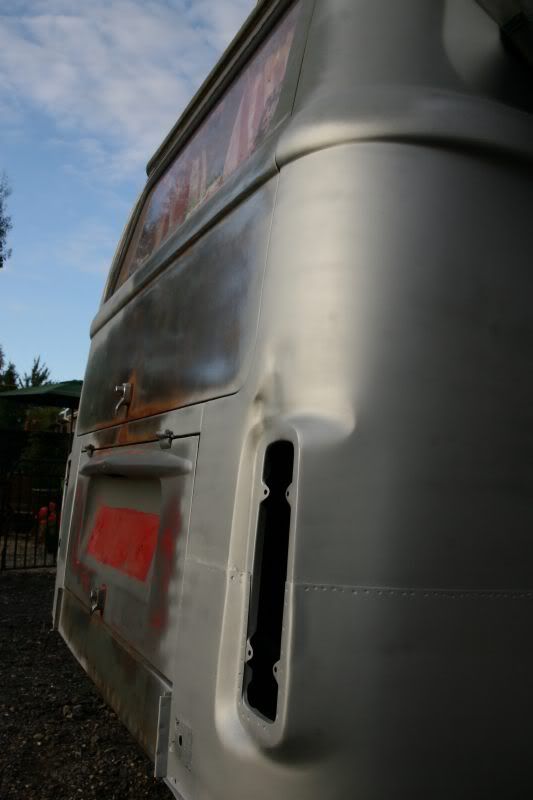
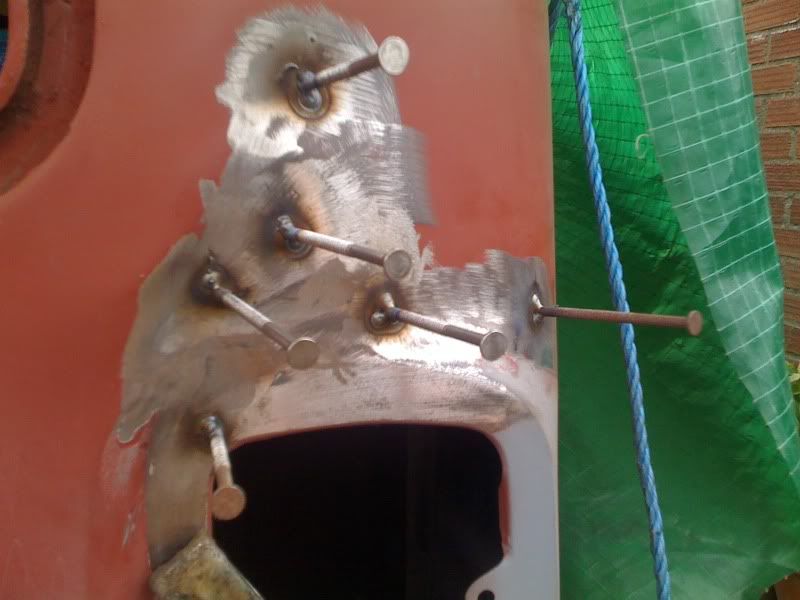
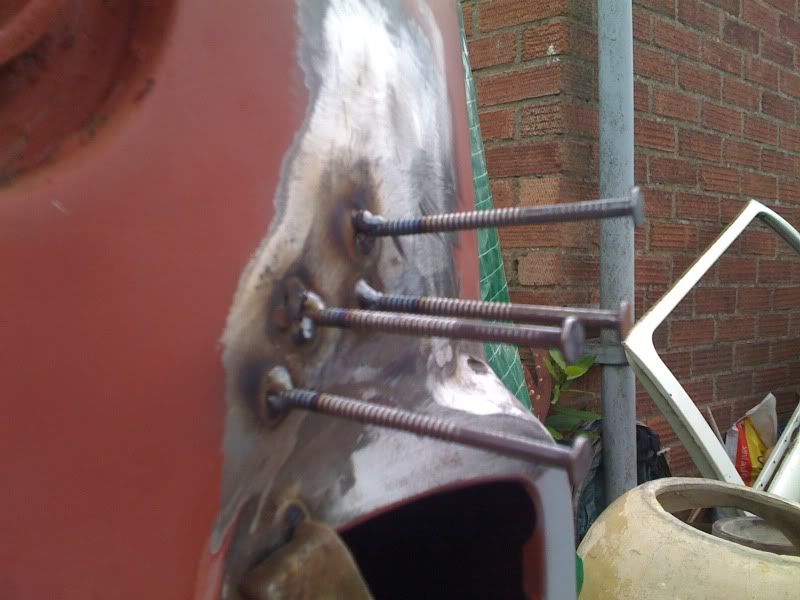
actually, I think it looks worse than it really is, most of the major welding and pannels have already been done. The doors on it in the pics are scrap ones put on to stop everything falling out, couple of really tidy ones ware included, as was a decent sliding door and a sill repair pannel for the drivers side. Front steps, rear arches, rear corners and complete front pannel have already been done.

as it arrived,
Image
Image
Image

unhitched, rope slung around the rear axle and pulled it into the back garden with the compact, very very slowly and with a bit of a smelly clutch :D

everything was unloaded, the van was literally full of parts, bumpers, fold out hammock beds, cabinets, sink, rear bed, fold out table, the engine on the floor, a decent set of engine tinware and all the lights etc.

Image
Image
Image
Image
Image

can't wait to get stuck in, although i'm going to have to rig up some sort of shelter to keep the worst of the weather off and still be able to work on it over the winter. A garage big enough to fit it in would be nice :D
cheers,

harry
User avatar
harry_p
Engaged to the E30 Zone
Posts: 5313
Joined: Thu Oct 12, 2006 11:00 pm
Location: norfolk

Thu Aug 25, 2011 10:45 pm

only going to need a couple of very small patches on the floor and some minor tidying before it's all painted white inside.
Image

cabinet unit - sink still has it's popup tap and foot operated water pump, which still seems to work perfectly! strange sliding grille which we have assumed is a sort of breadbin or something, havent seen another with the same, any other ideas, let me know. on the right is the cool box, it's polestyrene insulated between it and the cabinet, has a drain and a lid, supposed to work quite well, just bung in ice packs (or even just a bag of ice) and it should stay cool for a weekend, would be nice to find a toploading electric fridge that would fit the hole though.
Image

cutlery draw
Image

closeup of the heart of the beast ;D
Image
cheers,

harry
User avatar
harry_p
Engaged to the E30 Zone
Posts: 5313
Joined: Thu Oct 12, 2006 11:00 pm
Location: norfolk

Thu Aug 25, 2011 10:46 pm

some actual progress at last, putting stuff back rather than just removing stuff / making more mess!

Looked a bit grotty under the rearmost side window, popped it  out and found this....
Image
Image

drilled out the spotwelds allong the window edge, thankfully the inner panel had no rust at all, just surface stains from the rotten outer, cut out what i could to get a neat edge with the grinder, not easy due to the curves and limited reach of an angle grinder.

no in progress pic as i was a bit busy  ;) currently at this stage...

Image


just need to grind the welds back and A quick skim with filler, shouldnt take much, looks pretty close by eye, the whole bit is coveredwith a trim piece anyway  :)
cheers,

harry
User avatar
harry_p
Engaged to the E30 Zone
Posts: 5313
Joined: Thu Oct 12, 2006 11:00 pm
Location: norfolk

Thu Aug 25, 2011 10:47 pm

kind of lost interest over winter, and the reality of how much needed doing started hitting home so i knept putting it off. i now sort of have a plan of attack.

start at the back and move forwards. then i can get the engine in and out of the way which clears the inside of the bus and some space in my lockup. plus if i can get it running i think it would give a massive confidence and motivation boost.

decided to take a closer look at this corner as i wasn't keen on how it had been spot welded over the top which would mean needing a lot of filler almost all the way up the side of the van to try and blend the tiny step in on a flat surface,

Image

so i cut the corner off

Image

which revealed some pretty nasty bodges
Image
Image

i.e a massive overlap between the old panel and the new, totally unsealed. at least they had cut the rust out. unfortunately it also reavealed some rot in the bottom few inches of the main rear frame structure wich will need to be cut out and new pieces made and welded in., and the battery tray which looked and felt solid turned out to be half of a new tray welded into the middle of a rotten old one.

so i drilled, twisted, pulled and bashed the old tray out of the way leaving a nice big hole.
Image

the outer valance was a bit holey, i was going to chop out sections and plate it, but bought a new one instead and cut the old one off (old one can be seen on the floor on top of the new one)
Image

thankfully the rust on the rear crossmember was pretty mild and cleaned up ok.

not having a spotwelder means you need to improvise. drill a hole and weld through it, then outwards into a small circle. new battery tray attached
Image


the worrying thing is, if the previous owner had finished i can imagine it being bodged full of filler, and sold with fresh paint and mot for £8k+ imagine buying it for that and a year down the line all the filler sinking / dropping out and the rot coming back even worse than it was :cry:
cheers,

harry
User avatar
harry_p
Engaged to the E30 Zone
Posts: 5313
Joined: Thu Oct 12, 2006 11:00 pm
Location: norfolk

Thu Aug 25, 2011 10:47 pm

old double patch battery tray vs new one
Image

Rear quarter that had been randomly chopped up was trimmed square
Image

Removed rear corner cut to fit properly
Image

Tacked into place. Really struggled to get decent welds today, too much wind blowing the gas away, really doesn't look pretty.

Getting the corner on meant being able to finish a few of the smaller joining pieces, and get the gaps around the engine lid neat and square so I drilled the valance and started putting that back on too.
Image

Image
cheers,

harry
User avatar
harry_p
Engaged to the E30 Zone
Posts: 5313
Joined: Thu Oct 12, 2006 11:00 pm
Location: norfolk

Thu Aug 25, 2011 10:48 pm

ghetto dent puller

dent here above the light,
Image

which has some awkward creases and very limited access from behind.

take a load of nails, cut the pointy end off, and weld them to the lowpoints,
Image

i bought a cheap £20 slide hammer set from machine mart, and cut a slot in the 90degree attachment so i could slip it over the nail and gently pull the dent out.
as it started moving i could see / feel where it was still low, so more nails added.
Image

the first lot were cut off and the welds dressed back flush, and more added where work was still needed. really hard to see the progress in the pics, you might just be able to see the difference in the top part.
Image

once that lot was tweeked and cut off i was happy. i know i havent got the skills to get it perfect, but close enough to only need 1mm or less of filler instead of the 10mm it would have needed before.
cheers,

harry
User avatar
harry_p
Engaged to the E30 Zone
Posts: 5313
Joined: Thu Oct 12, 2006 11:00 pm
Location: norfolk

Thu Aug 25, 2011 10:48 pm

today, mostly doing what several people told us was impossible, whilst trying to sell us new bits  ::)

busses up to 76 had 13mm door hinge pins, and obviously hinges to match. one pard bolted to the bus, the other a welded permenant part of the door itself.

our early bus came with no hinges at all, and a pair of minty mint late doors, which use an 8mm hinge pin.

now, you'd think the easy solution would be to fit hinge halfs from a late bus and bolt the lot on. but you can't but the newer type, and finding secondahnd ones is near impossible plus apparently the fitment to the bus is different. we spoke to several people who told us to sell the door we had and buy another pair of the correct age. rather reluctant to do so when ours are near perfect, and ive seen some of the filler bodged shite out there.

eventually get hold of some early hinges plus pins. some measuring by eye i decide i can make them fit.

drill an 8mm hole down the middle of the 13mm pins, cut them in half so theyre the same size as the middle of the hinge, attach them to the door with some m8 bolts which will be the new hinge pins, and fit them to the but. suprise suprise, they line up fine. attach a latch mech and handle,and we have a working cab door  ;D

fair bit of fine adjustment needed, but theyre basically on and open and close.

Image
cheers,

harry
User avatar
harry_p
Engaged to the E30 Zone
Posts: 5313
Joined: Thu Oct 12, 2006 11:00 pm
Location: norfolk

Thu Aug 25, 2011 10:49 pm

been cleaning up the engine bay as i want to get it 'finished' before the engine goes in, and it's been a nightmare. ive been climbing under and sitting in there paint stirpping, sanding, rust removing, and finally rust converting any reminants before using plasticote metal protect primer and gloss white paint.

i was planning on just bunging a loat of matt black everywhere, but the mrs had other ideas  :panda) to be fair, she made a few good points, it will make it a lot lighter and brighter and easier to see what youre doing, which will be handy as you have to do any repairs whilst peering through a letterbox, and should make leaks etc easier to spot.

i also found the fuel tank which looks to be absolutely spotless, it's in a nicely sheltered place anyway!
Image

the cover got painted and bunged back on to see how it looked,
Image

this morning i had had enough prep and finally put some paint on, only the engine bay sides, ive not finished with the corner trays yet. everything above the wavy metal line is classed as the cool air zone and blocked in by plates attached to the engine. everythin bellow is the hot zone where the air blown over the engine exits, and where the exhausts sit, all of the underside is going to be black so i'm not worried about it yet
Image
Image
cheers,

harry
User avatar
harry_p
Engaged to the E30 Zone
Posts: 5313
Joined: Thu Oct 12, 2006 11:00 pm
Location: norfolk

Thu Aug 25, 2011 10:49 pm

Bit of an update, it's been a while  ;D

First, it moved!
Image

Thanks to some rope and some BMW horses anyway...

Took the gearbox out, cleaned it up, gave it a lick of paint, scraped all the old underseal off from above it, ground and wirebrushed any rust, thankfully all surface, gave it a coat of kurust to convert any remaining and neutralise it, then a couple of heavy coats of stone chip shield. Gearbox back in.
Image
Image


Central bellypan Hacked into,
Image

And removed,
Image
Image

Lots to do, but not as bad as it could have been. Just a couple of simple repairs to the main chassis and lower sections of the crossmembers. At least there's enough there to use as patterns to make new bits!

The above was 3 10 hour days worth of laying on my back. Shoulders and neck aching so today I did a few odd jobs.
Started repairing a nasty crack in the roof. Looked like it had flipped right over and broken its back. There's a steel rod that runs through it which had pinched and bent.

I cut away the glass to free the rod, trimmed each piece back to where it was round, and inserted a long bolt with the head cut off to join it back together, braced the roof then fibreglassed it back in, and over the cracked section.
Image
Image
Image
Image
And will do the same on the outside
Image

for some reason i started repairing one of the bumper side pieces which had been previously 'fixed' with filler and mesh
Image

Image

I seem to have got a bit of enthusiasm back for it, so much nicer working on a hard surface too instead of scrabbling in damp dirt / gravel!
cheers,

harry
User avatar
harry_p
Engaged to the E30 Zone
Posts: 5313
Joined: Thu Oct 12, 2006 11:00 pm
Location: norfolk

Thu Aug 25, 2011 10:50 pm

Sills!

The bus sills are in 3 parts, an inner which Links the floor to the end of the outriggers, a middle strengthener, and the outer, visible bit. The pic bellow the outer has been cut away, the middle is the bit with the holes in, and you can just about make out bits of the inner behind it.
Image

Usually you'd drill through the spot welds, leave the floor intact, and spot the new sill in. Old bits too rusty to find the weld marks, and drilling and welding from underneath is a sod of a job. So, slightly more dramatic, drill through the floorpan to break the welds, and peel the sills off.

Remains of the sills,
Image

Removed,
Image

When it comes to refitting I can just clamp the sill in place and sit inside the bus welding it to the floor filling in all the holes. Much nicer than laying under it getting covered in molten metal!

Had to cut off a 'finished' piece in front of the rear wheel. How many others are hiding rot and bodges like this?  :o
Image
Image
Image

Thankfully the replacement sills are full length!

Also chopped out a section of the main chassis rail and let in a new section, bit of shite welding,
Image

Which ground back nicely, until I dropped the grinder and broke my flap disk, so got a coat of zinc primer to stop it rusting. To be finished next time...
Image

Annoyingly the lip on the repair section is slightly too small, so I'll either have to add a bit, or trim the rest to match.
cheers,

harry
capri_rob
Married to the E30 Zone
Posts: 9681
Joined: Tue Feb 19, 2008 11:00 pm
Location: South Staffordshire

Fri Aug 26, 2011 7:59 am

Brave - but nice work :D

A couple of my mates have fetishes for aircooled VW's - never got the appeal myself but they do seem to be fetching silly money now even for basket cases 8O
Image

e30topless said : Proper BMW's have 4 headlights, last of the run was the E30 and E34/E32 anything after that is just complete shite
snakebrain
E30 Zone Addict
E30 Zone Addict
Posts: 3685
Joined: Tue Aug 11, 2009 11:00 pm

Mon Sep 05, 2011 9:10 pm

Hero!! :cool: :cool: :cool: :cool: Can't wait to see it finished...
Steve-E30
East Sussex Hooligan
Posts: 5876
Joined: Fri Apr 21, 2006 11:00 pm

Mon Sep 05, 2011 9:31 pm

snakebrain wrote:Hero!! :cool: :cool: :cool: :cool: Can't wait to see it finished...
+1
Keep the pic coming :D
Giggety Giggety Goo!!!
User avatar
Felix79
All loved up !
Posts: 5134
Joined: Sat May 24, 2008 11:00 pm
Location: Hereford

Mon Sep 05, 2011 11:12 pm

I wish I could weld like you can mate , really impressive welding going on there. If I was ever to do something like this I would freak and think "where the hell do I start from?"

Keep at it :)
Felix79 aka Dan
If you got haters, then your doing something right!
E85 Z4M Roadster
User avatar
harry_p
Engaged to the E30 Zone
Posts: 5313
Joined: Thu Oct 12, 2006 11:00 pm
Location: norfolk

Mon Sep 05, 2011 11:48 pm

going to vanfest next weekend to hopefully pick up the rest of the bits i need to finish off the welding.

some bits i can make, but it's all making do with the limited equipment i have, if you can buy a decent quality repair pannel for sensible money you can save a lot of time and energy! hoping to blitz most of the underside over the next few weeks. unfortunately what started as a rear wheel bearing change on the e36 has turned into pretty much a complete rear end overhaul :o:
cheers,

harry
User avatar
Felix79
All loved up !
Posts: 5134
Joined: Sat May 24, 2008 11:00 pm
Location: Hereford

Tue Sep 06, 2011 12:11 am

Too many projects and not enough time ?

I guess there must be a very healthy replacement parts and refurbed supply for the VW van?

Not going to go for a old 911 engine? I have seen on youtube one of these with an Impreza engine installed :eek:
Felix79 aka Dan
If you got haters, then your doing something right!
E85 Z4M Roadster
Post Reply