

I fitted new vents all round to my car - not that pricey and they are stiff and smooth as fook.
A must!
Worlds longest Resto, my C2 2.7 19/3/18 Vent guage action
Moderator: martauto
-
B7
- E30 Zone Team Member

- Posts: 15846
- Joined: Tue Feb 13, 2007 11:00 pm
- Location: Surrey / West Sussex
Trouble is Ratch, it's not a vent thats loose. It's the vent gauge. Not that cheap to replace.
B7's Motto. "If it's French, BURN IT!!!!!!"
-
e30topless
- E30 Zone Team Member
- Posts: 13598
- Joined: Wed Aug 23, 2006 11:00 pm
- Location: surrounded by scrap
Simon,
the wire is in wrong here,

this is why it is pointing wrong,
the loom should pass through the bottom of the duct before the flap which takes the weight of the wiring and keeps it pointing straight, also the vent can be open and closed properly then
the wire is in wrong here,
this is why it is pointing wrong,
the loom should pass through the bottom of the duct before the flap which takes the weight of the wiring and keeps it pointing straight, also the vent can be open and closed properly then
-
Simon13
- The longest resto in the world !
- Posts: 22697
- Joined: Mon Jan 10, 2005 11:00 pm
- Location: Camberley, Surrey don't u know
i see, well it does all work as it should and the flap will open and shut behind the guage. So i'm not sure i can be bothered!
Show me some pics steve!!!
Show me some pics steve!!!
-
Speedtouch
- Old Skooler

- Posts: 14099
- Joined: Tue Feb 14, 2006 11:00 pm
- Location: Canterbury
Did you get any pics of the circuit board to see what type of chips they used? 
///M aurice
ECU Upgrade EPROM Chips, £40 posted within the UK. Note these are not Zone chips.
viewtopic.php?f=6&t=279421
ECU Upgrade EPROM Chips, £40 posted within the UK. Note these are not Zone chips.
viewtopic.php?f=6&t=279421
-
Simon13
- The longest resto in the world !
- Posts: 22697
- Joined: Mon Jan 10, 2005 11:00 pm
- Location: Camberley, Surrey don't u know
just having it work will be enough for me, no intention of chipping my vent guage gov!
-
Speedtouch
- Old Skooler
- Posts: 14099
- Joined: Tue Feb 14, 2006 11:00 pm
- Location: Canterbury
I was just interested to see what sort of technology they used back then! 
///M aurice
ECU Upgrade EPROM Chips, £40 posted within the UK. Note these are not Zone chips.
viewtopic.php?f=6&t=279421
ECU Upgrade EPROM Chips, £40 posted within the UK. Note these are not Zone chips.
viewtopic.php?f=6&t=279421
-
e30topless
- E30 Zone Team Member
- Posts: 13598
- Joined: Wed Aug 23, 2006 11:00 pm
- Location: surrounded by scrap
sorry for the delay, I lost my VentsSimon13 wrote:i see, well it does all work as it should and the flap will open and shut behind the guage. So i'm not sure i can be bothered!
Show me some pics steve!!!
anyway Pics as promised , the loom can be pulled up and down in the grommet here si, this makes it point where you need it, I adjusted the last one so it was flat faced, looked much better,
the back,

and the front,

-
Simon13
- The longest resto in the world !
- Posts: 22697
- Joined: Mon Jan 10, 2005 11:00 pm
- Location: Camberley, Surrey don't u know
WEll well, thanks for those Steve but all is not well with this, i've wired it up this week and it doesn't seem to work. Great. So the plan is to go up to pacers and test my ECU and display on his B6 which has a working system. Then we can go from there. Hopefully it won't be anything too bad, might be a trip to Phil Crouch as he loves this sort of thing.
Anyhow its been a while but plenty of action to keep it on the boil. Only 2 months now with the crank i'm running out of things to do!
So where we left off was with a saggy vent guage that kept flopping

Looking at this inspired me to sacrifice it to the cause!

Get me?!

Glued on either side


Job jobbied, now its a touch stiff but it certainly doesn't flap about as before

Then i had the lead plug hanging out of there which seemed not very good

So all back apart and then like this. Which seems like its ok but as we know now its not 100% working i may aswell re do it again as its all coming apart. So the continued theme of everything is done about 3 times until we are happy with it!!


So building the dash up complete, we've got several looms here, cruise,OBC and lighting, Alarm too.

Ready to for action


ta da!

Look at this chocka block accesory socket, shes full! 1 spare plug hole left i'm not sure what goes here

Found this old stereo loom, so i just re soldered it up and its ready to go in. My head unit only works with an amp hence no speaker connections on this

Theres a surpise none working OBC bulbs with the RS components replacement bulbs to go in


Quite tricky this i think, and f**k 60 plus VAT bmw want for a new unit.

Now fuse 21 kept blowing............... how i found it was pure luck. Fuse 21 controls interior and boot lights, OBC display and radio in its tally. So very annoying. By chance i shut the boot and herd the fuse pop and which led me to this... i had routed the boot light wires incorretly and it had been rubbing through to short it i guess! So redone this after the red 2door showed me, and repaired this wire and everything seems ok touch wood! pleased me no end to sort this. As electrics aren't my strong point as we know


So on to the climate bit of the A/C climate control, as you can see here its not going to fit together as it is. I enquired about a climate only facia as such but there isn't so some dismantling was required


In bits to see if the penny was going to drop

penny landed! so......
 ]
]
That like this, bin the black part off

getting there

cooking on gas, not sure if this is 100% but seems the only way to me so i'm happy

On to the ICE side, nothing mega here but a steep learning curve for me on this one. Please not shouts about OE head units and all that crap, i'm not interested. So this is me adding a blob of solder to the amp connections. Can't be a bad thing i thought

Here is the chosen head unit. CD 400. top draw and looks the part. Plus its working here! The CD player bit seems to have broken now So i need to get it fixed but apart from that i like it. You can change the lighting to green from amber! i thought that was cool.

Here is my chosen amp, those who remember placey and his ice. Well he told me this was the amp to buy oldskool alpine V12. its 600amp i think but its 5 way so you can run a sub off it too if you wish. i'm not planning on it but its there if i wanted it later on. This was just a rough mock up to see if it works. Which it does!

Aerial wired in, brand new. This pleased me immensely. easily pleased i am. I've never done it before. Its also leaning rather to one side here, i've got it upright now too with a fiddle. When you fit it first you don't know where its going to point when you first fit it!

repainted the end bits on the amp, now this lot is about 3 evenings after work of head scratching and p!ssing about to mount this bloody thing. Its the best i can do!

Here is a ply plate i've made up for the amp to screw to and then this is bolted to the rear bulk head

but i wanted this trim panel in, they are NLA so no pressure. This looked a bit kack, plus there are extra holes in it for the alpina fuel tank. You won't see much of it either but it needs to be there!

this looks a bit better to me

pulled the pina tank out so i've got to mount above this

Plus with the tank in i couldn't get the side trims in or the rear bulkhead panel. So all in and ready then

Fuel tank in and my "custom" amp plate bolted on too. I sunk the bolt heads in so they are below the top if you get me, so its still flat for the amp to mount to

The other side, it ain't going no where!!

Amp in, not too bad with the wires, or not a large kebab type of wiring mess. Its out the way here and won't fall off! Where the fuel tank it where alot of people place amps and then subs on top etc. Looking at other peoples ICE installs. So that seemed to not help me for ideas either. I'm pleased with it and the boot is now done in my eyes. Note the Special alpina carpet to cover the tank! Alpinas way to making this fit is double sided stick tape!
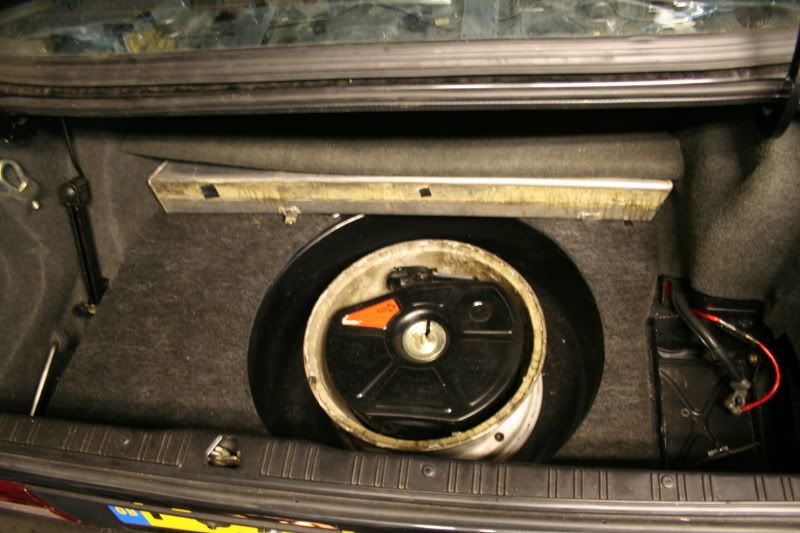
So thats how that is going to fit. I've 7j pina rim as a spare instead of the bloody 14 inch steel sytners let you roll out with when new. A steel rim won't fit over the ALpina big brakes on the front so this is a must. Along with my ultra rare morsel fuel can. Its a 9 litre not the usual 6 tat everyone else has! You need a 15inch BBS minimum for the big can

Then because of the fuel tank the boot carpet doesn't fit! So this has to be cut down, and also if you run a big width spare wheel ie a 7j rim, you need the extra carpet bit underneath so i've cut that also which you can see in the last pic

So we end up with this! I'll take some more pics later of minty jack chock tools etc
Wow now that might not look much but it seemed a marathon to me. Huge step closer to the finish line though. You wouldn't believe how much time i spent actually in the boot. Was hard work i tell thee

This is the last remains of the old cobra alarm. Nice job to sort and one that had me a bit worried to sort out properly

Borrowed this special tool from Barry to remove the pins from the C101. scrap one to play with. So this is a proper to the rescure tool this!

you gotta click it round to this to get them pins out

Pin out, but the other end of the wire sheething has split to i'll use the other one from the scrap plug

Had to be the thickest wire on the plug! And a bit of black on the car side of it great for soldering not.

Good dollop of flux helped

Heat shrink on FTW, some of it went off as you'd expect so i had to cut the shrunk bit off!

sorted another mighty pain in the arse job. So we can crack on with the engine loom, heater panel etc getting that all in and looking good now. I was even worried about the length being right other wise the ubber boot wouldn't fit over the top again. Had sweaty hands doing all this!

The offending item, you gotta love the alarm fitters It was a cobra by the way, i've end the reciept for it being fitted in about 1995 in Farnborough which is just up the road. Should i go round there and complain?!
And the end of this rather long update, all fiddly head thinking sh!t
Anyhow its been a while but plenty of action to keep it on the boil. Only 2 months now with the crank i'm running out of things to do!
So where we left off was with a saggy vent guage that kept flopping
Looking at this inspired me to sacrifice it to the cause!
Get me?!
Glued on either side
Job jobbied, now its a touch stiff but it certainly doesn't flap about as before
Then i had the lead plug hanging out of there which seemed not very good
So all back apart and then like this. Which seems like its ok but as we know now its not 100% working i may aswell re do it again as its all coming apart. So the continued theme of everything is done about 3 times until we are happy with it!!
So building the dash up complete, we've got several looms here, cruise,OBC and lighting, Alarm too.
Ready to for action
ta da!
Look at this chocka block accesory socket, shes full! 1 spare plug hole left i'm not sure what goes here
Found this old stereo loom, so i just re soldered it up and its ready to go in. My head unit only works with an amp hence no speaker connections on this
Theres a surpise none working OBC bulbs
Quite tricky this i think, and f**k 60 plus VAT bmw want for a new unit.
Now fuse 21 kept blowing............... how i found it was pure luck. Fuse 21 controls interior and boot lights, OBC display and radio in its tally. So very annoying. By chance i shut the boot and herd the fuse pop and which led me to this... i had routed the boot light wires incorretly and it had been rubbing through to short it i guess! So redone this after the red 2door showed me, and repaired this wire and everything seems ok touch wood! pleased me no end to sort this. As electrics aren't my strong point as we know
So on to the climate bit of the A/C climate control, as you can see here its not going to fit together as it is. I enquired about a climate only facia as such but there isn't so some dismantling was required
In bits to see if the penny was going to drop
penny landed! so......
]That like this, bin the black part off
getting there
cooking on gas, not sure if this is 100% but seems the only way to me so i'm happy
On to the ICE side, nothing mega here but a steep learning curve for me on this one. Please not shouts about OE head units and all that crap, i'm not interested. So this is me adding a blob of solder to the amp connections. Can't be a bad thing i thought
Here is the chosen head unit. CD 400. top draw and looks the part. Plus its working here! The CD player bit seems to have broken now
Here is my chosen amp, those who remember placey and his ice. Well he told me this was the amp to buy oldskool alpine V12. its 600amp i think but its 5 way so you can run a sub off it too if you wish. i'm not planning on it but its there if i wanted it later on. This was just a rough mock up to see if it works. Which it does!
Aerial wired in, brand new. This pleased me immensely. easily pleased i am. I've never done it before. Its also leaning rather to one side here, i've got it upright now too with a fiddle. When you fit it first you don't know where its going to point when you first fit it!
repainted the end bits on the amp, now this lot is about 3 evenings after work of head scratching and p!ssing about to mount this bloody thing. Its the best i can do!
Here is a ply plate i've made up for the amp to screw to and then this is bolted to the rear bulk head
but i wanted this trim panel in, they are NLA so no pressure. This looked a bit kack, plus there are extra holes in it for the alpina fuel tank. You won't see much of it either but it needs to be there!
this looks a bit better to me
pulled the pina tank out so i've got to mount above this
Plus with the tank in i couldn't get the side trims in or the rear bulkhead panel. So all in and ready then
Fuel tank in and my "custom" amp plate bolted on too. I sunk the bolt heads in so they are below the top if you get me, so its still flat for the amp to mount to
The other side, it ain't going no where!!
Amp in, not too bad with the wires, or not a large kebab type of wiring mess. Its out the way here and won't fall off! Where the fuel tank it where alot of people place amps and then subs on top etc. Looking at other peoples ICE installs. So that seemed to not help me for ideas either. I'm pleased with it and the boot is now done in my eyes. Note the Special alpina carpet to cover the tank! Alpinas way to making this fit is double sided stick tape!
So thats how that is going to fit. I've 7j pina rim as a spare instead of the bloody 14 inch steel sytners let you roll out with when new. A steel rim won't fit over the ALpina big brakes on the front so this is a must. Along with my ultra rare morsel fuel can. Its a 9 litre not the usual 6 tat everyone else has! You need a 15inch BBS minimum for the big can
Then because of the fuel tank the boot carpet doesn't fit! So this has to be cut down, and also if you run a big width spare wheel ie a 7j rim, you need the extra carpet bit underneath so i've cut that also which you can see in the last pic
So we end up with this! I'll take some more pics later of minty jack chock tools etc
Wow now that might not look much but it seemed a marathon to me. Huge step closer to the finish line though. You wouldn't believe how much time i spent actually in the boot. Was hard work i tell thee
This is the last remains of the old cobra alarm. Nice job to sort and one that had me a bit worried to sort out properly
Borrowed this special tool from Barry to remove the pins from the C101. scrap one to play with. So this is a proper to the rescure tool this!
you gotta click it round to this to get them pins out
Pin out, but the other end of the wire sheething has split to i'll use the other one from the scrap plug
Had to be the thickest wire on the plug! And a bit of black on the car side of it great for soldering not.
Good dollop of flux helped
Heat shrink on FTW, some of it went off as you'd expect so i had to cut the shrunk bit off!
sorted another mighty pain in the arse job. So we can crack on with the engine loom, heater panel etc getting that all in and looking good now. I was even worried about the length being right other wise the ubber boot wouldn't fit over the top again. Had sweaty hands doing all this!
The offending item, you gotta love the alarm fitters
And the end of this rather long update, all fiddly head thinking sh!t
-
bss325i
- E30 Zone Team Member
- Posts: 24536
- Joined: Sat Jan 20, 2007 11:00 pm
- Location: London/Surrey
Nice progress Simon.
The climate control unit doesn't need the black part removing, infact its a channel to the temp sensor.
The climate control unit doesn't need the black part removing, infact its a channel to the temp sensor.
bss325i wrote:I have used an EIS condensor from eurocar parts which is german made.
Anyhow, heres the process of building up the HVAC panel.
The E30 climate system uses a regulated temp control system that has a temp sensor for inside the car so when you set the temp on the dial, the system regulates itself to the temp you set it to and maintains it with electronic control of the heater valve as oposed to a mechanical flap that a standard E30 system has.
Here is the control unit removed from the HVAC panel. The temp sensor is very prone to getting blocked up with dust and this is not exclusive to E30's. Here is before and after clearing the dust.
The control unit
Before
After
The complete HVAC panel stripped
New temp foil


-
E30BeemerLad
- Married to the E30 Zone

- Posts: 16806
- Joined: Mon Mar 28, 2005 11:00 pm
- Location: Norfolk
So much paedo action 
But well worth it. Top drawer
But well worth it. Top drawer
-
oguz327
- Captain Armco
- Posts: 4174
- Joined: Tue Oct 25, 2005 11:00 pm
- Location: Hampshire
Awesome work Si, you must be well chuffed the wiring is all comming together!

-
darren_mk
- E30 Zone Newbie

- Posts: 247
- Joined: Sun Jan 28, 2007 11:00 pm
- Location: Northern Ireland
Excellent work as usual.
I can totally appreciate how time consuming this sort of work is, but so well worth it, and satisfying when done.
I can totally appreciate how time consuming this sort of work is, but so well worth it, and satisfying when done.
-
B7
- E30 Zone Team Member
- Posts: 15846
- Joined: Tue Feb 13, 2007 11:00 pm
- Location: Surrey / West Sussex
Top draw that man. Proper good stuff!
B7's Motto. "If it's French, BURN IT!!!!!!"
-
tonybtonyb
- E30 Zone Addict
- Posts: 3580
- Joined: Wed Jun 13, 2007 11:00 pm
- Location: essex
There is only one word and that is you are'Hardcore'a super job
They don't make bm's like this anymore!..They should.

-
Felix79

- All loved up !
- Posts: 5134
- Joined: Sat May 24, 2008 11:00 pm
- Location: Hereford
You never cease to amaze me with your diversity with the restro and again a bloody good write up of the work done! I bet it must be a great feeling with the end of the tunnel in sight!
Felix79 aka Dan
If you got haters, then your doing something right!
E85 Z4M Roadster
If you got haters, then your doing something right!
E85 Z4M Roadster
-
Gortour
- E30 Zone Team Member
- Posts: 9025
- Joined: Sat Sep 23, 2006 11:00 pm
- Location: Poole, Dorset
That's not the light at the end of the tunnel, Dan... That's the guy from the Spares department at BMW with a torch, bringing some more invoices for Simon...
Seriously though, this is epic Simon. Brilliant effort, and equally brilliant write-up.
Seriously though, this is epic Simon. Brilliant effort, and equally brilliant write-up.
Currently slumming it in an E46 Touring
-
Simon
- E30 Zone Team Member
- Posts: 14939
- Joined: Sun Jan 09, 2005 11:00 pm
- Location: South Wales

-
Simon13
- The longest resto in the world !
- Posts: 22697
- Joined: Mon Jan 10, 2005 11:00 pm
- Location: Camberley, Surrey don't u know
why cos of the number plate?
-
Simon
- E30 Zone Team Member
- Posts: 14939
- Joined: Sun Jan 09, 2005 11:00 pm
- Location: South Wales
Yes lol!
Saw it on pistonheads (SOTW) and knew the reg was familiar from somewhere..
Saw it on pistonheads (SOTW) and knew the reg was familiar from somewhere..
-
Simon13
- The longest resto in the world !
- Posts: 22697
- Joined: Mon Jan 10, 2005 11:00 pm
- Location: Camberley, Surrey don't u know
a classic nottingham reg the CH giving the game away
-
Blitz
- Married to the E30 Zone
- Posts: 11155
- Joined: Mon Jan 30, 2006 11:00 pm
- Location: East London+Basildon
Just found pics of a B3 2.7 identical to yours apart from being Allrad.


-
oguz327
- Captain Armco
- Posts: 4174
- Joined: Tue Oct 25, 2005 11:00 pm
- Location: Hampshire
Nice find Mo, liking the Black, Red and Gold stripe combo
-
Speedtouch
- Old Skooler
- Posts: 14099
- Joined: Tue Feb 14, 2006 11:00 pm
- Location: Canterbury
What's the difference between the B3 2.7 and the C2 2.7?
///M aurice
ECU Upgrade EPROM Chips, £40 posted within the UK. Note these are not Zone chips.
viewtopic.php?f=6&t=279421
ECU Upgrade EPROM Chips, £40 posted within the UK. Note these are not Zone chips.
viewtopic.php?f=6&t=279421
-
e30topless
- E30 Zone Team Member
- Posts: 13598
- Joined: Wed Aug 23, 2006 11:00 pm
- Location: surrounded by scrap
Germany, france spain ect got the B3, Uk got the C2 ?Speedtouch wrote:What's the difference between the B3 2.7 and the C2 2.7?
red leatherzz with gold warpaint Si
-
Simon13
- The longest resto in the world !
- Posts: 22697
- Joined: Mon Jan 10, 2005 11:00 pm
- Location: Camberley, Surrey don't u know
nothing, if anything we got the better deal as we had non cat engines which made a bit more power.Speedtouch wrote:What's the difference between the B3 2.7 and the C2 2.7?
The real reason is the german customers felt the C designation was inferior to the B, they changed the C2's to B3's when the E30 was facelifted to plastic bumpers
So the LHD chrome bumper 2.7s are C2's like ours.
Mo i've got the old article of that very car in BMW car mag from a long time ago, 2004 ish. Never thought mine would end up like that! Silver stripes chaps.
-
Andyboy
- Alpina Colada
- Posts: 12578
- Joined: Mon Sep 11, 2006 11:00 pm
The B3 2.7 Katalysator and C2 with the catalyst use the standard 325i camshaft.
-
goosiegander
- Zonegoose
- Posts: 2544
- Joined: Sun Nov 19, 2006 11:00 pm
- Location: East Anglia
Not ruled out the fine wood trim then Simon?Simon13 wrote:nothing, if anything we got the better deal as we had non cat engines which made a bit more power.Speedtouch wrote:What's the difference between the B3 2.7 and the C2 2.7?
The real reason is the german customers felt the C designation was inferior to the B, they changed the C2's to B3's when the E30 was facelifted to plastic bumpers
So the LHD chrome bumper 2.7s are C2's like ours.
Mo i've got the old article of that very car in BMW car mag from a long time ago, 2004 ish. Never thought mine would end up like that! Silver stripes chaps.

-
Simon13
- The longest resto in the world !
- Posts: 22697
- Joined: Mon Jan 10, 2005 11:00 pm
- Location: Camberley, Surrey don't u know
no f**king chance, looks kack this and headlamp wash wipe won't be going near it!
-
bss325i
- E30 Zone Team Member
- Posts: 24536
- Joined: Sat Jan 20, 2007 11:00 pm
- Location: London/Surrey
The DME is a different part number for cat cars as well.Andyboy wrote:The B3 2.7 Katalysator and C2 with the catalyst use the standard 325i camshaft.
-
suchy
- True Zone Relic
- Posts: 6604
- Joined: Tue Apr 26, 2005 11:00 pm
- Location: Portsmouth
The red/black combo is obviously loaded with win, but think silver looks better than gold for the stripes. That wood trim looks dreadful!! But it was made a few years ago!!
What did you decide on for the rear shelf in the end?
What did you decide on for the rear shelf in the end?
-
B7
- E30 Zone Team Member
- Posts: 15846
- Joined: Tue Feb 13, 2007 11:00 pm
- Location: Surrey / West Sussex
Spot on Such on the stripes!!!suchy wrote:The red/black combo is obviously loaded with win, but think silver looks better than gold for the stripes. That wood trim looks dreadful!! But it was made a few years ago!!
What did you decide on for the rear shelf in the end?
B7's Motto. "If it's French, BURN IT!!!!!!"
-
Simon13
- The longest resto in the world !
- Posts: 22697
- Joined: Mon Jan 10, 2005 11:00 pm
- Location: Camberley, Surrey don't u know
Black shelf, just need to buy some dye for it, and some speakers.
-
Speedtouch
- Old Skooler
- Posts: 14099
- Joined: Tue Feb 14, 2006 11:00 pm
- Location: Canterbury
What's that knobbly thing sticking out of the centre console, behind the gearstick?Blitz wrote:
///M aurice
ECU Upgrade EPROM Chips, £40 posted within the UK. Note these are not Zone chips.
viewtopic.php?f=6&t=279421
ECU Upgrade EPROM Chips, £40 posted within the UK. Note these are not Zone chips.
viewtopic.php?f=6&t=279421
-
Dezzy
- CR24v it's a lifestyle
- Posts: 11974
- Joined: Thu May 15, 2008 11:00 pm
- Location: Middlesbrough
Its a 90's sony caontrol stick

Co Founder of CR24vTM By Invitation Only. Absolutely no riff raff!!!