
Martin's rally car rebuild
Moderator: martauto
-
martinpallot

- E30 Zone Regular

- Posts: 352
- Joined: Sat Aug 04, 2007 11:00 pm
- Location: Jersey C.I
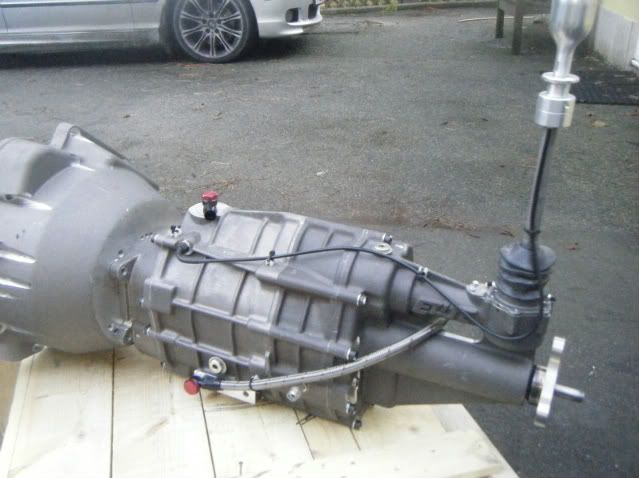
Sump is off an e36, theres space to go about another inch and a half back but would mean the gearstick would be way too far back so decided its staying where it is.
-
Dezzy
- CR24v it's a lifestyle
- Posts: 11974
- Joined: Thu May 15, 2008 11:00 pm
- Location: Middlesbrough
Is that after shortening the bracket for the gear selector etc?

Co Founder of CR24vTM By Invitation Only. Absolutely no riff raff!!!
-
martinpallot
- E30 Zone Regular
- Posts: 352
- Joined: Sat Aug 04, 2007 11:00 pm
- Location: Jersey C.I
cant shorten the bracket on this
-
Dezzy
- CR24v it's a lifestyle
- Posts: 11974
- Joined: Thu May 15, 2008 11:00 pm
- Location: Middlesbrough
I read you were using one of them doh 
That's going to be a weapon.
That's going to be a weapon.
Co Founder of CR24vTM By Invitation Only. Absolutely no riff raff!!!
-
DavesM3
- E30 Zone Newbie

- Posts: 47
- Joined: Sat Jul 18, 2009 11:00 pm
Thats a fab project,love the detail. The pedal box is a work of art, any details, also can you post some pics of the dtm lower arms and specs, thinking of doing them on my track car.
-
E30BeemerLad
- Married to the E30 Zone

- Posts: 16806
- Joined: Mon Mar 28, 2005 11:00 pm
- Location: Norfolk
Hell yeah, I'm liking this thread more & more.
Sequential box FTW!
I'll be having another look at those early pics if I ever get round to my V12 swap
Sequential box FTW!
I'll be having another look at those early pics if I ever get round to my V12 swap
-
martinpallot
- E30 Zone Regular
- Posts: 352
- Joined: Sat Aug 04, 2007 11:00 pm
- Location: Jersey C.I
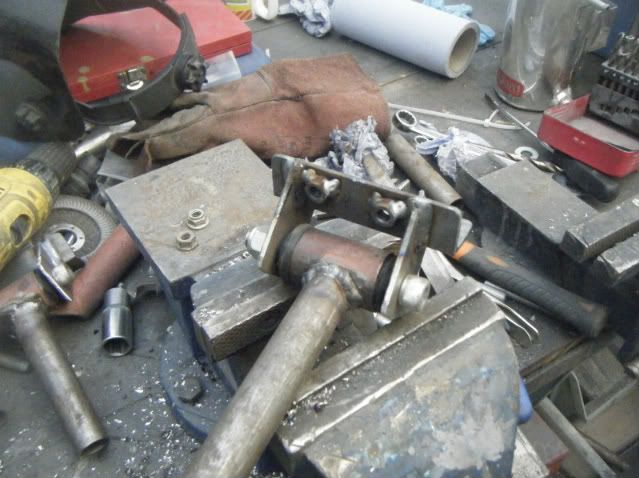
Made a start on the gearbox cradle today, but didnt finish as it was cold in the garage 

-
martinpallot
- E30 Zone Regular
- Posts: 352
- Joined: Sat Aug 04, 2007 11:00 pm
- Location: Jersey C.I
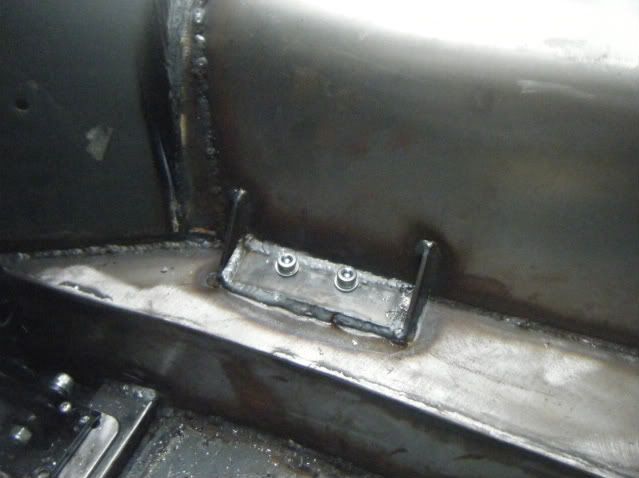
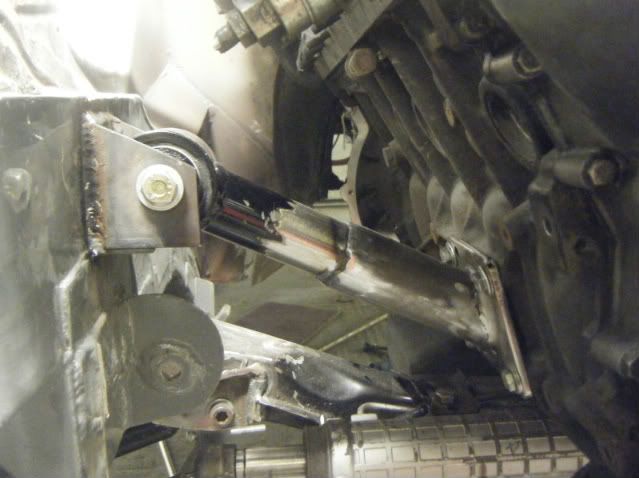
Engine mounts done today, complete ballache of a job but its done now. Ended up making new chassis mounts as I realised using the old ones just wasnt practical, also got it moved back another 3/4 of an inch without affecting the gearstick position as much as I thought. Now sits much more snug againt the bulkhead 
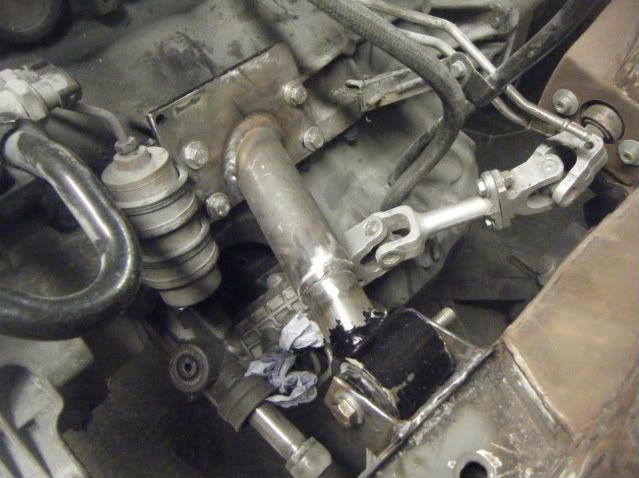
With this offside mount, I want to brace it higher up the block somehow. Will give it a go once the engine is back out so that access is a bit easier. As it is at the moment I think the angle of it puts the lower bolts under a lot of strain, especially as this is the 'heavier' side of the block
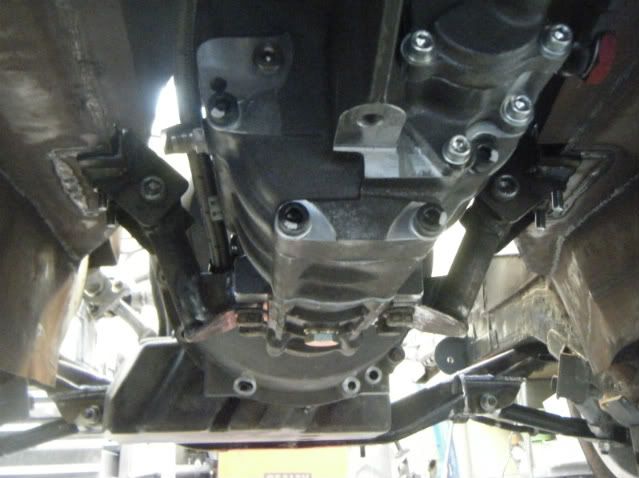
Now that the engine and box is in the middle I can do the gearbox cradle and centre bearing bracket for the prop, hopefully tomorrow morning.
With this offside mount, I want to brace it higher up the block somehow. Will give it a go once the engine is back out so that access is a bit easier. As it is at the moment I think the angle of it puts the lower bolts under a lot of strain, especially as this is the 'heavier' side of the block
Now that the engine and box is in the middle I can do the gearbox cradle and centre bearing bracket for the prop, hopefully tomorrow morning.
-
martinpallot
- E30 Zone Regular
- Posts: 352
- Joined: Sat Aug 04, 2007 11:00 pm
- Location: Jersey C.I
Finally the engine and gearbox are supporting themselves in the car
-
emdog16
- E30 Zone Regular
- Posts: 333
- Joined: Thu Mar 18, 2010 11:00 pm
- Location: Bicester Oxfordshire
lookin good!!!
Avid E30 Nut, and Scientist of all things that go BOiiiNGGGG.
If you want to go mental on your shocks... check out ForRacingUseOnly.com
If you want to go mental on your shocks... check out ForRacingUseOnly.com
-
martinpallot
- E30 Zone Regular
- Posts: 352
- Joined: Sat Aug 04, 2007 11:00 pm
- Location: Jersey C.I
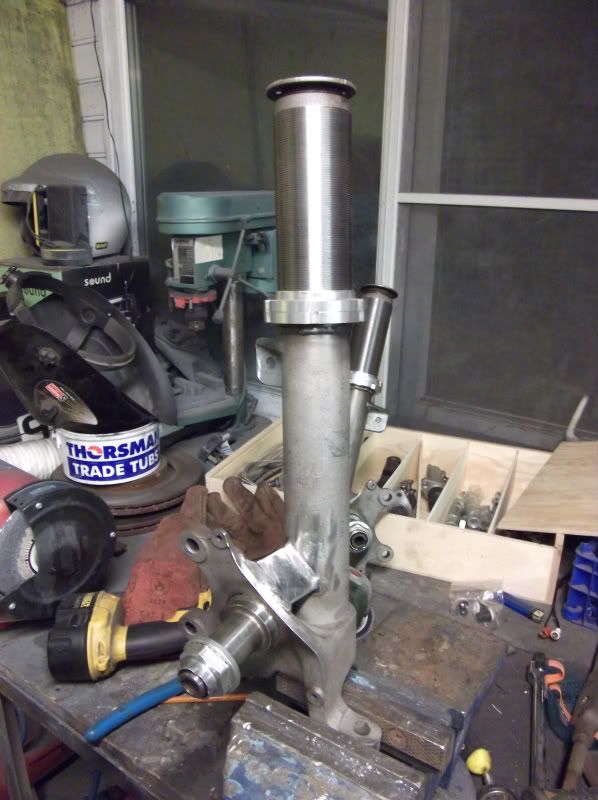
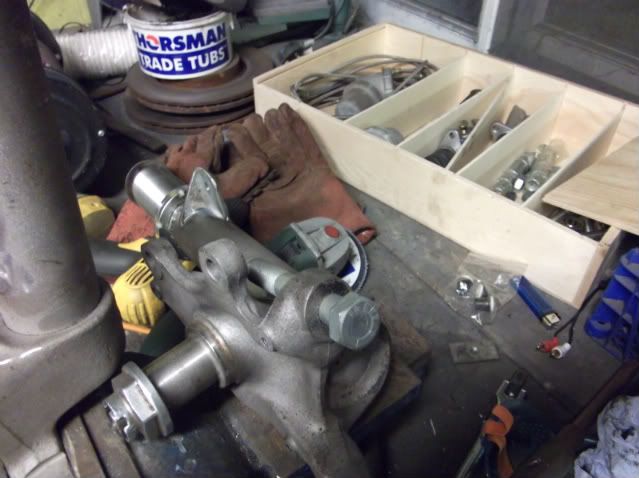
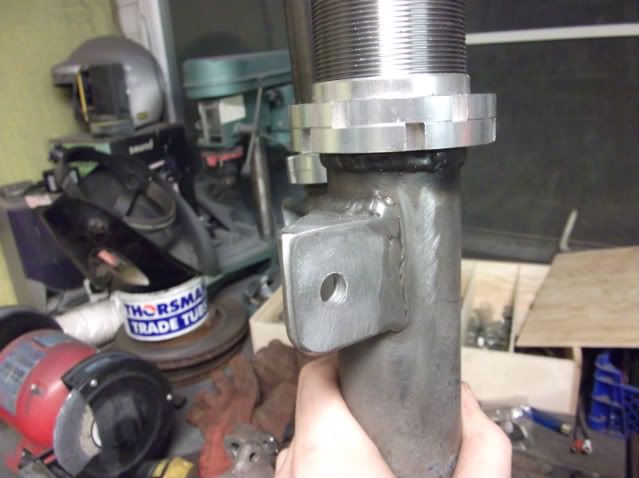
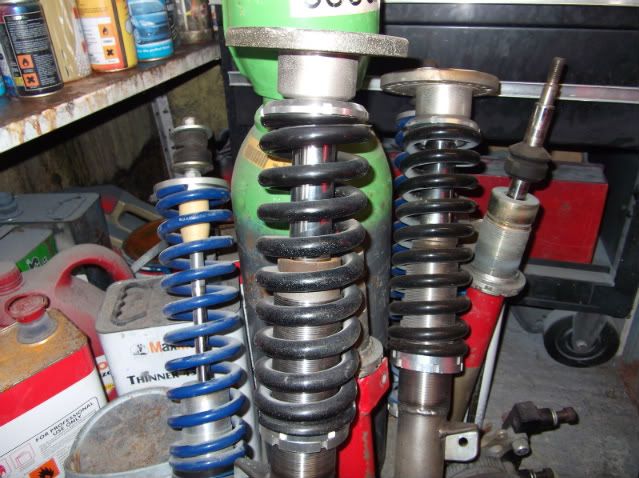
Well progress has been slow over December, as in absolutely nothing got done on the car up until today. I had some 50mm struts off a 323 I broke so thought id have a play with them. I stripped them down, sandblasted them and cut the standard spring perches of, welded some coilover conversion tubes on and some heavy duty arb mounts onto the strut.
Whilst clamping one of them into the vice I realised that the cast piece at the bottom can be made to flex quite easily , so I got a bit of 3mm steel and plated it a bit. I didnt want to wedge it completely and with thick steel as I think it needs a bit of give to avoid potential breakage somewhere else along the casting. We'll se how it goes. Also drilled the bottom ball joint taper out to 5/8ths so that I can use the rose joint arms. All they need now is alick of paint
Still undecided about what inserts to use. I wanted bilsteins but the lack of adjustability can be a problem as Ive found with the current shocks. Think I'll give the Gaz adustables inserts a shot. At 70 quid each they seem good value and Ive had good experiences with Gaz in the past.
-
martinpallot
- E30 Zone Regular
- Posts: 352
- Joined: Sat Aug 04, 2007 11:00 pm
- Location: Jersey C.I
Stripped the car down and rolled it on its side on a frame we made up. Started stripping the underseal off. Whats the best way people have done this? The best way we have found so far it a heat gun and scraper at first then buff off with a wire wheel in the Grinder. It works but its painfully slow 
-
DanThe
- E30 Zone Team Member

- Posts: 28649
- Joined: Sat Sep 10, 2005 11:00 pm
- Location: Staffs
Thats one of the common ways to do it, if you want to do it quicker you need to get the steel hotter, so oxy/acetylene to warm it up and it will brush off by hand with a wire brush
I need to get a conservatory like that
I need to get a conservatory like that
-
Jon_Bmw
- Dangerous when thinking
- Posts: 7606
- Joined: Tue Jan 11, 2005 11:00 pm
- Location: Salisbury
Awesome thread.
Looks a really well thought out build. I agree within Tomson, how you still have any knees left is beyond me.
With regards the gear stick position, I guess it wouldn't be much of a job for you to relocate the drivers seat slightly further back. Might help with weight distribution as well?
Looks a really well thought out build. I agree within Tomson, how you still have any knees left is beyond me.
With regards the gear stick position, I guess it wouldn't be much of a job for you to relocate the drivers seat slightly further back. Might help with weight distribution as well?
-
martinpallot
- E30 Zone Regular
- Posts: 352
- Joined: Sat Aug 04, 2007 11:00 pm
- Location: Jersey C.I
Thanks gearshift position is Ok now, the seat is a fair bit further back but im limited eventually by the main hoop of the cage.
Managed to haul my arse into the garage for a couple of hours despite the bollocks weather were having atm. Dressed all the welds off after cutting into my thumb whilst attacking the seam sealer when my chisel slipped then spent an hour or so finishing the left hand footwell. Think im getting the hang of it now as its coming along faster than yesterday. I modified my scraper to have round sharp edges which has helped a lot. Im hoping itl be done in a weeks time and then I can finally get some primer on it.
I think im going to take it off everywhere apart from the rear arches. Mainly because the sealant is in really good nick round there and because the wheels are spinning most of the time so paint would get shitty even if I stonechipped them.
Also had a brainwave the other day. I had a tech1 sport sitting outisede which i remebered had a bilsteins and a lowering kit on it. The car is a proper rotter so I wasnt too excited until I pulled it apart. They look to have been replaced recently as they're spot on with the exception of the wiper seals in the retaining collars. Theyre solid compared to the FK's that were on the car which I was using with 600lb springs. As I was planning to use some longer springs and go for 450lb's due to adding a roll bar, I think I'l stick with these and see how they perform before I shell out for a new pair of shocks.
Managed to haul my arse into the garage for a couple of hours despite the bollocks weather were having atm. Dressed all the welds off after cutting into my thumb whilst attacking the seam sealer when my chisel slipped
I think im going to take it off everywhere apart from the rear arches. Mainly because the sealant is in really good nick round there and because the wheels are spinning most of the time so paint would get shitty even if I stonechipped them.
Also had a brainwave the other day. I had a tech1 sport sitting outisede which i remebered had a bilsteins and a lowering kit on it. The car is a proper rotter so I wasnt too excited until I pulled it apart. They look to have been replaced recently as they're spot on with the exception of the wiper seals in the retaining collars. Theyre solid compared to the FK's that were on the car which I was using with 600lb springs. As I was planning to use some longer springs and go for 450lb's due to adding a roll bar, I think I'l stick with these and see how they perform before I shell out for a new pair of shocks.
-
martinpallot
- E30 Zone Regular
- Posts: 352
- Joined: Sat Aug 04, 2007 11:00 pm
- Location: Jersey C.I
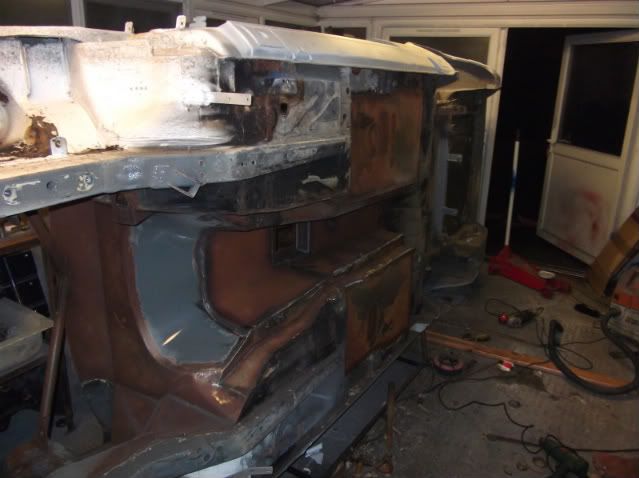
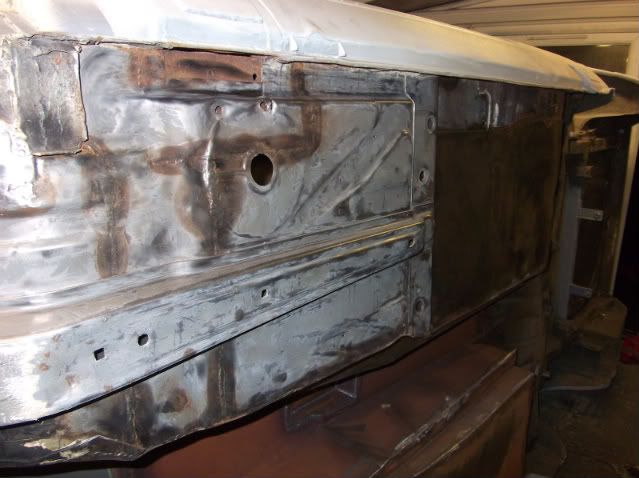
Well, all this is taking much longer than expected, but the end of the worst part seems to be in sight. So far everything apart from the the offside arches has had the rubberised sealant removed, I had most of it in a bag and ther must have been at least 10 kilos of the stuff on the bits that I took off, not including the standard tunnel and floor which were already removed. The rear arches which were destined to keep the sealer originally had to be stripped after some prodding of the screwdriver found the dreases brow plague beginning to fester.
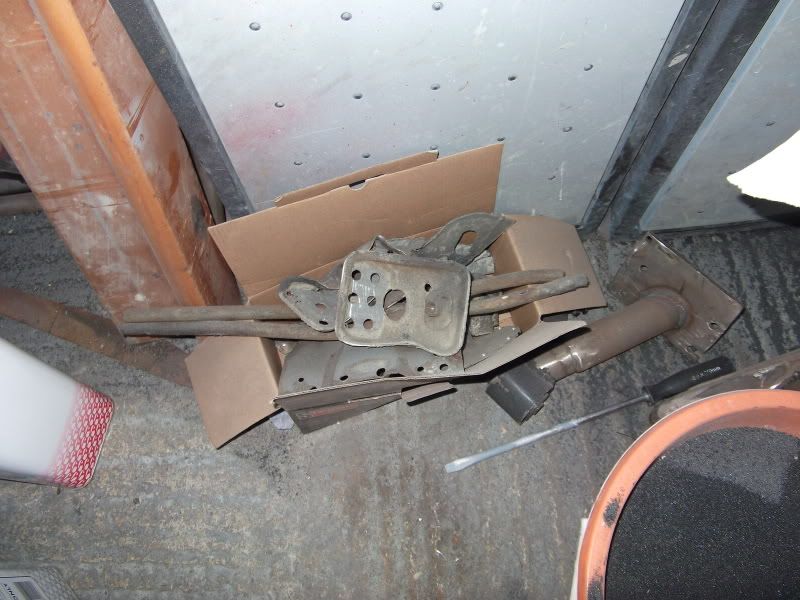
Unfortunately what removing the sealer exposed were some very crusty but not rotten areas over various bits of the car. Because of this every single bracket has been removed from the underneath and where sanblasting didnt clean up as much as I'd liked the areas have been cut out and will be plated. I also removed the standard rear spring perches as I will be making up some tunular adjustable rear arms. The centre of the rear seat area and areas of the rear floor have been panel beaten as high as possible to allow the prop and rear arm brackets not to foul as the beam will sit around 20mm higher.
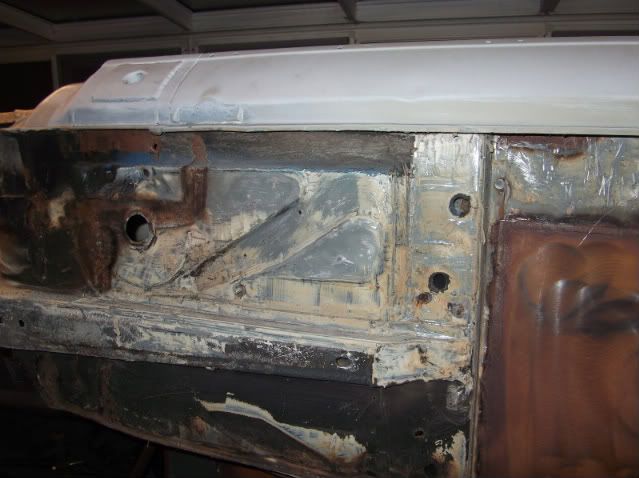
So here is the car as it stands. You may be able to see the red circles around holes which were proviously for screws and now need welding up, as well as vaious bits around the seatbelt reinforecments that were too crusty. I sanblasted the whole bottom of the car as it was rusting extremely quickly in this damp wheather


The box of brackets/rust traps removed from the underside so far. This lot on its own weighs about 2 kilos with the spring perches
Unfortunately what removing the sealer exposed were some very crusty but not rotten areas over various bits of the car. Because of this every single bracket has been removed from the underneath and where sanblasting didnt clean up as much as I'd liked the areas have been cut out and will be plated. I also removed the standard rear spring perches as I will be making up some tunular adjustable rear arms. The centre of the rear seat area and areas of the rear floor have been panel beaten as high as possible to allow the prop and rear arm brackets not to foul as the beam will sit around 20mm higher.
So here is the car as it stands. You may be able to see the red circles around holes which were proviously for screws and now need welding up, as well as vaious bits around the seatbelt reinforecments that were too crusty. I sanblasted the whole bottom of the car as it was rusting extremely quickly in this damp wheather
The box of brackets/rust traps removed from the underside so far. This lot on its own weighs about 2 kilos with the spring perches
-
jimmyspeed
- E30 Zone Regular
- Posts: 848
- Joined: Sat Sep 08, 2007 11:00 pm
- Location: riding a wagon wheel west
Awesome build !!! should be a beast when finished
I see your a dab hand at welding fabrication
im looking to buy a welder and see you've got something in the back looks like a lincoln powertec ?
is this what youve been using on the thick and thin metal or have you got a couple of sets?
keep up the good work !
I see your a dab hand at welding fabrication
im looking to buy a welder and see you've got something in the back looks like a lincoln powertec ?
is this what youve been using on the thick and thin metal or have you got a couple of sets?
keep up the good work !
Last edited by jimmyspeed on Tue Jan 18, 2011 10:50 pm, edited 1 time in total.
-
martinpallot
- E30 Zone Regular
- Posts: 352
- Joined: Sat Aug 04, 2007 11:00 pm
- Location: Jersey C.I
Thanks, I try my best
Its actually A sealey megamig 210. I use it for pretty much everything. I got this one in the summer after the wire feed controller blew up on my old 190 which I had used for around 6 years. I think you will be hard pushed to find as good for the same sort of money as these are. This newer model is much better than the old version I had before and theyve actually got cheaper over the years.
The only advice I would give to people when looking for a welder is to get a decent one with a eurotorch and at least a 180 amp rating. These little cheap 130 amp welders that people often use to 'learn' with are actually going to do your welding skilles more harm than good. Also, with a big mig you can get proper penetration when you want to weld thicker metal.
-
jimmyspeed
- E30 Zone Regular
- Posts: 848
- Joined: Sat Sep 08, 2007 11:00 pm
- Location: riding a wagon wheel west
cheers Martin
Always good to get an unbiased opinion from someone, as the sales people always say they only sell the best. The sealey looks to perform well on all thicknesses too, hadnt really considered one until seeing this thread but will do a bit of research and try and find a good deal
just need a descent workshop/conservatory next
-
martinpallot
- E30 Zone Regular
- Posts: 352
- Joined: Sat Aug 04, 2007 11:00 pm
- Location: Jersey C.I
No problem. R.e the garage, its a greenhouse if anyone asks 
Today I spent the day filling the holes. As you can see there were millions of the damn things


Unfortunately the inside of the boot now looks like this Owel, at least it wont look like a piece of swiss cheese anymore when its painted.

The postman also came today and bought some goodies, not terribly exciting but its a bit of motivation

Tomorrow, Il shoot some primer on the bare metal to keep the tin worm at bay, then I need to roll it onto the other side to do the other arches and some bits which I couldnt get to when it was this way up.
Today I spent the day filling the holes. As you can see there were millions of the damn things
Unfortunately the inside of the boot now looks like this
The postman also came today and bought some goodies, not terribly exciting but its a bit of motivation
Tomorrow, Il shoot some primer on the bare metal to keep the tin worm at bay, then I need to roll it onto the other side to do the other arches and some bits which I couldnt get to when it was this way up.
-
craigieeb
- E30 Zone Addict
- Posts: 4988
- Joined: Mon Jan 10, 2005 11:00 pm
- Location: In my man cave modifying... something
M50 Turbo!!!  I shall say no more
-
MurphyE30
- E30 Zone Addict
- Posts: 2543
- Joined: Wed Dec 22, 2010 11:00 pm
- Location: North
Awsome Build!!!
-
martinpallot
- E30 Zone Regular
- Posts: 352
- Joined: Sat Aug 04, 2007 11:00 pm
- Location: Jersey C.I
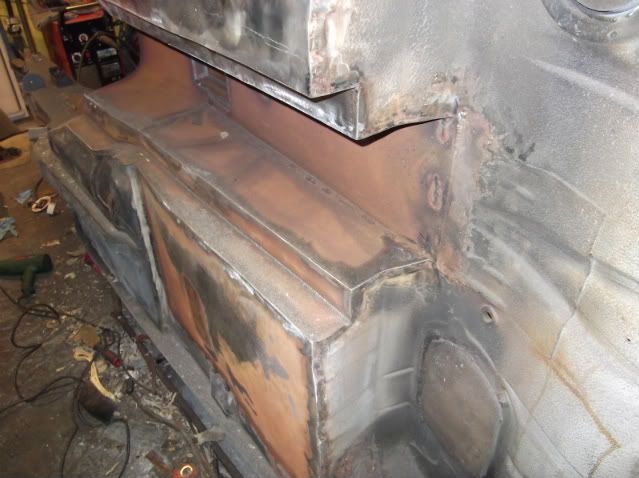
Today I put some primer on the bare metal and set about modifying the rear beam so it sits higher. I cut down the top of the beam tubes and bushes accordingly:

As you can see, this results in a favourable rise for the beam, easy fix.......

Erm, no, it now means the upper diff bracket thingy fouls on one of the rails running across the car, so the diff is effectively prohibited from goin about 10mm higher, will have to notch the rail and weld it up again, Also need to massage the rear seat area a bit more with the birmingham spanner as its rubbing atm.

To add to that the outer trailing arm mounts now sit up in the body shell and would subsequently foul on the chassis rails as the suspension travels. Theres a dimple in the rail there from the factory but this will also need to be made a fair bit bigger. See the second pic where you will be able to see what I mean.
On a better note, the mobile blaster should be coming in 2 weeks time to blast the engine bay, wheel tubs, interior and boot. After my adventures the other week doing it indoors I'd rather pay someone to do it outside then go through the ballache again Better get my arse into gear and get it ready!
As you can see, this results in a favourable rise for the beam, easy fix.......
Erm, no, it now means the upper diff bracket thingy fouls on one of the rails running across the car, so the diff is effectively prohibited from goin about 10mm higher, will have to notch the rail and weld it up again, Also need to massage the rear seat area a bit more with the birmingham spanner as its rubbing atm.
To add to that the outer trailing arm mounts now sit up in the body shell and would subsequently foul on the chassis rails as the suspension travels. Theres a dimple in the rail there from the factory but this will also need to be made a fair bit bigger. See the second pic where you will be able to see what I mean.
On a better note, the mobile blaster should be coming in 2 weeks time to blast the engine bay, wheel tubs, interior and boot. After my adventures the other week doing it indoors I'd rather pay someone to do it outside then go through the ballache again
-
beardymat
- E30 Zone Squatter

- Posts: 1979
- Joined: Tue Jun 14, 2005 11:00 pm
- Location: sheffield, city of steel, and rust apparently
now thats some awesome custom work 
almost unbelievable how far back you have got the S50, could have done with that much room in mine recently when i changed the PAS pump.
One thing though, why the change to LHD? sorry if you have covered it but didnt see an explanation.
almost unbelievable how far back you have got the S50, could have done with that much room in mine recently when i changed the PAS pump.
One thing though, why the change to LHD? sorry if you have covered it but didnt see an explanation.
No longer self employed but still available for welding duties.
-
martinpallot
- E30 Zone Regular
- Posts: 352
- Joined: Sat Aug 04, 2007 11:00 pm
- Location: Jersey C.I
Cheers
Dont think I have covered it on here actually, it was a conscious decision rather than a necesity. Space was pretty limited in the right hand footwell for both a floor mounted or bulkhead mounted pedal box becuase of the slant of the engine. It wasnt impossible but I didnt want to make things too complicated so whilst it was apart it made sense to throw the wheel in the other side.
It also means I can use a standard S50 manifold
A lot of people complain about LHD but I believe that a lot of them are moaning pansies who are simply unable to adjust. Everyone who I know that has done a lot of driving in left hooker have said that they dont care either way. Which prompts me to believe that a lot of the 'haterz' have never actually driven one.
-
Duke137
- Married to the E30 Zone
- Posts: 7207
- Joined: Sat Aug 29, 2009 11:00 pm
I drove a LHD fiat panda on Rhodes once lol
This is an epic build and you have skills! very very very cool.
This is an epic build and you have skills! very very very cool.
How do you pronounce 'either'? I say 'either', but some say 'either'. Either is correct.
-
DanThe
- E30 Zone Team Member
- Posts: 28649
- Joined: Sat Sep 10, 2005 11:00 pm
- Location: Staffs
Chop/weld FTW
Sandblasting dust is best kept outside, preferably on a windy day
Sandblasting dust is best kept outside, preferably on a windy day
-
e21Jason
- E30 Zone Addict
- Posts: 2040
- Joined: Tue Jan 11, 2005 11:00 pm
- Location: Dubai, UAE
Intresting on the LHD I was talking to guy who looks after several e30 race cars and he had corner wieghted a LHD & RHD 325 side and said the ride hieght on the LHD car is practically level compared to the RHD
Jason
Jason
BMW e21 track car supercharged s14 cage and fabrication by www.chizfab.com
Z3M Coupe for sale
69 Alfa spyder
Z3M Coupe for sale
69 Alfa spyder
-
Duke137
- Married to the E30 Zone
- Posts: 7207
- Joined: Sat Aug 29, 2009 11:00 pm
Would that be because the E30 was built in a country where LHD is norm or is that just an interesting fact do you think?e21Jason wrote:Intresting on the LHD I was talking to guy who looks after several e30 race cars and he had corner wieghted a LHD & RHD 325 side and said the ride hieght on the LHD car is practically level compared to the RHD
Jason
How do you pronounce 'either'? I say 'either', but some say 'either'. Either is correct.
-
martinpallot
- E30 Zone Regular
- Posts: 352
- Joined: Sat Aug 04, 2007 11:00 pm
- Location: Jersey C.I
Not surpsising Jason, mainly attributable to the tilt of the engine and was supposedly something which BMW did intentionaly. What you must bear in mind that BMWs are designed with the LHD market first and foremost
Today I made a start on dummy building the rear beam. First cut away the offending bracing

Then moved my attention to the beam support brackets. First I shortened the stainless tubes to mock it up, then chopped the brackets themselves. As you can see, this has effectively lowered the car 30mm without actually lowering the car, if you get my drift

Plated it in situ

then finished it off with a gusset

Because I made the mount for the e36 rear cover using the standard setup, these also need chopping. All dummy built now

tomorrow I'll notch the chssis legs to allow the outer arms more clearance. Hopefully thats the welding underneath finished!
Today I made a start on dummy building the rear beam. First cut away the offending bracing
Then moved my attention to the beam support brackets. First I shortened the stainless tubes to mock it up, then chopped the brackets themselves. As you can see, this has effectively lowered the car 30mm without actually lowering the car, if you get my drift
Plated it in situ
then finished it off with a gusset
Because I made the mount for the e36 rear cover using the standard setup, these also need chopping. All dummy built now
tomorrow I'll notch the chssis legs to allow the outer arms more clearance. Hopefully thats the welding underneath finished!
-
martinpallot
- E30 Zone Regular
- Posts: 352
- Joined: Sat Aug 04, 2007 11:00 pm
- Location: Jersey C.I
More progress made today. Chassis rails notched and plated up. Couldnt work out a decent way to brace it afterwards so just plated it with 3mm plate, should do the job.

Bit above the diff sorted.

This one is so subtle but very necessary. I'l give bragging rights to anyone who can guess whats been done and why?

Bit above the diff sorted.
This one is so subtle but very necessary. I'l give bragging rights to anyone who can guess whats been done and why?
-
CHR1S1990
- E30 Zone Camper

- Posts: 1121
- Joined: Fri Mar 14, 2008 11:00 pm
- Location: Blackpool
drivfeshaft clearance due to the highering of the beam?

-
martinpallot
- E30 Zone Regular
- Posts: 352
- Joined: Sat Aug 04, 2007 11:00 pm
- Location: Jersey C.I
CHR1S1990 wrote:drivfeshaft clearance due to the highering of the beam?
-
CHR1S1990
- E30 Zone Camper
- Posts: 1121
- Joined: Fri Mar 14, 2008 11:00 pm
- Location: Blackpool
duely received very nice project mate, been watching closely. looking forward to updates