
Can someone point me in the direction of the above.
If one exists. Car is a 325i if that helps.
Have tried an extensive search btw. Thanks.
Head changing guide.
Moderator: martauto
-
daimlerman
- **BANNED**
- Posts: 15968
- Joined: Mon Feb 27, 2006 11:00 pm
- Location: Grumpy Old Man
Tell us a little bit more,are you swapping cylinder head yourself? Do you suspect an issue with the current one? Are you confident that you can tackle the job yourself or are you checking on A N Other's work?
Youth is wasted on the young.
-
gooner1

- Out humping Reindeer
- Posts: 13280
- Joined: Fri Apr 14, 2006 11:00 pm
- Location: Northampton.For my sins.
Will be (trying) to swap the head myself Malcom. Only issue with current one is a broken exhaust manifold stud, but i want it sorted. Confident, hmm, not totally, but nothing ventured and all that. Have the chance of another head at a decent price, and as you know two heads
are better than one. Will never make a mechanic, but i feel i should at least attempt to do more.
are better than one. Will never make a mechanic, but i feel i should at least attempt to do more.


There's a guide on rebuilding a head on the wiki already but we could do with one for head changing too. Maybe you'd be up for photo graphing the affair if you don't find a guide about. That combined with some text with whoever offers for changing your head would be quick way to an article me thinks.
E46 M3 CSL but dreaming of another E30.
-
daimlerman
- **BANNED**
- Posts: 15968
- Joined: Mon Feb 27, 2006 11:00 pm
- Location: Grumpy Old Man
Now then I see what is what! This is a reasonably straightforward job as long as you take care. I would suggest that you change the cam belt at the same time,they do not like being disturbed.So, remove the radiator,this gives you more working room.Remove the fan,this has a 'left hand thread',so unfastens in the opposite direction to normal.You now need to clear all the bits that are attached to the head,both manifolds,thermostat housing etc. The rocker cover needs to come off,and the cam belt covers,the crank pulley(do not try to remove the 22mm bolt,the pulley is bolted to the bit behind it!) Unfasten the head bolts starting at each end,that is,slack off the front two,then the rear two,working your way towards the middle of the head. When you are satisfied that nothing else is still attached to the head,lift it clear,it is heavier than you think,so take care. With the head off,remove the old gasket and carefully clean the top surface of the block,it should end up smooth and shiny,smooth is more important than shiny.Look out for the two locating dowels,they can come free with the head and they can stay behind attached to the block.To fit the replacement head,cut the heads off two old head bolts(you need a set of new head bolts BTW) and screw them into the block a turn or two. Slide the head down these into position,this avoids damaging the head or block surface by scoring it with the dowels  fit a new cambelt and rebuild. As you pull it apart you should see the casting marks that tell you where the cam and crank should be positioned,after the new belt is fitted and the head torqued down,turn the engine BY HAND on the 22mm bolt for two turns and re-check the timing marks.Please note,this is an 'off the cuff' guide,a comprehensive guide is in both Haynes and Bentley and I may have missed some detail!
Youth is wasted on the young.
-
gooner1
- Out humping Reindeer
- Posts: 13280
- Joined: Fri Apr 14, 2006 11:00 pm
- Location: Northampton.For my sins.
Thanks for that Malcom. So in essence, it,s not a huge difference to a timing belt change?.
Which, incidentally , i managed to complete with a lot of help from people and info on here.
Think, i, ll collect all releveant parts, then book a couple of days off.
Which, incidentally , i managed to complete with a lot of help from people and info on here.
Think, i, ll collect all releveant parts, then book a couple of days off.
-
Taylor325i
- E30 Zone Camper

- Posts: 1120
- Joined: Sun Jan 30, 2005 11:00 pm
- Location: Kilmarnock, Ayrshire, Scotland. Brilliant Red Tech II 325i.
M20 Cylinder Head Removal
1. Decompress the fuel pressure
2. Disconnect battery
3. Remove bonnet (makes life much easier)
4. Unplug all relevant wiring (label as reqd)
5. Disconnect throttle cable
6. Unbolt throttle body from inlet manifold
7. Disconnect fuel lines (label as reqd)
8. Remove distributor cap
9. Drain coolant & remove radiator & relevant hoses
10. Unbolt exhaust manifold
11. Remove fan belt
12. Unbolt fan blades from viscous coupling
13. Set to TDC
14. Remove timing belt covers
15. Remove timing belt
16. Remove rocker cover
17. Loosen head bolts (a turn each in correct sequence)*
18. Lift head off
* This must be done in the reverse of the tightening sequence (see below)
The following new parts are a must for re-assembly
Head bolts (Torx type)
Head gasket
Timing belt & tensioner
The following new parts are optional for re-assembly (but it would be rude not to) -
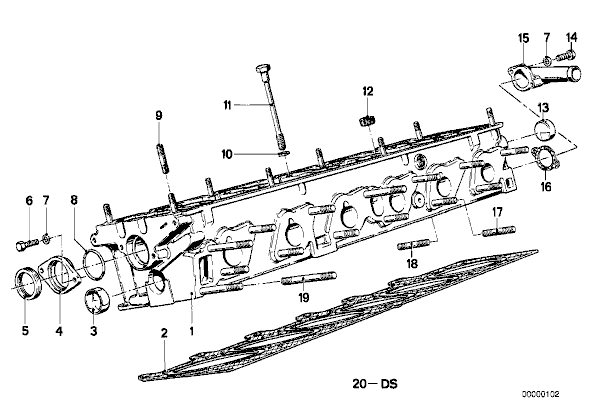
Thermostat (& housing if reqd)
Blue & Brown temperature sensors
Water pump & gasket
Rocker cover gasket
Inlet manifold gasket
Throttle body gasket
Thermostat housing gasket
Camshaft oil seal
Rocker shaft bung seals
Refitting
1. Use a gasket scrapper to clean the mating surfaces
2. Re-tap the threads in the bolt holes in the block and make sure the holes are totally free from debris/oil/water
3. Fit new head gasket
4. Use 2 old head bolts with the heads cut off as guides for lining the head onto the block (slot the tops so you can remove them with a screwdriver once the head is on
5. Tighten the head bolts in the correct sequence and to correct torque
Tightening Sequence
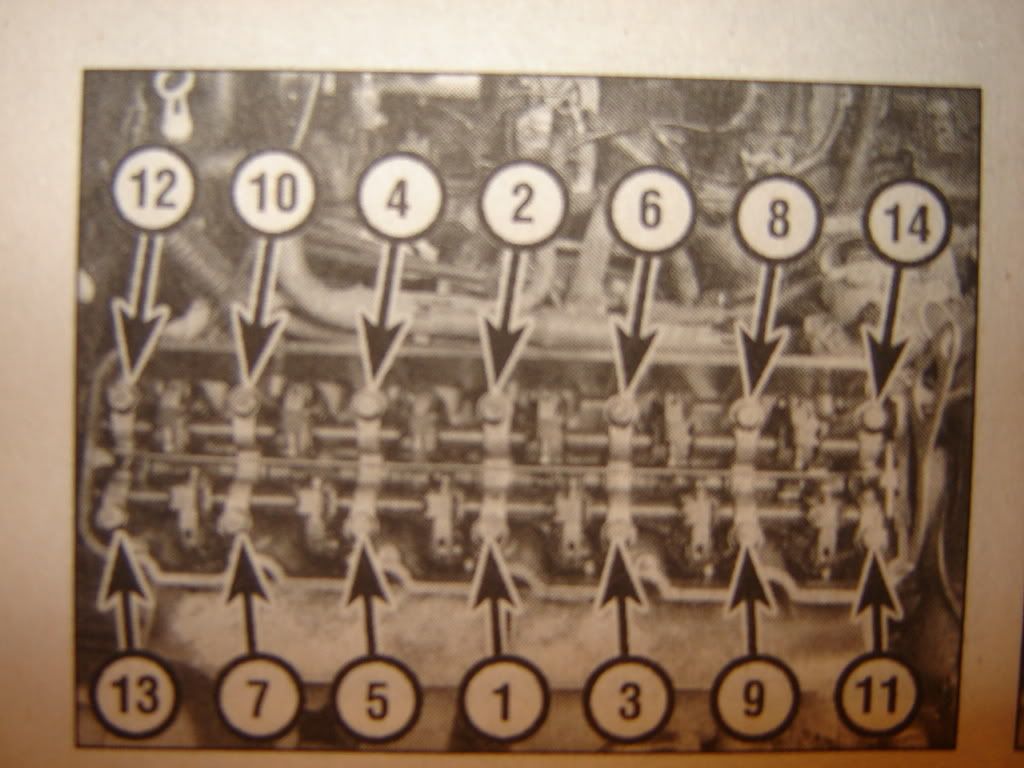
Torque Specifications For Torx Head Bolts
Stage 1 - 30Nm
Stage 2 - Angle tighten 90 degrees
Stage 3 - Angle tighten 90 degrees
The remainder is reverse of removal.
Look on wiki pages for timing belt refitting.
Somebody feel free to add this to a new wiki page and add to or edit as necessary.
Taylor.
1. Decompress the fuel pressure
2. Disconnect battery
3. Remove bonnet (makes life much easier)
4. Unplug all relevant wiring (label as reqd)
5. Disconnect throttle cable
6. Unbolt throttle body from inlet manifold
7. Disconnect fuel lines (label as reqd)
8. Remove distributor cap
9. Drain coolant & remove radiator & relevant hoses
10. Unbolt exhaust manifold
11. Remove fan belt
12. Unbolt fan blades from viscous coupling
13. Set to TDC
14. Remove timing belt covers
15. Remove timing belt
16. Remove rocker cover
17. Loosen head bolts (a turn each in correct sequence)*
18. Lift head off
* This must be done in the reverse of the tightening sequence (see below)
The following new parts are a must for re-assembly
Head bolts (Torx type)
Head gasket
Timing belt & tensioner
The following new parts are optional for re-assembly (but it would be rude not to) -
Thermostat (& housing if reqd)
Blue & Brown temperature sensors
Water pump & gasket
Rocker cover gasket
Inlet manifold gasket
Throttle body gasket
Thermostat housing gasket
Camshaft oil seal
Rocker shaft bung seals
Refitting
1. Use a gasket scrapper to clean the mating surfaces
2. Re-tap the threads in the bolt holes in the block and make sure the holes are totally free from debris/oil/water
3. Fit new head gasket
4. Use 2 old head bolts with the heads cut off as guides for lining the head onto the block (slot the tops so you can remove them with a screwdriver once the head is on
5. Tighten the head bolts in the correct sequence and to correct torque
Tightening Sequence
Torque Specifications For Torx Head Bolts
Stage 1 - 30Nm
Stage 2 - Angle tighten 90 degrees
Stage 3 - Angle tighten 90 degrees
The remainder is reverse of removal.
Look on wiki pages for timing belt refitting.
Somebody feel free to add this to a new wiki page and add to or edit as necessary.
Taylor.

-
daimlerman
- **BANNED**
- Posts: 15968
- Joined: Mon Feb 27, 2006 11:00 pm
- Location: Grumpy Old Man
You pretty much have the right idea,the post that followed mine gives a bit more detail.I would suggest that a Bentley manual (Amazon books online) would be a useful purchase...you will need a set of new headbolts and a gasket set,both available from GSF at good quality and sensible prices.A torx socket (size E14) is the only tool that is unlikely to be in your tool kit,this is essential for the headbolts.gooner1 wrote:Thanks for that Malcom. So in essence, it,s not a huge difference to a timing belt change?.
Which, incidentally , i managed to complete with a lot of help from people and info on here.
Think, i, ll collect all releveant parts, then book a couple of days off.
-
gooner1
- Out humping Reindeer
- Posts: 13280
- Joined: Fri Apr 14, 2006 11:00 pm
- Location: Northampton.For my sins.
Many thanks for the help given so far. Just another couple
of questions. Realoem list two different size gaskets.
ONE 1.75MM the other 2.05MM, which do i need.
Also, have found every part bar the Rocker Shaft Bung seals.
could someone kindly point out which part no they are.
Thank,s again.
-
daimlerman
- **BANNED**
- Posts: 15968
- Joined: Mon Feb 27, 2006 11:00 pm
- Location: Grumpy Old Man
You will get some nice new one's in with your head gasket set,an Elring one from GSF is fine.gooner1 wrote:Thanks hoshy. Just need the number of the Rocker Shaft Bung seals now.
-
gooner1
- Out humping Reindeer
- Posts: 13280
- Joined: Fri Apr 14, 2006 11:00 pm
- Location: Northampton.For my sins.
Ignore last post. Just found an old thread from Hubble which contained details of the head gasket set. It prompted another question though, can i get the head chemically cleaned
with all the internals in situ.
with all the internals in situ.
-
gooner1
- Out humping Reindeer
- Posts: 13280
- Joined: Fri Apr 14, 2006 11:00 pm
- Location: Northampton.For my sins.
Have now got a later head, and hope to start the swap on Friday.
Need some further advice on parts, forgive my ignorance, but i,d much rather look stupid than be stupid. As i,m putting a later head on an early block, do i need to order the waterpump, tensioner and thermostat for the early car or the later one. Also got the headgasket set from
GSF,what is the verdict on their Timing belt tensioner and Thermostats. Will be using a genuine
BMW waterpump and headbolts whatever the verdict.

It won't make a difference, all the water pumps timing belt kits are the same, as for the Thermostat I'm sure that will be the same too.
As for the GSF stuff, it's all fine, I'd prob get the water pump from there too, save you a bit of cash, they're all of a good spec.
As for the GSF stuff, it's all fine, I'd prob get the water pump from there too, save you a bit of cash, they're all of a good spec.
Paul.
325i sport Tech1
335i Chromie - Sold
2001 E46 M3-Sold
1999 E39 M5

325i sport Tech1
335i Chromie - Sold
2001 E46 M3-Sold
1999 E39 M5
When I did the head on my 320 I used GSF for all but the belt and head bolts. The w/pump and head set, tensioner and stat etc were all from GSF 
Depends on funds and how long you plan to keep the car. My 323 has had its water pump on for at least 17 years and no probs. It is getting OE kit all through this year when I change the belt on it. .
.
Depends on funds and how long you plan to keep the car. My 323 has had its water pump on for at least 17 years and no probs. It is getting OE kit all through this year when I change the belt on it.
'82 323i henna
'90 320iSE sterling silver No more!
'10 116d Sport Red - MkI
'12 1.4 Punto Easy Exotica Red
'11 X3 3.0d SE
'89 240 DL Estate
'90 320iSE sterling silver No more!
'10 116d Sport Red - MkI
'12 1.4 Punto Easy Exotica Red
'11 X3 3.0d SE
'89 240 DL Estate
-
gooner1
- Out humping Reindeer
- Posts: 13280
- Joined: Fri Apr 14, 2006 11:00 pm
- Location: Northampton.For my sins.
ricey46 wrote:It won't make a difference, all the water pumps timing belt kits are the same, as for the Thermostat I'm sure that will be the same too.
As for the GSF stuff, it's all fine, I'd prob get the water pump from there too, save you a bit of cash, they're all of a good spec.
Both Realoem and GSF give different part numbers for different years for the waterpumps.
No. Description Supplement Qty From Up To Part Number Price Notes
01 RMFD WATER PUMP 1 09/1987 11519071562 $77.28 Cat=No
01 RMFD WATER PUMP 1 09/1987 11519070759 $77.28

-
gooner1
- Out humping Reindeer
- Posts: 13280
- Joined: Fri Apr 14, 2006 11:00 pm
- Location: Northampton.For my sins.
Just removed the head this evening core. The last remaining hose at the bulhead end was a mare.  Was gong to initially just swap heads and move on, but now its off, think i,ll tidy up a bit in the bay while i,m at it.
-
gooner1
- Out humping Reindeer
- Posts: 13280
- Joined: Fri Apr 14, 2006 11:00 pm
- Location: Northampton.For my sins.
May have had a lucky escape today. I foolishly assumed the head i was fitting had been set to TDC before being removed, it was,nt. A Polish neighbour,who alledegedly trained as a mechanic in the Army, spotted this before i torqued the head down. Managed to set the head
using the old timing belt round the Camshaft pulley. Also managed to snap one of the bolts that
hold the lower timing case on, right inside the block, fortunateley they are very short bolts so should be able to driil it out.
using the old timing belt round the Camshaft pulley. Also managed to snap one of the bolts that
hold the lower timing case on, right inside the block, fortunateley they are very short bolts so should be able to driil it out.