
Matt's ran 80% DC but I think Dave Walker said slightly larger ones would be ideal.
My 209 was on stock (19lb?) injectors but the DC was off the scale, hence the 26lb new ones (yet to be fitted)
I was running 4.8bar on the stock injectors but I'll drop back to 3/3.5 when the bigger ones are in.
M42 Rotrex (for sale!) + track build
Moderator: martauto
-
hoshy

- E30 Zone Wiki Guru

- Posts: 4118
- Joined: Tue Jan 18, 2005 11:00 pm
- Location: Munich
E46 M3 CSL but dreaming of another E30.
-
appletree
- E30 Zone Addict

- Posts: 3479
- Joined: Fri Jan 20, 2006 11:00 pm
- Location: Retford
Ya thats right they were running at 100% DC at 3.5bar (standard) so we upped the pressure to 4 bar which lowered the DC to 80/5% and dave said they would be ok at that as it only went upto or just past 80% DC after 6krpm and it red lined at 6250 but idealy it would be better to get slightly larger injectors and back the perssure down back to standard. 
O/T hoshy did the text about the throttle position being up stream make sence?
O/T hoshy did the text about the throttle position being up stream make sence?

You should never underestimate the predictability of stupidity
M42 Supercharged 285bhp + M3 6speed box
-
hoshy
- E30 Zone Wiki Guru
- Posts: 4118
- Joined: Tue Jan 18, 2005 11:00 pm
- Location: Munich
And following on from what Matt says there, a 6250 limit is a little conservative. From what I understand the m42 is good for 7200 so I'm planning on either keeping my 7k limit or if I'm feeling like being save, down to 6800.
Matt - I'd been wondering in the back of my mind whether I got back to you about that Let me grab Corky Bell and mull it over.
Oh I'm back home now so expect the dyno print on my thread v. soon.
Matt - I'd been wondering in the back of my mind whether I got back to you about that
Oh I'm back home now so expect the dyno print on my thread v. soon.
E46 M3 CSL but dreaming of another E30.
-
rix313
- E30 Zone Team Member

- Posts: 4968
- Joined: Fri Oct 31, 2008 11:00 pm
- Location: Silverstone
How much extra over the rovers 215cc/min should I be looking at getting to reduce the amount of pressure needed? Closer to 240-50?
Local injector man recommened some over 300
Local injector man recommened some over 300
Last edited by rix313 on Sat Jan 17, 2009 11:48 am, edited 1 time in total.
-
hoshy
- E30 Zone Wiki Guru
- Posts: 4118
- Joined: Tue Jan 18, 2005 11:00 pm
- Location: Munich
Have a go with the calculator at the bottom of this page: [ur]http://www.rceng.com/technical.aspx[/url]
E46 M3 CSL but dreaming of another E30.
-
rix313
- E30 Zone Team Member
- Posts: 4968
- Joined: Fri Oct 31, 2008 11:00 pm
- Location: Silverstone
I've got some injectors from an Audi TT Turbo good for 225BHP. Flow rate is 279cc/min @ 3bar, I had them ultrasonicaly cleaned and reconditioned

Test result sheet:

Also got an FSE adjustable regulator and also a gauge for setup.

Test result sheet:
Also got an FSE adjustable regulator and also a gauge for setup.
-
rix313
- E30 Zone Team Member
- Posts: 4968
- Joined: Fri Oct 31, 2008 11:00 pm
- Location: Silverstone
Had a pretty good day today, the main aim was just to get the interooler bolted in and very happy with how it worked:
New cooler

Simple L shaped bracket to bolt onto the chassis

Managed to get a stuck bolt out and removed the front end

Bolted the cooler to the bracket, offered it up and checked it with a spirit level, then drilled holes for the Rivnuts to go into.

Checked it then drilled a second set of holes to make it secure and painted it brilliant red.


It was still abit wobly as expected so had to pretty much guesstimate where the top mount would line up with but got it smack on Put a bolt through it and now it's rock 'ard.


Put the front end back on althought will probably come off for a new one as the lower part is bent out of shape where some one has probably driven it into a kurb.

Whats also really good it my fan and radiator setup fits in perfectly behind it so nice neat little arrangement for cooling. I will need to trim some small bits out of the bumper to allow for the hoses to clear it but appart from that it's brilliant.
I also took the ali door cards off and to my shock I found the windows where held up with two bits of wood
I had been planning to fit some manual window mechanisms so bought a set of them but was a bit worried that the center sections of the doors had been removed previously for weight saving, thankfuly when I got the cards off the middles where still in so that saved me a job (althought the handle parts were removed to add to the door cards).

Good times

Comments
P.s. Going to be getting my strut brace remade after it was bent to fit over the inlet
New cooler
Simple L shaped bracket to bolt onto the chassis
Managed to get a stuck bolt out and removed the front end
Bolted the cooler to the bracket, offered it up and checked it with a spirit level, then drilled holes for the Rivnuts to go into.
Checked it then drilled a second set of holes to make it secure and painted it brilliant red.
It was still abit wobly as expected so had to pretty much guesstimate where the top mount would line up with but got it smack on
Put the front end back on althought will probably come off for a new one as the lower part is bent out of shape where some one has probably driven it into a kurb.
Whats also really good it my fan and radiator setup fits in perfectly behind it so nice neat little arrangement for cooling. I will need to trim some small bits out of the bumper to allow for the hoses to clear it but appart from that it's brilliant.
I also took the ali door cards off and to my shock I found the windows where held up with two bits of wood
I had been planning to fit some manual window mechanisms so bought a set of them but was a bit worried that the center sections of the doors had been removed previously for weight saving, thankfuly when I got the cards off the middles where still in so that saved me a job (althought the handle parts were removed to add to the door cards).
Good times
Comments
P.s. Going to be getting my strut brace remade after it was bent to fit over the inlet
Last edited by rix313 on Tue Feb 10, 2009 7:33 pm, edited 2 times in total.
-
armanib
- **BANNED**
- Posts: 1241
- Joined: Mon Jan 12, 2009 11:00 pm
- Location: under dogfaces tits
Can you supercharge and turbo?
-
GrindCulture
- E30 Zone Addict
- Posts: 2955
- Joined: Mon Mar 03, 2008 11:00 pm
- Location: Exeter
Yes.armanib wrote:Can you supercharge and turbo?
Not in E30s any more 
-
appletree
- E30 Zone Addict
- Posts: 3479
- Joined: Fri Jan 20, 2006 11:00 pm
- Location: Retford
Great work rich, looks well neet, ive just come back from site and will sort you out some dimensions out for the pully ive got for you. do you want me to mod it for you?
theres a small spacer to make too but i havent got the material to do that for you or i could offer to do that to.
Is that FPR from dave? if it is you need to get an adaptor for it, you need one anyway, it plugs in to the hole were the origonal one went and directs the fuel to the FPR.
theres a small spacer to make too but i havent got the material to do that for you or i could offer to do that to.
Is that FPR from dave? if it is you need to get an adaptor for it, you need one anyway, it plugs in to the hole were the origonal one went and directs the fuel to the FPR.
You should never underestimate the predictability of stupidity
M42 Supercharged 285bhp + M3 6speed box
-
rix313
- E30 Zone Team Member
- Posts: 4968
- Joined: Fri Oct 31, 2008 11:00 pm
- Location: Silverstone
Cheers
I got it from a local motorsport supplier was able to pick it up same day and was a tad cheaper I was wondering how yours was at the other end of the rail what have you done?
Be handy if you could do it all and I'll bundle you sone ££ like but failing that should be able to sort it my end with some info
I got it from a local motorsport supplier was able to pick it up same day and was a tad cheaper
Be handy if you could do it all and I'll bundle you sone ££ like but failing that should be able to sort it my end with some info
-
appletree
- E30 Zone Addict
- Posts: 3479
- Joined: Fri Jan 20, 2006 11:00 pm
- Location: Retford
I could do it if your not in a major rush or i can send you mine and i'll make a new one, either way i havent got any material big enough.
it needs to be a piece of solid round ally, 4" dia and 2" long so ive got some thing to holed in the chuck if you supply it i'll do it.
it needs to be a piece of solid round ally, 4" dia and 2" long so ive got some thing to holed in the chuck if you supply it i'll do it.
You should never underestimate the predictability of stupidity
M42 Supercharged 285bhp + M3 6speed box
-
rix313
- E30 Zone Team Member
- Posts: 4968
- Joined: Fri Oct 31, 2008 11:00 pm
- Location: Silverstone
I'll speak to the bloke who did my fly wheel and see if he can buzz me one out to send over.
How's your FPR set up?
How's your FPR set up?
-
e30_Turbo
- Boost Junkie
- Posts: 3158
- Joined: Mon Jan 10, 2005 11:00 pm
- Location: East Anglia
Looking good dude!
I got the new blower on, had to do some mods to the rocker cover but it's on and works
I got the new blower on, had to do some mods to the rocker cover but it's on and works

-
rix313
- E30 Zone Team Member
- Posts: 4968
- Joined: Fri Oct 31, 2008 11:00 pm
- Location: Silverstone
-
appletree
- E30 Zone Addict
- Posts: 3479
- Joined: Fri Jan 20, 2006 11:00 pm
- Location: Retford
On the reg end? theres an adaptor plug. it fits in to the old hole and is the same as the old reg but streight through so the new one can regulater the presssure remotely. the rail, adaptor and hose to the new FPR are all at the set pressure.
Dont get him to cut anything yet, let me get you some propper measurements, ill do it tomorrow.
Dont get him to cut anything yet, let me get you some propper measurements, ill do it tomorrow.
You should never underestimate the predictability of stupidity
M42 Supercharged 285bhp + M3 6speed box
-
e30_Turbo
- Boost Junkie
- Posts: 3158
- Joined: Mon Jan 10, 2005 11:00 pm
- Location: East Anglia
It'll need remapping but as to how much I'm not sure, it's bigger but not by much, will see on weds when I get to play with it again.rix313 wrote:You need to do much work to the management to accept the extra puf or it quite straight forward?
-
rix313
- E30 Zone Team Member
- Posts: 4968
- Joined: Fri Oct 31, 2008 11:00 pm
- Location: Silverstone
What thread does it need to be found these on ebay:
http://cgi.ebay.co.uk/Facet-Fuel-Pump-U ... 0147087837
http://cgi.ebay.co.uk/Facet-Fuel-Pump-U ... 0147067606
Then just need to run a small pipe to the reg?
Nice one Fozz, look forward to seeing everything finished
http://cgi.ebay.co.uk/Facet-Fuel-Pump-U ... 0147087837
http://cgi.ebay.co.uk/Facet-Fuel-Pump-U ... 0147067606
Then just need to run a small pipe to the reg?
Nice one Fozz, look forward to seeing everything finished
Last edited by rix313 on Sun Jan 25, 2009 9:48 pm, edited 1 time in total.
-
tomson
- E30 Zone Addict
- Posts: 3598
- Joined: Sun Nov 06, 2005 11:00 pm
- Location: Bristol
Great work there!
-
e30_Turbo
- Boost Junkie
- Posts: 3158
- Joined: Mon Jan 10, 2005 11:00 pm
- Location: East Anglia
rix313 wrote: Nice one Fozz, look forward to seeing everything finished


-
appletree
- E30 Zone Addict
- Posts: 3479
- Joined: Fri Jan 20, 2006 11:00 pm
- Location: Retford
Nearly, you use the origonal clamp to hold it in place.


The pully pics


The pully pics
You should never underestimate the predictability of stupidity
M42 Supercharged 285bhp + M3 6speed box
-
rix313
- E30 Zone Team Member
- Posts: 4968
- Joined: Fri Oct 31, 2008 11:00 pm
- Location: Silverstone
Sweet cheers bud, which of those adaptors will fit in the rail?
-
appletree
- E30 Zone Addict
- Posts: 3479
- Joined: Fri Jan 20, 2006 11:00 pm
- Location: Retford
Neither, you need to buy the alloy bit with the rbber orings on or make one, mine cost £8 but i cant remember were i got it from. maybe try ringin gthe people you bought it from?
You should never underestimate the predictability of stupidity
M42 Supercharged 285bhp + M3 6speed box
-
appletree
- E30 Zone Addict
- Posts: 3479
- Joined: Fri Jan 20, 2006 11:00 pm
- Location: Retford
This company sell them as part of a kit so may be able to sell you one sepertly
http://cgi.ebay.co.uk/FSE-POWER-BOOST-V ... 0003r13120
http://cgi.ebay.co.uk/FSE-POWER-BOOST-V ... 0003r13120
You should never underestimate the predictability of stupidity
M42 Supercharged 285bhp + M3 6speed box
-
Phill172
- E30 Zone Camper

- Posts: 1117
- Joined: Wed Feb 20, 2008 11:00 pm
- Location: Basingstoke
that intercooler sits in disgustingly well! coming on nicely, so whats the next stages of the build? good work!
-
rix313
- E30 Zone Team Member
- Posts: 4968
- Joined: Fri Oct 31, 2008 11:00 pm
- Location: Silverstone
Um I'm doing bits and bobs around the car as well as the S/C. Gotta do boring stuff like sort the windows out but, the next stage is to get my new engine delivered and on a stand so we can then start cleaning it up and building the super charger onto the side of it. Toying with the idea of getting some uprated cams but will see. Get the old engine out and smarten up the engine bay then drop the new one in.
Should keep me busy for a month or two lol
-
appletree
- E30 Zone Addict
- Posts: 3479
- Joined: Fri Jan 20, 2006 11:00 pm
- Location: Retford
Pully spacer is now done, just got to machine a new crank washer up for you.
Some pics, its come out nicer than the one i made for myself


Some pics, its come out nicer than the one i made for myself
You should never underestimate the predictability of stupidity
M42 Supercharged 285bhp + M3 6speed box
-
rix313
- E30 Zone Team Member
- Posts: 4968
- Joined: Fri Oct 31, 2008 11:00 pm
- Location: Silverstone
Looks mucking fagic cheers mate
Will post up some pictures of my head lights when I have them all wired in propa. Got the near side ready to go just going to add a multipin plug to it can easily be removed later. The pods require some modding but other than that it is pretty much plug in and play ;)
Will post up some pictures of my head lights when I have them all wired in propa. Got the near side ready to go just going to add a multipin plug to it can easily be removed later. The pods require some modding but other than that it is pretty much plug in and play ;)
-
hoshy
- E30 Zone Wiki Guru
- Posts: 4118
- Joined: Tue Jan 18, 2005 11:00 pm
- Location: Munich
show us them lights build pics then
E46 M3 CSL but dreaming of another E30.
-
rix313
- E30 Zone Team Member
- Posts: 4968
- Joined: Fri Oct 31, 2008 11:00 pm
- Location: Silverstone
Ok well here’s something that I hope will benefit every one doing F/I projects with FMICs.
I have done a dual to single head light unit conversion to so the inner high beam units to be removed to allow for IC pipe work.
I managed to source some single units which house side, dip and main beam from Vehicle Wiring Products.

First thing I did was get the lens off the dip beam E30 unit. It wasn’t easy to get off to say the least. It requires running a Stanley knife blade around the lens several times to try and remove as much of the sealer as possible; then need to wedge a screw driver underneath and try to get the lens moving all the time still cutting away the sealer. It takes quite a long time and on the first unit I ended taking some chunks out of the plastic rim with the screw driver oops.
Once it’s free the silver backing to the light comes out and left me with the shell which will hold the new light unit.
I had to make some modifications to the inside to make sure the unit sat in nicely. Did the first bits with snips then tidied it up with my die grinder. Then I painted the inside black just for effect.

The lighting units had little prongs on them, I didn’t fancy taking a grinder to them and cutting them off so just cut some slits into the casing to allow the lights to sit in them. As can be seen I also cut the holders in half to allow for the hoses etc and they aren’t needed. I used the OEM side light fixing and wire as it was easier just to bung it in and clip the wire to the frame.
Then the light literally drops in it’s a very nice fit. Just needed filling with silicone sealer to hold it in place. The unit sits a few little higher than the standard unit but you cannot tell one bit and the silver rings slip on over just fine. The only difference is the lens is domed as opposed to flat.


Wiring:
I have been lead to believe that the H4 bulb cannot take both the current of the dip and main beam as it would just get too hot and bye bye bulb. So I'm going to use a 5 pin relay to switch between the two filaments.
What I'm going to do is use the dip beam 12v feed as the 12v feed for both the dip and main beam and switch between the two using the full beam circuit. So when the dip beam is switched, power goes to pin 87a to power the dip beam, when the full beam stalk is switched, it will send a current to pin 86 pulling the contact over to pin 87 (full beam side). This shouldn't be a problem with fuses as both lights use a 7.5amp fuse.
Then send the outputs to a water proof plug to allow seperation if I wanted to which then go to a plug on the bulb.
Diagram:

I have done a dual to single head light unit conversion to so the inner high beam units to be removed to allow for IC pipe work.
I managed to source some single units which house side, dip and main beam from Vehicle Wiring Products.
First thing I did was get the lens off the dip beam E30 unit. It wasn’t easy to get off to say the least. It requires running a Stanley knife blade around the lens several times to try and remove as much of the sealer as possible; then need to wedge a screw driver underneath and try to get the lens moving all the time still cutting away the sealer. It takes quite a long time and on the first unit I ended taking some chunks out of the plastic rim with the screw driver oops.
Once it’s free the silver backing to the light comes out and left me with the shell which will hold the new light unit.
I had to make some modifications to the inside to make sure the unit sat in nicely. Did the first bits with snips then tidied it up with my die grinder. Then I painted the inside black just for effect.
The lighting units had little prongs on them, I didn’t fancy taking a grinder to them and cutting them off so just cut some slits into the casing to allow the lights to sit in them. As can be seen I also cut the holders in half to allow for the hoses etc and they aren’t needed. I used the OEM side light fixing and wire as it was easier just to bung it in and clip the wire to the frame.
Then the light literally drops in it’s a very nice fit. Just needed filling with silicone sealer to hold it in place. The unit sits a few little higher than the standard unit but you cannot tell one bit and the silver rings slip on over just fine. The only difference is the lens is domed as opposed to flat.
Wiring:
I have been lead to believe that the H4 bulb cannot take both the current of the dip and main beam as it would just get too hot and bye bye bulb. So I'm going to use a 5 pin relay to switch between the two filaments.
What I'm going to do is use the dip beam 12v feed as the 12v feed for both the dip and main beam and switch between the two using the full beam circuit. So when the dip beam is switched, power goes to pin 87a to power the dip beam, when the full beam stalk is switched, it will send a current to pin 86 pulling the contact over to pin 87 (full beam side). This shouldn't be a problem with fuses as both lights use a 7.5amp fuse.
Then send the outputs to a water proof plug to allow seperation if I wanted to which then go to a plug on the bulb.
Diagram:
Last edited by rix313 on Tue Mar 03, 2009 6:20 pm, edited 4 times in total.
-
tinnaM42

- E30 Zone Regular

- Posts: 468
- Joined: Fri Jun 13, 2008 11:00 pm
- Location: leeds
ur build looks awsome mate
-
rix313
- E30 Zone Team Member
- Posts: 4968
- Joined: Fri Oct 31, 2008 11:00 pm
- Location: Silverstone
^ Cheers bud
My new engine has now arrived (thanks to Omi) really chuffed, means I can get on sorting out how it’ll all go together etc.
I bought my self a nice new engine stand to put it on, now I can start looking how the S/C and alternator will go on, get my newly balanced clutch and lightened fly wheel on and also my new pulley wheel (thanks Matt).
I want to give it a good clean and maybe a splash of paint to smarten it up. What paint will I need to paint the block? What sort or prep will I need to do to it?

I invested in a new set of gaskets for the inlet and exhaust manifolds as well as new thermostat gaskets and seals, some bits were ok on the engine but I wanted the piece of mind that I had fitted new ones and nothing would be a problem.

Also, I have wanted to do an oil filter relocation set up. Thought it could be a nice addition to ye old engine bay and if I ever felt the need could always add a cooler too with no head aches.
Got a good price on the take off plate to be bolted to block.
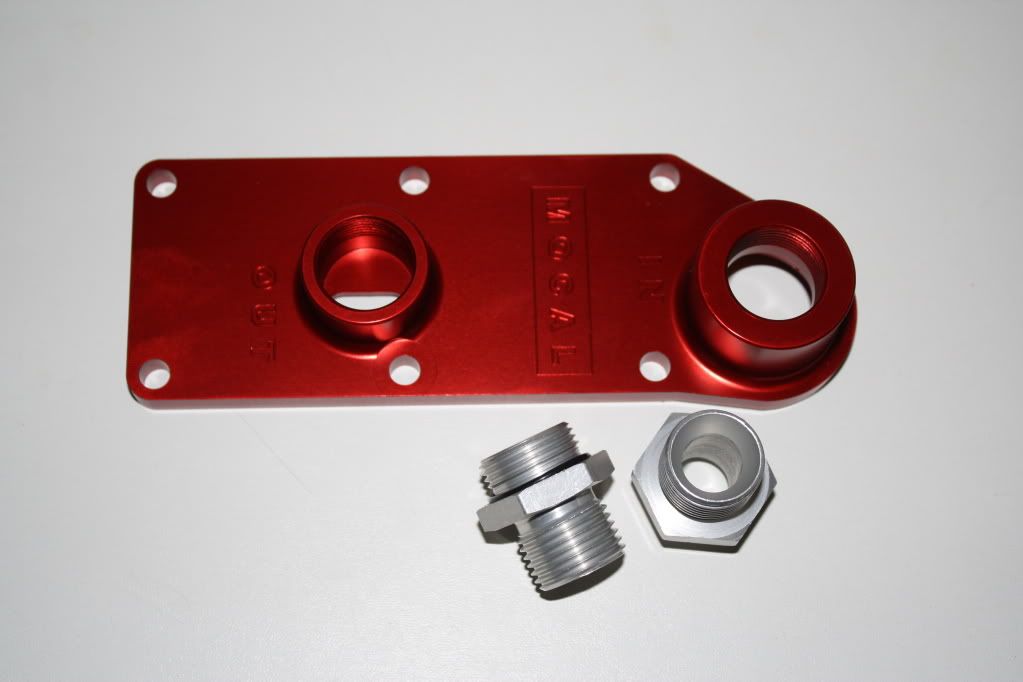
Got all my unions and bits today too:


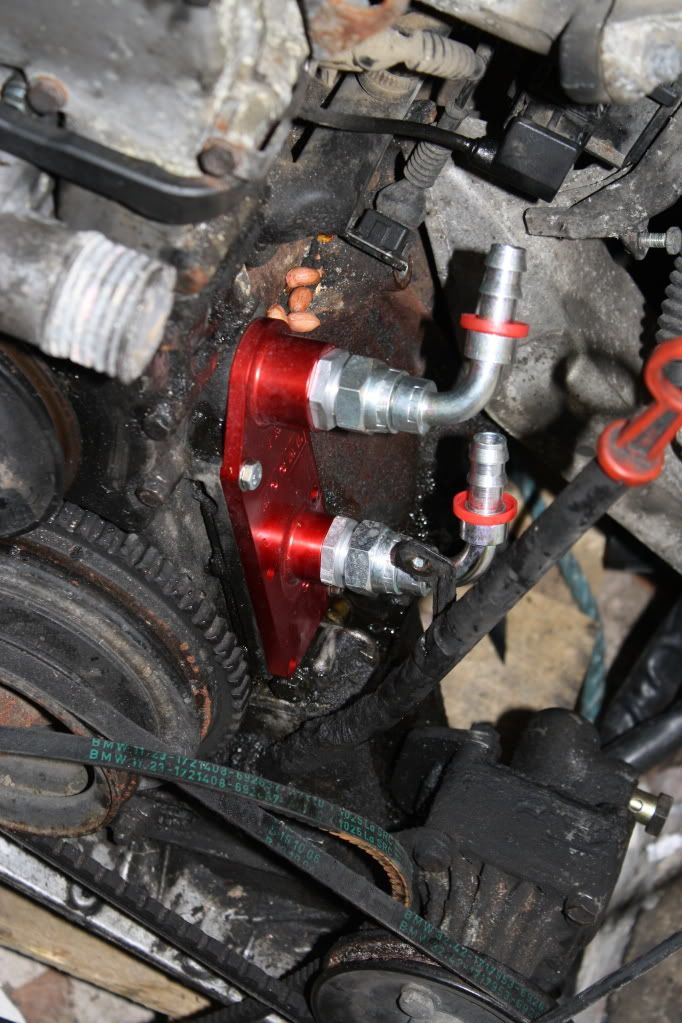
Now for another of my wood, glue and metal, blue peter stylee mock ups I made a mock up of a remote head so I could find a position for it.

I was going to put it behind the N/S head light but thought there's already alot going on on that side so decided against it. I then remembered that I'm going to be moving the battery to the boot freeing up the space over there. There's space behind the engine to run the pipe work so its won first prize on going there, comme ca:

Big thanks to 'Think Automotive' who supplied me with the take off plate and also a custom remote head tapped to M12 x 1.5 thread for the OEM pressure switch.
UPDATE: Head arrived and got the pressure switch fitted:


Then placed it where it will eventualy live:

I also got a new front valance from Oakey. Mine was bent where it must’ve hit a kerb previously and was a bit tatty so got a nice new one. Cut some material out so that the cooler hosing doesn’t rub and fail. Loads of room there now.


Got both my head lights in and wired up, whacked the grilles on to see how it looked


So almost got the front end all built up working back into the engine bay now. Not in any real rush to remove the engine as I’m bit tight for space. I will try and do a long weekend of engine removal and re-fitment but knowing me that’ll change lol. Also, I bought some aluminium to chop up to make some new door cards.
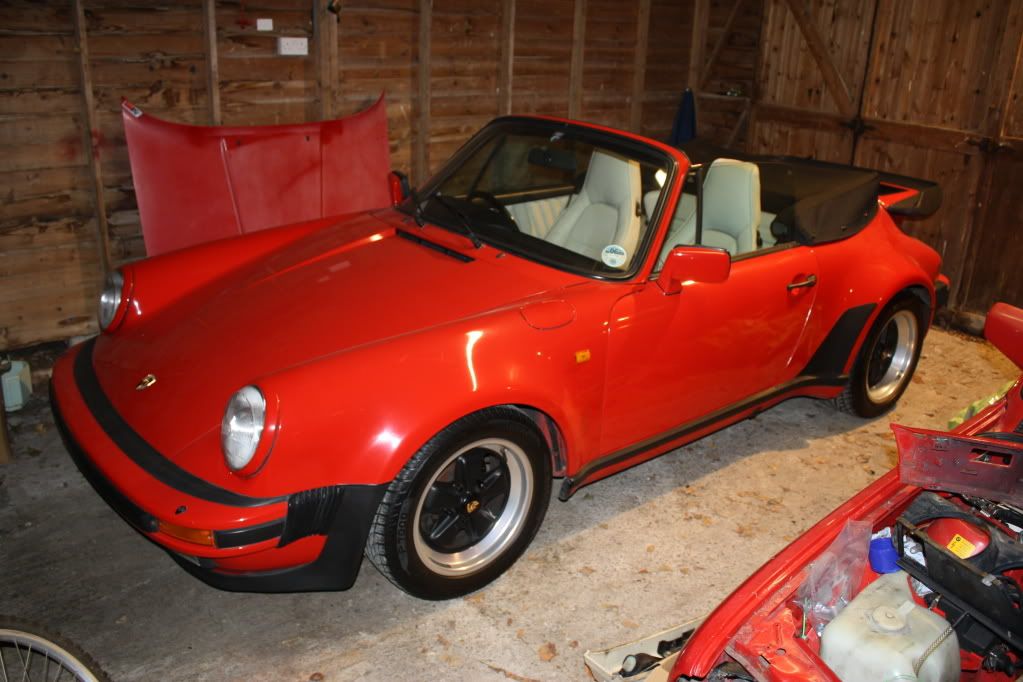
AND a shameles pic of dad's red German toy:
My new engine has now arrived (thanks to Omi) really chuffed, means I can get on sorting out how it’ll all go together etc.
I bought my self a nice new engine stand to put it on, now I can start looking how the S/C and alternator will go on, get my newly balanced clutch and lightened fly wheel on and also my new pulley wheel (thanks Matt).
I want to give it a good clean and maybe a splash of paint to smarten it up. What paint will I need to paint the block? What sort or prep will I need to do to it?
I invested in a new set of gaskets for the inlet and exhaust manifolds as well as new thermostat gaskets and seals, some bits were ok on the engine but I wanted the piece of mind that I had fitted new ones and nothing would be a problem.
Also, I have wanted to do an oil filter relocation set up. Thought it could be a nice addition to ye old engine bay and if I ever felt the need could always add a cooler too with no head aches.
Got a good price on the take off plate to be bolted to block.
Got all my unions and bits today too:
Now for another of my wood, glue and metal, blue peter stylee mock ups
I was going to put it behind the N/S head light but thought there's already alot going on on that side so decided against it. I then remembered that I'm going to be moving the battery to the boot freeing up the space over there. There's space behind the engine to run the pipe work so its won first prize on going there, comme ca:
Big thanks to 'Think Automotive' who supplied me with the take off plate and also a custom remote head tapped to M12 x 1.5 thread for the OEM pressure switch.
UPDATE: Head arrived and got the pressure switch fitted:
Then placed it where it will eventualy live:
I also got a new front valance from Oakey. Mine was bent where it must’ve hit a kerb previously and was a bit tatty so got a nice new one. Cut some material out so that the cooler hosing doesn’t rub and fail. Loads of room there now.
Got both my head lights in and wired up, whacked the grilles on to see how it looked
So almost got the front end all built up working back into the engine bay now. Not in any real rush to remove the engine as I’m bit tight for space. I will try and do a long weekend of engine removal and re-fitment but knowing me that’ll change lol. Also, I bought some aluminium to chop up to make some new door cards.
AND a shameles pic of dad's red German toy:
Last edited by rix313 on Mon Jul 20, 2009 4:19 pm, edited 1 time in total.
-
rix313
- E30 Zone Team Member
- Posts: 4968
- Joined: Fri Oct 31, 2008 11:00 pm
- Location: Silverstone
Been out in the garage doing more bits and bobs, finaly built my engine stand so just gotta get the bolts to bolt the engine onto it with and an engine crane and get it up on there.
Started pulling bits off of the engine today though, removed the alternator and associated brackets (to be relocated), the OE oil filter housing and the clutch. Also did some constructive work, cleaned up the thermostat housing and fitted the new ring and gasket; then to see how it fitted, I loosely bolted my oil take off plate onto the engine, as can be seen it still needs a fecking good clean:
Then put my exhaust wrap insulation on the.......exhaust

(that black cable tie will be replaced for a stainless one when the new ones arrived)
Also wired up my electric fan, just need to get my 12v over there from the fuse box and will test the thermo-switch with a heat gun or something:


Just a pic of the SFS coolant hoses that I had made:


Also planing with how the charge hoses will go:


And here's my white board of thoughts and daily jobs:

Started pulling bits off of the engine today though, removed the alternator and associated brackets (to be relocated), the OE oil filter housing and the clutch. Also did some constructive work, cleaned up the thermostat housing and fitted the new ring and gasket; then to see how it fitted, I loosely bolted my oil take off plate onto the engine, as can be seen it still needs a fecking good clean:
Then put my exhaust wrap insulation on the.......exhaust
(that black cable tie will be replaced for a stainless one when the new ones arrived)
Also wired up my electric fan, just need to get my 12v over there from the fuse box and will test the thermo-switch with a heat gun or something:
Just a pic of the SFS coolant hoses that I had made:
Also planing with how the charge hoses will go:
And here's my white board of thoughts and daily jobs:
Last edited by rix313 on Mon Apr 06, 2009 12:04 am, edited 1 time in total.
-
appletree
- E30 Zone Addict
- Posts: 3479
- Joined: Fri Jan 20, 2006 11:00 pm
- Location: Retford
Nice work rich, realy liking the silicone hoses!
Shame i cant use them in mine, id have to mod the boost pipework to get it to fit.
Can you make any shape hose with in reason?
Shame i cant use them in mine, id have to mod the boost pipework to get it to fit.
Can you make any shape hose with in reason?
You should never underestimate the predictability of stupidity
M42 Supercharged 285bhp + M3 6speed box
-
rix313
- E30 Zone Team Member
- Posts: 4968
- Joined: Fri Oct 31, 2008 11:00 pm
- Location: Silverstone
One off tooling for the silicone hose's is very expensive. Those where made to match the OE ones to obviously be sold on so I gladly didn't have to foot the bill for tooling.
They can be made to go how ever you want them to though should you need it
They can be made to go how ever you want them to though should you need it