current mods are...
1 ) bmw z3 steering rack, (after trying the e36 rack and finding it wasn't quite enough).
2 ) full polybush set
3 ) currently running alpina type shocks but will have full challenge spec bilsteins soon when finances allow
4 ) alloy top mounts (home made) on rear
5 ) rear strut brace
6 ) quickshift linkage and weighted gearknob/stick
7 ) weight reduction (27kg's of sound deadening ang speakers removed)
8 ) hydraulic handbrake fitted (home made again) and an extra set of calipers attached to rear arms.
9 ) 325i LSD rebuilt with ford clutch pack and a 4.45:1 cwp fitted.
10 ) quick release aluminium spare wheel post fitted (home made again).
11 ) Aluminium quick release spotlight brackets fitted (you guessed it home made)
12 ) tank guard fitted (home made) and modified original bmw sump guard fitted too.
13 ) interior lights upgraded for plotting
14 ) raised/stiffer springs all round currently budget bits an bobs jobbies although the back end feels great spring wise so that'll be staying when i convert the front end to coil overs (which will be home made of course).
15 ) stud and nut conversio
16 ) z3 diff bush (stiffer than stock)
17 ) modified sump (see pic) although this was replaced due to unnecesscary oil wastage occuring ha ha
18 ) modified and strengthened front subframe which the sump guard bolts to.
19 ) shiny look at me mud flaps fitted.
yet to do...
1 ) fit my front alloy top mounts (home made again)
2 ) make a smaller spring height adjustable coil over kit for front end
3 ) remove sunroof mechanism and seal up permanently
4 ) 18 point safety devices roll cage arriving shortly so will be fitting that.
5 ) battery cut off switch waiting to be fitted
6 ) navigators footrest needs fitting (home made too see pic)
7 ) i'm currently modifying a set of front headlights to take 'h4 bulbs too as it's neccescary for the new road raly rules if i'm to blank of the inner main beams.
8 ) i'm going to make an escort style world cup crossmember for the car and am looking to do something to the gearbox mounts too
9 ) i've currently got a freebee bucket seat and a good set of harnesses to go in so after my cage is fitted they'll be going in to an eventually being replaced by sparco evo seats when i can afford it.
thats all i can think of that i've done so far but i'll keep you posted on it as an when things get done. cheers


part 2
a couple of updates on the car the first is that i forgot to add 'fast road clutch' to the list above. the second is that i've started to install the cage. and when i say started i mean hardly anything. it's been hammering down all day and i'm working outside so thats an explanation to why so littles been done it's not cos i'm lazy ha ha!
heres a few pics of the cage firstly for those of you who haven't seen a safety devices 18 pointer (me up until last week ).


if you're wondering i'm the idiot in the drivers seat (well sort of drivers seat) and the navigator is my mate garth. you'll be pleased to know that the final results of that livingroom-carpetbagger rally we actually came runner up! only the settee beat us by the narrrowest of margins.
Anyway the first job was to remove the rear seats again and remove my rear strut brace which is now incidentally completely useless to me . waste eh? next i lined up the fancy brackets that came with the cage as best as i could and started cutting the hole which the cage will come through.


currently i'm still waiting on the rest of my cage parts to arrive so i'm only really plodding at the mo.
part 3
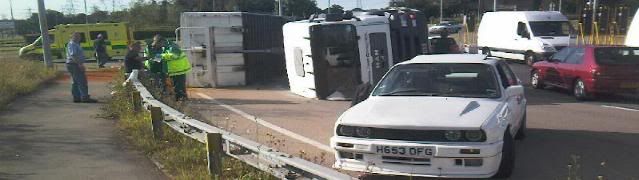
heres a couple of piccys of the car in action too.


part 4
i've finally had chance to start fitting the cage again today so here's whats been done...
firstly i cut out the pass side 'hole' for the cage mount to pass through and put some safe edge on it to make it look pretty and as i superglued it on it'll also seal the paint up to prevent rust.

next came the seat belt removal and door pillar trim ready for me to mess about with the main hoop.

the rest of the trim from above the dash also came out and i removed the headlining and folded it back so i could see the roof. the dashboard was then taken out which left a mass of nasty looking wires and cables which could cause rattles or at least look untidy so i set about clearing these up and also removing the sound deadening.

looks a lot better now and makes things easier to distinguish too!

part 5
another update for you, started to trial fit the cage today and found that i'd have to remove all the sunroof mechanism and parts after all not just part of it like i'd hoped for. so i spent nearly all day removing it and grinding the roof apart! to make things more difficult it hammered down most of the day although intermittently but i managed nonetheless i just got a bit wetter .
after removing the sunroof mechanism itself i found that there was alot more involved and here you can see the rest of the bits that needed removing.

it's difficult to see from this pic but theres the extra metal work that needed removing from inside the roof itself.

after carefully grinding the roof apart heres the extra sheet that comes with the sunroof. it weighs 4kg odd.

after removing the roof lining i then had to trim the rest of the lip out that was left as you can see in the photo, this was mostly glued on but was also welded on in some places by a tab which you can see in the photos. this had to be done very carefully as this was directly touching the outer roof skin and obviously i didn't want to damage it!


here you can see that the sunroof has been totally removed and trimmed and now looks a lot nicer and lighter!!

finally i got around to trial fitting the cage again but due to the weather really closing in i had to call it a day.

on the plus side after this work in the last two days i found that i've removed an extra 44kgs from the car (i've bought a little kitchen scales and been weighing everything i've taken out i've even kept a little list of everything (sad i know eh). the car is now sitting outside semi wrapped in industrial cling film (it's all i had to weatherproof it) .
part 6
how do again,
well heres another update for you, started the day straight off nights as it wasn't raining and i wanted to make the most of the weather by firstly getting the sunroof back in!
first job was to lighten the sunroof panel which was riduculously heavy to start with for such a relatively small piece of steel. i took off the outer seal and scraped off the sound proofing and then i saw that there were actually two layers to the skin so i set about grinding out the spot welds and scraping throught the glue. the result being that the sunroof now weighs alot less and looks the same from the outside. below is a picture of most of what was removed from the sunroof itself.

next I needed to put the skin back into the hole (ooerr that sounds rude ), to do this i bent up some of the ends of the lip that was hanging down as you can see from the pics and spot welded it together. i'm pleased with the result as it looks as though the sunroof is still completely normal from the outside as it sits well. The roof was then sealed up with a polyurethane black sealant (like tiger seal) and left to set.


next was to prep the floor ready for the feet to be welded into position .


after all the floor sections were prepped i slid the supplied floor plates under and set about fully assembling the whole cage together, the idea being that only once all the door bars etc were in could the final positions of the feet be properly established. after tacking the plates in including the multi point parts of the cage i.e. including those above the doors on the door pillars front and back etc. the cage was then disassembled and removed then proper welds put on. I found that the centre of the door pillars where on this cage is an extra bolting point had a very poorly shaped piece of steel supplied to weld in (cheaply does it


and that little lot believe it or not took me up until half past five! by which time i realised how hungry and tired i was and set about falling asleep on the couch.
btw now that the dash is out i've been offered to have it flocked for £60 so ive or take so i guess it'd be rude not to? and seems tha i've got to cut some holes in it shortly for the cage legs it'll look alot nicer with proper edges so i suppose i'll have to eh.
part 7
done a bit more today (booked half day from work to make the most of the dry weather


next i tidied up the roof where the sealant had spread and made a mess of the paint so a bit of time with some t-cut and a scalpel and it looks much better.


then i started to fit the headlining in but due to the fact that the roof is now 2 inches higher it wasn't straight forward, however with the aid of some spray glue and a bit of care it looks quite good. i also started to add trim back into the car as i have to keep it all due to road rally regs.


part 8
did a lot today but didn't actually get anything done if you know what i mean, basically now that the whole cage is attached in and ready to be finally assembled i needed to start on the triangulation of the front end. i started with the passenger side which firstly involved making a little space under where the glovebox would normally sit.

then i started attacking the other end where the fuse box sits as this is where the triangulation bolts to the car, at this point i'm not sure if the fusebox will be able to stay where it is or i'll have to reposition it elsewhere (i hope not


as you can see under and surrounding the fusebox was also a load of sound deadening so this was also removed and put in the 'to be weighed pile'.
the next stage was make a small square hole in the two layers of the shell where the struts would pass through, this was easier said than done as it is very difficult to guage where the holes need to be but im pretty happy with the job so far.

after this was attached in place loosely i had to remove the outer wing to obtain access to the inner arch so that my second part could go through and again had to guess the hole position.


thats the progress today, i've still got to bolt it all together and then attach alot of the trim into the car before i can do the drivers side one it's all bit by bit stuff but it's coming slowly, i'm hoping to have a full weekend on it shortly but i may have other commitments yet i'll have to ait and see, i'm at the point now where i want it done as i want to go for a spin in it!!
part 9
finished off the left hand side triangulation today, i'm pretty pleased with it and once all the wiring was tidied up again it looks really neat.


here you can see the top section outside of the car, this was then sealed up with tiger seal, and the wing put back on.


i was quite pleased to find that the fusebox did fit back in it's original position, albeit not quite so snugly but still securely attached and the bonnet doesn't foul on it.

next job is to re-do the headlining with some spongebacked new stuff i bought (coming monday hopefully), the reason being mainly because it doesn't quite look good enough when the sunroof panel section of headlining goes back in, and it'll wind me up that i didn't finih it off properly.
part 10
spent a bit of time on her again today, first job this morning was putting that headlining in, blinking eck that was hard work! it came as a sheet of spongebacked nylon type cloth 3m x 2.5m and the instructions were - here is a can of spray glue.....
before...

after... (difficult to see i know but not as difficult as trying to get a good photo of a black roof looking at the sun ha ha!


whilst doing the headlining i also fished all the interior lights cable through small slits i made in the material for the next stage of work.
after this i reassembled the rest of the cage in the car for the final time on the drivers side and secured everything.
next came modifying the door pockets these were basically chopped up a bit and made to fit so that the door bars cleared them. the main reason for me keeping these was that they are very handy for the navigator.
before...

after...

next i concentrated on putting the rear seaats back into place (i need all interior trim remember for the regs), this involved a great deal of cuting and trimming of sponge which is a nuisance to cut might i add and seems to be better than iron at bluntening stanley knives


i decided to make a start on the final piece of the cage too even though it was getting late, firstly the battery was taken out and the clutter removed. i then offered up the bars and having gained a little experience from last time made a smaller neater hole for the top part of the triangulation as you can see below. i then started to remove the wing but gave up as tiredness and darkness were coming after me with a big stick. i did discover quite happily though that the battery can remain in it's current location even with the extra bars in the way which is good news for me!!!


part 11
made a set of seat brackets in work today and modified a bit of plastic to make my bonnet release catch work again.


part 12
i finished off the cage today, woo hoo! but don't worry it's not quite done yet still got alot of bits left to do. i also had some asistance today off a mate; heres a little snippet of what was done...


pay particular attention in this photo to the set of safety flops you can see i say safety flops as a good combo betweeen boots and flip flops which are what all good garage mechanics are wearing this summer apparently.

and heres the fool in question, andjust in case you were wondering what he was doing down there he was fitting the plastic piece i made (with a few mods), not bad only took him two hours


still, i suppose we can't all be as handsome as me eh? ha ha

up till now i've removed 83kg's from the car in excess weight whilst keeping the whole of the interior for rally regs and it's going well.
i'll keep you posted on the rest of the project if anyones interested, just thought it may be handy for people to see pics.
Cheers
Kevo