Installing VDO gauges
While the E30 was without doubt the best performance vehicle of the Eighties, its Instruments were lacking some of the features of other manufacturers, especially those of the Volkswagen-Audi Group. To remedy that situation, here's how to add extra gauges to your engine.
Contents
Overview
The standard dash cluster will give you an indication of engine temperature, and this is taken from a basic sensor in the Cooling system. This is great for making sure you don't overheat, but it's useless for telling you the condition of your Oil, which is far more important when it comes to racing or other spirited driving sessions. Neither does it tell you the status of your electrical system or the boost flow of your turbo. All of this information is available in the form of additional gauges that you can fit to your car.
The gauges are driven by sender units. which are the measuring sensors that you fit to the engine; you can't use any of the existing sensors in your BMW engine. No matter what gauges you use, it is essential to pair the gauge with the appropriate sender, so if your oil pressure gauge runs from 0 - 5bar, you will need a 5-bar sender; a 10-bar sender will give completely false readings, and vice versa.
The standard set of gauges fitted to similar-period Audis offered Oil Temperature, Oil Pressure and Volts, all manufactured by VDO. Gauges from slightly earlier vehicles such as the VW Golf II can also be fitted, and differ only in the data range presented.
Gauges
Oil Temperature
Cold oil dramatically increases engine wear, so thrashing the engine before the lubrication is ready will do serious damage to your car's internals. Similarly, oil that gets too hot won't lubricate as much as it should, so even steady use will damage the engine more than it should.
For that reason, fitting an oil temperature gauge will let you know how your oil is really doing, and when it's ready to give it some beans.
The Audi Oil Temp gauge has a range of 0-170°C. VW gauges will show 0-150°C. It is also possible to find 0-120°C gauges; some will say Oel (oil) while others will show the standard Coolant image, but they are identical units underneath.
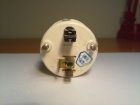
The oil temp gauge is driven by a single thermistor sender. This little unit looks like a bolt with a pin on top, and has no moving parts. Once screwed in and wired up, a basic current is passed through the sender, earthing through the engine. As the temperature rises, the sender's internal resistance is lowered, increasing the current and therefore increasing the power to the gauge. This makes the needle move more to one side, and therefore reading a higher temp. How simple. What's important is to use the right sender for the gauge, so here are the VDO part numbers to order the appropriate sender (if you haven't got it already):
| M10 x 1.0 | M12 x 1.5 | |
|---|---|---|
| 120°C | 049-919-563B | |
| 150°C | 323-804-006-005D or 323-804-006-006D | 323-801-010-003 |
| 170°C | 323-804-015-001D |
Oil Pressure
Knowing the current engine pressure will tell you immediately when something's gone wrong in the engine, whether it's a blown head gasket or a broken crank bearing. If you keep your eye on the gauge, you should be able to see the pressure drop and turn off the engine immediately, before any lasting damage is done. This is particularly important in performance engines that take a lot of punishment, but is equally valid on long-life engines that have been running for 20 years without a rebuild. The oil pressure gauge can save the life of your engine; by the time your standard oil pressure warning light glows, it's often too late.
Oil Pressure responds to heat too, but that doesn't mean it's a duplicate of the temperature gauge. Of course, from cold the oil pressure will read very high as the oil pump tries to move the thicker sludge around your engine, and this will drop as the temperature increases, but the Oil Pressure gauge will give you a much more dynamic view of what the oil is doing. As soon as you put your foot down you will see an significant rise on the gauge, and letting off the throttle will immediately make the needle fall. In this way, you can learn how your engine responds to being pushed hard.
Oil Pressure gauges from Audis usually run from 0-5 bar, while earlier VW gauges show 0-10bar.
The Oil Pressure sender is the most significant part of the system, and should be a fat metal canister with a threaded bolt at the bottom and one or two pins at the top. These top pins will either be spade connectors or threaded posts with nuts; both can be used in your E30. If your sender has two top pins, it means you don't need the oil pressure switch which is currently fitted to your engine, since that function is built into your new sender.
The most important part is the pressure rating of your sender; on the side of the bottom bolt face should be a pressure rating; 0-5 or 0-10. It is essential that this matches the range of your pressure gauge. The sender part numbers are:
- 0-5 bar -
- 0-10 bar -
Volts
Some consider the Volt Gauge or Voltmeter to be filler; an extra dial to make the cockpit look more advanced, more technical. While it's certainly not as crucial for the engine as the Oil gauges, the Volt gauge is very important for assessing the health of your charging system, and lets you know how your alternator is doing, whether your battery is up to the job and whether you've got a serious power failure on your hands.
Unlike other gauges, the Volt gauge needs a simple connection to a switched 12V supply; there are no senders required to make the gauge work, and is therefore a very simple addition to the instruments.
Fitting
Gauges
The gauges you will be using are most likely the 52mm versions fitted to Audis and VWs. Sometimes these will come mounted in a plastic frame, but are easy to disassemble.
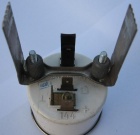
On the back of each gauge, you will see two threaded posts. These are the mounting arms for the mounting plate, which is a C-shape of metal with two holes to fit onto the mounting arms. The plate is held in place with two furled nuts. The idea is that the plate pushes against the back of the fascia, sandwiching the gauges in place. If you bought gauges without the mounting plate included, you will have to get creative and make your own.
Depending on where you want your gauges, you will have to fabricate your own fascia or buy one from our Zone traders such as Kos. To make your own:
- Decide where you want to place your gauges, and take some measurements
- Find a piece of plastic to use as a fascia, and cut it to size so that it fits the area you want it
- Using a hole saw, drill holes the same size as the BODY of the gauge, but not as big as the face
- Drop the gauge into the hole from the outside
- Turn over, and fit the mounting plate onto the mounting arms. The feet of the plate should be pressing against your piece of plastic
- Screw on the furled nuts until the gauge is locked in place tightly
- Depending on placement, you will need to devise a method to hold the fascia in place
Placement
Tuning companies such as Hartge and Alpina offered additional pod units that sat on top of the dashboard; these were either extensions of the main instrument binacle, or standalone pods that sat on either in the centre or the passenger side of the dashboard. By placing the gauges on the same level as the other instruments, they gave the driver a more natural viewing position.
However, it is very hard to get hold of these pods, and aftermarket alternatives are of generally poor quality. They also necessitate drilling, cutting and gluing the dashboard, which is something you may be very reluctant to do.
Because of this, we recommend you choose one of these locations to fit your gauges. All three will necessitate a small amount of fabrication, but this can be done with standard plastic sheet rather than building a complete gauge pod.
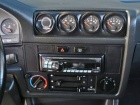
Top Air Vents: This is where Alpina mounted their infamous Digital Dash Unit. By popping out and blocking up these central vents, you will be able to mount up to four gauges, or keep one vent and fit two gauges. This places the gauges in the most visible position, at the expense of losing an element of the air vent system, which is no real loss.
Ashtray: A very popular choice, and one of the Zone team sells fascias ready made for this location. The gauges are not obscured by the steering wheel, and no permanent damage needs to be done to the interior to mount the fascia. The downside is the loss of the ashtray, which is unacceptable for smokers and people who keep small change in their cars. Three gauges can be fitted here, or just two while retaining the cigarette lighter.
Under Heater Controls: Often referred to as the cubby hole, the area above the ashtray and below the heater controls seems perfect for an extra panel; so good that this is where Hartge often mounted their instruments. Placing your gauges here means you don't have to sacrifice any other features of the Interior.


