
325i Touring restoration "the wrong way around"
Moderator: martauto

-
beardymat
- E30 Zone Squatter

- Posts: 1979
- Joined: Tue Jun 14, 2005 11:00 pm
- Location: sheffield, city of steel, and rust apparently
i cant wait to see this car in the metal.the standard of this restoration is beyond excelent.you keep moving the goalposts so i have little chance of keeping up. 
i noticed you managed to get new fuel pipes,did you ask about brake pipes? i realise that these were irrelevent to you but you never know.and another thing, how do you manage to get yours so straight?its just not human
keep up the good fight
looking forward to more drivel
i noticed you managed to get new fuel pipes,did you ask about brake pipes? i realise that these were irrelevent to you but you never know.and another thing, how do you manage to get yours so straight?its just not human
keep up the good fight
looking forward to more drivel
No longer self employed but still available for welding duties.
i just bought pipe and flaring tool was a piece of piss to bend and flareDanThe wrote:All brake pipes are available, they come flared with the correct unions and are the right length, you just have to bend them to shape which is easier than you would think.
m
The BMW pipes do indeed come ready to bend but they were no good to me as all my pipes, with exception to the rear end are now different to original due to the relocation of the master cylinder and the omission of the ABS.
You can cut the steel pipes and reflare them with new fittings. I was considering buying a few front to rear (long)OEM pipes and doing just that but I figured this was way too anal. Even for me.
Surprisingly, the steel pipes bend as well if not better than kunifer does (90% copper/10%zinc) It also holds a DIN flare better.
As you can tell I did try it out. Just in case 
You can cut the steel pipes and reflare them with new fittings. I was considering buying a few front to rear (long)OEM pipes and doing just that but I figured this was way too anal. Even for me.
Surprisingly, the steel pipes bend as well if not better than kunifer does (90% copper/10%zinc) It also holds a DIN flare better.
As you can tell I did try it out. Just in case
Hi all,
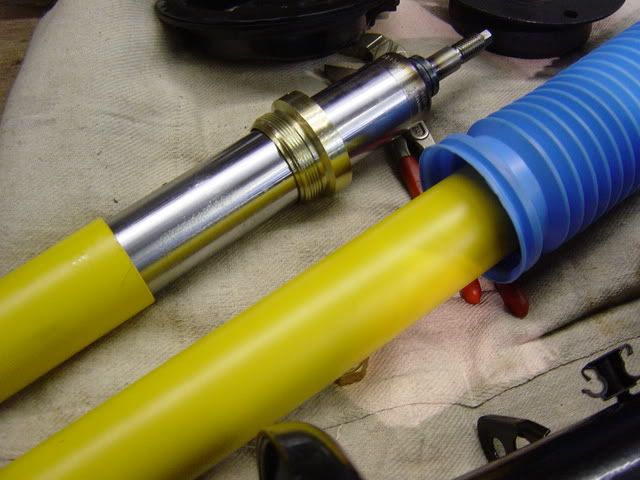
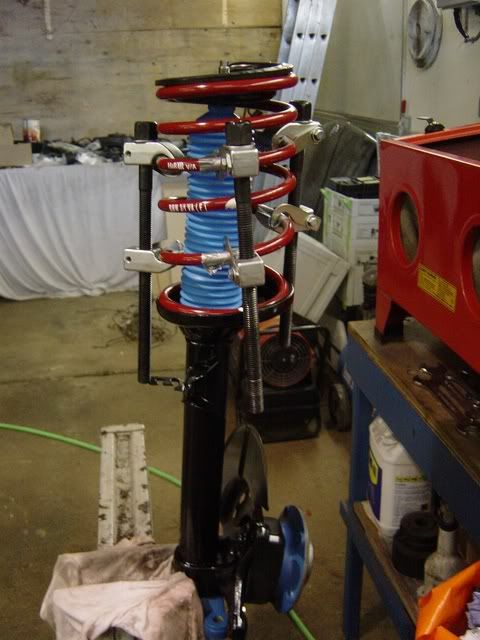
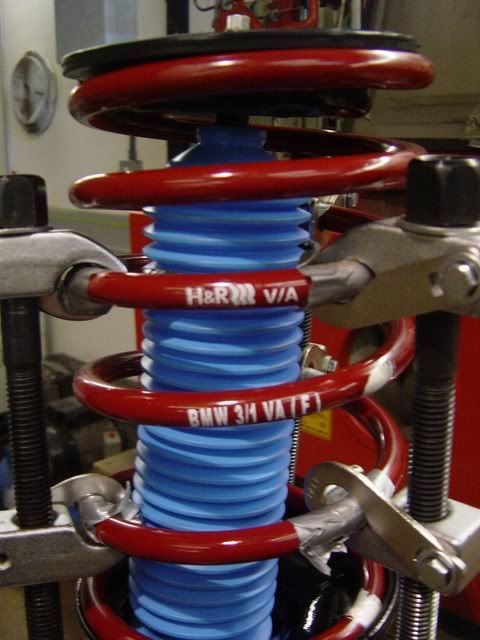
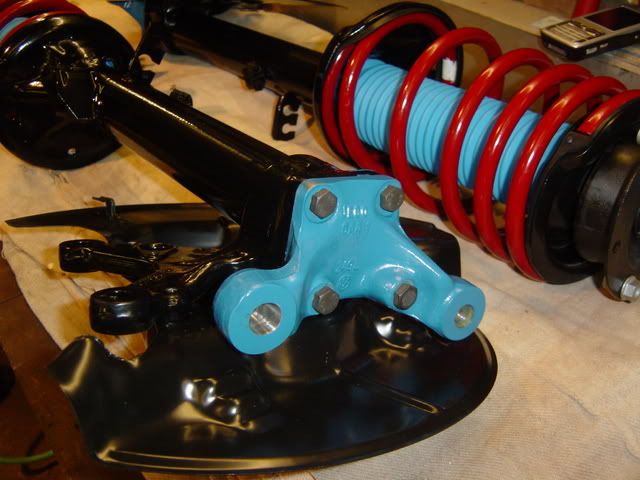
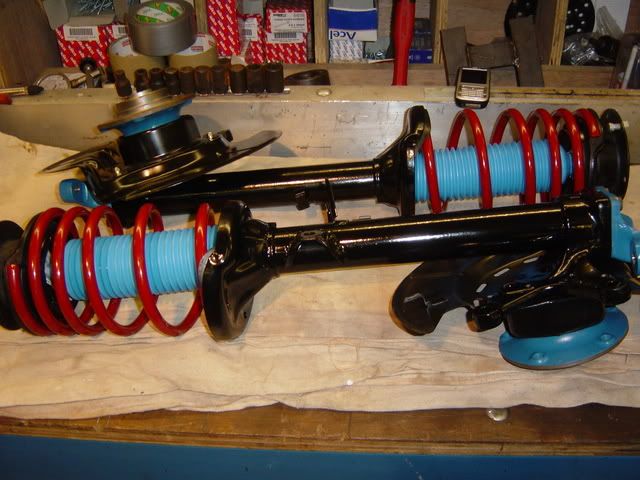
Managed to get the shocks and spings picked up and fitted today.
I got the HD Inverted Bilsteins front and rear, and H&R -30mm spings. Although these are for a six pot they should make mine sit a little lower with the S50 at the front giving a nice look.
Pics speak a thousand words so I'll shut up.
The engine is being worked on next week and will be going in straight after Ian, Buster, you'd better switch off your mobiles
Managed to get the shocks and spings picked up and fitted today.
I got the HD Inverted Bilsteins front and rear, and H&R -30mm spings. Although these are for a six pot they should make mine sit a little lower with the S50 at the front giving a nice look.
Pics speak a thousand words so I'll shut up.
The engine is being worked on next week and will be going in straight after
-
DieselMeister

- E30 Zone Regular

- Posts: 388
- Joined: Sat Nov 12, 2005 11:00 pm
Excellent work - coming together beautifully


Souvenirs, souvenirs...
Great setup to drive with! Just a little firm at the front with the M20. Should be spot on!
... And I don't know what you're doing with the ARB's, but with the standard ones, the touring will remain slightly understeery, (if you don't do silly things ) which might be a good idea with the couple of poneys you'll soon have, to not end up in the ditch stright away.
And the balljoint brackets just show your usual attention to detail. Great car!
Great setup to drive with! Just a little firm at the front with the M20. Should be spot on!
... And I don't know what you're doing with the ARB's, but with the standard ones, the touring will remain slightly understeery, (if you don't do silly things
And the balljoint brackets just show your usual attention to detail. Great car!
Seb, I have ordered the rollbars from Ireland Engineering. They will be plenty man enough for the jobsuzie650 wrote:Souvenirs, souvenirs...
Great setup to drive with! Just a little firm at the front with the M20. Should be spot on!
... And I don't know what you're doing with the ARB's, but with the standard ones, the touring will remain slightly understeery, (if you don't do silly things
And the balljoint brackets just show your usual attention to detail. Great car!
Thank you SirJhonno wrote:Good work! I am very impressed still with the work you have done!! Wish i had the facilities to have done mine the same
Thanks Dieselmeister, Maxfield. I have to be fairly realistic about when it is going to be finished totally. I have a lot coming up with a house and workshop move so I need to factor that in. The good news is my new place will have 1800 sq/ft with a new 2 post ramp
So with this in mind, I am setting myself a target of it being ready for Gaydon in '08. It may seem like a long time but I need to be realistic as there is so much to do and only me doing it! I need one of this countdown tickers like the ones they have for the olympic games opening ceremony lol.
I shall be attending a fews shows this year for some inspiration too. Is anyone from here going to Gaydon this year?
We will be going this year. (not on the back on an aa truck)old_skool_2002 wrote:
Thanks Dieselmeister, Maxfield. I have to be fairly realistic about when it is going to be finished totally. I have a lot coming up with a house and workshop move so I need to factor that in. The good news is my new place will have 1800 sq/ft with a new 2 post rampKinda like a big kids toyshop.
So with this in mind, I am setting myself a target of it being ready for Gaydon in '08. It may seem like a long time but I need to be realistic as there is so much to do and only me doing it! I need one of this countdown tickers like the ones they have for the olympic games opening ceremony lol.
I shall be attending a fews shows this year for some inspiration too. Is anyone from here going to Gaydon this year?
Seems so long away but it will come real quick (well i hope)
Ill have my car by then and a license.


Where was I?
Oh yes, the engine.
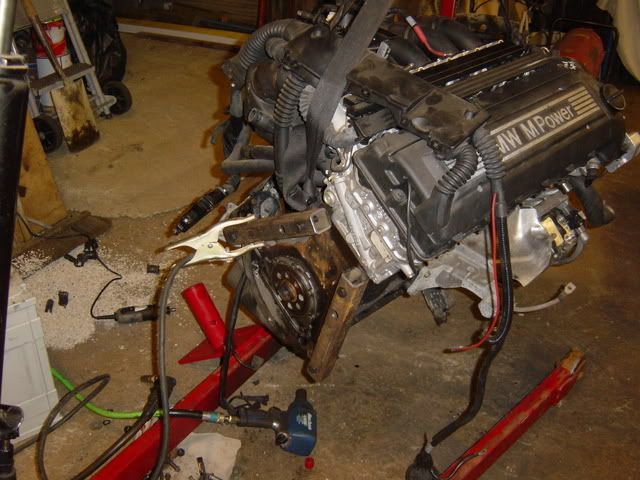
Well I got it back today. It was still on a pallet so I needed to lift it up with a crane and put it on a stand. Easy? No!
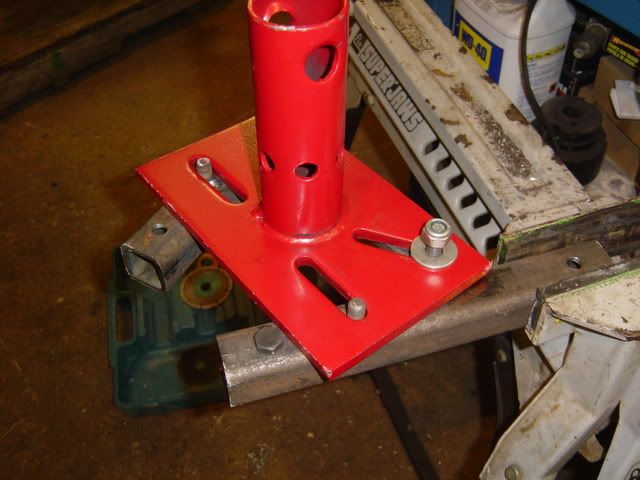
I bought a reasonable engine stand that was on offer at machine mart. They do two different kinds, this is the larger. Only £40, bargain. Only real problem was the fittings that they provide didn't really match well enough to the S50 block. The only solution was to fabricate a mounting jig for it.
So I removed the clutch pressure plate, driven plate and flywheel and got started
I used some 40x40 steel box cut to length and welded in some M12 cage nuts to take the load. These were then mounted to the cast parts of the block, again with M12 bolts. Then I welded a brace across the whole lot and drilled and tapped it to take the standard engine stand mounting.
Then I fitted it all up:
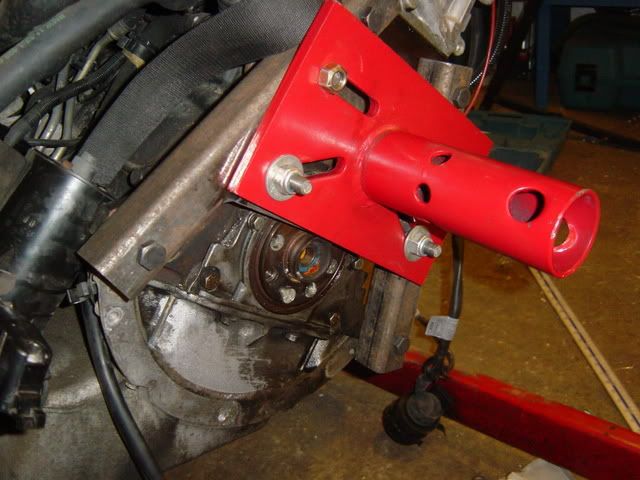
Next was a very nervous lowering of the crane to see if all was well

I'm not sure what the S50 weighs, especially with all these ancillaries still fitted like it is, howver the stand took the load without any signs of distress. Now I can rotate it around and do all the jobs I need to do.
Tomorrow I'm going to remove the sump, fit the ARP rod bolts, swap to the new S50B30 oil pump, S50B32 drive cog and new chain, new oil pick up from the E34 M50 then fit the new E34 M50 sump. I have all the parts now including the sump gasket etc. so hopefully tomorrow night I can post some serious photos/progress.
I need some torque settings for various parts so I'll be pestering Mr. Haynes tomorrow...

Oh yes, the engine.
Well I got it back today. It was still on a pallet so I needed to lift it up with a crane and put it on a stand. Easy? No!
I bought a reasonable engine stand that was on offer at machine mart. They do two different kinds, this is the larger. Only £40, bargain. Only real problem was the fittings that they provide didn't really match well enough to the S50 block. The only solution was to fabricate a mounting jig for it.
So I removed the clutch pressure plate, driven plate and flywheel and got started
I used some 40x40 steel box cut to length and welded in some M12 cage nuts to take the load. These were then mounted to the cast parts of the block, again with M12 bolts. Then I welded a brace across the whole lot and drilled and tapped it to take the standard engine stand mounting.
Then I fitted it all up:
Next was a very nervous lowering of the crane to see if all was well
I'm not sure what the S50 weighs, especially with all these ancillaries still fitted like it is, howver the stand took the load without any signs of distress. Now I can rotate it around and do all the jobs I need to do.
Tomorrow I'm going to remove the sump, fit the ARP rod bolts, swap to the new S50B30 oil pump, S50B32 drive cog and new chain, new oil pick up from the E34 M50 then fit the new E34 M50 sump. I have all the parts now including the sump gasket etc. so hopefully tomorrow night I can post some serious photos/progress.
I need some torque settings for various parts so I'll be pestering Mr. Haynes tomorrow...
-
DieselMeister
- E30 Zone Regular
- Posts: 388
- Joined: Sat Nov 12, 2005 11:00 pm
Did I mention that you're a complete dude?
-
buster

- E30 Zone Addict

- Posts: 3779
- Joined: Sun Jan 09, 2005 11:00 pm
- Location: Near middlesbrough,Teesside
NIce one
It should be up to the job.Ive had an m20 hanging off the cheaper machine mart stand and it didnt snap.A bit scary moving it though as it only has 1 leg as apposed to your 2.
Keep the pics coming !
It should be up to the job.Ive had an m20 hanging off the cheaper machine mart stand and it didnt snap.A bit scary moving it though as it only has 1 leg as apposed to your 2.
Keep the pics coming !
Cheers guys,
Buster, thanks for you PM dude, no I haven't got your number :DOH: could you PM it to me again
I need the torque settings for the following if some one can help *cough* IAN !!! *cough*
Sump bolts
Oil Pump bolts
Oil pump drive cog bolt
Rod Bolts (OEM settings) the ARP's are 50 lb/ft
Flywheel bolts
Clutch pressure plate bolts
Oil pump drive cog bolt
Must try and get a damn S50 manual
-
Simon13
- The longest resto in the world !
- Posts: 22697
- Joined: Mon Jan 10, 2005 11:00 pm
- Location: Camberley, Surrey don't u know
good to see your cracking on still Damo!
just finished fitting my LSD to the touring was a real bitch tonight for some reason
You rang the other day mate? I lost my phone and all me numbers. So give us a bell for ya number again!
just finished fitting my LSD to the touring was a real bitch tonight for some reason
You rang the other day mate? I lost my phone and all me numbers. So give us a bell for ya number again!
-
ian332isport
- E30 Zone Team Member

- Posts: 5380
- Joined: Wed Dec 22, 2004 11:00 pm
- Location: West Sussex
- Contact:
Dameon,old_skool_2002 wrote:I need the torque settings for the following if some one can help *cough* IAN !!! *cough*
I'm afraid I don't currently have access to my torque setting info. I recently installed a later version of the TIS, but it only seems to install in German. I would just re-install the previous version, but I can't find the CD. I think Ste may have it, but need to check.
I can confirm that the sump bolts a 10Nm, but can't currently help with the others.
Ian.
If it aint broke - Modify it...
^^ Ian, your ears must have been burning! I was just on the phone to Buster talking about this very thing and we both agreed you'd know all the answers
No problem, I'm sure I can find some way of getting them.
Meanwhile,
Today has been a very busy day in S50 land. I have done a kind of mini "how to prep your S50 for an E30" tech article. I have taken over 80 pictures, here is a selection and a brief description of what I have done.
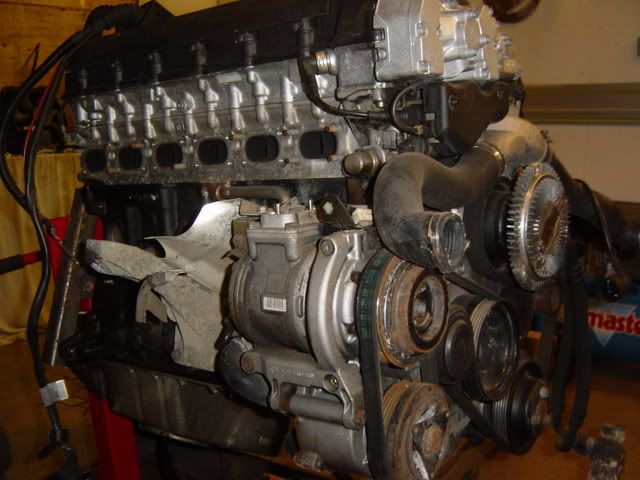
I started with the engine mounted firmly in the stand, like so.

Then the oil was drained/vacuumed, with my PELA oil extractor via the dipstick tube:

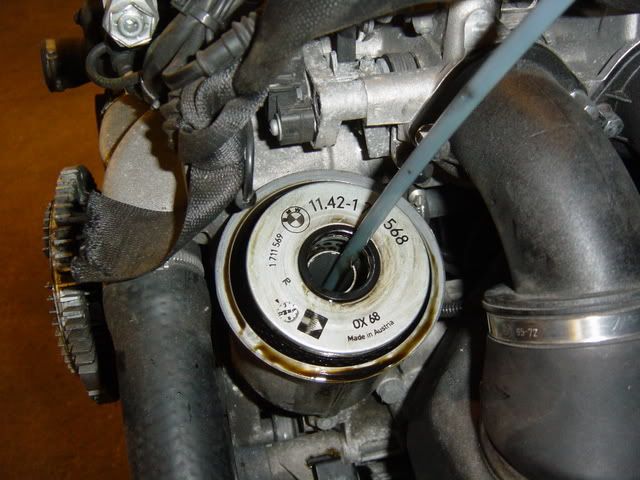
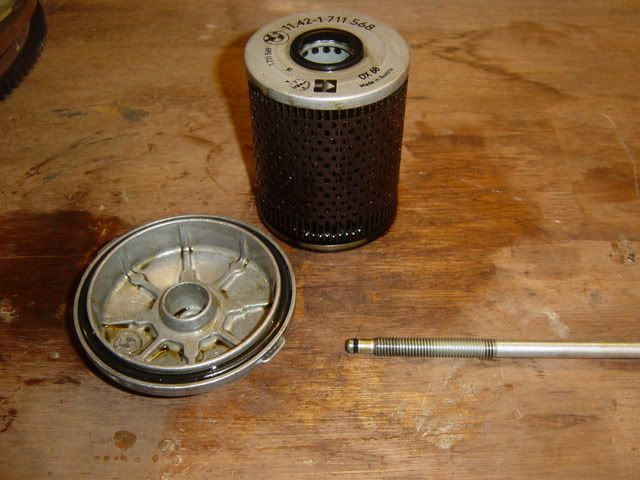
Then the oil filter was removed and the volute was sucked out to avoid as much mess as possible:
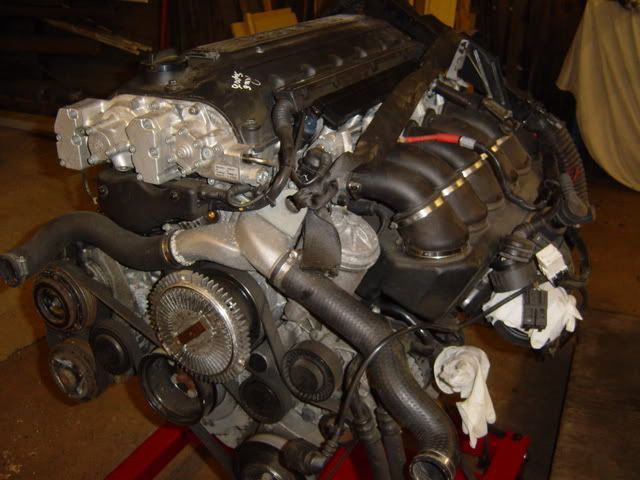
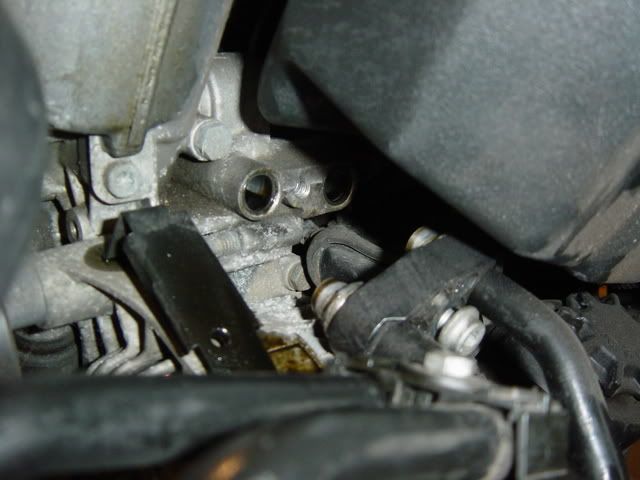
Then I removed the oil cooler, viscous fan coupling and air emissions pump. This is pretty easy.
Oil cooler connection:
Viscous coupling

This is the S50 belt layout, note two belts:

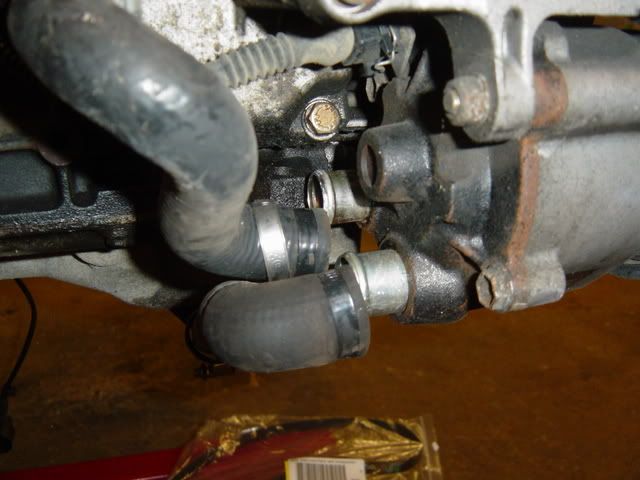
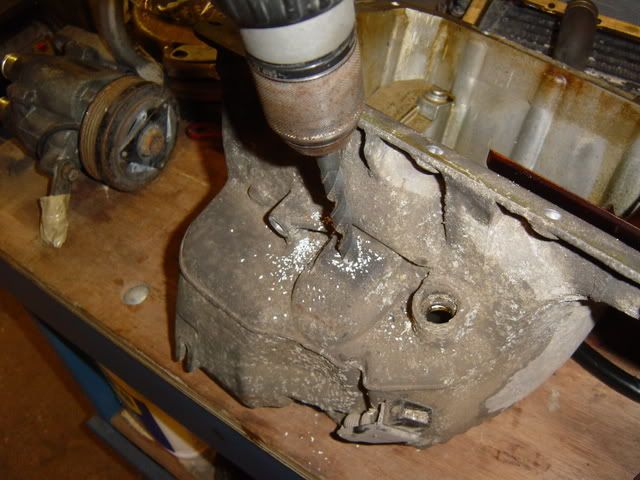
This is the emissions pump, not required for E30 use. It lives under the A/C compressor. I'm going to be retrofitting factory A/C so I need to keep the compressor. Ordinarily the belt and tensioner could be done away with altogether. I'm using the 880mm BMW genuine belt. this will just run the compressor, pulley and tensioner, minus the emissions pump. The tensioner is manually adjusted on this belt. The belt that runs the water pump, alternator and PAS pump has a hydraulic tensioner.
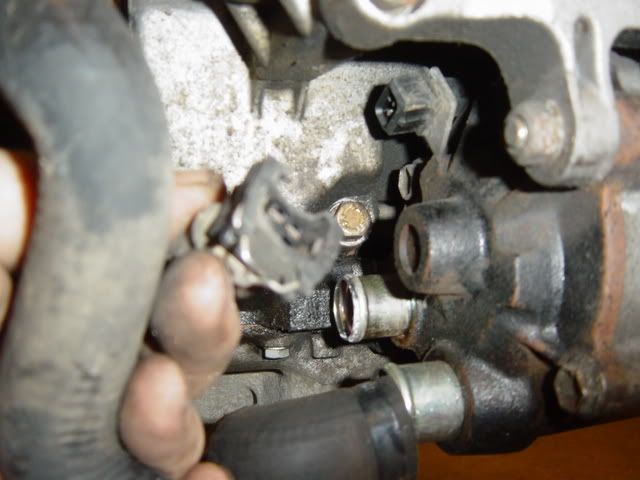
This is the rear of the emssions pump with the hoses removed:
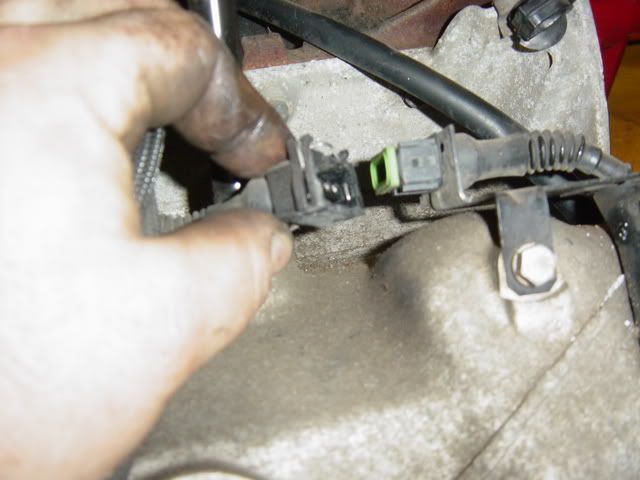
Then remove the electrical connection to the pump:
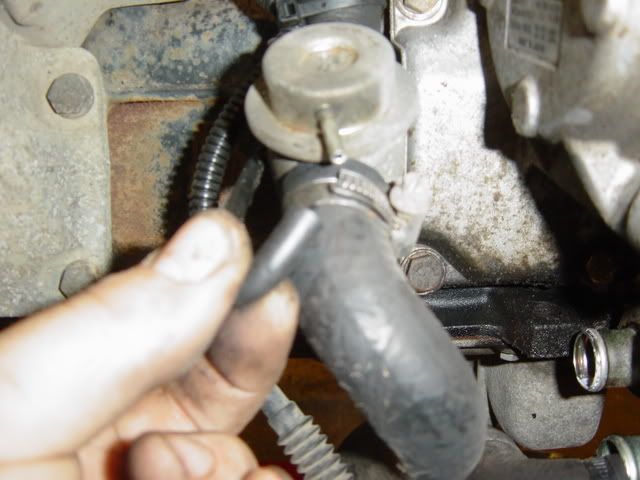
And the venturi tube from the inline purge valve:
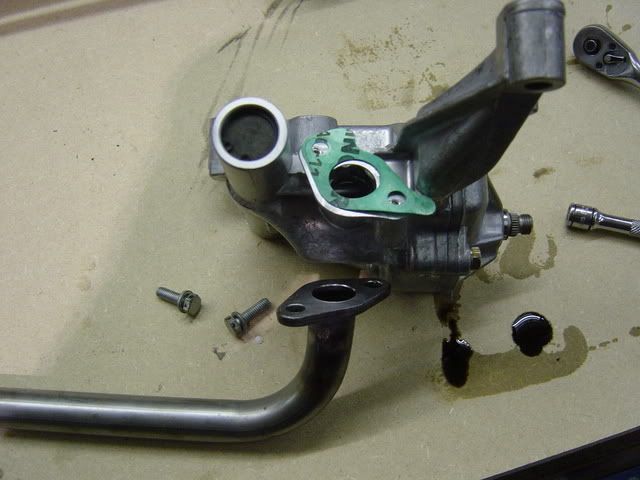
Then I removed the connection where the pipe meets the underside of the cylinder head. This will then be blanked off with the SA spec, (non emissions equipped) blanking plate and gasket.


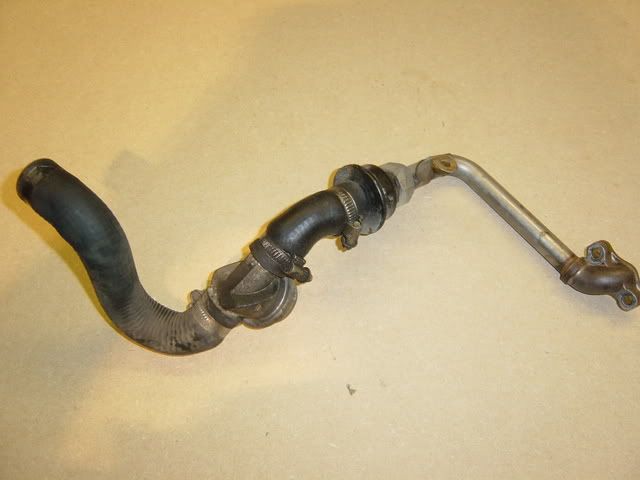
This is the whole pipework assembly for the emissions system. This can be "set aside"
Emissions pump and carrier removed and also, set aside.

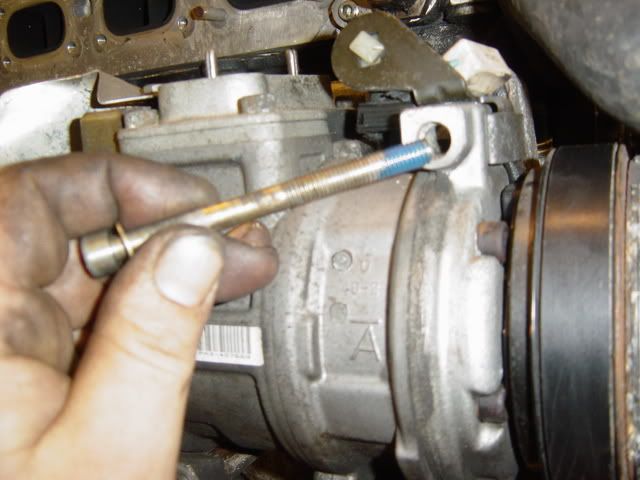
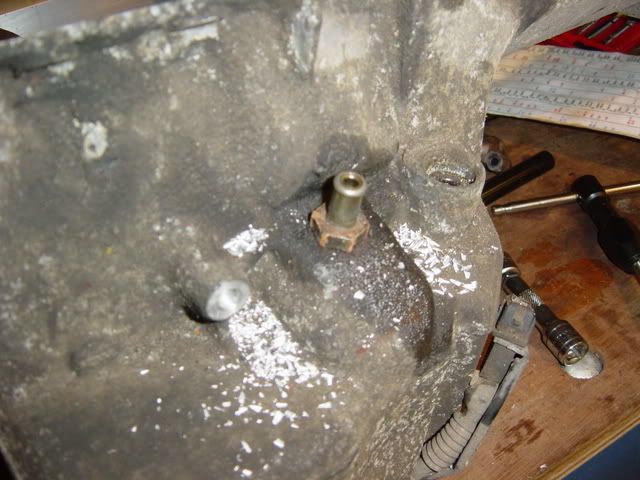
The emissions pump carrier that joins it on to the A/C compressor is no longer required so can be removed. The bolts that hold the carrier to the engine also go through the A/C compressor so they need to be re fitted once the carrier is out of the way otherwise the A/C compressor will fall off. Note that the holes in the A/C casting are blind so the three bolts need to be shortened otherwise they will crack the casting. I shortened them by 12mm and ran them through a die to clean them up. Then I applied some loctite and torqued them back up to 35nm.
Now it's time for the sump. This is pretty easy too. Just remember to loosen the PAS pump out of the way otherwise it will foul the sump. Remove all the sump bolts, oil level electrical connection:
and oil drain.

Then the sump will come off like so: (here's one I prepared earlier)

More later tonight!
No problem, I'm sure I can find some way of getting them.
Meanwhile,
Today has been a very busy day in S50 land. I have done a kind of mini "how to prep your S50 for an E30" tech article. I have taken over 80 pictures, here is a selection and a brief description of what I have done.
I started with the engine mounted firmly in the stand, like so.
Then the oil was drained/vacuumed, with my PELA oil extractor via the dipstick tube:
Then the oil filter was removed and the volute was sucked out to avoid as much mess as possible:
Then I removed the oil cooler, viscous fan coupling and air emissions pump. This is pretty easy.
Oil cooler connection:
Viscous coupling
This is the S50 belt layout, note two belts:
This is the emissions pump, not required for E30 use. It lives under the A/C compressor. I'm going to be retrofitting factory A/C so I need to keep the compressor. Ordinarily the belt and tensioner could be done away with altogether. I'm using the 880mm BMW genuine belt. this will just run the compressor, pulley and tensioner, minus the emissions pump. The tensioner is manually adjusted on this belt. The belt that runs the water pump, alternator and PAS pump has a hydraulic tensioner.
This is the rear of the emssions pump with the hoses removed:
Then remove the electrical connection to the pump:
And the venturi tube from the inline purge valve:
Then I removed the connection where the pipe meets the underside of the cylinder head. This will then be blanked off with the SA spec, (non emissions equipped) blanking plate and gasket.
This is the whole pipework assembly for the emissions system. This can be "set aside"
Emissions pump and carrier removed and also, set aside.
The emissions pump carrier that joins it on to the A/C compressor is no longer required so can be removed. The bolts that hold the carrier to the engine also go through the A/C compressor so they need to be re fitted once the carrier is out of the way otherwise the A/C compressor will fall off. Note that the holes in the A/C casting are blind so the three bolts need to be shortened otherwise they will crack the casting. I shortened them by 12mm and ran them through a die to clean them up. Then I applied some loctite and torqued them back up to 35nm.
Now it's time for the sump. This is pretty easy too. Just remember to loosen the PAS pump out of the way otherwise it will foul the sump. Remove all the sump bolts, oil level electrical connection:
and oil drain.
Then the sump will come off like so: (here's one I prepared earlier)
More later tonight!
Last edited by old_skool on Wed Apr 25, 2007 9:14 pm, edited 1 time in total.
Ok,
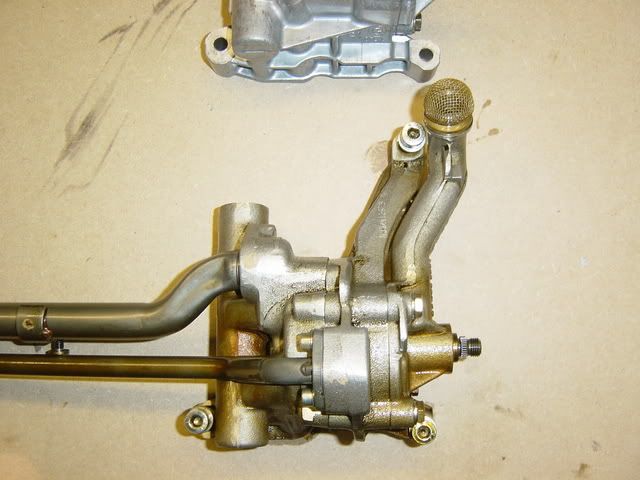
So now the sump is off, it's time to do the work on the oil pump and sump modifications.
This is the S50B32 (as fitted) oil pump.

It has oil pickups in all the wrong places to suit our new E34 M50 Sump. So now I have to remove it to fit the S50B30 oil pump from the pre-evo model. The drive cog needs to be dropped off with a 17mm reverse head nut, followed by three 5mm hex head bolts and it's off. The drive chain justs stays on the cog and the whole lot is moved aside.
This is the S50B32 oil pump (as removed):
And the S50B30 oil pump (replacement):

Here are the two pumps side by side:

Now I need to remove the oil pickup from the new pump and fit the E34 M50 oil pick up pipe. This is quite simply two M8 bolts and job done.
Now the pump can be refitted complete with E34 pickup pipe:

Different angle:

Because the original pump uses rearward pipework there are two brackets to be removed from the main bearing caps. These are on no. 3 and no. 5 main caps.

Next job is to drill the E34 M50 sump to fit the plenum drain from the S50:

This requires an 'odd' M12x1.5mm tap. Thankfully I had one lurking around and with telephone support from Buster it was a straightforward job. I will refit the drain with a suitable copper washer and loctite it in place later. I also plan to tack weld the pump drive cog nut in place. Belt and braces!
Tomorrow I plan to finish the above, fit the ARP rod bolts, refit the sump and clean up some more components.

So now the sump is off, it's time to do the work on the oil pump and sump modifications.
This is the S50B32 (as fitted) oil pump.
It has oil pickups in all the wrong places to suit our new E34 M50 Sump. So now I have to remove it to fit the S50B30 oil pump from the pre-evo model. The drive cog needs to be dropped off with a 17mm reverse head nut, followed by three 5mm hex head bolts and it's off. The drive chain justs stays on the cog and the whole lot is moved aside.
This is the S50B32 oil pump (as removed):
And the S50B30 oil pump (replacement):
Here are the two pumps side by side:
Now I need to remove the oil pickup from the new pump and fit the E34 M50 oil pick up pipe. This is quite simply two M8 bolts and job done.
Now the pump can be refitted complete with E34 pickup pipe:
Different angle:
Because the original pump uses rearward pipework there are two brackets to be removed from the main bearing caps. These are on no. 3 and no. 5 main caps.
Next job is to drill the E34 M50 sump to fit the plenum drain from the S50:
This requires an 'odd' M12x1.5mm tap. Thankfully I had one lurking around and with telephone support from Buster it was a straightforward job. I will refit the drain with a suitable copper washer and loctite it in place later. I also plan to tack weld the pump drive cog nut in place. Belt and braces!
Tomorrow I plan to finish the above, fit the ARP rod bolts, refit the sump and clean up some more components.