
Skipunda's Tech 1 - update
Moderator: martauto
-
VeinAST
- E30 Zone Regular

- Posts: 461
- Joined: Sun May 10, 2009 11:00 pm
- Location: Wiltshire
I think if mine's that bad underneath I'll cry 

-
FEP

- E30 Zone Regular
- Posts: 309
- Joined: Sat May 24, 2008 11:00 pm
- Location: Hackney (of carriage fame) London
Best plan is to have a look underneath in the dark whilst wearing dark glasses.VeinAST wrote:I think if mine's that bad underneath I'll cry
-
skipunda
- E30 Zone Team Member

- Posts: 5672
- Joined: Thu Sep 04, 2008 11:00 pm
- Location: Cornwall/Plymouth
Ollie that is I think red oxide primer. I haven't been to the garage for a couple of weeks so can't remember! It's fairly substantial stuff but the seam sealer reacts to it. For this reason I also put some Hammerite grey anti rust primer over the top.Ollie_bwoii wrote:Wow thats soem serious amoutn of welding going on there.
If you don't mind me asking what rust paint did you use here?
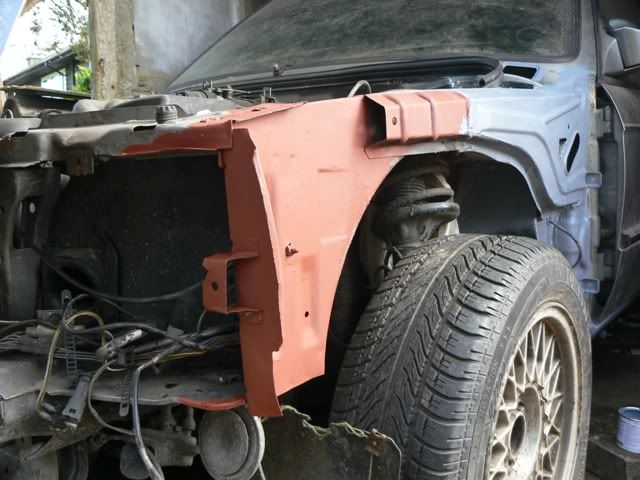
There may be better ways but this works very well for me. HTH
Been wondering whether I should just buy an inner inner arch. At £140 i'm not so keen
Chris
-
spook
- League two here we come !!!
- Posts: 7587
- Joined: Sat Aug 19, 2006 11:00 pm
- Location: portsmouth
Fair play to ya mate for saving that car, youve worked bloody hard on that, good work 
Keep the pics coming.
Keep the pics coming.

-
skipunda
- E30 Zone Team Member
- Posts: 5672
- Joined: Thu Sep 04, 2008 11:00 pm
- Location: Cornwall/Plymouth
Got stuck in to some of the car work these last few days. The motorsport is having it's bushes done for it's MOT - else i'd rather have been at the southern meet!
Anyway, So the main idea was to get the inner arch in but a few gremlins popped up along the way
I decided that the rot was a lot more than first thought, especially this area. I weighed up buying a new panel from BMW but bit the bullet and attempted to fabricate it all up instead.
inner arch

Create a panel and use the old one to get the same indentations in.

A small piece of the floor needed work too. While under there I looked at the overall condition of the rear floor. The wheel well needs to come out would you believe it!

New piece in

Most complicated bit so far. Pics next week - put it that way...
boot near side

Shot of a new piece to replace the ariel and surrounding area. This has been made with a bit of a recess so to allow for prep work at the paint shop.
near side above petrol cap

Smoothed down it looks ok. Removed rust and tidied the boot section, ready for the made-up pieces

Couple of weeks back I looked at the inner sill. This now has the final piece in
inner sill, next to door shut

Earlier shot showing another hole. Working upside down is a b*tch so theres nothing particulary pretty about it
top of inner arch

And after a bit of finessing it was time to test fit the new inner arch. I'll wait until the chassis is sound and there's a wheel on the car before putting the outer one in.

Another new piece, not in yet because there's a bit of work that needs finishing behind it first
bottom of inner arch, under filler cap

Looking better!

That horrible section earlier.

Big hole!
near-side boot section

Cheers all
Anyway, So the main idea was to get the inner arch in but a few gremlins popped up along the way
I decided that the rot was a lot more than first thought, especially this area. I weighed up buying a new panel from BMW but bit the bullet and attempted to fabricate it all up instead.
inner arch
Create a panel and use the old one to get the same indentations in.
A small piece of the floor needed work too. While under there I looked at the overall condition of the rear floor. The wheel well needs to come out would you believe it!
New piece in
Most complicated bit so far. Pics next week - put it that way...
boot near side
Shot of a new piece to replace the ariel and surrounding area. This has been made with a bit of a recess so to allow for prep work at the paint shop.
near side above petrol cap
Smoothed down it looks ok. Removed rust and tidied the boot section, ready for the made-up pieces
Couple of weeks back I looked at the inner sill. This now has the final piece in
inner sill, next to door shut
Earlier shot showing another hole. Working upside down is a b*tch so theres nothing particulary pretty about it
top of inner arch
And after a bit of finessing it was time to test fit the new inner arch. I'll wait until the chassis is sound and there's a wheel on the car before putting the outer one in.
Another new piece, not in yet because there's a bit of work that needs finishing behind it first
bottom of inner arch, under filler cap
Looking better!
That horrible section earlier.
Big hole!
near-side boot section
Cheers all
Chris
-
Ollie_bwoii
- Married to the E30 Zone

- Posts: 8695
- Joined: Sat May 17, 2008 11:00 pm
- Location: Northampton
Fantastic work. 
BTW I'm just uploading them pics for you.
BTW I'm just uploading them pics for you.
-
skipunda
- E30 Zone Team Member
- Posts: 5672
- Joined: Thu Sep 04, 2008 11:00 pm
- Location: Cornwall/Plymouth
Evening all,
Been a bit tied up these last few weeks but on the odd occasion I did manage to get some workshop time Here's a brief but again pic heavy update on the Tech 1.
Completed the cutting out of the side member piece (see above photo, previous post) and added to the bin of rust. I think I empty this thing out once every few weeks!

A replacement piece was trimmed down. Finding more rust I had to find and fit a second section on to it.

Welded in over some time to get good strong hold

Next up was the 'lid'.

Chopped down and put in

Next up was to cut down the Hadrians outer arch down. It's no good using large sections of this, they simply don't fit imo. Use the, erm, distinguishing features (sorry, it's getting late) to align the arch with the rest of the car and then use a can of spray primer to get a line.

Cut it down, leaving a few mm all the way around. Now fit the inner arch, apply your trimmed outer arch panel and scribe around.

Here's your line. Now simply cut it out.

...

Line up the inner arch. Unless really careful with the cutting out of the old one your going to have a very slight alignment issue. Get some clamps out and a hammer!

Then spot weld it in

And rivet the edge as a precautionary against moisture, assuming something happens - plus it looks tidy from inside.

Outer arch in, using thumb and a flathead screwdriver to tweak it into position. I've worked from the far corners up to the top, tacking along the way.

...

Next up is the lower rear. This isn't seen because of the kit and exactly the same principle applies as the outer arch. First off create some holes for plugging it by using a punch then a 3-5mm drill

Finished piece after a bit of offering up, cutting down and bending:

Then start with the lengthy welding job

Oh, you'll see I've put holes with a couple of inch spacing around the outer arch too. These are not welded until the end.

Use a hammer to lightly tap and reduce the mm gap to nothing between the inner and outer arch. Then follow behind with the torch.

Then apply a few coats of this oxide primer. The seam sealer will react to this so a different primer (the grey stuff in other posts) is used on top. Side member pretty much complete!

...and the finished arch just needing grinding down and finishing

Thanks for reading again
Been a bit tied up these last few weeks but on the odd occasion I did manage to get some workshop time
Completed the cutting out of the side member piece (see above photo, previous post) and added to the bin of rust. I think I empty this thing out once every few weeks!
A replacement piece was trimmed down. Finding more rust I had to find and fit a second section on to it.
Welded in over some time to get good strong hold
Next up was the 'lid'.
Chopped down and put in
Next up was to cut down the Hadrians outer arch down. It's no good using large sections of this, they simply don't fit imo. Use the, erm, distinguishing features (sorry, it's getting late) to align the arch with the rest of the car and then use a can of spray primer to get a line.
Cut it down, leaving a few mm all the way around. Now fit the inner arch, apply your trimmed outer arch panel and scribe around.
Here's your line. Now simply cut it out.
...
Line up the inner arch. Unless really careful with the cutting out of the old one your going to have a very slight alignment issue. Get some clamps out and a hammer!
Then spot weld it in
And rivet the edge as a precautionary against moisture, assuming something happens - plus it looks tidy from inside.
Outer arch in, using thumb and a flathead screwdriver to tweak it into position. I've worked from the far corners up to the top, tacking along the way.
...
Next up is the lower rear. This isn't seen because of the kit and exactly the same principle applies as the outer arch. First off create some holes for plugging it by using a punch then a 3-5mm drill
Finished piece after a bit of offering up, cutting down and bending:
Then start with the lengthy welding job
Oh, you'll see I've put holes with a couple of inch spacing around the outer arch too. These are not welded until the end.
Use a hammer to lightly tap and reduce the mm gap to nothing between the inner and outer arch. Then follow behind with the torch.
Then apply a few coats of this oxide primer. The seam sealer will react to this so a different primer (the grey stuff in other posts) is used on top. Side member pretty much complete!
...and the finished arch just needing grinding down and finishing
Thanks for reading again
Chris
-
ImysE30
- Married to the E30 Zone
- Posts: 22486
- Joined: Mon Jul 07, 2008 11:00 pm
- Location: Derby Massive!!
Serious hard work and dedication going into this 
Great stuff so far
Great stuff so far
Current Fleet:
E30 335i Turbo M3 Convertible Replica
E30 335i Turbo M3 Convertible Replica
-
zaust
- Zone day release
- Posts: 13007
- Joined: Sun Jan 09, 2005 11:00 pm
- Location: Somewhere in Hertfordshire , or press Ctrl + W
What he said ↑↑↑☺
I want another Tech 1
I want another Tech 1
M30 Tech 1 Touring on gas.


-
DanThe
- E30 Zone Team Member
- Posts: 28649
- Joined: Sat Sep 10, 2005 11:00 pm
- Location: Staffs
Dont know how I missed this before, but, your obviously mad.....
.... in a good way, great job your doing
.... in a good way, great job your doing
-
skipunda
- E30 Zone Team Member
- Posts: 5672
- Joined: Thu Sep 04, 2008 11:00 pm
- Location: Cornwall/Plymouth
Yes, probably mad but no turning back now, ay
Chris
-
Alex
- Married to the E30 Zone
- Posts: 22666
- Joined: Fri Feb 11, 2005 11:00 pm
- Location: Johannesburg, South Africa
Awsome work. Will be worth it in the end. Very inspirational
-
skipunda
- E30 Zone Team Member
- Posts: 5672
- Joined: Thu Sep 04, 2008 11:00 pm
- Location: Cornwall/Plymouth
Want to get this on the road again so have asked a zoner for a few body parts. I will have the inside, roof and engine bay sprayed in a fortnight fingers crossed. Two different paintshops have been round this arvo for the outer shell work and both want the job so hopefully we'll be getting somewhere soon
Last edited by skipunda on Fri Jul 23, 2010 11:56 pm, edited 1 time in total.
Chris
-
Cook318IS
- E30 Zone Addict
- Posts: 4587
- Joined: Fri Jun 08, 2007 11:00 pm
- Location: Torquay
who are you getting to do the paint squire?

-
jbh
- Hartge Crew
- Posts: 3963
- Joined: Sat Aug 11, 2007 11:00 pm
- Location: denny
what parts you needing Chris? ill be cutting a black preface lift shell in the next few days.skipunda wrote:Want to get this on the road again so have asked a zoner for a few body parts. I will have the inside, roof and engine bay sprayed in a fortnight fingers crossed. Two different paintshops have been round this arvo for the outer shell work and both want the job so hopefully we'll be getting somewhere soon

-
skipunda
- E30 Zone Team Member
- Posts: 5672
- Joined: Thu Sep 04, 2008 11:00 pm
- Location: Cornwall/Plymouth
Toss up between a team in Bodmin and someone near Liskeard who's just finished an old skool CSL - big money job. I don't have a trailer (considering buying) so I guess if I bought one I could go further...but so much money for one!
Just so I'm not hiding my feelings I was soo bloody tempted to go Lazur Blue or White II on this shell!
South West peeps....What's your opinion??!
Just so I'm not hiding my feelings I was soo bloody tempted to go Lazur Blue or White II on this shell!
South West peeps....What's your opinion??!
Chris
-
Ollie_bwoii
- Married to the E30 Zone
- Posts: 8695
- Joined: Sat May 17, 2008 11:00 pm
- Location: Northampton
Has it got leccy windows?jbh wrote:what parts you needing Chris? ill be cutting a black preface lift shell in the next few days.
-
skipunda
- E30 Zone Team Member
- Posts: 5672
- Joined: Thu Sep 04, 2008 11:00 pm
- Location: Cornwall/Plymouth
@ JBH I'll pm you buddy
Chris
-
Cook318IS
- E30 Zone Addict
- Posts: 4587
- Joined: Fri Jun 08, 2007 11:00 pm
- Location: Torquay
White tech 1's look awesome but i'd be tempted to keep it original tbh. I've heard good things from a place called spectrum in saltash, had a few mates had there cars sprayed there and they looked good although i didnt get a close up look tbh. Its were i think i'd take mine for a quote if / when the time comes.
-
skipunda
- E30 Zone Team Member
- Posts: 5672
- Joined: Thu Sep 04, 2008 11:00 pm
- Location: Cornwall/Plymouth
I'm worried about something actually. The Bodmin guys hadn't heard of using plasticiser for the bodykit when I asked. Meanwhile the CSL chap is asking for something in the region of 1.5k.
Crumbs
Crumbs
Chris
-
skipunda
- E30 Zone Team Member
- Posts: 5672
- Joined: Thu Sep 04, 2008 11:00 pm
- Location: Cornwall/Plymouth
Is that the place near the American import cars? An old school friend recommended them but I've yet to see their work 1 day/1 month/1 year down the line.
White tech 1 with schnitzers or hartges
White tech 1 with schnitzers or hartges
Last edited by skipunda on Sat Jul 24, 2010 12:09 am, edited 1 time in total.
Chris
-
Cook318IS
- E30 Zone Addict
- Posts: 4587
- Joined: Fri Jun 08, 2007 11:00 pm
- Location: Torquay
not a clue, i've not been to there. here's there address though:
unit 8 cockles farm, saltash, pl12 6lq, near china fleet club
01752 842220
unit 8 cockles farm, saltash, pl12 6lq, near china fleet club
01752 842220
-
jbh
- Hartge Crew
- Posts: 3963
- Joined: Sat Aug 11, 2007 11:00 pm
- Location: denny
yip but im using the loom. but i might have a spare one not sure will have to look.Ollie_bwoii wrote:Has it got leccy windows?jbh wrote:what parts you needing Chris? ill be cutting a black preface lift shell in the next few days.
-
skipunda
- E30 Zone Team Member
- Posts: 5672
- Joined: Thu Sep 04, 2008 11:00 pm
- Location: Cornwall/Plymouth
Aha, next door to my golf club
Chris
-
jbh
- Hartge Crew
- Posts: 3963
- Joined: Sat Aug 11, 2007 11:00 pm
- Location: denny
not a prob Chris.skipunda wrote:@ JBH I'll pm you buddy
-
Ollie_bwoii
- Married to the E30 Zone
- Posts: 8695
- Joined: Sat May 17, 2008 11:00 pm
- Location: Northampton
What about the reg's & motors?jbh wrote:yip but im using the loom. but i might have a spare one not sure will have to look.Ollie_bwoii wrote:Has it got leccy windows?jbh wrote:what parts you needing Chris? ill be cutting a black preface lift shell in the next few days.
-
FEP
- E30 Zone Regular
- Posts: 309
- Joined: Sat May 24, 2008 11:00 pm
- Location: Hackney (of carriage fame) London
Might it not have been easier to fashion an entirely new shell from galvanised dustbins?
What's the labour hours count now?
FEP
What's the labour hours count now?
FEP