
Tzantushka wrote: ↑Tue Oct 05, 2021 6:36 amThanks for the thumbs-up.Cypriotgeeza wrote: ↑Mon Oct 04, 2021 10:16 amIts always the little things people don't normally notice that make the biggest difference on my car i e the dash and also the sound deadening under the bonnet. When I replaced that it made a huge difference to the engine bay! Its all on my thread if you've got a few weeks to spare to read through it lol
Good work as always mate
You're spot on - it's the little details that add-up.
I have read through your build thread for inspiration!
Malachtgrun 320i cabrio from Australia
Moderator: martauto
-
Cypriotgeeza

- E30 Zone Addict

- Posts: 3019
- Joined: Sat Apr 04, 2009 11:00 pm
- Location: Under a bonnet somewhere..
Check my M30 build threads:
Project Frankenstein: viewtopic.php?f=25&t=194154
Headgasket: viewtopic.php?f=55&t=165704
Clutch issues: viewtopic.php?f=55&t=172482
Instagram: www.instagram.com/Cypriotgeeza
Project Frankenstein: viewtopic.php?f=25&t=194154
Headgasket: viewtopic.php?f=55&t=165704
Clutch issues: viewtopic.php?f=55&t=172482
Instagram: www.instagram.com/Cypriotgeeza
-
Tzantushka

- E30 Zone Regular

- Posts: 461
- Joined: Sat Nov 24, 2018 4:18 am
- Location: Melbourne, Australia
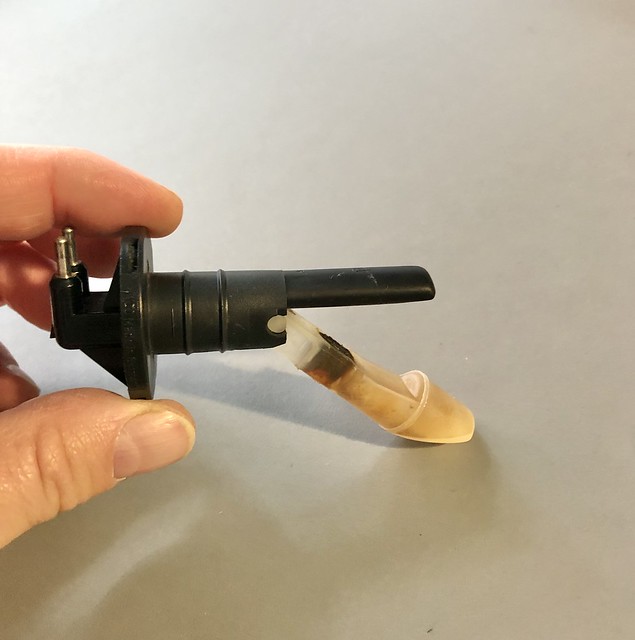
You might remember I wasn't a fan of the gaudy-looking status indicator light on the Right Click keyless entry kit?

Having a flashing light is still a good deterrent, but would prefer something that looks a bit more - er... integrated.
Well I fixed that...

Comes apart pretty easy & you're left with a clear LED that's pretty bright & (still) flashes blue.
But can be installed in a much neater manner:

Sure, I would have liked to install at the top edge of the dash in between the demister vents for clean looking install & maximum visibility...
(a-la Volvo style)
But I couldn't bring myself to drill a hole in a freshly re-skinned dashboard.
So the A pillar was just right.
Very effective at night time - as it casts light across the top of the dash & reflects off the windscreen.
Having a flashing light is still a good deterrent, but would prefer something that looks a bit more - er... integrated.
Well I fixed that...
Comes apart pretty easy & you're left with a clear LED that's pretty bright & (still) flashes blue.
But can be installed in a much neater manner:
Sure, I would have liked to install at the top edge of the dash in between the demister vents for clean looking install & maximum visibility...
(a-la Volvo style)
But I couldn't bring myself to drill a hole in a freshly re-skinned dashboard.
So the A pillar was just right.
Very effective at night time - as it casts light across the top of the dash & reflects off the windscreen.

-
Tzantushka
- E30 Zone Regular
- Posts: 461
- Joined: Sat Nov 24, 2018 4:18 am
- Location: Melbourne, Australia
Will see if I can get a night video!
Also doing a few odds and ends.
The windscreen washer pump was a bit noisy.
Every time I washed the windscreen, the pump squealed like a 10 year old girl getting a pony for her birthday...
The pump had been replaced with a generic aftermarket one and a right royal bodge on the wiring.
Ended up replacing it with a Febi unit and new OE plug housing and terminals.

Remove the reservoir, gave it a good clean, emptied the slime out and re-wrapped the wiring looms.

As it turned out the washer level sensor had crapped itself as well and someone had bodged the wires together. So I’ll chase down a new one...
Also doing a few odds and ends.
The windscreen washer pump was a bit noisy.
Every time I washed the windscreen, the pump squealed like a 10 year old girl getting a pony for her birthday...
The pump had been replaced with a generic aftermarket one and a right royal bodge on the wiring.
Ended up replacing it with a Febi unit and new OE plug housing and terminals.
Remove the reservoir, gave it a good clean, emptied the slime out and re-wrapped the wiring looms.
As it turned out the washer level sensor had crapped itself as well and someone had bodged the wires together. So I’ll chase down a new one...
-
Cloggy Saint
- Old Skooler

- Posts: 8024
- Joined: Sun Jan 09, 2005 11:00 pm
- Location: zummerzet
I'm fairly sure the plug housing is the same as those used on the light units, so that could help your search.

E30 zone - promoting adult illiteracy since 2004
Looks that way to me as well but Cotswolds will know and be able to help as well.Cloggy Saint wrote: ↑Sat Oct 30, 2021 1:14 pmI'm fairly sure the plug housing is the same as those used on the light units, so that could help your search.
Mart.
Only the E46 cab left now.
Just got too old.
Just got too old.
-
Tzantushka
- E30 Zone Regular
- Posts: 461
- Joined: Sat Nov 24, 2018 4:18 am
- Location: Melbourne, Australia
Can dig up the part numbers for you.
The plug housing is the grey one and the pump was from Clickable.
I have #61121380673 - for the full wiring harness, which I think is the only easy way to get hold of the connectors(?). Getting the pump was easy.Tzantushka wrote: ↑Sun Oct 31, 2021 4:05 amCan dig up the part numbers for you.
The plug housing is the grey one and the pump was from Clickable.
Ta, looks like 5. Not sure how I've never found the 'Single components wiring harness repair' diagram before!BenHar wrote: ↑Sun Oct 31, 2021 3:36 pmIt's probably 5 or 7 here: https://www.realoem.com/bmw/enUS/showpa ... Id=61_0534
Ben
-
Tzantushka
- E30 Zone Regular
- Posts: 461
- Joined: Sat Nov 24, 2018 4:18 am
- Location: Melbourne, Australia
Plug housing
Yep it's the grey one - 90 degree cable exit
I think it's the same one for the diff speedo sensor...
P/N 61131378418
Replacement female terminals
Also 90 degree
Suit male bullet terminals 1.0-2.5mm
Not cheap for what they are...
Used in lots of places - eg. headlights
P/N 61130007446
-
Tzantushka
- E30 Zone Regular
- Posts: 461
- Joined: Sat Nov 24, 2018 4:18 am
- Location: Melbourne, Australia
The reed switch was rusted in the old one and the float filled up with water.Tzantushka wrote: ↑Fri Oct 29, 2021 1:07 pmAs it turned out the washer level sensor had crapped itself as well and someone had bodged the wires together.
So I’ll chase down a new one...
Took a punt and ordered a Chinese washer level sensor from AliExpress for US$ 11.00.
Was pleasantly surprised - arrived in 20 days,

Installed fine and works perfectly - no washer fluid level light on the check panel.
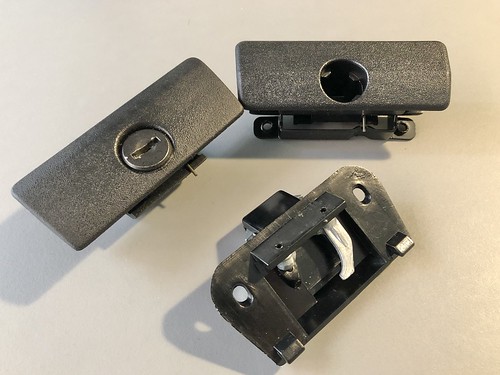
Also ordered a replacement glove box latch to replace my busted lockable one - can only source non-locking latches locally.
Again, it's not a critical part so happy to give it a shot.
Quality looks reasonable, although does have a slightly different profile to OE.

Last edited by Tzantushka on Thu Jan 13, 2022 10:39 am, edited 1 time in total.
-
Tzantushka
- E30 Zone Regular
- Posts: 461
- Joined: Sat Nov 24, 2018 4:18 am
- Location: Melbourne, Australia
Not bad.
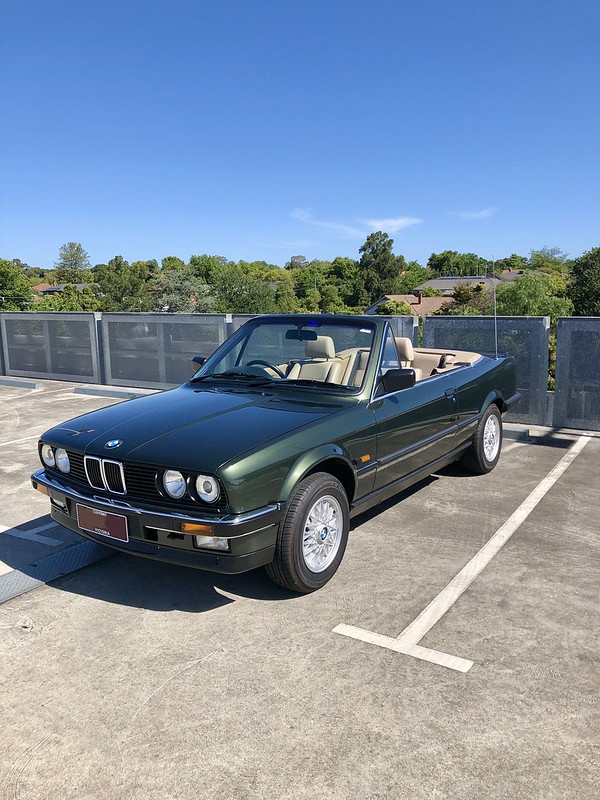
Took the car for a spin on Saturday and it rained all day.
On the drive it beaded fine and only when we parked under a tree did it lose some of the beading.
A rinse with the hose and it was clean again.
So far - thumbs up.
Not sure how to post/save a video with out setting up a YouTube Account...
-
Tzantushka
- E30 Zone Regular
- Posts: 461
- Joined: Sat Nov 24, 2018 4:18 am
- Location: Melbourne, Australia
Minor update, installed a NOS wiper stalk found online.
(more info here)


Back to 'as new' condition.
(more info here)
Back to 'as new' condition.
-
Tzantushka
- E30 Zone Regular
- Posts: 461
- Joined: Sat Nov 24, 2018 4:18 am
- Location: Melbourne, Australia
Nothing significant apart from the annual oil change ( Penrite HPR 30 20W-60 full zinc mineral oil) and enjoying the hell out of the car over the Xmas break.
Took the E30 on a 4-day road trip around the Macedon Ranges just outside of Melbourne.
Covered approx. 750 miles // 1,200 km and it ran great.
Although it has an intermittent high idle every now and again.
Today it was approx. 74F // 23C and hardly a cloud in the sky.
More than happy to help with the grocery run in this kind of weather.


Rear brakes & rotors are due shortly.
Collecting the bits for that.
Took the E30 on a 4-day road trip around the Macedon Ranges just outside of Melbourne.
Covered approx. 750 miles // 1,200 km and it ran great.
Although it has an intermittent high idle every now and again.
Today it was approx. 74F // 23C and hardly a cloud in the sky.
More than happy to help with the grocery run in this kind of weather.
Rear brakes & rotors are due shortly.
Collecting the bits for that.
-
aimlessrock

- E30 Zone Squatter

- Posts: 1821
- Joined: Sun Dec 06, 2009 11:00 pm
- Location: Manchester
...love your cabby,- wish we had some sun to get mine out in!
E30 320i Convertible (1989)
190 Mercedes (1988)
"there is nothing more expensive than a cheap E30"
190 Mercedes (1988)
"there is nothing more expensive than a cheap E30"
-
Tzantushka
- E30 Zone Regular
- Posts: 461
- Joined: Sat Nov 24, 2018 4:18 am
- Location: Melbourne, Australia
Thanks gents - certainly in its element on a sunny day.aimlessrock wrote: ↑Mon Jan 03, 2022 6:44 pm...love your cabby,- wish we had some sun to get mine out in!
You guys just need a sunny day over there - crank the heater and you're all set.
Thx Coops - sitting in traffic in 37 deg C even with the roof up is not fun.
- plus your A/C is busted right?
-
Tzantushka
- E30 Zone Regular
- Posts: 461
- Joined: Sat Nov 24, 2018 4:18 am
- Location: Melbourne, Australia
Also, I was never happy with the headlights.
Yes, after a mini-refurb they were slightly better.
But the pass side (LH) headlamp assembly was reasonably new as it looks like accident repair on that side.
And the driver's side (RH) was a mix of Bosch + Hella high beams.
Plus all four of them were way out of alignment.
Picked-up a refurbished Bosch unit so they are now all matching.
After some research, fitted them with some upgraded H1 bulbs:
- OSRAM Night Breaker Laser
- Philips X-tremeVision Pro150
Lubed the adjusters
And correctly adjusted them following the guide from Daniel Stern adapted for RHD.
I don't have hydraulic adjusters, so it's set & forget.
Night vision is much better.
With the Elipsoid Bullseye headlights the cutoff is great and now they are aimed properly I'm not dazzling oncoming traffic.
LHS side is illuminated nicely and the correctly adjusted high beams are awesome for extending vision.
Some pics from the local shopping centre car park during set-up & adjustment.
https://www.ebay.co.uk/itm/132778766804 ... SwDepg3OeT
I know they are not OEM and in the photos look cheesy but they are very good !!
I believe "Paultv" on here has a set and he thinks they are really good too and he travels all over Europe.
I too have Osrams in like yours and they are worth every penny.
Looking great mate
Mart.
I know they are not OEM and in the photos look cheesy but they are very good !!
I believe "Paultv" on here has a set and he thinks they are really good too and he travels all over Europe.
I too have Osrams in like yours and they are worth every penny.
Looking great mate
Mart.
Only the E46 cab left now.
Just got too old.
Just got too old.
It's part-fixed and works ok (unless it's 37C), but it's not healthy. The compressor is old and knackered and spitting oil into the system, which is clogging up the receiver/drier. I struggled to find a new compressor when I looked about a year ago.Tzantushka wrote: ↑Thu Jan 13, 2022 10:04 amThx Coops - sitting in traffic in 37 deg C even with the roof up is not fun.
- plus your A/C is busted right?
-
Tzantushka
- E30 Zone Regular
- Posts: 461
- Joined: Sat Nov 24, 2018 4:18 am
- Location: Melbourne, Australia
I know it's a big commitment, but overhauling the A/C was one of the hardest jobs, but well worth it.
Even today it was warm with the roof up on the drive home - much easy to press the A/C button and have cold air for maximum comfort
-
Tzantushka
- E30 Zone Regular
- Posts: 461
- Joined: Sat Nov 24, 2018 4:18 am
- Location: Melbourne, Australia
Only a few minor updates as the car is running well (knock on wood).
Engine mounts were original and flat as a pancake, so swapped those out.
The main one was the ignition switch.
For no consistent reason the car wouldn't start - some times no problem, others it took 7 or 8 goes for the engine to fire.
Accessories fine.
Ignition on fine.
Turn to crank - nothing.
Only after multiple attempts with the key forced into the start position and lots of jiggling would it crank.
Bit the bullet and bought a new ignition switch & loom.
The new version with the red switch part is much sturdier and has a solid spring loaded click when starting.
Starts first time now like a treat.
Out of curiosity, pulled apart the old switch and it was certainly worn & gummed up with crud.


Sure I could have carefully cleaned it and re-installed and hoped for the best.
But wasn't going to risk a 30 y.o. part that would crap out at any time.
Engine mounts were original and flat as a pancake, so swapped those out.
The main one was the ignition switch.
For no consistent reason the car wouldn't start - some times no problem, others it took 7 or 8 goes for the engine to fire.
Accessories fine.
Ignition on fine.
Turn to crank - nothing.
Only after multiple attempts with the key forced into the start position and lots of jiggling would it crank.
Bit the bullet and bought a new ignition switch & loom.
The new version with the red switch part is much sturdier and has a solid spring loaded click when starting.
Starts first time now like a treat.
Out of curiosity, pulled apart the old switch and it was certainly worn & gummed up with crud.
Sure I could have carefully cleaned it and re-installed and hoped for the best.
But wasn't going to risk a 30 y.o. part that would crap out at any time.
-
Tzantushka
- E30 Zone Regular
- Posts: 461
- Joined: Sat Nov 24, 2018 4:18 am
- Location: Melbourne, Australia
Well, this happened.

Rather than replace with exactly the same flat tinted glass, went for a convex version.
eBay listing showed a LH & RH convex, but they sent 1x flat one.

You can see the difference.

Ended up separating the mirror and retaining ring and flipping the mirror so it fits perfectly
Still works a treat with better field of view!
Rather than replace with exactly the same flat tinted glass, went for a convex version.
eBay listing showed a LH & RH convex, but they sent 1x flat one.
You can see the difference.
Ended up separating the mirror and retaining ring and flipping the mirror so it fits perfectly
Still works a treat with better field of view!
-
Tzantushka
- E30 Zone Regular
- Posts: 461
- Joined: Sat Nov 24, 2018 4:18 am
- Location: Melbourne, Australia
When I bought the car back in 2019 the rear brakes were serviceable.
Pads were about 50%, but the rotor had scoring, was very rusted and the park brake only really held on one side.
Thanks to COVID-19 induced shipping delays what would normally take a week or two was drawn-out to 2+ months waiting for parts to arrive in.
Good news is it's all done.
We don't have salt on the roads here, so the backing plates are fine.
Swapped out the park brake shoes & spring hardware
Hub flanges were fine, so rotary wire-brushed those and cleaned up residual rust with some phos acid rust converter.
gave the mating surfaces a think smear of nickel anti seize to retard corrosion & help with disassembly later.
Went with DBA T2 rotors which have a mild slot to keep pads true - For the local lads, another purchase from DVS Performance Parts.
Calipers also got a refurb with new seals & rubber guides.
Wire-brushed, cleaned & and a good coating of Duplicolor ceramic caliper paint.
Sure, re-plating them in yellow Zinc would have been true to original - but I wanted a coating that would be resistant to the occasional thioglycolic acid iron removers (e.g. IronX)

Reassembled with high-temp brake lube, correctly adjusted the park brake and I am all set!

Pads were about 50%, but the rotor had scoring, was very rusted and the park brake only really held on one side.
Thanks to COVID-19 induced shipping delays what would normally take a week or two was drawn-out to 2+ months waiting for parts to arrive in.
Good news is it's all done.
We don't have salt on the roads here, so the backing plates are fine.
Swapped out the park brake shoes & spring hardware
Hub flanges were fine, so rotary wire-brushed those and cleaned up residual rust with some phos acid rust converter.
gave the mating surfaces a think smear of nickel anti seize to retard corrosion & help with disassembly later.
Went with DBA T2 rotors which have a mild slot to keep pads true - For the local lads, another purchase from DVS Performance Parts.
Calipers also got a refurb with new seals & rubber guides.
Wire-brushed, cleaned & and a good coating of Duplicolor ceramic caliper paint.
Sure, re-plating them in yellow Zinc would have been true to original - but I wanted a coating that would be resistant to the occasional thioglycolic acid iron removers (e.g. IronX)
Reassembled with high-temp brake lube, correctly adjusted the park brake and I am all set!
-
Tzantushka
- E30 Zone Regular
- Posts: 461
- Joined: Sat Nov 24, 2018 4:18 am
- Location: Melbourne, Australia
Thanks Mart - plugging away the things that make the car more reliable.
Which leads me to the viscous fan clutch replacement.
After all the money spent on bringing the car up to snuff, I'd hate for a 34+ y.o. part to crap itself and cook the head.
I know the fan clutch was original and working, but it was starting to get noisy when you spin it by hand and starting to weep from the front.

It was a 30 min remove & refit job.
- pull out 2x fan shroud push pins
- remove shroud
- 32mm fan clutch spanner (which I had to buy... and glad I did) with a tap on the spanner with the hammer
- Unscrew fan assembly clockwise when looking at the front of the car
- swap over fan & reinstall.
But took the time to clean & check the blade assembly and fan shroud.
Ended up using a German made Behr Premium Line clutch - part no CFC64000P & 8MV 376 732-231.
If the Behr unit coming out of the car is any indication this will last a decade or two.

Last edited by Tzantushka on Sun Feb 27, 2022 10:39 am, edited 1 time in total.
-
Tzantushka
- E30 Zone Regular
- Posts: 461
- Joined: Sat Nov 24, 2018 4:18 am
- Location: Melbourne, Australia
Probably not available in your neighbourhood...
But I used a water based cleaner & degreaser - Chemtech CT14.
it's marketed as a bilge cleaner as well
Depending on the dilution ratio, pretty impressive stuff - gets rid of dirt and dust and helps remove light oily residue as well.

Thanks so much for this thread - it's proving really helpful with the work on my own 320i! viewtopic.php?f=25&t=283420Tzantushka wrote: ↑Tue Jan 07, 2020 4:57 amThanks lads.
Thankfully we are far away from the bushfires this summer.
With a few hours here and there over summer holidays, I've been able to start cosmetic stuff and fixing the small things that bring a smile to your face...
- Replaced the broken heater control panel
- New backlight bulbs & cleaned the fibre optics for the heater sliders
- New A/C switch that finally stays on
- Cleaned all the trim panels, radio and replaced bulbs in switches
Now all the controls work and I can see them at night!
Getting the basics working makes you appreciate them more

Question for you... I replaced the bulbs in my heater control panel yesterday however the lights are very dim on one side of the fan sliders compared to the other. Did you find cleaning the fibre optics made them brighter? And how did you go about cleaning them?
-
Tzantushka
- E30 Zone Regular
- Posts: 461
- Joined: Sat Nov 24, 2018 4:18 am
- Location: Melbourne, Australia
Glad you're finding inspiration and I can help in some way.wilma84 wrote: ↑Wed Mar 09, 2022 9:10 am
Thanks so much for this thread - it's proving really helpful with the work on my own 320i! viewtopic.php?f=25&t=283420
Question for you... I replaced the bulbs in my heater control panel yesterday however the lights are very dim on one side of the fan sliders compared to the other. Did you find cleaning the fibre optics made them brighter? And how did you go about cleaning them?
Assume you've got the right bulbs and they are inserted in the correct positions on the slider & temp dial housing
1. on the lower RH side of the slider assy
2. at the 1-o clock position near the temp control knob
(when looking at the front of the slider assembly)

With the HVAC sliders fibre optics - cleaning is straight forward - cotton bud with a bit of all purpose cleaner to wipe the fibre optic ends.
Also worth checking:
- the fibre optic cables are seated correctly in the housing where the bulb is
- your fibre optic cables aren't broken or cracked when you slide the HVAC controls (light leakage)
A small torch / flashlight source at the source of the bulb can help
I'm thinking the bottom right bulb may have been pushed out of place a bit as I was fitting the panel back on? I'll have to get in there and take another look when I get the time - thanks again for the response and photos, very helpfulTzantushka wrote: ↑Wed Mar 09, 2022 11:34 amGlad you're finding inspiration and I can help in some way.wilma84 wrote: ↑Wed Mar 09, 2022 9:10 am
Thanks so much for this thread - it's proving really helpful with the work on my own 320i! viewtopic.php?f=25&t=283420
Question for you... I replaced the bulbs in my heater control panel yesterday however the lights are very dim on one side of the fan sliders compared to the other. Did you find cleaning the fibre optics made them brighter? And how did you go about cleaning them?

Assume you've got the right bulbs and they are inserted in the correct positions on the slider & temp dial housing
1. on the lower RH side of the slider assy
2. at the 1-o clock position near the temp control knob
(when looking at the front of the slider assembly)
With the HVAC sliders fibre optics - cleaning is straight forward - cotton bud with a bit of all purpose cleaner to wipe the fibre optic ends.
Also worth checking:
- the fibre optic cables are seated correctly in the housing where the bulb is
- your fibre optic cables aren't broken or cracked when you slide the HVAC controls (light leakage)
A small torch / flashlight source at the source of the bulb can help