
Looks good rich. It seems to turn in nicely, certainly compared to that P6!
Are you suffering oil pressure issues? The gauge which I assume is oil pressure and temp flashes red quite a lot, but it also does it on a straight with miminal g forces on it, so it would seem unlikely...
318iS race car - back on track
Moderator: martauto
-
Jon_Bmw
- Dangerous when thinking

- Posts: 7604
- Joined: Tue Jan 11, 2005 11:00 pm
- Location: Salisbury
-
Nobby_N
- Old Skooler

- Posts: 3954
- Joined: Sat Mar 24, 2007 11:00 pm
- Location: Boston Lincs Mainly being a Coont
Love this, top work and can only dream of doing this!
-
rix313
- E30 Zone Team Member

- Posts: 4968
- Joined: Fri Oct 31, 2008 11:00 pm
- Location: Silverstone
Cheers guys 
The gauge flashing is because of the oil temperature. I need to change the point at which the alarm comes on. It was getting to 110degrees which I'm comfortable with at the moment. I am looking to change to an aluminium rad which will hopefully make the water cooling more efficient and then that will have an effect on the oil temp. Fitting an oil cooler to an M42 is pretty painful.
Here's a couple of pics that have filtered through so far:


It does feel pretty hooked up although I know I need more seat time to get my lap times down but it's comfortable at the moment which is what's important to begin with. I still need to stiffen the front end up I think. Will look at spring change but I will try going stiffer on the roll bar first.Jon_Bmw wrote:Looks good rich. It seems to turn in nicely, certainly compared to that P6!
Are you suffering oil pressure issues? The gauge which I assume is oil pressure and temp flashes red quite a lot, but it also does it on a straight with miminal g forces on it, so it would seem unlikely...
The gauge flashing is because of the oil temperature. I need to change the point at which the alarm comes on. It was getting to 110degrees which I'm comfortable with at the moment. I am looking to change to an aluminium rad which will hopefully make the water cooling more efficient and then that will have an effect on the oil temp. Fitting an oil cooler to an M42 is pretty painful.
Here's a couple of pics that have filtered through so far:
Last edited by rix313 on Mon Dec 23, 2019 10:27 pm, edited 2 times in total.
-
rix313
- E30 Zone Team Member
- Posts: 4968
- Joined: Fri Oct 31, 2008 11:00 pm
- Location: Silverstone
Had a little post Donington/pre Brands Hatch prep day yesterday. I had bought a few bits and bobs to put on the car this last week. First is a Direnza aluminium radiator. It has a slightly thicker core so will hopefully take more heat away from the engine and keep those oil temperatures in check as a result.


At Donington I forgot to ask any one to put my lap timer beacon on the pit wall, net result is I wasn't able to get my lap times on my OTTO lap timer. This wasn't the end of the world as it was more about just getting into the swing of things but the info would have been nice. 'Back in the day' when I used to look after cars in Kumho BMW Championship all of them used Race Technology DL1 data loggers with a Dash 3 display. The DL1 uses a GPS sensor to map the circuit and give you your lap times based on this. You can set markers and do quite a lot of stuff with it which I have yet to sit down and properly look at. So the bonus of this is my lap times will be displayed without having to place (and potentially forget) a beacon on the pit wall and the data is recorded so it can be analysed after the session. One of the chaps who I used to do some bits for in that championship did me a bit of a deal on his old DL1 Mk2 and Dash 3 full pairing so I had that off of him.
I'm going to mount the whole lot in the dash vents so I have removed them and will take it all to work and make it all fit in to fit when I get to Brands Hatch. I have fitted the GPS sensor and wired the basic power in so all I need to do is plug it in.


Finally for this time, many of you said I would need it when I fitted my bonnet originally and after the weekend I decided it probably was a good idea, to fit an Aerocatch to the centre of the bonnet. It wasn't lifting too badly but it was starting to flap a little bit on the long straights. I had one which was my emergency spare as I've seen them snapped and broken quite a few times by people being rough with them or in a collision.
I took a bit of time getting it lined up with the badge and trying to fine the best place for the pin. I used a pencil grinder to cut the hole out which made life much easier than previous efforts stitch drilling and filing due to lack of compressed air. I need to get some more arrows so they all match now and that'll be a good job done.

Brands Hatch CTCRC weekend is the 25th/26th. Myself and Mike Sheraton will be there representing the E30's

At Donington I forgot to ask any one to put my lap timer beacon on the pit wall, net result is I wasn't able to get my lap times on my OTTO lap timer. This wasn't the end of the world as it was more about just getting into the swing of things but the info would have been nice. 'Back in the day' when I used to look after cars in Kumho BMW Championship all of them used Race Technology DL1 data loggers with a Dash 3 display. The DL1 uses a GPS sensor to map the circuit and give you your lap times based on this. You can set markers and do quite a lot of stuff with it which I have yet to sit down and properly look at. So the bonus of this is my lap times will be displayed without having to place (and potentially forget) a beacon on the pit wall and the data is recorded so it can be analysed after the session. One of the chaps who I used to do some bits for in that championship did me a bit of a deal on his old DL1 Mk2 and Dash 3 full pairing so I had that off of him.
I'm going to mount the whole lot in the dash vents so I have removed them and will take it all to work and make it all fit in to fit when I get to Brands Hatch. I have fitted the GPS sensor and wired the basic power in so all I need to do is plug it in.
Finally for this time, many of you said I would need it when I fitted my bonnet originally and after the weekend I decided it probably was a good idea, to fit an Aerocatch to the centre of the bonnet. It wasn't lifting too badly but it was starting to flap a little bit on the long straights. I had one which was my emergency spare as I've seen them snapped and broken quite a few times by people being rough with them or in a collision.
I took a bit of time getting it lined up with the badge and trying to fine the best place for the pin. I used a pencil grinder to cut the hole out which made life much easier than previous efforts stitch drilling and filing due to lack of compressed air. I need to get some more arrows so they all match now and that'll be a good job done.
Brands Hatch CTCRC weekend is the 25th/26th. Myself and Mike Sheraton will be there representing the E30's
Last edited by rix313 on Mon Dec 23, 2019 10:34 pm, edited 1 time in total.
-
rix313
- E30 Zone Team Member
- Posts: 4968
- Joined: Fri Oct 31, 2008 11:00 pm
- Location: Silverstone
Spent the day today fitting the DL1 logger to the other side of my dash vents and replacing the OTTO 100 lap timer with the Dash 3 display. It took me quite a while to make a small bracket which the logger is dual-locked onto and then make the carbon facia panel which the front of the logger is flush with. Sadly I didn't get the weave to line up  haha
haha

Everything is all wired up on the car read so all I have to do when I get to Brands Hatch is plug it in and slot it in
Everything is all wired up on the car read so all I have to do when I get to Brands Hatch is plug it in and slot it in
Last edited by rix313 on Mon Dec 23, 2019 10:35 pm, edited 1 time in total.
-
Mikey_Boy

- E30 Zone Regular

- Posts: 996
- Joined: Sun Mar 16, 2008 11:00 pm
- Location: Cheshire - trying to avoid the bling!
Now you've got a bigger radiator, have you thought about fitting a modine type oil cooler? One that sandwiches between the oil filter and block that you plumb into the heater circuit? Cools the oil really well AND warms up your oil quicker too!!
Light as well...
Light as well...
-
rix313
- E30 Zone Team Member
- Posts: 4968
- Joined: Fri Oct 31, 2008 11:00 pm
- Location: Silverstone
The issue I have with that Mike is the M42 has this daft filter housing so it isn't possible to fit a simple sandwich plate as is the case with a spin on filter. I have seen people make lids which allow the fitment of a remote cooler. I may look into this depending on how Brands Hatch goes. Our races are only 15 minutes, I'm using high quality oil and will change it regularly, so I'm not too stressed out about it at the moment 
-
Mikey_Boy
- E30 Zone Regular
- Posts: 996
- Joined: Sun Mar 16, 2008 11:00 pm
- Location: Cheshire - trying to avoid the bling!
That's fair enough - I know next to naff all about M42s so thanks for the education! Like you say, 15 min races aren't worth stressing about for oil temps...
Cars looking great!
Cars looking great!
-
rix313
- E30 Zone Team Member
- Posts: 4968
- Joined: Fri Oct 31, 2008 11:00 pm
- Location: Silverstone
So this weekend just gone saw my second outing in the old girl. I hadn’t previously considered doing this weekend due to being busy with work but I thought better of it and signed up.
Checking the weather all week leading up to the race the forecast was switching from fair and sunny, to torrential rain. This would change on a ”˜bi-daily’ basis. When we arrived Friday it was hammering it down and very grim. The awning would be much appreciated this weekend that’s for sure!
Saturday came round and things were looking up. Clear skies, a bit on the windy side but”¦ no rain! Bonus. Having never driven there before or in the wet I was keen that there was at least one dry session or day for me to get the hang of the circuit.
Qualifying: As with Donington it was a case of going out there and finding my way round. As we were on the short Indy circuit and we had 15 minutes, there was plenty of time to get the laps in. My goal was to do a sub 1 minute lap time which is what I remembered the class D Kumho cars doing round there. I got up to speed with it fairly quickly and my best time was a 59.553. Target achieved. Quick PBMW guys are doing low 59’s/high 58’s and the 325i E30 in my class did a 56.677 so I am still a way of but it’s all about seat time, which I have little of thus far. But 16th on the grid of 25 wasn’t half bad plus this put me 3rd in class.
Race 1: I was pretty nervous about this. Paddock is a daunting corner on it’s own without piling into it with a gaggle of other cars. I had made some adjustments to the suspension to stiffen the car and also lower the rear ride height in a bid to help my performance. I had a bit too much wheel spin off the start but I managed to go from 1st gear to 2nd gear this time so that was a positive as far as I was concerned. 16th is on the outside of the grid and this put me on the outside for Paddock Hill and Druids, not ideal. I lost a couple of places off the start but kept on the back of the cars that passed me and I set to work on getting the places back. I was racing a couple of VW’s and it was interesting to see which cars were stronger in which areas of the circuit. I overtook a black Golf GTi which was in my class going into Paddock Hill, not some where I was expecting to duck down the inside of some one at, but it stuck and that place was mine. Next up was a Scirocco, which was again in my class (D). I kept getting a good run on him coming down from druids to Graham Hill then along the back straight to Clearways. I was so close to the back of him I wasn’t able to make a proper stab and carry my speed, as I had to use his braking points. I tried to sneak past with a lapping E30 M3 but I didn’t quite have the legs. I did eventually pass him going into Clearways and started to pull away. It was after this I had a bit of space and if I’m honest lost focus for a lap or two and had a couple of rubbish laps. It then dawned on me the car just ahead was another class D VW and I was catching him. I got my head down and set to get on him. Sadly the flag came out with a 2.370 second gap from him. Time I probably lost with my off laps and being stuck behind the Scirocco for too long. So I finished 3rd in class and 13th overall. Happy days. The ”˜podium’ means all the more when there were 6 cars in the class. The car felt very good but it was apparent I set my cold pressures too high as they definitely went too high towards the end of the race effected my grip.
Race 2: Sunday came, it was raining. Lots. Crap. I set about making changes on the car and preparing for going out in the wet. Fog-ex and Rain-ex on the windows. Blank the brake ducts. Soften off all the suspension. Tape up any holes to stop water getting in. Tyre pressures. I only have one set of tyres; Dunlop 03G and these are a cut slick, not a wet weather tyre by any stretch of the imagination. Other people were changing to Toyo R1R and Uniroyal Rain sports. My goal for this was simply to get the experience of racing in the wet and get to the end unscathed. We had 2 green flag laps before the start of the race. Weaving for tyre temperature was a bit of a waste of time but I gave it a go, the thing I gave most attention to was the brakes and making sure they had plenty of temperature in them. Time to start the race. The lights go out and I am wheel spinning my arse down the straight being overtaken by, well, nearly every one. I kept it tight into paddock and made the trip up to druids. Around druids I got on the power and with the slightest push on the pedal the rear and came around. All the steering lock in the world wasn't getting me back round and as I slid I was looking out the side window trying to avoid the cars, which were behind me. I reacted pretty well if I do say so myself. As the car got to 180 degress I wound the lock off to make sure I was facing straight up the hill and didn't veer left of right into the path of the cars, which were already starting to avoid me any way. They all went by and I turned myself back around and carried on my way. The rest of the race was just being safe and keeping out of every one else way. Get to the end; get my signature and job done. It is annoying to have lost the places and with them the points but I'd rather have my car in one piece. Here is a little video of the start and the moment. Notice my friend Mike in the other class D E30 having the same problem at the bottom of Paddock Hill:
Sum up: I am glad I made the effort to get to Brands. Saturday being dry was a bonus and I wish I could have had another stab at it in the dry on the Sunday but its all-good fun. Pembrey is the next round in August but I doubt I’ll be able to make it due to work. Snetterton is the one after that on the 19th/20th of September, which I will probably get myself entered for.
Some photos from race 1:
Paddock hill for the first time:

Chasing down:

Gotcha!:

On the hunt again:

Sorted:

On me tod:

Thanks for reading
Checking the weather all week leading up to the race the forecast was switching from fair and sunny, to torrential rain. This would change on a ”˜bi-daily’ basis. When we arrived Friday it was hammering it down and very grim. The awning would be much appreciated this weekend that’s for sure!
Saturday came round and things were looking up. Clear skies, a bit on the windy side but”¦ no rain! Bonus. Having never driven there before or in the wet I was keen that there was at least one dry session or day for me to get the hang of the circuit.
Qualifying: As with Donington it was a case of going out there and finding my way round. As we were on the short Indy circuit and we had 15 minutes, there was plenty of time to get the laps in. My goal was to do a sub 1 minute lap time which is what I remembered the class D Kumho cars doing round there. I got up to speed with it fairly quickly and my best time was a 59.553. Target achieved. Quick PBMW guys are doing low 59’s/high 58’s and the 325i E30 in my class did a 56.677 so I am still a way of but it’s all about seat time, which I have little of thus far. But 16th on the grid of 25 wasn’t half bad plus this put me 3rd in class.
Race 1: I was pretty nervous about this. Paddock is a daunting corner on it’s own without piling into it with a gaggle of other cars. I had made some adjustments to the suspension to stiffen the car and also lower the rear ride height in a bid to help my performance. I had a bit too much wheel spin off the start but I managed to go from 1st gear to 2nd gear this time so that was a positive as far as I was concerned. 16th is on the outside of the grid and this put me on the outside for Paddock Hill and Druids, not ideal. I lost a couple of places off the start but kept on the back of the cars that passed me and I set to work on getting the places back. I was racing a couple of VW’s and it was interesting to see which cars were stronger in which areas of the circuit. I overtook a black Golf GTi which was in my class going into Paddock Hill, not some where I was expecting to duck down the inside of some one at, but it stuck and that place was mine. Next up was a Scirocco, which was again in my class (D). I kept getting a good run on him coming down from druids to Graham Hill then along the back straight to Clearways. I was so close to the back of him I wasn’t able to make a proper stab and carry my speed, as I had to use his braking points. I tried to sneak past with a lapping E30 M3 but I didn’t quite have the legs. I did eventually pass him going into Clearways and started to pull away. It was after this I had a bit of space and if I’m honest lost focus for a lap or two and had a couple of rubbish laps. It then dawned on me the car just ahead was another class D VW and I was catching him. I got my head down and set to get on him. Sadly the flag came out with a 2.370 second gap from him. Time I probably lost with my off laps and being stuck behind the Scirocco for too long. So I finished 3rd in class and 13th overall. Happy days. The ”˜podium’ means all the more when there were 6 cars in the class. The car felt very good but it was apparent I set my cold pressures too high as they definitely went too high towards the end of the race effected my grip.
Race 2: Sunday came, it was raining. Lots. Crap. I set about making changes on the car and preparing for going out in the wet. Fog-ex and Rain-ex on the windows. Blank the brake ducts. Soften off all the suspension. Tape up any holes to stop water getting in. Tyre pressures. I only have one set of tyres; Dunlop 03G and these are a cut slick, not a wet weather tyre by any stretch of the imagination. Other people were changing to Toyo R1R and Uniroyal Rain sports. My goal for this was simply to get the experience of racing in the wet and get to the end unscathed. We had 2 green flag laps before the start of the race. Weaving for tyre temperature was a bit of a waste of time but I gave it a go, the thing I gave most attention to was the brakes and making sure they had plenty of temperature in them. Time to start the race. The lights go out and I am wheel spinning my arse down the straight being overtaken by, well, nearly every one. I kept it tight into paddock and made the trip up to druids. Around druids I got on the power and with the slightest push on the pedal the rear and came around. All the steering lock in the world wasn't getting me back round and as I slid I was looking out the side window trying to avoid the cars, which were behind me. I reacted pretty well if I do say so myself. As the car got to 180 degress I wound the lock off to make sure I was facing straight up the hill and didn't veer left of right into the path of the cars, which were already starting to avoid me any way. They all went by and I turned myself back around and carried on my way. The rest of the race was just being safe and keeping out of every one else way. Get to the end; get my signature and job done. It is annoying to have lost the places and with them the points but I'd rather have my car in one piece. Here is a little video of the start and the moment. Notice my friend Mike in the other class D E30 having the same problem at the bottom of Paddock Hill:
Sum up: I am glad I made the effort to get to Brands. Saturday being dry was a bonus and I wish I could have had another stab at it in the dry on the Sunday but its all-good fun. Pembrey is the next round in August but I doubt I’ll be able to make it due to work. Snetterton is the one after that on the 19th/20th of September, which I will probably get myself entered for.
Some photos from race 1:
Paddock hill for the first time:
Chasing down:
Gotcha!:
On the hunt again:
Sorted:
On me tod:
Thanks for reading
Last edited by rix313 on Mon Dec 23, 2019 10:47 pm, edited 3 times in total.
-
rix313
- E30 Zone Team Member
- Posts: 4968
- Joined: Fri Oct 31, 2008 11:00 pm
- Location: Silverstone
Quick pic from Brands Hatch I've had through from Alex Ball:

Only 4 weeks until Snetterton. In the mean time I have been collating and making up a few parts and upgrades in preparation for the winter rebuild/development period:

Only 4 weeks until Snetterton. In the mean time I have been collating and making up a few parts and upgrades in preparation for the winter rebuild/development period:
Last edited by rix313 on Mon Dec 23, 2019 10:49 pm, edited 1 time in total.
-
milescook
- E30 Zone Camper

- Posts: 1285
- Joined: Thu Jan 13, 2011 11:00 pm
- Location: The 'bran of Cwm
I spy  Good stuff!
The story so far... http://www.cookracing.co.uk/
Also please help the race budget by watching some videos https://www.youtube.com/cookracinguk
Also please help the race budget by watching some videos
-
rix313
- E30 Zone Team Member
- Posts: 4968
- Joined: Fri Oct 31, 2008 11:00 pm
- Location: Silverstone
The making of!
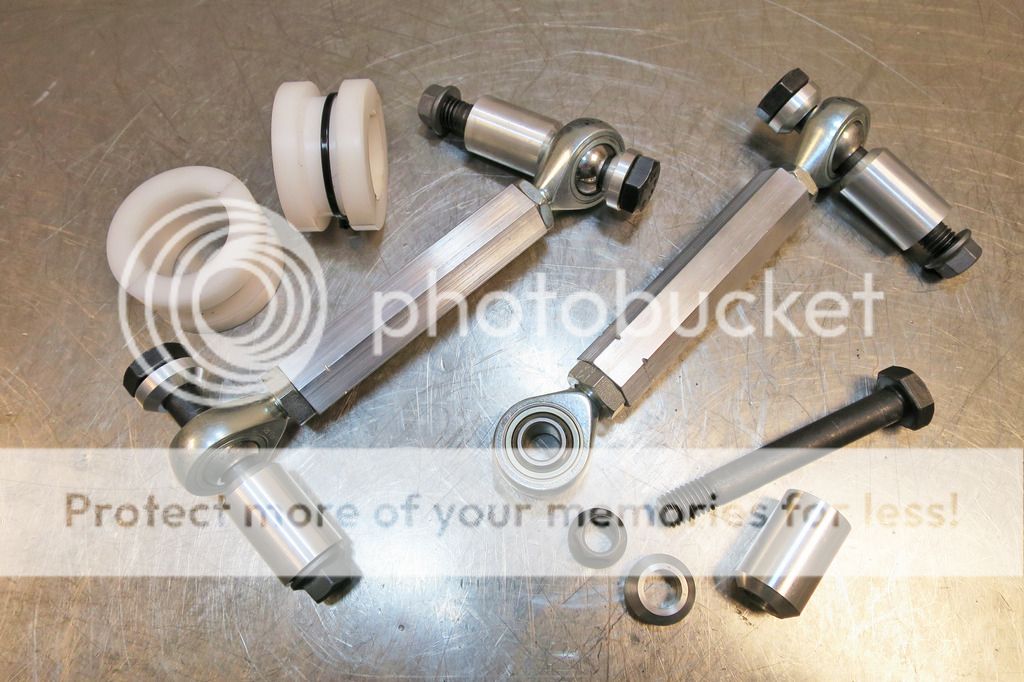
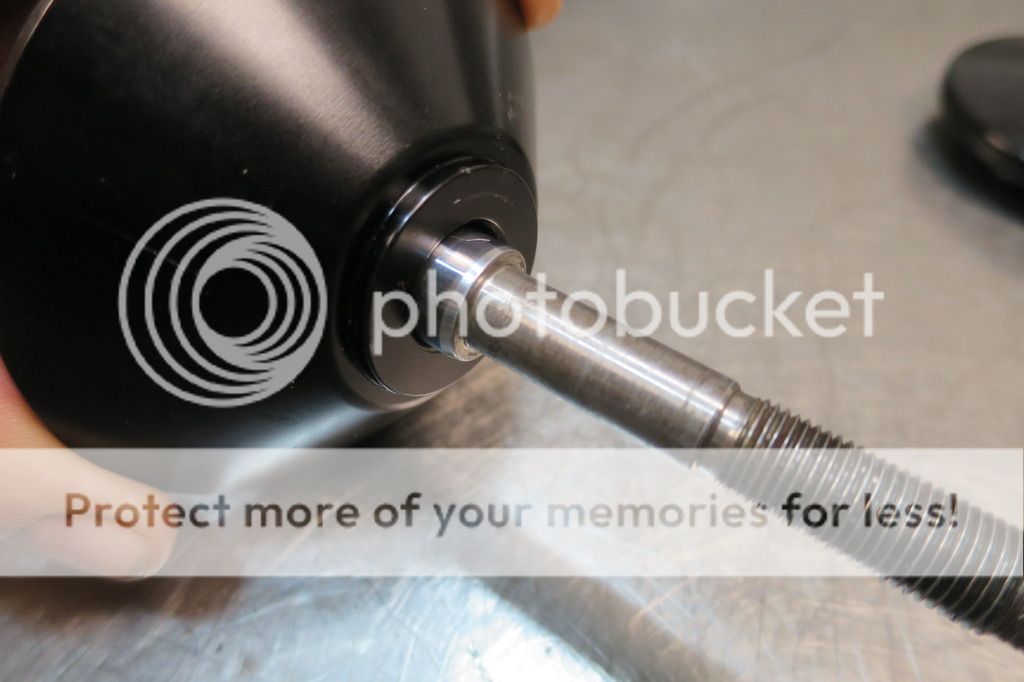
I whizzed home at the weekend and grabbed some bits and measurements off the car. I had been wanting to make up some rose jointed anti roll bar links for my Eibach roll bars. The rear roll bar link isn't so bad as it pivots in the same direction at the top and bottom so it moves quite freely. The front however is not very happy. With the standard mounting location on the wishbone, the bush on the link is put under a lot of tension with the bar on full stiff and it wouldn't take long for it to wear and fail very quickly if it remained this way.
I ordered the parts up to make the rear links and get them underway. The rod ends are left and right hand thread. Having them this way enables them to be adjusted when the car is at ride height and unwanted preload can be eliminated.
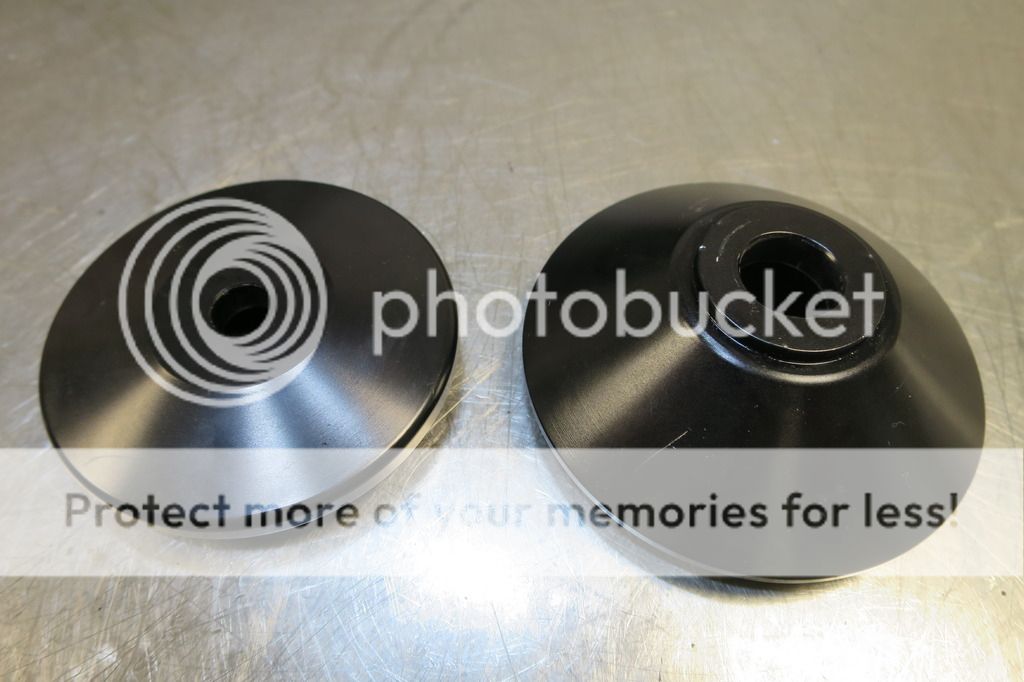
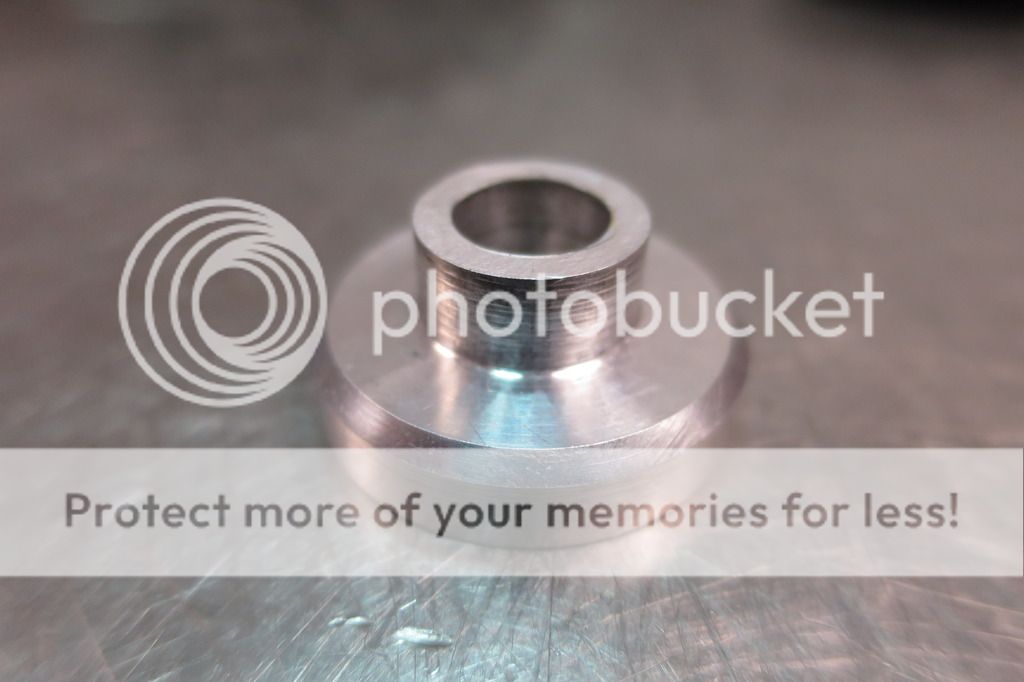
Popped into work today and jumped on the lathe making up the remaining top hats and also machining some bolts down. I used longer bolts and turned them down so that there is more shank (the strongest part) going through the joint and just enough thread for the k-nuts to hold on to.


I've ordered a stepper motor tachometer with digital speedo and water temperature gauge from SPA Design as well today. The tachometer will take centre stage on the dash binnacle and the water temp gauge will go with the other two gauges on the dash centre console.
I was due to be racing again on the 19th/20th at Snetterton, supporting the truck racing. Bitter sweet but I can't do it because I'll be in Texas with Aston Martin Racing for the 6h race at the Circuit of The Americas
I whizzed home at the weekend and grabbed some bits and measurements off the car. I had been wanting to make up some rose jointed anti roll bar links for my Eibach roll bars. The rear roll bar link isn't so bad as it pivots in the same direction at the top and bottom so it moves quite freely. The front however is not very happy. With the standard mounting location on the wishbone, the bush on the link is put under a lot of tension with the bar on full stiff and it wouldn't take long for it to wear and fail very quickly if it remained this way.
I ordered the parts up to make the rear links and get them underway. The rod ends are left and right hand thread. Having them this way enables them to be adjusted when the car is at ride height and unwanted preload can be eliminated.
Popped into work today and jumped on the lathe making up the remaining top hats and also machining some bolts down. I used longer bolts and turned them down so that there is more shank (the strongest part) going through the joint and just enough thread for the k-nuts to hold on to.
I've ordered a stepper motor tachometer with digital speedo and water temperature gauge from SPA Design as well today. The tachometer will take centre stage on the dash binnacle and the water temp gauge will go with the other two gauges on the dash centre console.
I was due to be racing again on the 19th/20th at Snetterton, supporting the truck racing. Bitter sweet but I can't do it because I'll be in Texas with Aston Martin Racing for the 6h race at the Circuit of The Americas
Last edited by rix313 on Mon Dec 23, 2019 10:51 pm, edited 1 time in total.
-
Demlotcrew
- E30 Zone Team Member
- Posts: 13329
- Joined: Mon Dec 20, 2004 11:00 pm
- Location: East Anglia
On a race E30 the rear drop links need to be much shorter as the ride height is so low the stock length links would hit the boot floor under compression. You're still not that low so should be ok, but something to consider for the future.

-
juniorGT

- E30 Zone Regular
- Posts: 262
- Joined: Fri Aug 01, 2008 11:00 pm
- Location: West Sussex
question. where'd you purchase the coolant pipes from?
318is.

-
rix313
- E30 Zone Team Member
- Posts: 4968
- Joined: Fri Oct 31, 2008 11:00 pm
- Location: Silverstone
Quite right. As can be seen in the photo's there is 10mm of available at each end, so there is quite a lot of adjustment available.Demlotcrew wrote:On a race E30 the rear drop links need to be much shorter as the ride height is so low the stock length links would hit the boot floor under compression. You're still not that low so should be ok, but something to consider for the future.
They are from one of my sponsors, SFS Performance ( http://www.sfsperformance.co.uk/prod_ca ... p?make=bmw ) CHS232juniorGT wrote:question. where'd you purchase the coolant pipes from?
-
Brianmoooore
- E30 Zone Team Member
- Posts: 49359
- Joined: Mon Jan 10, 2005 11:00 pm
Just made a small edit to the above post to make the link work. Got to keep the sponsors happy!
-
rix313
- E30 Zone Team Member
- Posts: 4968
- Joined: Fri Oct 31, 2008 11:00 pm
- Location: Silverstone
Thank you Brian
Ok so I ordered my SPA gauges the other day. As mentioned previously I have stepper motor water temperature gauge and 9000k tachometer with built in speedo. The coolant temp gauge will go on my centre console with my other temperature and pressure gauges. This leaves the dash binnacle clear with just the tachometer and any warning or information lights which I will fit later.
I posted a picture before of the modified binnacle with the carbon facia but I have some pictures here of how I did it incase any one else wanted to do it:
First up was to start making a paper template from which to cut the carbon around:

Using the template to mark the tape on the carbon:

Centre of the binnacle removed with air tools. Face of binnacle scored to aid bonding. I also cut out a strip for the lower section where the warning lights normal are. This strip is held in place by the 'front' lower section which clips on:

I taped the carbon to prevent glue getting on it and used 3M DP490 epoxy glue to fix the carbon to the binnacle:

Once the gauges arrived it was time to measure up and cut the hole. I tried to used 'fixed points' n the binnacle to take the measurements from. As it has a lot of curves I used the corners 'tags' on the top and also the corners of the binnacle. Marked the centre and used a hole saw to cut the hole, then cleaned the edges with a barrel sander:


Gauge fitted:

Hopefully in the next couple of weeks I will be getting the car into a mates work shop up near Gaydon and I'll be able to crack on with fitting these bits and getting stuck into my winter job list
Ok so I ordered my SPA gauges the other day. As mentioned previously I have stepper motor water temperature gauge and 9000k tachometer with built in speedo. The coolant temp gauge will go on my centre console with my other temperature and pressure gauges. This leaves the dash binnacle clear with just the tachometer and any warning or information lights which I will fit later.
I posted a picture before of the modified binnacle with the carbon facia but I have some pictures here of how I did it incase any one else wanted to do it:
First up was to start making a paper template from which to cut the carbon around:
Using the template to mark the tape on the carbon:
Centre of the binnacle removed with air tools. Face of binnacle scored to aid bonding. I also cut out a strip for the lower section where the warning lights normal are. This strip is held in place by the 'front' lower section which clips on:
I taped the carbon to prevent glue getting on it and used 3M DP490 epoxy glue to fix the carbon to the binnacle:
Once the gauges arrived it was time to measure up and cut the hole. I tried to used 'fixed points' n the binnacle to take the measurements from. As it has a lot of curves I used the corners 'tags' on the top and also the corners of the binnacle. Marked the centre and used a hole saw to cut the hole, then cleaned the edges with a barrel sander:
Gauge fitted:
Hopefully in the next couple of weeks I will be getting the car into a mates work shop up near Gaydon and I'll be able to crack on with fitting these bits and getting stuck into my winter job list
Last edited by rix313 on Mon Dec 23, 2019 10:55 pm, edited 1 time in total.
-
rix313
- E30 Zone Team Member
- Posts: 4968
- Joined: Fri Oct 31, 2008 11:00 pm
- Location: Silverstone
Had a good day today got a lot of positive things done. I took my rear dampers over to AST and took them apart with Curtis. The spec I had originally was what they run in PBMW, so it is very soft with a lot of droop. This is to make up for the fact they can't run rear ARB or LSD. So me and Curtis set about stripping them, machining the body down and making spacers for the piston to reduce the droop. For the time being they have been rebuilt with the 250mm long spring I already have. We are hoping to fit a more generic sized 57mm spring instead of the special 51mm spring which they currently run. Once I can be sure they will fit I'll be changing the front and rear springs for stiffer alternatives.


Before and after of the dampers. You can see less of the damper shaft is showing:

Here you can see how much droop was on the rear:

And now:

Less exciting jobs included fitting my radiator duct. I will need to remount my transponder as the bracket it was mount on interferes with the shroud but that's an easy enough job:

And stuck on my blind spot mirrors. With my wide angle rear view mirror, visibility out the left hand side of the car is very good, but the right hand side is not so great, even with the mirror all the way out. With this I can now see the rear quarter and also further out to the side then previously:

I removed my 4.1 LSD and will be taking it into work to strip it down and compare the internals to my 4.45 ratio LSD. The 4.1 has had multiple plates fitted and is pretty lively. I'm keen to take a look and see the differences in this set up and also the differences in the preload between the two as the 4.45 is a standard set up as far as I know.
Before and after of the dampers. You can see less of the damper shaft is showing:
Here you can see how much droop was on the rear:
And now:
Less exciting jobs included fitting my radiator duct. I will need to remount my transponder as the bracket it was mount on interferes with the shroud but that's an easy enough job:
And stuck on my blind spot mirrors. With my wide angle rear view mirror, visibility out the left hand side of the car is very good, but the right hand side is not so great, even with the mirror all the way out. With this I can now see the rear quarter and also further out to the side then previously:
I removed my 4.1 LSD and will be taking it into work to strip it down and compare the internals to my 4.45 ratio LSD. The 4.1 has had multiple plates fitted and is pretty lively. I'm keen to take a look and see the differences in this set up and also the differences in the preload between the two as the 4.45 is a standard set up as far as I know.
Last edited by rix313 on Mon Dec 23, 2019 11:00 pm, edited 1 time in total.
-
Motorhole
- E30 Zone Addict
- Posts: 2395
- Joined: Tue Jul 12, 2005 11:00 pm
- Location: Cheshire
What radiator duct is that you're using mate?
-
rix313
- E30 Zone Team Member
- Posts: 4968
- Joined: Fri Oct 31, 2008 11:00 pm
- Location: Silverstone
It's just the standard 4 pot one. Spend a while waiting for one at a decent price people seemed to want pretty crazy money for them (in my opinion any way). Just waiting for the clips to arrive. It will certainly be better than previous however there are still a few gaps around it. I was quite surprised how much of a 'lose' fit it is.
-
Andyboy
- Alpina Colada
- Posts: 12577
- Joined: Mon Sep 11, 2006 11:00 pm
The 318iS rad is nothing special, just the M50 24v E34 unit.
-
rix313
- E30 Zone Team Member
- Posts: 4968
- Joined: Fri Oct 31, 2008 11:00 pm
- Location: Silverstone
I was back in work today, took the opportunity to get into the sub assembly room and get the LSD's stripped. No major reason or requirement but I was keen to check them out make sure everything is ok inside them. I had a 4.1 ratio fitted to the car and this has had a multi plate upgrade so it has 4 friction plates instead of the standard two. Tested the preload on it and it was at ~52nm. A year ago I bought a 4.45 ratio diff from a guy that did hill climbs but I have not yet got around to fitting it. This is standard spec inside and the preload on that was ~59nm. I'll more than likely clean everything up and put them back together and get the 4.45 in the car for the next time I drive it and see what the difference is. After the two races I did this year I recon is should make a big difference.

Next week I should have a few more developments coming
Next week I should have a few more developments coming
Last edited by rix313 on Mon Dec 23, 2019 11:02 pm, edited 1 time in total.
-
rix313
- E30 Zone Team Member
- Posts: 4968
- Joined: Fri Oct 31, 2008 11:00 pm
- Location: Silverstone
So, a lot has been going on the last couple of months. Some progress has happened but a lot is slowly boiling away. Firstly was my LSD's. I had bought my 4.45 ratio as 'rebuilt'. I can only assume it was some sort of road car transmission shop that performed this work, as the case was crusty as anything and there were also anomalies with the internals (the clutch plates had picked up on something which has damaged them). Any who I decided to fully strip it and start again. I rang around a few places about cleaning up the casings but was met with massive lead times and little interest. A bit more digging and I was referred to a place that was only down the road. Totally old school place, no trace on the Internet, one landline and in the middle of nowhere. After driving around for half an hour I stumbled across the place. 3pm Thursday I arrive. 9am Friday morning I get a call to say he had done all the bits because next week was looking busy. What more can you ask for?!


After collecting it was back to work to quickly get some red oxide primer on all the parts:

Finally all parts painted with Simoniz tough satin black. Time to get it all back together:

Ta-daaaa:


A good experience although the re-painting the parts and not chipping them was what I found to be the biggest pain in the arse!
Next up was my engine mounts. I bought these from the states a while ago. The stud that they came with for the engine mount to fix to was way to short. So I removed it and for a short-term fix I used a bolt with lock washer and torque seal to keep an eye on it. This wasn't great as the bolt often came lose after every session. So a Google search and I bought some studs with a rolled thread as opposed to a cut thread (rolled threads being stronger). They were longer than I needed but I turned them down on the lathe to the length I required. I then used 638 Loctite (a bearing retainer) to secure it in place. Due to the new long stud it became impossible to slot the mount between the engine leg and the sub frame without excessively jacking the engine up. So I removed the 'sub frame stud' and replaced this with a cap head bolt, schnor washer, large load spreading washer and 270 Loctite to secure it. Unlike the bolt I used on the 'engine side', this one will not be able to work lose as it bolts through fixed materials. The engine side was subject to the polyurethane 'bush' flexing. Finally, as and where I can I have used lightweight, thermal resistant K-nuts to secure it.


Harking back to the early days of this car when we had it at college now. Long story short, we locked the keys in the car, had to get through the ski hatch and then welded a plate over it. There was also a steel plate welded onto the rear parcel shelf, no idea why. Any way I decided that enough was enough; I need to find some weight to lose in the car so out they come! I took the angle grinder to it and set to work. Next up will be some carbon fiber covers for the holes in the bulkhead and parcel shelf to get it sealed for the fuel tank. I also removed a few extra spot welded brackets. I got it on the scales and it was about 2.5kg worth. All helps.


Primered and painted the bare metal from grinding the plates off:

There’s a fair few holes that need covering up so knocked up these carbon blanks. I just need to make a template up for the roll cage holes but I’ve got a plan for that! I ran out of silicone this evening though so will have to go back to fit the rest of the bulkhead panels.


Lastly I had a look at rack stops to limit the amount of lock I have. There are a couple of reasons for this. One, is it will help with making rose jointed drop links work. Laying about at work were some 30mm long ones that they used on the Ferrari 458 GTE cars when they ran in ELMS. The I/D of these are 27mm which is the same as the E46 rack. I popped them in earlier, but I wasn’t happy with their ”˜low profile’ so I’ll be getting some Delrin ordered up so I can make a few different lengths and sizes for when it comes to testing the car next year.

Until next week
After collecting it was back to work to quickly get some red oxide primer on all the parts:
Finally all parts painted with Simoniz tough satin black. Time to get it all back together:
Ta-daaaa:
A good experience although the re-painting the parts and not chipping them was what I found to be the biggest pain in the arse!
Next up was my engine mounts. I bought these from the states a while ago. The stud that they came with for the engine mount to fix to was way to short. So I removed it and for a short-term fix I used a bolt with lock washer and torque seal to keep an eye on it. This wasn't great as the bolt often came lose after every session. So a Google search and I bought some studs with a rolled thread as opposed to a cut thread (rolled threads being stronger). They were longer than I needed but I turned them down on the lathe to the length I required. I then used 638 Loctite (a bearing retainer) to secure it in place. Due to the new long stud it became impossible to slot the mount between the engine leg and the sub frame without excessively jacking the engine up. So I removed the 'sub frame stud' and replaced this with a cap head bolt, schnor washer, large load spreading washer and 270 Loctite to secure it. Unlike the bolt I used on the 'engine side', this one will not be able to work lose as it bolts through fixed materials. The engine side was subject to the polyurethane 'bush' flexing. Finally, as and where I can I have used lightweight, thermal resistant K-nuts to secure it.
Harking back to the early days of this car when we had it at college now. Long story short, we locked the keys in the car, had to get through the ski hatch and then welded a plate over it. There was also a steel plate welded onto the rear parcel shelf, no idea why. Any way I decided that enough was enough; I need to find some weight to lose in the car so out they come! I took the angle grinder to it and set to work. Next up will be some carbon fiber covers for the holes in the bulkhead and parcel shelf to get it sealed for the fuel tank. I also removed a few extra spot welded brackets. I got it on the scales and it was about 2.5kg worth. All helps.
Primered and painted the bare metal from grinding the plates off:
There’s a fair few holes that need covering up so knocked up these carbon blanks. I just need to make a template up for the roll cage holes but I’ve got a plan for that! I ran out of silicone this evening though so will have to go back to fit the rest of the bulkhead panels.
Lastly I had a look at rack stops to limit the amount of lock I have. There are a couple of reasons for this. One, is it will help with making rose jointed drop links work. Laying about at work were some 30mm long ones that they used on the Ferrari 458 GTE cars when they ran in ELMS. The I/D of these are 27mm which is the same as the E46 rack. I popped them in earlier, but I wasn’t happy with their ”˜low profile’ so I’ll be getting some Delrin ordered up so I can make a few different lengths and sizes for when it comes to testing the car next year.
Until next week
Last edited by rix313 on Mon Dec 23, 2019 11:11 pm, edited 2 times in total.
-
milescook
- E30 Zone Camper
- Posts: 1285
- Joined: Thu Jan 13, 2011 11:00 pm
- Location: The 'bran of Cwm
The story so far... http://www.cookracing.co.uk/
Also please help the race budget by watching some videos https://www.youtube.com/cookracinguk
Also please help the race budget by watching some videos
-
DanThe
- E30 Zone Team Member
- Posts: 28649
- Joined: Sat Sep 10, 2005 11:00 pm
- Location: Staffs
Nice diff!
Is that sound deadening I can see in the quarter panels?

Is that sound deadening I can see in the quarter panels?
-
rix313
- E30 Zone Team Member
- Posts: 4968
- Joined: Fri Oct 31, 2008 11:00 pm
- Location: Silverstone
Eagle eyes! Yes it is, I bought a heat gun the other day but forgot to take it to the workshop with me when I went over last. It's on the list. Gotta get that shifter mounted as well I've got a notepad which gets jobs and bits added to it on an hourly basis of stuff I think of that needs doing and sorting
-
rix313
- E30 Zone Team Member
- Posts: 4968
- Joined: Fri Oct 31, 2008 11:00 pm
- Location: Silverstone
As Dan pointed out there was some left over sound proofing lurking around inside the car. I bought myself a heat gun and took to scraping it off. Quick and easy job and a nice little saving made from removing this. Although I do not have an exact figure it brings my current savings to just over 3kg. I will point out that I have bought some extra parts which will likely increase weight slightly but the savings I am making will allow for more equipment without being heavier. Yin Yan if you will haha.

After test fitting the rack stops mentioned previously I decided to take a look at the front anti roll bar links which I have been tinkering with for a couple of months now (time flies!). The M10 rod ends I have don’t have a particularly high angle to them, which is why I have limited the amount of lock available. The E46 rack has a lot of lock on offer, too much for what I have planned to work. I knocked up some aluminium spacers to continue the ”˜testing’ and with the 30mm rack stops, they appear to work. It was hard to get decent pics but these below show from full lock one way, to center, to full lock the other way.


There is still a small amount of movement available in the joints so they aren’t necking out. The damper mount is at an odd angle, which is annoying because if it wasn’t, it would be possible to reduce the length of the spacers for less flex. We shall see how that works out when the car hits the track. Once I know it all works I’ll make the parts from steel and do the same as I did with the rear and turn down some bolts with a long shank to help with the strength.
On the theme of rack stops I bought a rod of Delrin. Rather frustratingly I got a 50mm O/D bar and the lathe only takes up to 45mm so I couldn’t fit the whole bar in. All the more annoying was I actually needed to turn it down to 45mm but that O/D wasn’t available. Hey ho. So I had to cut smaller lengths and work with them. I decided to make a few different lengths; 30mm was one seeing as that is apparently what is required for the drop links to work. I also made 25mm to see if I can get away with that with the links and also 20mm for shits and giggles. I then cut them in half so they can be easily changed or removed. 30mm reduces the lock-to-lock turns to just less than one. Some people may argue that isn’t enough, but watching my onboard videos from this year, there was only one occasion when I got a bit out of shape. That was at Donington when I got a bit out of shape and throttle happy coming out of the loop hairpin and I only got as far as 3/4 of a turn. The other ”˜moment’ (aka me coming out of druids backwards at Brands Hatch) happened even with me spinning the wheel like a mad thing all the way to the limits of the rack, which had no affect at all. Further from that after winding all of that lock on it was a bit of a panic to get it all back off again so I didn’t veer into the path of other cars. So all a bit pointless.

Another seamless link now, moving from ARB links to suspension springs. The AST dampers I have came with 90N/mm front springs and 40N/mm on the rear. Super duper soft. The car was comfortable to drive but it felt like it needed tightening up. Under heavy breaking the front would dive quite hard and the weight transfer this caused meant the rear went light and the rear brakes would lock. I am hoping with these new 120N/mm front and 70N/mm rear springs will have the desired result! Another thing I have altered is the size of the rear spring. As I am doing away with the standard fuel tank, filler and pipework etc, I have extra room in the RH wheel arch to run a more readily available 57mm I/D spring. With these I also had to buy and machine a set of adjuster collars and top collars to suit. As the damper is now shorter I’ve gone for a shorter spring too:

I’m still persevering with making carbon-blanking panels for the bulkhead. A tedious task for sure but hopefully light at the end of the tunnel with that soon!
After test fitting the rack stops mentioned previously I decided to take a look at the front anti roll bar links which I have been tinkering with for a couple of months now (time flies!). The M10 rod ends I have don’t have a particularly high angle to them, which is why I have limited the amount of lock available. The E46 rack has a lot of lock on offer, too much for what I have planned to work. I knocked up some aluminium spacers to continue the ”˜testing’ and with the 30mm rack stops, they appear to work. It was hard to get decent pics but these below show from full lock one way, to center, to full lock the other way.
There is still a small amount of movement available in the joints so they aren’t necking out. The damper mount is at an odd angle, which is annoying because if it wasn’t, it would be possible to reduce the length of the spacers for less flex. We shall see how that works out when the car hits the track. Once I know it all works I’ll make the parts from steel and do the same as I did with the rear and turn down some bolts with a long shank to help with the strength.
On the theme of rack stops I bought a rod of Delrin. Rather frustratingly I got a 50mm O/D bar and the lathe only takes up to 45mm so I couldn’t fit the whole bar in. All the more annoying was I actually needed to turn it down to 45mm but that O/D wasn’t available. Hey ho. So I had to cut smaller lengths and work with them. I decided to make a few different lengths; 30mm was one seeing as that is apparently what is required for the drop links to work. I also made 25mm to see if I can get away with that with the links and also 20mm for shits and giggles. I then cut them in half so they can be easily changed or removed. 30mm reduces the lock-to-lock turns to just less than one. Some people may argue that isn’t enough, but watching my onboard videos from this year, there was only one occasion when I got a bit out of shape. That was at Donington when I got a bit out of shape and throttle happy coming out of the loop hairpin and I only got as far as 3/4 of a turn. The other ”˜moment’ (aka me coming out of druids backwards at Brands Hatch) happened even with me spinning the wheel like a mad thing all the way to the limits of the rack, which had no affect at all. Further from that after winding all of that lock on it was a bit of a panic to get it all back off again so I didn’t veer into the path of other cars. So all a bit pointless.
Another seamless link now, moving from ARB links to suspension springs. The AST dampers I have came with 90N/mm front springs and 40N/mm on the rear. Super duper soft. The car was comfortable to drive but it felt like it needed tightening up. Under heavy breaking the front would dive quite hard and the weight transfer this caused meant the rear went light and the rear brakes would lock. I am hoping with these new 120N/mm front and 70N/mm rear springs will have the desired result! Another thing I have altered is the size of the rear spring. As I am doing away with the standard fuel tank, filler and pipework etc, I have extra room in the RH wheel arch to run a more readily available 57mm I/D spring. With these I also had to buy and machine a set of adjuster collars and top collars to suit. As the damper is now shorter I’ve gone for a shorter spring too:
I’m still persevering with making carbon-blanking panels for the bulkhead. A tedious task for sure but hopefully light at the end of the tunnel with that soon!
Last edited by rix313 on Mon Dec 23, 2019 11:17 pm, edited 2 times in total.
-
Superleggera
- E30 Zone Newbie

- Posts: 152
- Joined: Wed Nov 05, 2014 11:00 pm
Great work - will be keen to hear how you get on with the new spring combination. My car is still being finalised so havent had it on the road but Im using the previous owners spring combination of 200N/mm and 140N/mm which seems horrendously stiff, although it does have tender springs which are around 60N/mm
-
rix313
- E30 Zone Team Member
- Posts: 4968
- Joined: Fri Oct 31, 2008 11:00 pm
- Location: Silverstone
Good god yes that is very stiff!  People get carried away and assume stiffer is better, but they go too far and make things worse
-
rix313
- E30 Zone Team Member
- Posts: 4968
- Joined: Fri Oct 31, 2008 11:00 pm
- Location: Silverstone
It's not been a particularly productive month, I haven't even been to see the car. I need to decide what to prioritise because at this rate I will miss the few races I can do.
So I've been doing my best at work to get a few machining jobs done. First was to finish the front ARB links, source and machine some 12.9 bolts to use with them and make another rack stop. This is because rather annoyingly I measured the O/D of the drivers side for the rack, which was 27mm. So accordingly made a set of rack stops to suit. Rather randomly the passenger side of the rack is 28mm! Bollocks, so I needed to make a 28mm I/D stop in order to wrap up this particular 'project'.
Hopefully next time I get to the 'shop I can fit these and move on.
Next up was more attention on the rear dampers. Due to the larger spring I therefore larger top collar. The one I was sent was for a damper with a much larger shaft so it didn't fit mine properly:
So to rectify this I jumped on the lathe and knocked up some top hats. I was super keen to get the tolerance correct and made them so they were almost an interference fit into the collar. I also made them fairly beefy to keep the strength:
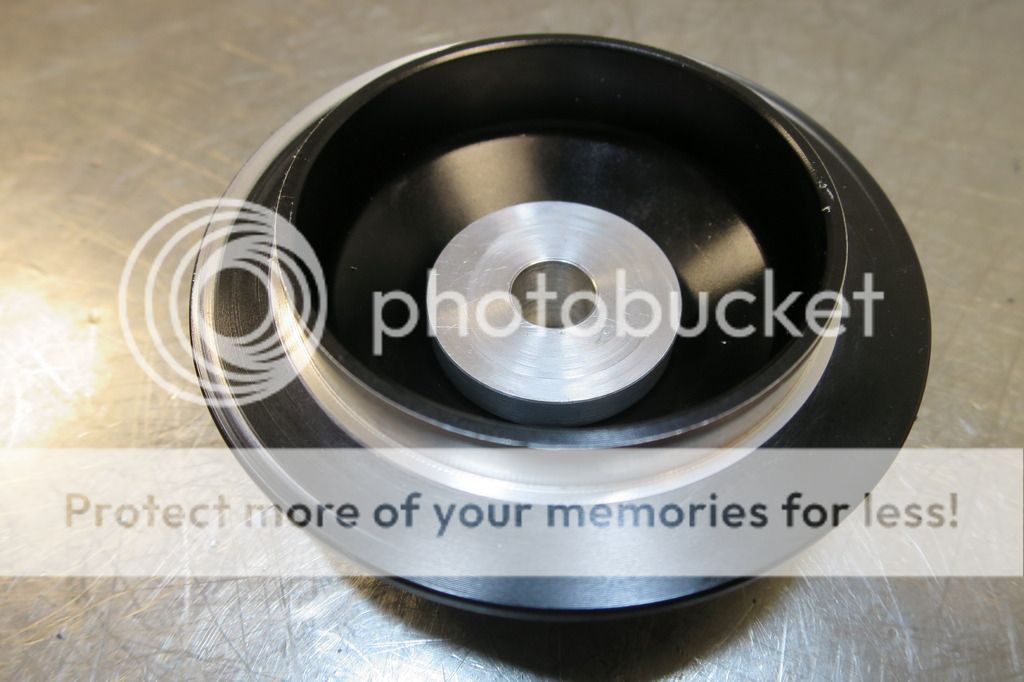
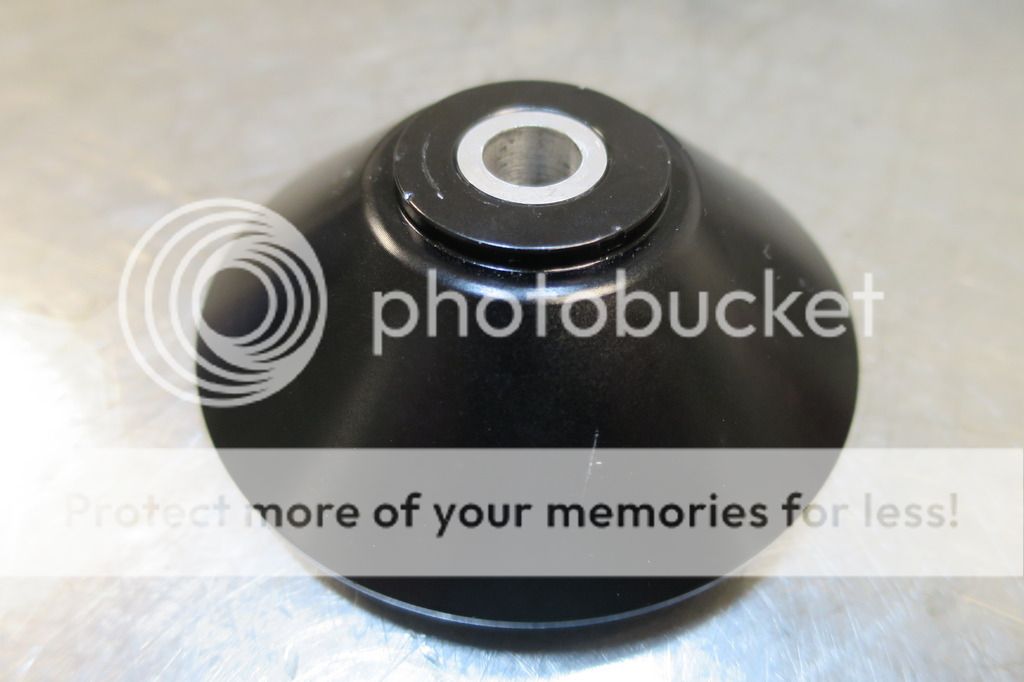
Should do the trick:
I got my fuel tank top plate back the other week as well. I need to do some work on it getting all the unions and wiring sorted. So until next week...
So I've been doing my best at work to get a few machining jobs done. First was to finish the front ARB links, source and machine some 12.9 bolts to use with them and make another rack stop. This is because rather annoyingly I measured the O/D of the drivers side for the rack, which was 27mm. So accordingly made a set of rack stops to suit. Rather randomly the passenger side of the rack is 28mm! Bollocks, so I needed to make a 28mm I/D stop in order to wrap up this particular 'project'.
Hopefully next time I get to the 'shop I can fit these and move on.
Next up was more attention on the rear dampers. Due to the larger spring I therefore larger top collar. The one I was sent was for a damper with a much larger shaft so it didn't fit mine properly:
So to rectify this I jumped on the lathe and knocked up some top hats. I was super keen to get the tolerance correct and made them so they were almost an interference fit into the collar. I also made them fairly beefy to keep the strength:
Should do the trick:
I got my fuel tank top plate back the other week as well. I need to do some work on it getting all the unions and wiring sorted. So until next week...
-
rix313
- E30 Zone Team Member
- Posts: 4968
- Joined: Fri Oct 31, 2008 11:00 pm
- Location: Silverstone
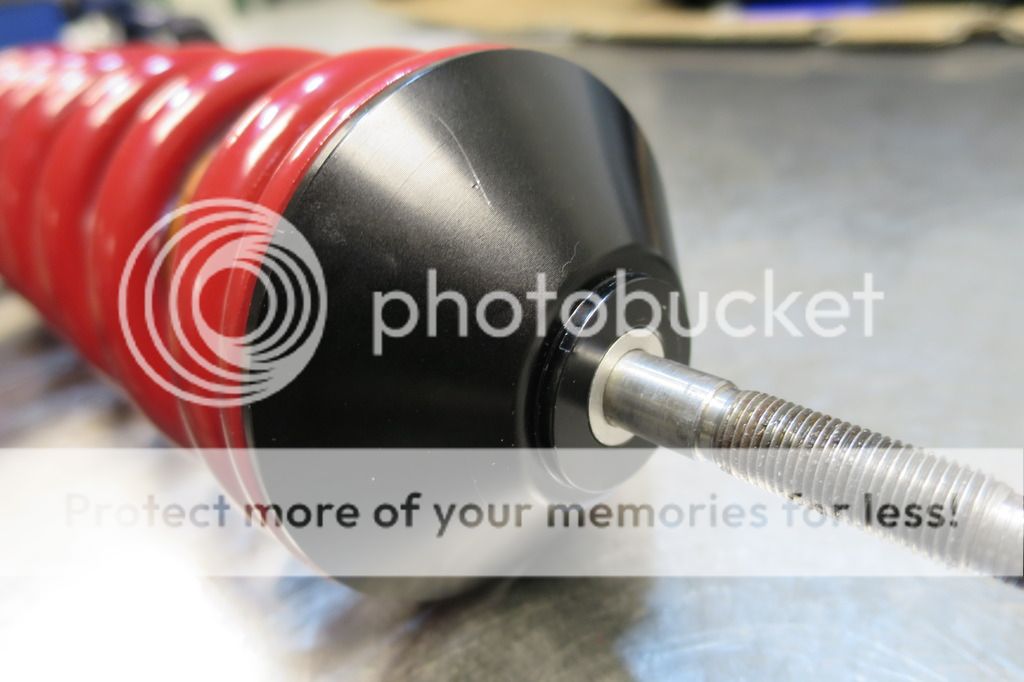
The rack stop and anti roll bar drop like combo work a treat. To say I am relieved is an understatement as it seemed to be a never ending mini project but hopefully the performance gained will make it worth while
I got the left rear damper fitted but the right hand side remains unfitted as I've got to re-route the pipe work for the standard fuel tank breather system. I will be removing the standard tank at a later date in favour of the item I about to go into more detail on now.
For some time I've had a 30L ATL fuel cell kicking around the garage. I'd previously been unwilling to fit it as the only location was in the boot. High up and further back isn't ideal but the weight saving is there so I'll make the compromise. The top plate I had was unfit for my application. The fuel pump I am using is too tall and there are other components I wanted to have that required something custom. So I had one made my a friend of mine who has a company called Venture Engineering in Bourton-on-the-water knock one up.
So this is the view form the top. On the right is the filler, in the very centre is the pump outlet, behind and to the right is the rail return, to the left of that is the roll over valve, directly up from that is the pump wiring 'bulkhead' fitting and on the far left is the level sensor. All works quite nicely in my opinion, roll over goes at the rear so under heavy braking the fuel isn't able to slosh out as it would if it was at the front. Also placing the return at the back means under the same conditions, fuel is still available at the rear of the tank should it surge too much when the level is very low.


And from underneath all pretty self explanatory. The reason the top plate had to be raised was because of the fuel pump and unions making it taller than the tank. There was a bit of a miscommunication with the level sensor but it is recessed so it sits level with the top of the tank and the bottom of it is inline with the bottom of the pump. Both sit about 4 or 5mm from the base of the tank make maximum use of the capacity. The sensor and gauge are fully programmable so once it is all installed I can go through that process. You can also see in this pic that there is a small bracket between the pump and the filler. This is to provide some stability to both components otherwise it would put too much stress on the fittings and potentially cause a failure.

Currently the plan, as things have taken longer than anticipated, is to get the car to a point where it is back on its wheels and running so I can do the first race of the CTCRC Pre 93 Touring Car Championship at Rockingham on the 9th and 10th of April. I will continue to test fit things like the fuel tank and other future mods but I will leave the car largely as it stands. Due to a busy race season with work I won't be able to race this again until September so plenty of time in-between them to continue
I got the left rear damper fitted but the right hand side remains unfitted as I've got to re-route the pipe work for the standard fuel tank breather system. I will be removing the standard tank at a later date in favour of the item I about to go into more detail on now.
For some time I've had a 30L ATL fuel cell kicking around the garage. I'd previously been unwilling to fit it as the only location was in the boot. High up and further back isn't ideal but the weight saving is there so I'll make the compromise. The top plate I had was unfit for my application. The fuel pump I am using is too tall and there are other components I wanted to have that required something custom. So I had one made my a friend of mine who has a company called Venture Engineering in Bourton-on-the-water knock one up.
So this is the view form the top. On the right is the filler, in the very centre is the pump outlet, behind and to the right is the rail return, to the left of that is the roll over valve, directly up from that is the pump wiring 'bulkhead' fitting and on the far left is the level sensor. All works quite nicely in my opinion, roll over goes at the rear so under heavy braking the fuel isn't able to slosh out as it would if it was at the front. Also placing the return at the back means under the same conditions, fuel is still available at the rear of the tank should it surge too much when the level is very low.
And from underneath all pretty self explanatory. The reason the top plate had to be raised was because of the fuel pump and unions making it taller than the tank. There was a bit of a miscommunication with the level sensor but it is recessed so it sits level with the top of the tank and the bottom of it is inline with the bottom of the pump. Both sit about 4 or 5mm from the base of the tank make maximum use of the capacity. The sensor and gauge are fully programmable so once it is all installed I can go through that process. You can also see in this pic that there is a small bracket between the pump and the filler. This is to provide some stability to both components otherwise it would put too much stress on the fittings and potentially cause a failure.
Currently the plan, as things have taken longer than anticipated, is to get the car to a point where it is back on its wheels and running so I can do the first race of the CTCRC Pre 93 Touring Car Championship at Rockingham on the 9th and 10th of April. I will continue to test fit things like the fuel tank and other future mods but I will leave the car largely as it stands. Due to a busy race season with work I won't be able to race this again until September so plenty of time in-between them to continue
Last edited by rix313 on Wed Dec 25, 2019 3:31 pm, edited 3 times in total.
-
DanThe
- E30 Zone Team Member
- Posts: 28649
- Joined: Sat Sep 10, 2005 11:00 pm
- Location: Staffs
Nice progress Rich
One job I need to do is relocate the ARB links up to the strut, have you had a weigh in with the tanks?
One job I need to do is relocate the ARB links up to the strut, have you had a weigh in with the tanks?
-
rix313
- E30 Zone Team Member
- Posts: 4968
- Joined: Fri Oct 31, 2008 11:00 pm
- Location: Silverstone
Cheers Dan hopefully all these 'shiny' bits will have a positive impact on the handling
I poped the ATL tank on the corner weight scales and they said 6 - 6.5kg. They only go in half kilo increments and are a bit hit and miss with small objects so be interested to get it on some house hold scales. Hoping that's a 4 or 5kg saving over the standard tank.
I poped the ATL tank on the corner weight scales and they said 6 - 6.5kg. They only go in half kilo increments and are a bit hit and miss with small objects so be interested to get it on some house hold scales. Hoping that's a 4 or 5kg saving over the standard tank.
-
Mikey_Boy
- E30 Zone Regular
- Posts: 996
- Joined: Sun Mar 16, 2008 11:00 pm
- Location: Cheshire - trying to avoid the bling!
Superb work!! Keep the updates coming....