

Great job, I cut mine too, see the plate I made up in our build thread, ally is easy to work with!
Cheers
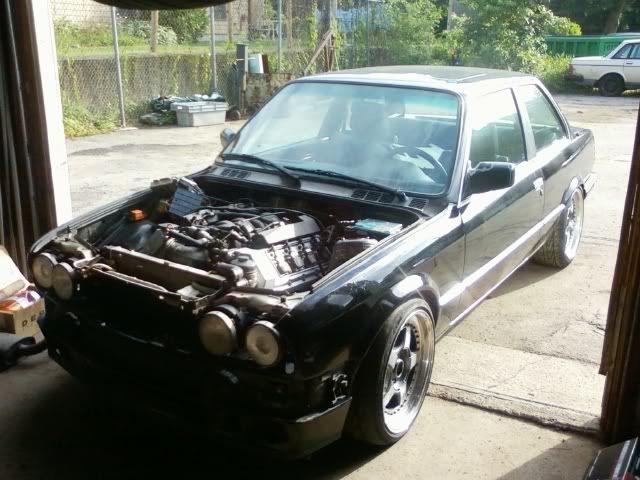
My 318is M60/6speed swap
Moderator: martauto
-
E30SPDFRK
- E30 Zone Newbie

- Posts: 56
- Joined: Mon Dec 29, 2008 11:00 pm
- Location: Newport Beach, CA, USA
Just been doing little things to the car in the few hours after work. Shortened the shifter linkage, re-bent the clutch hose to fit the e39 slave, installed the radiator (still need to figure out where I'm going to run the upper hose), etc. Been working on the wiring but my harness seems to be different that what the pinout's show so it's being a pain. Still trying to figure out a booster solution, thinking I may try the Geo Metro route that I've heard of 24v guys doing. Hopefully going to build the headers this weekend.
Few more shitty phone pics. Once we got the engine in my boss took it upon himself to make me a transmission bracket :alright

This one shows off how shitty my drivetrain angle is without the subframe spacers. I'm thinking I should buy stock in 105mm guibos
Few more shitty phone pics. Once we got the engine in my boss took it upon himself to make me a transmission bracket :alright
This one shows off how shitty my drivetrain angle is without the subframe spacers. I'm thinking I should buy stock in 105mm guibos
-Byron
-
E30SPDFRK
- E30 Zone Newbie
- Posts: 56
- Joined: Mon Dec 29, 2008 11:00 pm
- Location: Newport Beach, CA, USA
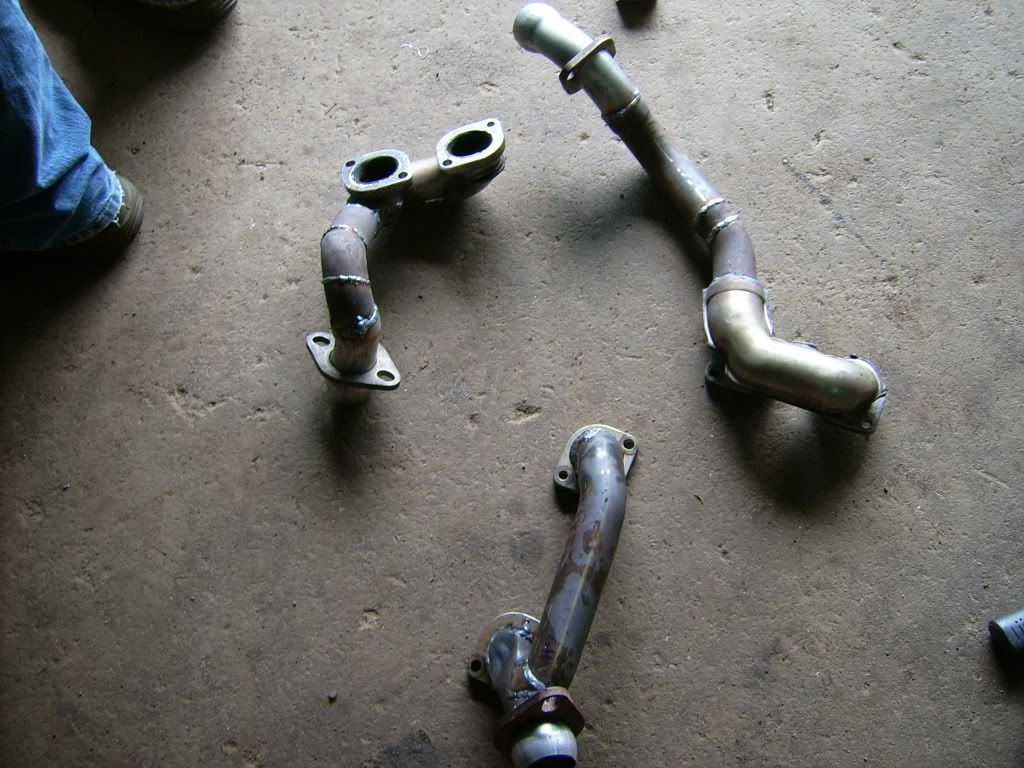
Worked on the exhaust manifolds for a few hours yesterday and got pretty much nowhere. I'm trying to modify the factory ones but they're dual-walled and nowhere close to fitting so it's being a pain. I've got a few other options (X5 4.0 manifolds, build log manifolds, buy a bunch of 90* bends and make some from scratch) but all involve either more money or more time than I want to spend.
Does anyone know if X5 4.4 manifolds will fit without modification too? My co-workers sister-in-law has a crashed one.
Does anyone know if X5 4.4 manifolds will fit without modification too? My co-workers sister-in-law has a crashed one.
-Byron
X5 Manifolds should fit your passenger side, but not your drivers side.
Check this out! they make E30 V8 manifolds cost approx £700 but well worth it, I battled with mine for so long, in hind site I should have bought some of these.
www.gamamotorsport.com
Check this out! they make E30 V8 manifolds cost approx £700 but well worth it, I battled with mine for so long, in hind site I should have bought some of these.
www.gamamotorsport.com
M60 Touring and Sport
-
glenn
- Engine Transplant Services

- Posts: 2198
- Joined: Sat Jan 29, 2005 11:00 pm
- Location: blackwood, south wales
cut the outer wall off first.
they are there to get as much heat as possible into the cats, to get the emissions lower, quicker.
once the outer wall has been cut off, its suprising how much smaller they are, giving you more room to play with.
they are there to get as much heat as possible into the cats, to get the emissions lower, quicker.
once the outer wall has been cut off, its suprising how much smaller they are, giving you more room to play with.
-
E30SPDFRK
- E30 Zone Newbie
- Posts: 56
- Joined: Mon Dec 29, 2008 11:00 pm
- Location: Newport Beach, CA, USA
$1000 for manifolds is not worth it to me. I've spent barely over that on the whole swap so far haha.
I got a lead on the little small-diameter bend pieces but parts alone would be close to $300 so I'm going to work some more on just modifying the factory ones. Most parts of them really aren't that far off to be honest.
I got a lead on the little small-diameter bend pieces but parts alone would be close to $300 so I'm going to work some more on just modifying the factory ones. Most parts of them really aren't that far off to be honest.
-Byron
-
E30SPDFRK
- E30 Zone Newbie
- Posts: 56
- Joined: Mon Dec 29, 2008 11:00 pm
- Location: Newport Beach, CA, USA
Figured out my wiring issues I think. While looking for pinouts I found an e36 x20 plug diagram and 90% of the colors and locations were the same. The other 10% matched up with the e34 stuff thats on e30.de, so I think it's gonna work. Hopefully I'll be able to try it out tomorrow, wish me luck! 
-Byron
-
E30SPDFRK
- E30 Zone Newbie
- Posts: 56
- Joined: Mon Dec 29, 2008 11:00 pm
- Location: Newport Beach, CA, USA
Few updates, no pics.
Both the manifolds are mocked up, just need to tig all the welds now then add flanges and build the rest of the exhaust. Making the drivers side fit around the steering colum was a pita.
Finally found a V8 booster too. Went to a yard looking for a Geo Metro but saw they had a e32 right by the door so I just got it from that.
Stopped at the driveshaft shop too. Dude said to expect a call next week!
-Byron
-
E30SPDFRK
- E30 Zone Newbie
- Posts: 56
- Joined: Mon Dec 29, 2008 11:00 pm
- Location: Newport Beach, CA, USA
Got the brake booster 66% in, just want to make another gusset. It doesn't flex at all as is now but I know theres going to be quite a bit of pressure on it so I want to be sure. Took some phone pics so this thread doesn't get too boring


It was a big pain in the ass getting it positioned and making the main bracket. I've got maybe a quarter inch to the fender, headlights, oil filter and radiator support.
It was a big pain in the ass getting it positioned and making the main bracket. I've got maybe a quarter inch to the fender, headlights, oil filter and radiator support.
-Byron
-
E30SPDFRK
- E30 Zone Newbie
- Posts: 56
- Joined: Mon Dec 29, 2008 11:00 pm
- Location: Newport Beach, CA, USA
Picked up my driveshaft this morning

went back to the shop to put it in and its too long Only by about half an inch, but its enough to make it put too much pressure on the guibo. It's the shops fault, as I told them exactly what I wanted and even gave them a blueprint with the needed measurements, so I'm going to go back Monday and see if they can fix it for me within the week.
Still got some other things done, although not as much as I wanted. Got the third booster bracket made. Stiffer than viagra now.

All painted, booster and new resovoir installed. Started making the last two lines but I had the wrong sized fittings so it's going to have to wait.

Figured out the linkage too. I was planning on either notching the strut tower support or making a bent linkage to get from the pedal to the booster, but inspiration struck when I started working on it. I took the hinge assembly from the e32 setup and cut the pivot point off. The end of the hinge has a heim joint in it, so it will be able to move on the angle it does. Plus the hinge is made of 1/8" steel and is pre-stepped, so it's plenty strong and got rid of my angle problem.

Next I took a piece of 3/8" round stock and threaded the end so it would fit the old linkage from the stock booster. This will be welded to the hinge once I get all the measurements set correctly.

This being at an angle though made it unable to attach to the brake pedal. rather than bent the round stock and make it weaker, I took the pedal out and bent where it will attach.

Hopefully have that all made tomorrow and get the correct fittings so I can finally have brakes again.
went back to the shop to put it in and its too long
Still got some other things done, although not as much as I wanted. Got the third booster bracket made. Stiffer than viagra now.
All painted, booster and new resovoir installed. Started making the last two lines but I had the wrong sized fittings so it's going to have to wait.
Figured out the linkage too. I was planning on either notching the strut tower support or making a bent linkage to get from the pedal to the booster, but inspiration struck when I started working on it. I took the hinge assembly from the e32 setup and cut the pivot point off. The end of the hinge has a heim joint in it, so it will be able to move on the angle it does. Plus the hinge is made of 1/8" steel and is pre-stepped, so it's plenty strong and got rid of my angle problem.
Next I took a piece of 3/8" round stock and threaded the end so it would fit the old linkage from the stock booster. This will be welded to the hinge once I get all the measurements set correctly.
This being at an angle though made it unable to attach to the brake pedal. rather than bent the round stock and make it weaker, I took the pedal out and bent where it will attach.
Hopefully have that all made tomorrow and get the correct fittings so I can finally have brakes again.
-Byron

Yes good bit of progress going on there. just to add, im going for a pedal box to over come the servo space issue. the 3 reservoirs will be mounted on the firewall where the battery tray is.
should free up some space that way.
your lucky being left hand drive
should free up some space that way.
your lucky being left hand drive

6pot wilwoods front
4pot Porsche rear
89 E30 stripped running a 6speed V8
Twin Turbo M60 in progress
-
E30SPDFRK
- E30 Zone Newbie
- Posts: 56
- Joined: Mon Dec 29, 2008 11:00 pm
- Location: Newport Beach, CA, USA
Yeah, I don't really like the booster up front either but I didn't like the price of a tilton box either. And I like power brakes. If I had more time and money though, I'd probably go that route. Much cleaner and easier it seems.
Linkage kicked my ass today. Worked on it pretty much all day and it's still not done. Attached the piece I made yesterday and went to get a length off it but it would bind up after the first few inches of travel. Luckily I found a heim joint laying around the shop.

But it was too big to attach to the 3/8" round stock. So I found a larger rod laying in a corner, drilled and tapped it, then welded it to the end of the 3/8" and bolted it to the pedal.


The part I made yesterday now fit perfectly to the e32 bracket, so I welded them together and tried it out.

And it just pushed the booster linkage into the fender. So I welded some nuts onto the inner fender as a sliding point, but then the linkage just moved up. So I marked the e32 bracket and was planning on slotting it and having a guide pin, but I couldn't find the right size milling bit. So I gave up for the night, slightly dejected.
Linkage kicked my ass today. Worked on it pretty much all day and it's still not done. Attached the piece I made yesterday and went to get a length off it but it would bind up after the first few inches of travel. Luckily I found a heim joint laying around the shop.
But it was too big to attach to the 3/8" round stock. So I found a larger rod laying in a corner, drilled and tapped it, then welded it to the end of the 3/8" and bolted it to the pedal.
The part I made yesterday now fit perfectly to the e32 bracket, so I welded them together and tried it out.
And it just pushed the booster linkage into the fender. So I welded some nuts onto the inner fender as a sliding point, but then the linkage just moved up. So I marked the e32 bracket and was planning on slotting it and having a guide pin, but I couldn't find the right size milling bit. So I gave up for the night, slightly dejected.
-Byron
You'll get there, it just needs some more time 
It seems that every E30 V8 swap is different what comes to brake setup. It's good that people don't always do the same thing but think by themselves.. Still waiting for the one who dares to modify the firewall enough to fit the booster right next to brake pedal as in one german S62 E30 M3 swap
It seems that every E30 V8 swap is different what comes to brake setup. It's good that people don't always do the same thing but think by themselves.. Still waiting for the one who dares to modify the firewall enough to fit the booster right next to brake pedal as in one german S62 E30 M3 swap
E30 Cabrio M-Tech, powered by V8
E34 M5 3.8 x 2
Alpina D10 Touring #33/93
E46 318i Touring
Toyota Hiace 4wd
E34 M5 3.8 x 2
Alpina D10 Touring #33/93
E46 318i Touring
Toyota Hiace 4wd
-
E30SPDFRK
- E30 Zone Newbie
- Posts: 56
- Joined: Mon Dec 29, 2008 11:00 pm
- Location: Newport Beach, CA, USA
Unfortunatly I don't have much time haha. I'm helping organize and promote a show on August 1st, and I'm trying to have it running at least a few days before that so I can work out the bugs a bit- The show is 150 miles away.
I'm not too happy with this brake setup, but it was the easiest route while still keeping power brakes. I think eventually I'd like to switch to a bellcrank setup like yours, it seems much sturdier. Making one fit on the firewall would be a bitch!
I started school again so updates have been slow. My boss and I started working on the exhaust Wednesday night after work. Got the flanges put on the drivers side manifolds and a collecter added, then called it quits for the night. I'm being a pain in the ass about it because I want the functionality of being able to pull everything out seperate and I want as much ground clearance as possible. Plus, theres not much room left under there for an exhaust lol. The drivers side floor doesn't have a cutout for the tubing like the passengers side does, so I'm planning on ovaling out a piece of 2.25" to run there. He's going to to come by Sunday to help finish it up.
-Byron
You're saying you do the exhaust manifolds so that they can be bolted off the engine when it sits on its place? I don't see how that could be made on the drivers side, there just is not enough room..E30SPDFRK wrote:I'm being a pain in the ass about it because I want the functionality of being able to pull everything out seperate and I want as much ground clearance as possible.
Ovalling the pipes is good way to gain more ground clearance.
E30 Cabrio M-Tech, powered by V8
E34 M5 3.8 x 2
Alpina D10 Touring #33/93
E46 318i Touring
Toyota Hiace 4wd
E34 M5 3.8 x 2
Alpina D10 Touring #33/93
E46 318i Touring
Toyota Hiace 4wd
-
E30SPDFRK
- E30 Zone Newbie
- Posts: 56
- Joined: Mon Dec 29, 2008 11:00 pm
- Location: Newport Beach, CA, USA
Yeah mine come right off. I have to pull the steering shaft now with the flanges installed, but still not that big of a deal. Much easier than pulling the whole engine haha.
Made my upper radiator hose today and got an idea for the pressure cap.
Hose all made and marked for the new pressure cap.
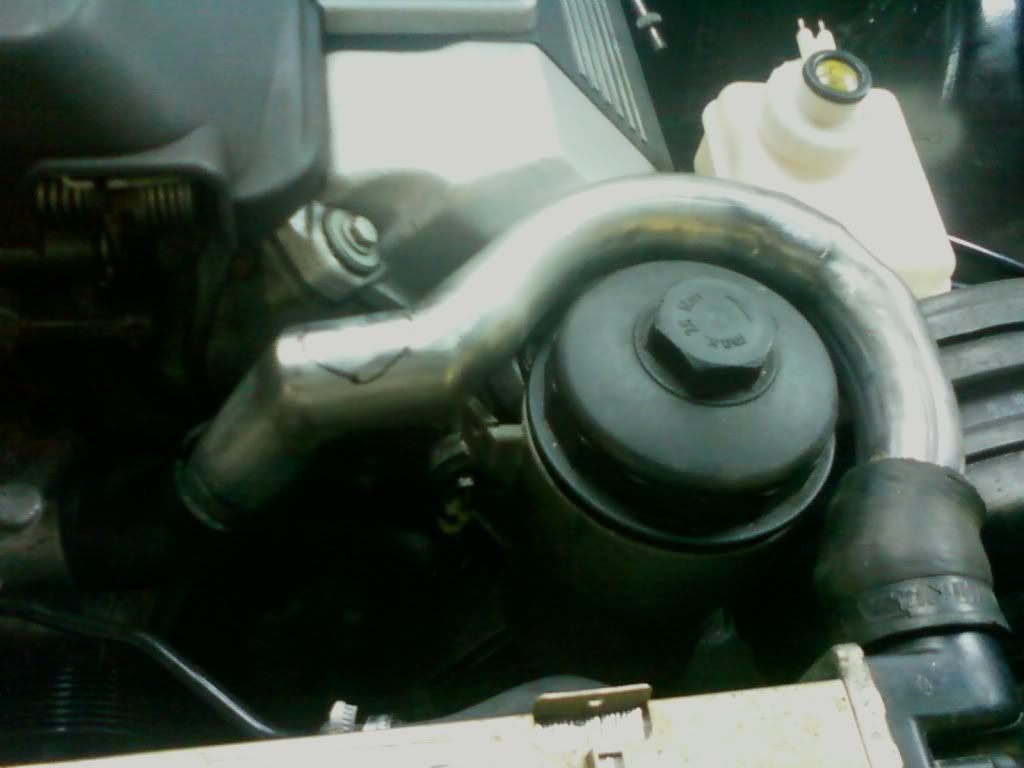
Still room to remove the oil filter cap
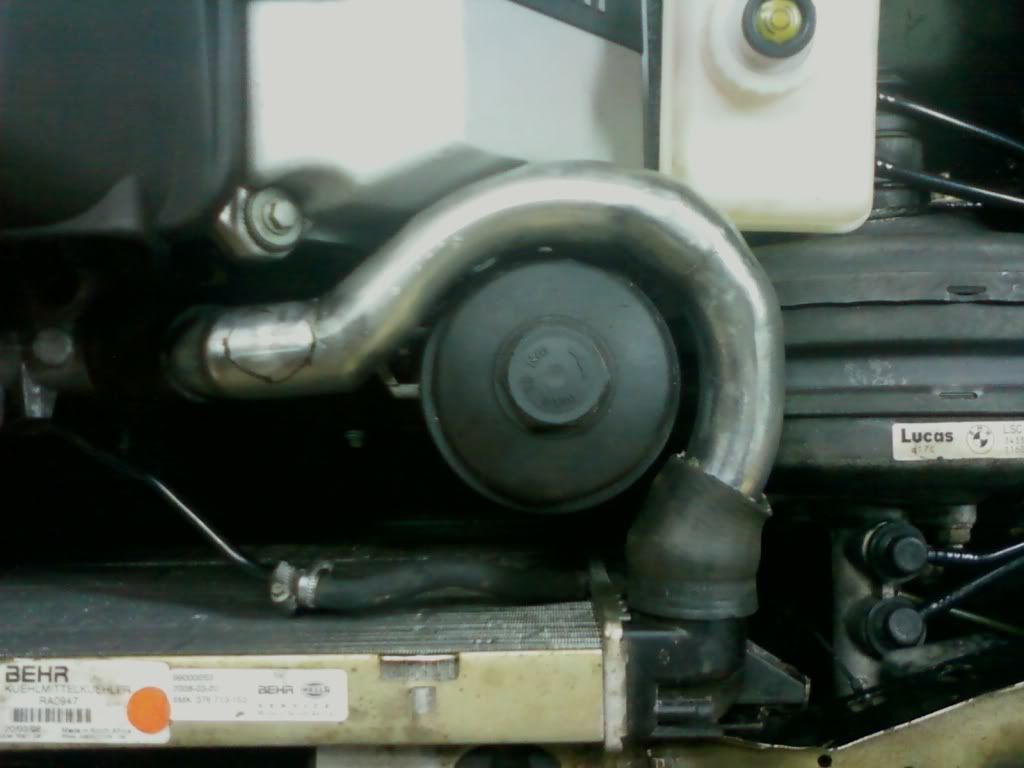
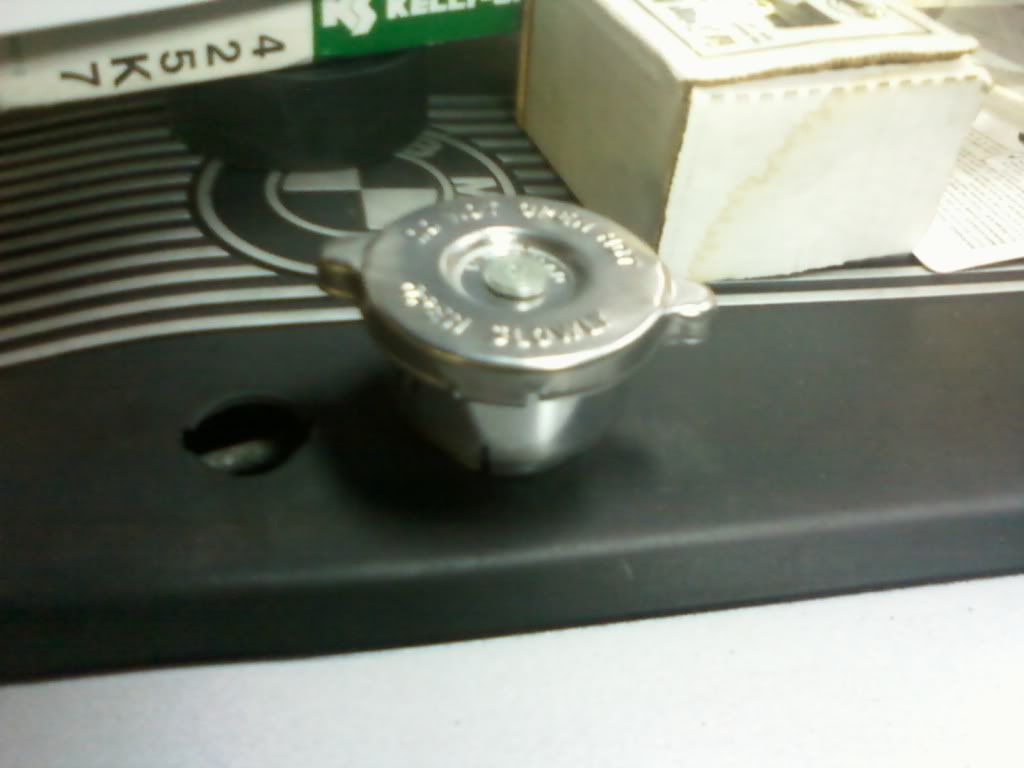
I was planning on using a pressure cap setup from a Dadge Dakota, but I tried it out and there just wasn't enough room to fit it. I was checking for a coolant leak on a car at work yesterday though, and came up with my new idea. I went to Autozone and bought a Toyota cooling system pressure adaptor and cap (all they had), then cut the bottom part off the adaptor.
I need to drill a hole in my new line, then I'm going to weld this to it. And voilà , instant cooling system!
I tried to get a new serp belt too, but I couldn't find one short enough. I don't have power steering anymore, so the belt had to be routed with one of the idlers removed. Any of you guys figure out this problem?
Made my upper radiator hose today and got an idea for the pressure cap.
Hose all made and marked for the new pressure cap.
Still room to remove the oil filter cap
I was planning on using a pressure cap setup from a Dadge Dakota, but I tried it out and there just wasn't enough room to fit it. I was checking for a coolant leak on a car at work yesterday though, and came up with my new idea. I went to Autozone and bought a Toyota cooling system pressure adaptor and cap (all they had), then cut the bottom part off the adaptor.
I need to drill a hole in my new line, then I'm going to weld this to it. And voilà , instant cooling system!
I tried to get a new serp belt too, but I couldn't find one short enough. I don't have power steering anymore, so the belt had to be routed with one of the idlers removed. Any of you guys figure out this problem?
-Byron
Be sure to check that the coolant cap has correct pressure rating, as BMW uses 1.4 bar and many japs use 1.1 bar ..
Good job that you can unbolt exhaust manifold while engine in place, i suppose you've to unbolt steering, alternator etc etc anyways? That must be a bitch job anyhow
Good job that you can unbolt exhaust manifold while engine in place, i suppose you've to unbolt steering, alternator etc etc anyways? That must be a bitch job anyhow
E30 Cabrio M-Tech, powered by V8
E34 M5 3.8 x 2
Alpina D10 Touring #33/93
E46 318i Touring
Toyota Hiace 4wd
E34 M5 3.8 x 2
Alpina D10 Touring #33/93
E46 318i Touring
Toyota Hiace 4wd
-
E30SPDFRK
- E30 Zone Newbie
- Posts: 56
- Joined: Mon Dec 29, 2008 11:00 pm
- Location: Newport Beach, CA, USA
D'oh I thought it was only 1 bar system. You sure it's 1.4?
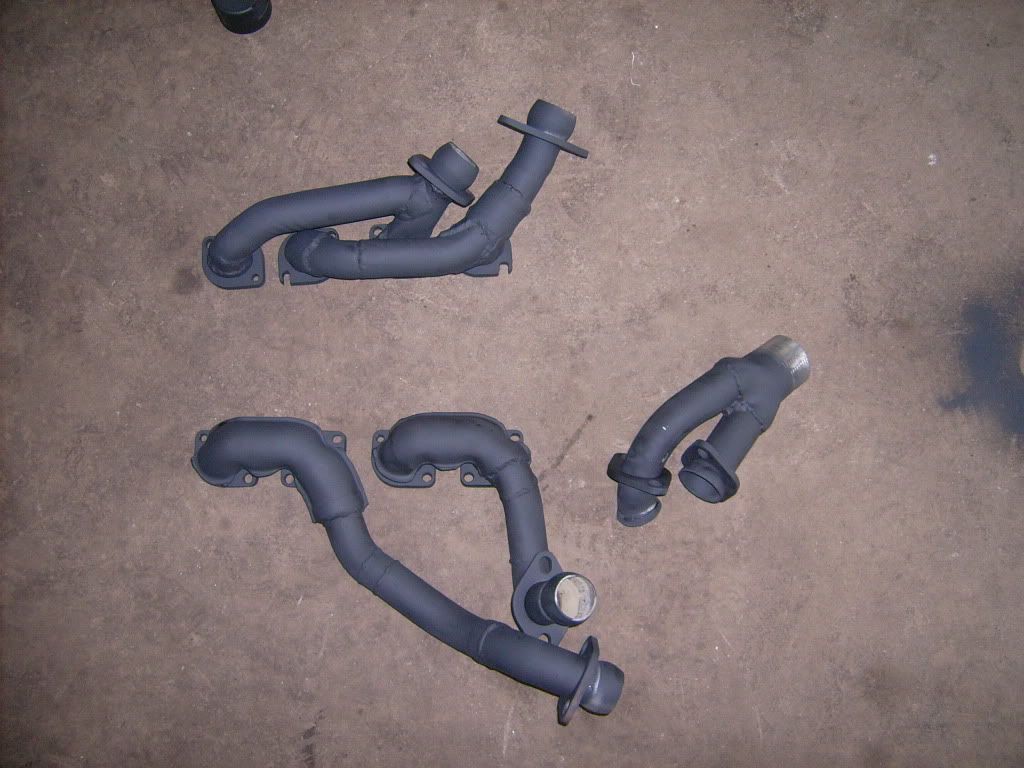
Proof of the manifolds. Steering shaft has to be moved but its easy on my car because I have an airbag. Alternator can stay in place.
Got a bunch of little shit done recently. Completely finished the manifolds, finished the booster linkage, finished 99% of the wiring and my driveshaft is done for the second time.
I found out that the pressure adaptor I got was aluminum (:facepalm: stupid me for not checking first), and therefore unable to be welded to the upper hose I made. So I welded a piece of pipe thread onto the hose and tapped the inside of the adaptor. Tried it in the car, but it was just too high and hit the hood. So I went to turn it down another half turn and the adaptor came apart in two pieces. It was glued together or something, and somehow held up to welding, tapping, pressure testing and other things before it came apart in my hands. So my boss went to work trying to make that work again for the rest of the day while I went back to the headers.
Didn't take many pictures because every time I'd go for the camera my boss would come up with some stupid remark
Headers all done and painted. Other collecter was getting painted during the picture
The issues I'ma having with the wiring are pin 6 and pin 8 on the c101.
Pin 6 (green/yellow) is the O2 relay power. I think it goes to pin 11 (Brown/Yellow) on the x20 "ferntermometer", but I have no idea what that is so I didn't want too hook it up
I don't have a label for pin 8 (White), but my notes show it connecting to x20 pin 24 (White/Black) computer fuel consumption.
Do those sound right?
Proof of the manifolds. Steering shaft has to be moved but its easy on my car because I have an airbag. Alternator can stay in place.
Got a bunch of little shit done recently. Completely finished the manifolds, finished the booster linkage, finished 99% of the wiring and my driveshaft is done for the second time.
I found out that the pressure adaptor I got was aluminum (:facepalm: stupid me for not checking first), and therefore unable to be welded to the upper hose I made. So I welded a piece of pipe thread onto the hose and tapped the inside of the adaptor. Tried it in the car, but it was just too high and hit the hood. So I went to turn it down another half turn and the adaptor came apart in two pieces
Didn't take many pictures because every time I'd go for the camera my boss would come up with some stupid remark
Headers all done and painted. Other collecter was getting painted during the picture
The issues I'ma having with the wiring are pin 6 and pin 8 on the c101.
Pin 6 (green/yellow) is the O2 relay power. I think it goes to pin 11 (Brown/Yellow) on the x20 "ferntermometer", but I have no idea what that is so I didn't want too hook it up
I don't have a label for pin 8 (White), but my notes show it connecting to x20 pin 24 (White/Black) computer fuel consumption.
Do those sound right?
-Byron
E30SPDFRK wrote:D'oh I thought it was only 1 bar system. You sure it's 1.4?
pin 11 (Brown/Yellow) on the x20 "ferntermometer"
It's actually 2,0 bar ( http://bmwfans.info/parts/catalog/E34/S ... sion_tank/ )..
Fernthermometer is temperature sensor.
E30 Cabrio M-Tech, powered by V8
E34 M5 3.8 x 2
Alpina D10 Touring #33/93
E46 318i Touring
Toyota Hiace 4wd
E34 M5 3.8 x 2
Alpina D10 Touring #33/93
E46 318i Touring
Toyota Hiace 4wd
-
E30SPDFRK
- E30 Zone Newbie
- Posts: 56
- Joined: Mon Dec 29, 2008 11:00 pm
- Location: Newport Beach, CA, USA
I'll preface this by saying that wiring will be the death of me. If it seems like I'm not getting any of what you're saying, it's probably because I'm not
Also, my x20 pinouts didn't match the ones on e30.de at all. Most of the colors were the same as an e36 x50, so I went off that.
Also, my x20 pinouts didn't match the ones on e30.de at all. Most of the colors were the same as an e36 x50, so I went off that.
So you're saying you hooked the wire that goes to the O2 relay (which one is that?) directly to constant power?willnz wrote:Pin#8 C101 is yellow/white in all my diagrams but should be fuel input (colours do vary). My notes show it going to Pin#24 on X20 also.
I connected the oxygen sensor relay Green/violet power wire (it is live in the on and start positions) to the green supply wire. I dont have any record of the oxygen relay supply wire going through X20. I didnt bother with using the pin6 X101 connection.
I have c101 pin 4 hooked up to x20 pin 12 (Brown/Violet), which was the coolant temp sensor for the e36. Think it should be hooked to pin 11 (Brown/Yellow)?willnz wrote: Needing a switched power supply, the brown/yellow in X20 is the wrong colour combination as BMW uses combinations of green/other colour to signal a supply that is live in the on and start positions. The brown/yellow will be a ground wire of sorts, either switched/partial or full.
My records show that X20 brown/yellow is the temp gauge wire and will go to pin#4 0f C101.
Double d'oh. I may just hook up the e32 coolant bottle after all. I had one with my first m30 swap car but I had to cut the hood to make it clear, and I really don't want to have to do that to this car. Do you have to do any car mods while fitting it with this engine? Other than the screw holes in the blower cover of course.Jonsku wrote:E30SPDFRK wrote:D'oh I thought it was only 1 bar system. You sure it's 1.4?
pin 11 (Brown/Yellow) on the x20 "ferntermometer"
It's actually 2,0 bar ( http://bmwfans.info/parts/catalog/E34/S ... sion_tank/ )..
Fernthermometer is temperature sensor.
-Byron
-
E30SPDFRK
- E30 Zone Newbie
- Posts: 56
- Joined: Mon Dec 29, 2008 11:00 pm
- Location: Newport Beach, CA, USA
Last few things are always the things you've forgotten
Power and grounds: I have the big red starter wire hooked to power, are the two braided white-ish ones next to it power as well? And the black wire coming out of the harness right after the body plug boot, thats a ground, right?
I've got an auto harness, is it going to mess anything up if I cut most of the wires for the auto out?
Which opening on the coolant block goes to the upper heater core opening, and which one goes to the lower?
-Byron
The coolant reservoir won't fit if you don't lower the front subframe, i've some small paint scratches from hood on it even though i've modified the reservoir a bit and dropped the front subframe.
And what comes to wiring, well, you've to find the pins out by yourself from WDS as the pins and wire colours differ a bit on every model.. If i remember correctly, i ditched the two white wires at starter and there might be power-wire near body plug, just take the cover away a bit from the plug and check which colour is the wire.
This might help with coolant circulation:
E30 Cabrio M-Tech, powered by V8
E34 M5 3.8 x 2
Alpina D10 Touring #33/93
E46 318i Touring
Toyota Hiace 4wd
E34 M5 3.8 x 2
Alpina D10 Touring #33/93
E46 318i Touring
Toyota Hiace 4wd
-
E30SPDFRK
- E30 Zone Newbie
- Posts: 56
- Joined: Mon Dec 29, 2008 11:00 pm
- Location: Newport Beach, CA, USA
Got it to crank today, but that really means nothing other than I have power to the starter haha.
I had the big red starter wire and the little red one (below) hooked up to power and nothing happened. Touched the white starter wire with the square end to the power block and the engine cranked, so I guess that needs to be attached to a switched power source. I wish I had a 540/740 around for reference purposes
The starter wires in question. What were they attached to in the e32? It's been too long to remember.
and the red wire I had hooked to positive (top of the pic)
I didn't hear the fuel pump when the key was on, but I couldn't reach the relays to see if they were clicking or not. I have both Green/Violets hooked together from the c101 to the x20; both were pin 13.
So the main question I guess is what do I do with the two braided white wires that go to the starter?
-Byron
-
E30SPDFRK
- E30 Zone Newbie
- Posts: 56
- Joined: Mon Dec 29, 2008 11:00 pm
- Location: Newport Beach, CA, USA
Thanks for checking for me, helped out when I was trying to trace wires.willnz wrote:The 2 white wires go onto the solenoid. One has a terminal with a larger hole than the other one and is plain white, the other is white with a very fine black stripe. The white one goes to the 6mm terminal closest to the engine, the one with the black stripe goes to the 4mm terminal opposite.
The red must be hooked to a permanent positive feed, and a strong one at that (at least the same gauge wire).
I hope so haha. There seems to be though, the engine doesn't move too much.glenn wrote:nice work.E30SPDFRK wrote:
is there enough rubber pipe there, to allow the engine to 'rock' without tearing the rubber?

Been slacking on updates the past few days. My boss and I got the exhaust all made so we could try starting it without the neighbors complaining. Turned the key and got nothing. I could get it to crank by putting power directly to the starter wires but the switched power wasn't getting to it. Saturday I called my friend Mike of e30 truck fame to come help, and he had it figured out in about ten minutes lol. Turns out the 7 had a remote start system spliced into the engine harness, so we cut it out and ran the wires to the starter like they should have been and it started right up. I still haven't made the coolant lines that go to the heater core though so we couldn't run it for long. We went to bleed the brakes while he still had time, and the 3/8" steel rod I used just bent as soon as we started getting pressure
Since I've got some time now before the next show, I think I'm going to try the bellcrank idea that I should have done in the first place. Once that and the heatercore are done, the swap will be done! I'm real excited to finally drive the car again, it's been like 9 months since I blew the engine and drove it last.
-Byron
some good progress there mate....
im still waiting to put my M62 in, still have the multipoint to weld in and build some new rear shock towers then she will be going in and ill start to ask you some annoying questions
im still waiting to put my M62 in, still have the multipoint to weld in and build some new rear shock towers then she will be going in and ill start to ask you some annoying questions
6pot wilwoods front
4pot Porsche rear
89 E30 stripped running a 6speed V8
Twin Turbo M60 in progress