
M42 Rotrex (for sale!) + track build
Moderator: martauto
-
appletree
- E30 Zone Addict

- Posts: 3479
- Joined: Fri Jan 20, 2006 11:00 pm
- Location: Retford

You should never underestimate the predictability of stupidity
M42 Supercharged 285bhp + M3 6speed box
-
rix313
- E30 Zone Team Member

- Posts: 4968
- Joined: Fri Oct 31, 2008 11:00 pm
- Location: Silverstone
Been drowning the bolt in WD40 and tapping it with my hammer...

In some vein attempt that it will loosen it a tad but we shall see.
How do you run your PAS?
-
appletree
- E30 Zone Addict
- Posts: 3479
- Joined: Fri Jan 20, 2006 11:00 pm
- Location: Retford
m43 aircon pully, fits inside the one i made for you 
Part 2
http://www.realoem.com/bmw/showparts.do ... g=11&fg=18
then i used a m50 pas pully on the m42 pump
http://www.realoem.com/bmw/showparts.do ... g=11&fg=18
then i used a m50 pas pully on the m42 pump
You should never underestimate the predictability of stupidity
M42 Supercharged 285bhp + M3 6speed box
-
rix313
- E30 Zone Team Member
- Posts: 4968
- Joined: Fri Oct 31, 2008 11:00 pm
- Location: Silverstone
Ah god gotta find one of them now 
How much torque ness does the pully wheel need to be? Wondering if I can do it once the engine is in as I'm really on a push to get it done now.
Any idea what year M52 as they list two pullys for it or how many teeth? There's loads down the local scrap yard.
How much torque ness does the pully wheel need to be? Wondering if I can do it once the engine is in as I'm really on a push to get it done now.
Any idea what year M52 as they list two pullys for it or how many teeth? There's loads down the local scrap yard.
-
appletree
- E30 Zone Addict
- Posts: 3479
- Joined: Fri Jan 20, 2006 11:00 pm
- Location: Retford
i'll get you the part number off mine when i'am home again.
As for the torque, its alot, odbod knows as he posted it the otherday 400+nm iirc You can do it all in the bay, i did, loads of room.
just put some blocks of wood against the chassis legs incase somthing lets go to stop you twating your wing
As for the torque, its alot, odbod knows as he posted it the otherday 400+nm iirc You can do it all in the bay, i did, loads of room.
just put some blocks of wood against the chassis legs incase somthing lets go to stop you twating your wing
You should never underestimate the predictability of stupidity
M42 Supercharged 285bhp + M3 6speed box
-
rix313
- E30 Zone Team Member
- Posts: 4968
- Joined: Fri Oct 31, 2008 11:00 pm
- Location: Silverstone
I twated a meter and a half long britool torque wrench doing up wheel humbs at my old job a bit of it flew off and just missed one of the car windows.
-
rix313
- E30 Zone Team Member
- Posts: 4968
- Joined: Fri Oct 31, 2008 11:00 pm
- Location: Silverstone
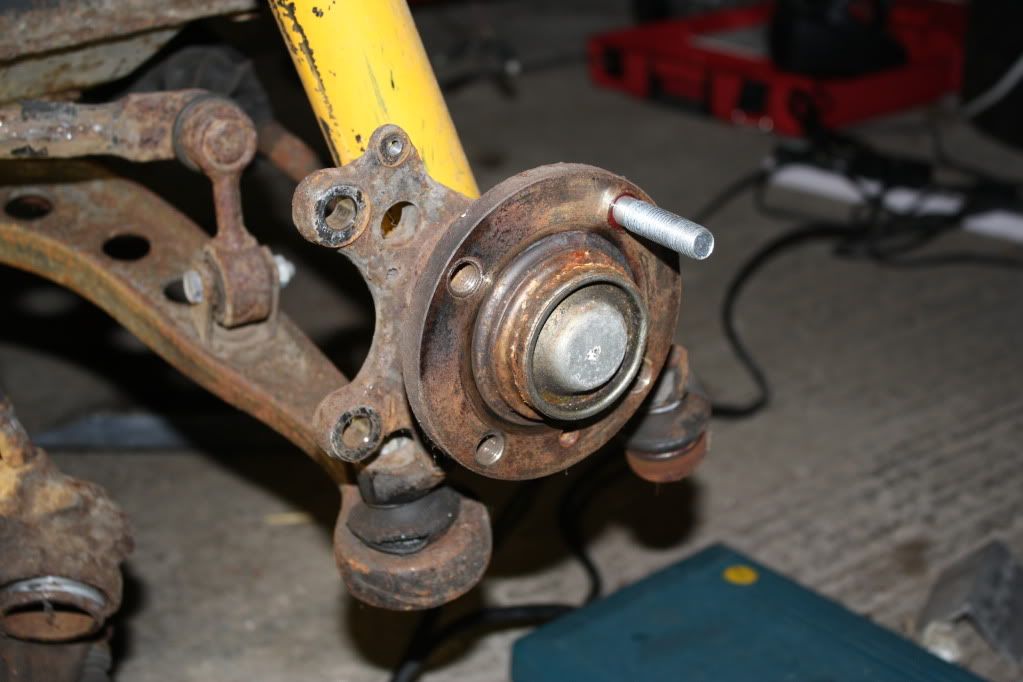
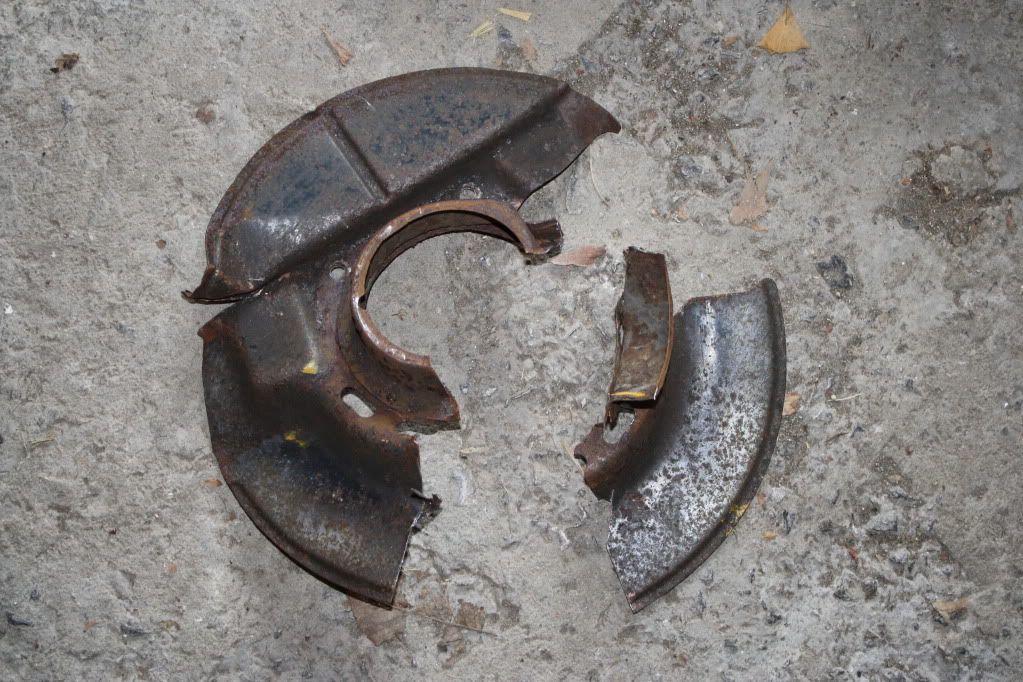
Well I did my stud conversion today.
Went ok, fronts were easy enough and pretty much straight forward. I did, while I was there, make a point of taking off the brake dust covers as the studs were rubbing on them and I don't need them there:
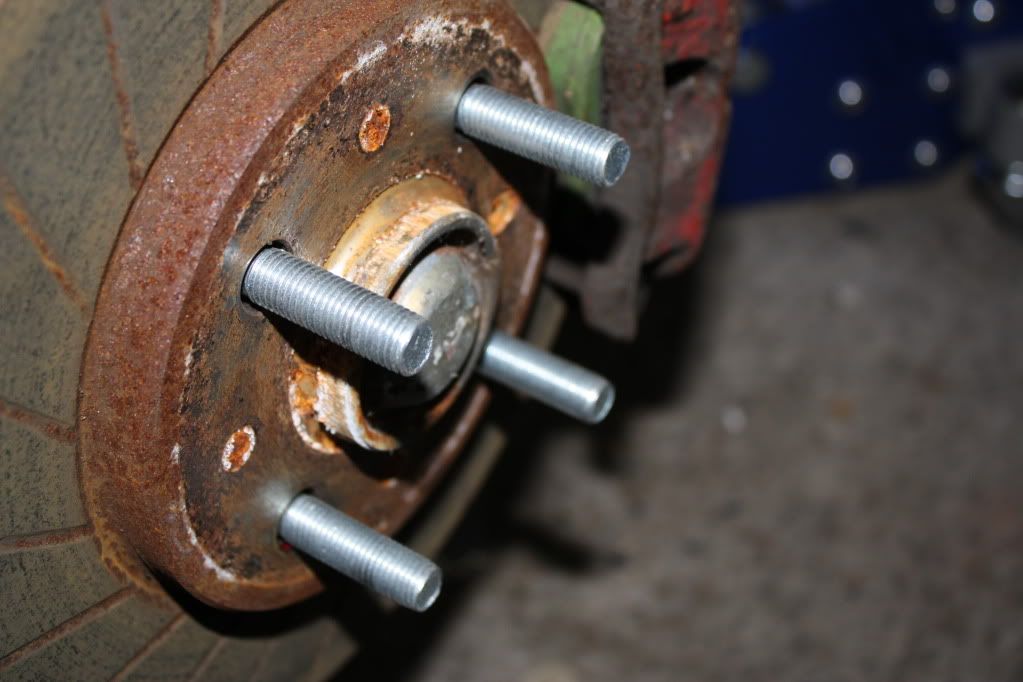
The O/S rear was terrible I'm going to get a tap and dye set and run down them as they felt awful. It was also very hard to know when they were at the end of the thread as they didn't actualy stop
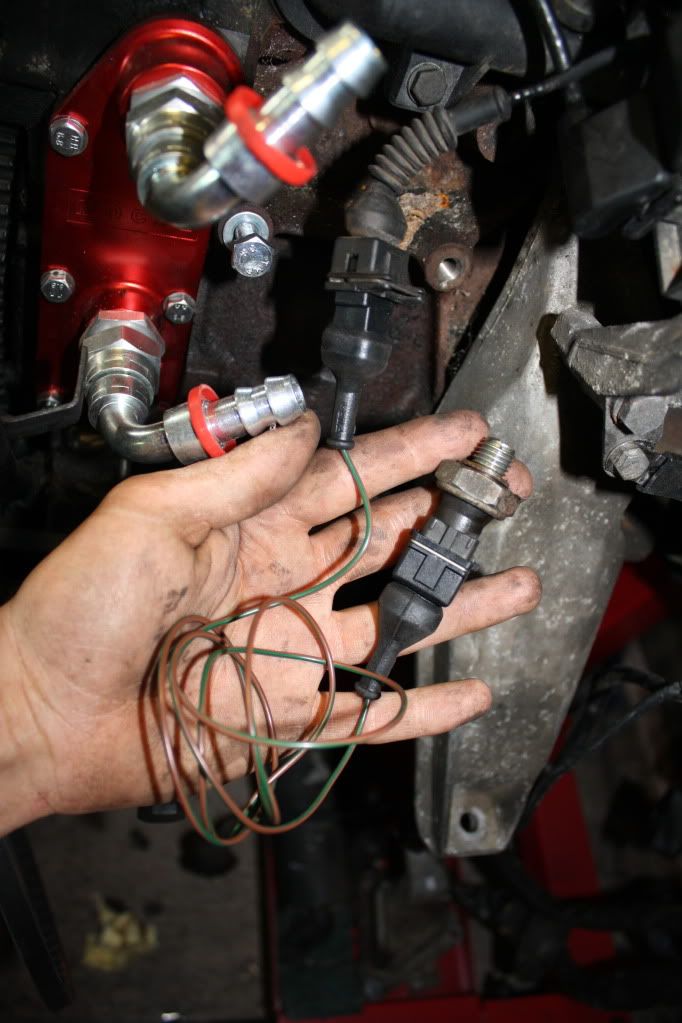
Sorted out my oil pressure switch wiring. VWP do OE 2 pin connectors and I ordered a meter of brown with green tracer wire (to match the loom). Idea being to create a simple 'extension lead' to just plug into the OE loom and then go to the pressure switch in its new location:
Went ok, fronts were easy enough and pretty much straight forward. I did, while I was there, make a point of taking off the brake dust covers as the studs were rubbing on them and I don't need them there:
The O/S rear was terrible I'm going to get a tap and dye set and run down them as they felt awful. It was also very hard to know when they were at the end of the thread as they didn't actualy stop
Sorted out my oil pressure switch wiring. VWP do OE 2 pin connectors and I ordered a meter of brown with green tracer wire (to match the loom). Idea being to create a simple 'extension lead' to just plug into the OE loom and then go to the pressure switch in its new location:
-
rix313
- E30 Zone Team Member
- Posts: 4968
- Joined: Fri Oct 31, 2008 11:00 pm
- Location: Silverstone
Well been doing lots or preperation for my engine removal (looms disconnected and exhausts undone) so nothing gripping to rant on about.
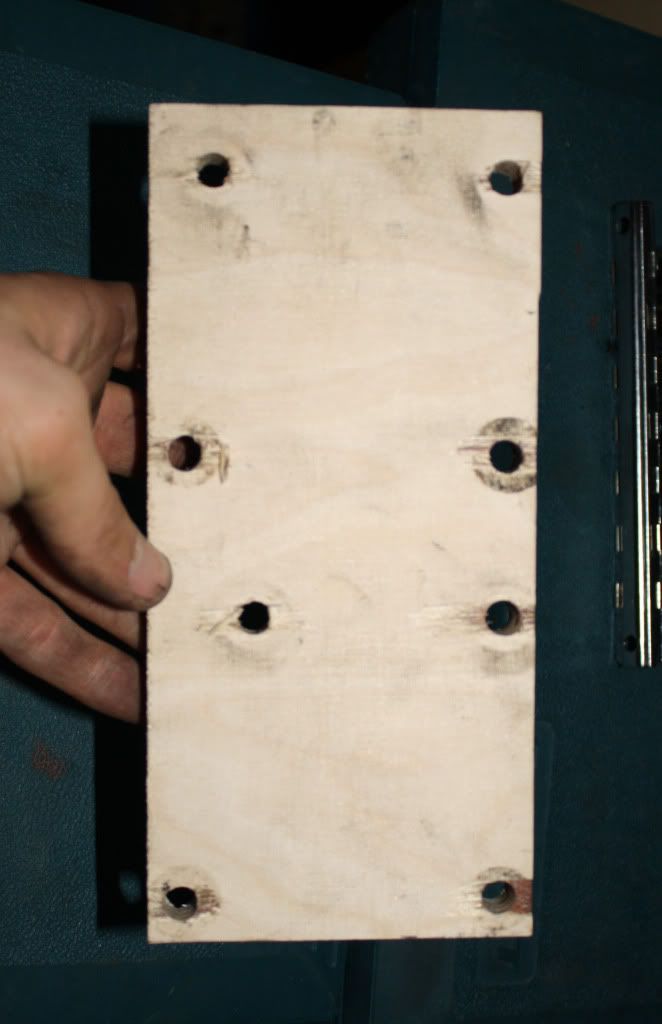
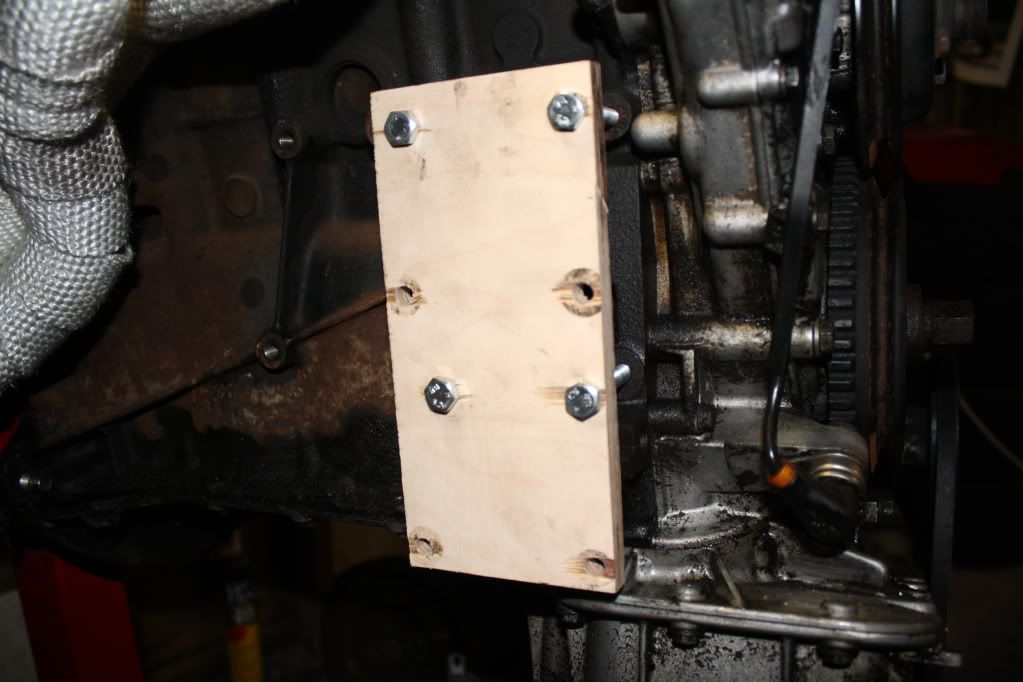
I have been working on the alternator bracket and have done a 'drawing'.
It was easier than I imagined to drill the holes for. I put the alternator bracket on the piece of wood and drilled the four holes. Then drilled an 8mm hole 20mm bellow what will be the top right alternator hole. Then measured 60mm over to the second lower hole on the block and drilled. Then measured 105mm up to the top front hole, then 70mm accross to that.
This is actualy the back but here it is. Left is the bottum, right is the top:
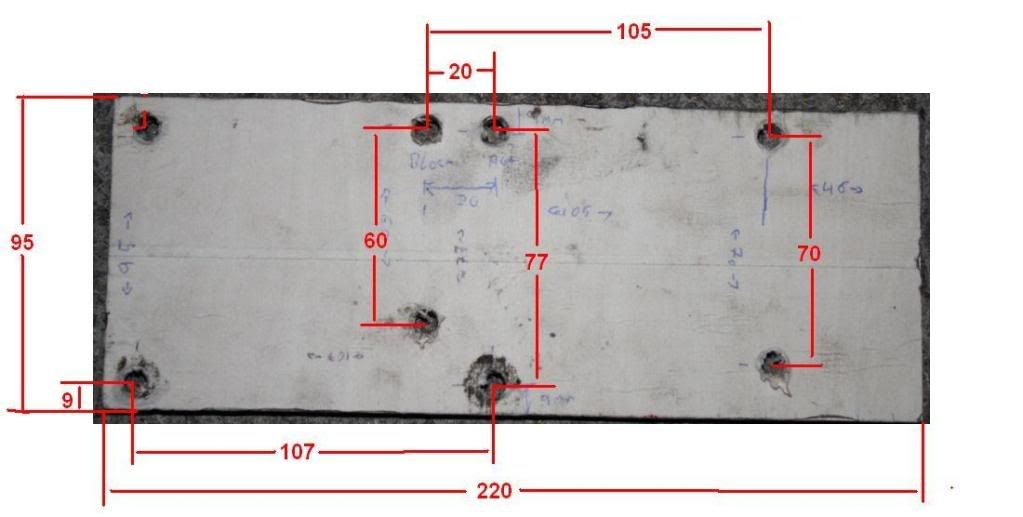
I will be chopping 30mm off the top as it is currently 250mm.
Look at Matts it looks as if it maybe a little low down but easy to rectify as its only wood. I have all the dimensions for the two sets of holes so its just moving them about Next thing to do is to get it cut out of metal 
Also just picked up some 15inch wheels from fellow local zoner Breadbin
Ready for a set of these:
I have been working on the alternator bracket and have done a 'drawing'.
It was easier than I imagined to drill the holes for. I put the alternator bracket on the piece of wood and drilled the four holes. Then drilled an 8mm hole 20mm bellow what will be the top right alternator hole. Then measured 60mm over to the second lower hole on the block and drilled. Then measured 105mm up to the top front hole, then 70mm accross to that.
This is actualy the back but here it is. Left is the bottum, right is the top:
I will be chopping 30mm off the top as it is currently 250mm.
Look at Matts it looks as if it maybe a little low down but easy to rectify as its only wood. I have all the dimensions for the two sets of holes so its just moving them about
Also just picked up some 15inch wheels from fellow local zoner Breadbin
Ready for a set of these:
-
appletree
- E30 Zone Addict
- Posts: 3479
- Joined: Fri Jan 20, 2006 11:00 pm
- Location: Retford
looking good rich, will the wilwoods fit under 15"s thought they had to go under 16"???
The bracket looks good to, cant remember how low mine was, if you need any more pics i can get you them tomorrow AM as i'm off work
The bracket looks good to, cant remember how low mine was, if you need any more pics i can get you them tomorrow AM as i'm off work
You should never underestimate the predictability of stupidity
M42 Supercharged 285bhp + M3 6speed box
-
rix313
- E30 Zone Team Member
- Posts: 4968
- Joined: Fri Oct 31, 2008 11:00 pm
- Location: Silverstone
It's the 280mm set, uses the same discs as the WMS so will fit under 15's, I hope
I've done a drawing and moved the 'A/C' set of holes down 40mm to bring the alternator up. Currently the plate will be 200mm x 95mm.
I've done a drawing and moved the 'A/C' set of holes down 40mm to bring the alternator up. Currently the plate will be 200mm x 95mm.
-
appletree
- E30 Zone Addict
- Posts: 3479
- Joined: Fri Jan 20, 2006 11:00 pm
- Location: Retford
just found another pic i didn't post before, might be usefull although it looks like you've got is sussed now
You should never underestimate the predictability of stupidity
M42 Supercharged 285bhp + M3 6speed box
-
rix313
- E30 Zone Team Member
- Posts: 4968
- Joined: Fri Oct 31, 2008 11:00 pm
- Location: Silverstone
Thats a better one cheers.
I made my second attempt to so I'll fit it up and take some pics.
Got my battery cables crimped today by a local company called BAE, awsome service, crimped them for a tenner because they felt harsh charging me the £25pr half hour fee for 4 crimps
So got the battery clamped down in the rear behind the drivers seat. This is temporary while the boot is rammed full of parts and I need to get this pumpy's heart beating again!


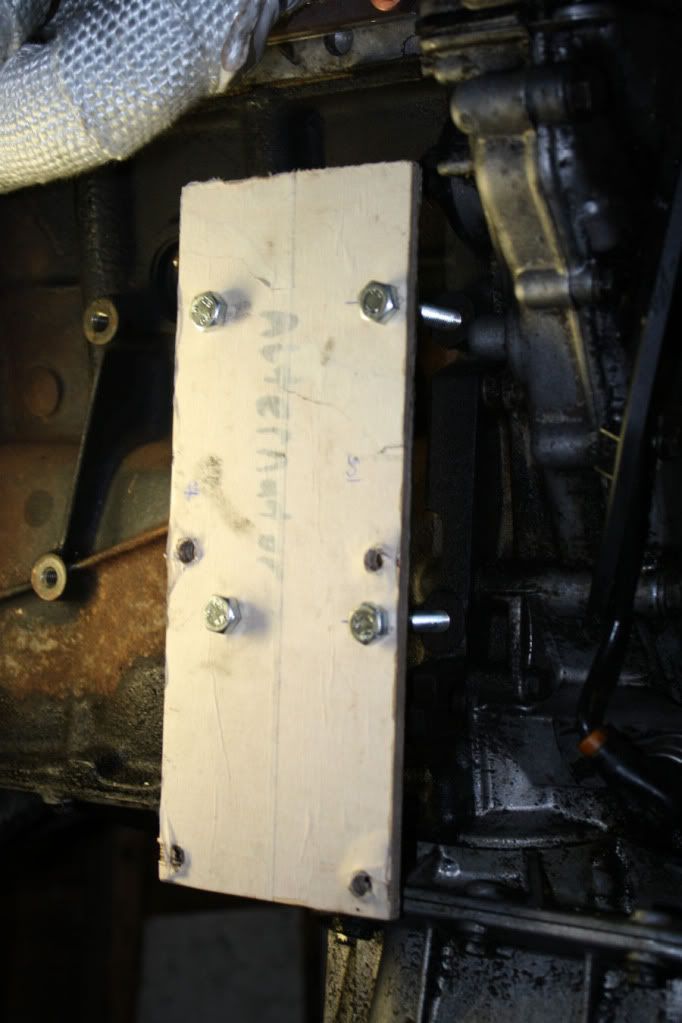
Re-did the alternator plate. I dropped the A/C holes down a further 20mm to bring the alternator up.
Left and right is correct on this:
Bolted it on:
Then bolted the alternator on and put the belt on:D:D:

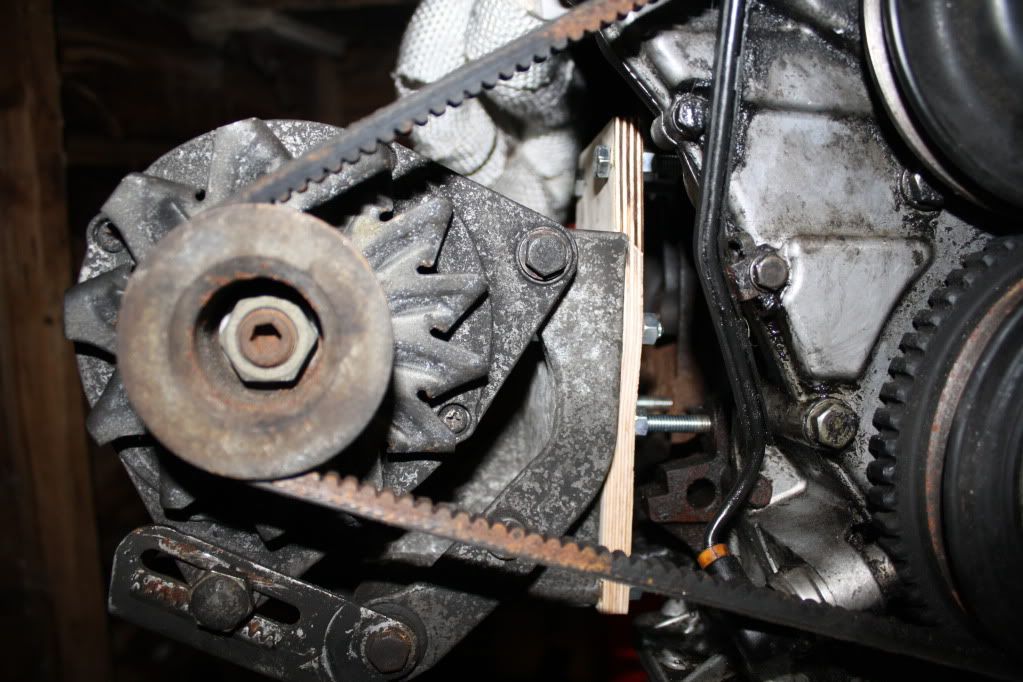
Now, I'm sure this will change once the engine is running (and the bracket isn't made from wood.....) but currently the belt is missing the CPS 
I made my second attempt to so I'll fit it up and take some pics.
Got my battery cables crimped today by a local company called BAE, awsome service, crimped them for a tenner because they felt harsh charging me the £25pr half hour fee for 4 crimps
So got the battery clamped down in the rear behind the drivers seat. This is temporary while the boot is rammed full of parts and I need to get this pumpy's heart beating again!
Re-did the alternator plate. I dropped the A/C holes down a further 20mm to bring the alternator up.
Left and right is correct on this:
Bolted it on:
Then bolted the alternator on and put the belt on
Now, I'm sure this will change once the engine is running (and the bracket isn't made from wood.....
Last edited by rix313 on Thu May 21, 2009 10:11 pm, edited 1 time in total.
-
appletree
- E30 Zone Addict
- Posts: 3479
- Joined: Fri Jan 20, 2006 11:00 pm
- Location: Retford
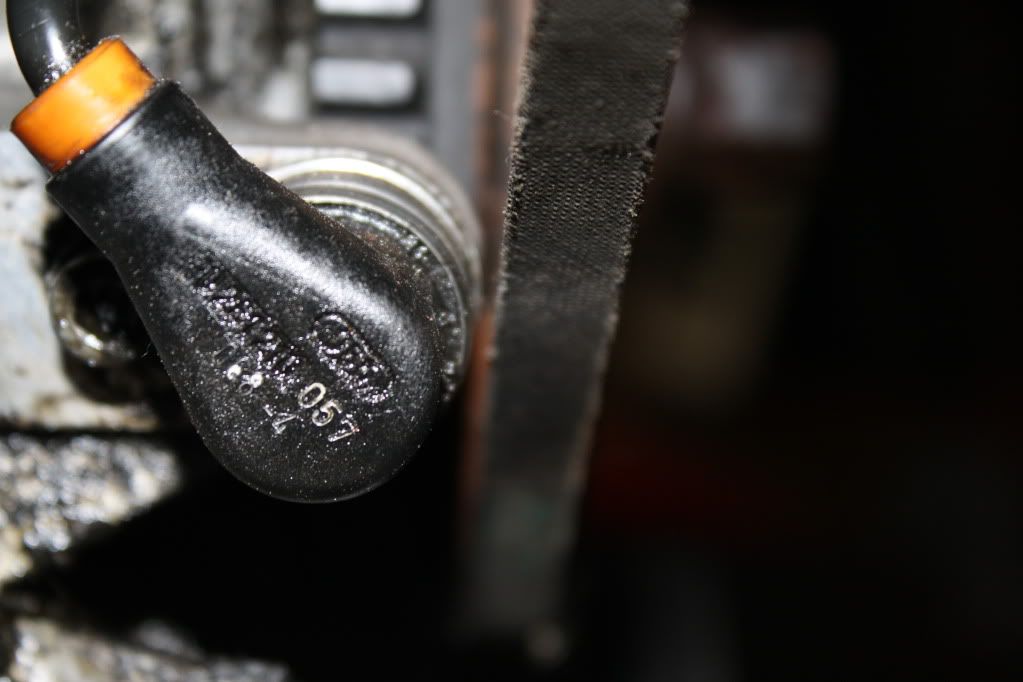
That looks great rich, i put my alternator bolt holes on the same centreline as the aircon ones and the belt just to say touches the sensor, maybe you could drill them 2mm or so forward, it would mean the pullys wouldn't be perfectly lined up but it would miss and it wouldn't be that bad to be a problem
You should never underestimate the predictability of stupidity
M42 Supercharged 285bhp + M3 6speed box
-
rix313
- E30 Zone Team Member
- Posts: 4968
- Joined: Fri Oct 31, 2008 11:00 pm
- Location: Silverstone
I'll see how it goes though I'm not too worried as its treid and tested not to be a problem by you and Ash
-
appletree
- E30 Zone Addict
- Posts: 3479
- Joined: Fri Jan 20, 2006 11:00 pm
- Location: Retford
PAS crank pully - 1739429
PAS pump pully - 1740858
Halfrauds belt number - HB850e 674
PAS pump pully - 1740858
Halfrauds belt number - HB850e 674
You should never underestimate the predictability of stupidity
M42 Supercharged 285bhp + M3 6speed box
-
rix313
- E30 Zone Team Member
- Posts: 4968
- Joined: Fri Oct 31, 2008 11:00 pm
- Location: Silverstone
Cheers fella.
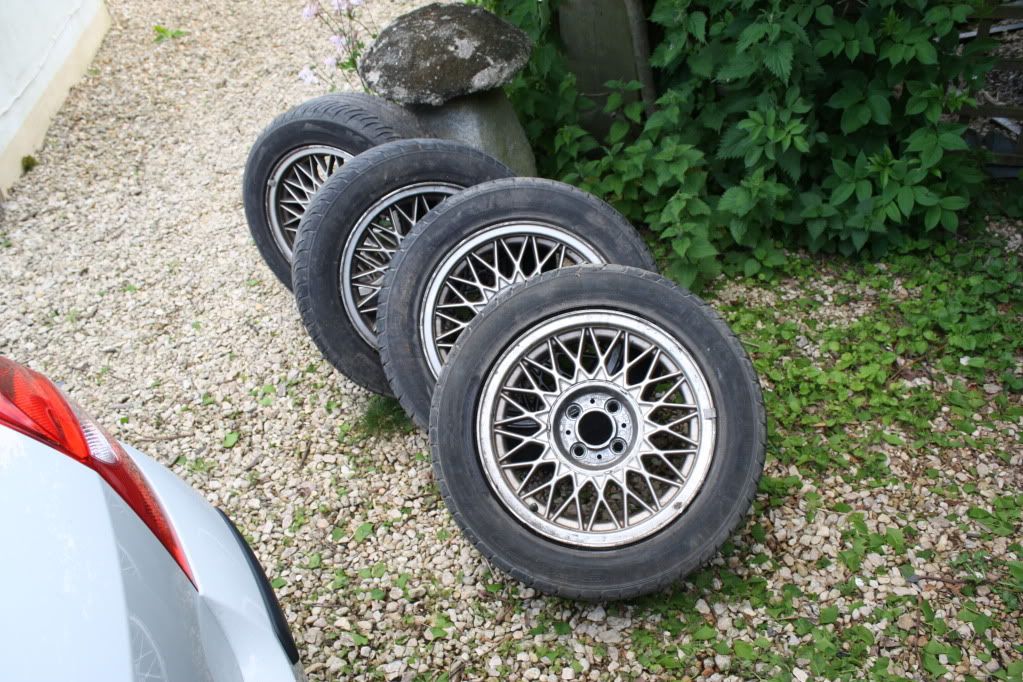
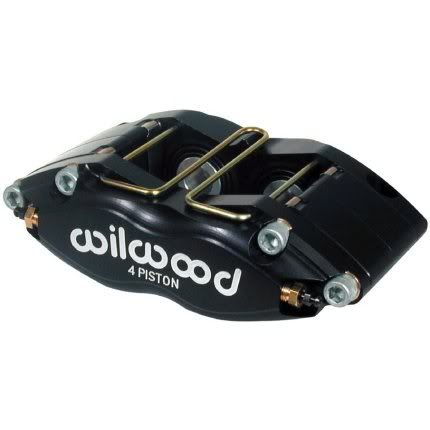
Right, my brakes FINALY arrived after alot of faf from the supplier.
Opted for a Wilwood 4pot kit. Discs are 20mm larger than the standard discs @ 280mm.
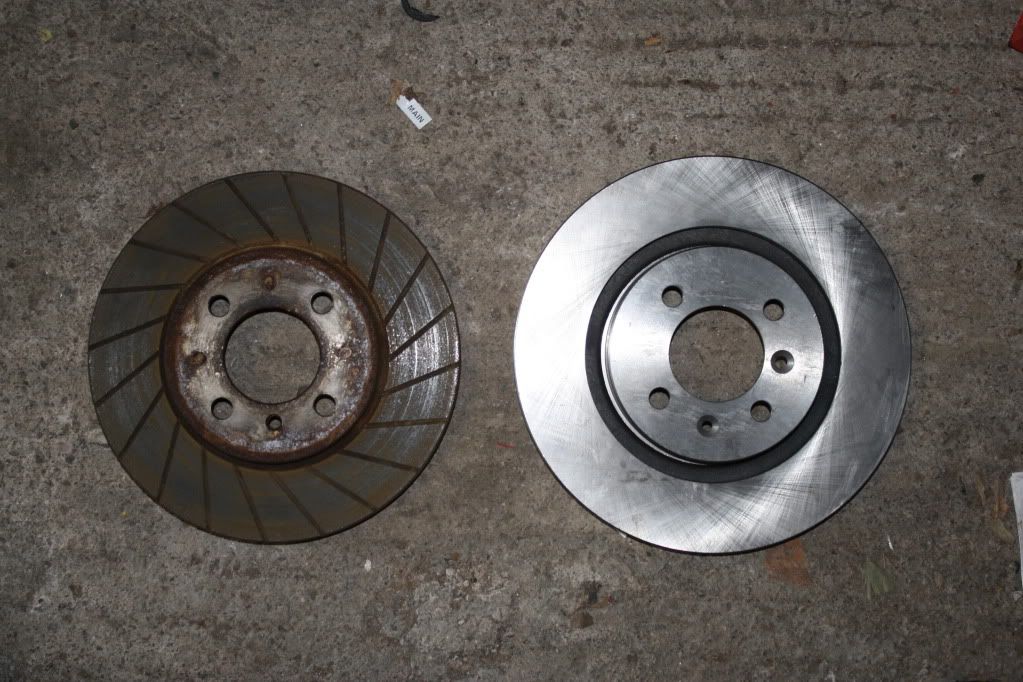

Sooo chuffed with them, wanted Wilwoods ever since I first bought the car over 2 years ago.
Whiped off the standard set up and got them on:

Very snug fitte behind the 15inch bbs:

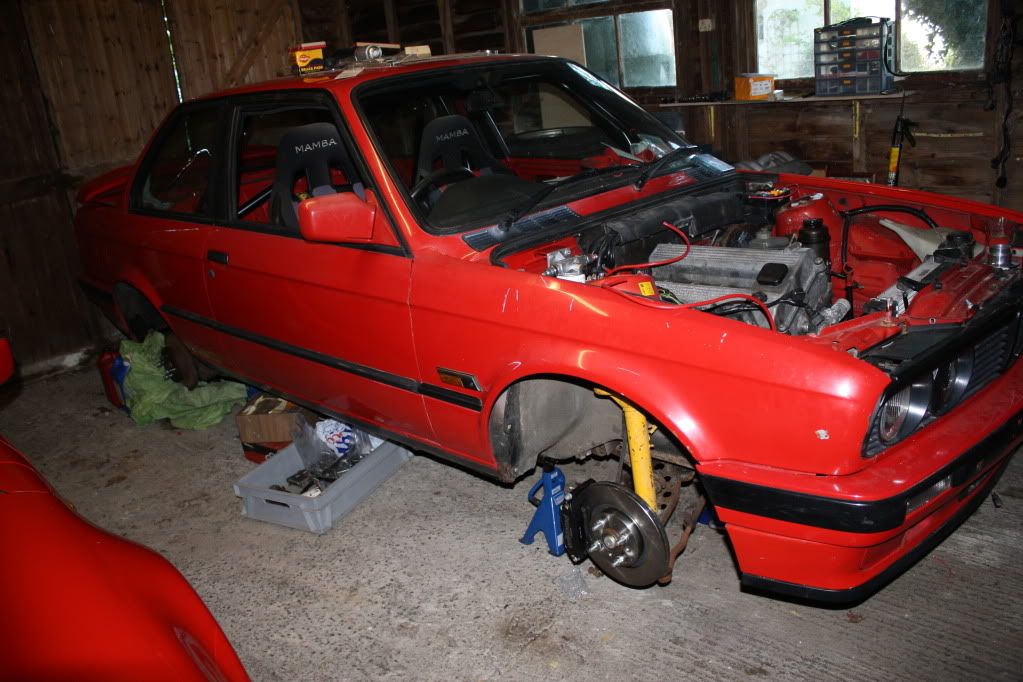
I have some WMS braided hoses and 2mm spacers on order from Keri so will get them plumbed in and stopping asap
Right, my brakes FINALY arrived after alot of faf from the supplier.
Opted for a Wilwood 4pot kit. Discs are 20mm larger than the standard discs @ 280mm.
Sooo chuffed with them, wanted Wilwoods ever since I first bought the car over 2 years ago.
Whiped off the standard set up and got them on:
Very snug fitte behind the 15inch bbs:
I have some WMS braided hoses and 2mm spacers on order from Keri so will get them plumbed in and stopping asap
Last edited by rix313 on Wed May 27, 2009 12:08 am, edited 1 time in total.
-
pilt

- E30 Zone Newbie

- Posts: 108
- Joined: Mon Jan 10, 2005 11:00 pm
Hey, Nice build!
Where did you get ur Willwoods from and how much did u pay? I was thinking of getting a set of these soon from rallydesign, did the kit have everything you needed?
And why do you have studs in the pics, was this just to trial fit them?
Cheers
Dan
Where did you get ur Willwoods from and how much did u pay? I was thinking of getting a set of these soon from rallydesign, did the kit have everything you needed?
And why do you have studs in the pics, was this just to trial fit them?
Cheers
Dan
-
rix313
- E30 Zone Team Member
- Posts: 4968
- Joined: Fri Oct 31, 2008 11:00 pm
- Location: Silverstone
Hi Dan,
Thanks its getting there slowly.
I bought these from JMC in Wales, can't say I recommend them from my experience; however when the box arrived it had Rally Design written on it.
You need to order the pads seperatly. I think the kit (discs, calipers, carriers and all the fixings) plus Wilwood's own track day pads cost me just over £500. As I mentioned, I have a set of front braided lines on order from WMS and also a set of 2mm spacers (also from WMS).
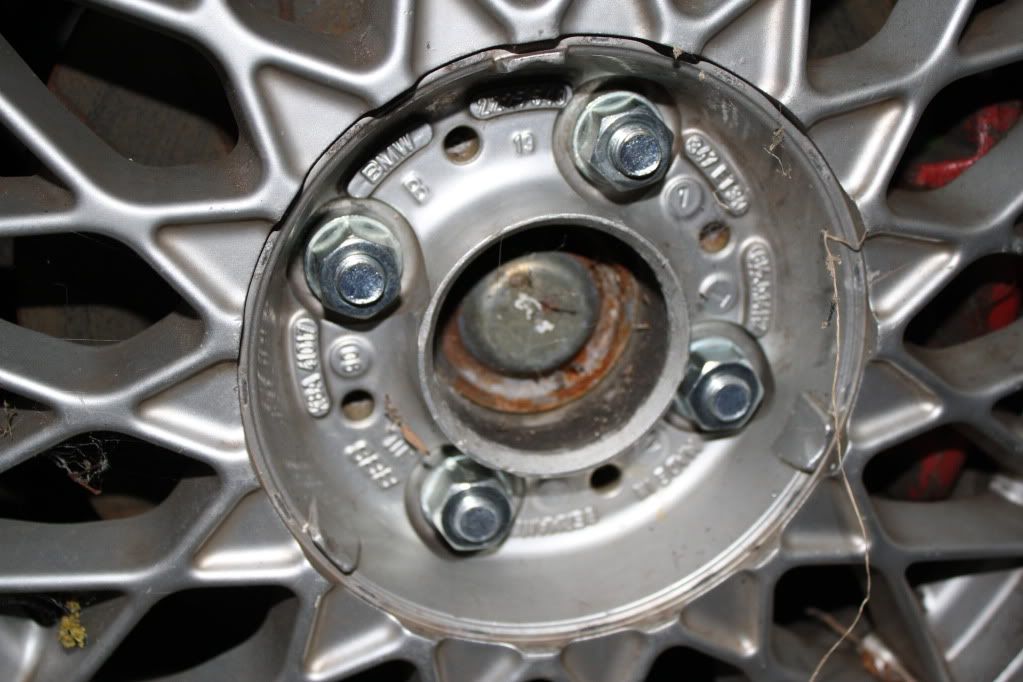
I'm running studs as opposed to bolts as its a track car, I had the nuts wound up as I don't have the disc retaining screw for the hub (OE part but I need a new one as it's missing) and wanted the disc to stay back while the wheels are off.
Thanks its getting there slowly.
I bought these from JMC in Wales, can't say I recommend them from my experience; however when the box arrived it had Rally Design written on it.
You need to order the pads seperatly. I think the kit (discs, calipers, carriers and all the fixings) plus Wilwood's own track day pads cost me just over £500. As I mentioned, I have a set of front braided lines on order from WMS and also a set of 2mm spacers (also from WMS).
I'm running studs as opposed to bolts as its a track car, I had the nuts wound up as I don't have the disc retaining screw for the hub (OE part but I need a new one as it's missing) and wanted the disc to stay back while the wheels are off.
-
rix313
- E30 Zone Team Member
- Posts: 4968
- Joined: Fri Oct 31, 2008 11:00 pm
- Location: Silverstone
Right good day.
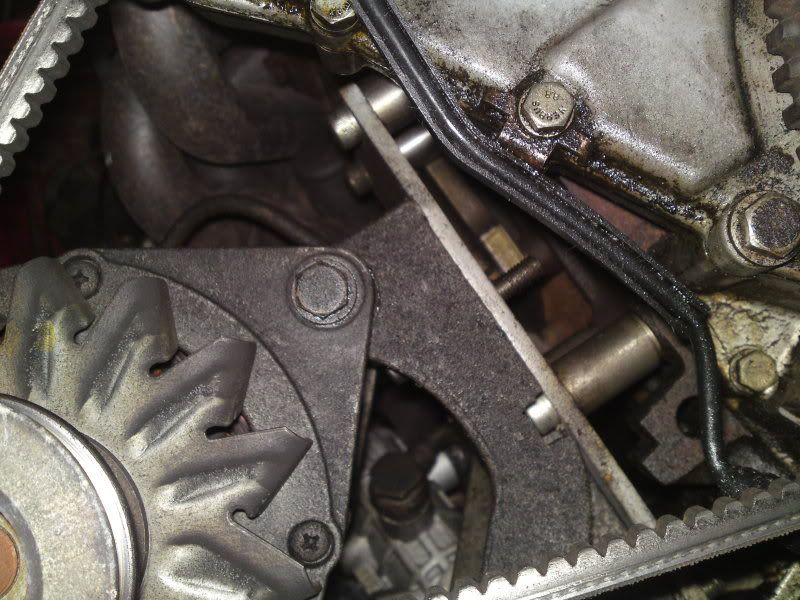
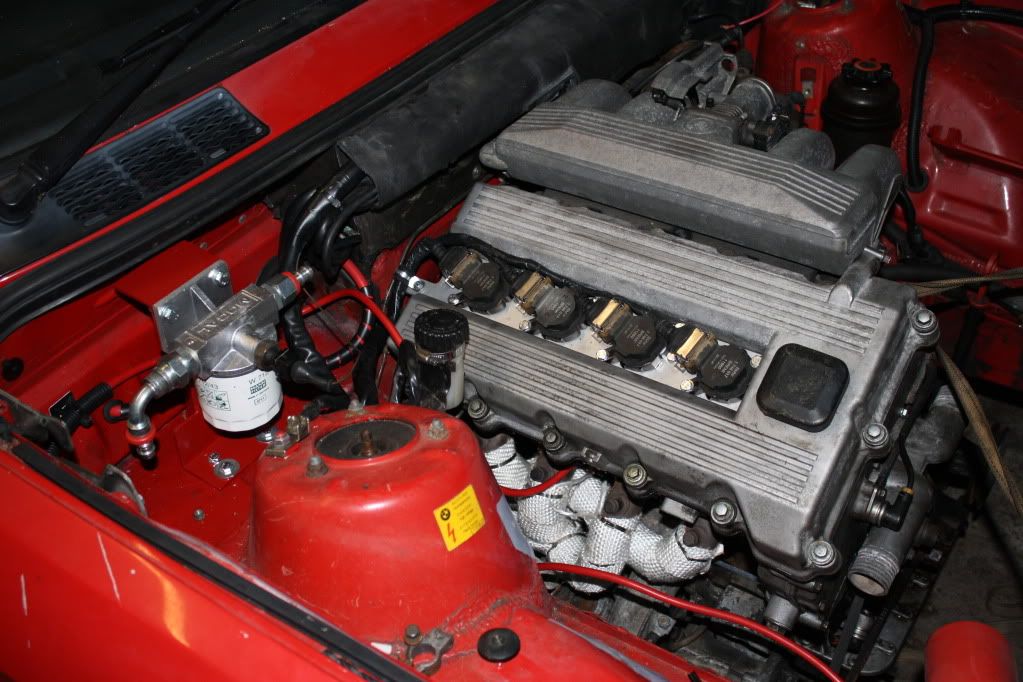
Had a mate who builds race engines, machine my alternator plate out of 5mm Ali. Cut and drilled on a CNC milling machine the finish was epic. Also turned me some 35mm Ali spacers...didn't cost a penny

Got it bolted on yesterday:

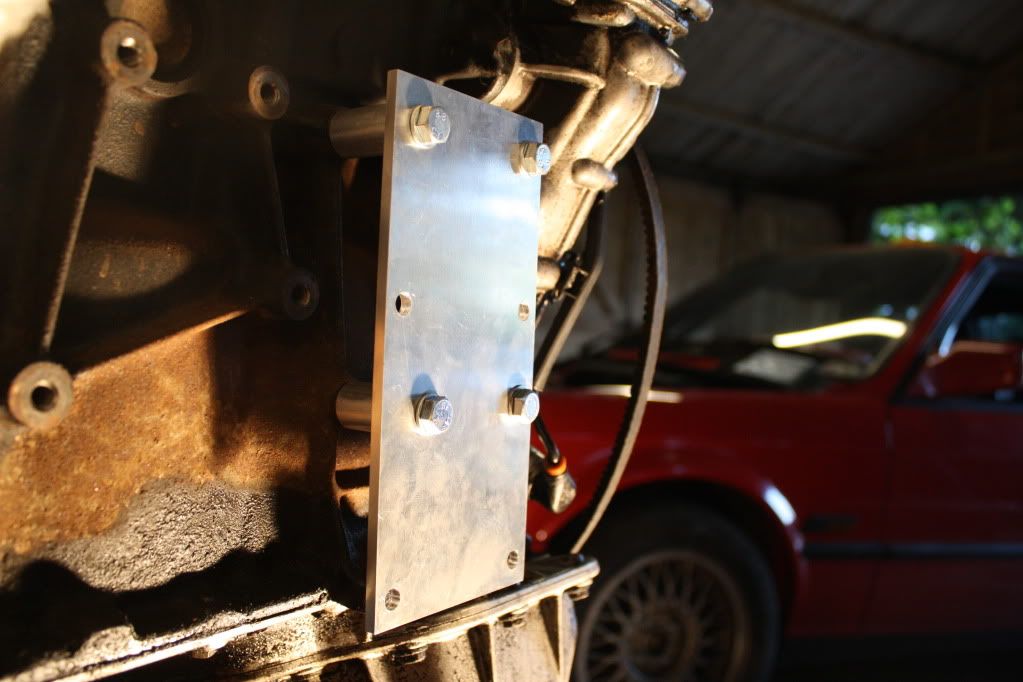
Then got the alternator on :

I did have to modify the engine mount ever so slightly by grinding off a small lug on the side to allow them to sit together.
Engine ready:
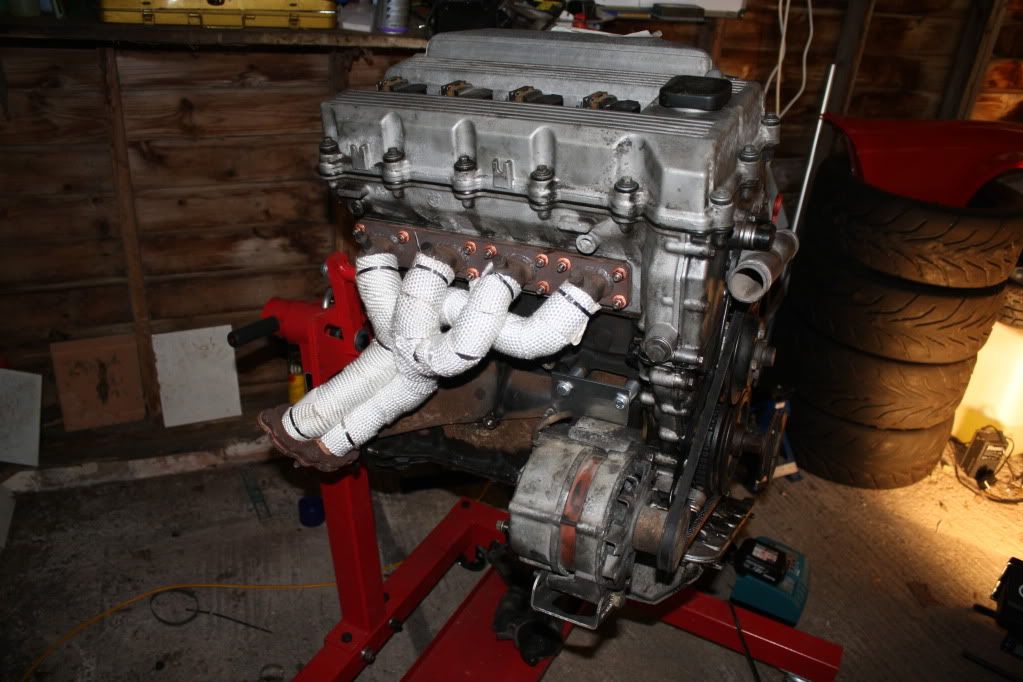

Engine time!!!!
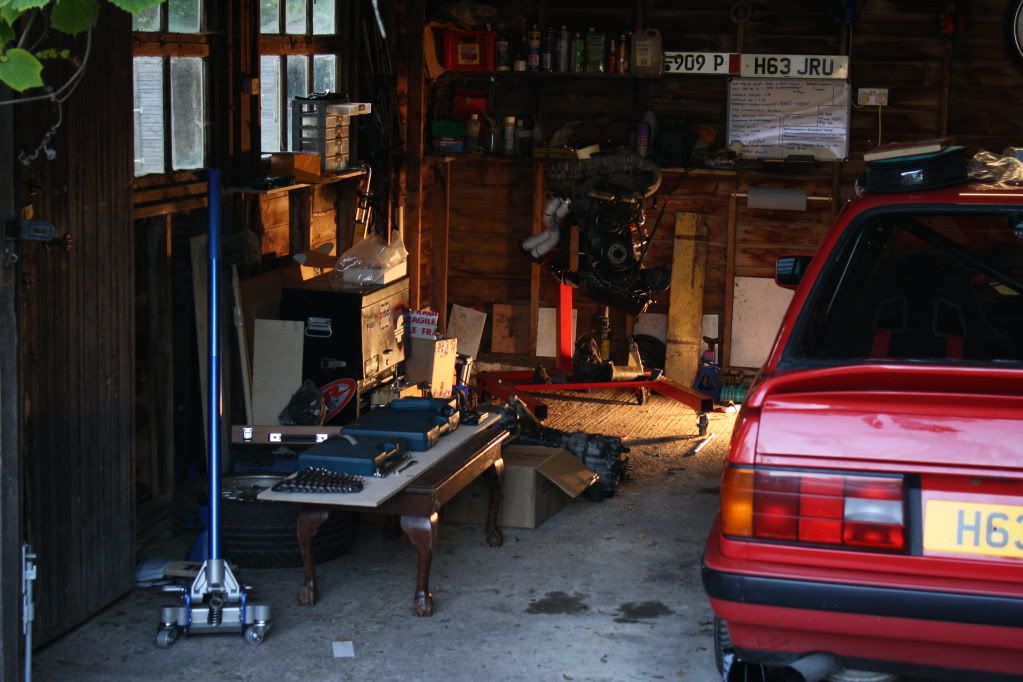
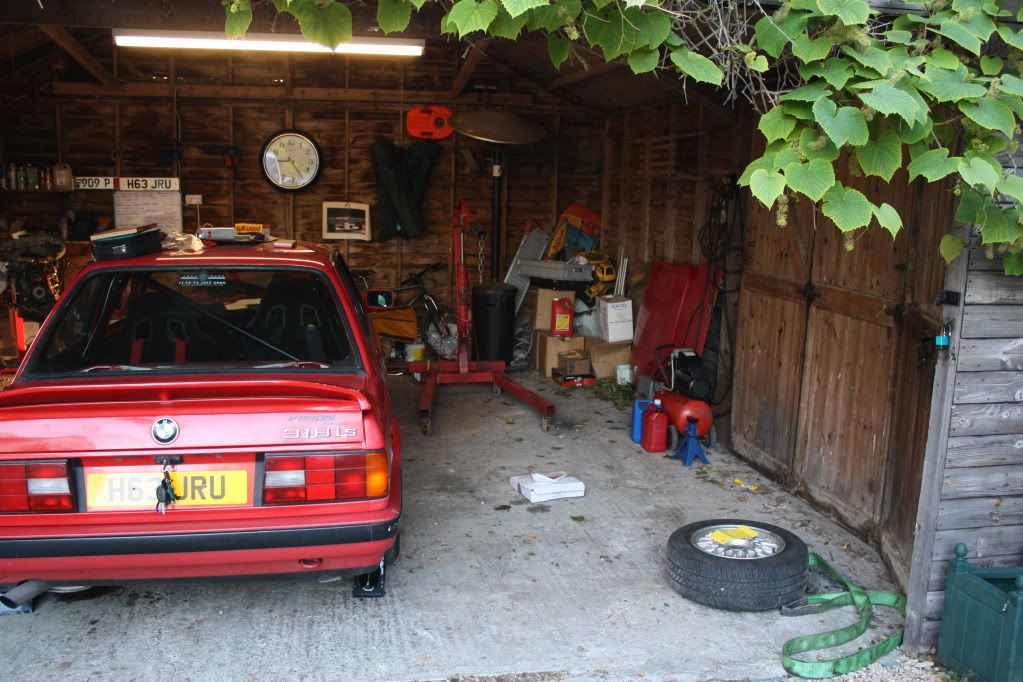
Moved everything in the garage out the way including dad's car ready for engine change.
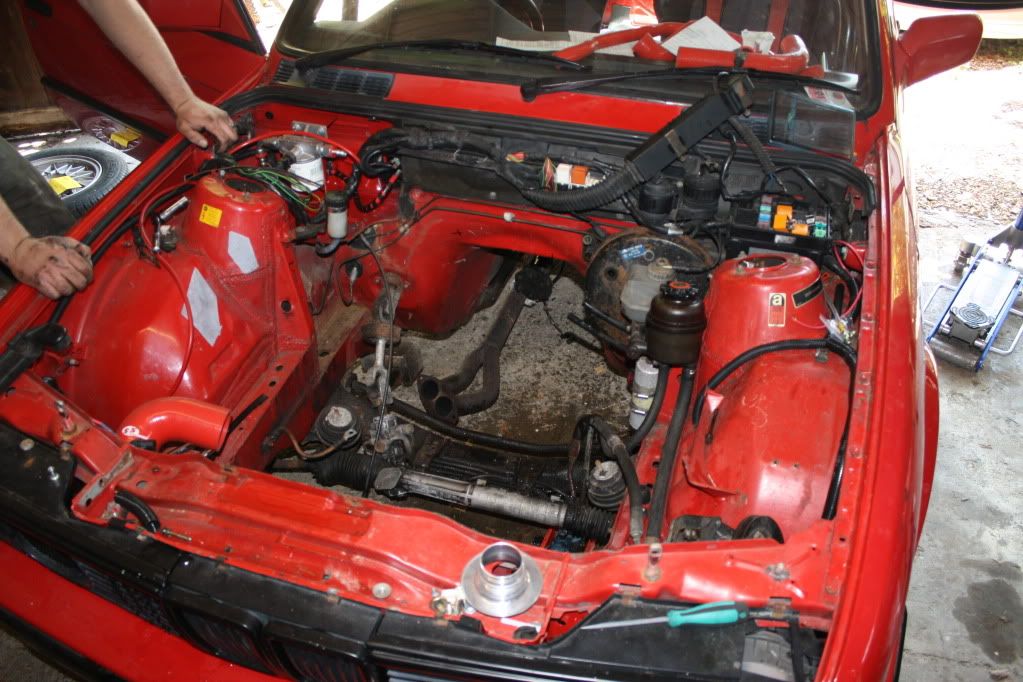
The prop bush was knackered so need another one. Getting the engine and box out was pretty easy, I have spent ages slowly pulling bits off the engine so only had the mounts to disconnect:

Loads of room :
:
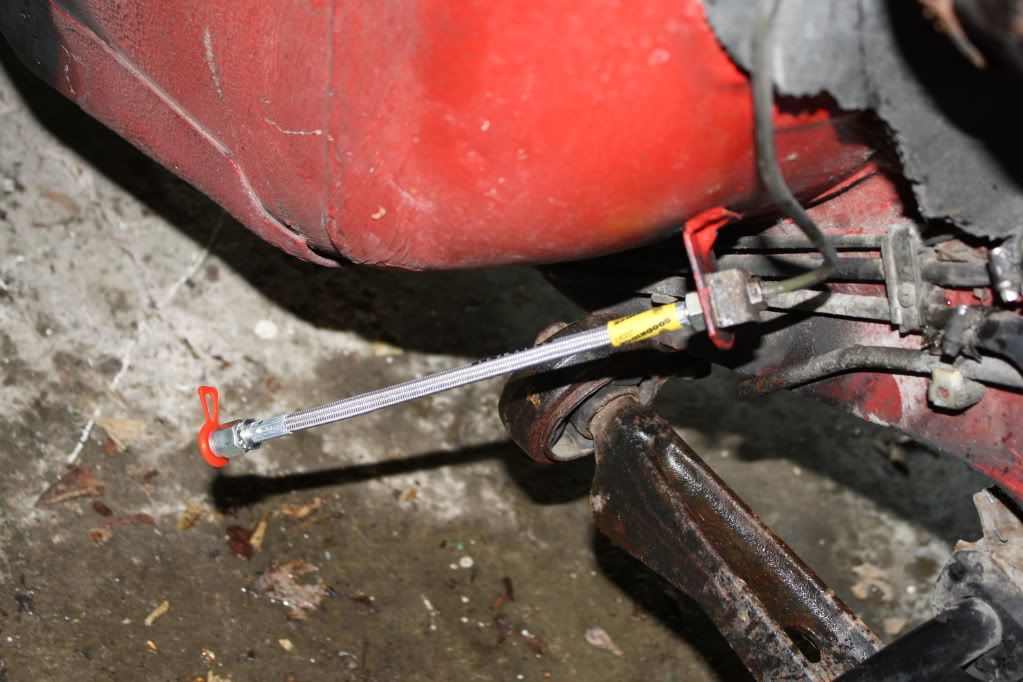
While the engine was out quickly put the braided clutch line on:
Got the clutch and lightened fly wheel on:

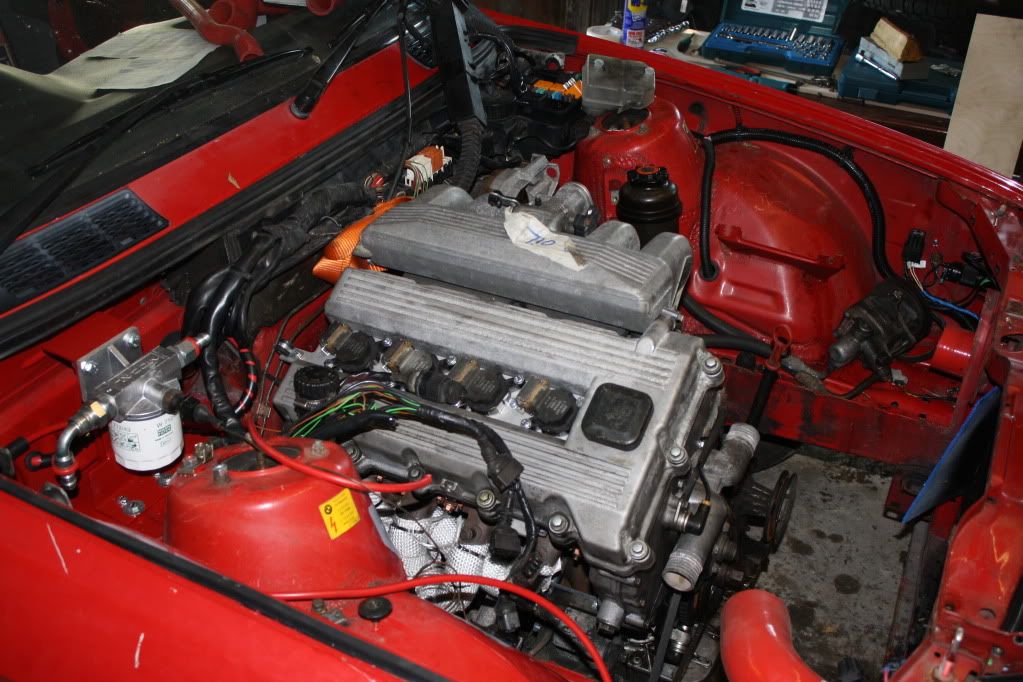
In time The engine pretty much fell in place was beautiful lol :

Currently it is resting on a bit of wood as going to lift the box in from the bottum when I have a new prop bush.
Alternator and all fits like a glove:

Started connecting up all the loom and bits so I can get it running again! Get that baby purring!
So a really good day. I was up and in the garage fafing at 8 this morning. Phil (aka Finite) arrived just after 9, freind of Phil arrived a while after and we were cleaned up and done before 3 Epicly huge thanks to you guys!
Watch this space
Had a mate who builds race engines, machine my alternator plate out of 5mm Ali. Cut and drilled on a CNC milling machine the finish was epic. Also turned me some 35mm Ali spacers...didn't cost a penny
Got it bolted on yesterday:
Then got the alternator on
I did have to modify the engine mount ever so slightly by grinding off a small lug on the side to allow them to sit together.
Engine ready:
Engine time!!!!
Moved everything in the garage out the way including dad's car ready for engine change.
The prop bush was knackered so need another one. Getting the engine and box out was pretty easy, I have spent ages slowly pulling bits off the engine so only had the mounts to disconnect:
Loads of room
While the engine was out quickly put the braided clutch line on:
Got the clutch and lightened fly wheel on:
In time
Currently it is resting on a bit of wood as going to lift the box in from the bottum when I have a new prop bush.
Alternator and all fits like a glove:
Started connecting up all the loom and bits so I can get it running again! Get that baby purring!
So a really good day. I was up and in the garage fafing at 8 this morning. Phil (aka Finite) arrived just after 9, freind of Phil arrived a while after and we were cleaned up and done before 3
Watch this space
Last edited by rix313 on Sun May 31, 2009 11:03 pm, edited 1 time in total.
-
appletree
- E30 Zone Addict
- Posts: 3479
- Joined: Fri Jan 20, 2006 11:00 pm
- Location: Retford
Great work rich, did you split the box from the engine and then lift it out or lift both out togeather?
Did moving the alternator tension the belt much?
Did moving the alternator tension the belt much?
You should never underestimate the predictability of stupidity
M42 Supercharged 285bhp + M3 6speed box
-
rix313
- E30 Zone Team Member
- Posts: 4968
- Joined: Fri Oct 31, 2008 11:00 pm
- Location: Silverstone
They're seperate. Going to have a chat with my neighbour who has a 4 post lift to see if I can use it to lift the box in.
Nope doesn't seem to make much difference, just rolls around
Nope doesn't seem to make much difference, just rolls around
-
appletree
- E30 Zone Addict
- Posts: 3479
- Joined: Fri Jan 20, 2006 11:00 pm
- Location: Retford
Ya same as mine then.
You should never underestimate the predictability of stupidity
M42 Supercharged 285bhp + M3 6speed box
-
rix313
- E30 Zone Team Member
- Posts: 4968
- Joined: Fri Oct 31, 2008 11:00 pm
- Location: Silverstone
Probably going to look at making some sort of cover to protect it from water, not that it'll be going out in the rain but yeah
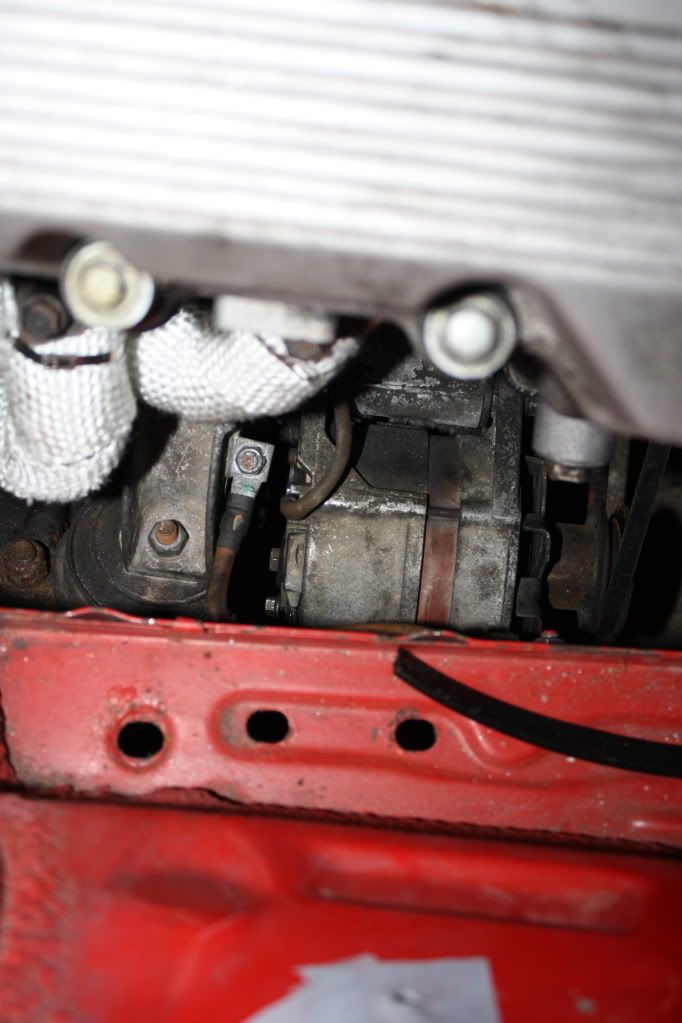
O/S of the bay is looking good now, tidied up the COP wiring, pluged it in and fixed it down. Also ran my oil idiot light wiring round the the OE plug on the engine and taped it up. then fitted the loom cover:
Next stage is to get the gearbox fitted, route the oil hoses (nightmare), fill'er up and run it.
-
appletree
- E30 Zone Addict
- Posts: 3479
- Joined: Fri Jan 20, 2006 11:00 pm
- Location: Retford
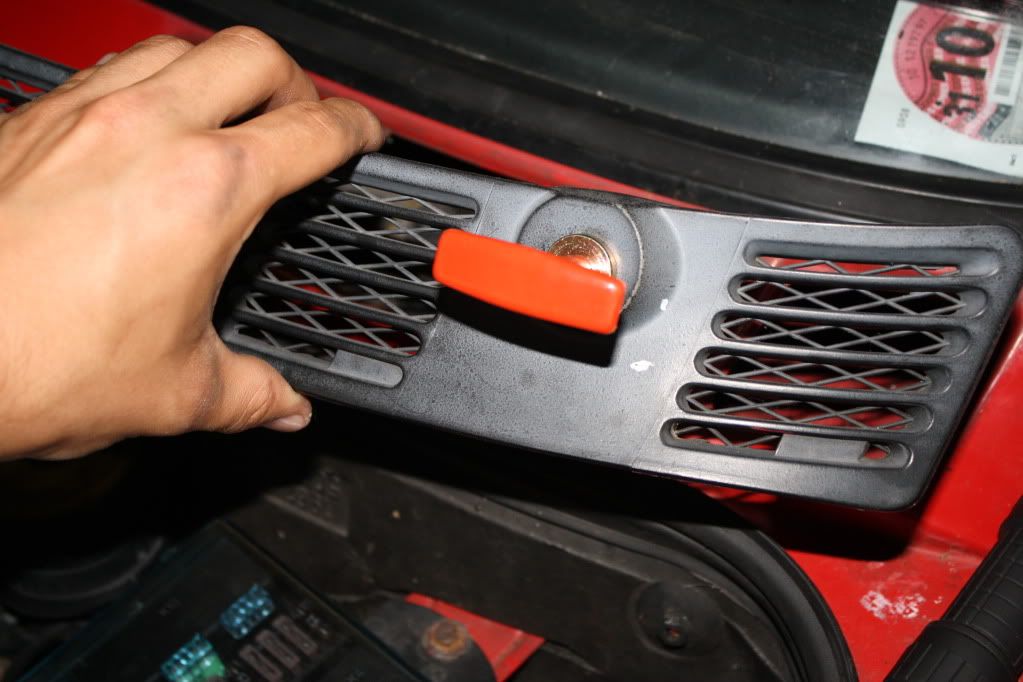
Just a heads up if you do a z3 rack swop with the alternator in the new place the 'group buy' hoses wont work and its not as streight forward as a normal IS swop to fit around the bracket and alternator.
You should never underestimate the predictability of stupidity
M42 Supercharged 285bhp + M3 6speed box
-
rix313
- E30 Zone Team Member
- Posts: 4968
- Joined: Fri Oct 31, 2008 11:00 pm
- Location: Silverstone
You found this out the hard way per chance?
Sorted out where my oil hose will run, hopfuly wont change when I fit my gearbox (with regards the engine angles etc.) so once thats done its plug in and pray time.
Sorted out where my oil hose will run, hopfuly wont change when I fit my gearbox (with regards the engine angles etc.) so once thats done its plug in and pray time.
-
odbod
- E30 Zone Regular

- Posts: 298
- Joined: Mon May 08, 2006 11:00 pm
- Location: leamington Spa
I played the blowtorch and pipe bending game when I fitted mine, it's a bit of a pain in the arse but you can choose where the pipes run...appletree wrote:Just a heads up if you do a z3 rack swop with the alternator in the new place the 'group buy' hoses wont work and its not as streight forward as a normal IS swop to fit around the bracket and alternator.

-
rix313
- E30 Zone Team Member
- Posts: 4968
- Joined: Fri Oct 31, 2008 11:00 pm
- Location: Silverstone
Right I guess I'll do a small 'update'.
Haven't really done alot to shout about just bits and bobs that need doing.
Shaped and fitted my new N/S/R brake pipe (the old one was knackered) which then enabled me to fit my rear braided brake lines. Will spanner check all the fittings and then get the brakes bled up. Got issues on the front with the new discs not sitting properly by it's self and causing the wheel to go on at a funny angle causing obvious problems .
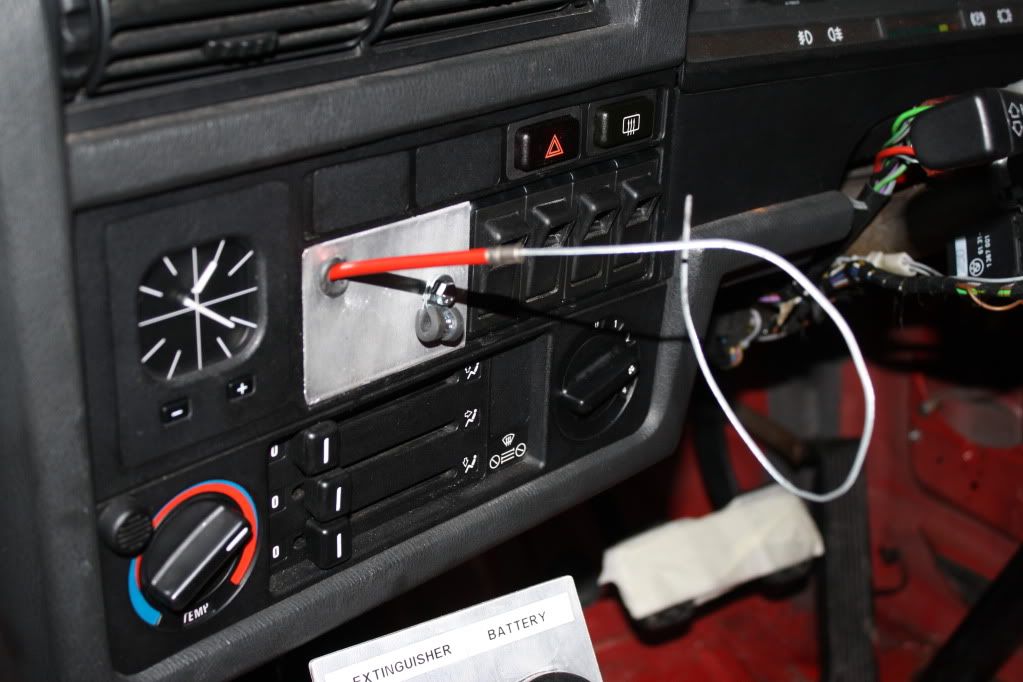
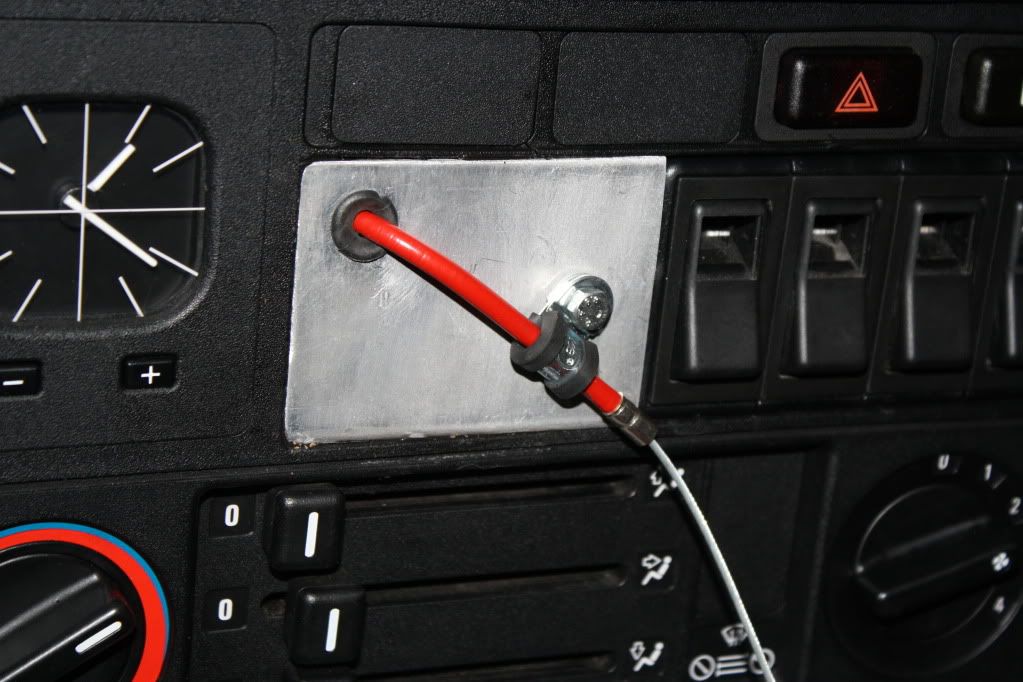
Also up-routed my battery cable so I could re-route it for my battery cut out switch:
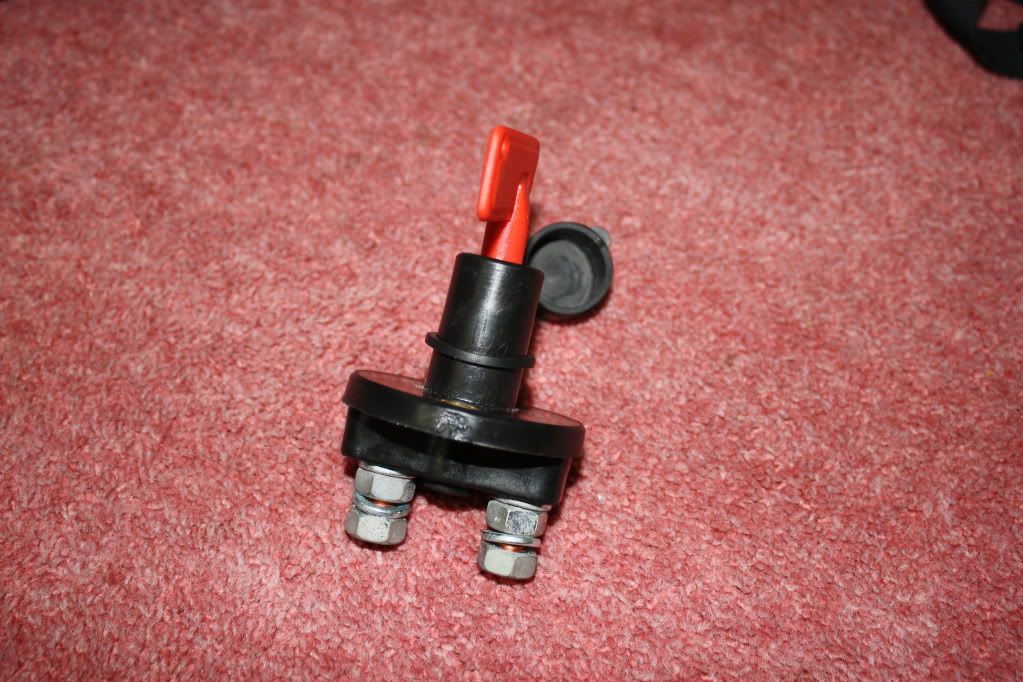
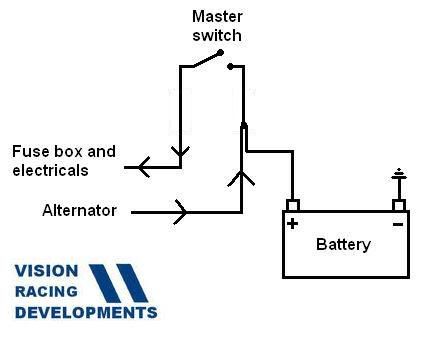
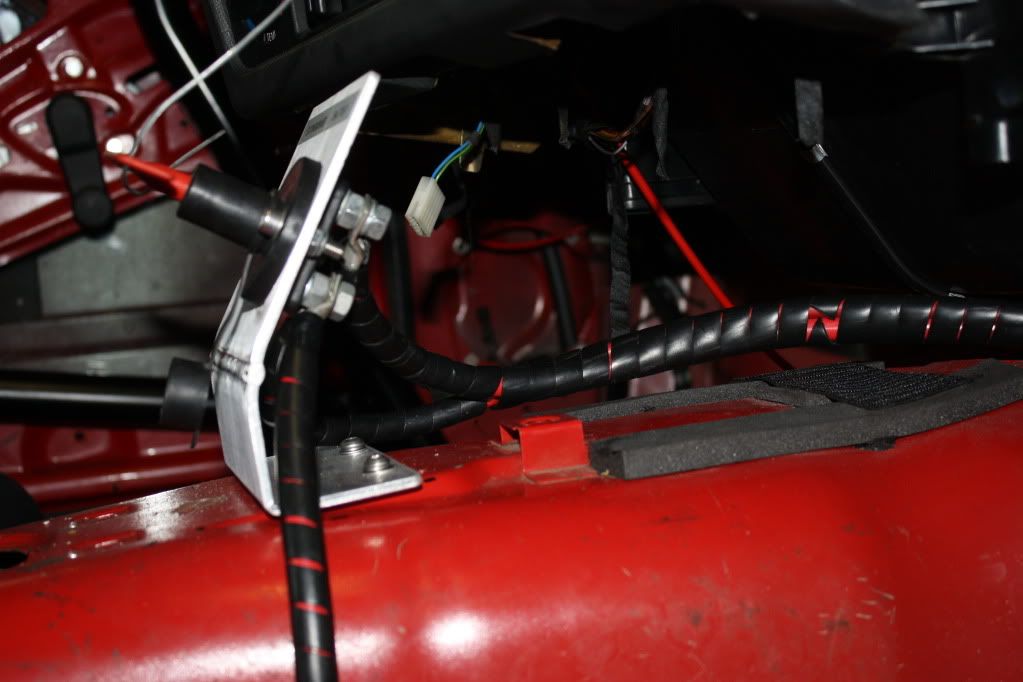
As I had to re-wire the alternator, I decided to run the alternator feed directly to the 'Isolated' side of the battery switch. This means that if the switch is pulled, the engine cannot continue to run off of the alternator and the alternator cannot spike the electronics:
Then made a simple aluminium bracket for the switch and also for the extinguisher pull (extinguisher coming soon ) (and no I didn't weld it ):


I'm now waiting for some money so I can get a new greabox to prop coupling and then fit up a new gearbox, if I can find one :/
Then tuen the key and see what happens.
Haven't really done alot to shout about just bits and bobs that need doing.
Shaped and fitted my new N/S/R brake pipe (the old one was knackered) which then enabled me to fit my rear braided brake lines. Will spanner check all the fittings and then get the brakes bled up. Got issues on the front with the new discs not sitting properly by it's self and causing the wheel to go on at a funny angle causing obvious problems
Also up-routed my battery cable so I could re-route it for my battery cut out switch:
As I had to re-wire the alternator, I decided to run the alternator feed directly to the 'Isolated' side of the battery switch. This means that if the switch is pulled, the engine cannot continue to run off of the alternator and the alternator cannot spike the electronics:
Then made a simple aluminium bracket for the switch and also for the extinguisher pull (extinguisher coming soon
I'm now waiting for some money so I can get a new greabox to prop coupling and then fit up a new gearbox, if I can find one :/
Then tuen the key and see what happens.
-
rix313
- E30 Zone Team Member
- Posts: 4968
- Joined: Fri Oct 31, 2008 11:00 pm
- Location: Silverstone
Fitted the external battery pull today, easy enough drilling a couple of holes an job done, just need to route the actual cable and attach it to the switch:


Also got my Ultra Racing front strut brace so poped that on:

I've got another gearbox coming and I've got a new coupling so going to get the two married up and then check everything is ok for an engine start.
Also got my Ultra Racing front strut brace so poped that on:
I've got another gearbox coming and I've got a new coupling so going to get the two married up and then check everything is ok for an engine start.
-
rix313
- E30 Zone Team Member
- Posts: 4968
- Joined: Fri Oct 31, 2008 11:00 pm
- Location: Silverstone
My nex gearbox has arrived so going to get that whacked in one evening next week
Also found a bit of aluminium prime for completing my battery switch external pull system. As I had a nice large gap next to my aux switches where the radio used to be, I decided that'd be the baet place to run the end of the pull cable. Dispite the tight angle, it pulls very smoothly so I'm happy, I'm just waiting for a solderless nipple to go on the end of the cable.


Check out my fab shop
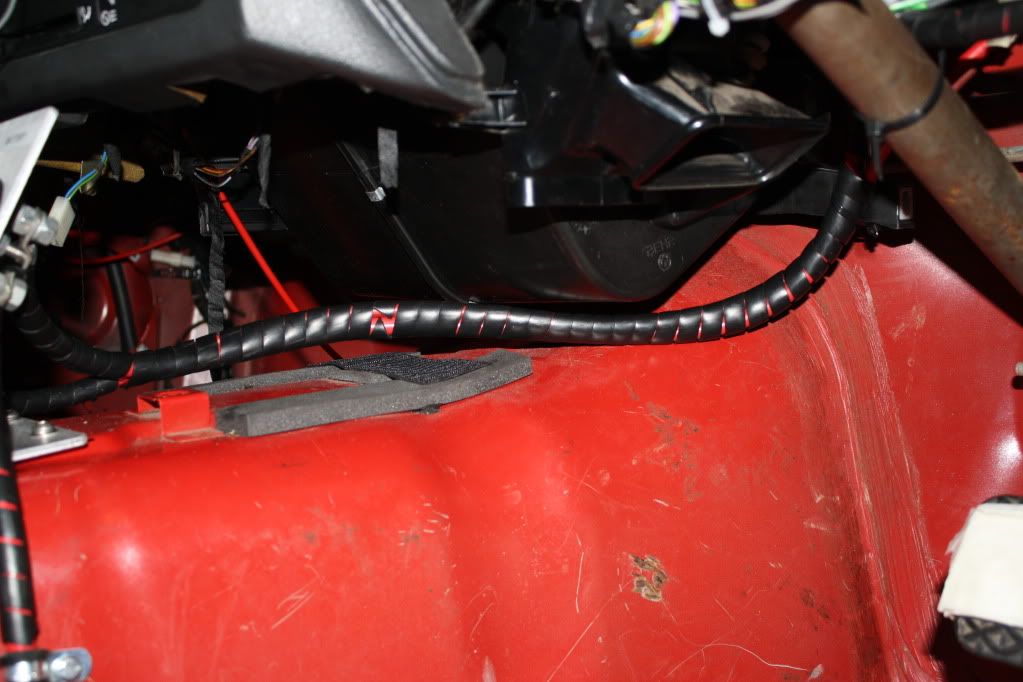
Just some pics of the switch wired. Alternator cable comes through the wiring loom grommit and the main battery same as before. They then meet and are wrapped together in spiral wrap. They then connect to the terminals as illustrated on a previous post. The battery cable then continues down the transmission tunnel, across and underneath the front of the seat and then along the sill:

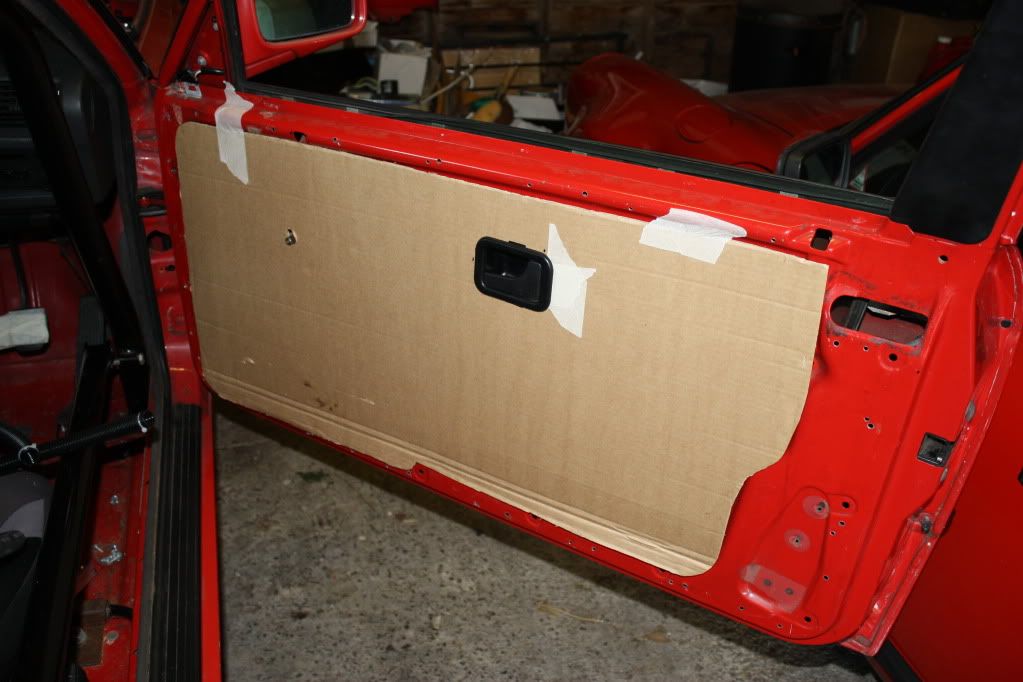
Also sorted the template for my door cards so will get the aluminium cut to shape and glued on.
Also found a bit of aluminium prime for completing my battery switch external pull system. As I had a nice large gap next to my aux switches where the radio used to be, I decided that'd be the baet place to run the end of the pull cable. Dispite the tight angle, it pulls very smoothly so I'm happy, I'm just waiting for a solderless nipple to go on the end of the cable.
Check out my fab shop
Just some pics of the switch wired. Alternator cable comes through the wiring loom grommit and the main battery same as before. They then meet and are wrapped together in spiral wrap. They then connect to the terminals as illustrated on a previous post. The battery cable then continues down the transmission tunnel, across and underneath the front of the seat and then along the sill:
Also sorted the template for my door cards so will get the aluminium cut to shape and glued on.
-
rix313
- E30 Zone Team Member
- Posts: 4968
- Joined: Fri Oct 31, 2008 11:00 pm
- Location: Silverstone
I've been having a look at the space down the back of the engine and felt comfortable enough to route my oil hosing given that there is loads of space behind there even without the gearbox fitted.
So I got both lengths worked out using 20mm conduit. Being the same outside diameter as the actual hose, it allowed me to accurately gauge the length and space required.
I got the hose lengths cut and took them to my local Pirtek as getting the unions on was a total mission. I also wrapped the pipes in spiral wrap to protect them from chaffing etc.

The hoses come out of the take off plate, ontop of the engine loom case, behind the bracket which holds the case in place, then around the back of the engine where engine out let hose goes around and under the wiring, P-clips to the filter bracket then up into the housing, the return comes out and follows the same route. It's very secure and I've tied the hoses together to keep them from moving about.


Just need a *special washer for my sump plug and I can fill it up with oil.
I was wanting to do the gearbox the other day but an unforseeable problem occured with a freind who was going to help me so im not at engine start just yet, I keep saying it, but soon
In the mean time I've got issues with my brakes which I have to sort out and I've ordered some hosing to make my breather and idle system with so all progress.
So I got both lengths worked out using 20mm conduit. Being the same outside diameter as the actual hose, it allowed me to accurately gauge the length and space required.
I got the hose lengths cut and took them to my local Pirtek as getting the unions on was a total mission. I also wrapped the pipes in spiral wrap to protect them from chaffing etc.
The hoses come out of the take off plate, ontop of the engine loom case, behind the bracket which holds the case in place, then around the back of the engine where engine out let hose goes around and under the wiring, P-clips to the filter bracket then up into the housing, the return comes out and follows the same route. It's very secure and I've tied the hoses together to keep them from moving about.
Just need a *special washer for my sump plug and I can fill it up with oil.
I was wanting to do the gearbox the other day but an unforseeable problem occured with a freind who was going to help me so im not at engine start just yet, I keep saying it, but soon
In the mean time I've got issues with my brakes which I have to sort out and I've ordered some hosing to make my breather and idle system with so all progress.
Last edited by rix313 on Mon Jul 20, 2009 4:16 pm, edited 2 times in total.
-
appletree
- E30 Zone Addict
- Posts: 3479
- Joined: Fri Jan 20, 2006 11:00 pm
- Location: Retford
Rich isnt it ment to be a copper/ali crush washer on the sump not a fibre one??? would have thought a fibre one would go soft once its got soaked on oil and heated up a few times.
Oil systems looking great, would have you thought about an oil cooler?? just to be safe on track
Oil systems looking great, would have you thought about an oil cooler?? just to be safe on track
You should never underestimate the predictability of stupidity
M42 Supercharged 285bhp + M3 6speed box
-
rix313
- E30 Zone Team Member
- Posts: 4968
- Joined: Fri Oct 31, 2008 11:00 pm
- Location: Silverstone
Sorry yeah it is, I forgot to take the bolt into Pirtek this morning, they wanted to see if for what ever reason.
I have definantly thought about the cooler but from the temperatures you've reported I'm going to see how it goes before I go spending more time and money on something that may not be required, I've had enough of doing that lol! It'll be easy enough to adapt as I made sure I left a decent amound of room under the filter to allow for a sandwhich plate.
I have definantly thought about the cooler but from the temperatures you've reported I'm going to see how it goes before I go spending more time and money on something that may not be required, I've had enough of doing that lol! It'll be easy enough to adapt as I made sure I left a decent amound of room under the filter to allow for a sandwhich plate
-
hoshy
- E30 Zone Wiki Guru

- Posts: 4118
- Joined: Tue Jan 18, 2005 11:00 pm
- Location: Munich
Looking great Rich.. It's really coming on now!
E46 M3 CSL but dreaming of another E30.
-
SteMarsden
- E30 Zone Regular
- Posts: 381
- Joined: Tue Jun 10, 2008 11:00 pm
- Location: Wirral
Looks great!
IMO. Dont glue the ali onto the doors, get some sticky-backed velcro from B&Q for £2 and use that, dead easy and light!
IMO. Dont glue the ali onto the doors, get some sticky-backed velcro from B&Q for £2 and use that, dead easy and light!
BMW E30 318i ex PBMWC track car
2011 VW Passat Est
2011 VW Passat Est