
Twin Seq. Dry sumping for beginners :D
Moderator: martauto
-
Speedtouch
- Old Skooler

- Posts: 14031
- Joined: Tue Feb 14, 2006 11:00 pm
- Location: Canterbury
That's groovy, man  Obviously, the artist had a bit of a thing for Mercedes - did Janis Joplin once live there?
///M aurice
ECU Upgrade EPROM Chips, £40 posted within the UK. Note these are not Zone chips.
viewtopic.php?f=6&t=279421
ECU Upgrade EPROM Chips, £40 posted within the UK. Note these are not Zone chips.
viewtopic.php?f=6&t=279421
-
Turbo-Brown
- Boost Junkie
- Posts: 4705
- Joined: Tue Feb 15, 2005 11:00 pm
- Location: Aldershot, Hants
- Contact:
Had a bit of a break from housework last night, and started to make the internal structure molds for the charge cooler.
Was gonna go really to town and make a set of permanent molds, but had a bit of a reality check and so they're just made from cardboard covered in release film.
Here's the turning vane for the inlet. This extends all the way up the inlet pipe and runs to half way along the cores:
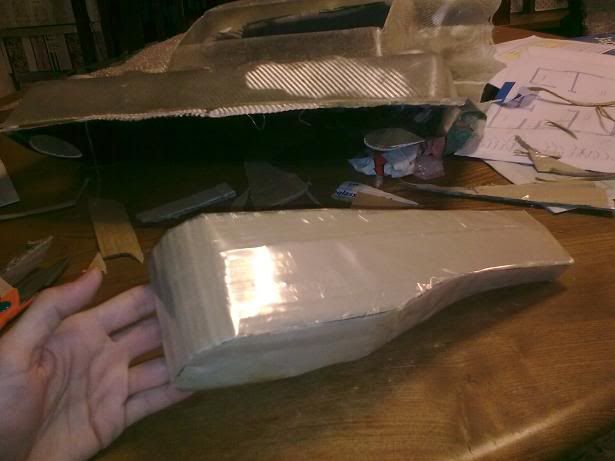
And this is the start of the structure that will hopefully hold the top and bottom halves together:

Idea with the second one is to have the reinforcement zig-zag up and down, being bonded to top and bottom of the cooler. Will remove a fair amount of material from it once it's done in an attempt to keep pressures throughout the cooler reasonably consistent.
Was gonna go really to town and make a set of permanent molds, but had a bit of a reality check and so they're just made from cardboard covered in release film.
Here's the turning vane for the inlet. This extends all the way up the inlet pipe and runs to half way along the cores:
And this is the start of the structure that will hopefully hold the top and bottom halves together:
Idea with the second one is to have the reinforcement zig-zag up and down, being bonded to top and bottom of the cooler. Will remove a fair amount of material from it once it's done in an attempt to keep pressures throughout the cooler reasonably consistent.
-
Turbo-Brown
- Boost Junkie
- Posts: 4705
- Joined: Tue Feb 15, 2005 11:00 pm
- Location: Aldershot, Hants
- Contact:
So far, I've moved a wall and painted a room, taken out the old central heating and stripped lots of wall paper
Promise to get back to the far more important (and enjoyable!) matter of working on the car as soon as I can!
-
MotorKnyttet
- E30 Zone Newbie

- Posts: 4
- Joined: Fri Apr 30, 2010 11:00 pm
- Location: Sweden
Updates! 
"Promise to get back to the far more important (and enjoyable!)"
//Torbjörn from Sweden
"Promise to get back to the far more important (and enjoyable!)"
//Torbjörn from Sweden

Hi there, thought you might like the look of this ;)http://passionford.com/forum/restoratio ... ttack.html
E30 340i project in progress now 328 turbo
Breaking '97 728i Auto box, tubular manifolds and other morsels.
For sale E34 M50 sump, pick up and dip stick. PM for de
Breaking '97 728i Auto box, tubular manifolds and other morsels.
For sale E34 M50 sump, pick up and dip stick. PM for de
-
Turbo-Brown
- Boost Junkie
- Posts: 4705
- Joined: Tue Feb 15, 2005 11:00 pm
- Location: Aldershot, Hants
- Contact:
I promise to make more progress before Christmas! 
Promise! Although my house is currently the coldest place on Earth due to a total lack of heating, it's like getting thermal shock when I take a shower in the mornings!
Holy crap, that carbon-cossie is absolutely insane! Probably a good lesson in just getting on with making things rather than spending aaaaages thinking about how I might do things!
They're bonkers.. There's a Ferrari 550 (I think) on that thread too, exactly the same although they're using a supercharged BMW V8 as a pose to the V12 it was blessed with lol.
Did you see the 3D scanning set-up they had?
Did you see the 3D scanning set-up they had?
E30 340i project in progress now 328 turbo
Breaking '97 728i Auto box, tubular manifolds and other morsels.
For sale E34 M50 sump, pick up and dip stick. PM for de
Breaking '97 728i Auto box, tubular manifolds and other morsels.
For sale E34 M50 sump, pick up and dip stick. PM for de
-
MotorKnyttet
- E30 Zone Newbie
- Posts: 4
- Joined: Fri Apr 30, 2010 11:00 pm
- Location: Sweden
Bump bump bump......
Or worse Speed bump?
//Torbjörn
Or worse Speed bump?
//Torbjörn
-
Turbo-Brown
- Boost Junkie
- Posts: 4705
- Joined: Tue Feb 15, 2005 11:00 pm
- Location: Aldershot, Hants
- Contact:
Well, looks like I broke my promise 
Had been meaning to design the dry sump system over Christmas, but works at the flat are ongoing! Can't believe how long DIY takes!
Had been meaning to design the dry sump system over Christmas, but works at the flat are ongoing! Can't believe how long DIY takes!

-
Turbo-Brown
- Boost Junkie
- Posts: 4705
- Joined: Tue Feb 15, 2005 11:00 pm
- Location: Aldershot, Hants
- Contact:
Bugger me, 4 years!
-
Turbo-Brown
- Boost Junkie
- Posts: 4705
- Joined: Tue Feb 15, 2005 11:00 pm
- Location: Aldershot, Hants
- Contact:
Anyone know where I can legally acquire an old metal beer keg?
Brewery might let you have one? Ebay?
E30 340i project in progress now 328 turbo
Breaking '97 728i Auto box, tubular manifolds and other morsels.
For sale E34 M50 sump, pick up and dip stick. PM for de
Breaking '97 728i Auto box, tubular manifolds and other morsels.
For sale E34 M50 sump, pick up and dip stick. PM for de
-
Turbo-Brown
- Boost Junkie
- Posts: 4705
- Joined: Tue Feb 15, 2005 11:00 pm
- Location: Aldershot, Hants
- Contact:
Tried both, seems they're not very keen on letting them go!
Tiny (and cryptic) update!
Just had this delivered:

Who can guess what's coming next
Tiny (and cryptic) update!
Just had this delivered:
Who can guess what's coming next
-
Jhonno
- Homo Hair
- Posts: 20362
- Joined: Mon Jan 10, 2005 11:00 pm
- Location: FLAT, FLAT, FLAT!!
- Contact:
Lets hope less time than it's taken to build this eh...Turbo-Brown wrote:Well, looks like I broke my promise
Had been meaning to design the dry sump system over Christmas, but works at the flat are ongoing! Can't believe how long DIY takes!

-
Turbo-Brown
- Boost Junkie
- Posts: 4705
- Joined: Tue Feb 15, 2005 11:00 pm
- Location: Aldershot, Hants
- Contact:
Hooooray! Finally got something meaningful done on the car!
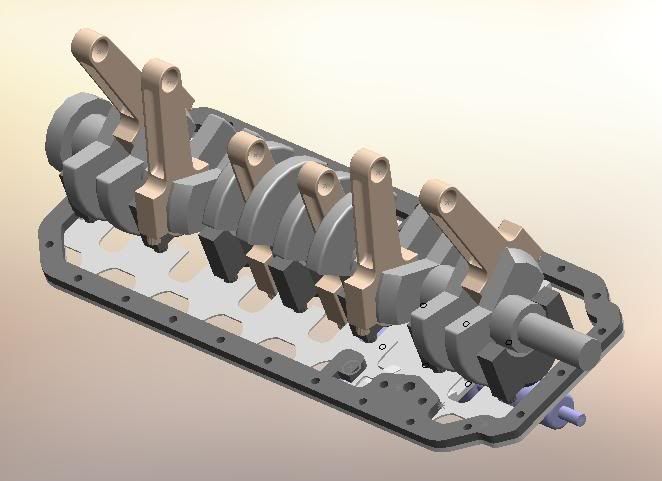
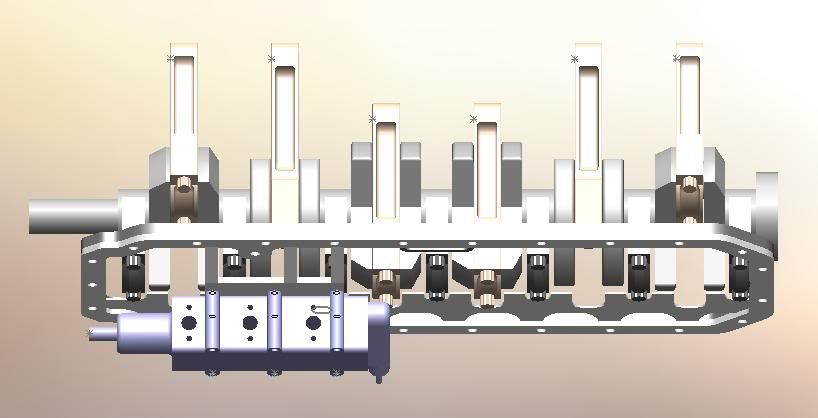
Have spent some time measuring up the engine and dry sump pump and then putting all the data into the computer.
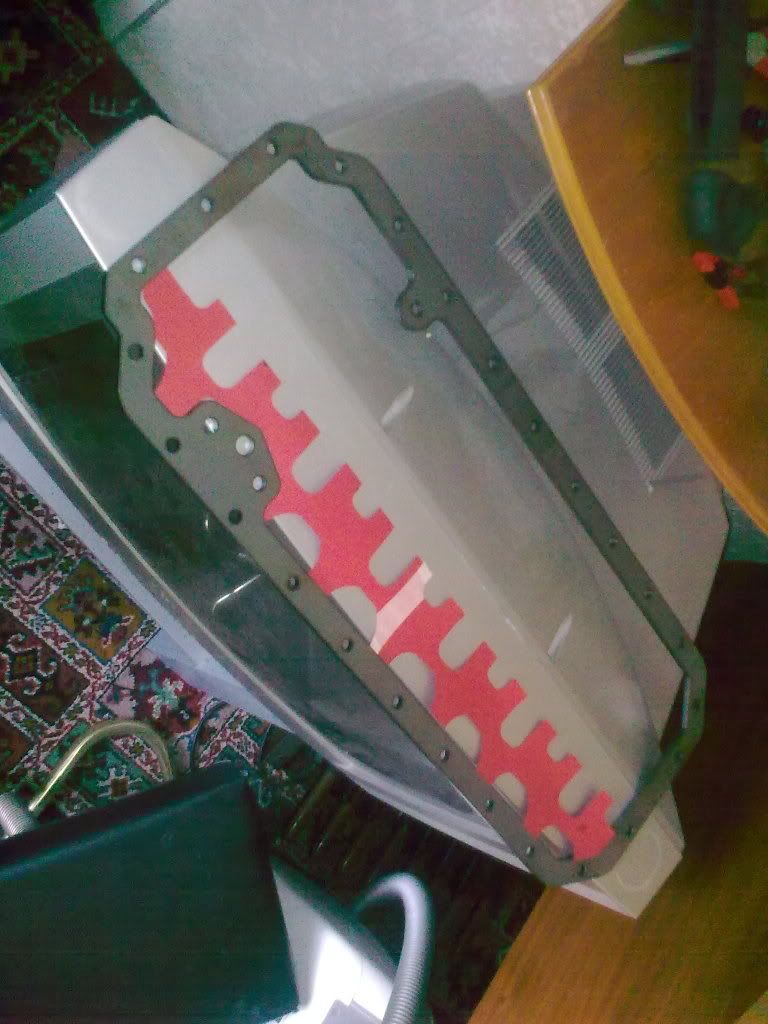
Had these two sump flanges cut last summer(!) which form the basis for the sump system.
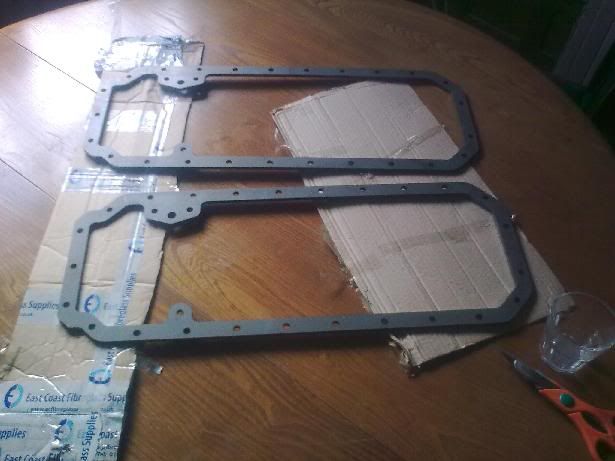
One of the flanges carries the pump and a crank scraper (the light grey assembly in the pics):
While the other carries the sump itself (the orangey bit):
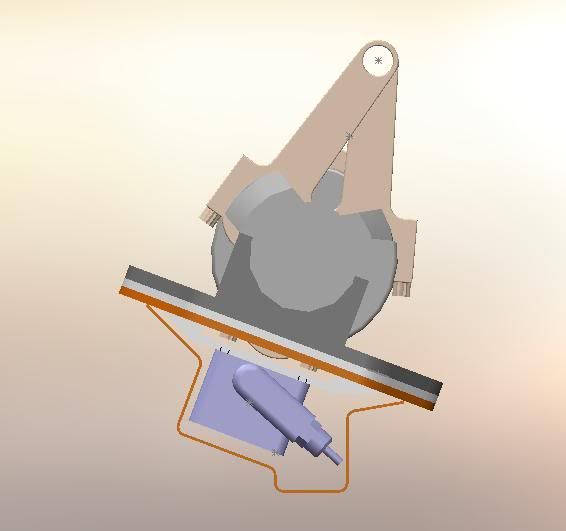
Really only started sketching the sump last night so what's shown is really just a first idea.
Also need the light grey assy to carry the oil pickup pipes and the connections to the outside world.
The eagle eyed among you might have noticed the oil pressure relief valve from the block has gone missing. This is gonna need to be angled over towards the centre of the engine so as to avoid the sump, although another option is just to build the sump around it. We'll see!
Have spent some time measuring up the engine and dry sump pump and then putting all the data into the computer.
Had these two sump flanges cut last summer(!) which form the basis for the sump system.
One of the flanges carries the pump and a crank scraper (the light grey assembly in the pics):
While the other carries the sump itself (the orangey bit):
Really only started sketching the sump last night so what's shown is really just a first idea.
Also need the light grey assy to carry the oil pickup pipes and the connections to the outside world.
The eagle eyed among you might have noticed the oil pressure relief valve from the block has gone missing. This is gonna need to be angled over towards the centre of the engine so as to avoid the sump, although another option is just to build the sump around it. We'll see!

UHHHH! where did you get this from? Was looking everywhere but could't find a source willing to sell small qty'sTurbo-Brown wrote:Tried both, seems they're not very keen on letting them go!
Tiny (and cryptic) update!
Just had this delivered:
Who can guess what's coming next
I did mention that I own a 3D printer?
-
Turbo-Brown
- Boost Junkie
- Posts: 4705
- Joined: Tue Feb 15, 2005 11:00 pm
- Location: Aldershot, Hants
- Contact:
The refractory?
Got it here:
http://www.firecement.com/refractory-ma ... -1700.html
Arrived the next day!
What are you melting dude?
I'd love a 3D printer! Be amazing to be able to have a trial fit of all these components before comitting them to metal.
Got it here:
http://www.firecement.com/refractory-ma ... -1700.html
Arrived the next day!
What are you melting dude?
I'd love a 3D printer! Be amazing to be able to have a trial fit of all these components before comitting them to metal.
if you got something, get in touch. Might not be as expensive as you may think.Turbo-Brown wrote:The refractory?
Got it here:
http://www.firecement.com/refractory-ma ... -1700.html
Arrived the next day!
What are you melting dude?
I'd love a 3D printer! Be amazing to be able to have a trial fit of all these components before comitting them to metal.
You can also use the 3D printed parts as patterns.
I also have a wax dipping tank.
so carbon fiber wasnt good enough, now you need to start casting your own metal stuff?
dont know if you are familiar with this forum, really lots of usefull info. great read.
http://backyardmetalcasting.com/forums/
hope it helps, will keep on waiting for new updates, cheers.
dont know if you are familiar with this forum, really lots of usefull info. great read.
http://backyardmetalcasting.com/forums/
hope it helps, will keep on waiting for new updates, cheers.
-
Turbo-Brown
- Boost Junkie
- Posts: 4705
- Joined: Tue Feb 15, 2005 11:00 pm
- Location: Aldershot, Hants
- Contact:
Ooh, that casting formum is a mega find! Cheers for that dude!
Slowly but surely, we're getting there with the sump!
Made a little template for the crank scraper over the weekend (and had many a computer problem! )
The scraper clears everything nicely.....which is more than can be said for the oil pump!
Basically, it needs to be about 25mm shorter in order to clear the steering rack!
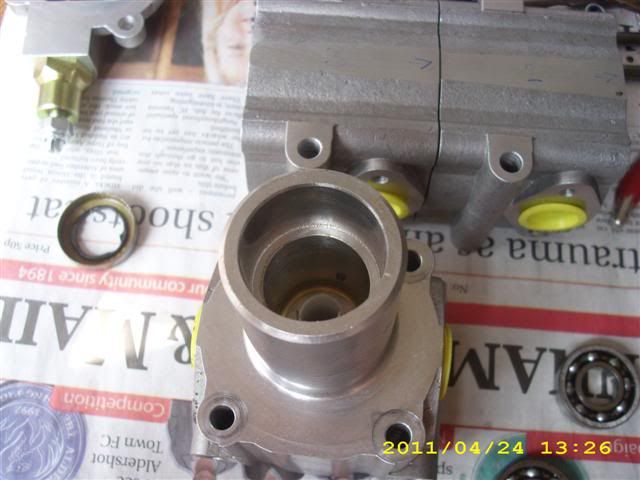
Took the new pump apart last night to see if this might be achievable:
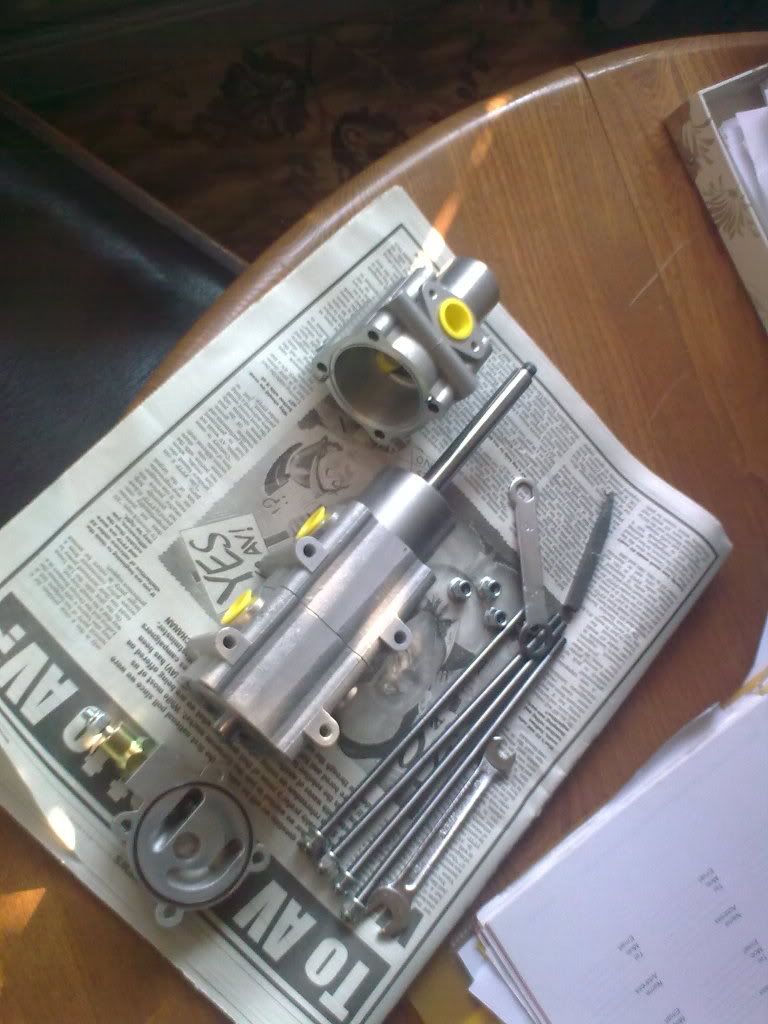
Luckily, it looks like the nose bearing can be shifted back and the front of the pump machined off! So all in all, a good evening yesterday
Slowly but surely, we're getting there with the sump!
Made a little template for the crank scraper over the weekend (and had many a computer problem!
The scraper clears everything nicely.....which is more than can be said for the oil pump!
Basically, it needs to be about 25mm shorter in order to clear the steering rack!
Took the new pump apart last night to see if this might be achievable:
Luckily, it looks like the nose bearing can be shifted back and the front of the pump machined off! So all in all, a good evening yesterday
-
Turbo-Brown
- Boost Junkie
- Posts: 4705
- Joined: Tue Feb 15, 2005 11:00 pm
- Location: Aldershot, Hants
- Contact:
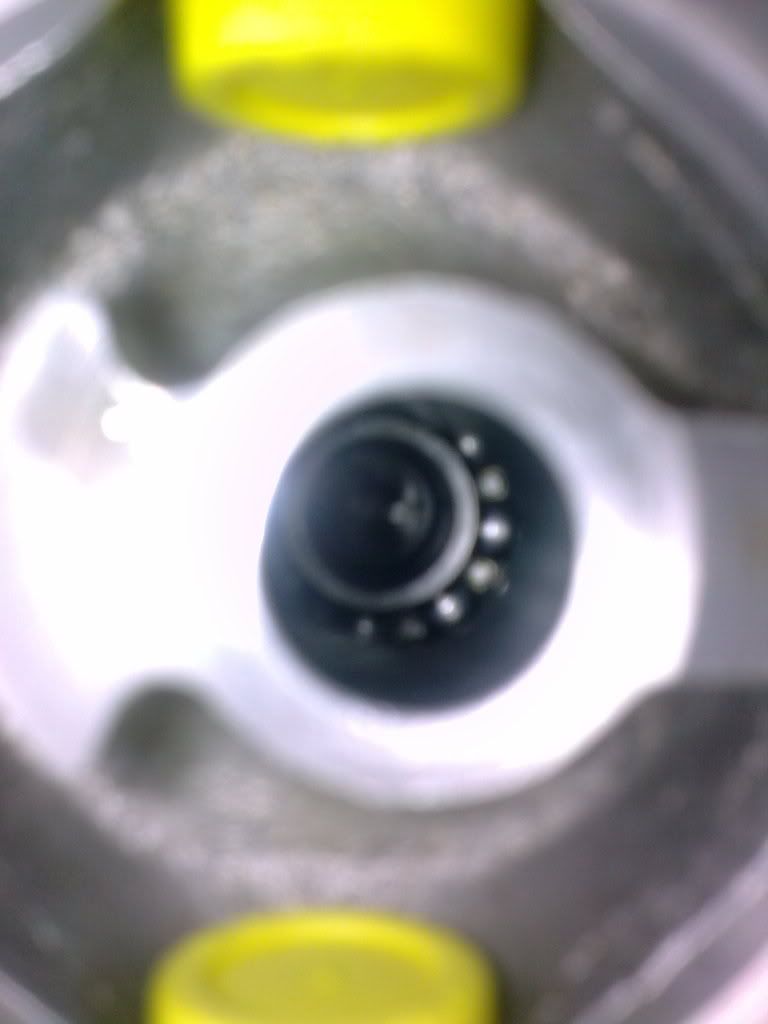
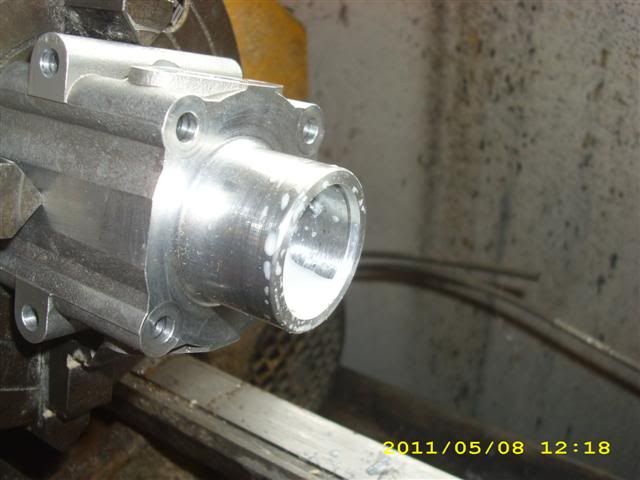
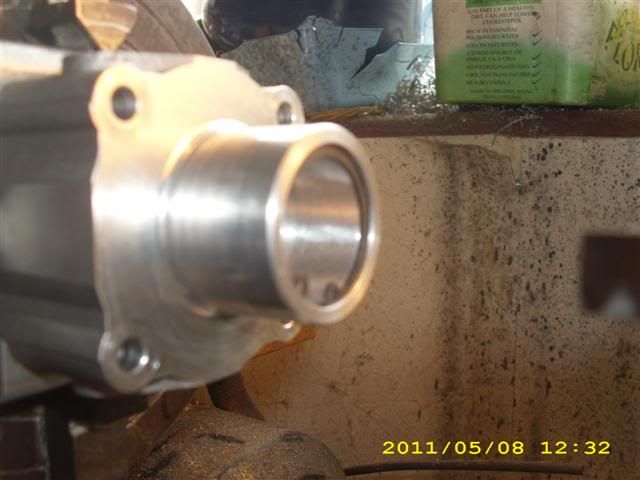
Have been very busy this weekend, doing all kinds of terrifying things!
Have machined the nose off of the oil pump, terrifying because it needed to be very accurate, and cost lots of money in the first place!
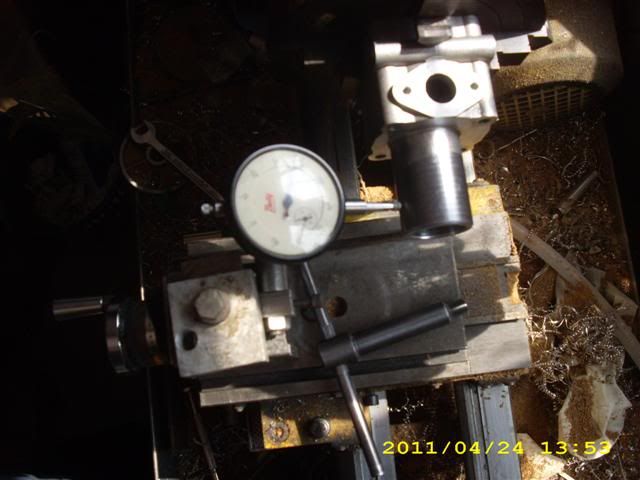
Started off by moving this shoulder down by 25mm:
Which meant clocking the housing in on the lathe:
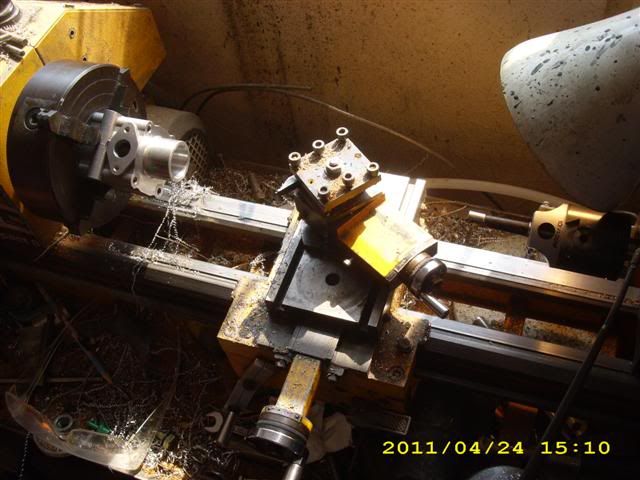
and then using the boring head to veeeeery carefully remove the offending metal:
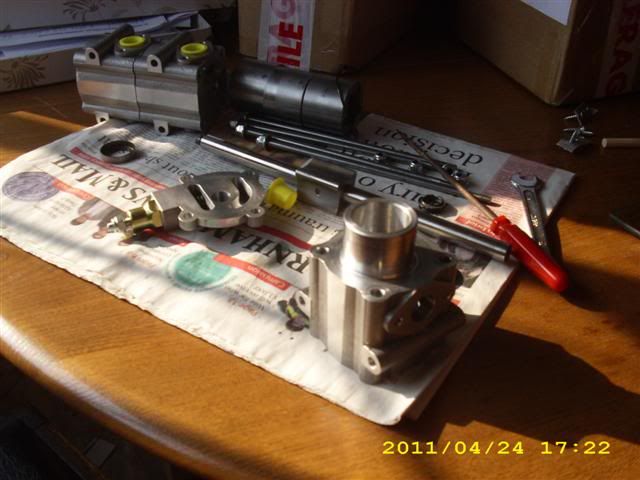
But the end result is this shortened nose:
Need to order new bearings for it now, thinking that it can do without the front seal though, as it's living in an oily environment now. This probably does mean that I need to maching a groove for a snap ring though.
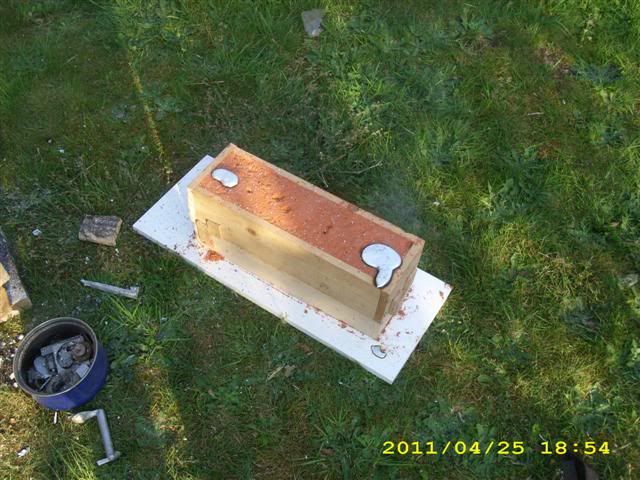
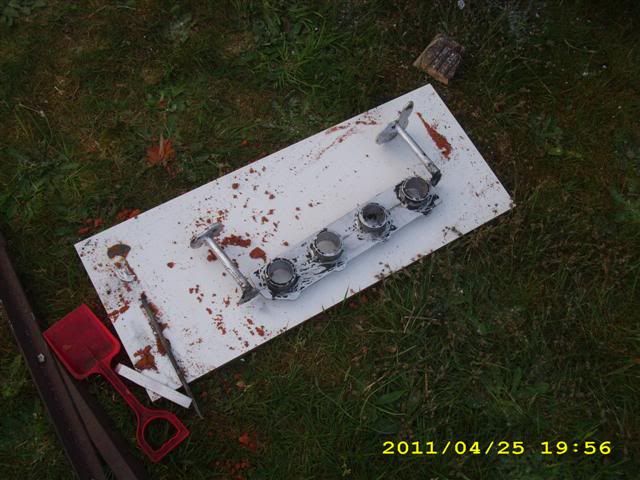
And while all that was going on, also decided to have another go at casting.
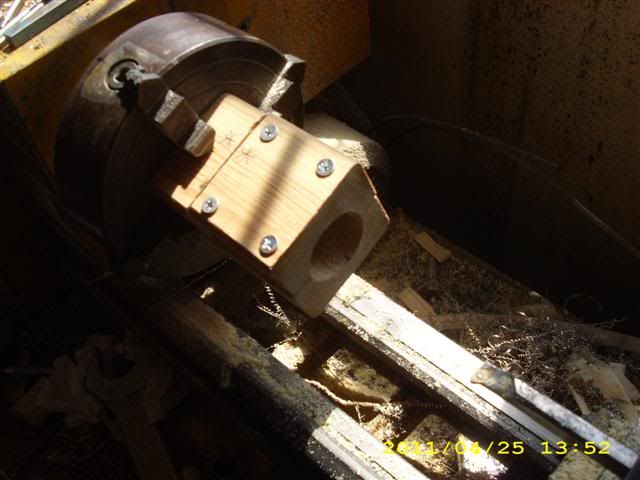
Quite boring and involved, but basically you take some wood and make a pattern:
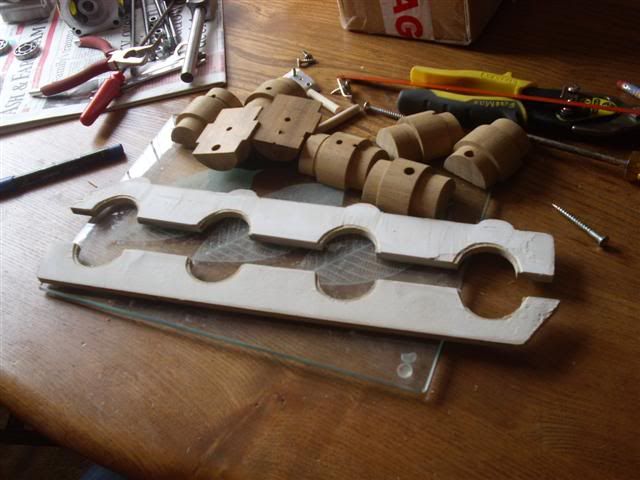

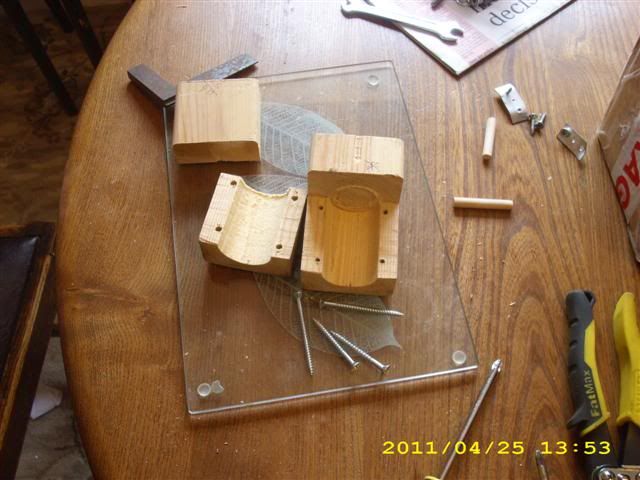
Take some more wood and make a core box:
Take yet more wood and make some flasks:
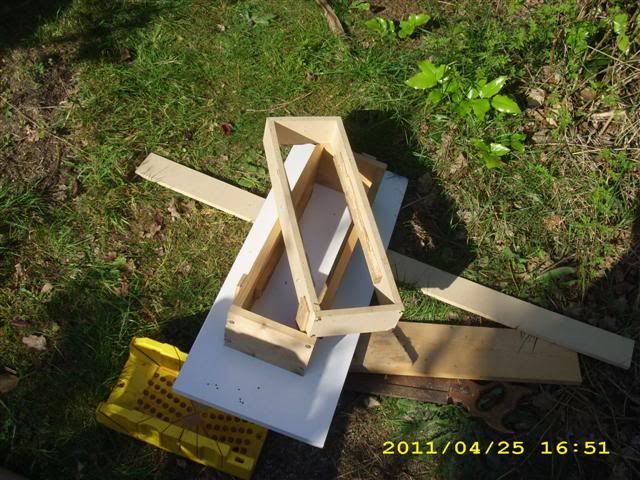
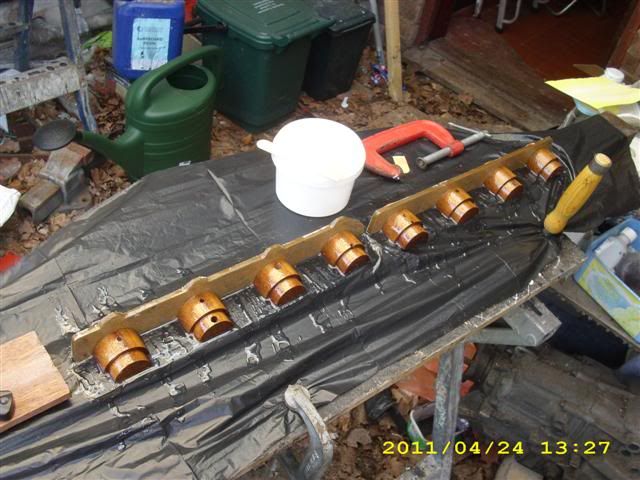
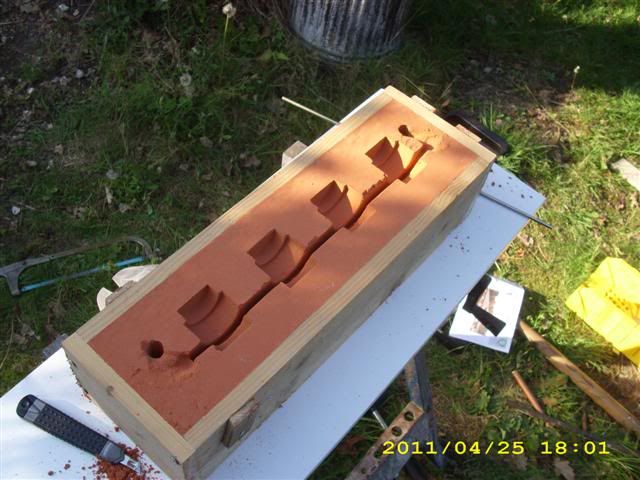
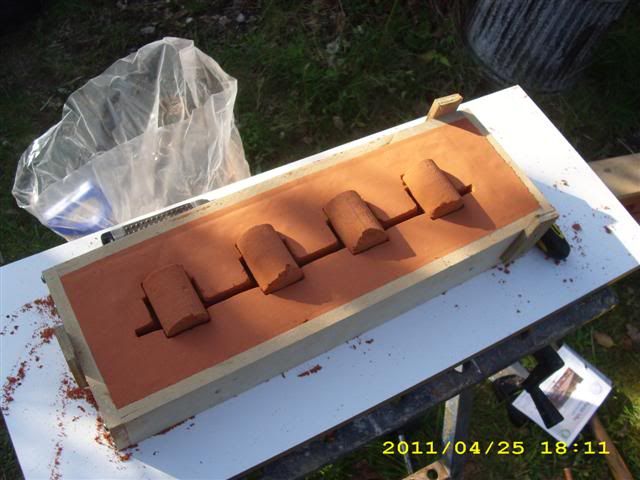
Take some sand and make some molds:
Take some fire and make some heat:
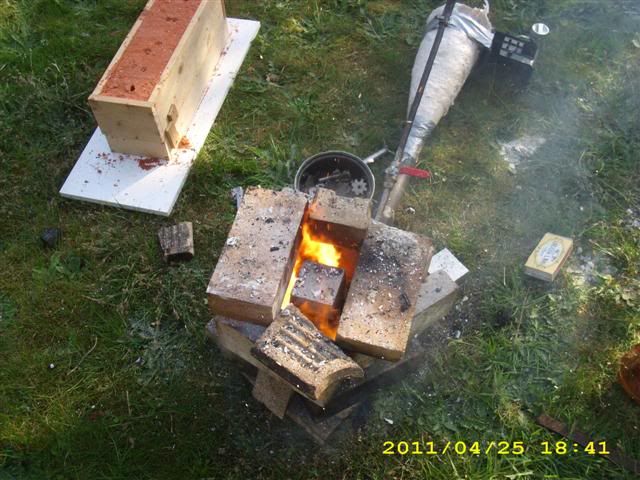
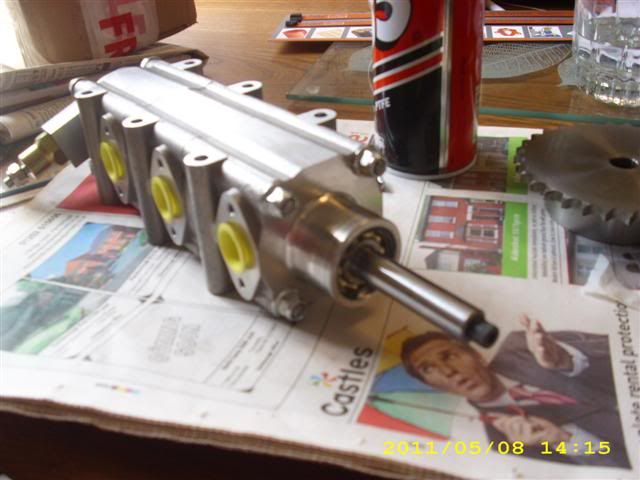
Take some liquid metal and make a little inlet manifold
Have machined the nose off of the oil pump, terrifying because it needed to be very accurate, and cost lots of money in the first place!
Started off by moving this shoulder down by 25mm:
Which meant clocking the housing in on the lathe:
and then using the boring head to veeeeery carefully remove the offending metal:
But the end result is this shortened nose:
Need to order new bearings for it now, thinking that it can do without the front seal though, as it's living in an oily environment now. This probably does mean that I need to maching a groove for a snap ring though.
And while all that was going on, also decided to have another go at casting.
Quite boring and involved, but basically you take some wood and make a pattern:
Take some more wood and make a core box:
Take yet more wood and make some flasks:
Take some sand and make some molds:
Take some fire and make some heat:
Take some liquid metal and make a little inlet manifold
-
Turbo-Brown
- Boost Junkie
- Posts: 4705
- Joined: Tue Feb 15, 2005 11:00 pm
- Location: Aldershot, Hants
- Contact:
I do still need a beer keg! Ya got one spare, full is fine!

-
MotorKnyttet
- E30 Zone Newbie
- Posts: 4
- Joined: Fri Apr 30, 2010 11:00 pm
- Location: Sweden
You are the man!!! 
This is fu..ing art in my opinion, kip it up.
// Tobbe
This is fu..ing art in my opinion, kip it up.
// Tobbe
-
Turbo-Brown
- Boost Junkie
- Posts: 4705
- Joined: Tue Feb 15, 2005 11:00 pm
- Location: Aldershot, Hants
- Contact:
Cheers guys, hopefully more to come this weekend!
The beer keg really needs to be stainless steel I think, and probably around 18" or so in diameter
The beer keg really needs to be stainless steel I think, and probably around 18" or so in diameter
-
Turbo-Brown
- Boost Junkie
- Posts: 4705
- Joined: Tue Feb 15, 2005 11:00 pm
- Location: Aldershot, Hants
- Contact:
Apparently there's both available, no idea what determines which metal they use though!
Little bit of progress this weekend.
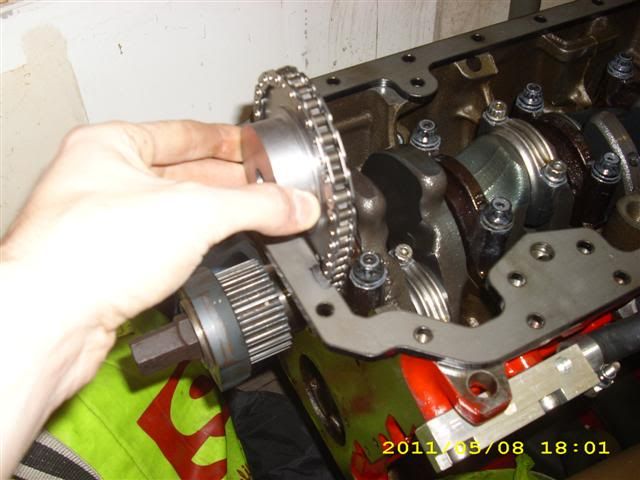
Got the pump back together, very pleased with how accurately I managed to machine for the nose bearings. Just had to pop the nose section of the pump back on the machine to run a groove for a circlip:
And then it was just a case of making a spacer to seperate the bearings and chucking it all back together:
Can't really tell here, but the sprocket has been recessed to allow the pump to move forward:
And finally, started work on the mounting plate for the pump:
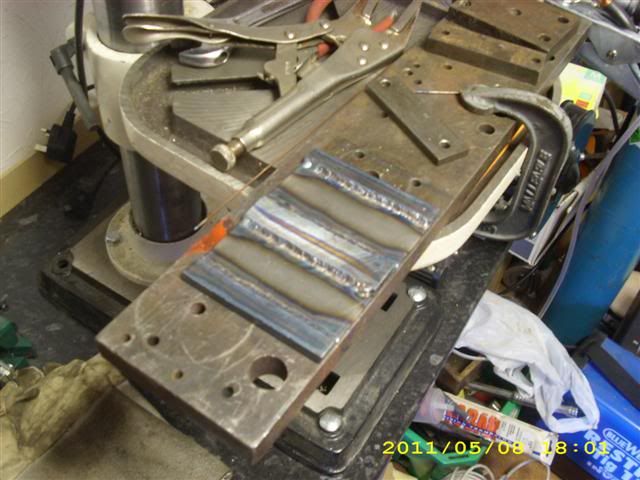
It's 3mm steel with 3mm tapping plates welded on. There'll be some machining to clear the big ends, but hopefully I'll be able to get it tacked into place this evening
Little bit of progress this weekend.
Got the pump back together, very pleased with how accurately I managed to machine for the nose bearings. Just had to pop the nose section of the pump back on the machine to run a groove for a circlip:
And then it was just a case of making a spacer to seperate the bearings and chucking it all back together:
Can't really tell here, but the sprocket has been recessed to allow the pump to move forward:
And finally, started work on the mounting plate for the pump:
It's 3mm steel with 3mm tapping plates welded on. There'll be some machining to clear the big ends, but hopefully I'll be able to get it tacked into place this evening