
Twin Seq. Dry sumping for beginners :D
Moderator: martauto
-
Turbo-Brown
- Boost Junkie
- Posts: 4705
- Joined: Tue Feb 15, 2005 11:00 pm
- Location: Aldershot, Hants
- Contact:
Will have to give them a go. It's actually come up pretty well with just white spirit and a paint brush though! Might give it a go with the wire wool tomorrow or something like that.
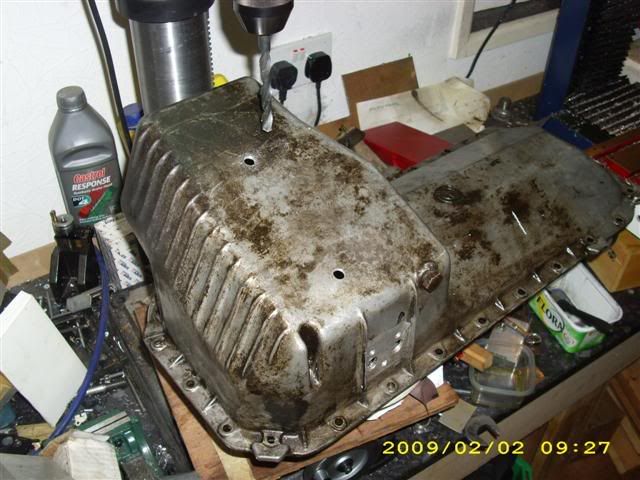
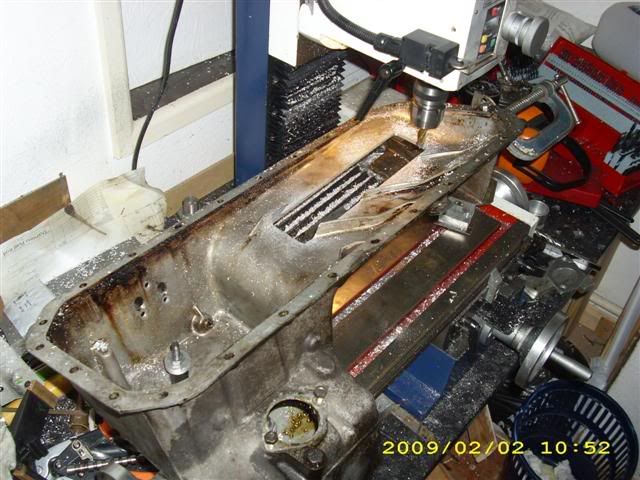
Made a start on the dry sump today
Thought about making a sump from scratch, but then thought it'd be much cheaper, quicker and easier to just cut up an existing sump and weld a channel section to it.
Started out by drilling the horizontal bit of the pan so it could be bolted to the mill:
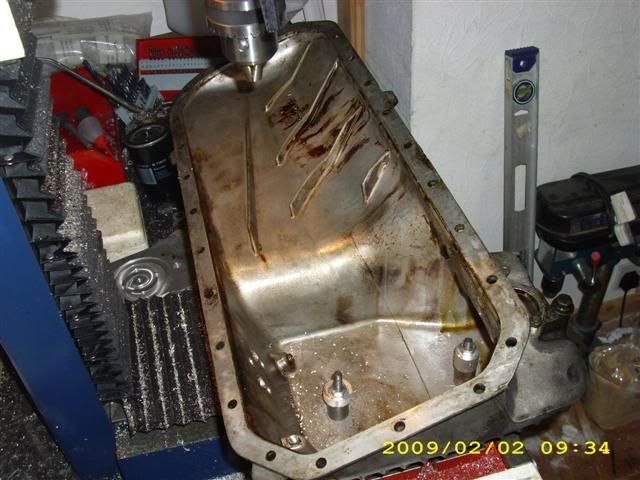
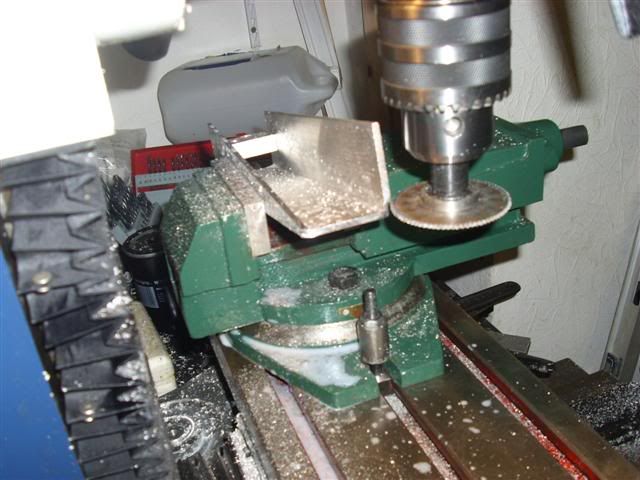
Made a little angle bracket and also used the old baffle from the sump as a support for the flappy about end:
And then set about cutting:
Plan is to weld a section of 2"x2" channel which slopes towards the back of the engine into this hole:
And re-make the front of the sump to follow the basic shape of the rear of the sump, also with a channel which slopes towards the front.

Made a start on the dry sump today
Thought about making a sump from scratch, but then thought it'd be much cheaper, quicker and easier to just cut up an existing sump and weld a channel section to it.
Started out by drilling the horizontal bit of the pan so it could be bolted to the mill:
Made a little angle bracket and also used the old baffle from the sump as a support for the flappy about end:
And then set about cutting:
Plan is to weld a section of 2"x2" channel which slopes towards the back of the engine into this hole:
And re-make the front of the sump to follow the basic shape of the rear of the sump, also with a channel which slopes towards the front.
-
gareth
- E30 Zone Team Member

- Posts: 11009
- Joined: Tue Jan 11, 2005 11:00 pm
- Location: hastings, east sussex
just an idea, is the sump relatively symmetrical as far as the fixing holes and gasket shape are concerned?
Thinking you could cut and weld two together to get the flat sections easily...?
i'm guessing you're dry sumping it then...
Thinking you could cut and weld two together to get the flat sections easily...?
i'm guessing you're dry sumping it then...
Sole founder of Fe2O3-12V it's a lifestyle

LSD rebuilding / modification services provided, PM for details
LSD rebuilding / modification services provided, PM for details
Turbo, you probably know this already, but an oil contaminated aluminium casting is a bugger to weld. Would suggest that you soak your modified sump in a bucket of acetone (not cheap) for 3 days before wleding it. That should help get the oil out of any porosities in the casting. But put a lid on the bucket to stop it from all evaportating away up your nose (not nice, oh the headaches I have had!).

"It is amazing how many drivers, even at the Formula-1 level, think that brakes are for slowing the car down." - Mario Andretti
-
Turbo-Brown
- Boost Junkie
- Posts: 4705
- Joined: Tue Feb 15, 2005 11:00 pm
- Location: Aldershot, Hants
- Contact:
I seem to recall that they're not quite symetrical unfortunately. Something like the holes on the angled bits in the corners don't line up.
Not too much of an issue though, means I can fabricate the front portion from something more ductile than the casting.
Cheers for the tip Geoff! Will order up some acetone and give it a good soaking.
Anyone know if acetone burns cleanly? Don't really wanna be breathing anything deadly in when I weld it!
-
Turbo-Brown
- Boost Junkie
- Posts: 4705
- Joined: Tue Feb 15, 2005 11:00 pm
- Location: Aldershot, Hants
- Contact:
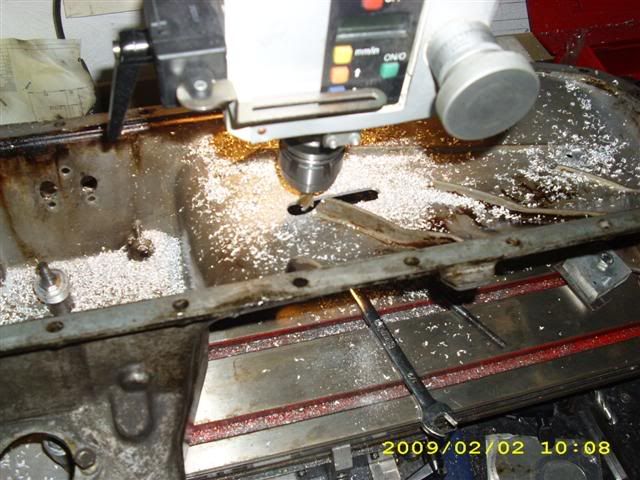
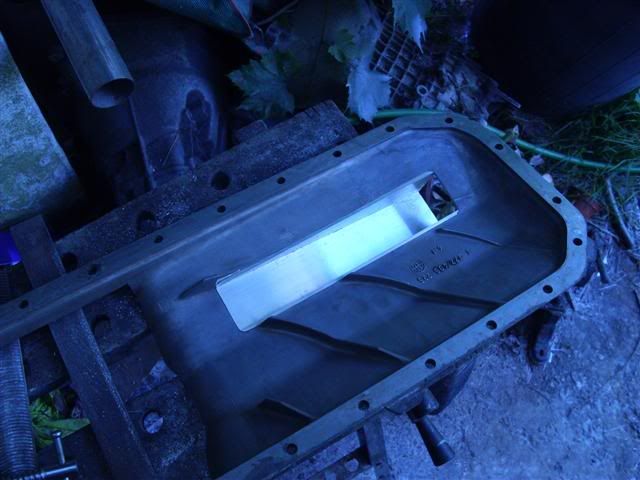
Made a little progress with the dry sump today. Basically faffed around alot this morning doing stuff for other people, and then got on with making the rear channel for the sump:
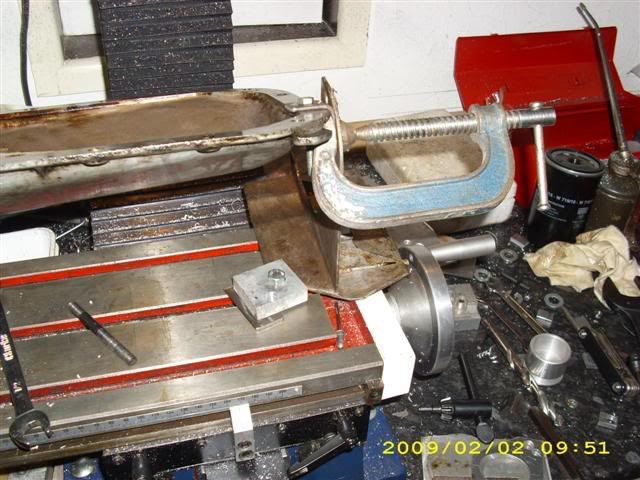
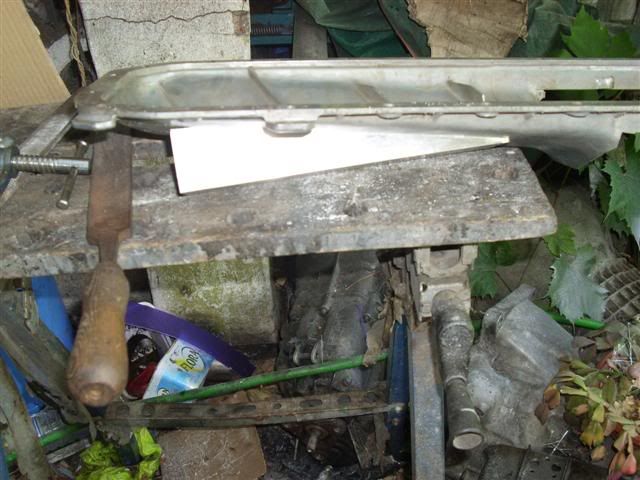
Pretty simple to do this one really, just cut the channel at an angle:
And then file the ends so it fits neatly in the letterbox I'd cut into the sump. Behold my mighty ground clearance!
Need to dream up some connectors for the scavenge hoses which keep them immersed in oil if at all possible.
It's not a problem if they're not as the pump has seperate scavenge stages so under braking, for example, when all the oil floods to the front, the rear one having little oil to drink won't make any difference to anything.
Think it's probably a good idea to incorporate a windage tray in there too.
Will try and make the welding attachment tomorrow too if I can.
Alex pace do some connectors you could weld to the oil pan, and I also used some inline filters on the scavange on my m30 dry sump.
http://www.petersonfluidsys.com/filter_oil.html
bottom of page, also moroso have a lot of bits
http://www.moroso.com/articles/articled ... stems.html
Jason
http://www.petersonfluidsys.com/filter_oil.html
bottom of page, also moroso have a lot of bits
http://www.moroso.com/articles/articled ... stems.html
Jason

-
Turbo-Brown
- Boost Junkie
- Posts: 4705
- Joined: Tue Feb 15, 2005 11:00 pm
- Location: Aldershot, Hants
- Contact:
You're more than welcome to pop around Rich, but there's not really anything cohesive to see
I had a thought about the system yesterday which is that there's a slim chance I might be able to mount the pump in the sump and drive it by a chain. Gotta do some investigation on the weekend but if that's an option I'll be a happy ham-demon as it'll solve all those irritating pump drive problems associated with externally driven pumps!
Going to copy the screening system BMW used for their pickups I think, and making outlets should be pretty easy I reckon
Think it'll be a real milestone for me mentally getting the 'head bolted on Ash, just gotta rebuild it with the new rockers and give the face a good clean up and then hope and pray that I can get a MLS gasket to seal. There's still a chance I might go for a stock HG though, build a cheap weak link into the system.
-
Turbo-Brown
- Boost Junkie
- Posts: 4705
- Joined: Tue Feb 15, 2005 11:00 pm
- Location: Aldershot, Hants
- Contact:
Had a thought about driving the pump.
Really don't wanna faff about with external drives which need dismantling every time you need to change a fan belt or something like that which got me to thinking about mounting the pump in the sump.
My thought is that I could machine down the cam drive sprocket from an M50 so that it's got just the one sprocket on it, make up a spacer for the lower oil seal housing which moves it forwards by say 15mm or so, a spacer for the cam tensioner so that's in line and, when it comes to making an adjustable cam pulley, adjust the offset of that too.
Only possible problem I can see it the waterpump and alternator would be out of line with the crank pulley. The alternator should be easy enough to sort, but the pump might need a bit more thought.
Can anyone think of anything I've missed / glaringly obvious problems I've overlooked?
Sounds like a wizz-bang idea to me.
You could bin the mechanical waterpump altogether (replace it with an idler pulley) in favour of an electric pump. I've had great success with mine. The trick is to control the current to the pump motor as a function of engine temperature. That is to say, the pump pumps at its hardest when the engine is hottest, and vice-versa. It basically works to keep the engine at a set temperature that you set on the motor controller. Pumps and controllers are made by Davies-Craig. 'Requires an extra temperature sensor on the water outlet from the engine and don't forget to remove the mechanical thermostat. There's plenty of horror stories out there from people who have installed these pumps incorrectly and done damage!Turbo-Brown wrote:The alternator should be easy enough to sort, but the pump might need a bit more thought.
"It is amazing how many drivers, even at the Formula-1 level, think that brakes are for slowing the car down." - Mario Andretti
Hi
Alex on the m30 I just keep the crank damper with a single belt that drives the alt & water pump, removed the aux pully and had a billet alloy pulley turned up to drive the pump, the same set as the s14 i bought which was already dry sumped, the pump sit's were the pas pump was.
Also if you use an electic pump, you have to fit a flow restrictor to the head to keep the head pressue therfore boiling point up above 100degc
Jason
-
Turbo-Brown
- Boost Junkie
- Posts: 4705
- Joined: Tue Feb 15, 2005 11:00 pm
- Location: Aldershot, Hants
- Contact:
Thinking about it, the simplest (and cheapest!) way to sort the water pump would be to space the pulley out. That way the impellor stays in the block where it needs to be Only disadvantage is that it'll upset the loadings on its bearings slightly.
I'm really keen to keep the oil pump tucked out of harms way, and I'm terrified of it being belt driven. On a road car, it'd need covering up to keep bits of debris out, and that makes it difficult to inspect.
A chain drive, living with lots of lovely oil around should be trouble free for a good while, and it means you don't need to remove the oil pump drive when the fan belt needs changing.
Alex
I am sure you could make up a CF cover for the belt, I now what you mean the amount of cossie powered escorts and other cars I have seen with no timing belt cover on trackdays one trip onto the cat litter, get a stone inb there and there goes the engine.
Jason
I am sure you could make up a CF cover for the belt, I now what you mean the amount of cossie powered escorts and other cars I have seen with no timing belt cover on trackdays one trip onto the cat litter, get a stone inb there and there goes the engine.
Jason
-
Turbo-Brown
- Boost Junkie
- Posts: 4705
- Joined: Tue Feb 15, 2005 11:00 pm
- Location: Aldershot, Hants
- Contact:
Timing belts really do give me the whilleys! I'd so much rather that everything be chain driven with the chain in a nice metal case!
As I say, it's the inspection of the belt that I don't wanna have to do.
Will hopefully find out tomorrow whether it's gonna be possible to chain drive and sump mount the oil pump
As I say, it's the inspection of the belt that I don't wanna have to do.
Will hopefully find out tomorrow whether it's gonna be possible to chain drive and sump mount the oil pump
-
Turbo-Brown
- Boost Junkie
- Posts: 4705
- Joined: Tue Feb 15, 2005 11:00 pm
- Location: Aldershot, Hants
- Contact:
Holy crap!
Just had a delivery of some free Prepreg carbon fibre samples!
1sqm of a low temp cure and another sqm of a higher temp stuff!
Think I'll be making little samples of things this weekend!
Just had a delivery of some free Prepreg carbon fibre samples!
1sqm of a low temp cure and another sqm of a higher temp stuff!
Think I'll be making little samples of things this weekend!

Looking really good. It's coming on really well, How much more have you to do before the engine can be installed and gotten running?
E30 340i project in progress now 328 turbo
Breaking '97 728i Auto box, tubular manifolds and other morsels.
For sale E34 M50 sump, pick up and dip stick. PM for de
Breaking '97 728i Auto box, tubular manifolds and other morsels.
For sale E34 M50 sump, pick up and dip stick. PM for de
-
Turbo-Brown
- Boost Junkie
- Posts: 4705
- Joined: Tue Feb 15, 2005 11:00 pm
- Location: Aldershot, Hants
- Contact:
Load and loads unfortunately.
Had a reasonably productive weekend trying lots of little bits out.
Had a go with the prepreg on saturday. Cocked it up massively as I ran out of time, but it was interesting stuff to work with, and it demonstrated how mould designs need to be different using this stuff compared to wet lay-up stuff.
Decided to fill just this end of the wing mould as it's a complex area. This needs simplifying massively to work with prepreg, with the return for the headlamp needing to be reduced to about 6mm instead of 30!
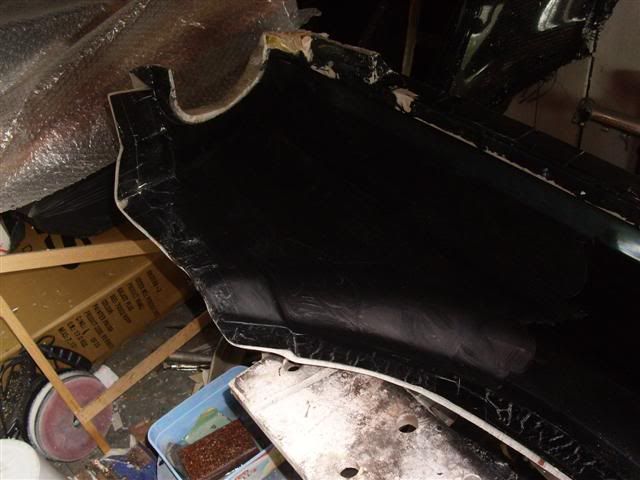
And here's the prepreg in the mould. It's lovely stuff to work with. You just chop it up and it holds together. You could easily make a cosmetically pleasing butt joint using this stuff I reckon.
Will leave it for a few days and then see if it'll come out of the mold, but I suspect it won't as I only got it up to temperature for about an hour and a half
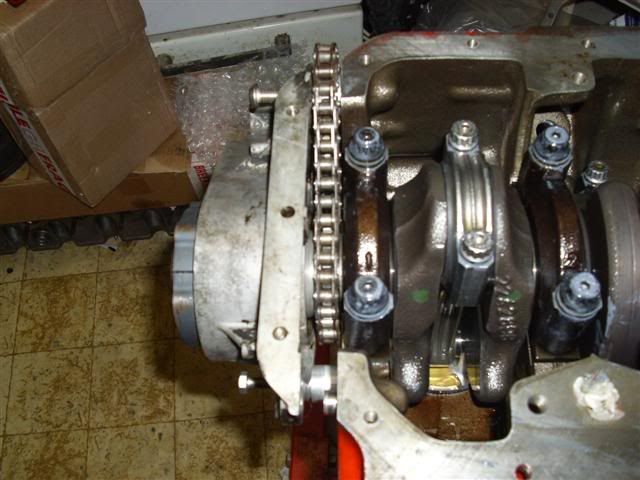
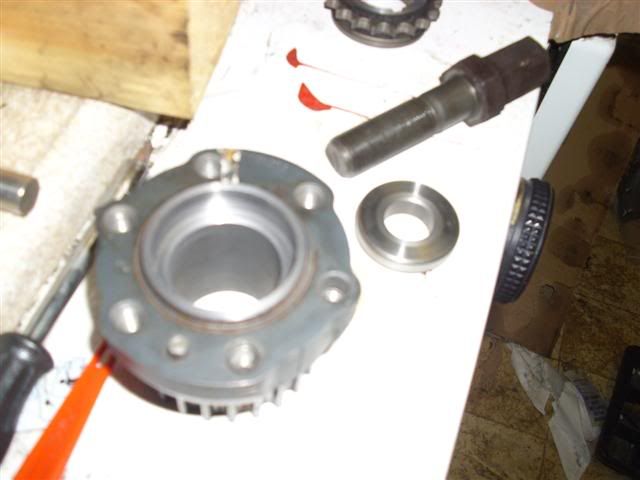
Attentions turned to sorting out this pump drive on Sunday and today. Managed to shave the M52 crank sprocket down to 15,6mm which gives the chain about 1mm clearance to the face of the block:

Then turned up a couple of 15mm spacers to dummy fit the timing cover:
Also shaved 0.6mm off of the oil seal thing you have to make when fitting the M52 crank so that the lower timing pulley would only move out by 15mm overall.
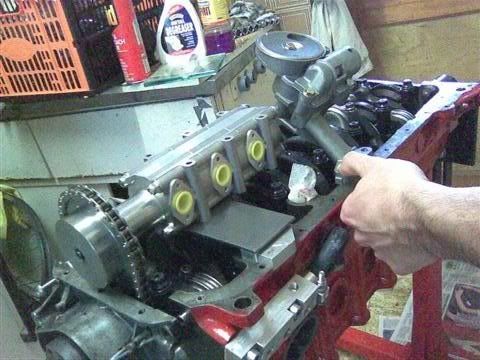
Here's the pump roughly where it'll go, just need to find out which are the outlet ports and sort out some way of getting the scavenges and pressure feed plumbed in. Think the pressure outlet will be dead easy as it's just across the block.
Then started thinking about the engagement of the crank nose bolt. Moving everything out by 15mm obviously makes this a bit marginal so I started looking for longer bolts, shaving the odd mm off the big washer that goes under this bolt....all that kind of thing. Then is suddenly occured to me that I could just recess the lower timing pulley and be done with it....so here's the result
Need to order some material to make the spacer plate for the timing cover from, and also think it's a good idea to remake the jackshaft 15mm longer and without the gear as it's now redundant. Cobbling a 15mm spacer onto this is just asking for trouble I think, and it's a simple thing to replicate.
Also need to order a sprocket for the pump. As luck would have it (and logic really) BMW just use a normal off the shelf chain in their engines which has a 3/8" pitch meaning I can buy an off the shelf sprocket. Also by chance, the old volvo 260 engine that chain in the piccy came from had the same chain type which has been useful for seeing what clearances to things are. Knew keeping that chain for the last 17 years was a good idea!
Had a reasonably productive weekend trying lots of little bits out.
Had a go with the prepreg on saturday. Cocked it up massively as I ran out of time, but it was interesting stuff to work with, and it demonstrated how mould designs need to be different using this stuff compared to wet lay-up stuff.
Decided to fill just this end of the wing mould as it's a complex area. This needs simplifying massively to work with prepreg, with the return for the headlamp needing to be reduced to about 6mm instead of 30!
And here's the prepreg in the mould. It's lovely stuff to work with. You just chop it up and it holds together. You could easily make a cosmetically pleasing butt joint using this stuff I reckon.
Will leave it for a few days and then see if it'll come out of the mold, but I suspect it won't as I only got it up to temperature for about an hour and a half
Attentions turned to sorting out this pump drive on Sunday and today. Managed to shave the M52 crank sprocket down to 15,6mm which gives the chain about 1mm clearance to the face of the block:
Then turned up a couple of 15mm spacers to dummy fit the timing cover:
Also shaved 0.6mm off of the oil seal thing you have to make when fitting the M52 crank so that the lower timing pulley would only move out by 15mm overall.
Here's the pump roughly where it'll go, just need to find out which are the outlet ports and sort out some way of getting the scavenges and pressure feed plumbed in. Think the pressure outlet will be dead easy as it's just across the block.
Then started thinking about the engagement of the crank nose bolt. Moving everything out by 15mm obviously makes this a bit marginal so I started looking for longer bolts, shaving the odd mm off the big washer that goes under this bolt....all that kind of thing. Then is suddenly occured to me that I could just recess the lower timing pulley and be done with it....so here's the result
Need to order some material to make the spacer plate for the timing cover from, and also think it's a good idea to remake the jackshaft 15mm longer and without the gear as it's now redundant. Cobbling a 15mm spacer onto this is just asking for trouble I think, and it's a simple thing to replicate.
Also need to order a sprocket for the pump. As luck would have it (and logic really) BMW just use a normal off the shelf chain in their engines which has a 3/8" pitch meaning I can buy an off the shelf sprocket. Also by chance, the old volvo 260 engine that chain in the piccy came from had the same chain type which has been useful for seeing what clearances to things are. Knew keeping that chain for the last 17 years was a good idea!
-
Morat
- E30 Zone Team Member
- Posts: 8943
- Joined: Thu Feb 09, 2006 11:00 pm
- Location: The Peoples Republic of Yorkshire
haha, good one mate - never throw anything away!
You're now losing me on the technical stuff but it is still fascinating....
You're now losing me on the technical stuff but it is still fascinating....
E30 Touring 0.35 cD - more slippery than prison soap
Praise the Lard... and pass the dripping!
Praise the Lard... and pass the dripping!
-
Turbo-Brown
- Boost Junkie
- Posts: 4705
- Joined: Tue Feb 15, 2005 11:00 pm
- Location: Aldershot, Hants
- Contact:
Hey, this is quite cool!
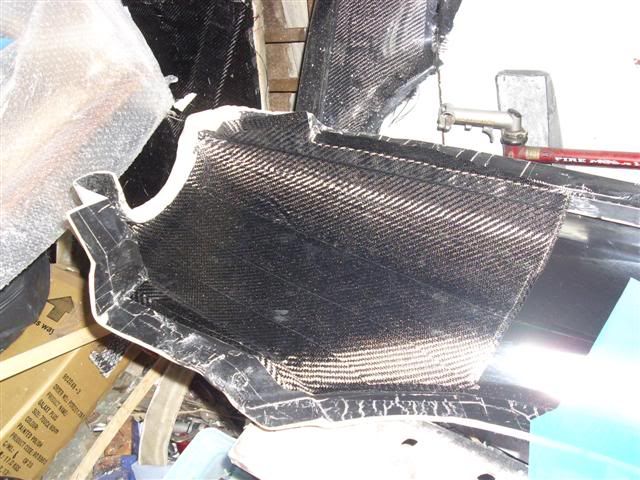
Demolded the little bit of a front wing I made in prepreg carbon today (been away all weekend so not made any progress on anything )
Here's the result
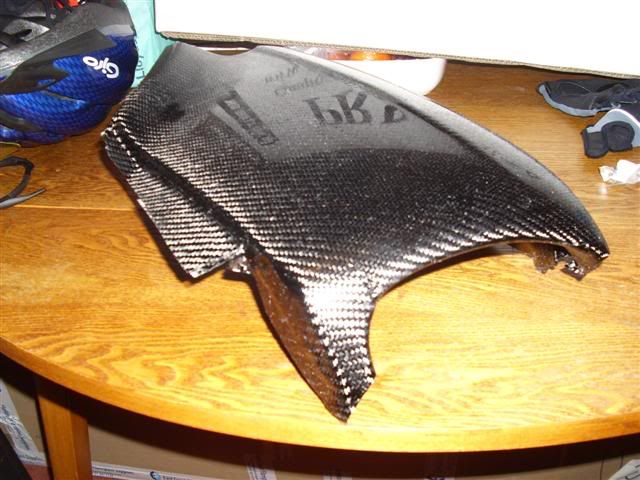
Considering it was made using a bar heater and a vacuum cleaner, it's not all that bad!
The mold does need to be remade in higher temp resistant materials and with more removable sections, and I need to sort out a decent vacuum pump to get to at least 12psi. Finally, need to build an oven which can get to around 120degrees C.
Get all that sorted and it should be relatively easy to produce high quality parts....finally!
Demolded the little bit of a front wing I made in prepreg carbon today (been away all weekend so not made any progress on anything
Here's the result
Considering it was made using a bar heater and a vacuum cleaner, it's not all that bad!
The mold does need to be remade in higher temp resistant materials and with more removable sections, and I need to sort out a decent vacuum pump to get to at least 12psi. Finally, need to build an oven which can get to around 120degrees C.
Get all that sorted and it should be relatively easy to produce high quality parts....finally!

oo that looks nice 

-
Turbo-Brown
- Boost Junkie
- Posts: 4705
- Joined: Tue Feb 15, 2005 11:00 pm
- Location: Aldershot, Hants
- Contact:
Cheers chaps
Gonna order a 1.5hp single phase electric motor (should be man enough for the job!) and also the vacuum pump from a transit van this evening.
Using a vacuum cleaner as the vac pump doesn't generate anywhere near enough vacuum, and it's annoyingly noisy (like you can hear it in the house from the garage!) too.
Reckon with a bit of crafty machining, I should be able to make a fairly decent pump that'll run all day long in relative silence.
Also need to order the heating element and fan from an electric oven.
Anybody got any ideas for a temperature controller though?
-
gareth
- E30 Zone Team Member
- Posts: 11009
- Joined: Tue Jan 11, 2005 11:00 pm
- Location: hastings, east sussex
could the thermostat from said electric oven could be used? just get a cheap one off ebay! mine makes a click from the rear of the knob at the set temperature and has a probe poking into the rear (ooer!) so i guess it's a PT100 type platinum jobbie? should be easily cannibalisable (if that's a word..) to use the whole setup
Sole founder of Fe2O3-12V it's a lifestyle
LSD rebuilding / modification services provided, PM for details
LSD rebuilding / modification services provided, PM for details
Alex,
I can get a proper vacum pump used on machinery if it's any use?
Got a customer whom can't use the old model pump anymore, they're used to suck paper and cardboard to runners while they're turned into books.
I can get a proper vacum pump used on machinery if it's any use?
Got a customer whom can't use the old model pump anymore, they're used to suck paper and cardboard to runners while they're turned into books.

-
march109
- Engaged to the E30 Zone

- Posts: 6632
- Joined: Sun Aug 20, 2006 11:00 pm
- Location: Bournemouth
- Contact:
Alex are you doing the wing in two parts?
325i Tech 1 Touring, breaking.
2.5 high comp. M20, 3.64 LSD, Fully undersealed, Spax springs & Bilstein shocks, s/s exhaust, Alpina rep wheels and more.
2.5 high comp. M20, 3.64 LSD, Fully undersealed, Spax springs & Bilstein shocks, s/s exhaust, Alpina rep wheels and more.

PID controller? I have one fitted to my coffee machine ;)Turbo-Brown wrote:Cheers chaps
Gonna order a 1.5hp single phase electric motor (should be man enough for the job!) and also the vacuum pump from a transit van this evening.
Using a vacuum cleaner as the vac pump doesn't generate anywhere near enough vacuum, and it's annoyingly noisy (like you can hear it in the house from the garage!) too.
Reckon with a bit of crafty machining, I should be able to make a fairly decent pump that'll run all day long in relative silence.
Also need to order the heating element and fan from an electric oven.
Anybody got any ideas for a temperature controller though?
Check out www.auberins.com

Something like that would work fine no?
Keen to buy CF parts still heeheee ;)
-
Turbo-Brown
- Boost Junkie
- Posts: 4705
- Joined: Tue Feb 15, 2005 11:00 pm
- Location: Aldershot, Hants
- Contact:
I did think about perhaps using the control system from an oven, but ideally you'd have some kind of adjustable ramp rate if possible. Might be that my oven can only warm up slowly anyway in which case that's not a problem though.
Sent you a PM about the pump Mark
I am doing the wing in two parts, the main skin of the wing and then that a secondary bonded on bit at the back edge which has some mountings on it.
Funnily enough I typed "temperature controller" into google last night and it mentioned PID controllers, if they can do ramp rates then they'd be absolutely idea.
Cheers for the link dude, will have a look now
-
gareth
- E30 Zone Team Member
- Posts: 11009
- Joined: Tue Jan 11, 2005 11:00 pm
- Location: hastings, east sussex
for true heath robinson engineering, doctoring an old oven has to be the way forward!
they do simply apply and on/off control to the heater element though but some form of manual voltage control to step it up yourself could be used maybe?
they do simply apply and on/off control to the heater element though but some form of manual voltage control to step it up yourself could be used maybe?
Sole founder of Fe2O3-12V it's a lifestyle
LSD rebuilding / modification services provided, PM for details
LSD rebuilding / modification services provided, PM for details
Hey alex, dont know if you already got that vacuum pump. if you havent, you may want to consider using a rotary compressor from an AC unit.
the air volume they pull is not that big, but the vacuum they pull is quite strong. i used to use one of those when building cooling unit, you need to suck any moisture from the system before charging it up.
they should be cheap too.
just my 2 cents, regards.
the air volume they pull is not that big, but the vacuum they pull is quite strong. i used to use one of those when building cooling unit, you need to suck any moisture from the system before charging it up.
they should be cheap too.
just my 2 cents, regards.
-
Turbo-Brown
- Boost Junkie
- Posts: 4705
- Joined: Tue Feb 15, 2005 11:00 pm
- Location: Aldershot, Hants
- Contact:
Got the fridge vac pump (compressor) today. Just gotta make up a load switch assembly for it and an oil recuperator and we're away!....except I need to make an oven too
Also, and totally unrelated to this, I passed my motorcycle theory test today!
Been crapping my pants about it for a week as when I did my driving theory about 12 years ago, it was just the multiple choice thing and there wasn't a hazard perception test. The lady in reception also helpfully told me that lots of people who've been driving for years fail the hazard perception part!
Anyway, got 50/50 for the theory, and 62/75 for the hazards. Pass for hazard is 44 so reasonably comfortable!
Got the CBT on monday now, module 1 practical on Friday, and then module 2 practical (if I pass the CBT and mod1) on the 6th of Oct!
How did you go with the temperature controller thing? I have the PDF that Auber supply with their PID kits (for Rancilo Silvia machines) if you want to read over it ... it might make more sense in the technical side of things to you then me.... drop me an email marc at dirte30.com and I can forward it over.
-
Turbo-Brown
- Boost Junkie
- Posts: 4705
- Joined: Tue Feb 15, 2005 11:00 pm
- Location: Aldershot, Hants
- Contact:
I've not bought one yet, there are some available from HK which have a ramp and soak function which, in theory, is exactly what I need as you're supposed to ramp the temperature up and then hold it for however long.
-
Turbo-Brown
- Boost Junkie
- Posts: 4705
- Joined: Tue Feb 15, 2005 11:00 pm
- Location: Aldershot, Hants
- Contact:
Oh dear, not been getting much done recently!
Have been on an intensive motorbike course this week (module 1 practical test is on Friday! ) and also had the pleasure of being in the office on my own all weekend.
Turns out that, as with all things in life, more power is more betterer The 500cc bikes are SO much easier to ride than the 125s!
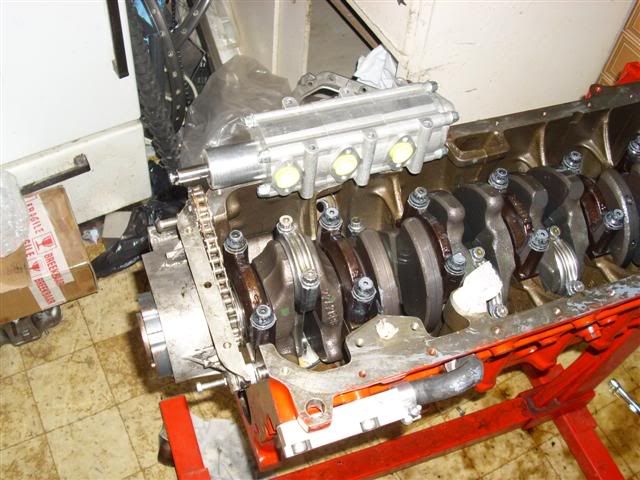
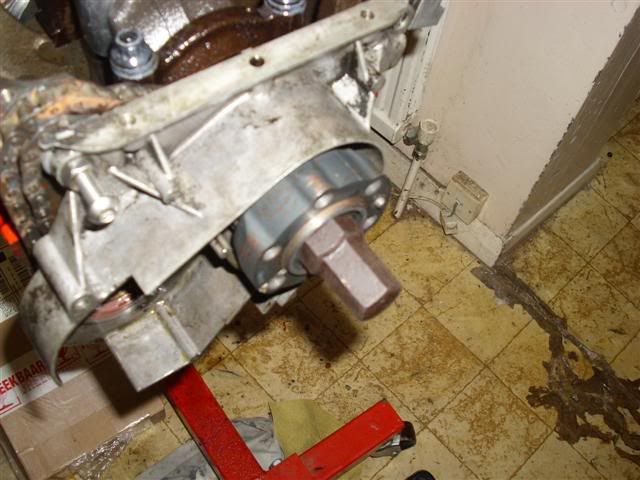
Anyway, did pop back to my folks' house for a bit to trial fit the sprocket which turned up for the oil pump. Also bought a chain from BMW in the hope that it'd be long enough to get the pump over to the side of the engine. It's not, but think the pump should be okay in the middle:
Put the standard pump in the pic to show how much ground clearance we gain. It's still a worthwhile amound I think, plus the sump can be smaller.
Had a bit of a panic when I thought the pump might foul the steering rack, but it looks like I can relieve the back of the sprocket to move the pump forward a give a little clearance. Don't think it's an issue where it is now, but pays to be sure!
Have been on an intensive motorbike course this week (module 1 practical test is on Friday!
Turns out that, as with all things in life, more power is more betterer
Anyway, did pop back to my folks' house for a bit to trial fit the sprocket which turned up for the oil pump. Also bought a chain from BMW in the hope that it'd be long enough to get the pump over to the side of the engine. It's not, but think the pump should be okay in the middle:
Put the standard pump in the pic to show how much ground clearance we gain. It's still a worthwhile amound I think, plus the sump can be smaller.
Had a bit of a panic when I thought the pump might foul the steering rack, but it looks like I can relieve the back of the sprocket to move the pump forward a give a little clearance. Don't think it's an issue where it is now, but pays to be sure!