My M3 Restoration and Turbo Project

Show off your pride and joy here

Moderator: martauto

User avatar
215m3
E30 Zone Regular
E30 Zone Regular
Posts: 328
Joined: Sun Oct 23, 2005 11:00 pm

Post Mon Jun 20, 2011 8:38 am

Back in 2004 I decided my Garage Queen was too good to track so I eventually purchased a black 195 1987 M3 for the pricely sum of £4,500(I know if only they were still this cheap). She came with such goodies as BBS split rims(sold), Evo II front(still have but have removed) and rear spoilers, 2 piece header(sold), bolted in roll cage(sold), lowered suspension(sold).

Image

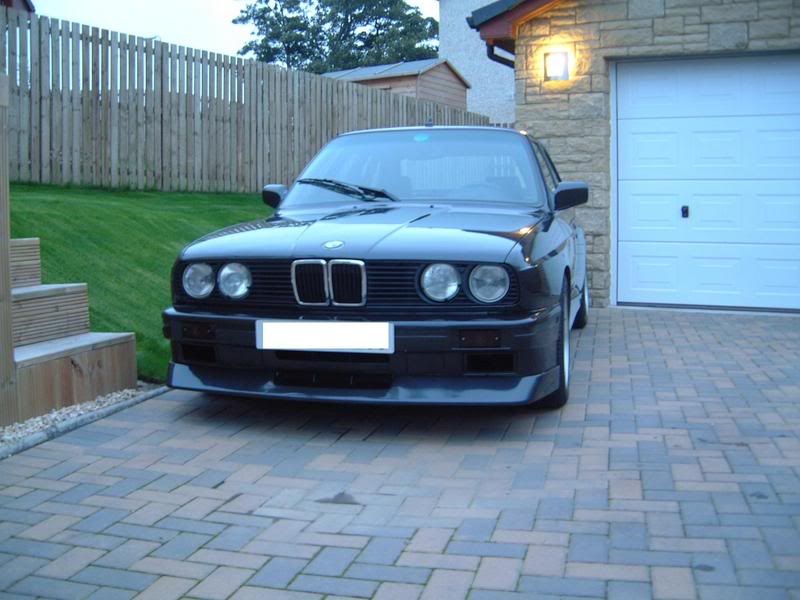
My Garage Queen - sadly sold

Image
Image

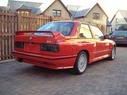
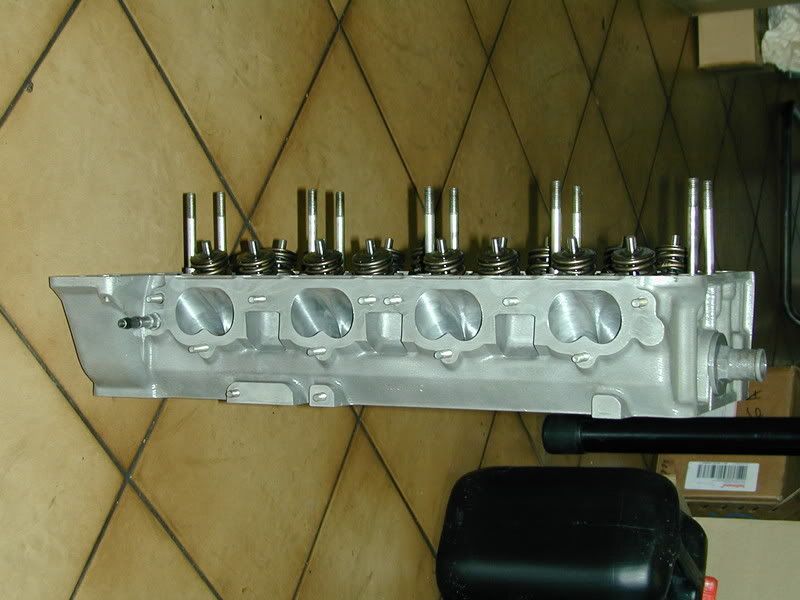
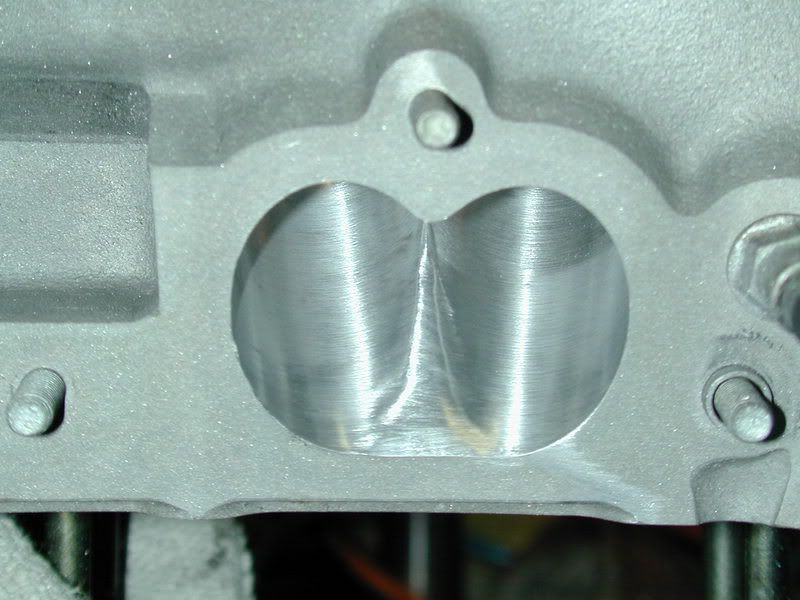
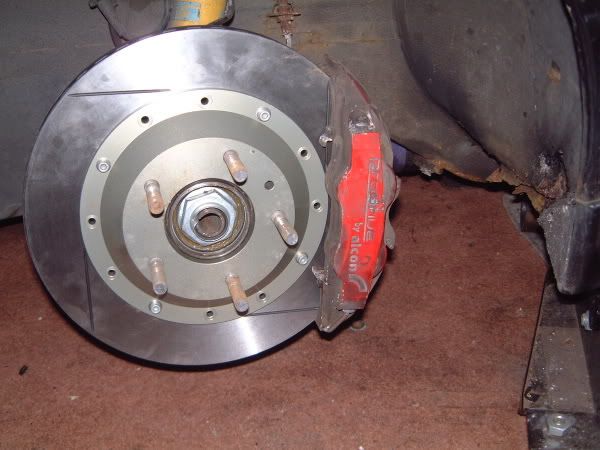
After a year or so I added a Grp A specced head from Mosang, CF air box and Maxx Alpha N system, Bilstien Grp N coilovers, straight through exhaust with no centre box, 4 pot Alcon Prodrive front calipers with 325mm discs, Sparco seats and harness.

Image
Image
Image
Image
Image
Image


The car produced 236 BHP and the flattest power line I have seen. The power to weight was equal to an E46 M3 and she did pick up very quickly too!

Image

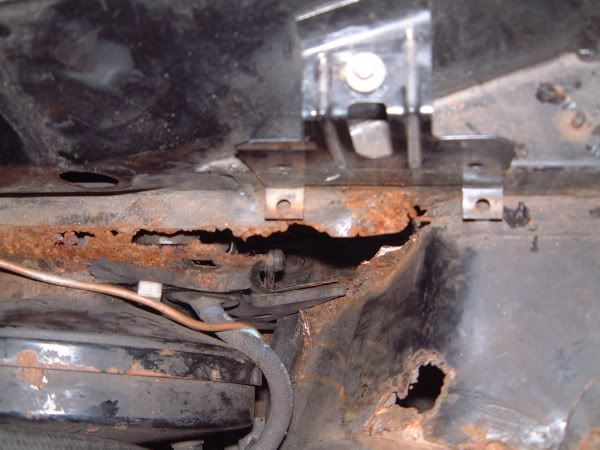
After I had fitted the suspension I took the car to a renowned M3 specialist in setting up Grp A E30 M3’s from the past. He spotted the huge rust hole and advised I get this sorted, obviously, advising it was pointless spending money on changing the suspension settings until this was repaired.

Image
Image

One final track day loomed so once this was over I looked into who I should get to fit the cage. Wayne, who built the orange V8 M3 recommended a chap in Stafford.

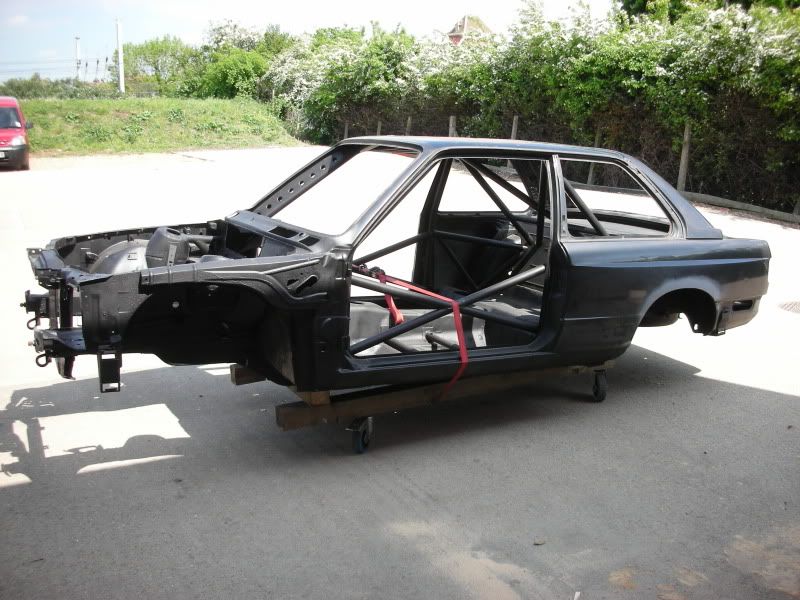
So once the deal had been done I drove the car down to a place in Stafford to have a full FIA Approved 8 point cage fitted. However once I had left the car there they asked if I could have the engine removed, so I had to bring the car all the way back to Scotland to remove the engine and ancillaries. Also to fix the rot and replace the back panel (which I had a couple in stock). This was carried out by a company in Dunfermline, so not too far away.

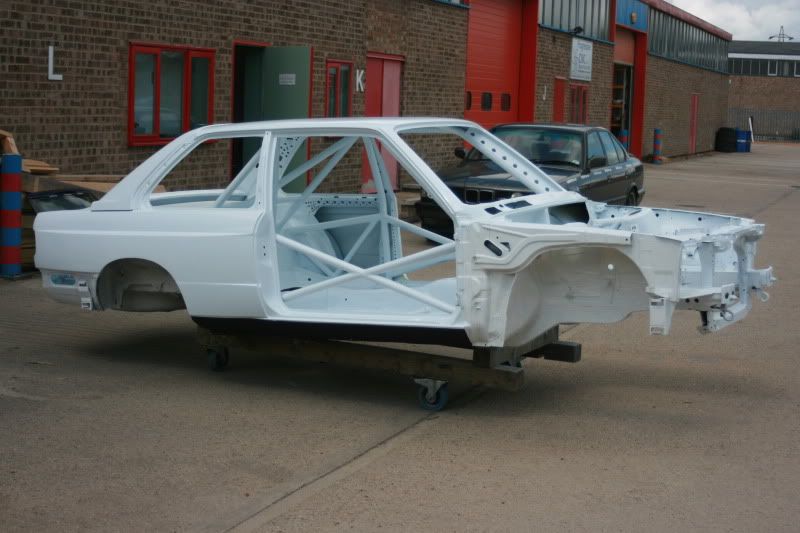
Eventually the shell went back down and the car was caged. I chose a company that build ”˜one off’ Paris Dakar cars and they had just employed the head cage designer from Custom Cages too.

Image
Image
Image

So once the car was caged I needed to get here blasted. Funds ran dry as I started a new business up and she took a back seat for a while. After scouring the web for blasters, who weren’t expensive I managed to find one with 10 miles of where I lived. However he had moved but know one knew where too. Another year passed and I heard of another chap who blasted and again he was with 10 miles. It was the same chap but he had moved to larger premises.

Image
Image
Image
Image

He agreed to blast the car and advise of a timescale of 4 months. 6 months later the car was still in my garage. Time was running out as I was relocating my business 400 miles south and eventually he advised he could blast the car, so I dropped the car off. A few weeks later I had a phone call advising the car was ready and with excitement I asked how she looked? The answer I got made me a little depressed, ”˜she has quite a few holes in her’. My heart sank a little.

Image
Image

So trailer in tow I collected the car and to my joy she only had 2 holes of 1”a in diameter and half a dozen other much smaller holes, but nothing that would need panels replacing. He also painted her with a black anti rust coat too and all for the princely sum of £230. Not bad for a car which is 23 years old. A result!!!

So after the move down south I moved into a block of units that have a paint shop a few units down, so I approached him for painting the car. He agreed and they got started on repairing the holes etc and once that was done she needed to wait for her slot.

Image
Image

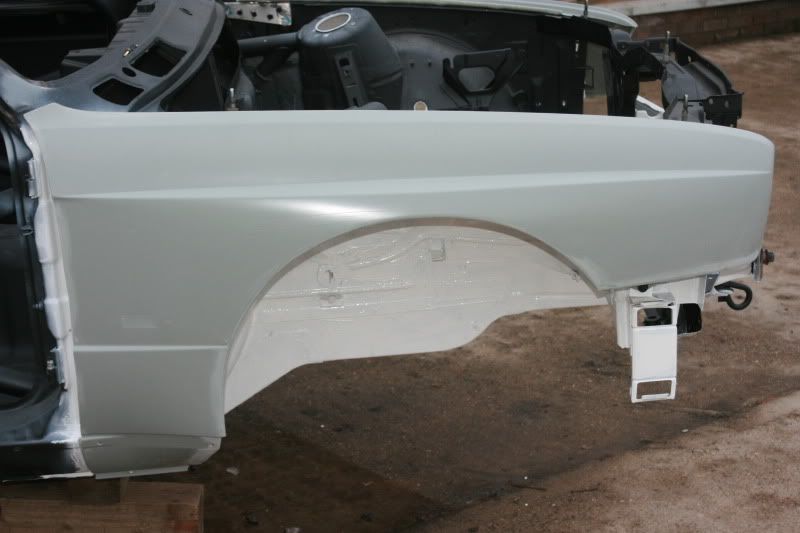
This gave me time to fit panels and the bonnet pins in location. The wings require some work to get them to fit snug and lined up.

Image
Image
Image
Image
Image
Image
Image

Fit the Grp A lever from Markus

Image

I then got to work on the pedal box and weld in the strengthening plate on the engine side and additional support from the roll cage. I approached my good friend Uwe for welding help and after advice, I purchased a welder and headed down to his for a lesson.

Pedal box support welded in etc and a few additional holes for the washer jet and bonnet supports.

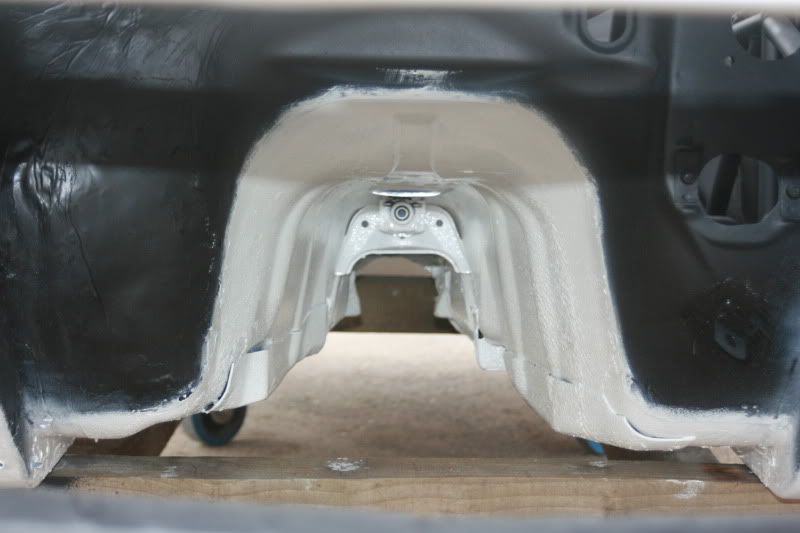
As the car is primarily going to be a race car I painted the underside, arches and rear panel under the bumper in an industrial white paint. It didn't need to be perfect as it won't be seen. Most of the underseal of the car was still intact from the sand blasting so just painted over the whole of the underside for additional rust prevention.

Image
Image

After being let down a few times by the painters the car finally went for paint and she has just arrived back and a extremely pleased with the results.

Image

The next part of the project may take some time to complete, but most of the parts are on the shelf ready to assemble. First things first though is to sort out the old loom and see what to discard. I am moving the fuse box to the where the head unit and heater are normally as I am removing the heater matrix and will fit a heated screen.

Most of the parts have been blasted, cleaned and painted red in contrast to the white. The suspension went off to Bilstien to lower the bump stop from advise from the chap that was going to corner weight the car until he spotted the rust.

The engine has been rebuilt and balanced with a lightened flywheel. They advised against lightening the crank as this makes idling more rough and unstable. Dave Gamble completed the top end rebuild as he had done before with the head from Mosang.

Here are a few pictures of what else is here to go on the car when required

Image
Image
Image
Image
Image

In addition i have CF mirrors, Z3M diff cooler finns and also a diff cooler kit. The exhaust will be a side exit version and will locate the rear muffler in the space where the old tank was as i am having a fuel cell in the boot/trunk. As well as fitting ploycarbonate side and rear windows, a DTM oil pan and Garret Gt3076R turbo and Tial wastegate.
Toby

1987 E30 M3 S14 Turbo
1971 V12 E type Roadster
Jhonno
Homo Hair
Posts: 20362
Joined: Mon Jan 10, 2005 11:00 pm
Location: FLAT, FLAT, FLAT!!

Post Mon Jun 20, 2011 8:53 am

I like.. Looks like fun! :cool:
Got cable ties? Get diffin..

Arch roller for hire.

www.zeroexhausts.co.uk

Image
Miris325i
E30 Zone Newbie
E30 Zone Newbie
Posts: 242
Joined: Fri Feb 26, 2010 11:00 pm
Location: Bangor, NI

Post Mon Jun 20, 2011 2:03 pm

Jhonno wrote:I like.. Looks like fun! :cool:
1+
SHAKEELE30
Boost Junkie
Posts: 3278
Joined: Mon Apr 04, 2005 11:00 pm
Location: CROYDON

Post Mon Jun 20, 2011 2:21 pm

more pics mate... winkeye
goosiegander
Zonegoose
Posts: 2544
Joined: Sun Nov 19, 2006 11:00 pm
Location: East Anglia

Post Mon Jun 20, 2011 2:49 pm

Excellent! :D
maxfield
Old Skooler
Old Skooler
Posts: 15186
Joined: Sat Nov 26, 2005 11:00 pm
Location: Mansfield

Post Mon Jun 20, 2011 2:55 pm

:cool: That manifold is rather nice!
Image
User avatar
215m3
E30 Zone Regular
E30 Zone Regular
Posts: 328
Joined: Sun Oct 23, 2005 11:00 pm

Post Mon Jun 20, 2011 5:49 pm

SHAKEELE30 wrote:more pics mate... winkeye
I will when i get mor eprogress but need to wait a few weeks for the paint to harden in the sun!
Toby

1987 E30 M3 S14 Turbo
1971 V12 E type Roadster
User avatar
215m3
E30 Zone Regular
E30 Zone Regular
Posts: 328
Joined: Sun Oct 23, 2005 11:00 pm

Post Mon Jun 20, 2011 5:50 pm

maxfield wrote::cool: That manifold is rather nice!
It is in deed and am very pleased with it. They were my second chose to fab the manifold and the workmanship speaks for itself!
Toby

1987 E30 M3 S14 Turbo
1971 V12 E type Roadster
e21Jason
E30 Zone Addict
E30 Zone Addict
Posts: 2040
Joined: Tue Jan 11, 2005 11:00 pm
Location: Dubai, UAE

Post Mon Jun 20, 2011 6:16 pm

Looks very fresh since the last time I saw it, hopefully you are at the stage where the enthusiasm is coming back after the slog to get there.

I guess moving south means you can leave it in the sun rather than the rain.

Jason
BMW e21 track car supercharged s14 cage and fabrication by www.chizfab.com
Z3M Coupe for sale
69 Alfa spyder
DanThe
E30 Zone Team Member
Posts: 28649
Joined: Sat Sep 10, 2005 11:00 pm
Location: Staffs

Post Mon Jun 20, 2011 6:35 pm

Nice job 8)

What was the company that did the cage called?
User avatar
215m3
E30 Zone Regular
E30 Zone Regular
Posts: 328
Joined: Sun Oct 23, 2005 11:00 pm

Post Mon Jun 20, 2011 8:38 pm

e21Jason wrote:Looks very fresh since the last time I saw it, hopefully you are at the stage where the enthusiasm is coming back after the slog to get there.

I guess moving south means you can leave it in the sun rather than the rain.

Jason
Hi Jas

Getting it blasted was the real headache, when i was being quoted silly figures.

Your right about the sun, it was out all day today in 20+ .

Never lost the enthusiasm, just funding some othe parts!
Toby

1987 E30 M3 S14 Turbo
1971 V12 E type Roadster
User avatar
215m3
E30 Zone Regular
E30 Zone Regular
Posts: 328
Joined: Sun Oct 23, 2005 11:00 pm

Post Mon Jun 20, 2011 8:41 pm

DanThe wrote:Nice job 8)

What was the company that did the cage called?
I don't know, but i can post a site map of where they are based if you wish. It is just outside Stratford Upon Avon. The did the cage, seat bars and seam welded for £1150 but that was back in 2007. I doubt they would be too much more.
Toby

1987 E30 M3 S14 Turbo
1971 V12 E type Roadster
DanThe
E30 Zone Team Member
Posts: 28649
Joined: Sat Sep 10, 2005 11:00 pm
Location: Staffs

Post Mon Jun 20, 2011 8:43 pm

Ahhh Stratford, you wrote Stafford which is only up the road from me, thats why I was interested TBH. Nice job either way 8)
User avatar
215m3
E30 Zone Regular
E30 Zone Regular
Posts: 328
Joined: Sun Oct 23, 2005 11:00 pm

Post Mon Jun 20, 2011 9:10 pm

sorry, didn't read it through well enough before i posted it.
Toby

1987 E30 M3 S14 Turbo
1971 V12 E type Roadster
User avatar
215m3
E30 Zone Regular
E30 Zone Regular
Posts: 328
Joined: Sun Oct 23, 2005 11:00 pm

Post Sat Jun 25, 2011 1:18 pm

Quick update.

Since i am fitting a turbo to the S14 i have been looking for a suitable vent for the bonnet. The Cosworth ones were too small and CF are to expensive, so i decided to cut out the grille slots, which meant i could put the vent where i wanted. However the bonnet has reinforcement bars as it is FG.

I managed to get the vent slots to sit perfectly between these bars and the ridge in the bonnet and is almost perfect as the turbo will sit directly beneath.

I angled the vents at the same angle as the leading edge of the bonnet and kept them equal distance from the bonnet ridge that runs from the windscreen to the front edge.

The sighter holes and washer holes will be filled as i plan to run a jet from the wiper arm.

Image

Image

Image

Image

Image

In the next 2 pictures you can see the vent slots fit nicely within the bonnet support bars

Image

Image

I also have a vent grille from Gustave that will be inserted as shown in the picture below

Image

Now back to putting the front axle and components on.
Toby

1987 E30 M3 S14 Turbo
1971 V12 E type Roadster
Ajsingh
E30 Zone Addict
E30 Zone Addict
Posts: 2378
Joined: Sun Mar 28, 2010 11:00 pm
Location: West Laaaandaan init! / Milton Keynes

Post Sat Jun 25, 2011 6:40 pm

Wow.. I will be watching this.. Great work mate!!!
E30 Crazy!
Finto_316
E30 Zone Regular
E30 Zone Regular
Posts: 421
Joined: Tue Apr 06, 2010 11:00 pm
Location: Ireland,Louth

Post Sun Jun 26, 2011 12:24 am

i will be watching this one :D
Image
BMW e30 325i Sport-88-Diamond Shwartz
User avatar
Felix79
All loved up !
Posts: 5134
Joined: Sat May 24, 2008 11:00 pm
Location: Hereford

Post Sun Jun 26, 2011 3:52 pm

Pure M3 porn! :D
Felix79 aka Dan
If you got haters, then your doing something right!
E85 Z4M Roadster
User avatar
215m3
E30 Zone Regular
E30 Zone Regular
Posts: 328
Joined: Sun Oct 23, 2005 11:00 pm

Post Mon Jun 27, 2011 10:22 am

Added the front Bilstien grp N coilovers on on Saturday

Revalved and sealed by Bilstien and painted red in homage to my old garage queen.

Image
Image
Image
Image

Ground control adjustable top mount with spacer ring. The top nut needed to be machined to fit inside the rose joint as these reverse shock absorbers have a short thread

Image

Single wiper Bonrath fitted

Image

Hopefully get the steering rack on once the control arms have been painted.
Toby

1987 E30 M3 S14 Turbo
1971 V12 E type Roadster
Falkster
Engaged to the E30 Zone
Posts: 5787
Joined: Fri Sep 30, 2005 11:00 pm
Location: Yorkshire

Post Mon Jun 27, 2011 11:58 pm

Looking good Toby!!

Always liked your red one though!!
Image
oomz1975
E30 Zone Addict
E30 Zone Addict
Posts: 2019
Joined: Mon Feb 09, 2009 11:00 pm
Location: London UK

Post Tue Jun 28, 2011 12:12 am

Ajsingh wrote:Wow.. I will be watching this.. Great work mate!!!
+1
Image
User avatar
215m3
E30 Zone Regular
E30 Zone Regular
Posts: 328
Joined: Sun Oct 23, 2005 11:00 pm

Post Tue Jun 28, 2011 7:49 pm

Falkster wrote:Looking good Toby!!

Always liked your red one though!!
Cheers Falkster, i too miss the red one, 5 years on!!! That is why i have paint most of the parts underneath red in homage to it.

Here it is at Gaydon front left

Image
Toby

1987 E30 M3 S14 Turbo
1971 V12 E type Roadster
User avatar
toby
E30 Zone Addict
E30 Zone Addict
Posts: 3609
Joined: Thu Aug 11, 2005 11:00 pm
Location: Kent

Post Tue Jun 28, 2011 11:50 pm

Great write up Toby. I'm so looking forward to the turbo...
Image
Dezzy
CR24v it's a lifestyle
Posts: 11974
Joined: Thu May 15, 2008 11:00 pm
Location: Middlesbrough

Post Wed Jun 29, 2011 12:16 pm

This looks great.

Still to good for track though imo :cool:
Image
Co Founder of CR24vTM By Invitation Only. Absolutely no riff raff!!!
User avatar
215m3
E30 Zone Regular
E30 Zone Regular
Posts: 328
Joined: Sun Oct 23, 2005 11:00 pm

Post Wed Jun 29, 2011 6:12 pm

More parts arrived back from the painters today

Image
The frames are still to be painted gloss black, but will get them done later
Image
Image
Image
Image
Toby

1987 E30 M3 S14 Turbo
1971 V12 E type Roadster
User avatar
215m3
E30 Zone Regular
E30 Zone Regular
Posts: 328
Joined: Sun Oct 23, 2005 11:00 pm

Post Wed Jun 29, 2011 6:17 pm

Dezzy wrote: Still to good for track though imo :cool:
Cheers.

The more i see the car the more i am thinking it is too nice to race. I'm confident in my skills as i have raced before as well as ice driving, but it's others you have no control over who maybe have deep pockets and a gungho style of driving rather than being skilled and controlled.
Toby

1987 E30 M3 S14 Turbo
1971 V12 E type Roadster
Dezzy
CR24v it's a lifestyle
Posts: 11974
Joined: Thu May 15, 2008 11:00 pm
Location: Middlesbrough

Post Wed Jun 29, 2011 6:30 pm

215m3 wrote:
Dezzy wrote: Still to good for track though imo :cool:
Cheers.

The more i see the car the more i am thinking it is too nice to race. I'm confident in my skills as i have raced before as well as ice driving, but it's others you have no control over who maybe have deep pockets and a gungho style of driving rather than being skilled and controlled.
Exactly the reason i said it mate
Image
Co Founder of CR24vTM By Invitation Only. Absolutely no riff raff!!!
User avatar
215m3
E30 Zone Regular
E30 Zone Regular
Posts: 328
Joined: Sun Oct 23, 2005 11:00 pm

Post Sat Jul 02, 2011 5:46 pm

Got a little more parts added back on the car today.

I only have one of the hubs so far, so put the dust cap, hub and retaining bolt on. I also fitted the track rod ends during the week.

Image
Image

Last night i put the rear axle on

Image
Image

Today i started by fitting the diff

Image
There will be a cooling system added to the diff.
Image

Image
Image

Then added the rear brake backing plates and then added the bearings and stub axles
Image
Image

Then the biggest pain of the day, fitting the rear brake shoes! I could only complete one side as i thought i had 2 screw adjusters in stock, but could only find one.
Image

Then added the discs bells. If the backing plates foul the discs then i will remove the outer edges.
Image
Image
Image

Then i fitted the caliper carriers and AP 4 pot calipers
Image
Image
Image

Also added the handbrake and Markus supplier Grp A gear lever
Image
Toby

1987 E30 M3 S14 Turbo
1971 V12 E type Roadster
Sanchez
Married to the E30 Zone
Posts: 7578
Joined: Sun Apr 17, 2005 11:00 pm
Location: Sunny Scotland

Post Sat Jul 02, 2011 6:31 pm

Clean!!!!!
Image
User avatar
215m3
E30 Zone Regular
E30 Zone Regular
Posts: 328
Joined: Sun Oct 23, 2005 11:00 pm

Post Sat Jul 23, 2011 5:38 pm

Quick Update.

Went to fit the steering column and found it is now fouled the brake pedal. I move the pedals closer to the throttle as i felt they were a little to far apart.

I made a template of the base unit that the column slots into and then cut off the flat plate to leave the tube.

Image

The spot welded for a test fit.

Image
Image
Image

I moved it 7mm over and now clears the brake pedal. This should not really effect the steering as it is quite a small amount. Welded up

Image
Image

Then ground off the excess weld for a flat surface to fit against the bulkhead. Fairly new to welding, so it's not perfect but I’m pleased with it.

I also need to extend the throttle linkage as the clutch master cylinder is fouling the movement. This is alloy so will need to get someone else to weld this for me. Pictures to follow when it has been welded.

I routed the rear brake cable down the tunnel as i am deleting the ABS. I drilled one hole next to the handbrake tubing and used another on the gear box mount that i won't be using. This is the most direct route rather than feeding it down the side of the underside of the shell. I won't be fitting a bias valve, I’ll just use the bias on the pedals.

Image

The rear cross member support

Image

The gear box support

Image

That's all for now.
Toby

1987 E30 M3 S14 Turbo
1971 V12 E type Roadster
User avatar
215m3
E30 Zone Regular
E30 Zone Regular
Posts: 328
Joined: Sun Oct 23, 2005 11:00 pm

Post Sat Jul 30, 2011 5:23 pm

Been working on the car today.

Fitted the new steering column guide
Image

The Wilwood master cylinders have a 3/8 adaptor while the BMW part for the brake line is a M10. I ordered some3/8 brake line adaptors and 2 diff M22 adaptors so i could fit the diff cooler.

The brake line for the rear brakes has been fitted once i flared the pipe.
Image

It took me a while to work out where to put the diff cooler. I plan to run the exhaust silencer out the passenger side and locate it in the space where the fuel tank used to be.

With the potential heat from the exhaust, i decided the drivers side was better, so found a couple of brackets from stock that would help fit the cooler. I used one of the diffs rear cover bolts as one fixing point.

Before
Image
After
Image

For the other side i used the ARB bracket(well i think it is)

Before
Image

After
Image

Once this was fitted i then went about rducing the braided hoses for the lines
Image

I located the pump in the boot near the large hole for the extended range tank and will need to get a grommet for this space.
Image

Before the pipes
Image

With the pipes
Image

After 4 weeks of chasing Bilstien for the rear suspnsion spring platforms and rose joint adaptors, they finally turned up.

Good and bad news, one of the spring platforms, although tight, does fit on, but the other side seems to be ripping the thread. The locking adaptors works without any issues so these spring platforms must have a problem. Back to the phone again to see what they will do. So i got one side fitted. After cleaning up the parts after they have been stored for a while, i got them painted yesterday so i could fit them today.

These are Bilstien rear coilovers and are the same units used on the Mk2 Escorts. I have had the internal thread shortened as they were a little too long, as advised by the chap who corner weighted the car a few years ago.

Image
Image
Image
Image
Image
Image

Tightened
Image

Image
Image

Top Mounts in the car
Image

That's all for now
Toby

1987 E30 M3 S14 Turbo
1971 V12 E type Roadster
Coops90
E30 Zone Regular
E30 Zone Regular
Posts: 994
Joined: Sun Oct 21, 2007 11:00 pm
Location: Sheffield

Post Sat Jul 30, 2011 5:31 pm

Serious piece of kit!
Malachite uber alles
User avatar
215m3
E30 Zone Regular
E30 Zone Regular
Posts: 328
Joined: Sun Oct 23, 2005 11:00 pm

Post Fri Aug 05, 2011 5:00 pm

On cleaning up the steering knuckle i noticed the rubber guibo was feeling a bit flexable and as i'm looking to tighten up the steering i asked a local company t m Radical Pression to make me an aluminium one.

So I handed them this

Image

And got back this

Image

Side by side

Image

I have also spoken to a tuning company recommended to my by someone who has a tunned 318is 16v with 195 bhp. They will bed in the engine and then map it all on a dyno. They are only a couple of miles away, so close enough if required. I have been advised to use a Pectal T6 ECU which will work with an AiM dash unit. It has to be the T6 rather than the T2 as the car has individual throttle bodies. These unit are the same ECU's they run on the world rally cars.
Toby

1987 E30 M3 S14 Turbo
1971 V12 E type Roadster
bridgemond
E30 Zone Regular
E30 Zone Regular
Posts: 300
Joined: Thu Oct 08, 2009 11:00 pm
Location: cork ireland

Post Fri Aug 05, 2011 6:22 pm

Great work man. I will be following this :D
ezagood
E30 Zone Regular
E30 Zone Regular
Posts: 379
Joined: Sat Dec 09, 2006 11:00 pm
Location: essex

Post Fri Aug 05, 2011 8:19 pm

interesting build