
E30 325e 3/1987
Moderator: martauto
-
Cloggy Saint
- Old Skooler

- Posts: 8027
- Joined: Sun Jan 09, 2005 11:00 pm
- Location: zummerzet
Good stuff, for someone who claims to have no technical background you're sure getting involved!

E30 zone - promoting adult illiteracy since 2004
-
e30Passion
- E30 Zone Newbie

- Posts: 232
- Joined: Wed Jun 20, 2012 11:00 pm
- Location: Netherlands
WTF did i just do 


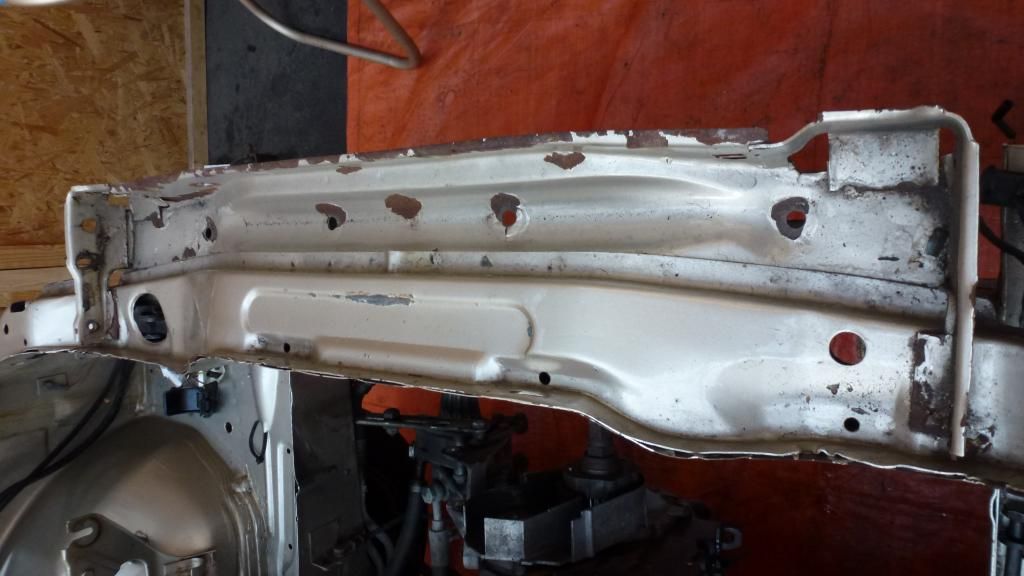
The right side corner has been replaced at some point and they overlapped the sheet metal.

Surpriiiiiiiiise...

Found a little hole here to but it took some dedicated searching.


That was pretty much al the rust i could find. Been having a good poke under the car to but it all seems ok.


The right side corner has been replaced at some point and they overlapped the sheet metal.

Surpriiiiiiiiise...

Found a little hole here to but it took some dedicated searching.


That was pretty much al the rust i could find. Been having a good poke under the car to but it all seems ok.
Last edited by e30Passion on Sat Oct 04, 2014 2:54 pm, edited 3 times in total.
-
e30Passion
- E30 Zone Newbie
- Posts: 232
- Joined: Wed Jun 20, 2012 11:00 pm
- Location: Netherlands


Ordered a new genuine front from BMW but the quality was absolutely terrible. Who the hell spotwelded this? Stevie Wonder?


Last edited by e30Passion on Sat Oct 04, 2014 2:51 pm, edited 3 times in total.
-
Rav335uk
- E30 Zone Meets/Events Team

- Posts: 27985
- Joined: Wed Jan 19, 2005 11:00 pm
- Location: Mad mad mad
Looks like he did

If you Got "Haters",Then your doing something Right!
CR24v??? Where's it all gone?? LOL
-
e30Passion
- E30 Zone Newbie
- Posts: 232
- Joined: Wed Jun 20, 2012 11:00 pm
- Location: Netherlands
In the meantime my cylinderhead was beeing rebuild by the old man's business buddy's which meant no labour costs 

A total of 3 slightly bend valves where changed for ones of the same diameter.

New seals and valve guides.


They blasted it which sucks big time as the paint on it was as new. Costs me a crate of beer on aerosol paint.


Everything new then. Should make a big difference.


A total of 3 slightly bend valves where changed for ones of the same diameter.

New seals and valve guides.


They blasted it which sucks big time as the paint on it was as new. Costs me a crate of beer on aerosol paint.


Everything new then. Should make a big difference.

Last edited by e30Passion on Sat Oct 04, 2014 6:03 am, edited 4 times in total.
-
Tan91
- E30 Zone Regular

- Posts: 368
- Joined: Fri Jun 20, 2008 11:00 pm
- Location: West London
From changing the Steelies > Bottle caps > BBS > Total shell rebuilding fiasco...
Love this thread mate, pure passion...I know I will be doing this soon keep it up excellent work fella!
Love this thread mate, pure passion...I know I will be doing this soon keep it up excellent work fella!
1990 - 316i LUX Coupe[/size:364a72de04]
-
e30Passion
- E30 Zone Newbie
- Posts: 232
- Joined: Wed Jun 20, 2012 11:00 pm
- Location: Netherlands
Decided to cut the rusty bits out..


This needed to come off as well because it's on the new piece.


The reason i'm here at e30zone.. engine bay stickers. NLA at the dealers but a dutch forummember said i could find them here.


In a vise i bend the ends.


This needed to come off as well because it's on the new piece.


The reason i'm here at e30zone.. engine bay stickers. NLA at the dealers but a dutch forummember said i could find them here.


In a vise i bend the ends.

Last edited by e30Passion on Tue Oct 14, 2014 4:46 am, edited 4 times in total.
-
e30Passion
- E30 Zone Newbie
- Posts: 232
- Joined: Wed Jun 20, 2012 11:00 pm
- Location: Netherlands
Here i also found rust. As usual behind the seamsealer.


So then.. next lesson. Welding. First time in my life holding a MIG welder....... didn't went well!

So i cut the whole piece out and started again. Welding the lower piece went allright.


A bit more practicing then before before giving it another go.

So over to plan B if there ever was one. At the local junkyard there was a black 316i touring which had a 2 good sections available for me to cut off.

The big one needed a small new piece at the bottem where it started to rust at the same spot as on the piece it replaces.

Last edited by e30Passion on Sat Oct 04, 2014 3:11 pm, edited 1 time in total.
-
e30Passion
- E30 Zone Newbie
- Posts: 232
- Joined: Wed Jun 20, 2012 11:00 pm
- Location: Netherlands
Spotdotwelded the pieces in place until one continuous weld. If it went wrong this time i would've set the whole bloody place on fire!


The black stuff is Fertan rust inhibitor which smells like candy. You allmost wanna drink it.

Very happy with it


The black stuff is Fertan rust inhibitor which smells like candy. You allmost wanna drink it.

Very happy with it

Last edited by e30Passion on Sun Oct 05, 2014 9:08 pm, edited 5 times in total.
-
e30Passion
- E30 Zone Newbie
- Posts: 232
- Joined: Wed Jun 20, 2012 11:00 pm
- Location: Netherlands
Testfitting came next..


Last edited by e30Passion on Sat Oct 04, 2014 4:10 pm, edited 1 time in total.
-
Rav335uk
- E30 Zone Meets/Events Team
- Posts: 27985
- Joined: Wed Jan 19, 2005 11:00 pm
- Location: Mad mad mad
The stickers are made by a member called Pukar.
http://www.e30zone.net/modules.php?name ... t=stickers
http://www.e30zone.net/modules.php?name ... t=stickers
If you Got "Haters",Then your doing something Right!
CR24v??? Where's it all gone?? LOL
-
e30Passion
- E30 Zone Newbie
- Posts: 232
- Joined: Wed Jun 20, 2012 11:00 pm
- Location: Netherlands
The bumpercarrier came from a red touring. NLA from BMW.

Drilled some holes for puddlewelding the front back on as i have no spotwelder and couldn't find one either.


I also used Mahotec Inox Spray in an attempt to prevent rust between the sheets of metal. It's weld-through primer but is really for spotwelding with a proper spotwelder.


Cut the rust out..

And made a new piece to fit.


Last edited by e30Passion on Sat Oct 04, 2014 5:08 pm, edited 2 times in total.
-
e30Passion
- E30 Zone Newbie
- Posts: 232
- Joined: Wed Jun 20, 2012 11:00 pm
- Location: Netherlands
Before that horrible front section whent back on i came to the brilliant idea to repaint the engine because the old paint was flaking off badly.
And that with the engine still in the car as at this piont i did not have the capability to drop the engine or move the car. So i bought a few cleaning stuff.

Applied paint remover to the block.

Waited till it was dry, covered everything and started cleaning.

It takes a while to get to this piont.


Last edited by e30Passion on Sat Oct 04, 2014 5:24 pm, edited 1 time in total.
-
e30Passion
- E30 Zone Newbie
- Posts: 232
- Joined: Wed Jun 20, 2012 11:00 pm
- Location: Netherlands
Since i had no compression at my disposal i used these 2 Pack paints out of an aerosol can. Great stuff!

Shake well for 5 days. Press the button and shake well for again.

Cleaned the engine multiple times with sillicon remover.

A couple of thin layers of 2 Pack Epoxy black with a few minutes drying time in between.


Before painting the sills i tried to hide the imperfections with hand on sealer. I should have used the spray on type. But that was afterwards.

I was even mad enough to paint these as they were black originally. Sanding them was an absolute joy
Great idea from the ultasonic rebuilding people to take the bloody paint off!

Sandblasted and painted the fuelrail to as the original paint was coming of.


Last edited by e30Passion on Tue Oct 14, 2014 6:59 am, edited 4 times in total.
-
e30Passion
- E30 Zone Newbie
- Posts: 232
- Joined: Wed Jun 20, 2012 11:00 pm
- Location: Netherlands
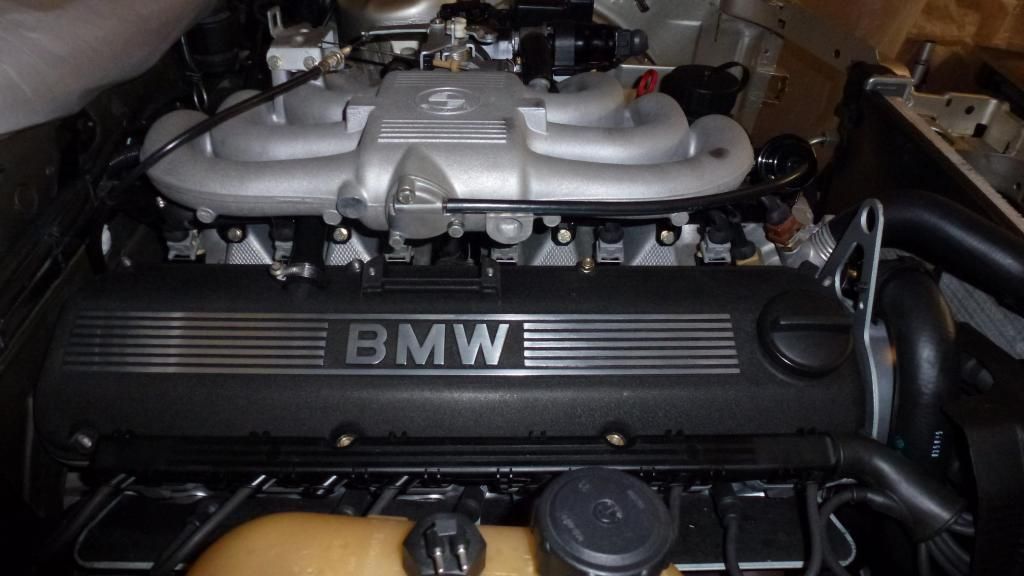
2 Pack satin black and a thin layer of 2 pack clear coat.


I regret the clear coat. This looked better just before. You learn as you go along.

A set of new freeze plugs back in. Bloody expensive these basterds.


I regret the clear coat. This looked better just before. You learn as you go along.

A set of new freeze plugs back in. Bloody expensive these basterds.


Last edited by e30Passion on Tue Oct 14, 2014 6:51 am, edited 3 times in total.
-
e30Passion
- E30 Zone Newbie
- Posts: 232
- Joined: Wed Jun 20, 2012 11:00 pm
- Location: Netherlands
I wanted to paint the engine bay myself using the same 2 Pack aerosol system but dust was a big problem and the colour ordered BMW bronzitbeige 139 did not match exactly. So i had the damage repair company to do it for me professionally.
That meant i had to make a rolling chassis. But everything was off the car... looking like crap!


Pulled the struts apart..

And drop'em all of for powdercoating. Some got done before painting the engine bay, some after.


That meant i had to make a rolling chassis. But everything was off the car... looking like crap!


Pulled the struts apart..

And drop'em all of for powdercoating. Some got done before painting the engine bay, some after.


Last edited by e30Passion on Sat Oct 04, 2014 8:21 pm, edited 3 times in total.
-
NickSuzy

- E30 Zone Newbie
- Posts: 75
- Joined: Sun Apr 15, 2012 11:00 pm
wow, dont know what else to say
My e30 is the same model in the same colour, only difference is mine is a four door and will look like shit compared to yours.
Keep up the good work.
My e30 is the same model in the same colour, only difference is mine is a four door and will look like shit compared to yours.
Keep up the good work.
-
e30Passion
- E30 Zone Newbie
- Posts: 232
- Joined: Wed Jun 20, 2012 11:00 pm
- Location: Netherlands
Less then 200 quid for ALL the powdercoating. The brandnew splashguards got coated to.


I taped the spline with duct-tape where the wheelbearing sits... BAD idea! Powdercoating obviously gets baked but i forgot. Better leave the old bearings to get baked.

Got it off eventually though.

Here the brake caliper carrier gets bolted on to so i removed the thick layer of powdercoat. Don't want those things coming loose.

Here you can tap the bolt trough..

Here you can't cause it's tapered. I used a dremel wirebrush. Connect the dremel to the brush and turn it on. Pull back slowly.

Old springs are replaced by genuine M-Tech. Front axle allways felt to strongly sprung compared to the rear. Maybe the Boge Turbo gasstruts want 6 coils instead of 7. Front springs where coated, rears are new and both came from some weird auctionsite with an E in it.

Remember those brandnew mudflaps?


ohh yeah.. the brakes. Looking terrible.

Sandblasted them myself which was a blast. Pulled them apart after that.

Golden VHT caliper paint. I had a new one for sale to compare.

Painted the head with VHT aluminium.


Last edited by e30Passion on Sat Oct 04, 2014 8:41 pm, edited 4 times in total.
-
e30Passion
- E30 Zone Newbie
- Posts: 232
- Joined: Wed Jun 20, 2012 11:00 pm
- Location: Netherlands
Before welding the front back on and sending the car to paint i assembled the engine now it was easy to reach.
That meant cleaning all the parts.

With some new part to go with it.

OEM Lemforder suspension from the internet. Much cheaper but excactly the same as the dealer parts. New nuts & bolts from BMW.

First thing that goes back on is this thing.

The edge where the crankshaft spins against. The difference between new and 106.000 kms.


Just the slightest minimal smear of bleu sealant on the gasket. Bit of grease on the shaftseals to.

A light rub of 1000 grid wet sandpaper and drying/cleaning it off before installing the crankcase cover.

Last edited by e30Passion on Sat Oct 04, 2014 9:04 pm, edited 1 time in total.
-
Kedge
- Old Skooler
- Posts: 7702
- Joined: Thu Jan 13, 2005 11:00 pm
- Location: Leicestershire
Awesome work, best thread that's been posted on here for a long time! 
-
e30Passion
- E30 Zone Newbie
- Posts: 232
- Joined: Wed Jun 20, 2012 11:00 pm
- Location: Netherlands
A wanted to take the pistons out to have a look at the state of the rings and bearings but couldn't bear the costs. The engine didn't use a drop of oil anyway.

The reason i wanted to take the pistons out. Something went seriously wrong here at some stage and it wasn't me. Maybe it has something to do with the frontal damage, who knows?
Piston 1 (pic) and 6 pretty bad, 2 and 5 a light dent and 3 and 4 just a scratch. No further obvious damage to cylinderwalls or anything.

Again, just the slightest smear of bleu sealant to help the new seal stick to the oilpan which eases installation as you can see.

Time to start welding. Covered everything and started welding the front back on.


Still not a proffessional but it turned out allright. Pleased with the results so far.

Last edited by e30Passion on Tue Oct 14, 2014 8:18 am, edited 7 times in total.
-
e30Passion
- E30 Zone Newbie
- Posts: 232
- Joined: Wed Jun 20, 2012 11:00 pm
- Location: Netherlands
Grinded down all the welds, sanded it up roughly and put some filler on there in an attempt to disquise the welds.


At this stage i thought it was a good idea to build a state of the art spraying room using cutting edge materials .

Dry sanded the filler nice and smooth and gave the hole engine bay a final rub before cleaning everything multiple times with silicon remover.
After that everything got a few good coats of 2 pack beige epoxy primer.


Allready looking better then before even if it's the wrong colour.

After at least 48 hours of curing the primer i wetsanded every inch of the engine bay with very fine 1200grid until it started to reflect the light.
Next step: Seamsealer.
Tried to get a factory look but that totallly and utterly failed! Horrible stuff. I regret not smoothing all the brush marks out on the struttowers.


Last edited by e30Passion on Sun Oct 05, 2014 4:17 am, edited 2 times in total.
-
e30Passion
- E30 Zone Newbie
- Posts: 232
- Joined: Wed Jun 20, 2012 11:00 pm
- Location: Netherlands
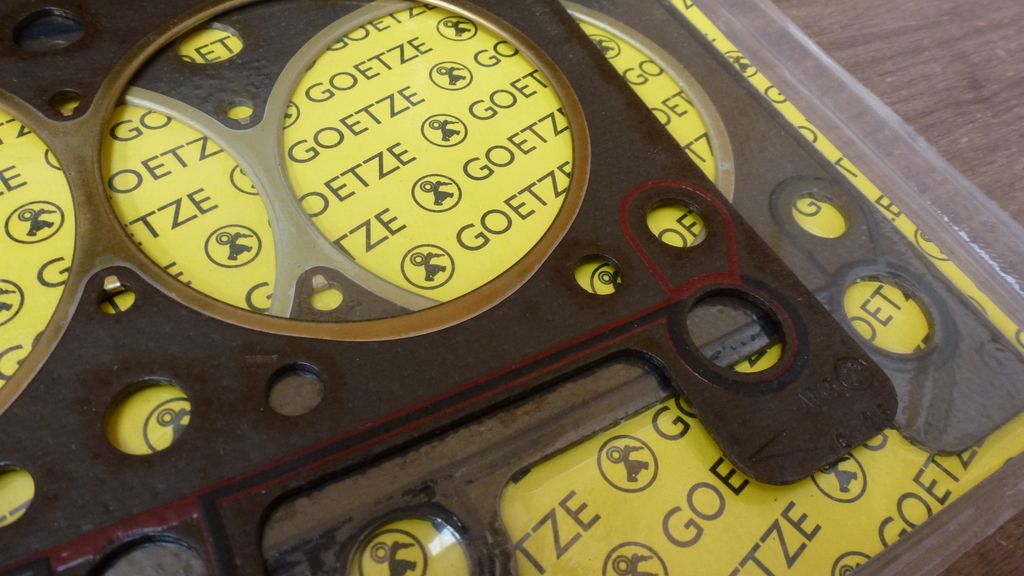
Putting the head on..
The top gasket is a genuine BMW dealer part of 80 euro's which is made by Goetze as it's the OEM supplier. The bottom one is aftermarket Goetze and is half dealer price. I notice no difference except some extra silicon beading and copper spray on the dealer item. Not worth the extra cash in my opinion so i'll go Goetze aftermarket next time!
Cleaned the deck of the block to mirror finish and chased the threads of the headbolts. Compressed air and/or a vacuumcleaner is handy at this stage.

Lots of dirt in there.

Slightly greased the cylinderwalls with an oily finger after cleaning them thoroughly and put the gasket in place.

After making sure the crank was set at TDC i broke my spine putting the head on. Bloody hell that thing is heavy!

After installing the timing belt i put the valve cover back on and taped everything off so the painter doesn't have to do that. Saves cash

Pushed the car outside and pulled it on the trailer. Perfect opportunity to see the front getting ripped strait off.

While the car was out for painting i got bored..


Took the horrible looking paint off the starter..

..and polished it. No rust here anyway.

Cleaned the manifolds with a nylon brush. Looking back i should've painted them in heatresistant black or something.

The top gasket is a genuine BMW dealer part of 80 euro's which is made by Goetze as it's the OEM supplier. The bottom one is aftermarket Goetze and is half dealer price. I notice no difference except some extra silicon beading and copper spray on the dealer item. Not worth the extra cash in my opinion so i'll go Goetze aftermarket next time!

Cleaned the deck of the block to mirror finish and chased the threads of the headbolts. Compressed air and/or a vacuumcleaner is handy at this stage.

Lots of dirt in there.

Slightly greased the cylinderwalls with an oily finger after cleaning them thoroughly and put the gasket in place.

After making sure the crank was set at TDC i broke my spine putting the head on. Bloody hell that thing is heavy!

After installing the timing belt i put the valve cover back on and taped everything off so the painter doesn't have to do that. Saves cash

Pushed the car outside and pulled it on the trailer. Perfect opportunity to see the front getting ripped strait off.

While the car was out for painting i got bored..


Took the horrible looking paint off the starter..

..and polished it. No rust here anyway.

Cleaned the manifolds with a nylon brush. Looking back i should've painted them in heatresistant black or something.

Last edited by e30Passion on Sun Feb 01, 2015 6:13 am, edited 2 times in total.
-
e30Passion
- E30 Zone Newbie
- Posts: 232
- Joined: Wed Jun 20, 2012 11:00 pm
- Location: Netherlands
Got the car back the next day and the result was not to shabby Might look the wrong shade but i think the paint had yet to settle.

Some comparisons then..
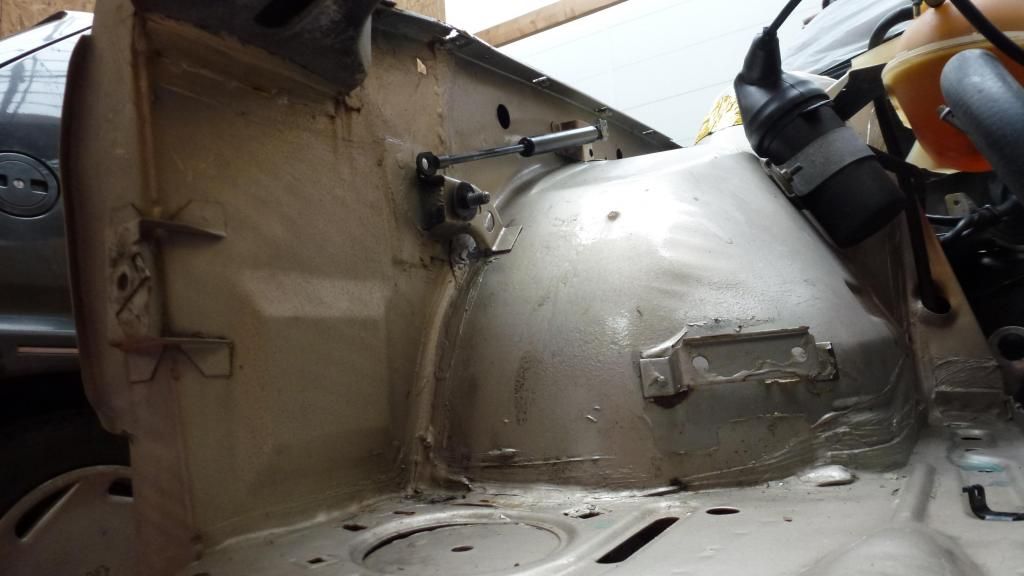


With a bucket of soap and a handbroom i cleaned the underside of the car's front section.
Next day: Stonechipping. I used a bottle of Valvoline black which gave some nice results.


After that i waxoiled every cavity i could find muliple times.


Even the chassisleg where the subframe bolts on to got loads of the stuff.

This area got some attension to when the subframe was beeing powdercoated.


Some comparisons then..


With a bucket of soap and a handbroom i cleaned the underside of the car's front section.
Next day: Stonechipping. I used a bottle of Valvoline black which gave some nice results.


After that i waxoiled every cavity i could find muliple times.


Even the chassisleg where the subframe bolts on to got loads of the stuff.

This area got some attension to when the subframe was beeing powdercoated.

Last edited by e30Passion on Sun Oct 05, 2014 6:34 am, edited 2 times in total.
-
e30Passion
- E30 Zone Newbie
- Posts: 232
- Joined: Wed Jun 20, 2012 11:00 pm
- Location: Netherlands
Installed the suspension, steering rack and dressed the engine up.


All hoses where replaced as they were in a dangerous state, especially the fuel hoses.
I would advice anyone with an old car to take a serious good look at them for obvious reasons.

Every single fuelhose i pulled out of the engine bay had cracks all over it.

Sandblasted and painted black afterwards.


All new nuts and bolts.

Last edited by e30Passion on Sun Oct 05, 2014 7:12 am, edited 3 times in total.
-
e30Passion
- E30 Zone Newbie
- Posts: 232
- Joined: Wed Jun 20, 2012 11:00 pm
- Location: Netherlands
Before you know it you're nearly done.
Soaked the camshaft in engine oil. Topped off the coolant by disconnecting and filling the big radiator hoses. Fresh braking fluid.

Didn't like the looks of it tho..

Yes, much better

Double checking everything before turing the key.

And somewhere last month the engine ran for the first time
Stationary a bit rough as it pitches up and down a little as it starts to warm up. Think i need to take it for a drive to see whats what.
I warmed up the engine with handbrake on and the automatic in D (runs like a dream) before changing the fluids and filters.
And if that was not enough the car had another surprise... The electrics

Soaked the camshaft in engine oil. Topped off the coolant by disconnecting and filling the big radiator hoses. Fresh braking fluid.

Didn't like the looks of it tho..

Yes, much better


Double checking everything before turing the key.

And somewhere last month the engine ran for the first time
Stationary a bit rough as it pitches up and down a little as it starts to warm up. Think i need to take it for a drive to see whats what.
I warmed up the engine with handbrake on and the automatic in D (runs like a dream) before changing the fluids and filters.
And if that was not enough the car had another surprise... The electrics

Last edited by e30Passion on Sun Oct 05, 2014 9:30 am, edited 2 times in total.
-
Nobby_N
- Old Skooler
- Posts: 3957
- Joined: Sat Mar 24, 2007 11:00 pm
- Location: Boston Lincs Mainly being a Coont
Officially this guy is now in the Zone hall of fame surely! WOW WOW WOW surely if we all had time and money this is what most of us would do to and E30
-
bab-91
- Married to the E30 Zone

- Posts: 7177
- Joined: Thu Jan 06, 2011 11:00 pm
- Location: Northern Ireland
Keep it coming!
The Internet - It has proven to be worthless, and is nothing but a repository for perverts.
IG - bab91
IG - bab91
-
e30Passion
- E30 Zone Newbie
- Posts: 232
- Joined: Wed Jun 20, 2012 11:00 pm
- Location: Netherlands
Many thanks for the kind words everyone 
The bloody electrics..
The wireloom was wrapped in tape that started to unravle thanks to previous owners doing a half assed job converting to facelift headlights.

Multiple plug connections were also braking off thanks to the wire beeing exposed because of bending. A design fault.

Connections left side
A= Horn
B= Lowbeam
C= Mainbeam
D= Don't know what this is.. headlight wash system?
E= Foglights
F= Ground chassis
G= Indicators
Only B needed attension. The rest of the connections were ok.

The passenger side (drivers side for you guys) was in a really bad state.
H= Screenwash pump
I = Screenwash level sensor
J = Coolant level sensor
Except A, E and G everything needed soldering new connection.

All brown wires came together to form 2 little ground bloks. Left was still perfect but the right one was disintegrating.
Note the tape on the terrible solder connections. Whoever did this is somebody i wouln't trust replacing a lightbulb.

Needed to re-use some connectors because the new ones only come in bags of 10.

Good to see they changed the design on the new bits so that the wire doesn't get exposed when bend. With the old wires i think many BMW's will eventually have this wire issue if they get old enough.

All wires checked throughout there entire length. Victims soldered and double sleeved.


Last edited by e30Passion on Sat Nov 08, 2014 7:27 am, edited 5 times in total.
-
e30Passion
- E30 Zone Newbie
- Posts: 232
- Joined: Wed Jun 20, 2012 11:00 pm
- Location: Netherlands
To prevent the same problem in the future i sleeved the old connectors that where re-used.


After giving it a really good stretch the 3M Scotch T23 watertight rubber tape got mounted ’sticky side up’ all the way from the fusebox.

Another job done!


After giving it a really good stretch the 3M Scotch T23 watertight rubber tape got mounted ’sticky side up’ all the way from the fusebox.

Another job done!

Last edited by e30Passion on Sun Oct 05, 2014 8:47 am, edited 4 times in total.
-
e30Passion
- E30 Zone Newbie
- Posts: 232
- Joined: Wed Jun 20, 2012 11:00 pm
- Location: Netherlands
Now we're at it i decided to freshen up the front bumper to.


These things where really rusty so went and bought new ones.

Some half-dried tectyl to prevent them rusting so quickly.


These things where really rusty so went and bought new ones.

Some half-dried tectyl to prevent them rusting so quickly.

Last edited by e30Passion on Sun Oct 05, 2014 9:07 am, edited 1 time in total.
-
e30Passion
- E30 Zone Newbie
- Posts: 232
- Joined: Wed Jun 20, 2012 11:00 pm
- Location: Netherlands
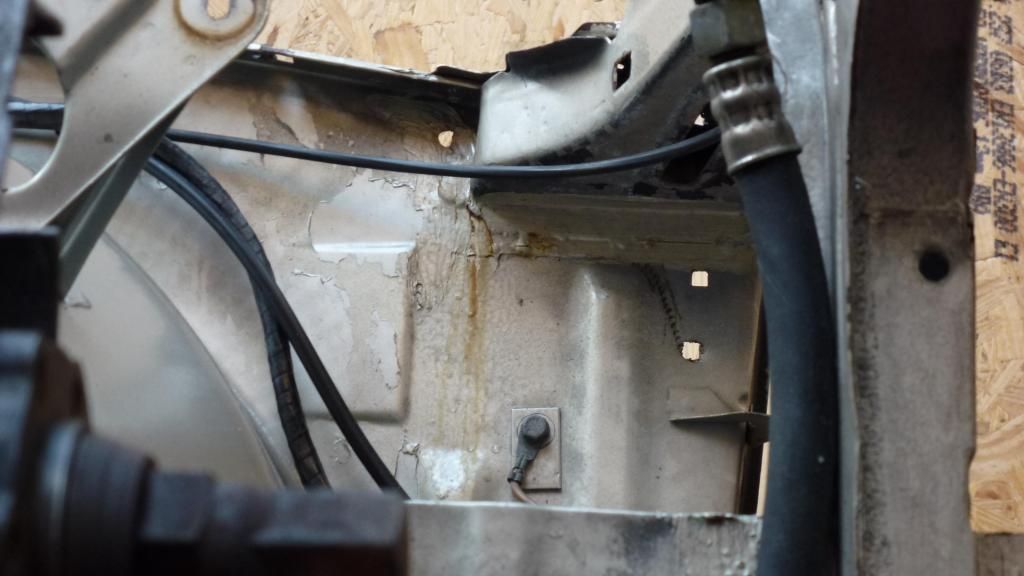
Before mounting the McPherson struts i put some tectyl in these places as there was lots of rust there before powdercoating.

Put just a little bit here as well.

Another bottle in here.


Had the bonnet hinge freshley painted to.

Wy not.. light coat on the new srews to mount the fenders.


Put just a little bit here as well.

Another bottle in here.


Had the bonnet hinge freshley painted to.

Wy not.. light coat on the new srews to mount the fenders.


Last edited by e30Passion on Sun Oct 05, 2014 10:31 am, edited 2 times in total.
-
e30Passion
- E30 Zone Newbie
- Posts: 232
- Joined: Wed Jun 20, 2012 11:00 pm
- Location: Netherlands
Nice for the option list.


Hope te have the bonnet, passenger door and a new right fender resprayed in the future. Then the entire car would have new paint.


Hope te have the bonnet, passenger door and a new right fender resprayed in the future. Then the entire car would have new paint.

Last edited by e30Passion on Sun Oct 05, 2014 10:43 am, edited 2 times in total.
-
e30Passion
- E30 Zone Newbie
- Posts: 232
- Joined: Wed Jun 20, 2012 11:00 pm
- Location: Netherlands
So.. this is what i've been up to the last 4 years and where i am today. Hope you enjoyed this short story of me and my e30 so far. Haven't driven the car yet cause i want to empty the fuel tank and put some fresh fuel in. The car has been sitting on axle stand for 7 months.
If i ever have the chance i would love to do the rear axle as well but i think i need a bit of help on that one.
Cheers
If i ever have the chance i would love to do the rear axle as well but i think i need a bit of help on that one.
Cheers
-
Tan91
- E30 Zone Regular
- Posts: 368
- Joined: Fri Jun 20, 2008 11:00 pm
- Location: West London
Looks good mate.
If you have time pics of interior maybe?
Well done again
Tan.
If you have time pics of interior maybe?
Well done again
Tan.
1990 - 316i LUX Coupe[/size:364a72de04]