
Right, i got fed up of waiting for advice, so i pulled the unit apart and it came out ok
On first inspection of the clutch plates they dont look too badly worn, but they look unevenly worn, like they're contacting more in one place than another?!
I'll hopefully be able to put some money aside for the rebuild kit this month, which is about £120 delivered and I think i've found a handy machinist for all that side of things!!
Im taking a club-load of pics, so i'll select a few soon and throw them up so you can all keep an eye on whats cracking
LSD rebuild and ratio change
Moderator: martauto
-
stuartgallafant
- E30 Zone Addict

- Posts: 4531
- Joined: Tue Mar 29, 2005 11:00 pm
- Location: Costa del Croydon

-
Omi
- Witty custom rank.
- Posts: 1478
- Joined: Sun Jan 09, 2005 11:00 pm
- Location: Darlington, North East
A tutorial, list of parts/tools and diagrams/tolerances/measurements as well as the pictures would be fantastic for the Wiki and would make you very popular round here!
(Not that we don't like you already, but this might mean free beers!)
(Not that we don't like you already, but this might mean free beers!)
...or is it?
-
stuartgallafant
- E30 Zone Addict
- Posts: 4531
- Joined: Tue Mar 29, 2005 11:00 pm
- Location: Costa del Croydon
i'll see what i can do...
everyone likes free beer!!
everyone likes free beer!!
-
Simon13
- The longest resto in the world !
- Posts: 22697
- Joined: Mon Jan 10, 2005 11:00 pm
- Location: Camberley, Surrey don't u know
i've been told the clutch packs have a 10 hour lock up life so on a typical E30 LSD now they are going to be well fubred unless it's been strapped to an auto.
but good work bert, guildford soon
but good work bert, guildford soon
-
stuartgallafant
- E30 Zone Addict
- Posts: 4531
- Joined: Tue Mar 29, 2005 11:00 pm
- Location: Costa del Croydon
yeah i heard about the 10 hour lock up time
i'll put some photos up of the clutch plates and thrust plates in my drum. you can see the hot spots on them where they've done plenty of locking!!
cant wait to see what it feels like when its done, it should lock up real nice
you going guildford si?
i'll put some photos up of the clutch plates and thrust plates in my drum. you can see the hot spots on them where they've done plenty of locking!!
cant wait to see what it feels like when its done, it should lock up real nice
you going guildford si?

-
stuartgallafant
- E30 Zone Addict
- Posts: 4531
- Joined: Tue Mar 29, 2005 11:00 pm
- Location: Costa del Croydon
whadda ya mean?!hoshy wrote:stu - please do use the wiki mate - any problems pm me.
See that Articles button at the top of the page ? Click on it 
Basically we've set up a wikipedia type system so when people do interesting work like rebuilding diffs - they can easily create articles...
Basically we've set up a wikipedia type system so when people do interesting work like rebuilding diffs - they can easily create articles...
E46 M3 CSL but dreaming of another E30.
-
stuartgallafant
- E30 Zone Addict
- Posts: 4531
- Joined: Tue Mar 29, 2005 11:00 pm
- Location: Costa del Croydon
Ah, I see!! I'll do my best!!hoshy wrote:See that Articles button at the top of the page ? Click on it
Basically we've set up a wikipedia type system so when people do interesting work like rebuilding diffs - they can easily create articles...
Dont know if the answer was replied to ok, but i just read this on the bmw rally forum, ill quote as you have to be a member to see it
HTH
HTH
Sunbmw wrote:Here is a quick guide on how to build a diff, actually, I am just going to show you how to install a CWP for now, it would be to involved to go into LSD rebuilds as well, I will cover that later.
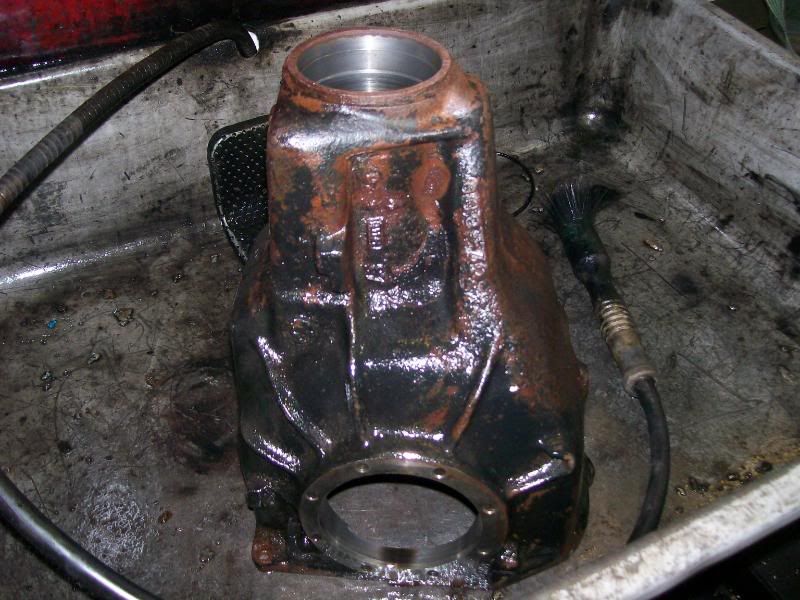
The diff is my 5.28 Large (200mm) unit that recently gave up the ghost on the Richard Burns rally, I have found the offending item to be the preset "Crush" spacer that fits inbetween the two pinion bearings, alowing quicker assembly times on first build from the factory, however, these are a single usage item, are not easy to get hold of, and are not really up to big power and/or motorsport use, so I have done away with it and have made several spacers and shims to allow accurate setting of the pre-load and position of the pinion.
Firstly, clean the casing and all components......
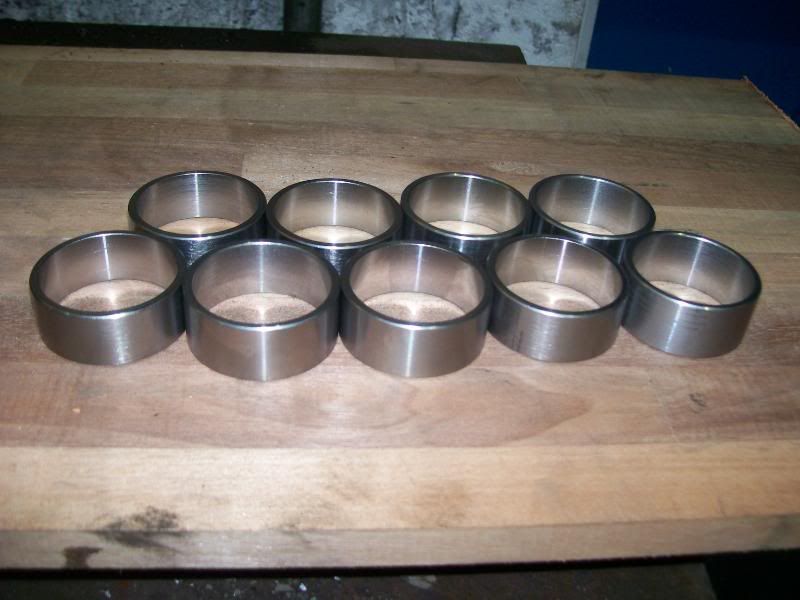
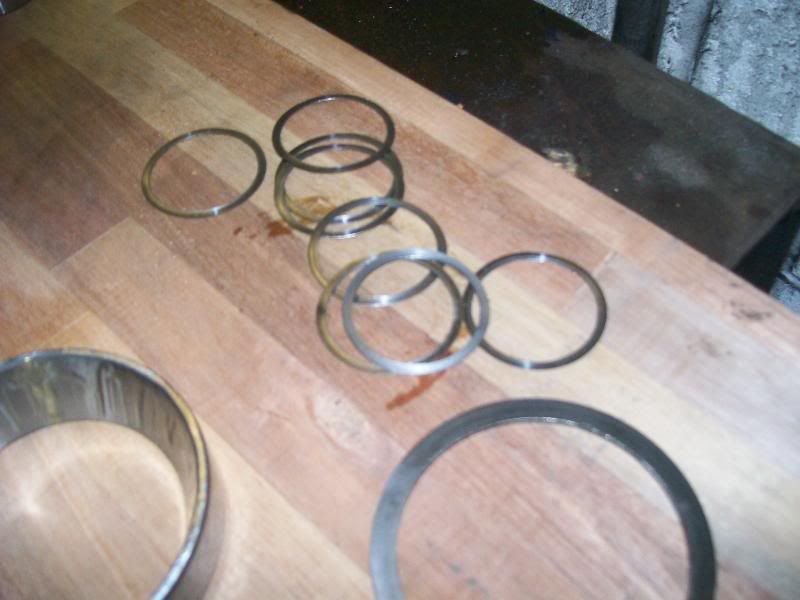
Here are the spacers and shims that I made.......
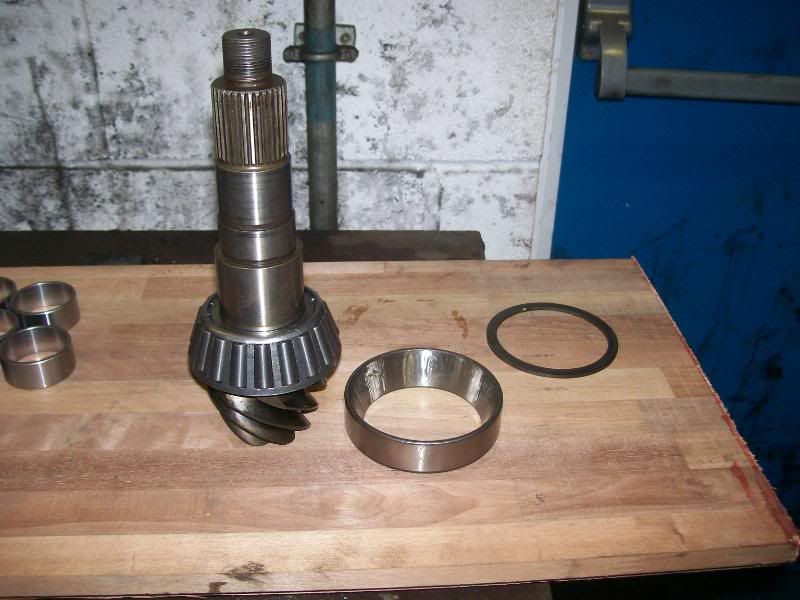
New bearing pressed onto the pinion......
Pinion without spacer......
And with..............
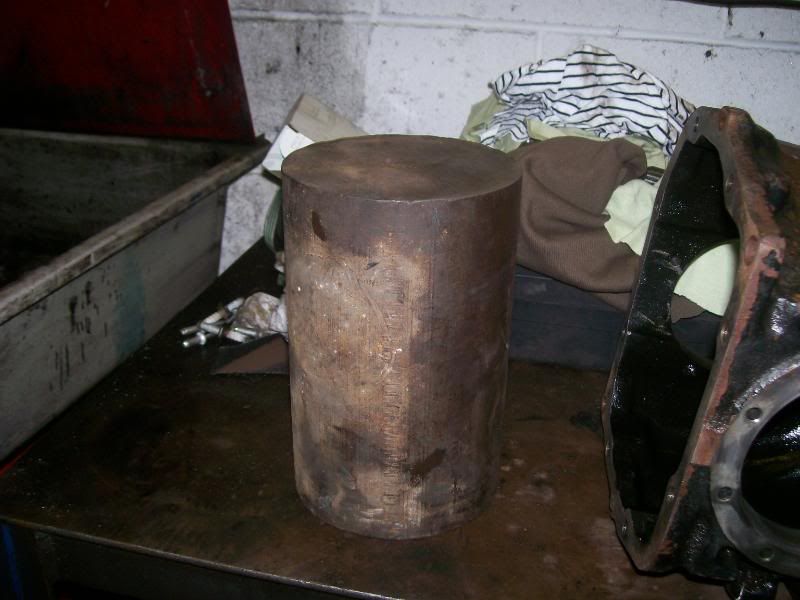
You then need a big chunk of steel (wood or owt'll do, just holds the pinion into the casing......
Install the pinion into the casing and fit the outer bearing (not the seal though, leave that till it is all set up as you do have to have the pinion in and out a few times and you could damage it) then place the casing over so it holds the pinion in place while you gently tap the outer bearing into place then fit the flange...............
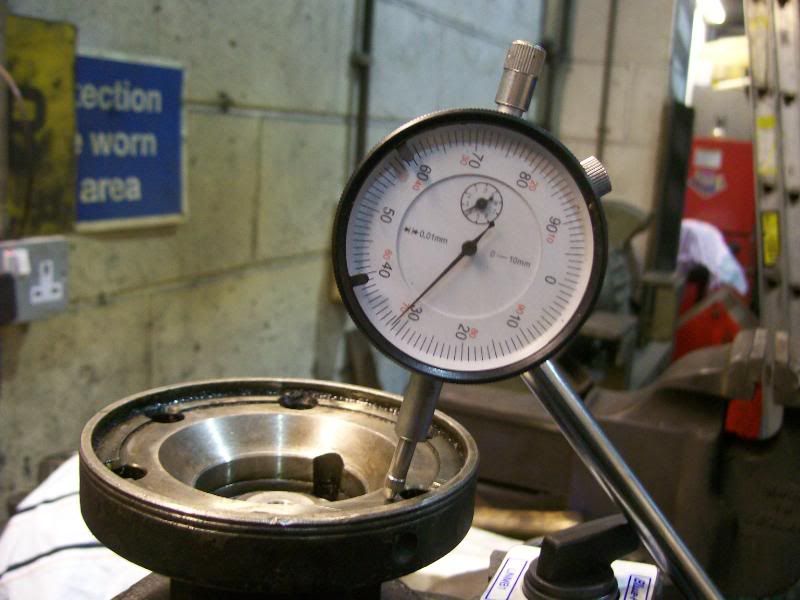
Then measure the end float you have (if any)...........
as you can see, that had about 0.30mm of end float, now, the pinion should have a slight amount of pre-load, so I removed the original spacer, and fitted the next size down, which luckily enough was 0.45mm thinner, I then repated the process, checked for any end float, and for the tightness of the bearing, with a small amount of pre-load, you can just feel that there is a very small resitance, but hard to describe.
When happy with that, fit the diff unit, preferably, if you have removed the item before, you should have a "base" set of side shims that you can start of with, these are usually fairly good but it is always worth checking the tooth pattern, or contact patch, and also the backlash........
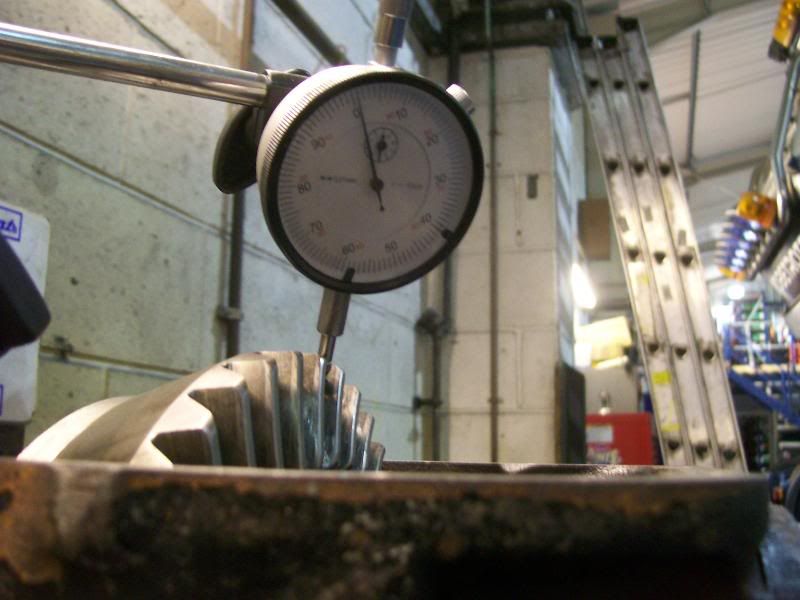
Checking bcaklash, usually, I aim for 0.15-0.25mm, this was in the latter.........
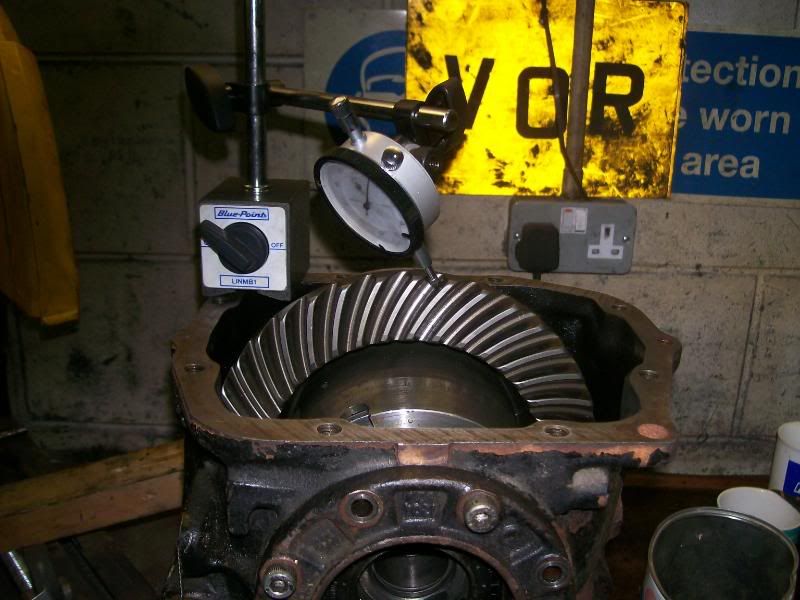
quick pic of where the magnetic stand was set up..............
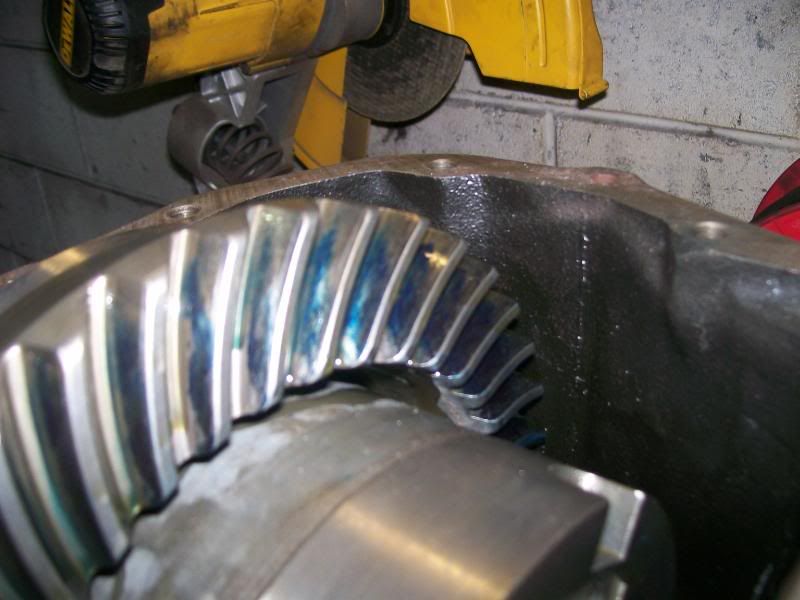
Backlash satisfactory, now check the tooth pattern, we need to cover the pinion teeth with engineers blue, fit the diff unit and spin in a forward direction, holding some resistance on the crownwheel, then have a look at the shape, size and position of the blue mark........
it is difficult to see here, but you really need a nice oval shape, fairly central to the tooth, luckily for me (cos I used the old shims and they were set up) I got it first time, however, if this is wrong, that ius when it starts to get time consuming, as you need to move the position of both the pinion and the crownwheel to get it rightm it can take a fair few hours to achieve, and to add to the difficulty, you really need an infinite amount of shims so you can move both components small amounts.
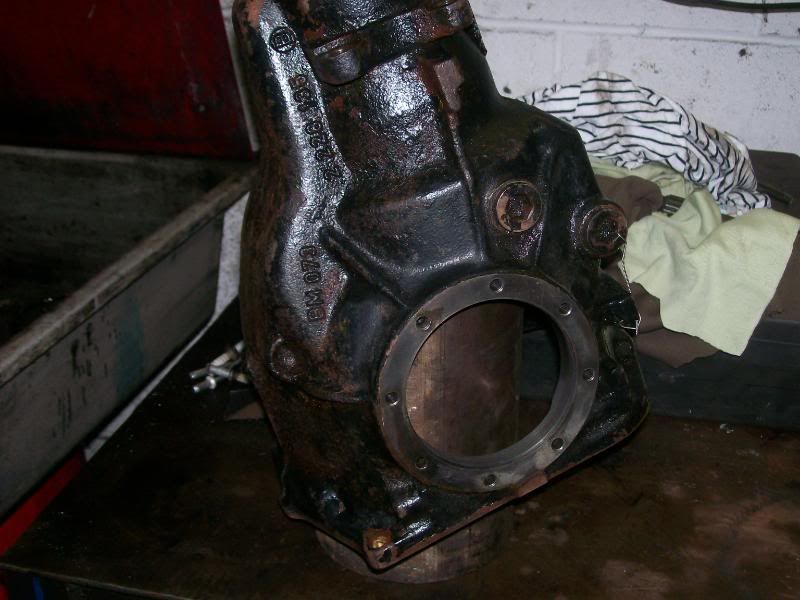
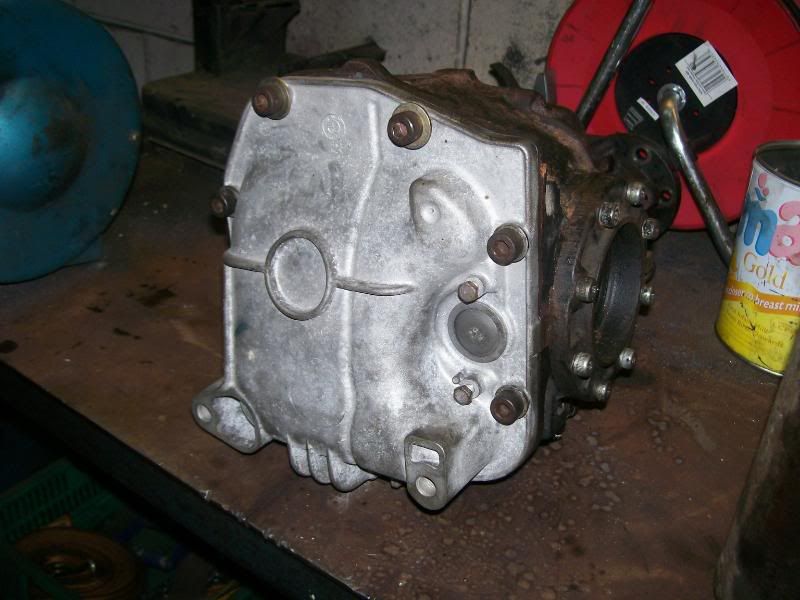
Right, when you are happy that all that is set up ok, remove the flange and fit the seal, then re-fit the rear cover and bob is your uncle.
I have lock-wired all my bolts as well, just for added security, pics of that in a bit........
Note rear cover with blanked off speedo drive hole.......
More in a bit.


-
gareth
- E30 Zone Team Member

- Posts: 11009
- Joined: Tue Jan 11, 2005 11:00 pm
- Location: hastings, east sussex
nope, totally different size entirely. why would you want to? you can fit either size casing to a E30marcp1987 wrote:Can you put a LSD pack from a 8 bolt casing into a 6 bolt casing?
Sole founder of Fe2O3-12V it's a lifestyle

LSD rebuilding / modification services provided, PM for details
LSD rebuilding / modification services provided, PM for details
-
gareth
- E30 Zone Team Member
- Posts: 11009
- Joined: Tue Jan 11, 2005 11:00 pm
- Location: hastings, east sussex
what engine are you running? i'm guessing a 4 pot?
maybe just sell it and buy a 3.91 large case? a lot easier and effectively it'll be free, depending on what you sell / buy for...
maybe just sell it and buy a 3.91 large case? a lot easier and effectively it'll be free, depending on what you sell / buy for...
Sole founder of Fe2O3-12V it's a lifestyle
LSD rebuilding / modification services provided, PM for details
LSD rebuilding / modification services provided, PM for details
-
SCOTT325SE
- Married to the E30 Zone
- Posts: 12582
- Joined: Sun Jan 09, 2005 11:00 pm
- Location: Carmarthen (West Wales)
do yoursalf a favour chap. Send the diff and £120 to Kevo off here and tell him to work his magic!gareth wrote:as i belive my LSD is fairly tired ('sometimes' doesn't lock up properly), i'm wondering about rebuilding it while i do a total rear suspension refit and also if possible swapping the rato for something better suited for my M30 while i'm at it (mine is a 3.91 at the mo.)
what is involved in a LSD rebuild?
can a better suited open diff be cannibalised for a more suited ratio?
i've read somewhere in the past that a 2.8 capri LSD rebuild kit can be used for the clutch plates or something... i believe the reasone being that one capri kit will do 2 E30 diffs and cost a lot less
does anyone know anything useful?

Sadly yeah lolgareth wrote:what engine are you running? i'm guessing a 4 pot?
maybe just sell it and buy a 3.91 large case? a lot easier and effectively it'll be free, depending on what you sell / buy for...
-
gareth
- E30 Zone Team Member
- Posts: 11009
- Joined: Tue Jan 11, 2005 11:00 pm
- Location: hastings, east sussex
that diff is long long gone, swapped with one on a mates 325i before he sold itSCOTT325SE wrote:do yoursalf a favour chap. Send the diff and £120 to Kevo off here and tell him to work his magic!gareth wrote:as i belive my LSD is fairly tired ('sometimes' doesn't lock up properly), i'm wondering about rebuilding it while i do a total rear suspension refit and also if possible swapping the rato for something better suited for my M30 while i'm at it (mine is a 3.91 at the mo.)
what is involved in a LSD rebuild?
can a better suited open diff be cannibalised for a more suited ratio?
i've read somewhere in the past that a 2.8 capri LSD rebuild kit can be used for the clutch plates or something... i believe the reasone being that one capri kit will do 2 E30 diffs and cost a lot less
does anyone know anything useful?
at present i have a decent LSD pack (may just give it new plates...? seems ok though) and a 3.38:1 CW&P setup, oh and i have some alpina spec ramp angles machined in my thrust plates for some holligan spec lockage
just need to sort out bearings and shimming etc and fit the bloody thing!
Sole founder of Fe2O3-12V it's a lifestyle
LSD rebuilding / modification services provided, PM for details
LSD rebuilding / modification services provided, PM for details
-
SCOTT325SE
- Married to the E30 Zone
- Posts: 12582
- Joined: Sun Jan 09, 2005 11:00 pm
- Location: Carmarthen (West Wales)
yea, sorry, im a bit slow on the uptake ofsome threads recently. 
-
gareth
- E30 Zone Team Member
- Posts: 11009
- Joined: Tue Jan 11, 2005 11:00 pm
- Location: hastings, east sussex
that's the best solution thenmarcp1987 wrote:Sadly yeah lolgareth wrote:what engine are you running? i'm guessing a 4 pot?
maybe just sell it and buy a 3.91 large case? a lot easier and effectively it'll be free, depending on what you sell / buy for...Seriously considering going to 6 pot power now anyway
Sole founder of Fe2O3-12V it's a lifestyle
LSD rebuilding / modification services provided, PM for details
LSD rebuilding / modification services provided, PM for details
-
gareth
- E30 Zone Team Member
- Posts: 11009
- Joined: Tue Jan 11, 2005 11:00 pm
- Location: hastings, east sussex
hehe, keep up!SCOTT325SE wrote:yea, sorry, im a bit slow on the uptake ofsome threads recently.
Sole founder of Fe2O3-12V it's a lifestyle
LSD rebuilding / modification services provided, PM for details
LSD rebuilding / modification services provided, PM for details
-
stuartgallafant
- E30 Zone Addict
- Posts: 4531
- Joined: Tue Mar 29, 2005 11:00 pm
- Location: Costa del Croydon
so people are moving forward with this now then?!
My diff is still in pieces next to my toolbox. Other priorities have taken over, so the diff took a backseat, but i really wanna finish it!!
Hows people getting on then?
My diff is still in pieces next to my toolbox. Other priorities have taken over, so the diff took a backseat, but i really wanna finish it!!
Hows people getting on then?
-
cliffybabe
- Powered by Nelly
- Posts: 10020
- Joined: Sun Dec 18, 2005 11:00 pm
- Location: Croydon
yeah u got a bike

Considering Selling the Cabby, looks like its gonna go
-
gareth
- E30 Zone Team Member
- Posts: 11009
- Joined: Tue Jan 11, 2005 11:00 pm
- Location: hastings, east sussex
i'm totally out of touch with where this thread ended and am too tired to re-read it all now but in my case, i've not touched my diff for ages due to various pathetic excuses but i've found a good source of plates.
driveandtraction.co.uk can do small case plates for £25 each and large case ones for £23.50 each
not bad ey?!
driveandtraction.co.uk can do small case plates for £25 each and large case ones for £23.50 each
not bad ey?!
Sole founder of Fe2O3-12V it's a lifestyle
LSD rebuilding / modification services provided, PM for details
LSD rebuilding / modification services provided, PM for details
Dragging this one up again 
What did you do for machining the thrust plates Gareth? Pm me if you like to keep the engineering secrets
Have a few cwps here and one or two LSD units in various states of condition so should really tidy them up and make at least one useful diff out of them
What did you do for machining the thrust plates Gareth? Pm me if you like to keep the engineering secrets
Have a few cwps here and one or two LSD units in various states of condition so should really tidy them up and make at least one useful diff out of them
M42 rightness above 6500rpm, nobody can hear you scream

Just thought I'd add my 2p worth too....
I recently noticed my lsd was acting unpredictably, sometimes locking and other times acting like an open diff. So I started doing my homework and trying to find out what was causing it and also if I could fix it myself without too much outlay, as money is getting very low for me lately.
My diff wasn't making any noises or whining etc just not locking.
I've found that it's very hard to get information on refurbing an LSD unit by just surfing the web, but I managed to work out that my LSD unit needed 'refreshing'. I'm also doing a little write up so that it might help others contemplating this in the future. Please note all the usual disclaimers etc, I'm no professional and this is the first time I've ever opened a diff up. This is just how I'm doing it and if it can help someone then I'll be happy. Just make sure you take all proper precautions etc.
All the talk of backlash, crush washers and engineers blue etc, did have me concerned but as far as I understood I wouldn't have to worry about it if I was putting the same differential back together again.
So I decided to bite the bullet and go for a diy LSD unit refurb. I had read about upgrading to alpina spec ramp angles and machining to double the amount of clutch plates in the unit. Which is exactly what I would have been doing if it wasn't for my crippling financial circumstances.
I pm'd 'gareth' who now offers this service and it is more than extremely reasonable. I would say it is a bargain considering the cost and results, unfortunately I'm in no position to take advantage of this great offer at the moment. So instead I'll simply be trying to get my LSD unit back in an oe spec. I'll also be taking pictures along the way and posting them up in this thread as I go.
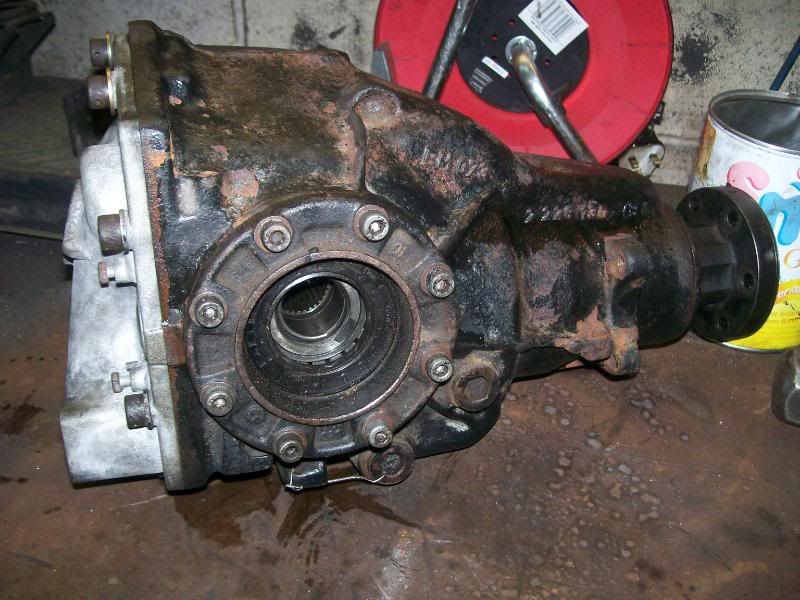
So far here's my progress...
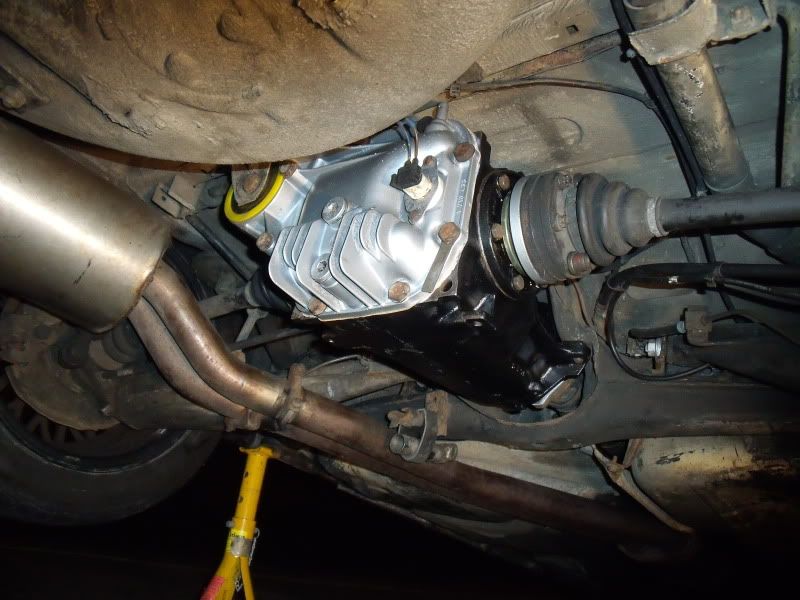
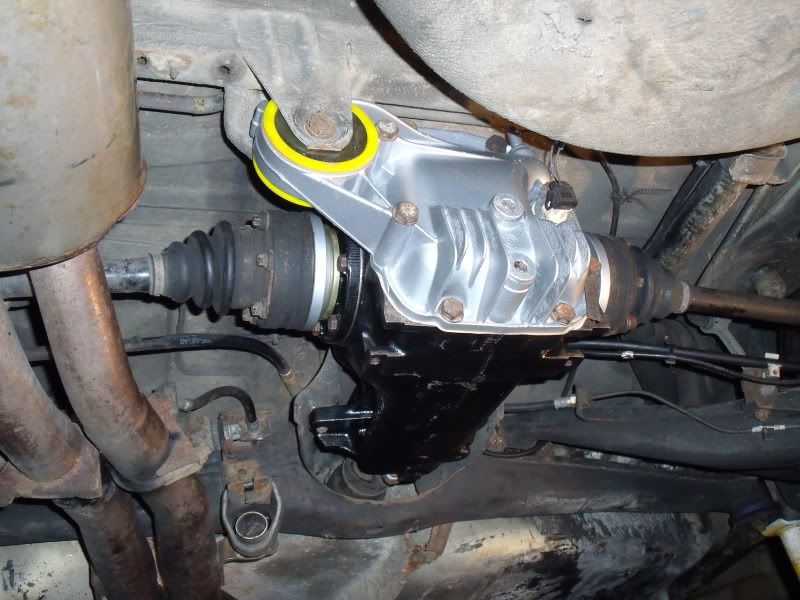
Get diff out of car (I'm changing the rear subframe, trailing arms bushes etc as I've had odd camber on my car since I bought it), you don't need to strip this much out, just the diff can be removed.

Loosen fill plug first then remove lower drain plug and leave to drain for a while. Check that the oil is clean with no metal particles.

Take off the 17mm bolts holding the back cover on

I was quite surprised at how clean it was in there

The bolts are all the same apart from the two long ones which are both equal(I'm paranoid about messing things up, so I like to make sure I can't mix up bolts etc - but no worries here)

You should see this now

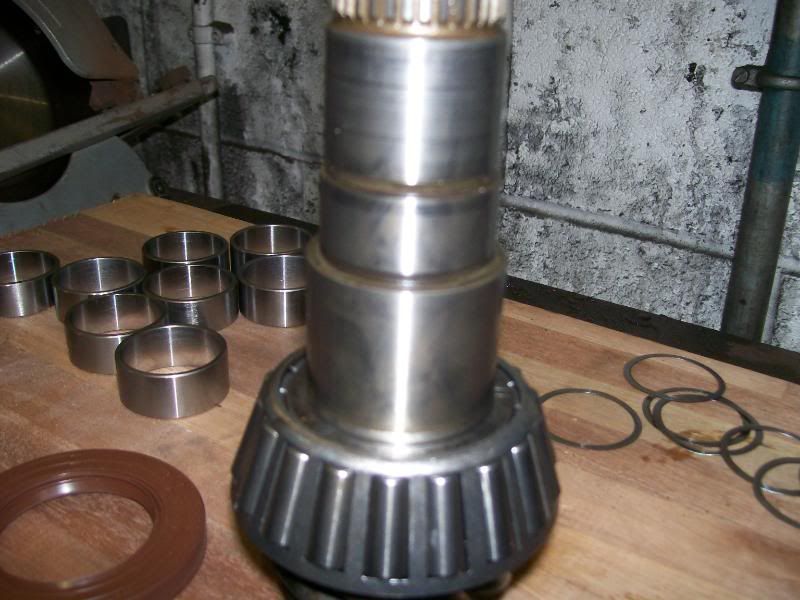
Now you need to pull the 'output shafts'(?) out

You should be able to see this from the side

and be at this stage

now you need to take the 13mm bolts off the 'end caps'(?) and pull them out. I used a small hammer to tap the tab at the top side to side as I pulled

These support the LSD unit within the differential so either wedge something under the unit to stop it dropping or do what I did and get someone to hold it while you take the second 'end cap' off. These also house the output shaft seals, mine are leaking slightly so I will be changing them.
You should now have this engineering marvel infront of you

Close up of LSD unit from the top

Take off the eight 6mm hex bolts, this can be tricky as they are quite tight. My vice was too small to hold the unit(if you use a vice make sure it either has soft alloy jaws or you put adequate padding between the jaws and the unit). So I held the unit while my brother used a ratchet and a hammer to crack the bolts.
All went fine until the last one which the hex socket must have moved ever so slightly off vertical and slipped, then slip the second time and finally slip once more so the head was no good and a hex socket wouldn't work.. fail
mole grips.. fail
torque/ spline socket tapped in... pass
but now I have one bolt which is scrap, anyone know where I can get another from?

With all eight bolts off you should see something like this, the 'top hat' (? I really need to learn what all these things are called) came up by approx 4.2mm. This picture is after I lifted it a bit more

This is a photo after it was taken off and placed upside down, the smear/missing bit of yellow is where I wiped the metal to see if it was discoloured metal or oil. It was just oil.

Now to start pulling the guts out, I made notes on the orientation of parts to help when I re-assemble. First things out, they came out as one but there is a washer first(looks a little like a spring/cone washer?) then a tabbed disc with a diamond embossed pattern on the bottom.
I don't know if there should be a similar pattern on the top of this tabbed disc(visible in the photo) there seems to be either some pitting or it's worn right down.
Any suggestions?

Next there is a large 'spring/cone washer'(?) pointing upwards / \


This disc/cone washer has worn slightly against the 'top hat', on the inner edge there is a slight step 0.3mm.
Is this ok or would this need replacing?

Then there is a 4 tabbed flat washer, with what looked like mub stamped on one of the tabs.


Now we reach the clutch disc. It was getting tricky to pull out so I lifted it out with the side gear and pressure plate

It looked quite good with even grooves between the segments but was showing slight wear on the outer edge and measured up at 88mm wide and 1.95mm thick with 23 teeth/splines
Is this typical of a worn clutch?


Next we have the pressure plate, this is what needs to be sent to gareth for upgrading( correct me if I'm wrong )

This is as far as I went today. The last thing out, the side gear

Halfway through...

So this is where I've got to so far. Any input/corrections will be gladly received and I will edit this post accordingly.
So far I'm about to order two clutch plates, if there's anything I missed or should be doing please let me know. Hopefully this will help others in the future.
I'll be taking more photo's and posting up as I go along.
I recently noticed my lsd was acting unpredictably, sometimes locking and other times acting like an open diff. So I started doing my homework and trying to find out what was causing it and also if I could fix it myself without too much outlay, as money is getting very low for me lately.
My diff wasn't making any noises or whining etc just not locking.
I've found that it's very hard to get information on refurbing an LSD unit by just surfing the web, but I managed to work out that my LSD unit needed 'refreshing'. I'm also doing a little write up so that it might help others contemplating this in the future. Please note all the usual disclaimers etc, I'm no professional and this is the first time I've ever opened a diff up. This is just how I'm doing it and if it can help someone then I'll be happy. Just make sure you take all proper precautions etc.
All the talk of backlash, crush washers and engineers blue etc, did have me concerned but as far as I understood I wouldn't have to worry about it if I was putting the same differential back together again.
So I decided to bite the bullet and go for a diy LSD unit refurb. I had read about upgrading to alpina spec ramp angles and machining to double the amount of clutch plates in the unit. Which is exactly what I would have been doing if it wasn't for my crippling financial circumstances.
I pm'd 'gareth' who now offers this service and it is more than extremely reasonable. I would say it is a bargain considering the cost and results, unfortunately I'm in no position to take advantage of this great offer at the moment. So instead I'll simply be trying to get my LSD unit back in an oe spec. I'll also be taking pictures along the way and posting them up in this thread as I go.
So far here's my progress...
Get diff out of car (I'm changing the rear subframe, trailing arms bushes etc as I've had odd camber on my car since I bought it), you don't need to strip this much out, just the diff can be removed.
Loosen fill plug first then remove lower drain plug and leave to drain for a while. Check that the oil is clean with no metal particles.
Take off the 17mm bolts holding the back cover on
I was quite surprised at how clean it was in there
The bolts are all the same apart from the two long ones which are both equal(I'm paranoid about messing things up, so I like to make sure I can't mix up bolts etc - but no worries here)
You should see this now
Now you need to pull the 'output shafts'(?) out
You should be able to see this from the side
and be at this stage
now you need to take the 13mm bolts off the 'end caps'(?) and pull them out. I used a small hammer to tap the tab at the top side to side as I pulled
These support the LSD unit within the differential so either wedge something under the unit to stop it dropping or do what I did and get someone to hold it while you take the second 'end cap' off. These also house the output shaft seals, mine are leaking slightly so I will be changing them.
You should now have this engineering marvel infront of you
Close up of LSD unit from the top
Take off the eight 6mm hex bolts, this can be tricky as they are quite tight. My vice was too small to hold the unit(if you use a vice make sure it either has soft alloy jaws or you put adequate padding between the jaws and the unit). So I held the unit while my brother used a ratchet and a hammer to crack the bolts.
All went fine until the last one which the hex socket must have moved ever so slightly off vertical and slipped, then slip the second time and finally slip once more so the head was no good and a hex socket wouldn't work.. fail
mole grips.. fail
torque/ spline socket tapped in... pass
but now I have one bolt which is scrap, anyone know where I can get another from?
With all eight bolts off you should see something like this, the 'top hat' (? I really need to learn what all these things are called) came up by approx 4.2mm. This picture is after I lifted it a bit more
This is a photo after it was taken off and placed upside down, the smear/missing bit of yellow is where I wiped the metal to see if it was discoloured metal or oil. It was just oil.
Now to start pulling the guts out, I made notes on the orientation of parts to help when I re-assemble. First things out, they came out as one but there is a washer first(looks a little like a spring/cone washer?) then a tabbed disc with a diamond embossed pattern on the bottom.
I don't know if there should be a similar pattern on the top of this tabbed disc(visible in the photo) there seems to be either some pitting or it's worn right down.
Any suggestions?
Next there is a large 'spring/cone washer'(?) pointing upwards / \
This disc/cone washer has worn slightly against the 'top hat', on the inner edge there is a slight step 0.3mm.
Is this ok or would this need replacing?
Then there is a 4 tabbed flat washer, with what looked like mub stamped on one of the tabs.
Now we reach the clutch disc. It was getting tricky to pull out so I lifted it out with the side gear and pressure plate
It looked quite good with even grooves between the segments but was showing slight wear on the outer edge and measured up at 88mm wide and 1.95mm thick with 23 teeth/splines
Is this typical of a worn clutch?
Next we have the pressure plate, this is what needs to be sent to gareth for upgrading( correct me if I'm wrong
This is as far as I went today. The last thing out, the side gear
Halfway through...
So this is where I've got to so far. Any input/corrections will be gladly received and I will edit this post accordingly.
So far I'm about to order two clutch plates, if there's anything I missed or should be doing please let me know. Hopefully this will help others in the future.
I'll be taking more photo's and posting up as I go along.
-
psychochild187
- E30 Zone Squatter

- Posts: 1857
- Joined: Tue Feb 08, 2005 11:00 pm
- Location: brighton
my thoughts are ,
at factory they put in a clutch and shimed it up and if i put a new set of clutches in now i would be useing the same shims and therfore have the same as factory
is this fairly true or do they end up way out even still?
at factory they put in a clutch and shimed it up and if i put a new set of clutches in now i would be useing the same shims and therfore have the same as factory
is this fairly true or do they end up way out even still?
I'm not certain, but that was my reasoning too.
I think it's changes when you get it open though, as mine has had me scratching my head....
I think the 'thrust washer' has worn right down and is allowing the cone washer to contact the 'top hat'(?), so it looks as though mine might need more than just the clutches.
I could do with some guidance though..
-
gareth
- E30 Zone Team Member
- Posts: 11009
- Joined: Tue Jan 11, 2005 11:00 pm
- Location: hastings, east sussex
looking good so far
the clutch plates don't tent to wear to a greatly reduced thickness, it's more that they glaze over. once they're glazed, they will slip more and hence wear more as / when you spin an inside wheel under power.
this is what driveandtraction.co.uk told me:
i'm not sure if the spring washers are available seperately, i've not seen them anywhere and BMW don't sell the internal components seperately, just re-con LSD packs complete. You'll not be losing a great deal of preload on the LSD pack though.
though i don't need the gear that's in that pic, just the pair of plates
the clutch plates don't tent to wear to a greatly reduced thickness, it's more that they glaze over. once they're glazed, they will slip more and hence wear more as / when you spin an inside wheel under power.
this is what driveandtraction.co.uk told me:
The drive plate thickness (new) is 2.04mm for both sizes of plate.
Your old plates will probably be close to this anway. The problem is that old plates, over a long period, develop a surface 'glaze' because the wear surface is very hard this then leads to slip
i'm not sure if the spring washers are available seperately, i've not seen them anywhere and BMW don't sell the internal components seperately, just re-con LSD packs complete. You'll not be losing a great deal of preload on the LSD pack though.
correctomondosupafly wrote:Next we have the pressure plate, this is what needs to be sent to gareth for upgrading( correct me if I'm wrong
Sole founder of Fe2O3-12V it's a lifestyle
LSD rebuilding / modification services provided, PM for details
LSD rebuilding / modification services provided, PM for details
-
chrisroberts

- E30 Zone Newbie

- Posts: 107
- Joined: Tue Mar 10, 2009 11:00 pm
Where can you get shims from for the side/gear flanges. Would i be best taking one somewhere to be machined, or buying a few and hoping one of them is the right size?
-
gareth
- E30 Zone Team Member
- Posts: 11009
- Joined: Tue Jan 11, 2005 11:00 pm
- Location: hastings, east sussex
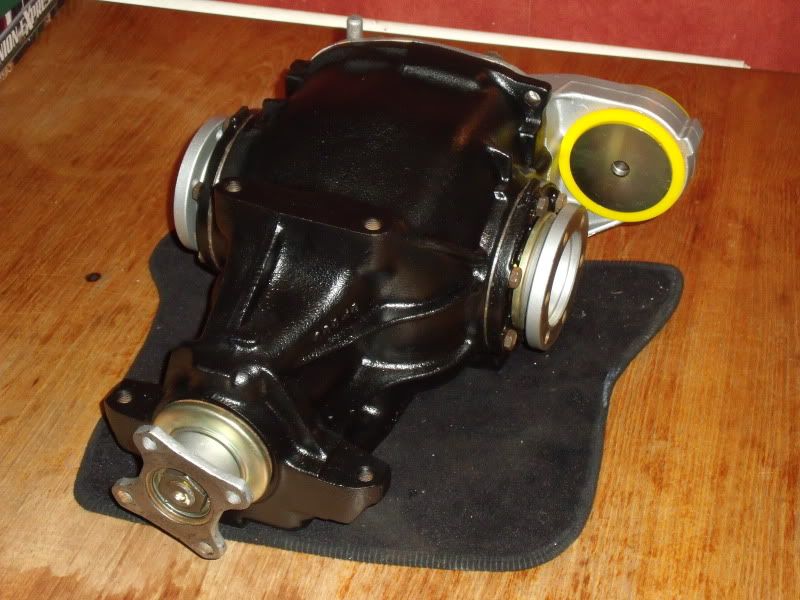
for anyone who's been following this oooooold thread, a wee update
i've now have my LSD in place for a while now and it's great
all new bearings, new clutch plates (as it's a daily use road car i did stick with the standard two plate setup), 40% locking (30° ramp angles) and a 3.38:1 CW&P from a E34 525ix all shimmed, preloaded and meshing adjusted too - what a lovely job that was 
The good news, upon installation, it's totally quiet and locks up a treat the ramp angle mod makes it soo much better.
I am now doing the occasional diff mod / rebuild for people so if anyone needs one doing, pm me
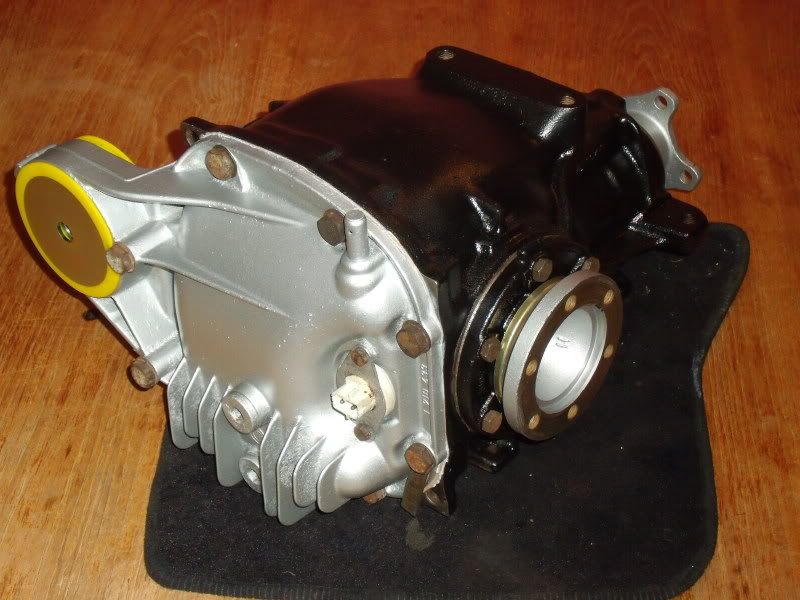
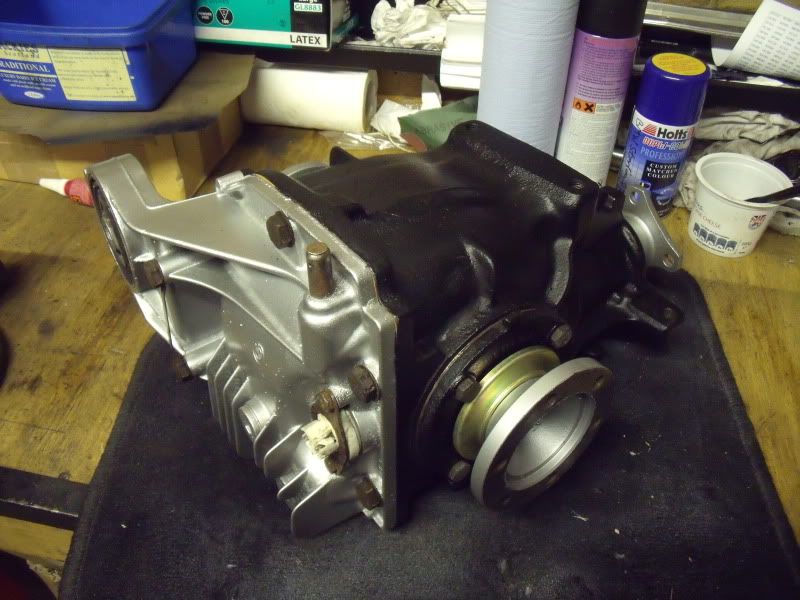
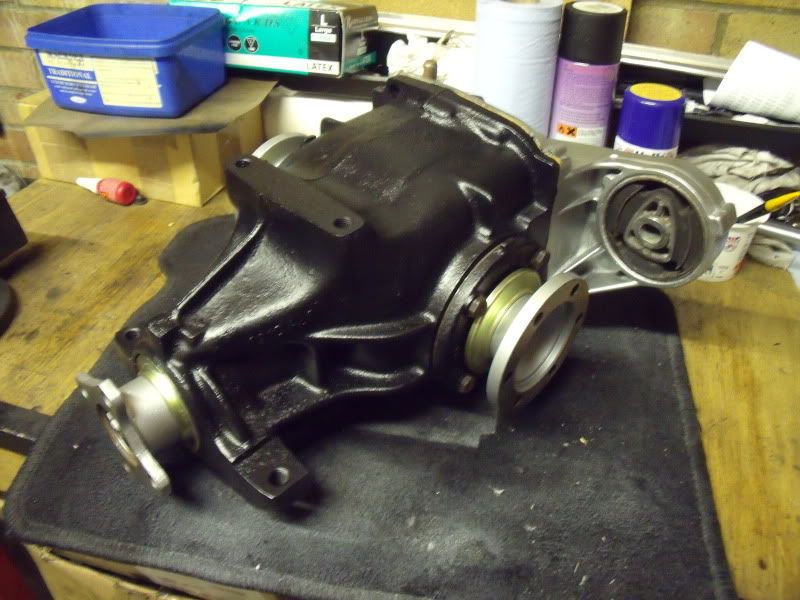
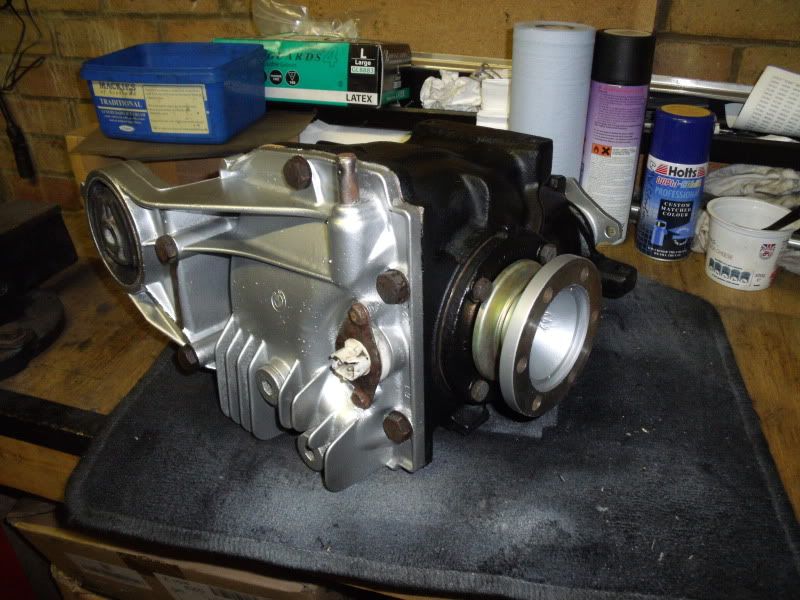
a few pics
My 3.38: medium case
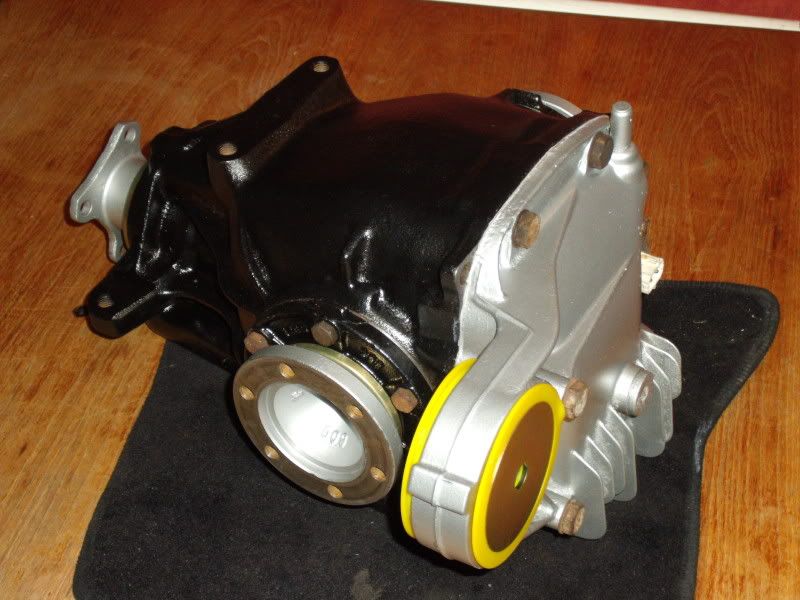
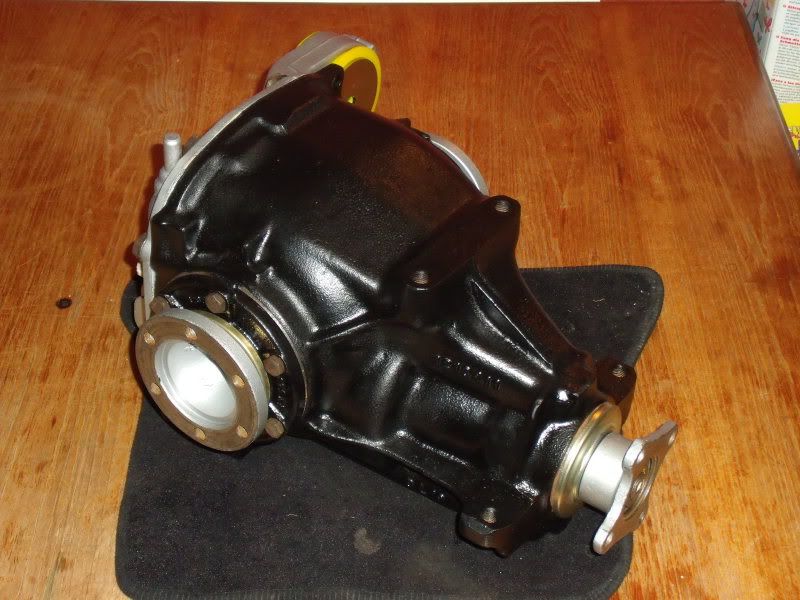
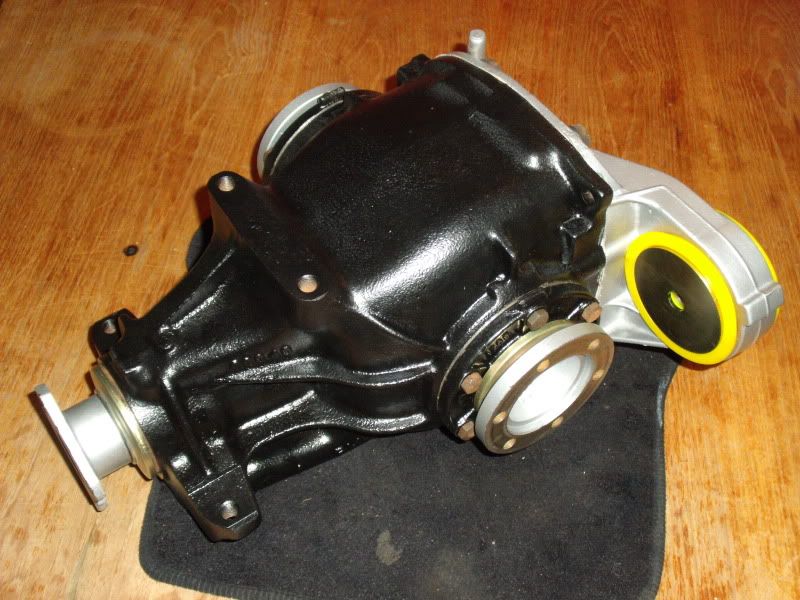
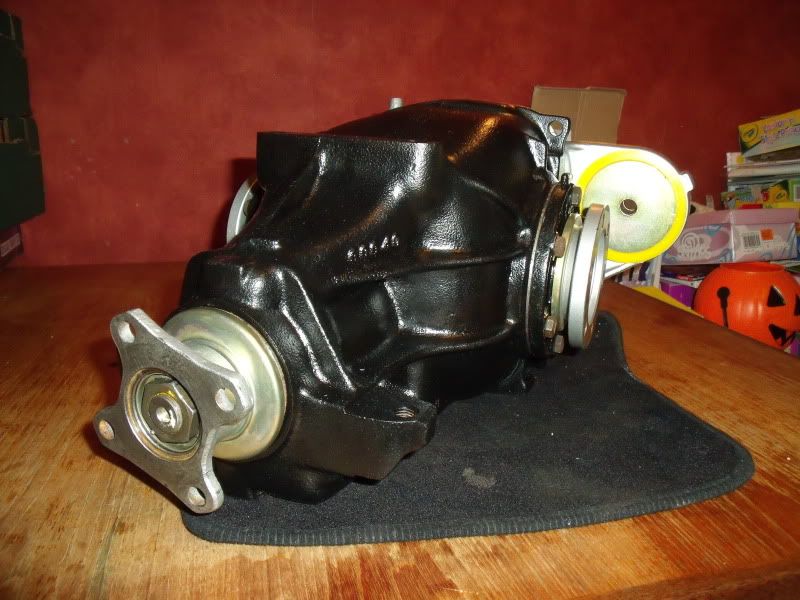
The holy grail for baby M3 owners.... winkeyea freshly rebuilt 4.1:1 small case LSD
i've now have my LSD in place for a while now and it's great
all new bearings, new clutch plates (as it's a daily use road car i did stick with the standard two plate setup), 40% locking (30° ramp angles) and a 3.38:1 CW&P from a E34 525ix
The good news, upon installation, it's totally quiet and locks up a treat
I am now doing the occasional diff mod / rebuild for people so if anyone needs one doing, pm me
a few pics
My 3.38: medium case
The holy grail for baby M3 owners.... winkeyea freshly rebuilt 4.1:1 small case LSD
Sole founder of Fe2O3-12V it's a lifestyle
LSD rebuilding / modification services provided, PM for details
LSD rebuilding / modification services provided, PM for details
Looks sweet Gareth!
I already have a 4.1 medium case in a similar condition as that as it came from the US, on the outside anyway it looks minty, could really do with new plates now but think I'll just build a 3.91 from scratch with the few little tweeks
How much did all the bearings, seals and other small new bits come to if you don't mind me asking as just want to get an idea of what a full rebuild will cost for mine. PM me if you like.
M42 rightness above 6500rpm, nobody can hear you scream