
Thanks, Brian. Your rebuild thread is a constant reference at each step and proving invaluable.x-works wrote:Beautiful work!
E30 M3 nut & bolt rebuild
Moderator: martauto
-
BMG

- E30 Zone Regular

- Posts: 439
- Joined: Mon Jun 27, 2005 11:00 pm
- Location: south east
-
Sanchez
- Married to the E30 Zone

- Posts: 7578
- Joined: Sun Apr 17, 2005 11:00 pm
- Location: Sunny Scotland
Wow. Lovely work.
-
KW355
- E30 Zone Regular
- Posts: 266
- Joined: Sat Mar 29, 2014 11:00 pm
- Location: Birmingham
Amazing attention to detail. I look forward to updates.
-
jimbom30cab
- Tech 1 freak
- Posts: 7634
- Joined: Mon Oct 12, 2009 11:00 pm
- Location: in the garage
Best thread on here at the moment IMO


-
tha881
- E30 Zone Regular
- Posts: 780
- Joined: Thu Apr 15, 2010 11:00 pm
- Location: Kent
"new bushings in the pedals" are you serious!
This is an amazing rebuild, thanks for taking the time to share it with us.
This is an amazing rebuild, thanks for taking the time to share it with us.

-
kdevitt
- E30 Zone Regular
- Posts: 581
- Joined: Sun Feb 05, 2006 11:00 pm
- Location: Dublin
Amazing work. Am kicking off a new project, which is a light resto - might need to avoid this thread or I'll end up spending a lot more cash than I want to 
-
aimlessrock
- E30 Zone Squatter

- Posts: 1821
- Joined: Sun Dec 06, 2009 11:00 pm
- Location: Manchester
the attention to detail is epic...if i had the time and the beans i would love to do a resto to this standard.
E30 320i Convertible (1989)
190 Mercedes (1988)
"there is nothing more expensive than a cheap E30"
190 Mercedes (1988)
"there is nothing more expensive than a cheap E30"
-
M-Sport
- E30 Zone Camper

- Posts: 1056
- Joined: Mon Jan 14, 2008 11:00 pm
- Location: west midlands
Nice work so far BMG, can't wait for next update 
This has got to be at the top with the x-works resto thread.
Mods can thread be stickeeeeeed?
This has got to be at the top with the x-works resto thread.
Mods can thread be stickeeeeeed?
-
mattmk1
- E30 Zone Newbie

- Posts: 213
- Joined: Wed Apr 08, 2009 11:00 pm
Great project, love the exploded views!
Do you have a link for the borescope...looks an interesting addition to the tool box!
Do you have a link for the borescope...looks an interesting addition to the tool box!
-
BMG
- E30 Zone Regular
- Posts: 439
- Joined: Mon Jun 27, 2005 11:00 pm
- Location: south east
Thanks for the kind words. I should point out that I'm merely bolting small bits back together so far and the major parts will have to be done by professionals, as I'm unable to weld, do body work, paint or rebuild engines. I'll be doing as much as I can, but comparisons to XWorks rebuild thread don't do justice to his work or skills.
I consider Xworks thread a gold standard of internet car rebuild threads, not only for the excellence of the work, but because he was able to do it all himself which is really what sets it apart. That he also wrote a 'how to' guide is something that's also made it much easier for me to follow in trying to replicate what he has done.
The borescope is low quality , but for the money has proved useful and handy to keep around. I don't have the link to the one I bought, but search on eBay for ' phone borescope' or 'android endoscope ' or similar and it'll bring up no end of results
-
DawieM3
- E30 Zone Regular
- Posts: 320
- Joined: Mon Jan 10, 2005 11:00 pm
- Location: London
Hi Brian,
Glad too see that you have started the process of putting it all back together.
I`m nearing completion of a full rebuild on my track car in the FINA livery.
Give me a call sometime and lets meet up as may be able to arrange a visit to a mate of mine, to see the ex Bristow Helicopters UK.
cheers,
Dave
E30 M3 Track car S14, 2.5l
2002, 2.0l fuel injected
E30 C2 2.7 Alpina
E36 M3 Evo
1602, - 2.5 S14
2002 E10 -M57 on e46 floorpan
335d - e92
320d -e92
Jag xj8 4.0l
Mitsu L200 animal
2002, 2.0l fuel injected
E30 C2 2.7 Alpina
E36 M3 Evo
1602, - 2.5 S14
2002 E10 -M57 on e46 floorpan
335d - e92
320d -e92
Jag xj8 4.0l
Mitsu L200 animal
-
BMG
- E30 Zone Regular
- Posts: 439
- Joined: Mon Jun 27, 2005 11:00 pm
- Location: south east
HI Dave,
Will give you a call and catch up sometime. Would be good to see you and your track car again. Thank God you went FINA and not Warsteiner !
Will give you a call and catch up sometime. Would be good to see you and your track car again. Thank God you went FINA and not Warsteiner !
-
BMG
- E30 Zone Regular
- Posts: 439
- Joined: Mon Jun 27, 2005 11:00 pm
- Location: south east
Time for an update. Slowly been doing bits and bobs as time allows.
Heater box time. The unit was looking a bit tired and the foam was breaking up and the metal parts a little corroded.
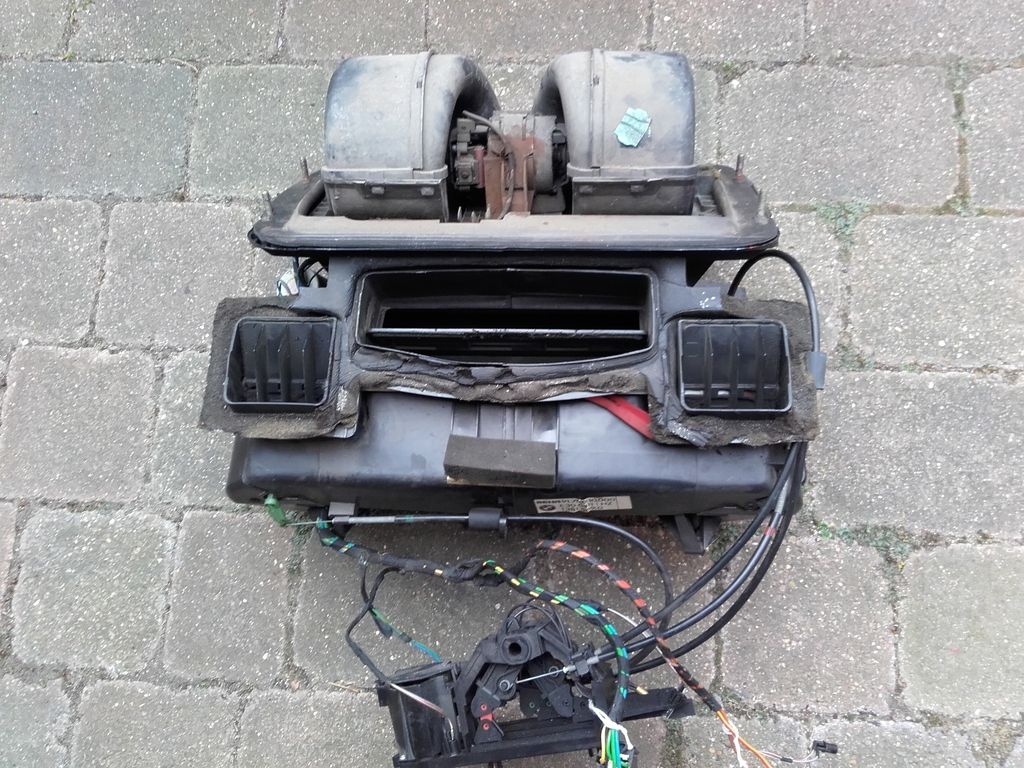
Evidence the heater valve has been leaking a little.
Foam on the various flaps all broken up.
 20160827_164854 by e30 m3, on Flickr
 20160930_152608 by e30 m3, on Flickr
Pulled apart and cleaned
 20170210_140025 by e30 m3, on Flickr
 20170210_140048 by e30 m3, on Flickr
Cut some new foam and cleaned up the various parts
 20160903_153958 by e30 m3, on Flickr
 20170210_140209 by e30 m3, on Flickr
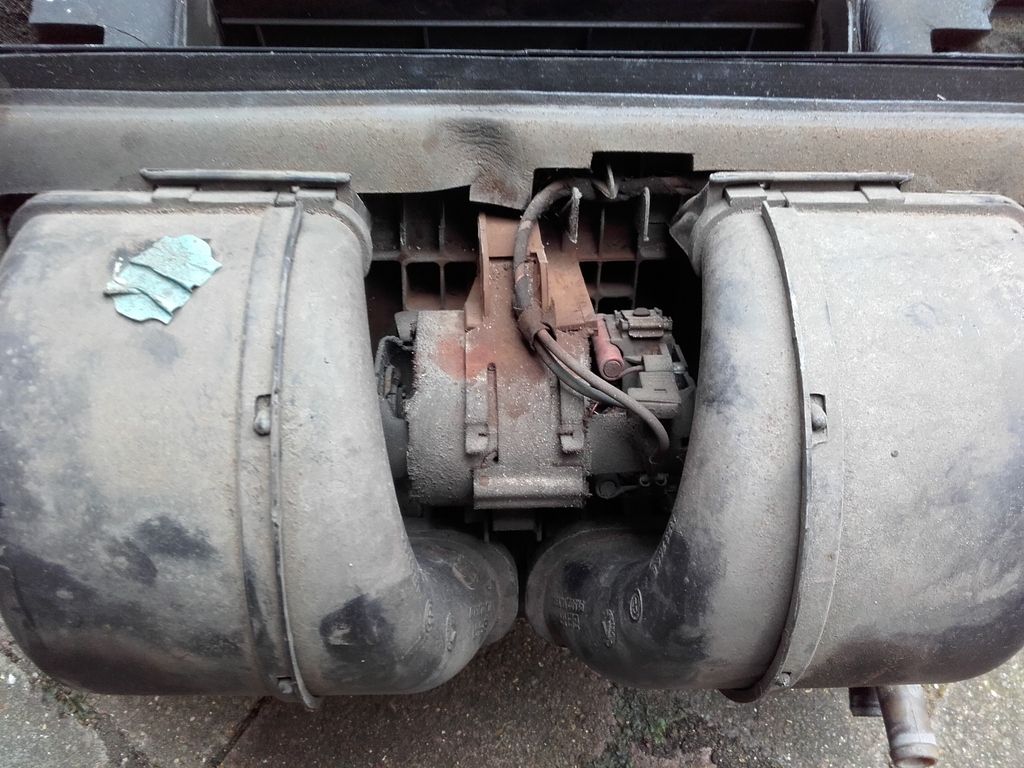
Motor gets a check over for play in the bearings and bench tested with a power supply. Bracket gets zinc plated and duct work cleaner of 20 odd years of dust, crisps and other assorted crap.
 20170210_140349 by e30 m3, on Flickr
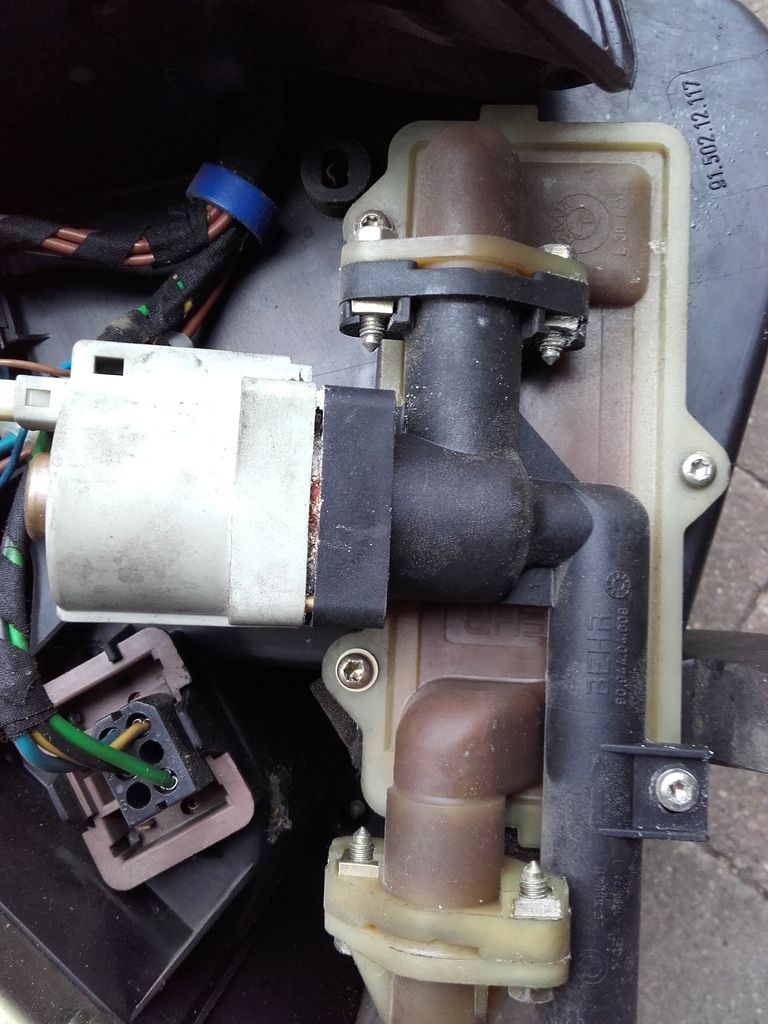
New foam gaskets, new heater core, new heater valve and cleaned the contacts on the resistor.
 20170210_140529 by e30 m3, on Flickr
Reassembly starts with putting the two flaps and duct in place.
 20170210_144818 by e30 m3, on Flickr
New bit of O-ring cord to seal the two halfs
 20170210_145308 by e30 m3, on Flickr
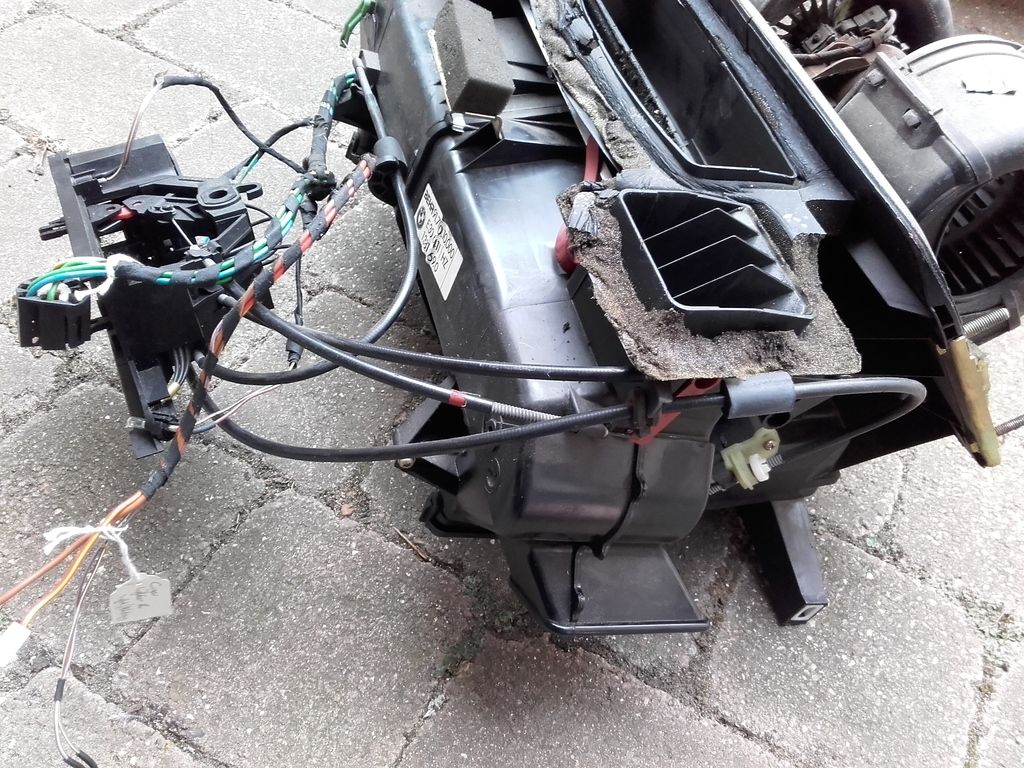
The wiring look gets cleaned, checked over and then wrapped in loom tape.
 20160904_104251 by e30 m3, on Flickr
Built up
 20170226_124853 by e30 m3, on Flickr
 20170226_124812 by e30 m3, on Flickr
Mounting brackets plated.
 20170411_154524 by e30 m3, on Flickr
Fitted.
 20170411_154554 by e30 m3, on Flickr
Finished unit. Minus the brackets which were out for plating at the time.
 20170226_124927 by e30 m3, on Flickr
Heater box time. The unit was looking a bit tired and the foam was breaking up and the metal parts a little corroded.


Evidence the heater valve has been leaking a little.

Foam on the various flaps all broken up.
20160827_164854 by e30 m3, on Flickr20160930_152608 by e30 m3, on FlickrPulled apart and cleaned
20170210_140025 by e30 m3, on Flickr20170210_140048 by e30 m3, on FlickrCut some new foam and cleaned up the various parts
20160903_153958 by e30 m3, on Flickr20170210_140209 by e30 m3, on FlickrMotor gets a check over for play in the bearings and bench tested with a power supply. Bracket gets zinc plated and duct work cleaner of 20 odd years of dust, crisps and other assorted crap.
20170210_140349 by e30 m3, on FlickrNew foam gaskets, new heater core, new heater valve and cleaned the contacts on the resistor.
20170210_140529 by e30 m3, on FlickrReassembly starts with putting the two flaps and duct in place.
20170210_144818 by e30 m3, on FlickrNew bit of O-ring cord to seal the two halfs
20170210_145308 by e30 m3, on FlickrThe wiring look gets cleaned, checked over and then wrapped in loom tape.
20160904_104251 by e30 m3, on FlickrBuilt up
20170226_124853 by e30 m3, on Flickr20170226_124812 by e30 m3, on FlickrMounting brackets plated.
20170411_154524 by e30 m3, on FlickrFitted.
20170411_154554 by e30 m3, on FlickrFinished unit. Minus the brackets which were out for plating at the time.
20170226_124927 by e30 m3, on Flickr
Last edited by BMG on Mon Apr 17, 2017 1:00 am, edited 1 time in total.
-
BMG
- E30 Zone Regular
- Posts: 439
- Joined: Mon Jun 27, 2005 11:00 pm
- Location: south east
The prop was paint stripped and both joints weren't that great. These are staked in joints and not replaceable without specialist machinery, so sent away for this.
 20160820_125129 by e30 m3, on Flickr
Painted with new lock and clamp ring.
 20160903_135821 by e30 m3, on Flickr
New bearing
 20160903_135716 by e30 m3, on Flickr
New rubber doughnut ,new nose bushing , nuts and bolts
 20160903_135724 by e30 m3, on Flickr
Finished unit
 20160903_135750 by e30 m3, on Flickr
The brake servo was looking a little tired.
 20160530_140606 by e30 m3, on Flickr
 20160530_140616 by e30 m3, on Flickr
 20160530_140707 by e30 m3, on Flickr
 20160530_140639 by e30 m3, on Flickr
I cleaned it up and gave it a paint job.
 20160828_151800 by e30 m3, on Flickr
 20160828_151717 by e30 m3, on Flickr
The cap and tank have been in my new garage toy, an ultrasonic cleaner.
The master cylinder ins't serviceable and only have a clean and new seal.
 20160828_151549 by e30 m3, on Flickr
New hose, locking nuts , foam gasket and decal from Pukar
Designs.
 20160828_151517 by e30 m3, on Flickr
There is meant to be a foam air filter under the bellows which is NLA and missing in this pic.
 20160828_152009 by e30 m3, on Flickr
Found this open cell foam on eBay being sold as a fish pond filter which got cut down to fit.
 20170319_124016 by e30 m3, on Flickr
Finished item came out well.
 20160828_153645 by e30 m3, on Flickr
 20160903_135922 by e30 m3, on Flickr
20160820_125129 by e30 m3, on FlickrPainted with new lock and clamp ring.
20160903_135821 by e30 m3, on FlickrNew bearing
20160903_135716 by e30 m3, on FlickrNew rubber doughnut ,new nose bushing , nuts and bolts
20160903_135724 by e30 m3, on FlickrFinished unit
20160903_135750 by e30 m3, on FlickrThe brake servo was looking a little tired.
20160530_140606 by e30 m3, on Flickr20160530_140616 by e30 m3, on Flickr20160530_140707 by e30 m3, on Flickr20160530_140639 by e30 m3, on FlickrI cleaned it up and gave it a paint job.
20160828_151800 by e30 m3, on Flickr20160828_151717 by e30 m3, on FlickrThe cap and tank have been in my new garage toy, an ultrasonic cleaner.
The master cylinder ins't serviceable and only have a clean and new seal.
20160828_151549 by e30 m3, on FlickrNew hose, locking nuts , foam gasket and decal from Pukar
Designs.
20160828_151517 by e30 m3, on FlickrThere is meant to be a foam air filter under the bellows which is NLA and missing in this pic.
20160828_152009 by e30 m3, on FlickrFound this open cell foam on eBay being sold as a fish pond filter which got cut down to fit.
20170319_124016 by e30 m3, on FlickrFinished item came out well.
20160828_153645 by e30 m3, on Flickr20160903_135922 by e30 m3, on Flickr
Last edited by BMG on Mon Apr 17, 2017 12:58 am, edited 2 times in total.
-
Kos

- E30 Zone Team Member

- Posts: 15546
- Joined: Tue Jul 12, 2005 11:00 pm
- Location: London / Cyprus
Nice work
PUKAR DESIGNS - Reproduction BMW Decals Labels Sticker & Number Plates
www.pukardesigns.com
www.facebook.com/pukar.designs/
IG Pukar.Designs
www.pukardesigns.com
www.facebook.com/pukar.designs/
IG Pukar.Designs
-
BMG
- E30 Zone Regular
- Posts: 439
- Joined: Mon Jun 27, 2005 11:00 pm
- Location: south east
The wiper motor was also looking a little bit tired and rusty.
 20160910_121508 by e30 m3, on Flickr
Corrosion on both ends
 20160910_125127 by e30 m3, on Flickr
 20160910_124853 by e30 m3, on Flickr
Cover removed and the old grease is looking a little thin.
 20160910_190250 by e30 m3, on Flickr
Gave the ends a light bead blast
 20160920_110902 by e30 m3, on Flickr
Built back up with new nuts, washers and o-rings.
 20160920_113912 by e30 m3, on Flickr
Freshly painted frame , greased motor and plated hardware.
 20160920_114427 by e30 m3, on Flickr
 20160924_154404 by e30 m3, on Flickr
New bushes.
 20160920_113836 by e30 m3, on Flickr
Completed the pedal box with a new cylinder.
 20160908_140433 by e30 m3, on Flickr
20160908_140433 by e30 m3, on Flickr
New hose.
 20160908_140445 by e30 m3, on Flickr
Made a new hard line up to spec.
 20160916_160246 by e30 m3, on Flickr
New clutch cylinder
 20160916_160537 by e30 m3, on Flickr
Not much I can do with the ABS unit other than clean it up.
 20160610_153115 by e30 m3, on Flickr
 20160610_153047 by e30 m3, on Flickr
 20160610_153127 by e30 m3, on Flickr
 20160610_155218 by e30 m3, on Flickr
 20160924_143833 by e30 m3, on Flickr
 20160924_145316 by e30 m3, on Flickr
 20160924_145242 by e30 m3, on Flickr
Finished up the throttles when the studs came back from plating
 20160924_165632 by e30 m3, on Flickr
Same on the plenum
 20160925_130743 by e30 m3, on Flickr
The oil cooler and lines were pretty rusty and shot and couldn't be saved, so new cooler and lines
 20160907_125148 by e30 m3, on Flickr
 20160907_125206 by e30 m3, on Flickr
20160910_121508 by e30 m3, on FlickrCorrosion on both ends
20160910_125127 by e30 m3, on Flickr20160910_124853 by e30 m3, on FlickrCover removed and the old grease is looking a little thin.
20160910_190250 by e30 m3, on FlickrGave the ends a light bead blast
20160920_110902 by e30 m3, on FlickrBuilt back up with new nuts, washers and o-rings.
20160920_113912 by e30 m3, on FlickrFreshly painted frame , greased motor and plated hardware.
20160920_114427 by e30 m3, on Flickr20160924_154404 by e30 m3, on FlickrNew bushes.
20160920_113836 by e30 m3, on FlickrCompleted the pedal box with a new cylinder.
20160908_140433 by e30 m3, on Flickr20160908_140433 by e30 m3, on FlickrNew hose.
20160908_140445 by e30 m3, on FlickrMade a new hard line up to spec.
20160916_160246 by e30 m3, on FlickrNew clutch cylinder
20160916_160537 by e30 m3, on FlickrNot much I can do with the ABS unit other than clean it up.
20160610_153115 by e30 m3, on Flickr20160610_153047 by e30 m3, on Flickr20160610_153127 by e30 m3, on Flickr20160610_155218 by e30 m3, on Flickr20160924_143833 by e30 m3, on Flickr20160924_145316 by e30 m3, on Flickr20160924_145242 by e30 m3, on FlickrFinished up the throttles when the studs came back from plating
20160924_165632 by e30 m3, on FlickrSame on the plenum
20160925_130743 by e30 m3, on FlickrThe oil cooler and lines were pretty rusty and shot and couldn't be saved, so new cooler and lines
20160907_125148 by e30 m3, on Flickr20160907_125206 by e30 m3, on Flickr-
BMG
- E30 Zone Regular
- Posts: 439
- Joined: Mon Jun 27, 2005 11:00 pm
- Location: south east
Shifter linkage gets a clean and new bushes etc. Not sure if I'll change out the old work shifter for something else yet.
 20160206_152418 by e30 m3, on Flickr
 20160206_152435 by e30 m3, on Flickr
 20160924_153509 by e30 m3, on Flickr
Header tank was fitted not long before the car came off the road, so just cleaned up.
 20160813_144417 by e30 m3, on Flickr
 20160813_144534 by e30 m3, on Flickr
 20160813_144519 by e30 m3, on Flickr
New cap and replated mounting.
 20160924_150227 by e30 m3, on Flickr
Ally water rail has been off for some vapour blasting. The steel line has been powder coated , new sensors o-rings and hardware purchased.
 20160907_123817 by e30 m3, on Flickr
M3 heatshields are NLA. 325 items are only slightly different and should be OK with the different ( smaller ) exhaust I'll be using, although the back one may need cutting, so purchased one before they too possibly went NLA.
 20160830_143313 by e30 m3, on Flickr
 20160830_143413 by e30 m3, on Flickr
 20160907_130439 by e30 m3, on Flickr
20160206_152418 by e30 m3, on Flickr20160206_152435 by e30 m3, on Flickr20160924_153509 by e30 m3, on FlickrHeader tank was fitted not long before the car came off the road, so just cleaned up.
20160813_144417 by e30 m3, on Flickr20160813_144534 by e30 m3, on Flickr20160813_144519 by e30 m3, on FlickrNew cap and replated mounting.
20160924_150227 by e30 m3, on FlickrAlly water rail has been off for some vapour blasting. The steel line has been powder coated , new sensors o-rings and hardware purchased.
20160907_123817 by e30 m3, on FlickrM3 heatshields are NLA. 325 items are only slightly different and should be OK with the different ( smaller ) exhaust I'll be using, although the back one may need cutting, so purchased one before they too possibly went NLA.
20160830_143313 by e30 m3, on Flickr20160830_143413 by e30 m3, on Flickr20160907_130439 by e30 m3, on Flickr-
BMG
- E30 Zone Regular
- Posts: 439
- Joined: Mon Jun 27, 2005 11:00 pm
- Location: south east
I got tempted to rebuild the diff myself in an effort to keep costs down, so pulled it out from storage and set about having a look. Looks pretty crusty but had no obvious leak or problems.
 20170218_133909 by e30 m3, on Flickr
 20170218_133923 by e30 m3, on Flickr
 20170218_134012 by e30 m3, on Flickr
 20160324_172959 by e30 m3, on Flickr
Back cover removed and we can see the LSD unit.
 20170218_133942 by e30 m3, on Flickr
Output flange removed.
 20170218_154430 by e30 m3, on Flickr
LSD unit removed and showing the pinion
Not chunks of diff or bearings found, so looking good.
 20170218_144040 by e30 m3, on Flickr
Pulled the LSD unit apart and found more expense.
 20170228_140817 by e30 m3, on Flickr
Both ramps torn up.
 20170228_141128 by e30 m3, on Flickr
Time to clean up what we have.
 20170301_160546 by e30 m3, on Flickr
 20170305_103730 by e30 m3, on Flickr
 20170305_103117 by e30 m3, on Flickr
Cleaned up with new seal, o-ring, bolts, lock ring and original spacer.
 20170305_103103 by e30 m3, on Flickr
 20170305_103351 by e30 m3, on Flickr
Full bearing set, clutches, seal, lock washer, crush ring.
 20170305_103620 by e30 m3, on Flickr
Back cover after vapour blasting and new parts
 20160803_162913 by e30 m3, on Flickr
The diff will be off to see Gareth for a rebuild and repair on the LSD ramps.
20170218_133909 by e30 m3, on Flickr20170218_133923 by e30 m3, on Flickr20170218_134012 by e30 m3, on Flickr20160324_172959 by e30 m3, on FlickrBack cover removed and we can see the LSD unit.
20170218_133942 by e30 m3, on FlickrOutput flange removed.
20170218_154430 by e30 m3, on FlickrLSD unit removed and showing the pinion
Not chunks of diff or bearings found, so looking good.
20170218_144040 by e30 m3, on FlickrPulled the LSD unit apart and found more expense.
20170228_140817 by e30 m3, on FlickrBoth ramps torn up.
20170228_141128 by e30 m3, on FlickrTime to clean up what we have.
20170301_160546 by e30 m3, on Flickr20170305_103730 by e30 m3, on Flickr20170305_103117 by e30 m3, on FlickrCleaned up with new seal, o-ring, bolts, lock ring and original spacer.
20170305_103103 by e30 m3, on Flickr20170305_103351 by e30 m3, on FlickrFull bearing set, clutches, seal, lock washer, crush ring.
20170305_103620 by e30 m3, on FlickrBack cover after vapour blasting and new parts
20160803_162913 by e30 m3, on FlickrThe diff will be off to see Gareth for a rebuild and repair on the LSD ramps.
-
BMG
- E30 Zone Regular
- Posts: 439
- Joined: Mon Jun 27, 2005 11:00 pm
- Location: south east
The diff case has been away to the powder coating shop for a blast clean and coat of satin black powder. Very pleased with the results.
 20170418_163917 by e30 m3, on Flickr
 20170418_164012 by e30 m3, on Flickr
 20170418_164142 by e30 m3, on Flickr
Been having a few things vapour blast at TSR and pleased with the results. Had this spare upper oil pan on the shelf and got it done with a batch of other bits. www.tsrvapourblasting.co.uk/
 20170402_100519 by e30 m3, on Flickr
Bought a little polishing mop kit for use on a 6 inch bench grinder and cleaned that up and had the bolts and oil drian return plated with a new bolt on the corner for the earth strap.
 20170415_094617 by e30 m3, on Flickr
Little dab of Loctite on the bolts and another part ready to be boxed and ready.
 20170418_144929 by e30 m3, on Flickr
This sorry looking mess is the fuel pump and filter.
 20160213_160533 by e30 m3, on Flickr
 20160213_160501 by e30 m3, on Flickr
Not much can be saved except ( and just about ) the brackets and clamp ring.
New Bosch pump , filter, hose, clamps, mounting rubbers and hardware.
 20170418_144655 by e30 m3, on Flickr
 20170418_144546 by e30 m3, on Flickr
The fuel rail was another part that had a visit to the powder coater.
 20160517_115937 by e30 m3, on Flickr
 20160517_115952 by e30 m3, on Flickr
Might as well put a new regulator on, new hose clamps and hardware. The injectors will be refurbished when the engine is close to being complete as its not wise to let them sit a long time after refurbishing.
Had the powder coated mask the cups in which the injectors and regulator sit so they were blasted or coated. Powder being quite a thick coating and could possibly interfere with the fit and seal of the injectors. Don't want petrol leaking everywhere....
 20170418_145401 by e30 m3, on Flickr
 20170418_145320 by e30 m3, on Flickr
The oil separator got a bath in the ultrasonic cleaner , bracket got plated along with the mounting bolts and new hoses purchased along with an idle valve.
 20170418_145726 by e30 m3, on Flickr
Slowly been buying bits as they come up for sale cheap, one of which was a new genuine water pump.
 20170418_184108 by e30 m3, on Flickr
 20170418_184125 by e30 m3, on Flickr
New thermostat.
 20170418_184006 by e30 m3, on Flickr
No option then but also get all those unique BMW only hoses. No point trying to salvage 27 year old rubber parts on this car.
 20170418_184031 by e30 m3, on Flickr
Water pump pulley is another powder coated item with new plated bolts
 20170418_184514 by e30 m3, on Flickr
20170418_163917 by e30 m3, on Flickr20170418_164012 by e30 m3, on Flickr20170418_164142 by e30 m3, on FlickrBeen having a few things vapour blast at TSR and pleased with the results. Had this spare upper oil pan on the shelf and got it done with a batch of other bits. www.tsrvapourblasting.co.uk/
20170402_100519 by e30 m3, on FlickrBought a little polishing mop kit for use on a 6 inch bench grinder and cleaned that up and had the bolts and oil drian return plated with a new bolt on the corner for the earth strap.
20170415_094617 by e30 m3, on FlickrLittle dab of Loctite on the bolts and another part ready to be boxed and ready.
20170418_144929 by e30 m3, on FlickrThis sorry looking mess is the fuel pump and filter.
20160213_160533 by e30 m3, on Flickr20160213_160501 by e30 m3, on FlickrNot much can be saved except ( and just about ) the brackets and clamp ring.
New Bosch pump , filter, hose, clamps, mounting rubbers and hardware.
20170418_144655 by e30 m3, on Flickr20170418_144546 by e30 m3, on FlickrThe fuel rail was another part that had a visit to the powder coater.
20160517_115937 by e30 m3, on Flickr20160517_115952 by e30 m3, on FlickrMight as well put a new regulator on, new hose clamps and hardware. The injectors will be refurbished when the engine is close to being complete as its not wise to let them sit a long time after refurbishing.
Had the powder coated mask the cups in which the injectors and regulator sit so they were blasted or coated. Powder being quite a thick coating and could possibly interfere with the fit and seal of the injectors. Don't want petrol leaking everywhere....
20170418_145401 by e30 m3, on Flickr20170418_145320 by e30 m3, on FlickrThe oil separator got a bath in the ultrasonic cleaner , bracket got plated along with the mounting bolts and new hoses purchased along with an idle valve.
20170418_145726 by e30 m3, on FlickrSlowly been buying bits as they come up for sale cheap, one of which was a new genuine water pump.
20170418_184108 by e30 m3, on Flickr20170418_184125 by e30 m3, on FlickrNew thermostat.
20170418_184006 by e30 m3, on FlickrNo option then but also get all those unique BMW only hoses. No point trying to salvage 27 year old rubber parts on this car.
20170418_184031 by e30 m3, on FlickrWater pump pulley is another powder coated item with new plated bolts
20170418_184514 by e30 m3, on Flickr-
BMG
- E30 Zone Regular
- Posts: 439
- Joined: Mon Jun 27, 2005 11:00 pm
- Location: south east
Been working on the steering parts.
The rack was leak free from what I remember, but tatty. Given the streering feel is one of the things the M3 is praised for, would be a shame not to make sure everything is in tip top condition.
Most of the oil on it is from I guess the S14 above it.
 20151003_152232 by e30 m3, on Flickr
 20151003_152256 by e30 m3, on Flickr
 20151003_152307 by e30 m3, on Flickr
The oil leaks didn't stop corrosion setting in on the steel main tube.
 20151003_152415 by e30 m3, on Flickr
 20151003_152431 by e30 m3, on Flickr
Starting pulling it apart. Under the small cover, water has got in and rusted some of the parts
 20170311_130503 by e30 m3, on Flickr
 20170311_130759 by e30 m3, on Flickr
 20170311_130835 by e30 m3, on Flickr
 20170311_131149 by e30 m3, on Flickr
Put the steering to center and marked the position of the parts
 20170311_132400 by e30 m3, on Flickr
 20170317_123531 by e30 m3, on Flickr
Removed the valve housing and pinion
 20170311_133047 by e30 m3, on Flickr
Pin wrench tool is needed to remove the large nut that secures the main steering rack tube to the aluminium casing
 20160521_210459 by e30 m3, on Flickr
 20170311_133703 by e30 m3, on Flickr
 20170311_133809 by e30 m3, on Flickr
This is the rack piston.
 20170311_134438 by e30 m3, on Flickr
With the main tube removed you have the rack and a smaller tube that sits inside.
 20170311_140647 by e30 m3, on Flickr
 20170311_140658 by e30 m3, on Flickr
With the rack removed you can see a spacer and oil seal inside one end
 20170311_140947 by e30 m3, on Flickr
This is the other end of the small tube.
 20170317_121703 by e30 m3, on Flickr
Inside one end of the main tube is a spacer, oil seal and this bearing sleeve. You can remove this with just a pic. You'll then need to remove the seal.
 20170311_150344 by e30 m3, on Flickr
This is the o ring and and snap ring on the other end.
20170311_133809 by e30 m3, on Flickr
The top valve housing has a bearing and oil seal ( seal already removed in this pic ) to be replaced.
The bearing has to be removed first which was done by heating with a heat gun and fell out before I even tried to drift it out.
The seal can then be knocked out.
 20170311_153110 by e30 m3, on Flickr
 20170311_153153 by e30 m3, on Flickr
The lower case also has a seal and bearing.
 20170311_133110 by e30 m3, on Flickr
 20170415_135432 by e30 m3, on Flickr
Word of warning on taking the rack apart. I could only find one of the three bearings in the rack and the ETK listed ( 32 13 1 132 798 )seal repair kit appears to be the wrong one. I also bought another generic Febi branded E30 kit and mixed and matched .
The only bearing I could find was for the lower case and it being a generic drawn cup part. The one on the pinion and in the top valve housing I couldn't find. See here for part numbers on the bearings I pulled from mine.
https://s14net.vbulletin.net/forum/s14/ ... ering-rack
With is all done, the parts all get a bead blast and bath in the ultrasonic cleaner.
Fit new top oil seal.
 20170415_135530 by e30 m3, on Flickr
Refit the old bearing.
 20170415_135609 by e30 m3, on Flickr
Fit new bearing in the lower case.
 20170415_135343 by e30 m3, on Flickr
New oil seal in the lower case
 20170415_135405 by e30 m3, on Flickr
 20170321_163653 by e30 m3, on Flickr
The oil seals fitted on the valve part. Under each of the 4 white ( nylon ? ) rings is a rubber o-ring to be replaced first.
 20170415_135646 by e30 m3, on Flickr
 20170321_164809 by e30 m3, on Flickr
These are piston parts on the rack.
 20170321_192247 by e30 m3, on Flickr
Under the white seal is the rubber o-ring
 20170321_192615 by e30 m3, on Flickr
The wiper seal and parts
 20170321_164305 by e30 m3, on Flickr
 20170321_164439 by e30 m3, on Flickr
Replated parts
 20170415_134845 by e30 m3, on Flickr
The small tube with new parts and another problem. The spacer under the oil seal that came out the rack had a chamfer on one side which the replacements didn't and which required me to cut one in.
 20170321_163757 by e30 m3, on Flickr
With these first few parts sub assembled, this is a layout of the rest.
 20170415_134723 by e30 m3, on Flickr
I polished up the rack to a mirror like finish and had the main tube replated and was just about to reassemble but wasn't happy with the plating. Doesn't show up in the above pic, but I should have prepped it better as the plating shop will just acid clean and plate.
It bugged me so ended up sanding it all back and polishing the tube ready for another plating try, but may this time buy a small zinc plating kit and do the remaining parts my self.
 20170416_153337 by e30 m3, on Flickr
That's it for now on the rack rebuild until the tube is plated.
The power steer reservoir gets an ultrasonic bath. New power steer hoses purchased and replated.
 20170418_143903 by e30 m3, on Flickr
 20170418_144031 by e30 m3, on Flickr
Bracket and hardware replated.
 20170418_144007 by e30 m3, on Flickr
New sticker from Pukar designs finishes everything off nicely.
 20170418_143950 by e30 m3, on Flickr
The rack was leak free from what I remember, but tatty. Given the streering feel is one of the things the M3 is praised for, would be a shame not to make sure everything is in tip top condition.
Most of the oil on it is from I guess the S14 above it.
20151003_152232 by e30 m3, on Flickr20151003_152256 by e30 m3, on Flickr20151003_152307 by e30 m3, on FlickrThe oil leaks didn't stop corrosion setting in on the steel main tube.
20151003_152415 by e30 m3, on Flickr20151003_152431 by e30 m3, on FlickrStarting pulling it apart. Under the small cover, water has got in and rusted some of the parts
20170311_130503 by e30 m3, on Flickr20170311_130759 by e30 m3, on Flickr20170311_130835 by e30 m3, on Flickr20170311_131149 by e30 m3, on FlickrPut the steering to center and marked the position of the parts
20170311_132400 by e30 m3, on Flickr20170317_123531 by e30 m3, on FlickrRemoved the valve housing and pinion
20170311_133047 by e30 m3, on FlickrPin wrench tool is needed to remove the large nut that secures the main steering rack tube to the aluminium casing
20160521_210459 by e30 m3, on Flickr20170311_133703 by e30 m3, on Flickr20170311_133809 by e30 m3, on FlickrThis is the rack piston.
20170311_134438 by e30 m3, on FlickrWith the main tube removed you have the rack and a smaller tube that sits inside.
20170311_140647 by e30 m3, on Flickr20170311_140658 by e30 m3, on FlickrWith the rack removed you can see a spacer and oil seal inside one end
20170311_140947 by e30 m3, on FlickrThis is the other end of the small tube.
20170317_121703 by e30 m3, on FlickrInside one end of the main tube is a spacer, oil seal and this bearing sleeve. You can remove this with just a pic. You'll then need to remove the seal.
20170311_150344 by e30 m3, on FlickrThis is the o ring and and snap ring on the other end.
20170311_133809 by e30 m3, on FlickrThe top valve housing has a bearing and oil seal ( seal already removed in this pic ) to be replaced.
The bearing has to be removed first which was done by heating with a heat gun and fell out before I even tried to drift it out.
The seal can then be knocked out.
20170311_153110 by e30 m3, on Flickr20170311_153153 by e30 m3, on FlickrThe lower case also has a seal and bearing.
20170311_133110 by e30 m3, on Flickr20170415_135432 by e30 m3, on FlickrWord of warning on taking the rack apart. I could only find one of the three bearings in the rack and the ETK listed ( 32 13 1 132 798 )seal repair kit appears to be the wrong one. I also bought another generic Febi branded E30 kit and mixed and matched .
The only bearing I could find was for the lower case and it being a generic drawn cup part. The one on the pinion and in the top valve housing I couldn't find. See here for part numbers on the bearings I pulled from mine.
https://s14net.vbulletin.net/forum/s14/ ... ering-rack
With is all done, the parts all get a bead blast and bath in the ultrasonic cleaner.
Fit new top oil seal.
20170415_135530 by e30 m3, on FlickrRefit the old bearing.
20170415_135609 by e30 m3, on FlickrFit new bearing in the lower case.
20170415_135343 by e30 m3, on FlickrNew oil seal in the lower case
20170415_135405 by e30 m3, on Flickr20170321_163653 by e30 m3, on FlickrThe oil seals fitted on the valve part. Under each of the 4 white ( nylon ? ) rings is a rubber o-ring to be replaced first.
20170415_135646 by e30 m3, on Flickr20170321_164809 by e30 m3, on FlickrThese are piston parts on the rack.
20170321_192247 by e30 m3, on FlickrUnder the white seal is the rubber o-ring
20170321_192615 by e30 m3, on FlickrThe wiper seal and parts
20170321_164305 by e30 m3, on Flickr20170321_164439 by e30 m3, on FlickrReplated parts
20170415_134845 by e30 m3, on FlickrThe small tube with new parts and another problem. The spacer under the oil seal that came out the rack had a chamfer on one side which the replacements didn't and which required me to cut one in.
20170321_163757 by e30 m3, on FlickrWith these first few parts sub assembled, this is a layout of the rest.
20170415_134723 by e30 m3, on FlickrI polished up the rack to a mirror like finish and had the main tube replated and was just about to reassemble but wasn't happy with the plating. Doesn't show up in the above pic, but I should have prepped it better as the plating shop will just acid clean and plate.
It bugged me so ended up sanding it all back and polishing the tube ready for another plating try, but may this time buy a small zinc plating kit and do the remaining parts my self.
20170416_153337 by e30 m3, on FlickrThat's it for now on the rack rebuild until the tube is plated.
The power steer reservoir gets an ultrasonic bath. New power steer hoses purchased and replated.
20170418_143903 by e30 m3, on Flickr20170418_144031 by e30 m3, on FlickrBracket and hardware replated.
20170418_144007 by e30 m3, on FlickrNew sticker from Pukar designs finishes everything off nicely.
20170418_143950 by e30 m3, on Flickr-
MPOWERCRAZY

- E30 Zone Regular
- Posts: 545
- Joined: Thu Jan 02, 2014 11:00 pm
- Location: Birmingham
love it! impressive work mate! hope it gets completed quickly, can't wait to see the finished results!
Back Again From The Darkside Of Doing E36'S 
Back With 2 E30 Projects
Back With 2 E30 Projects
-
bigbird76
- E30 Zone Regular
- Posts: 571
- Joined: Sat Feb 16, 2008 11:00 pm
- Location: Swansea Wales UK
Bloody hell, this is a great build..
-
Kos
- E30 Zone Team Member
- Posts: 15546
- Joined: Tue Jul 12, 2005 11:00 pm
- Location: London / Cyprus
Amazing attention to detail
PUKAR DESIGNS - Reproduction BMW Decals Labels Sticker & Number Plates
www.pukardesigns.com
www.facebook.com/pukar.designs/
IG Pukar.Designs
www.pukardesigns.com
www.facebook.com/pukar.designs/
IG Pukar.Designs
-
mani
- E30 Zone Camper
- Posts: 1143
- Joined: Mon May 26, 2008 11:00 pm
- Location: London
This is a proper build you don't see many done like this, well done mate .
-
aimlessrock
- E30 Zone Squatter
- Posts: 1821
- Joined: Sun Dec 06, 2009 11:00 pm
- Location: Manchester
This build is epic-loving it.
E30 320i Convertible (1989)
190 Mercedes (1988)
"there is nothing more expensive than a cheap E30"
190 Mercedes (1988)
"there is nothing more expensive than a cheap E30"
-
M5London
- E30 Zone Newbie
- Posts: 34
- Joined: Thu Mar 17, 2016 11:00 pm
Amazing build and coverage !
Can't wait to hear what Agreed Value Insurance figure you go with !!!
Can't wait to hear what Agreed Value Insurance figure you go with
E30 M3 1987 - Diamond Black Metallic / Black Leather
E34 M5 1995 - Arctic Silver / Black Leather
E39 M5 1999 - Carbon Black Metallic / Caramel Nappa Heritage Leather - Supercharged
F06 M6 Gran Coupe 2015 - Imperial Blue Xirallic / Silverstone Merino
E34 M5 1995 - Arctic Silver / Black Leather
E39 M5 1999 - Carbon Black Metallic / Caramel Nappa Heritage Leather - Supercharged
F06 M6 Gran Coupe 2015 - Imperial Blue Xirallic / Silverstone Merino
-
crossie
- E30 Zone Regular
- Posts: 472
- Joined: Mon Sep 05, 2005 11:00 pm
- Location: York
How bad was the shell?
Any photos?
Any photos?
-
SHAKEELE30
- Boost Junkie
- Posts: 3278
- Joined: Mon Apr 04, 2005 11:00 pm
- Location: CROYDON
thats some serious attention to detail there, wish i had your talent and skills...need to do the same but dont know where to start
-
BMG
- E30 Zone Regular
- Posts: 439
- Joined: Mon Jun 27, 2005 11:00 pm
- Location: south east
Thanks all. The shell isn't too bad, more just the usual E30 rust spots. That said, I haven't done anything with the shell yet, so no doubt more to uncover. No pics yet, but will post up when I get on to working on the shell.
-
Olie92
- E30 Zone Newbie
- Posts: 11
- Joined: Mon May 01, 2017 11:00 pm
Wow...just joined this forum and stunned with awe looking at this thread...super great work!
-
BMG
- E30 Zone Regular
- Posts: 439
- Joined: Mon Jun 27, 2005 11:00 pm
- Location: south east
Been finishing off the steering rack and had it replated. Here's the main tube and associated parts.
 20170527_141619 by e30 m3, on Flickr
The main seal, spacer and guide in place.
 20170603_132637 by e30 m3, on Flickr
The main tube , inner tube and rack.
 20170603_151506 by e30 m3, on Flickr
Together.
 20170603_151900 by e30 m3, on Flickr
Main piston in place.
 20170603_164151 by e30 m3, on Flickr
Main tube gets its locking ring and seal.
 20170603_171615 by e30 m3, on Flickr
Rack inserted into the main tube.
 20170603_172456 by e30 m3, on Flickr
Lower housing in place.
 20170603_195446 by e30 m3, on Flickr
Pinion in place.
 20170603_201201 by e30 m3, on Flickr
Upper housing in place.
 20170604_102201 by e30 m3, on Flickr
Center the rack and add top cover.
 20170604_102608 by e30 m3, on Flickr
Back of the rack .
 20170604_102630 by e30 m3, on Flickr
Pressure piece , spacer and spring in place.
 20170604_102824 by e30 m3, on Flickr
The cover get bolted down with a bit of sealant to stop the previous water ingress and light rust.
 20170604_102927 by e30 m3, on Flickr
Replated parts.
 20170605_123136 by e30 m3, on Flickr
Pipes in place.
 20170605_125803 by e30 m3, on Flickr
 20170605_125806 by e30 m3, on Flickr
Finished rack.
 20170605_125739 by e30 m3, on Flickr
 20170605_125826 by e30 m3, on Flickr
Coupling gets a clean-up and new pinch bolts and nuts.
 20160813_153021 by e30 m3, on Flickr
New inner and outer tie rods purchased. Bought Lemforder parts ( same as BMW use/supply ) from a parts specialist and much cheaper than a BMW dealer. The only problem being Lemforder sell them unpainted , so a quick paint job needed.
 20160227_143239 by e30 m3, on Flickr
Tie rods and gaiters in place and the rest of the steering parts .
 20170709_125038 by e30 m3, on Flickr
Mounting parts and shear bolts.
 20170710_115034 by e30 m3, on Flickr
20170527_141619 by e30 m3, on FlickrThe main seal, spacer and guide in place.
20170603_132637 by e30 m3, on FlickrThe main tube , inner tube and rack.
20170603_151506 by e30 m3, on FlickrTogether.
20170603_151900 by e30 m3, on FlickrMain piston in place.
20170603_164151 by e30 m3, on FlickrMain tube gets its locking ring and seal.
20170603_171615 by e30 m3, on FlickrRack inserted into the main tube.
20170603_172456 by e30 m3, on FlickrLower housing in place.
20170603_195446 by e30 m3, on FlickrPinion in place.
20170603_201201 by e30 m3, on FlickrUpper housing in place.
20170604_102201 by e30 m3, on FlickrCenter the rack and add top cover.
20170604_102608 by e30 m3, on FlickrBack of the rack .
20170604_102630 by e30 m3, on FlickrPressure piece , spacer and spring in place.
20170604_102824 by e30 m3, on FlickrThe cover get bolted down with a bit of sealant to stop the previous water ingress and light rust.
20170604_102927 by e30 m3, on FlickrReplated parts.
20170605_123136 by e30 m3, on FlickrPipes in place.
20170605_125803 by e30 m3, on Flickr20170605_125806 by e30 m3, on FlickrFinished rack.
20170605_125739 by e30 m3, on Flickr20170605_125826 by e30 m3, on FlickrCoupling gets a clean-up and new pinch bolts and nuts.
20160813_153021 by e30 m3, on FlickrNew inner and outer tie rods purchased. Bought Lemforder parts ( same as BMW use/supply ) from a parts specialist and much cheaper than a BMW dealer. The only problem being Lemforder sell them unpainted , so a quick paint job needed.
20160227_143239 by e30 m3, on FlickrTie rods and gaiters in place and the rest of the steering parts .
20170709_125038 by e30 m3, on FlickrMounting parts and shear bolts.
20170710_115034 by e30 m3, on Flickr-
BMG
- E30 Zone Regular
- Posts: 439
- Joined: Mon Jun 27, 2005 11:00 pm
- Location: south east
The diff is back from Gareth and looking good.
 20170521_123913 by e30 m3, on Flickr
 20170521_123824 by e30 m3, on Flickr
 20170521_123758 by e30 m3, on Flickr
Fuel filler pipe has been powder coated. New cap, rubber sleeve, mounting bolt and restrictive flap insert.
 20170423_102756 by e30 m3, on Flickr
The in tank lifter pump was a touch rotten...
 20160324_152810 by e30 m3, on Flickr
 20160324_152754 by e30 m3, on Flickr
New one much needed.
 20170420_134108 by e30 m3, on Flickr
 20170420_134047 by e30 m3, on Flickr
The fuel tank is away being painted. New parts for that include hoses and mounting brackets along with replated cross over tube and tank brackets .
 20170419_142553 by e30 m3, on Flickr
There's not a short of new bits needed, so a new Bosch ignition coil purchased and painted black. Bracket replated.
 20170420_133219 by e30 m3, on Flickr
New subframe mounting parts.
 20170419_140959 by e30 m3, on Flickr
 20170419_140825 by e30 m3, on Flickr
New wishbone bushes.
 20170419_135836 by e30 m3, on Flickr
I changed the roll bars years ago after getting a good deal on a Racing Dynamics set. The mounting bracket for the front gets a powder coating in black and and the bush clamps replated.
 20170419_141736 by e30 m3, on Flickr
Powder coated bars.
 20170723_104938 by e30 m3, on Flickr
The original spot lights were sold years ago and replaced with Sport Evo brake ducts. Going back to stock means shelling out more cash...
 20170421_152500 by e30 m3, on Flickr
The original headlights were an odd set ( one side Bosch , the other Hella ) and stone chipped to hell with rusted adjusters. So more credit card flexing on a new set of Hellas.
 20170420_134527 by e30 m3, on Flickr
 20170420_134410 by e30 m3, on Flickr
New intake gaskets purchased, replated hardware.
 20170419_141536 by e30 m3, on Flickr
The plater also did some other bits like the engine parts.
 20170419_140354 by e30 m3, on Flickr
Door parts.
 20160414_112034 by e30 m3, on Flickr
Replated bits.
 20170419_141317 by e30 m3, on Flickr
Alternator bracket plated.
 20170419_142324 by e30 m3, on Flickr
New bonnet rollers purchased, the other parts were just replated.
 20170419_141959 by e30 m3, on Flickr
A wise purchase while back was a complete timing chain and tensioner kit. Prices for this parts now are expensive !
 20170420_135949 by e30 m3, on Flickr
Exhaust bracket ( along with spare bellhousing bracket ) replated and new nuts.
 20170419_140156 by e30 m3, on Flickr
New exhaust hanger parts.
 20170419_140713 by e30 m3, on Flickr
The car came to me with a non cat ( larger ) header. This has been away for a heat coating paint.
 20170722_133511 by e30 m3, on Flickr
New gaskets, new Bosch lambda sensor and Turner Motorsport stud kit.
 20170722_133004 by e30 m3, on Flickr
New ignition wires , 8mm Turner parts.
 20170722_133908 by e30 m3, on Flickr
The original lower Evo airbox section had a hole worn in it. More credit card flexing for an expensive bit of plastic.
 20170722_134230 by e30 m3, on Flickr
Airbox parts and new filter.
 20170722_180603 by e30 m3, on Flickr
Old intake.
 20160903_115917 by e30 m3, on Flickr
 20160903_115904 by e30 m3, on Flickr
Cleaned with new mounting clips and gasket.
 20170722_182628 by e30 m3, on Flickr
Finished item.
 20170723_103455 by e30 m3, on Flickr
20170521_123913 by e30 m3, on Flickr20170521_123824 by e30 m3, on Flickr20170521_123758 by e30 m3, on FlickrFuel filler pipe has been powder coated. New cap, rubber sleeve, mounting bolt and restrictive flap insert.
20170423_102756 by e30 m3, on FlickrThe in tank lifter pump was a touch rotten...
20160324_152810 by e30 m3, on Flickr20160324_152754 by e30 m3, on FlickrNew one much needed.
20170420_134108 by e30 m3, on Flickr20170420_134047 by e30 m3, on FlickrThe fuel tank is away being painted. New parts for that include hoses and mounting brackets along with replated cross over tube and tank brackets .
20170419_142553 by e30 m3, on FlickrThere's not a short of new bits needed, so a new Bosch ignition coil purchased and painted black. Bracket replated.
20170420_133219 by e30 m3, on FlickrNew subframe mounting parts.
20170419_140959 by e30 m3, on Flickr20170419_140825 by e30 m3, on FlickrNew wishbone bushes.
20170419_135836 by e30 m3, on FlickrI changed the roll bars years ago after getting a good deal on a Racing Dynamics set. The mounting bracket for the front gets a powder coating in black and and the bush clamps replated.
20170419_141736 by e30 m3, on FlickrPowder coated bars.
20170723_104938 by e30 m3, on FlickrThe original spot lights were sold years ago and replaced with Sport Evo brake ducts. Going back to stock means shelling out more cash...
20170421_152500 by e30 m3, on FlickrThe original headlights were an odd set ( one side Bosch , the other Hella ) and stone chipped to hell with rusted adjusters. So more credit card flexing on a new set of Hellas.
20170420_134527 by e30 m3, on Flickr20170420_134410 by e30 m3, on FlickrNew intake gaskets purchased, replated hardware.
20170419_141536 by e30 m3, on FlickrThe plater also did some other bits like the engine parts.
20170419_140354 by e30 m3, on FlickrDoor parts.
20160414_112034 by e30 m3, on FlickrReplated bits.
20170419_141317 by e30 m3, on FlickrAlternator bracket plated.
20170419_142324 by e30 m3, on FlickrNew bonnet rollers purchased, the other parts were just replated.
20170419_141959 by e30 m3, on FlickrA wise purchase while back was a complete timing chain and tensioner kit. Prices for this parts now are expensive !
20170420_135949 by e30 m3, on FlickrExhaust bracket ( along with spare bellhousing bracket ) replated and new nuts.
20170419_140156 by e30 m3, on FlickrNew exhaust hanger parts.
20170419_140713 by e30 m3, on FlickrThe car came to me with a non cat ( larger ) header. This has been away for a heat coating paint.
20170722_133511 by e30 m3, on FlickrNew gaskets, new Bosch lambda sensor and Turner Motorsport stud kit.
20170722_133004 by e30 m3, on FlickrNew ignition wires , 8mm Turner parts.
20170722_133908 by e30 m3, on FlickrThe original lower Evo airbox section had a hole worn in it. More credit card flexing for an expensive bit of plastic.
20170722_134230 by e30 m3, on FlickrAirbox parts and new filter.
20170722_180603 by e30 m3, on FlickrOld intake.
20160903_115917 by e30 m3, on Flickr20160903_115904 by e30 m3, on FlickrCleaned with new mounting clips and gasket.
20170722_182628 by e30 m3, on FlickrFinished item.
20170723_103455 by e30 m3, on Flickr
Last edited by BMG on Sun Jul 23, 2017 11:21 am, edited 1 time in total.
-
BMG
- E30 Zone Regular
- Posts: 439
- Joined: Mon Jun 27, 2005 11:00 pm
- Location: south east
The driveshafts felt good, but the outer CV has a crimped on metal cover which means that can't be disassembled without wrecking the cover, which isn't available. Despite this I was interested in seeing the condition of the parts and if they could be reused.
The outward condition was tatty.
 20151231_154357 by e30 m3, on Flickr
 20151231_154338 by e30 m3, on Flickr
 20151231_154420 by e30 m3, on Flickr
ABS rings removed and replated.
 20151127_162811 by e30 m3, on Flickr
Shafts have been away for powder coating.
 20170723_103702 by e30 m3, on Flickr
I found a similar outer CV cover from a Dodge truck which gets cut down and a slight flare added to stop the CV boot sliding off. I'll have to work out a way to crimp the cover on. As yet to be plated.
 20170722_151419 by e30 m3, on Flickr
I bought new inner CV joint kits as they are cheaply available and replated the tin covers.
 20170419_143453 by e30 m3, on Flickr
The new parts laid out with the powder coated shafts along with the cleaned and painted outer CV parts.
 20170722_151359 by e30 m3, on Flickr
When the modified covers come back from plating we'll see if the experiment works out.
The outward condition was tatty.
20151231_154357 by e30 m3, on Flickr20151231_154338 by e30 m3, on Flickr20151231_154420 by e30 m3, on FlickrABS rings removed and replated.
20151127_162811 by e30 m3, on FlickrShafts have been away for powder coating.
20170723_103702 by e30 m3, on FlickrI found a similar outer CV cover from a Dodge truck which gets cut down and a slight flare added to stop the CV boot sliding off. I'll have to work out a way to crimp the cover on. As yet to be plated.
20170722_151419 by e30 m3, on FlickrI bought new inner CV joint kits as they are cheaply available and replated the tin covers.
20170419_143453 by e30 m3, on FlickrThe new parts laid out with the powder coated shafts along with the cleaned and painted outer CV parts.
20170722_151359 by e30 m3, on FlickrWhen the modified covers come back from plating we'll see if the experiment works out.