Map Light Upgrade
The Mirror Map Lights are one of the few optional extras that still command a very high price, and are very highly sought after by retrofitters. Not only do they look cool, they add some sorely-needed light to the otherwise gloomy E30 cabin.
But the Map lights have a very simple switch; always On or always Off; there's no third option to make the lights come on when the doors open. Until now...
Contents
Parts
- Map Light Mirror
- Extra wiring
- Spade Terminals
Procedure
Modifying Switch
What we're aiming to do is convert the existing switches to dual-function switches. As they currently stand, the switches just make or break a connection; we're going to adapt them to switch between two things; either Constantly On, or On With Doors Open. To do that, we need to dismantle the switches.
Start by removing the switches from the lights. You do this by popping a small screwdriver into the recesses on the back of the mirror and prising out the light-and-switch assembly. Once it's out, you'll see the switch itself is held in place with two plastic arms, which just prise apart to release the switch. And once you pull off the two wire connectors, you'll be left with this:
From there, we need to separate the components. This is very easy; just use a screwdriver to prise apart the "jaws" that hold in the switch, and pop it out. Be careful, because the metal rocker underneath will also slide out. You'll have this in your hands:
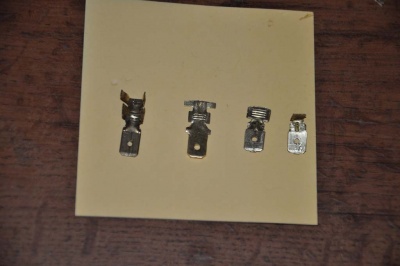
If you look inside, you can see that the middle connection sits proud, and the side connection is bent over. We're going to make another of these side connectors, so that the rocker can see-saw between the two terminals. To make that terminal, we need a cheapo spade terminal. Fold it out and flatten it with a hammer first, and then use some snips or side cutters to trim and bend it into shape, like so:
Once you've trimmed it, push it into place from the inside of the switch so that the spade part pokes out of the back. You might need some creative trimming and bending, and you might also need some glue to hold the spade in place if you trim off a little bit too much, but just take your time Blue-Peter-style, and it'll all come together like so:
Now repeat that for the other switch, and reassemble.
Wiring
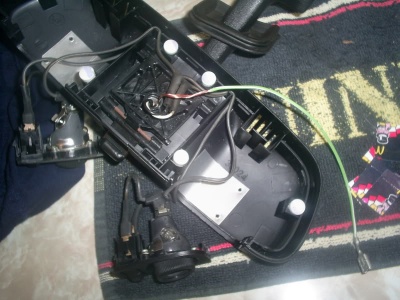
With your switches done, you now need to fiddle around inside the mirror itself. That means getting the glass out, which is a delicate operation which needs care. Use your thin-bladed screwdriver and from the outside edge, try to separate the rear shell from the plastic bezel holding in the glass. Work your way around slowly, and use gentle pressure rather than brute force. It'll all come apart with a bit of patience. Once it does, you'll end up with this:
The difference between this picture and your own mirror is the extra green wire. If you look carefully, this has been cunningly soldered to the metal ball that forms the bottom of the mirror mounting arm; there's also a generous amount of covering stripped from the wire to allow it to form a good connection to that metal. This wire is our new permanent earth wire, so go ahead and solder one to your own mirror. You'll also need to solder a similar wire to the other end of the arm by the mounting spring.
Once that's in place, you have to organise power. The aim is to have a permanent 12V coming into the mirror and through the lights to the central pin of each switch. From there, one side of the switch will have a permanent earth, and the other will be a switched earth from the interior lights. To make this happen, you'll need to switch over the two wires that currently go to your switches, so that the wire coming from the bulb now goes to the central pin of each switch.
A bit of fabrication and the inclusion of a 7.5A fuse on the permanent earth wire will see the switches fully wired up. Your internal wiring should now look something like this:
And if you need a diagram to understand that mess, it works like this:
Once the internals are in place, you can start wiring it into the existing loom. The proper wires for the map light should be there behind the headlining, and may take a bit of fishing around to find. If you really can't find them, you will either have to run your own permanent 12V wire down the A pillar to the Accessory Socket, or tap into the sunroof motor if you have one. You'll also need to wire your new permanent earth wire to somewhere close; again, look to the sunroof. Finally, you'll need to take a wire from the existing interior lights behind either the driver or passenger seat, that's up to you. On those lights, find the brown/purple and extend that all the way back to your map light mirror.
Now that you've got your three wires, connect them up in the right order. You won't be able to use the existing mirror plugs for this unless you're creative, so just find a way to get the permanent 12V going to the bulb and the switched wire from the lights going to your new switch pins. Cut off the existing plugs and wire in new ones if you have to.
When all that's done, test it to make sure it works before clipping the glass back into place. And you're done!
Original idea by goosiegander


