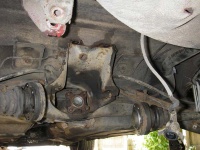
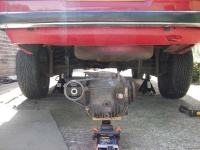
Fitting an E30 Differential
Before beginning the job so DO NOT attempt this unless you are sure that a: you have the correct decent quality tools for the job, b: you are competent enough to undergo the task and c: you are physically up to the task, if working alone (dif weighs 35-40kg).
Preparation
The tools used were: 1/2 inch drive ratchet and deep 30mm socket, short single hex 19mm socket, crack bar, 1/2 in drive 8mm allen bit socket, 3 large extension bars, 2 19mm combi spanners, 2 17mm combi spanners, large flat headed screwdriver, trolley jack and axle stands. Its always a good idea to use the best tools you can get your hands on and the job will go a whole lot easier and more importantly safer.
With the car still on the ground the first thing to do is get your wheel nuts and driveshaft nuts loosened. I suppose the wheels, drive shafts and exhaust don't really have to come off but i think its definite advantage as regards to light and room. The securing plates around the driveshaft bolts can be a bit fiddly to remove, in fact if the car has to be driven again right after the transplant it would be a good idea to obtain two new securing plates before starting because you will no doubt damage the old ones when removing them. Now that all is loose chalk the front wheels, jack the car up as high as safely possible and secure on axle stands, remove wheels. Now make sure the handbrake is applied and loosen the 8mm allen bolts holding the driveshaft to the output flange. When you have loosened all the bolts that are accessible release the handbrake and turn the shaft round so that remaining bolts can be removed, re-apply handbrake and loosen. Repeat for the other shaft. The bolts on the exhaust side can be tricky to get so i used three extension bars and done them from the side of the car. Once all bolts are removed use wire or heavy duty cable ties to tie the shafts out of the way, DO NOT let shafts fall to the ground. Although again unnecessary i removed the shafts from the car altogether in order to have maximum room.
Diff removal
Next I removed the 17mm nuts holding the prop shaft to the drive flange (or whatever you know it as). This can be done easily with two 17mm spanners. Put one of the spanners onto one of the nuts and turn shaft until the spanner jams against the carrier then you are able to loosen the nut next to it using the other spanner, repeat this all the way round. The last one might be a bit tricky but it is do-able in the same manner. Its now a good time to position your trolley jack under the diff making sure its sensibly positioned, remember this is a heavy unit and when the bolts are all removed the jack alone wont hold it for long if it is not positioned correctly. A flat block of wood would aid well on the jack. Raise the jack untill its just shy of the underside of the diff. Next loosen the four bolts holding the diff casing to the carrier. Just loosen each bolt one turn at this point. Loosen and remove the nut and bolt that goes through the centre of the large bush at the rear of the diff. Make sure again that you have the jack sitting ok and remove the lower two of the four bolts holding the diff to the carrier. Check jack again making sure the valve is tightly closed and the jack is touching the underside of the diff. Remove the remaining two bolts from the top of the carrier. Now after these bolts are removed playtime is over and its sweat time so make sure you are in a suitable position to be able to aid the jack in the lowering of the diff, again this has the potential to go badly so choosing a good position is paramount here, make sure you have the jack in a good central position and make sure you have yourself close enough to be of any use but not in a position where you will be in the flightpath of a possible diving diff. Once you have the five bolts removed its just the jack and the four prop studs going through the drive flange that's holding the bad boy so with great care lower the jack about an inch or until the flanges start to separate. Things will be very shaky here and the diff will have a strong urge to fall to earth so composure is key. When lowering the diff the drive flange will want to jam on the two lower prop studs so a large flat headed screwdriver will come in handy here for carefully prising them apart. When you have freed them you'll find out how ready you are for catching the diff if you have positioned the jack correctly which at this final stage should be more slightly more to the front end than centre and you have a good hold of the back end of the diff, gently lower the jack.
Refitting
Well that should be it safely out if all went well, now its time to introduce your new diff to the event. Get the new diff and yourself under the car and make sure you have all your bolts and tools to hand. Its fair to say the following procedure is not for the faint hearted and if you had difficulties getting the old diff out you might be better seeking another pair of hands to help with the fitting. The rest is a simple reverse of removal and be sure to tighten all bolts to specified torque settings and jobs a good'un as they say. If you haven't done so beforehand check for correct diff oil level.
Note that if you're swapping small case to medium case than you will need to adjust the length of the prop shaft; this is done by slackening off the sleeve nut near the centre bearing on the prop. Up under the heatshields above the exhaust. Slacken the nut off so the prop can slide, fit the diff and then tighten the prop up again.
Alternative method
It's possible to do it using ramps rather than jacks/stands and without taking anything else off (unless you need to adjust the prop length, see above). When on the ramps, with the handbrake on and in gear, remove the 6 star bolts per side holding the driveshafts to the diff output flanges. The side with the exhaust on is best done using a long extension so you can swing the ratchet on the other side of it. Input flange bolts - you should now be able to see two of them, take them off (17mm ring spanner) then take it out of gear, rotate the driveshaft (by hand!!!) until you can get to the other two. Put pit back in gear then remove them too.
Refitting - h/brake on, 1st gear. Put one driveshaft on, then two of the front bolts. Take it out of gear then rotate the propshaft until you can both reach the remaining two 17mm nuts to go on at the front, and get the bolts into the remaining driveshaft at the same time. Bolt up the driveshaft and then the last two 17's at the front. A dab of loctite on all the input and output flange bolts wouldn't go amiss.
Doing it in that order avoids having to jack a wheel up and turn it round to line the bolt holes up, and means you don't have to keep getting out from under the car as much while you're doing it which is good if you're a lazy bum like me.
Getting the topmost two of the four big mounting bolts back in can be a pain. I found the easiest way is to put the lower/front two in first as they're easier to line up. Do them up half way ish. Then move the jack under the nose area of the diff and move it up/down feeling the holes lining up using your fingertips as you go. Once you've got them in a few turns by hand, drop the jack off and it will give you another inch on top to squeeze a rachet in rather than doing it by fumbling around with a spanner.


