Malachtgrun 320i cabrio from Australia

Show off your pride and joy here

Moderator: martauto

User avatar
Tzantushka
E30 Zone Regular
E30 Zone Regular
Posts: 457
Joined: Sat Nov 24, 2018 4:18 am
Location: Melbourne, Australia

Wed Aug 28, 2019 1:17 pm

martauto wrote:
Tue Aug 27, 2019 11:50 pm

Welcome to the zone as well mate !!!

What do you drive and lets see some pics please ?

Mart.
Thanks and I'll answer Mart's question with a long introduction.

Ended up getting a BMW as a weekend ‘fun & cruising’ car.
Had to be an auto as the wife only has an auto license.
Had to be a four seater so all three of us could come along.
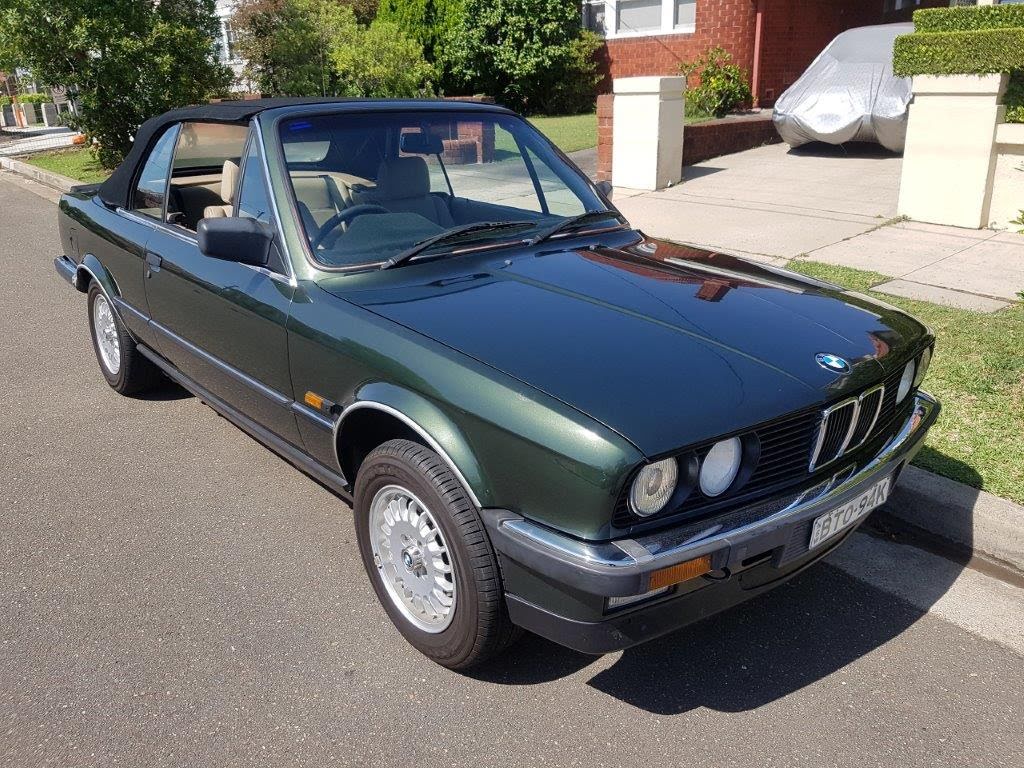
Always loved the E30, timeless style, easy to work on, built like a BMW should be…

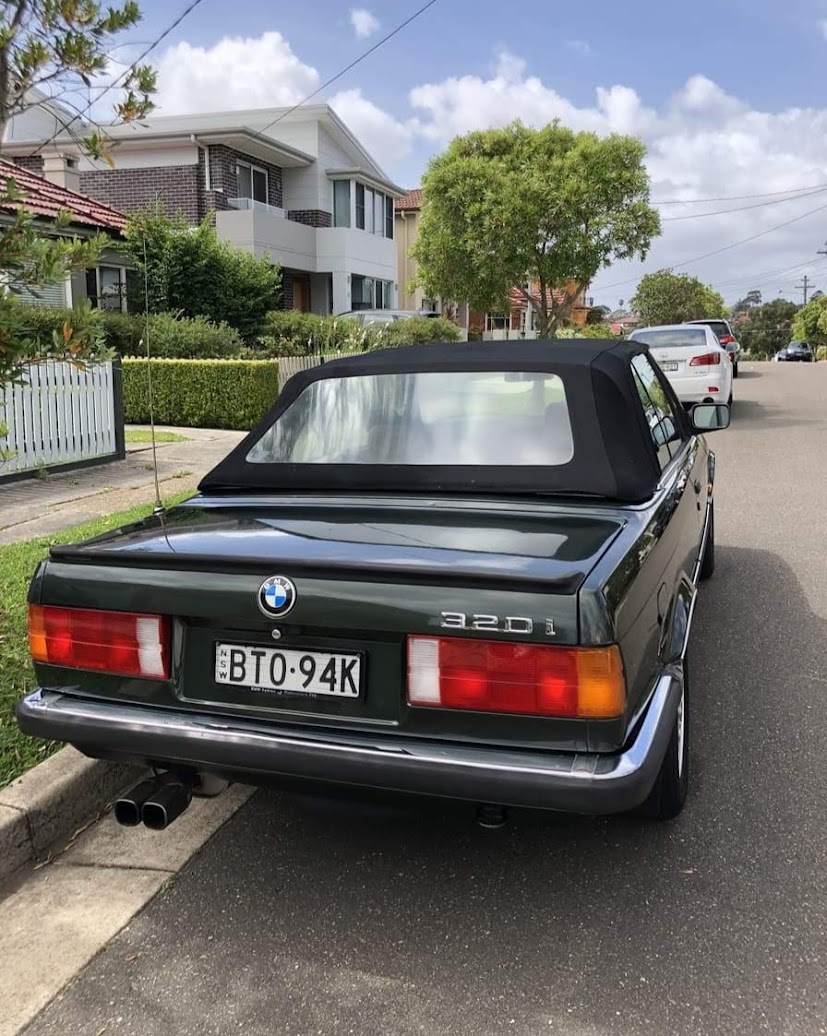
I'm in Melbourne, Australia and saw an ’88 320i in Sydney.
Ended up talking to the PO for a few months remotely and eventually had the car in the driveway back in Mar-19.

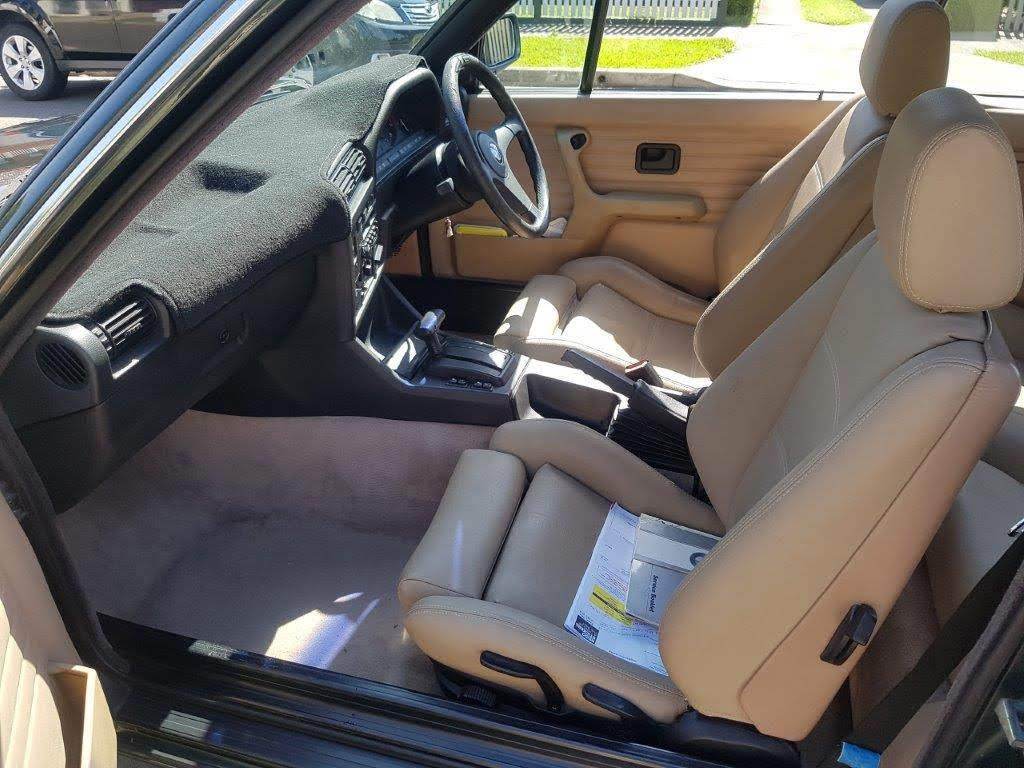
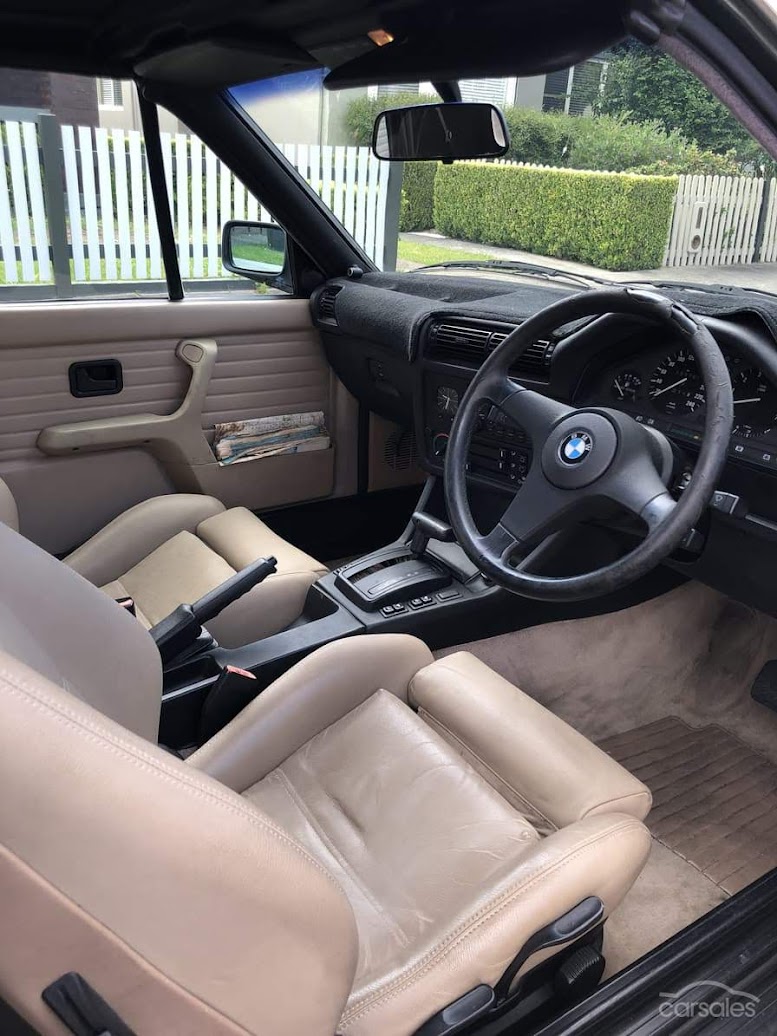
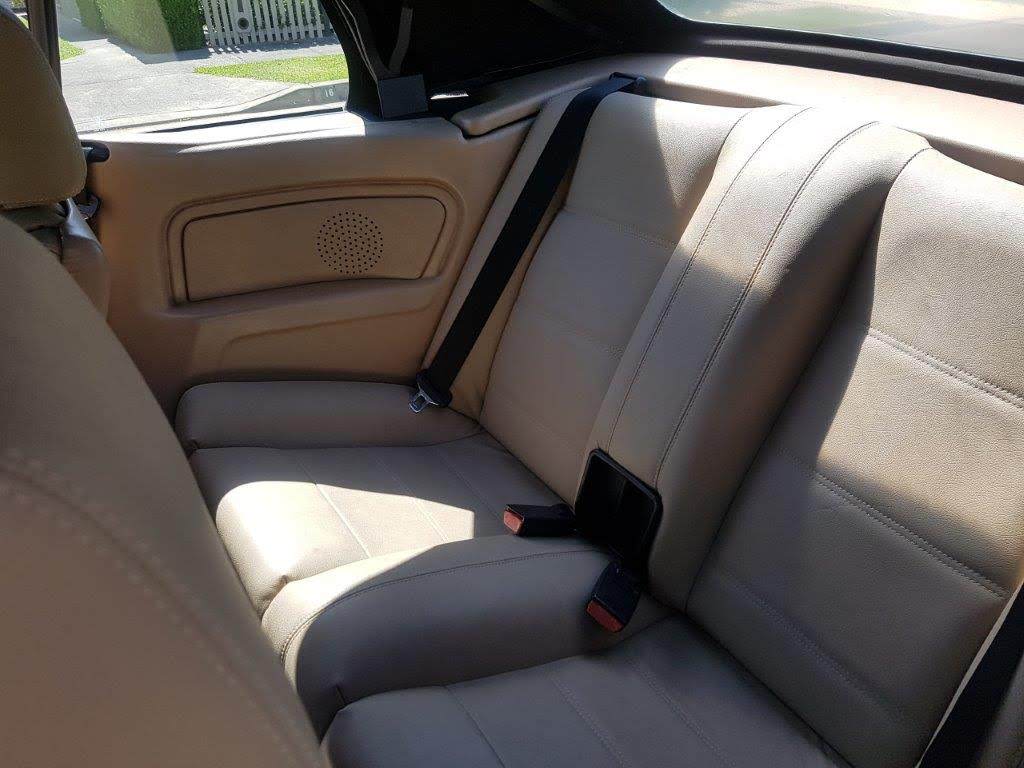
The car is original and unmolested and car is true to original specs:
Prod. Date 1988-02-15
Type 320I (EUR)
Series E30 (3 Series)
Body Type CABRIO
Steering RHD
Engine M20
Displacement 2.00
Power 95kw / 129hp
Transmission Automatic
Colour MALACHITGRUEN METALLIC (205)
Upholstery Natur (0295)

Driver Assistance And Lightning
S520A Fog Lights
S530A Air Conditioning
S540A Cruise Control

Spare time is my biggest issue. I’m realistic what I can get done in the weekends and after work.

Yes it’s a 320 – would have a loved a 325, but there are hard to find in good condition especially convertible. Because it’s original, the timing belt, tensioner, water pump & belts are the first things to be done.

In the meantime enjoy the pics.

Image

Image

Image

Image

Image

Oh, and I broke my first rule – ‘…get the critical and important mechanical work done before the cosmetics…’
Spotted a set 14” basket weaves for very reasonable price and had to buy them.

As it turns out the seller was a true gentleman and E30 aficionado. Tyres were Michelins and 90%, rims were in great condition. Some Iron-x, claybar and painting of the centre caps they look awesome. Also hit them with a ceramic coating to make cleaning easier down the track.

Image
User avatar
Tzantushka
E30 Zone Regular
E30 Zone Regular
Posts: 457
Joined: Sat Nov 24, 2018 4:18 am
Location: Melbourne, Australia

Wed Aug 28, 2019 1:22 pm

Have been tinkering away in the background over a few months.

Back in Jun-19, had a productive weekend with the driver's seat removed on Friday night and ready for re-install on Sunday night.

Leather seats were recovered back in 2016, but had very little love since then - plus the Australian climate and lots of open top motoring to the beach had taken it's toll.
Driver's seat was the worst. Dirty, hard leather, blown shocks, sticky tilt mechanism and the backrest wouldn't stay-up.

Disassembly was straight forward, although one of the two backrest screws had come loose (explains the wobbly seat back!).
Shocks swapped, brake cleaner fixed the recline mechanism plus a new tilt cable and cleaned & painted the rails.

I was sceptical about Leatherique on coated leather.
But my leather had lots of hairline cracks in the protective coating. The first treatment brought the dirt out.

Image

And lots of it.

Image

After using the rejuvenator oil and pristine clean a second time, the dirt kept coming and the leather became softer and softer. Final treatment was the oil with cling wrap on the top and a hairdryer. No more dirt, but the leather was good as new.

Image

After 30 years - time for a new seat belt receptacle.

Image

But the seats look like a million bucks and I don't have to re-cover them.

Image

Also, BMW sport seats are good, but nothing like the V60 Polestar seats V60 :)

The workshop supervisor also approves...

Image
Last edited by Tzantushka on Fri Nov 26, 2021 12:48 am, edited 1 time in total.
User avatar
Tzantushka
E30 Zone Regular
E30 Zone Regular
Posts: 457
Joined: Sat Nov 24, 2018 4:18 am
Location: Melbourne, Australia

Wed Aug 28, 2019 1:35 pm

Also undertook a headlight restoration.
The lights were in good condition - but cloudy on the inside.

Image

The low beams were easy.
Undo a few screws, wipe the projector lense with a microfibre cloth and IPA spray.
Wipe the inside of the lens with the cloth and rinse with IPA.
Let dry.

The high beams were a bit harder.
Ended up cutting a 1" strip of flannelette, stuffing this down the bulb hole with a bamboo skewer (but leaving a bit sticking our of the bulb hole).
Pour in some IPA, swish and agitate - using the skewer to get onto the hard to reach spots.

Image

Image

The pull out the flannelette, rinse with IPA & let dry.
Brilliant.

Image
User avatar
Tzantushka
E30 Zone Regular
E30 Zone Regular
Posts: 457
Joined: Sat Nov 24, 2018 4:18 am
Location: Melbourne, Australia

Wed Aug 28, 2019 2:05 pm

When i bought the car, I knew the suspension was tired.
Ended up doing a complete suspension refresh over a few months in weekends & evenings.

Rears
Swapped out the OE shocks after 190,000 km - they were buggered.
The piston went down like a sack of spuds.
Bilstein B4, factory springs, HD upper mounts and new spring perch rubbers worked like charm - No rattles or clunks.
Cleaned & re-painted the wheel well with Rustoleum epoxy satin black.

Fronts
A bit more involved as I had some minor surface rust due to a missing lower RHS splash guard panel.
Admittedly, the rust I was repairining was nothing to some of the stuff you guys have!

RHS Before wash-down:
Image

LHS dirt before wash-down
Image

LHS after washdown
Image

After a good clean & degrease, painted on some more Epoxy satin black.
New wheel arch liners, lower control arms - ready to receive the rebuilt struts.
Image

Which reminds me...
August was 'strut month' with new Bilstein B4 inserts going in, along with bump stops boots and spring seat rubbers and new strut tops.
Plus a good lick of satin black.
Image
User avatar
Tzantushka
E30 Zone Regular
E30 Zone Regular
Posts: 457
Joined: Sat Nov 24, 2018 4:18 am
Location: Melbourne, Australia

Wed Aug 28, 2019 2:06 pm

Also ended up making my own lower control arm assembly tool.
Thanks to the guys at work, laser cut some 6mm steel, machined a locating pin.
Bought some M8 all- thread and fasteners

Works a treat!
Image


Image

Image
Cloggy Saint
Old Skooler
Old Skooler
Posts: 8024
Joined: Sun Jan 09, 2005 11:00 pm
Location: zummerzet

Wed Aug 28, 2019 2:18 pm

Excellent work!
Image

E30 zone - promoting adult illiteracy since 2004
User avatar
boiliebasher
E30 Zone Regular
E30 Zone Regular
Posts: 269
Joined: Mon Nov 17, 2014 11:00 pm

Fri Aug 30, 2019 1:07 pm

Indeed, looks like a super clean car compared to what we're used to in the UK
User avatar
martauto
E30 Zone Team Member
Posts: 6186
Joined: Wed Aug 31, 2005 11:00 pm
Location: leeds

Fri Aug 30, 2019 2:18 pm

WOW :clap: :clap: :clap: :clap: :clap: :clap: :clap: :clap: :clap: :clap: :clap: :clap: :clap: :clap: :clap: :clap: :clap: :clap: :clap: :clap: :clap: :clap: :clap: :clap: :clap: :clap:
Mart.
Only the E46 cab left now.
Just got too old.
User avatar
Foe
E30 Zone Regular
E30 Zone Regular
Posts: 615
Joined: Fri Sep 25, 2009 11:00 pm
Location: South Wales

Fri Aug 30, 2019 9:15 pm

Amazing work on the leather!!
User avatar
Tzantushka
E30 Zone Regular
E30 Zone Regular
Posts: 457
Joined: Sat Nov 24, 2018 4:18 am
Location: Melbourne, Australia

Sun Sep 08, 2019 12:45 pm

Thanks guys.
Like anything - the preparation takes time!

Finally getting close to having the wheels on the ground again.

30+ year old leaky power steering reservoir cleaned up with new ZF reservoir + new suction & return hoses.

Front stoppers also had a refurbish and upgrade.
ATE calipers stripped, cleaned, painted with ceramic caliper paint cured and reassembled with new seals/guides.

Before...
Image

Image

During...
Image

After...
Image

Image

For those Australians who are interested - rotors are DBA T2 Street Seriesl and Q-FM HP-X Pads from DVS Performance.
I have this set-up on the wife's Volvo V50 and it's a great combo for a daily driver (less dust and good initial bite)
User avatar
Tzantushka
E30 Zone Regular
E30 Zone Regular
Posts: 457
Joined: Sat Nov 24, 2018 4:18 am
Location: Melbourne, Australia

Thu Oct 17, 2019 11:10 am

Finally got everything back together after...
- front suspension overhaul
- rust removed & re-chromed the front bumper
- dodgy rear muffler removed and replaced
- fixed up the blocked cat.

Few photos from the test drive.

Image

Image

Now for the club registration (reduced cost) and a good paint correction she is finally ready for Aussie summer.
User avatar
Tzantushka
E30 Zone Regular
E30 Zone Regular
Posts: 457
Joined: Sat Nov 24, 2018 4:18 am
Location: Melbourne, Australia

Wed Nov 06, 2019 10:39 am

Club rego done and took the car for it's first registered drive to and from work.
Happened to be a glorious 33 deg C / 91 deg F on the drive home.

The sunset in the evening made it even more special.

Image

The 320i with an auto transmission is, er... not exactly quick.
But after the blocked cat was replaced the old girl has some go in the upper rev band.
At 4-5,000 rpm merging on the freeway sounds fantastic.
User avatar
ocde30
E30 Zone Newbie
E30 Zone Newbie
Posts: 237
Joined: Thu Feb 07, 2019 4:54 pm
Location: Yorkshire

Wed Nov 06, 2019 12:59 pm

Wow, great looking car and some excellent work. Enjoy your car and that sunshine!
User avatar
Steve
E30 Zone Team Member
Posts: 13151
Joined: Sun Dec 19, 2004 11:00 pm
Contact:

Wed Nov 06, 2019 4:10 pm

Wow great project. :D
webmaster@e30zone.net
User avatar
Aly-g
E30 Zone Newbie
E30 Zone Newbie
Posts: 33
Joined: Sun May 21, 2017 11:00 pm
Location: London

Thu Nov 07, 2019 6:09 pm

you have great car there, seats look fantastic ,enjoy the top down summer

Allan
its not growing old that stops you playing.....its when you stop playing that makes you grow old.....
User avatar
Tzantushka
E30 Zone Regular
E30 Zone Regular
Posts: 457
Joined: Sat Nov 24, 2018 4:18 am
Location: Melbourne, Australia

Tue Jan 07, 2020 4:57 am

Thanks lads.
Thankfully we are far away from the bushfires this summer.

With a few hours here and there over summer holidays, I've been able to start cosmetic stuff and fixing the small things that bring a smile to your face...
- Replaced the broken heater control panel
- New backlight bulbs & cleaned the fibre optics for the heater sliders
- New A/C switch that finally stays on
- Cleaned all the trim panels, radio and replaced bulbs in switches

Now all the controls work and I can see them at night!

Image

Getting the basics working makes you appreciate them more
User avatar
Tzantushka
E30 Zone Regular
E30 Zone Regular
Posts: 457
Joined: Sat Nov 24, 2018 4:18 am
Location: Melbourne, Australia

Thu Jan 09, 2020 8:44 am

Also gave the RH rocker panel a repaint.
Most of the rocker schutz textured coating was in good shape - but 30+ years of road debris had taken it's toll on the paint.

Removed & repainted the rear subframe anchor plates for a good finish.

Image

Scuffed, masked & wipe down with wax & grease remover...

Image

Mask, mask & mask...

Image

Image

Preview with the subframe anchor plate installed...

Image

I had a leftover can of SEM Trim Black 39143 and used that.
It's a nice semi-gloss/satin black.
Not sure what the gloss level is for the OEM finish, but the SEM looks fine.
User avatar
Tzantushka
E30 Zone Regular
E30 Zone Regular
Posts: 457
Joined: Sat Nov 24, 2018 4:18 am
Location: Melbourne, Australia

Thu Jan 09, 2020 9:08 am

Reason for taking no chances with the masking...

I have partly finished the paint correction (only the bonnet & RH side done).
The car has been repainted on a few occasions so the paint is in reasonable condition.
But was full of marring, scratches and day-to-day wear & tear that made it look worse than what it was.

After a good wash and:
1. Claybar plus IronX paint decontamination
2. Rotary polish (Menzerna IP3000 & orange pad)
3. Dual action orbital polish (Menzerna SF4000 & black pad)
4. Oil & residue wipedown
5. Ceramic coating (CarPro CQuartz UK)

It came up a treat!
Really happy with the results - plus it will have low maintenance & durability for those Friday & weekend drives.

Image

Image

I didn't want the rocker panels to be the standout feature - so the SEM Trim Black blends-in fine.
Now the front is done... Need to tidy-up the rear the bumper and LH side.
User avatar
ocde30
E30 Zone Newbie
E30 Zone Newbie
Posts: 237
Joined: Thu Feb 07, 2019 4:54 pm
Location: Yorkshire

Thu Jan 09, 2020 10:10 am

Excellent work - you car is looking fantastic. Paint correction gives great results and is quite satisfying to do - though harder than it looks. The sills look correct to me - not too matt and not too shiny.
User avatar
martauto
E30 Zone Team Member
Posts: 6186
Joined: Wed Aug 31, 2005 11:00 pm
Location: leeds

Thu Jan 09, 2020 3:01 pm

ocde30 wrote:
Thu Jan 09, 2020 10:10 am
Excellent work - you car is looking fantastic. Paint correction gives great results and is quite satisfying to do - though harder than it looks. The sills look correct to me - not too matt and not too shiny.
Cant say any more mate :cool: :cool: :cool: :cool:

Mart.
Only the E46 cab left now.
Just got too old.
User avatar
BenHar
E30 Zone Addict
E30 Zone Addict
Posts: 3066
Joined: Sun Jul 11, 2010 11:00 pm
Location: Reigate, Surrey

Thu Jan 09, 2020 3:37 pm

The "rockers" would have been black when it left the factory.

Ben
User avatar
ah
E30 Zone Addict
E30 Zone Addict
Posts: 2518
Joined: Mon Mar 10, 2008 11:00 pm
Location: surrey

Thu Jan 09, 2020 8:53 pm

Looking very tidy,congrats !
Image
Born on the 23 April 1990 320i Alpinweiss ll kabriolett! (SOLD BUT NOT FORGOTTEN !) :cry:
User avatar
Tzantushka
E30 Zone Regular
E30 Zone Regular
Posts: 457
Joined: Sat Nov 24, 2018 4:18 am
Location: Melbourne, Australia

Sun Feb 02, 2020 11:28 am

Thanks gents...
It's coming along nicely using the good weather to get everything in good nick for winter!

Managed to install some new rear window seals on the weekend.

Image

Image

Full 'how to thread' here...

Also, gave the passenger side seatbelt a wash.
The seatbelt was retracting slowly and getting caught in the door jamb.
Learnt about an old trick of washing the seatbelt with some mild detergent.
Pulled out the seatbelt and put a spring clamp on the webbing to stop it retracting.
Sprayed some all purpose cleaner and rinsed with the pressure washer.
Well the amount of brown gunk that came out of the seatbelt webbing was amazing.

Let it dry - the webbing is not so stiff.
And now it retracts back in no problem!
User avatar
Tzantushka
E30 Zone Regular
E30 Zone Regular
Posts: 457
Joined: Sat Nov 24, 2018 4:18 am
Location: Melbourne, Australia

Wed Feb 05, 2020 11:43 am

Whilst the weather is great & summertime (daylight saving) is giving me time in the evenings - I'm can smash out the small stuff.
Time for new pedal bushings!

I thought the accelerator pedal was old.
- squeaky
- vauge sloppy feeling
- poor throttle response

As it turns out, there were no pedal bushings at all.
So when you press the accelerator the pedal linkage would flop & slop around before actually opening the throttle.

I know there is a plethora of aftermarket options available in different materials - bronze, Delrin, UHMWPE (Ultra-high-molecular-weight polyethylene).
Ended-up using good ol OE parts.
2pcs of 35411119016 (item 7)

Image

Also had some spare rubber grommets laying around (item 10 & 11) that help keep the return spring quiet
Image

I'm waiting for a replacement lower kick panel, so installation was easy.

Remove the circlip (item 6) & disconnect the accelerator pedal

Disconnect the return spring (and fit new rubbers if needed)

Remove the circlip (item 8 ) & manoeuvre the pedal shaft out of the mounts

Image

Pop the bushes in

Re installation is reverse of removal.

Check and adjust the throttle cable if need be.

Was really impressed with what a difference from this simple maintenance task.
The vagueness & slop is gone and great throttle response.

An auto 320i is actually fun to drive!
Last edited by Tzantushka on Wed Feb 26, 2020 10:31 am, edited 2 times in total.
User avatar
martauto
E30 Zone Team Member
Posts: 6186
Joined: Wed Aug 31, 2005 11:00 pm
Location: leeds

Wed Feb 05, 2020 3:09 pm

Good job mate , it`s silly how such a small bit of kit makes all the difference :cool: :cool:

Mart.
Only the E46 cab left now.
Just got too old.
coopman
E30 Zone Regular
E30 Zone Regular
Posts: 267
Joined: Tue Feb 25, 2020 10:19 am
Location: Sydney

Tue Feb 25, 2020 8:56 pm

Really interesting thread. My 320i (manual) also feels 'not exactly quick', particularly on Sydney's annoying hills. I don't have a good reference point though - the closest I've owned is a 1994 Renault 19, which from memory was punchier.
User avatar
Tzantushka
E30 Zone Regular
E30 Zone Regular
Posts: 457
Joined: Sat Nov 24, 2018 4:18 am
Location: Melbourne, Australia

Fri Apr 17, 2020 12:33 pm

Like our UK brothers/sisters, used some Coronavirus induced spare time over Easter to do a few fiddly jobs on the car.
Such as refinish the mis-matched colours on the interior trim.

Time & sun are not kind to the colourfastness of the Natur trim parts.
The footwell speaker grills turn a Donald Trump orange, and the door armrest and pocket turn another shade.

Ended up pulling the door cards & trim for a re-paint & fix loose trim.
Door cards trim will need to be reglued or replaced.
I'll do those later.

Image

Straightened out and glued the backing vinyl.

Door innards got some love
- removed the old & leaky vapour barrier
- cleaned out the dust & crud on the inside
- treated with penetrol & a coat of body deadener
- lubricated the window regulator & tracks similar to here (warning OCD content)

Image

Fitted a new vapor barrier.
For our AUS viewers ended up using Car Builders Door Restore kit - which is excellent and includes the buytl tape.
Pro-tip - don't use your old vapour barriers as a template - as the old one's can shrink in our warm climate.

Image

Painted the parts with 3-4 coats of Dupli Color Medium Beige

Image

It's a VERY close match to Natur!

Image


Image

Much better than it was.
coopman
E30 Zone Regular
E30 Zone Regular
Posts: 267
Joined: Tue Feb 25, 2020 10:19 am
Location: Sydney

Fri Apr 17, 2020 12:45 pm

Excellent. I'm basically going to copy everything you do (also a 320i cabrio in Australia).

I just replaced the retainer clips on my door cards. As a "funny" story - I left the tray part on the kitchen table and my wife put it in the dishwasher... the colour is now a lovely chalky yellow.
kdevitt
E30 Zone Regular
E30 Zone Regular
Posts: 576
Joined: Sun Feb 05, 2006 11:00 pm
Location: Dublin
Contact:

Sun Apr 19, 2020 4:25 pm

Thats smashing work - can't believe how well the leather came out.
User avatar
Tzantushka
E30 Zone Regular
E30 Zone Regular
Posts: 457
Joined: Sat Nov 24, 2018 4:18 am
Location: Melbourne, Australia

Mon Apr 20, 2020 12:17 pm

kdevitt wrote:
Sun Apr 19, 2020 4:25 pm
Thats smashing work - can't believe how well the leather came out.
Thanks - I dubious about Leatherique.
But it bloody works and takes a long time.

coopman wrote:
Fri Apr 17, 2020 12:45 pm
Excellent. I'm basically going to copy everything you do (also a 320i cabrio in Australia).

I just replaced the retainer clips on my door cards. As a "funny" story - I left the tray part on the kitchen table and my wife put it in the dishwasher... the colour is now a lovely chalky yellow.
No worries - glad to help - all part of being a member of 'The Zone'.
Repco sells the Duplicolor paint. :)
User avatar
Tzantushka
E30 Zone Regular
E30 Zone Regular
Posts: 457
Joined: Sat Nov 24, 2018 4:18 am
Location: Melbourne, Australia

Mon Apr 27, 2020 12:01 pm

Not sure if I mentioned previously, but I had my head unit refurbished (wanted the stock look)
I've got the BMW branded Alpine CM5905 fitted as standard for the Australian market with the tweeters in the door pods (but no Amp)
Alpine Australia did a great job and the unit better than it was back in 1988.

Unfortunately, not the speakers.
They've suffered the ravages of time, use and UV.
I was listening to some tunes a few weeks back and the RH side sounded more craptacular than usual.

This is why:

Image
Why repair when you can UPGRADE? :)

Lots of information on the interwebs on replacements.
And lots of conflicting information.

I wouldn't know where to start with car audio today.
Given 1) it's a cabby, 2) I'm not after a 'doof doof' set-up and 3) would like to keep it looking reasonably stock with a 'drop-in' replacement (at a nice price)...
Based on the advice of a local car audio installer, ended up going with a set of component speakers.

Image

Audison APK-130

On the surface, they look compact and pretty well made for the price.

Image

Image

First task was to remove old & refit the new tweeters into the OE door pods - they're glued in.
If you don't want to keep your old tweeters, here's a pro tip.
Boiling water.

Boil the kettle, fill a mug to the brim, put the tweeter face down into the mug.
Add a splash of hot water to the back and let the glue soften.

Image

OE tweeter grill can be pulled out from the front.
Use a small hook or screw driver to lift the grill out.
Don't pry on the edge of the plastic.

Image

The old tweeter comes out from the back.
Back into the mug, to loosen the remaining glue.
Push out with your thumbs or use some channel locks to pull out.

Image

Scrape away any remaining glue with a knife (but don't make the hole too large).
Line-up & push in the new tweeter at the edges - Don't bend the mesh.

Secure with the clamps provided - or in my case a dab of hot glue.
Very compact installation.

Image

Comparison of OE & upgrade:

Image

Ready to trim & terminate the wires, install the crossover and then the kick panel woofers.
Last edited by Tzantushka on Wed May 27, 2020 12:09 pm, edited 2 times in total.
User avatar
Tzantushka
E30 Zone Regular
E30 Zone Regular
Posts: 457
Joined: Sat Nov 24, 2018 4:18 am
Location: Melbourne, Australia

Wed May 06, 2020 1:56 am

I have some spare time on my hands, so decided to make a start on the rear of the car.
The rear bumper needs some straightening and need to fix-up the rear spoiler.

The bumper wasn't too bad.
Some surface rust.

Image

Hardware is not bad either - will get cleaned-up and re-plated in yellow zinc chromate.

Image

Ready for plating - bag of bolts with the above picture so nothing gets lost.

Image

Also, lots of crud underneath the spoiler.

Image

Ugh.
Now I have to deal with this.

Image
User avatar
ifinallyhaveane30
E30 Zone Newbie
E30 Zone Newbie
Posts: 18
Joined: Wed Apr 24, 2019 9:42 pm
Location: Los Angeles, Calif.

Thu May 07, 2020 5:39 am

hey dude,

cheers from sunny Los Angeles. read through your thread, really enjoying your thoroughness with everything. very inspiring stuff. i especially love the color of your car. mine used to be shwartz, repainted brilliantrot (ugh, why not just repaint the original paint code?! silly PO). lots of time on our hands with COVID-19 these days. mine is in the shop for front end bushing replacement.
User avatar
Tzantushka
E30 Zone Regular
E30 Zone Regular
Posts: 457
Joined: Sat Nov 24, 2018 4:18 am
Location: Melbourne, Australia

Wed May 13, 2020 11:41 am

ifinallyhaveane30 wrote:
Thu May 07, 2020 5:39 am
hey dude,

cheers from sunny Los Angeles. read through your thread, really enjoying your thoroughness with everything. very inspiring stuff. i especially love the color of your car. mine used to be shwartz, repainted brilliantrot (ugh, why not just repaint the original paint code?! silly PO). lots of time on our hands with COVID-19 these days. mine is in the shop for front end bushing replacement.
Greetings!
Thanks & glad my adventures are helping pass the time for you!
I originally wanted a red E30, but red ones are popular & the good ones are hard to come by.
Guess that's why the PO re-sprayed yours.
You'll also notice the difference in handling when the bushings are done.

As a further update...
While I had the LH kick-panel out for the speaker upgrade, I may as well run the wires for the remote central locking kit.

Sure enough, I came across every E30 owner's nightmare - THE DREADED AFTERMARKET ALARM INSTALL

The Scotch Lock / Snap Lock splice connectors & mis-matched wire sizes were the first clue.

Image

Out came the glove box.
Signs of water ingress - thanks to no seal on the alarm loom going trough the firewall.

More loom splice goodness hidden by PVC electrical tape.

Image

It's a Repeller.
The only thing this installation has repelled is 2 hours of my life I can't get back.

Image

After proper re-splicing, soldering & heat shrinking, good riddance.

Image
User avatar
Tzantushka
E30 Zone Regular
E30 Zone Regular
Posts: 457
Joined: Sat Nov 24, 2018 4:18 am
Location: Melbourne, Australia

Mon May 18, 2020 12:38 pm

Along with the newly discovered rust under the boot spoiler, I also had a spot of rust on the LH rear wheel arch.

Image

While that and boot rust was being repaired by a local panel shop, I turned my attention to the is spoiler.

Appears the spoiler was added locally and had been with the car its whole life.
After 32 years in the Australian sun, the spoiler looked OK - but needed some work.

Cleaned-up the gunk & dead sealant on the underside.
(diluted phosphoric acid alloy wheel cleaner did the trick quickly)

Image

The top of the spoiler looked OK, but close-up, the rubberised skin was showing cracking & pitting.

Image

Image

Image

Image

A light dusting of flexible primer & filler did the trick nicely.
Sand with 600-800 grit and it's ready for paint.

Image

Image

I wanted to keep it original, so ended up masking the label and giving it a few coats of SEM Trim Black.
Gave it a nice satin black colour and matches the rubberised 'sheen' nicely.

Image

Even preserved the patina of the 'Heckspoiler' label.

Image

Now, to stop water finding it's way in - and to allow for future disassembly - I'm taking no chances.
Two stage seal using a self-adhesive closed cell foam pad & small circle of butyl sealant.

First make the foam seal & stick to the spoiler:

Image

Image

Image

And then a small circle/donut of butyl sealant at the base the of the thread.

Ready for assembly!
Post Reply