
It looks like the whole mess merges with the main loom... I unraveled the loom that splits and separated out the wires from the main loom. They are cut but I have not yet had the courage to remove the whole loom (fuse box and all...)Jozi wrote:I missed the ABS debate but I'm pretty sure it's its own separate loom, could have saved you sniping the wires.
'91 318iS minor resto.. ;-)
Moderator: martauto
-
Split_S
- POR 15 junkie
- Posts: 529
- Joined: Sun Jun 16, 2013 11:00 pm
- Location: Canada
-
Split_S
- POR 15 junkie
- Posts: 529
- Joined: Sun Jun 16, 2013 11:00 pm
- Location: Canada
Work progresses here despite this winter which has slowed me down considerably...
I worked on the rear subframe and took a lot of great pics and then, like an idot, promptly deleted them while trying to transfer them to my computer. Im none too happy about that!!
Basically what I did was this:
Loosened the 2 hex bolts holding the reinforcement plate to the frame and to the bracket after soaking with loosenut for a day.
They actually came out rather easily considering they completely crudded up...

With those out next up was the large nut and bolt holding the rear beam to the frame. I used my long handled socket wrench to slowly torque this *&$% off. Had a nice pic of this but...


Prior to that though I removed the "rubber" thats put over the bolt head to have a looksee...

The bolts were here...


It was quite straightforward and the long bar made it easy... With the nut loosened the bracket came off...

As well as the bolt which I knocked out from the bottom...

Worse part of the car here on the RH side:

I don't know why this stuff excites me but I was pretty happy with the brackets and bolts out.... Just a little more and the subframe would come out noooo problem....
Bullsh*t.
I thought the subframe bushings would just "slide" out...What a moron... Those %$#&* were stuck and not coming out!!!
I pondered this a bit and when the brain fails the foot acts.
So I placed my foot on the sub frame and gently pressed down and then up to try to wiggle them out...
It "kinda" worked:


The subframe bushings basically cracked and the whole subframe came off. So, success in a way...
I had the subframe out but had a new problem with the bushings still stuck in their sleeves...
Its always the same isnt it??
Before I could pat myself on the back I noticed the parking brake cables were still attached.. I knew they were attached but I'd kinda forgotten about it... Sooo...

Loosen nuts on brake lines:

Guide the ends thru their respective holes and THUD, the subframe was free..


Uuuh..This thing is gonna need some serious attention!!
But, I was still pretty happy about having the subframe out and figured getting the bushings out would be for another day...
I worked on the rear subframe and took a lot of great pics and then, like an idot, promptly deleted them while trying to transfer them to my computer. Im none too happy about that!!
Basically what I did was this:
Loosened the 2 hex bolts holding the reinforcement plate to the frame and to the bracket after soaking with loosenut for a day.
They actually came out rather easily considering they completely crudded up...
With those out next up was the large nut and bolt holding the rear beam to the frame. I used my long handled socket wrench to slowly torque this *&$% off. Had a nice pic of this but...
Prior to that though I removed the "rubber" thats put over the bolt head to have a looksee...
The bolts were here...
It was quite straightforward and the long bar made it easy... With the nut loosened the bracket came off...
As well as the bolt which I knocked out from the bottom...
Worse part of the car here on the RH side:
I don't know why this stuff excites me but I was pretty happy with the brackets and bolts out.... Just a little more and the subframe would come out noooo problem....
Bullsh*t.
I thought the subframe bushings would just "slide" out...What a moron... Those %$#&* were stuck and not coming out!!!
I pondered this a bit and when the brain fails the foot acts.
So I placed my foot on the sub frame and gently pressed down and then up to try to wiggle them out...
It "kinda" worked:
The subframe bushings basically cracked and the whole subframe came off. So, success in a way...
I had the subframe out but had a new problem with the bushings still stuck in their sleeves...
Its always the same isnt it??
Before I could pat myself on the back I noticed the parking brake cables were still attached.. I knew they were attached but I'd kinda forgotten about it... Sooo...
Loosen nuts on brake lines:
Guide the ends thru their respective holes and THUD, the subframe was free..
Uuuh..This thing is gonna need some serious attention!!
But, I was still pretty happy about having the subframe out and figured getting the bushings out would be for another day...
Last edited by Split_S on Fri Mar 22, 2019 7:50 pm, edited 4 times in total.
-
Fastroad

- E30 Zone Addict

- Posts: 2405
- Joined: Mon Oct 22, 2007 11:00 pm
Some nice bit of work going on here.
It bit of an off question is there a reason this build thread is in general chat?
Keep up the good work and plenty of pictures
It bit of an off question is there a reason this build thread is in general chat?
Keep up the good work and plenty of pictures
-
Split_S
- POR 15 junkie
- Posts: 529
- Joined: Sun Jun 16, 2013 11:00 pm
- Location: Canada
Thanks! No idea why I put it in the general chat section... I do remember I was drinking some fine single malt scotch the night I originally posted so Im pretty sure that had something to do with it....Fastroad wrote:Some nice bit of work going on here.
It bit of an off question is there a reason this build thread is in general chat?
Keep up the good work and plenty of pictures
-
Mitchen
- E30 Zone Addict
- Posts: 2378
- Joined: Mon Jul 15, 2013 11:00 pm
- Location: London
Wow I salute you for all this time and money you've put into this.. Kind of skeptical that this is your first rodeo though, you seem to know your way around cars! lol
-
Split_S
- POR 15 junkie
- Posts: 529
- Joined: Sun Jun 16, 2013 11:00 pm
- Location: Canada
Thanks -appreciate it! Honestly, it is my first EVER crack at working on a car, apart from oil changes. Slow and steady and a healthy dose of over-confidence is seeing me thru.... and like all great projects, its going to be over-budget!!!Mitchen wrote:Wow I salute you for all this time and money you've put into this.. Kind of skeptical that this is your first rodeo though, you seem to know your way around cars! lol
-
Split_S
- POR 15 junkie
- Posts: 529
- Joined: Sun Jun 16, 2013 11:00 pm
- Location: Canada
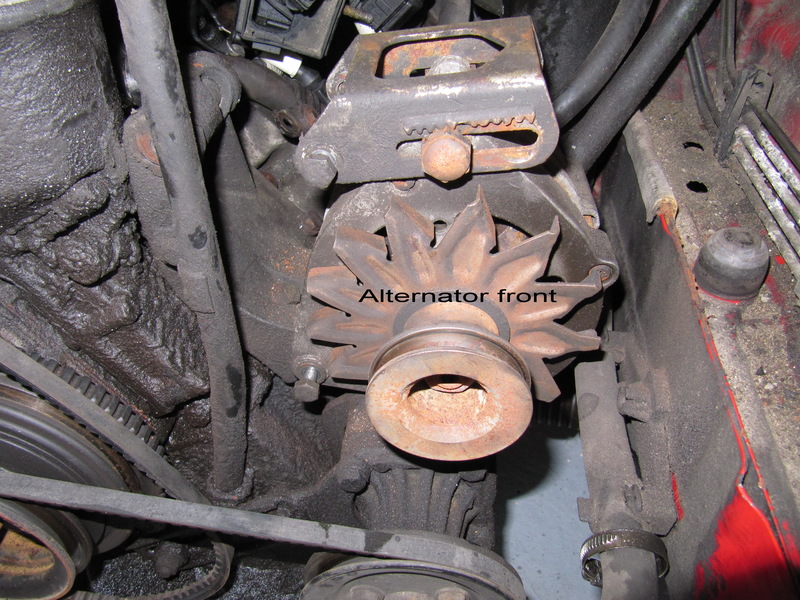
Been doing a few odds and ends...
I mostly completed a rebuild of my alternator - by mostly
I mean that I've left the bearing removal and the brass slip ring
to a rebuild shop as they will do it for less than I can buy the
parts for. Not because its too much of a pain in the *ss.. Oh no...
Also, I will have them test the output to ensure a nice steady
stream of power. If not I know I will have to change the
voltage regulator...Not what I originally wanted to do but it just
makes sense...
So here is how she was:
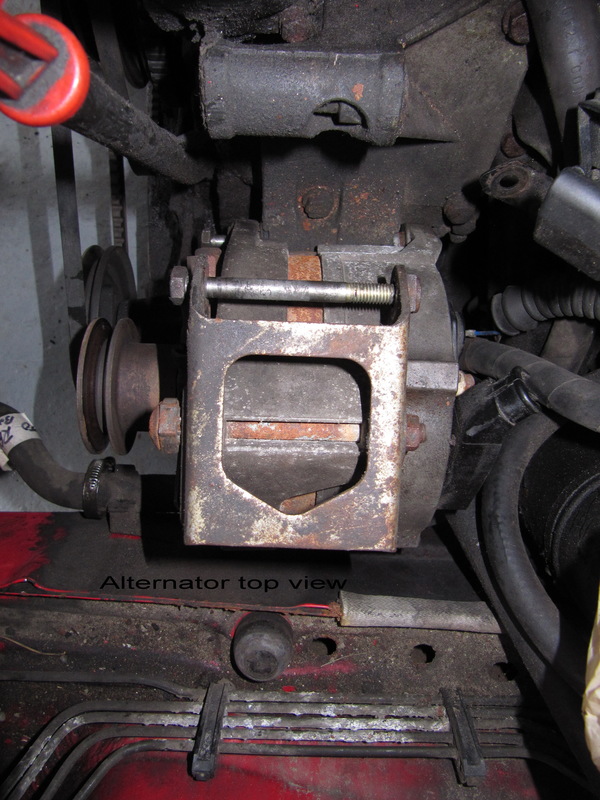
Once she was out I took stock of her:
Not sure what color she may have been when new but there was
no lack of rust, grime and grease!!

So after a few months of thinking about it I hauled her out of the
shed this week and figured Id have a crack at her... I was pretty
much in the "zone" on the disassembly as I completely forgot to
take some pics...
Basically you need a 24mm socket to loosen the nut in the center
of the pulley. I used a pneumatic gun on her and she came right
out (after trying for 20 minutes the old fashioned way...
My forearms aint what they used to be!!)
With that out you pull the pulley out and then the spacer. Easy.
Then you have 4 bolts in opposite corners. You need a phillips
head screwdriver for those but if you don't have one don't
worry because you won't be able to get them out anyways...
What will work is a good fight with the misses to get your blood
boiling (or a regular day dealing with your teenage daughter)
and then use a vise grip wrench tightly clamp to the middle of
the bolt (its exposed on the sides of the alternator). It will p*ss
you off for a while but they will give... Of course spray
penetrating oil before trying this... duh...
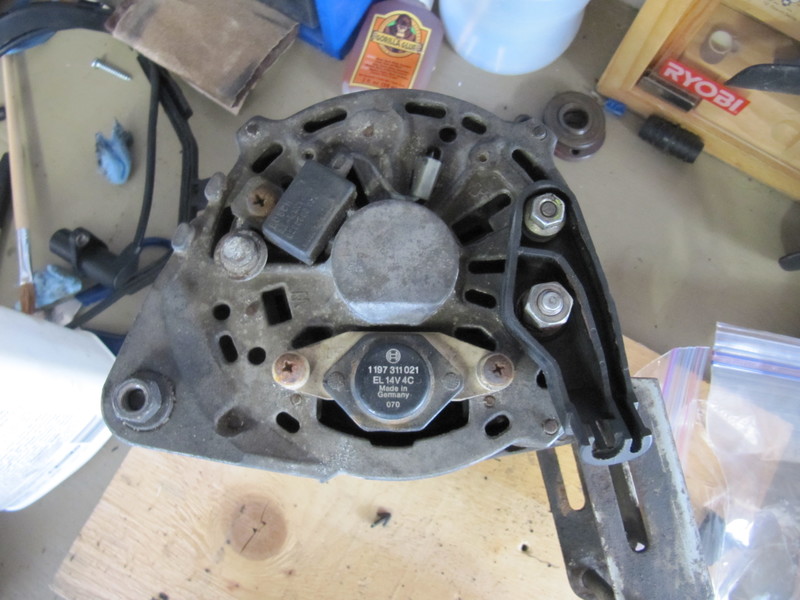
Then you remove all the stuff on the back:


Then I lightly tapped the sides apart and she opened up... Here is whats left over:

Im not a big fan of rust so I put the parts thru my magical rust removal process..


After about 5 days...


Not too shabby...
Worked on the exterior

and I also worked on the rotor..


With all that done I cleaned her up with some compressed air
and polished the outside on the wire wheel out in the shed...
and proceeded to put her all back together so the rebuild guys
can take her apart later on...
Finished...


And that's it for alternator porn....
I mostly completed a rebuild of my alternator - by mostly
I mean that I've left the bearing removal and the brass slip ring
to a rebuild shop as they will do it for less than I can buy the
parts for. Not because its too much of a pain in the *ss.. Oh no...
Also, I will have them test the output to ensure a nice steady
stream of power.
voltage regulator...Not what I originally wanted to do but it just
makes sense...
So here is how she was:
Once she was out I took stock of her:
Not sure what color she may have been when new but there was
no lack of rust, grime and grease!!
So after a few months of thinking about it I hauled her out of the
shed this week and figured Id have a crack at her... I was pretty
much in the "zone" on the disassembly as I completely forgot to
take some pics...
Basically you need a 24mm socket to loosen the nut in the center
of the pulley. I used a pneumatic gun on her and she came right
out (after trying for 20 minutes the old fashioned way...
My forearms aint what they used to be!!)
With that out you pull the pulley out and then the spacer. Easy.
Then you have 4 bolts in opposite corners. You need a phillips
head screwdriver for those but if you don't have one don't
worry because you won't be able to get them out anyways...
What will work is a good fight with the misses to get your blood
boiling (or a regular day dealing with your teenage daughter)
and then use a vise grip wrench tightly clamp to the middle of
the bolt (its exposed on the sides of the alternator). It will p*ss
you off for a while but they will give... Of course spray
penetrating oil before trying this... duh...
Then you remove all the stuff on the back:
Then I lightly tapped the sides apart and she opened up... Here is whats left over:
Im not a big fan of rust so I put the parts thru my magical rust removal process..
After about 5 days...
Not too shabby...
Worked on the exterior
and I also worked on the rotor..
With all that done I cleaned her up with some compressed air
and polished the outside on the wire wheel out in the shed...
and proceeded to put her all back together so the rebuild guys
can take her apart later on...
Finished...
And that's it for alternator porn....
Last edited by Split_S on Fri Mar 22, 2019 7:52 pm, edited 4 times in total.
-
mani
- E30 Zone Camper

- Posts: 1143
- Joined: Mon May 26, 2008 11:00 pm
- Location: London
Nice work mate that alternator came out really nice .
-
Split_S
- POR 15 junkie
- Posts: 529
- Joined: Sun Jun 16, 2013 11:00 pm
- Location: Canada
Thanks - not that hard really just that damn bolts that were hard to get out! Thats half the battle!!
-
Split_S
- POR 15 junkie
- Posts: 529
- Joined: Sun Jun 16, 2013 11:00 pm
- Location: Canada
Small update...
Getting ready for the subframe cleanup! First had to crack-free the four bolts holding the trailing arms to the rear beam... It was an EPIC battle, worthy of a Beowulf-like epic poem for sure, but I did manage to get them loose!! I now firmly believe restoring a car is all about forearm strength... atleast 95% of it anyways....
Dirty rotten bast*rds out and bagged:

Whats left:


Also got to work on the rear sway bar...

Removal, with the subframe out, was easy for a change... The bolts gave easily, probably scared by the beating those subframe bolts got!!

Not too shabby but a little rusty...

New kit, including bushings and brackets, links and bolts..

Took her out in the cold and cleaned her up... lots of fun when your hands are numb...

With the cleanup complete, a few coats of anti-rust paint applied and the bushings as well. I used KY jelly, uh, cause it works...


Fuel tank is next!!!!!
Getting ready for the subframe cleanup! First had to crack-free the four bolts holding the trailing arms to the rear beam... It was an EPIC battle, worthy of a Beowulf-like epic poem for sure, but I did manage to get them loose!! I now firmly believe restoring a car is all about forearm strength... atleast 95% of it anyways....
Dirty rotten bast*rds out and bagged:
Whats left:
Also got to work on the rear sway bar...
Removal, with the subframe out, was easy for a change... The bolts gave easily, probably scared by the beating those subframe bolts got!!
Not too shabby but a little rusty...
New kit, including bushings and brackets, links and bolts..
Took her out in the cold and cleaned her up... lots of fun when your hands are numb...
With the cleanup complete, a few coats of anti-rust paint applied and the bushings as well. I used KY jelly, uh, cause it works...
Fuel tank is next!!!!!
Last edited by Split_S on Fri Mar 22, 2019 7:53 pm, edited 2 times in total.
-
jonesy318
- E30 Zone Newbie

- Posts: 212
- Joined: Thu Dec 24, 2009 11:00 pm
- Location: Peterborough..
good stuff Norm, keep going mate
-
Split_S
- POR 15 junkie
- Posts: 529
- Joined: Sun Jun 16, 2013 11:00 pm
- Location: Canada
Thanks mate! Got a week off work starting Sunday - going to be VERY busy!!jonesy318 wrote:good stuff Norm, keep going mate
-
G-Bear
- E30 Zone Squatter

- Posts: 1632
- Joined: Wed Mar 12, 2008 11:00 pm
- Location: Hertfordshire
That's good hope to see some more updates..Split_S wrote:Thanks mate! Got a week off work starting Sunday - going to be VERY busy!!jonesy318 wrote:good stuff Norm, keep going mate
-
jimmyspeed
- E30 Zone Regular

- Posts: 848
- Joined: Sat Sep 08, 2007 11:00 pm
- Location: riding a wagon wheel west
restoring a car is all about forearm strength
and the ability to punch the adjacent object with as much force as removing said bolt !
admire your permaforst servicing skills . i won't touch the alt till it dies, the tank, like yourself is next on my list, have been wd40'ing it for a while
and the ability to punch the adjacent object with as much force as removing said bolt !
admire your permaforst servicing skills . i won't touch the alt till it dies, the tank, like yourself is next on my list, have been wd40'ing it for a while
-
Split_S
- POR 15 junkie
- Posts: 529
- Joined: Sun Jun 16, 2013 11:00 pm
- Location: Canada
Thanks - no choice but to deal with the damn cold living here...
Well fuel tank is next... With the subframe out of the way this isnt a huge job - but throw in 24 years of rain/road salt/snow/sand/dirt and it gets interesting...
Thinking ahead, I started WD40ing the bolts a few weeks back..
Here you can see the state of my brake lines ( a wee bit of rust..) and the rusted seam of the fuel tank:


To get started first I disconnected the fuel filler hose here on the right:

Here was the result of my first bolt removal attempt:

I took a moment and thought "This is going to be fun..."
Undetered I continued on.. The tank has 3 attachment points facing forward, two bolts far left,
and center and one nut which attaches to a stud on the far right - that's good to know cause I didn't...
Luckily I took it easier and got the 2nd one off.. Here is the stud:

On my car the far left forward bolt has the fuel filter
in the way..While a small pain in the *ss it came out...


Out:

Being optimistic about my chances of actually getting this thing out I disconnected the fuel lines to the filter and put a support underneath the tank...

Oddly enough the rear facing bolts came out no problem - go figure... and I was able to drop the tank:

However there are a few lines to disconnect: Electrical supply to the pump (previously removed)

Fuel line to the filter:


Vent lines:

This line, at the top of the pic below is a vent line to the charcoal filter. Its completely useless and will be completely removed. I will also not be reinstalling the charcoal filter. The vent line from the venting system (black part of it on right) will be rolled up with a small fuel line filter attached and vented to the atmosphere...

The frame of the car with the tank out: Brake line and fuel line replacement is a breeze now...


Almost out:

Out and uh, in the way...

Well fuel tank is next... With the subframe out of the way this isnt a huge job - but throw in 24 years of rain/road salt/snow/sand/dirt and it gets interesting...
Thinking ahead, I started WD40ing the bolts a few weeks back..
Here you can see the state of my brake lines ( a wee bit of rust..) and the rusted seam of the fuel tank:
To get started first I disconnected the fuel filler hose here on the right:
Here was the result of my first bolt removal attempt:
I took a moment and thought "This is going to be fun..."
Undetered I continued on.. The tank has 3 attachment points facing forward, two bolts far left,
and center and one nut which attaches to a stud on the far right - that's good to know cause I didn't...
Luckily I took it easier and got the 2nd one off.. Here is the stud:
On my car the far left forward bolt has the fuel filter
in the way..While a small pain in the *ss it came out...
Out:
Being optimistic about my chances of actually getting this thing out I disconnected the fuel lines to the filter and put a support underneath the tank...
Oddly enough the rear facing bolts came out no problem -
However there are a few lines to disconnect: Electrical supply to the pump (previously removed)
Fuel line to the filter:
Vent lines:
This line, at the top of the pic below is a vent line to the charcoal filter. Its completely useless and will be completely removed. I will also not be reinstalling the charcoal filter. The vent line from the venting system (black part of it on right) will be rolled up with a small fuel line filter attached and vented to the atmosphere...
The frame of the car with the tank out: Brake line and fuel line replacement is a breeze now...
Almost out:
Out and uh, in the way...
Last edited by Split_S on Fri Mar 22, 2019 7:55 pm, edited 2 times in total.
-
Split_S
- POR 15 junkie
- Posts: 529
- Joined: Sun Jun 16, 2013 11:00 pm
- Location: Canada
Short update...
Been very busy... Was planning on working on the car but was tired of how tight space was in my small garage so I bought an awesome DOUBLE garage with a big house attached to it.. and its only 1 km away!!! So now Im in the process of moving and the first thing I brought over was... you guessed it!

Was a bit tricky as the car had been completely stripped but I got her moved with some help...
Updates to come...
Been very busy... Was planning on working on the car but was tired of how tight space was in my small garage so I bought an awesome DOUBLE garage with a big house attached to it.. and its only 1 km away!!! So now Im in the process of moving and the first thing I brought over was... you guessed it!
Was a bit tricky as the car had been completely stripped but I got her moved with some help...
Updates to come...
Last edited by Split_S on Mon Oct 12, 2015 12:12 am, edited 1 time in total.
-
G-Bear
- E30 Zone Squatter
- Posts: 1632
- Joined: Wed Mar 12, 2008 11:00 pm
- Location: Hertfordshire
^^Thats the way to do it; garage comes first then house credentials second...
-
Split_S
- POR 15 junkie
- Posts: 529
- Joined: Sun Jun 16, 2013 11:00 pm
- Location: Canada
Just finished the move yesterday - what an ordeal!! But well worth it...
Off to work for the next week, will be back at work on the car once home...
Cheers...
Off to work for the next week, will be back at work on the car once home...
Cheers...
-
Split_S
- POR 15 junkie
- Posts: 529
- Joined: Sun Jun 16, 2013 11:00 pm
- Location: Canada
Cool.. I have finally started working on the car again!
Seems like forever since I've posted but stay tuned and watch a virgin welder pop his cherry....
Seems like forever since I've posted but stay tuned and watch a virgin welder pop his cherry....
-
Split_S
- POR 15 junkie
- Posts: 529
- Joined: Sun Jun 16, 2013 11:00 pm
- Location: Canada
I was tooling in my new neighbour's garage while he was out at work and came across this:

WOW! Amazing the things one can find whilst burglarizing one's neighbours..
Figuring he wouldn't miss it I dragged it over to my place...
Now I stated before I have never welded but like all things in this project to date IGNORANCE is not an obstacle!
I went to the local welder and bought this:

I figured since my welding experience totals ZERO I would start where it wouldn't show "if" I messed up... Logical place being the footwells...


So out with the grinder nice and early next morning.... zip zip cut cut...


Like a fat girl in a tight shirt: not pretty...

That left hand corner was really bad. I have to be honest and say I was pretty scared.

Can you tell we salt our roads??

Cut out and cleaned up...


Now how do I turn this welder on......
WOW! Amazing the things one can find whilst burglarizing one's neighbours..
Figuring he wouldn't miss it I dragged it over to my place...
Now I stated before I have never welded but like all things in this project to date IGNORANCE is not an obstacle!
I went to the local welder and bought this:
I figured since my welding experience totals ZERO I would start where it wouldn't show "if" I messed up... Logical place being the footwells...
So out with the grinder nice and early next morning.... zip zip cut cut...
Like a fat girl in a tight shirt: not pretty...
That left hand corner was really bad. I have to be honest and say I was pretty scared.
Can you tell we salt our roads??
Cut out and cleaned up...
Now how do I turn this welder on......
Last edited by Split_S on Fri Mar 22, 2019 7:56 pm, edited 5 times in total.
-
G-Bear
- E30 Zone Squatter
- Posts: 1632
- Joined: Wed Mar 12, 2008 11:00 pm
- Location: Hertfordshire
Looking forward to seeing first weld pics.. get stuck in...
-
Split_S
- POR 15 junkie
- Posts: 529
- Joined: Sun Jun 16, 2013 11:00 pm
- Location: Canada
hennared323i wrote:Epic thread
Thanks!
Ok, so I figured out how to turn that welder on, its 220V which in everywhere but north america is pretty normal but here that amount of juice is for heavy duty use only... So found a plug thats 220V...no more tumble dryer while I embarrass myself with this welder....
Now kindergarten was my highest academic achieving year and its paid off here:
Find some card board:

Make a template:

Cut it out: (you still with me?)

Transfer it:

Double check (this part is easy to skip...)

Take a picture with a pencil so it looks like you know what youre doing..

Cut template out then try bending it..

Fit...

Fit again... (AKA: whack the shizen out of it with a hammer)

Weld!! (Sincere apologies to those of you who know how to weld

My first ever welds - pretty damn challenging actually.. now to tackle the left hand corner which is gonna be a real $#%&!
Last edited by Split_S on Fri Mar 22, 2019 7:57 pm, edited 2 times in total.
-
hennared323i
- Old Skooler

- Posts: 2350
- Joined: Wed Jul 25, 2007 11:00 pm
mmmmmm welding 
I admire your tenacity sir, threads like this one are excellent.
Have you read Grrrrrrrrrrrrrrrrrrrrrrrrrrrrrrrrrrrsssssssssssssssssssssssssss resto thread? now that was a weldathon
I admire your tenacity sir, threads like this one are excellent.
Have you read Grrrrrrrrrrrrrrrrrrrrrrrrrrrrrrrrrrrsssssssssssssssssssssssssss resto thread? now that was a weldathon
-
Grrrmachine
- E30 Zone Wiki / Team Member

- Posts: 8043
- Joined: Sat Feb 09, 2008 11:00 pm
- Location: Warsaw, Poland
Cheers henna And I was in exactly the same situation as the OP - lots of holes and no welding experience at all.
As others said to me when I started; turn the amps up on your welder. Those little beads probably aren't penetrating through the metal enough. And invest in a few little hammers like a ball peen; they're lifesavers for getting the metal into the right shape.
Another little trick I picked up was using copper strip as a heatsink. I bought a footlong piece, two inches wide and quarter-inch thick, and clamped it under the joint I was welding. It gives you a lot more confidence in doing butt joints in thin plate, and also makes the finish a lot easier to clean up or seam-seal over.
Resto thread is in my sig if you fancy a read.
'89 325i Touring | Touring Resto Thread | In-Dash Screen install
-
Split_S
- POR 15 junkie
- Posts: 529
- Joined: Sun Jun 16, 2013 11:00 pm
- Location: Canada
Thanks hennared323i: persistence is the key to success in all things!
Grrrrrr, I read your thread: beautiful work! The amount of work you put in is epic! Thank God I don't have the rust issues you had in the front section - my wings and engine bay are quite clean. But the rear, well that's another story!
Thanks for the advice regarding the welding - penetration was actually really good. Its a difficult area to weld in but Im happy with the results. Considering the accelerator was held in place with insulating foam previously I thinkk its an improvement!!
More to come....
-
Split_S
- POR 15 junkie
- Posts: 529
- Joined: Sun Jun 16, 2013 11:00 pm
- Location: Canada
Kinda forgot to post the first part of the floorpan welding...


Had to put out a small fire caused by grease and stupidity but soldiered on...

As some of you have noticed Im tack welding - Ive tried to do a continuous run but its a little beyond me right now (READ: Cant F%^$# do it!)

Bottom view:

How's that for penetration?
Work continues...
Had to put out a small fire caused by grease and stupidity but soldiered on...
As some of you have noticed Im tack welding - Ive tried to do a continuous run but its a little beyond me right now (READ: Cant F%^$# do it!)
Bottom view:
How's that for penetration?
Work continues...
Last edited by Split_S on Fri Mar 22, 2019 7:58 pm, edited 2 times in total.
-
Split_S
- POR 15 junkie
- Posts: 529
- Joined: Sun Jun 16, 2013 11:00 pm
- Location: Canada
Got a little sidetracked due to the almost purchase of a 1990 M3. Its killing me to have NOT bought it but what would I have done with this mess?? So its back to work...
The LH side of the DS was pretty rusted out, so after cutting it out and grinding it:

I started with a template..


This idea while nice, didn't work. I couldn't bend it properly and just got angry... So I tossed it out and did this:


It was easier to bend the narrower pieces. Now I needed a piece to brace the top..


As I ground to clean up for the welding more rust appeared and required more patches.. Not pretty but stronger..

Had to cut out the outer edge and tack in a new one..

With the final piece welded in and a quick coat of primer


Por-15 it all and done..

Not beautiful but solid...
The LH side of the DS was pretty rusted out, so after cutting it out and grinding it:
I started with a template..
This idea while nice, didn't work. I couldn't bend it properly and just got angry... So I tossed it out and did this:
It was easier to bend the narrower pieces. Now I needed a piece to brace the top..
As I ground to clean up for the welding more rust appeared and required more patches.. Not pretty but stronger..
Had to cut out the outer edge and tack in a new one..
With the final piece welded in and a quick coat of primer
Por-15 it all and done..
Not beautiful but solid...
Last edited by Split_S on Fri Mar 22, 2019 8:00 pm, edited 3 times in total.
-
Split_S
- POR 15 junkie
- Posts: 529
- Joined: Sun Jun 16, 2013 11:00 pm
- Location: Canada
On to the passenger side..
Didn't look too bad with the sound-deadening still in place...
Once it was scrapped off however...
Lots of little areas to fix...

And this corner which looked to be a real challenge...


So I started with the easier stuff which was still a challenge because a few of the cutouts were curved making it tricky to fit the new steel.

Pretty ugly welds.. Didn't notice my gas wasn't flowing properly which gave me lots of trouble...


That grey stuff is like epoxy steel, I used it to smooth out the welds. That was stupid, I won't do it again... Live and learn...


With the smaller areas done I turned my attention to the problem corner area.. I puzzled over this angle for a while. Its the floorpan steel curving up to meet the door frame. I decided to cut it out and weld in a bent piece of steel. This would unite both sides and make it stronger.. Cutting it out was tricky due to the lack of space but it got done...
Quick coat of primer first..


Then on to template making...


Steel bending homestyle...


Holy Sh*t it fits!!!

Weld it in!! Hurry...

Nice...

Por-15 it and voila...

Didn't look too bad with the sound-deadening still in place...
Once it was scrapped off however...
Lots of little areas to fix...
And this corner which looked to be a real challenge...
So I started with the easier stuff which was still a challenge because a few of the cutouts were curved making it tricky to fit the new steel.
Pretty ugly welds.. Didn't notice my gas wasn't flowing properly which gave me lots of trouble...
That grey stuff is like epoxy steel, I used it to smooth out the welds. That was stupid, I won't do it again... Live and learn...
With the smaller areas done I turned my attention to the problem corner area.. I puzzled over this angle for a while. Its the floorpan steel curving up to meet the door frame. I decided to cut it out and weld in a bent piece of steel. This would unite both sides and make it stronger.. Cutting it out was tricky due to the lack of space but it got done...
Quick coat of primer first..
Then on to template making...
Steel bending homestyle...
Holy Sh*t it fits!!!
Weld it in!! Hurry...
Nice...
Por-15 it and voila...
Last edited by Split_S on Fri Mar 22, 2019 8:01 pm, edited 2 times in total.
-
jimmyspeed
- E30 Zone Regular
- Posts: 848
- Joined: Sat Sep 08, 2007 11:00 pm
- Location: riding a wagon wheel west
nice repairs, almost identical too what i had to do, one thing i would recommend doing is covering the welds with a seam sealer or polyurethane sealant
I wouldn't say its essential on the inside, especially with the thick paint but on the outside 100% to stop the stone chips and any pinholes you might have left between the welds
Another good product is weld through primer, as its very hard to guarantee a full covering of paint on the inner sills, in the uk we have a upol version but i have seen some people use a high zinc spray can - it doesn't work perfect buts a good start
-
G-Bear
- E30 Zone Squatter
- Posts: 1632
- Joined: Wed Mar 12, 2008 11:00 pm
- Location: Hertfordshire
Sterling efforts with the welder..
-
Speak-slower

- E30 Zone Newbie
- Posts: 32
- Joined: Fri Sep 07, 2012 11:00 pm
- Location: East Anglia
Looking good there mate. I'm getting ready to weld up my IS. The earlier post where you did the jacking point is that what the end of the sill should look like? I need some reference to make sure it's right on mine.
I've primed all my bare metal with etch weld primer. Which is a zinc based weld through primer is that what you've done? I've got seam sealer for the welds but what's the benefit of the por-15 you've used? Cheers bud loving what you've done so far. - mike
I've primed all my bare metal with etch weld primer. Which is a zinc based weld through primer is that what you've done? I've got seam sealer for the welds but what's the benefit of the por-15 you've used? Cheers bud loving what you've done so far. - mike