
Ratch's 318iS Resto is back!!!
Moderator: martauto
-
Royalratch

- E30 Zone Addict

- Posts: 4921
- Joined: Sat Oct 21, 2006 11:00 pm
- Location: London
Yeah - I'm also thinking to just renew the stock dampers or try other BMW alternatives.
-
Royalratch
- E30 Zone Addict
- Posts: 4921
- Joined: Sat Oct 21, 2006 11:00 pm
- Location: London
You don't get the adapter.kieran325 wrote:Ratch,
Ive just had my Becker head unit delivered
Thing is, does it come with the connection block that fits into the head unit itself, I haven't got one and I don't know if it's meant too
Cheers.
You need an ISO harness or adapter for any modern head-unit to work in an E30. It plugs into the your cars accessory panel (behind the glovebox). Some E30's have will have been converted, mine wasn't. It's a good time to dismantle all the butchery no doubt residing behind your head unit with proper grounded and solid 12V feeds, instead of getting power from your hazard switch or other such bodges I've seen.
Buy the harness here:
http://www.incarexpress.co.uk/view_prod ... tno=PC2254
When it arrives, swap the yellow and orange wire around as E30's have their 12V feed the wrong way around.
You could also get an adapter for your original E30 block to the modern ISO but the lead above replaces the whole thing with a one-hit solution and the adapter is pretty bulky.
-
Simon13
- The longest resto in the world !
- Posts: 22697
- Joined: Mon Jan 10, 2005 11:00 pm
- Location: Camberley, Surrey don't u know
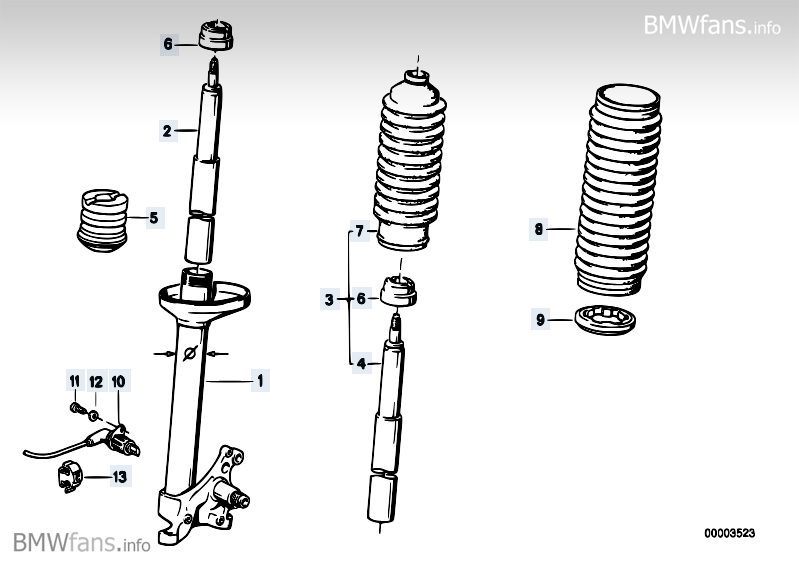
Ratch the dampers Andyboy mentions for the 86-87 mtech is the middle one in that picture
-
Andyboy
- Alpina Colada
- Posts: 12578
- Joined: Mon Sep 11, 2006 11:00 pm
325i Sport Billies are part no. 31321130065 (No.3) which come with collars and the concertina dust covers.
-
Royalratch
- E30 Zone Addict
- Posts: 4921
- Joined: Sat Oct 21, 2006 11:00 pm
- Location: London
Have my finger on the order button - quick question:
Bilstein B4 Front & Rear @ £205?
OR.
BOGE MTECH Front & Rear @ £150?
Which is better? The Bilsteins are their entry level 'sporty' damper, are not the inverted design and do not have the fatter damper rod.
The BOGE MTECH are the stock damper. Both brands are Gas dampers.
Are the Bilsteins worth punting the extra £50?
-
Simon13
- The longest resto in the world !
- Posts: 22697
- Joined: Mon Jan 10, 2005 11:00 pm
- Location: Camberley, Surrey don't u know
my opinion would be yes they are
-
Royalratch
- E30 Zone Addict
- Posts: 4921
- Joined: Sat Oct 21, 2006 11:00 pm
- Location: London
Ordered - am up for seeing how the B4 differs at all form stock.
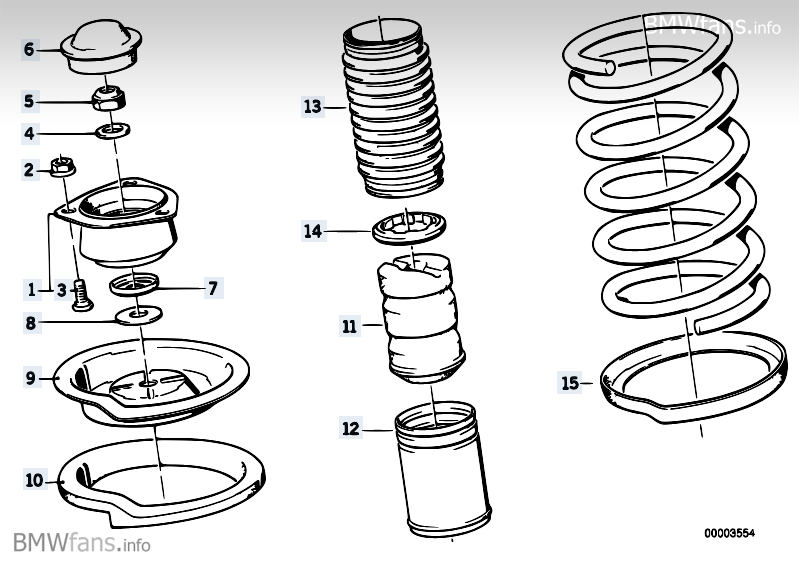
Also renewing top mounts of course but any other bits I should renew - there are a quite a few parts that look like over 20 years they would deteriorate, extra bumpstops, lockrings etc etc:
Front:
Alternate Front?
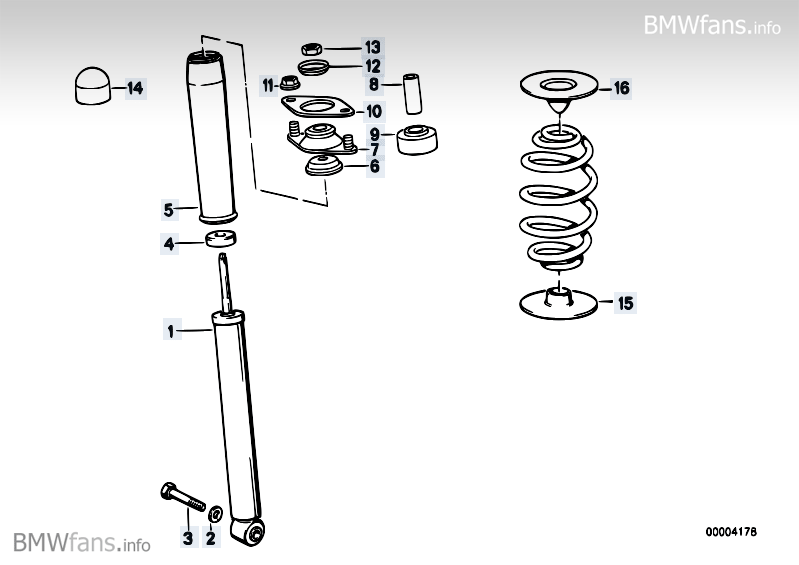
Rear:
Not sure what fasteners/hardware you get with a new damper either...
Also renewing top mounts of course but any other bits I should renew - there are a quite a few parts that look like over 20 years they would deteriorate, extra bumpstops, lockrings etc etc:
Front:
Alternate Front?
Rear:
Not sure what fasteners/hardware you get with a new damper either...
-
Andyboy
- Alpina Colada
- Posts: 12578
- Joined: Mon Sep 11, 2006 11:00 pm
The second pic down is the B4 / Boge type of bump stops. If you've lowered the car at all, get E36 Coupe bumpstops. New shocks should come with top retaining nuts and possibly the washer. You definitely want new retaining collars. Now, if you're really keen you could give them a coat of clear laquer once fitted (mask the damper rods up) so the bright anodised finish doesn't go all manky. I'll get me coat.............
I would have gone for Boge M Technic myself, but............
On the back, when you replace the shocks are top mounts also replace the paper gaskets - they're pennies but they do keep moisture out.
A full suspension rebuild will make such a huge difference.
I would have gone for Boge M Technic myself, but............
On the back, when you replace the shocks are top mounts also replace the paper gaskets - they're pennies but they do keep moisture out.
A full suspension rebuild will make such a huge difference.
-
toby

- E30 Zone Addict
- Posts: 3609
- Joined: Thu Aug 11, 2005 11:00 pm
- Location: Kent
Z3 reinforcement plates might be worth adding to the rear damper top mount for extra strength (2x 51 71 8 413 359).
These were available through a group buy but not sure if they still are-
http://www.e30zone.net/modules.php?name ... ent+plates
EDIT: almost certainly available through the BMW dealers.
These were available through a group buy but not sure if they still are-
http://www.e30zone.net/modules.php?name ... ent+plates
EDIT: almost certainly available through the BMW dealers.
Last edited by toby on Sat Oct 03, 2009 3:35 pm, edited 1 time in total.

-
Royalratch
- E30 Zone Addict
- Posts: 4921
- Joined: Sat Oct 21, 2006 11:00 pm
- Location: London
AARGGHH!
I may swap back to the original BOGE MTECH Dampers - it seems the Bilstein B4 are not actually shortened and the B8 is Bilstein's swap for a 318iS.
The B6 is a sporty long travel upgrade but for non-MTECH (standard height) cars. Seeing as I don't want to change the height or stiffness - BOGE it is.
@ Andyboy - Will replace as much as I can.
@Toby - good shout but if they're not easily available it's fine - I'm no thrasher and they've been fine uptil now.
-
Andyboy
- Alpina Colada
- Posts: 12578
- Joined: Mon Sep 11, 2006 11:00 pm
Bilstein B-4's are indeed standard length shocks but they work okay on slightly lowered cars - 30mm for example. I fitted a set of four B-4's to a 320i with an Eibach Prokit and it it worked well enough. It's when you try the usual 50-60mm drops that they're useless. I would just order up a set of 325i Sport M Tech Boge shocks and be done with it - 325i Touring ones are similar and they're more than stiff enough.
-
oomz1975
- E30 Zone Addict
- Posts: 2019
- Joined: Mon Feb 09, 2009 11:00 pm
- Location: London UK
Epic restoration, this is how it should be done.
I love this thread.
I love this thread.

-
Dantistas
- E30 Zone Newbie

- Posts: 51
- Joined: Mon Jan 21, 2008 11:00 pm
- Location: London - Vilnius
so how is going ? we need more fotos!!!
-
spook
- League two here we come !!!
- Posts: 7587
- Joined: Sat Aug 19, 2006 11:00 pm
- Location: portsmouth
Excellent thread, positive questions and answers from people who certainly know their stuff.

-
Royalratch
- E30 Zone Addict
- Posts: 4921
- Joined: Sat Oct 21, 2006 11:00 pm
- Location: London
Where were we.
Car is back from having some paint done and a polish - it looks crap here because of a light coating of bodyshop dust all over it.

The entire drivers side was painted and the rest of the car industrial mopped to bring the mintyness back.


Drivers door is great, you'd never know it used to a be Beige Chromer - definitely worth stripping properly.


New Escutcheon fitted - details kids!

Need new plastic nuts for that rear surround.

Memento from my days in Germany - lived here and in Munich over a year - this BMW dealer serviced this very car over 7 years ago!

So onto sorting the door. This shadowline trim is NLA and the one on here is scratched up so I have one last shot at getting it off my THIRD Lazer Blue door. I can't see how this is going to come off as it's clipped on such a way that makes it almost impossible. The clamps hold the exterior shadowline weather strip and the window seal together like so:

Seal is on top, the centre of the 'W' of that clamp is what slides onto the door frame. So you have to push the seal and the trim up together in one go - that's my plan anyway.
Rubbing strip off old door.

This won't be reused even though it's in good nick - the drivers door is getting all new trim.

On to the front valance. Some long awaited clips and nuts came in so I could get cracking on building it up.
Old and new valance - good to have old parts around as reference to make sure all the infinite BMW plastic buts and clips go where they should. Dip into the 'hardware hoard' but I don't have enough 8mm hex washer bolts - they're used everywhere and I really detest using old fasteners on new parts.


New Oil Cooler grille, one of my favorite 'styling' mods. to replace the stock blank one - I need all the help I can get to help tame the inferno-ike temperatures that the mighty M42 generates.

Replaced cracked passenger foglight. The drivers side came up like new with a little glass cleaner but the passenger side has either some embedded road grime of loads of chips on the lens it's very hazy - any ideas what stuff will get that out? Have tried electrical contact spray (my universal degreaser / grime remover lol).

Drivers side looks good.

Passenger side looks crap.

ready to go back on the car with a nice new standard thin apron - not really a fan of the iS one, plus it rubs like hell around London on all the bloody speed humps and kerbs.

All good - until I put the manky brake ducts brake in - that's obviously no good so they'll go off to paint

Onto the interior. Generally a mess but didn't have to any body repair work in here - totally rust free and should stay this way the amount of waxoil swilling around in side. Replaced all the drain plugs and chassis caps in the floorpan and seated them with a dose of waxoil. I've to tidy up the power amp wiring and route the rear speaker cables via all the sliding clips that also carry the loom. I've tried to keep the the speaker wire at right angles when against other cables for sonic integrity but in reality I just did that so I could type that I did - like it makes any difference! Will also get to sound proofing select areas but can't find my heat gun so that will wait. Can't wait to get that sorted and get the carpet in and the dash back as then I can start dreaming about driving the thing.
Onto the dashboard. The one in there is cracked at the usual place and so out it comes. I've done this a fews time now and the boring bits are out already so this flew by.
Steering wheel off, Instrument trim and cluster out, ECU bracket off ZZZZZZzzzzzzzzzzzz..........
The remnants of an Remote Central Locking install I had done years ago. It works very well but I now want to fit a period BMW remote locking fob with the an interior light delay relay so putting that wiring back to normal is going to be fun.

The foam gasket that sits between the main dash air intake and the heater matrix / vent box was totally gone. Just fell apart in my hands. I've heard that a weak gasket at this point is one of the causes of a weak blower and crap temperature mixture - will check the ETK for a replacement, if not, some improvisation will sort it.


Dash comes out!


This fell out the dash - have no idea what it is or what it does.

So out comes the replacement dashboard. Already fitted with new vents grilles that are all nice and smooth in operation. Headlight switch also fitted so now is the best time to fit the GPS antennae. Clean up the contact area, stick it down and thread the cable behind the dash where it will meet the back of the head unit. Fitting these afterward is a pain as you have to run them to one side and they get all tangled. Mounting at the rear screen is not an option as the heated screen interferes with the signal.


Pretty boring day, not a massive amount done and I can't put the dash back in until I lay all the audio lines and add extra sound proofing to the firewall and floor. But this arrived today which finished off the day nicely...


One cheeky thing. BMW have obviously started cutting corners or something as these wheels no longer come stitched in the three M-Colors. I'm not too bothered as the stitching goes black after a few months of death grip anyway.

That wheel now costs £250 and is it's NLA as a whole unit, you have to buy the wheel AND the centre push as two parts. Now only available in 370mm - apparently the mythical 365mm never existed...? I bought my first TECH II Wheel 8 years ago for £130 from BMW. I just sold that same wheel to a guy in Oz for £180+ and then bought this one.
Next up is carpet and audio install, my speaker pods should have been sorted by now so will get the doors wiring all sorted upto the tweeter pods too. Have ordered all new suspension parts for a full rebuild (dampers, bump stops, lock rings and top mounts etc) but I may not be able to fit them anytime soon as I have to move garages - balls.
Car is back from having some paint done and a polish - it looks crap here because of a light coating of bodyshop dust all over it.
The entire drivers side was painted and the rest of the car industrial mopped to bring the mintyness back.
Drivers door is great, you'd never know it used to a be Beige Chromer - definitely worth stripping properly.
New Escutcheon fitted - details kids!
Need new plastic nuts for that rear surround.
Memento from my days in Germany - lived here and in Munich over a year - this BMW dealer serviced this very car over 7 years ago!
So onto sorting the door. This shadowline trim is NLA and the one on here is scratched up so I have one last shot
Seal is on top, the centre of the 'W' of that clamp is what slides onto the door frame. So you have to push the seal and the trim up together in one go - that's my plan anyway.
Rubbing strip off old door.
This won't be reused even though it's in good nick - the drivers door is getting all new trim.
On to the front valance. Some long awaited clips and nuts came in so I could get cracking on building it up.
Old and new valance - good to have old parts around as reference to make sure all the infinite BMW plastic buts and clips go where they should. Dip into the 'hardware hoard' but I don't have enough 8mm hex washer bolts - they're used everywhere and I really detest using old fasteners on new parts.
New Oil Cooler grille, one of my favorite 'styling' mods. to replace the stock blank one - I need all the help I can get to help tame the inferno-ike temperatures that the mighty M42 generates.
Replaced cracked passenger foglight. The drivers side came up like new with a little glass cleaner but the passenger side has either some embedded road grime of loads of chips on the lens it's very hazy - any ideas what stuff will get that out? Have tried electrical contact spray (my universal degreaser / grime remover lol).
Drivers side looks good.
Passenger side looks crap.
ready to go back on the car with a nice new standard thin apron - not really a fan of the iS one, plus it rubs like hell around London on all the bloody speed humps and kerbs.
All good - until I put the manky brake ducts brake in - that's obviously no good so they'll go off to paint
Onto the interior. Generally a mess but didn't have to any body repair work in here - totally rust free and should stay this way the amount of waxoil swilling around in side. Replaced all the drain plugs and chassis caps in the floorpan and seated them with a dose of waxoil. I've to tidy up the power amp wiring and route the rear speaker cables via all the sliding clips that also carry the loom. I've tried to keep the the speaker wire at right angles when against other cables for sonic integrity but in reality I just did that so I could type that I did - like it makes any difference! Will also get to sound proofing select areas but can't find my heat gun so that will wait. Can't wait to get that sorted and get the carpet in and the dash back as then I can start dreaming about driving the thing.
Onto the dashboard. The one in there is cracked at the usual place and so out it comes. I've done this a fews time now and the boring bits are out already so this flew by.
Steering wheel off, Instrument trim and cluster out, ECU bracket off ZZZZZZzzzzzzzzzzzz..........
The remnants of an Remote Central Locking install I had done years ago. It works very well but I now want to fit a period BMW remote locking fob with the an interior light delay relay so putting that wiring back to normal is going to be fun.
The foam gasket that sits between the main dash air intake and the heater matrix / vent box was totally gone. Just fell apart in my hands. I've heard that a weak gasket at this point is one of the causes of a weak blower and crap temperature mixture - will check the ETK for a replacement, if not, some improvisation will sort it.
Dash comes out!
This fell out the dash - have no idea what it is or what it does.
So out comes the replacement dashboard. Already fitted with new vents grilles that are all nice and smooth in operation. Headlight switch also fitted so now is the best time to fit the GPS antennae. Clean up the contact area, stick it down and thread the cable behind the dash where it will meet the back of the head unit. Fitting these afterward is a pain as you have to run them to one side and they get all tangled. Mounting at the rear screen is not an option as the heated screen interferes with the signal.
Pretty boring day, not a massive amount done and I can't put the dash back in until I lay all the audio lines and add extra sound proofing to the firewall and floor. But this arrived today which finished off the day nicely...
One cheeky thing. BMW have obviously started cutting corners or something as these wheels no longer come stitched in the three M-Colors. I'm not too bothered as the stitching goes black after a few months of death grip anyway.
That wheel now costs £250 and is it's NLA as a whole unit, you have to buy the wheel AND the centre push as two parts. Now only available in 370mm - apparently the mythical 365mm never existed...? I bought my first TECH II Wheel 8 years ago for £130 from BMW
Next up is carpet and audio install, my speaker pods should have been sorted by now so will get the doors wiring all sorted upto the tweeter pods too. Have ordered all new suspension parts for a full rebuild (dampers, bump stops, lock rings and top mounts etc) but I may not be able to fit them anytime soon as I have to move garages - balls.
Last edited by Royalratch on Wed Oct 07, 2009 12:10 am, edited 1 time in total.
-
hennabm
- Old Skooler

- Posts: 1392
- Joined: Sun Jul 08, 2007 11:00 pm
- Location: Edinburgh
A very nice and detailed rebuild, just as it should be done.
The pin looking affair in the pic looks to me like a pivot from the door check strap or the bonnet strut pivot.
The pin looking affair in the pic looks to me like a pivot from the door check strap or the bonnet strut pivot.
'82 323i henna
'90 320iSE sterling silver No more!
'10 116d Sport Red - MkI
'12 1.4 Punto Easy Exotica Red
'11 X3 3.0d SE
'89 240 DL Estate
'90 320iSE sterling silver No more!
'10 116d Sport Red - MkI
'12 1.4 Punto Easy Exotica Red
'11 X3 3.0d SE
'89 240 DL Estate
-
bss325i
- E30 Zone Team Member

- Posts: 24536
- Joined: Sat Jan 20, 2007 11:00 pm
- Location: London/Surrey
Leather tech2 steering wheels didn't have the tri colour stitching.
Excelent stuff going on. I'm about to pull mine to bits including the dash.
Who did you use for your bodywork?
Townley again?
Excelent stuff going on. I'm about to pull mine to bits including the dash.
Who did you use for your bodywork?
Townley again?
-
skipunda
- E30 Zone Team Member
- Posts: 5672
- Joined: Thu Sep 04, 2008 11:00 pm
- Location: Cornwall/Plymouth
Very nice attention to detail
kudos
kudos
Chris
-
Royalratch
- E30 Zone Addict
- Posts: 4921
- Joined: Sat Oct 21, 2006 11:00 pm
- Location: London
No not Townley - it's a funny story actually...
Cooks Ferry in Enfield who did all my engine and driveline rebuild also have a full service body shop with a proper sealed low-bake oven etc etc. Their painter won millions on the lottery and pissed off lol! He visits now and again and I sometimes see his 07 plate Aston Vantage in the car park! So they had nobody for a while and now they have a good guy in there - apparently his welding is okay (he's working on a 2002tii resto) but his paint skills are very good.
Tech II wheel did come with the M-Stitching because my first one had it.
What you got planned on your SPort - it was bloody spotless when I saw it - what needs doing?
-
bss325i
- E30 Zone Team Member
- Posts: 24536
- Joined: Sat Jan 20, 2007 11:00 pm
- Location: London/Surrey
Its the door one. The bonnet one isn't tapered.hennabm wrote:A very nice and detailed rebuild, just as it should be done.
The pin looking affair in the pic looks to me like a pivot from the door check strap or the bonnet strut pivot.
-
Royalratch
- E30 Zone Addict
- Posts: 4921
- Joined: Sat Oct 21, 2006 11:00 pm
- Location: London
You lot should get out more.
Thanks - need to put it back then.
Thanks - need to put it back then.
-
bss325i
- E30 Zone Team Member
- Posts: 24536
- Joined: Sat Jan 20, 2007 11:00 pm
- Location: London/Surrey
The original tech2 wheel in mine never had it and that was a mint wheel. I never seen a leather one with it, only sport evo suede one with tri colour stitching.Royalratch wrote:No not Townley - it's a funny story actually...
Cooks Ferry in Enfield who did all my engine and driveline rebuild also have a full service body shop with a proper sealed low-bake oven etc etc. Their painter won millions on the lottery and pissed off lol! He visits now and again and I sometimes see his 07 plate Aston Vantage in the car park! So they had nobody for a while and now they have a good guy in there - apparently his welding is okay (he's working on a 2002tii resto) but his paint skills are very good.
Tech II wheel did come with the M-Stitching because my first one had it.
What you got planned on your SPort - it was bloody spotless when I saw it - what needs doing?
Check my thread to see whats in store but it involves retofitting a few things and general minting up of certain areas.
-
Kos

- E30 Zone Team Member
- Posts: 15546
- Joined: Tue Jul 12, 2005 11:00 pm
- Location: London / Cyprus
the ones with the coloured stitching are e34 m5 ones, not sure what size they are though but i'd gues they are bigger than the e30 ones
PUKAR DESIGNS - Reproduction BMW Decals Labels Sticker & Number Plates
www.pukardesigns.com
www.facebook.com/pukar.designs/
IG Pukar.Designs
www.pukardesigns.com
www.facebook.com/pukar.designs/
IG Pukar.Designs
-
Royalratch
- E30 Zone Addict
- Posts: 4921
- Joined: Sat Oct 21, 2006 11:00 pm
- Location: London
I only know about the M-Stitching because it was on my wheel when I bought it the first time, a 370mm Tech II Wheel for an E30, standard angle arms etc etc. It was the summer of 2000, now known forever as the summer of the M-Stitched Tech II Wheel for an E30.
That was quite a while back - perhaps they stopped doing it soon after.
That was quite a while back - perhaps they stopped doing it soon after.
-
bss325i
- E30 Zone Team Member
- Posts: 24536
- Joined: Sat Jan 20, 2007 11:00 pm
- Location: London/Surrey
385mmKos wrote:the ones with the coloured stitching are e34 m5 ones, not sure what size they are though but i'd gues they are bigger than the e30 ones
-
bss325i
- E30 Zone Team Member
- Posts: 24536
- Joined: Sat Jan 20, 2007 11:00 pm
- Location: London/Surrey
Mine was from 1989.Royalratch wrote:I only know about the M-Stitching because it was on my wheel when I bought it the first time, a 370mm Tech II Wheel for an E30, standard angle arms etc etc. It was the summer of 2000, now known forever as the summer of the M-Stitched Tech II Wheel for an E30.
That was quite a while back - perhaps they stopped doing it soon after.
Who knows eh?
-
Royalratch
- E30 Zone Addict
- Posts: 4921
- Joined: Sat Oct 21, 2006 11:00 pm
- Location: London
Have dedicated every evening this week to a big push to get this on the road for Winter lol!
Tonight is soundproofing and audio cable routing, whilst I wait for parts to arrive. Started by hoovering and tidying up the amp power cable and heated seat looms etc etc - anything that runs across the floor. Once this is all done I can get the carpet in which is a massive deal as it's kind of a light at the end of the tunnel.
All tidied up, zip-tied out the way.


Dug out the hardware. Some rolls of Dynamat Extreme, for better SQ but also for a quieter cabin if possible - I'm used to it now from my E46 etc. A lot of people say you can use bitumen based products, roofing tiles and all kinds of madness. This stuff is the lightest stuff on the market and offers the best damping, I say this after lots of research and recommendation, not because that's what it says on the packet.
Crossovers for the fronts and passive crossovers for the rears, Audiophile speaker cable and Becker Pre-Amp out.

Dynamat - don't bother without a heat gun, small roller and clean surfaces.

Heating it up first helps make it pliable then heat it up more as you're actually sticking it down. It also helps if you don't lose your heat gun and use the gayest smallest hair dyer you could possibly find - it is mine, I rock a tall quiff sometimes.

The quiff story was a lie and I don't own a hair dryer.
So, I started with the rear bulkhead, parcel shelf was done last year. Some people plaster this stuff everywhere but I only use it on the thinnest flattest areas most susceptible to vibration - the stiffer thicker parts of the chassis won't vibrate as much, if at all. I also left it in smaller shapes as I have an original BMW E30 centre hatch ski bag that fits in the centre. Needs a hole cutting so will lay of that for now.

And done, heated up pressed in with the handle of the roller into the recesses and then rolled in hard.

Onto the footwells. Even though the footwells and floor-pan are spotless, some of the existing sound deadening was manky so had to come off. 20mins with gay heat or 5 with a proper gun / scraper and it comes of very easily. BMW's deadening was rock hard and brittle - can't see how it's of any use anymore. So off it comes.

Aware that I may visit this area in the future for repairs I created templates (from my days back in Cali building choppers) to leave areas for the throttle pedal and floor plugs. Dynamat would make a mint including pre-printed templates for popular cars - save a lot of ball-ache.


Passenger side

Rear seat foot-spaces and transmission tunnel - should save quite a bit of noise here from the prop and diff. Only half done here.


Now onto routing the audio cable to the doors for the tweeters and door pods. Again, a fair few ways to attack this as the door grommet is a bitch. I found this method very easy and fast.
Needle nose pliers into a compressed grommet.

Place speaker wire in the end. Grip hard and pull through.

Sorted - quality cable runs into your door.

Mounting the crossovers in the door will mean only one run of cable in but what a headache to retrieve it. My crossovers will be mounted behind the ashtray underneath the heater matrix - perfect location for perfect size.
Whilst down there, ditched some remnant alarm loom that was all scotch-blocked into the door loom too. Was a really well installed into the fusebox and scuttle relays and then botched up here. Bitch to get out - that's the last of it. Had to chop the part of the loom going to the fusebox but at least I can use it for a proper 12V feed for the period BMW remote locking fob when it comes. No idea what the part that went to the Orange relay in the scuttle tho. Left a long section in case I need to use it.

Hope to get the carpet in in next which is a very satisfying milestone...
Tonight is soundproofing and audio cable routing, whilst I wait for parts to arrive. Started by hoovering and tidying up the amp power cable and heated seat looms etc etc - anything that runs across the floor. Once this is all done I can get the carpet in which is a massive deal as it's kind of a light at the end of the tunnel.
All tidied up, zip-tied out the way.
Dug out the hardware. Some rolls of Dynamat Extreme, for better SQ but also for a quieter cabin if possible - I'm used to it now from my E46 etc. A lot of people say you can use bitumen based products, roofing tiles and all kinds of madness. This stuff is the lightest stuff on the market and offers the best damping, I say this after lots of research and recommendation, not because that's what it says on the packet.
Crossovers for the fronts and passive crossovers for the rears, Audiophile speaker cable and Becker Pre-Amp out.
Dynamat - don't bother without a heat gun, small roller and clean surfaces.
Heating it up first helps make it pliable then heat it up more as you're actually sticking it down. It also helps if you don't lose your heat gun and use the gayest smallest hair dyer you could possibly find - it is mine, I rock a tall quiff sometimes.
The quiff story was a lie and I don't own a hair dryer.
So, I started with the rear bulkhead, parcel shelf was done last year. Some people plaster this stuff everywhere but I only use it on the thinnest flattest areas most susceptible to vibration - the stiffer thicker parts of the chassis won't vibrate as much, if at all. I also left it in smaller shapes as I have an original BMW E30 centre hatch ski bag that fits in the centre. Needs a hole cutting so will lay of that for now.
And done, heated up pressed in with the handle of the roller into the recesses and then rolled in hard.
Onto the footwells. Even though the footwells and floor-pan are spotless, some of the existing sound deadening was manky so had to come off. 20mins with gay heat or 5 with a proper gun / scraper and it comes of very easily. BMW's deadening was rock hard and brittle - can't see how it's of any use anymore. So off it comes.
Aware that I may visit this area in the future for repairs I created templates (from my days back in Cali building choppers) to leave areas for the throttle pedal and floor plugs. Dynamat would make a mint including pre-printed templates for popular cars - save a lot of ball-ache.
Passenger side
Rear seat foot-spaces and transmission tunnel - should save quite a bit of noise here from the prop and diff. Only half done here.
Now onto routing the audio cable to the doors for the tweeters and door pods. Again, a fair few ways to attack this as the door grommet is a bitch. I found this method very easy and fast.
Needle nose pliers into a compressed grommet.
Place speaker wire in the end. Grip hard and pull through.
Sorted - quality cable runs into your door.
Mounting the crossovers in the door will mean only one run of cable in but what a headache to retrieve it. My crossovers will be mounted behind the ashtray underneath the heater matrix - perfect location for perfect size.
Whilst down there, ditched some remnant alarm loom that was all scotch-blocked into the door loom too. Was a really well installed into the fusebox and scuttle relays and then botched up here. Bitch to get out - that's the last of it. Had to chop the part of the loom going to the fusebox but at least I can use it for a proper 12V feed for the period BMW remote locking fob when it comes. No idea what the part that went to the Orange relay in the scuttle tho. Left a long section in case I need to use it.
Hope to get the carpet in in next which is a very satisfying milestone...
-
Nay
- Channel Island Crew
- Posts: 3988
- Joined: Wed Aug 13, 2008 11:00 pm
Keep up the good work! 

Uni is killing the project.
-
capri_rob
- Married to the E30 Zone
- Posts: 9681
- Joined: Tue Feb 19, 2008 11:00 pm
- Location: South Staffordshire
Get DiffinRoyalratch wrote:Have dedicated every evening this week to a big push to get this on
All tidied up, zip-tied out the way.
...
Like the forward thinking of making templates for future repair areas

e30topless said : Proper BMW's have 4 headlights, last of the run was the E30 and E34/E32 anything after that is just complete shite
-
Royalratch
- E30 Zone Addict
- Posts: 4921
- Joined: Sat Oct 21, 2006 11:00 pm
- Location: London
Laid all the wiring to both doors and a bit more sound deadening on the passenger footwell and transmission tunnel / gearbox.

Having done that I could finally get the carpet in. 6-Cylinder, better sound deadening and posher pile. I tried to fit without removing the heater matrix, some people have said you can slide it under but upon Barry pointing out attached coolant hoses, release bolts in the engine bay etc etc I cut it instead - cheers Barry.


You'd never know it was cut - I can highly recommend this bodge, saves a lot of ball-ache.

Crossovers sit perfectly in there.

Also routed all the audio wiring. Amp in place under the seat - rear heating outlet doubles perfectly for this purpose.

On to drivers side power window - remove from old door and refit to new door.
Old door - glass, runners, power mech and loom very easy to come out - long as the window is in the right position. This is the same as a power window conversion.

Mech out.

New door with power mech bolted in.

Had to leave this bit of loom in the old door for now - I think it's the heated barrel or central locking microswitch wiring...? The new door has it in place already so it's all sorted for now.

Get the dash in next and the for the first time in over 8 months it will start to look like a car! Also have a very special bit of interior trim coming that will be AWESOME - more on that later.
Having done that I could finally get the carpet in. 6-Cylinder, better sound deadening and posher pile. I tried to fit without removing the heater matrix, some people have said you can slide it under but upon Barry pointing out attached coolant hoses, release bolts in the engine bay etc etc I cut it instead - cheers Barry.
You'd never know it was cut - I can highly recommend this bodge, saves a lot of ball-ache.
Crossovers sit perfectly in there.
Also routed all the audio wiring. Amp in place under the seat - rear heating outlet doubles perfectly for this purpose.
On to drivers side power window - remove from old door and refit to new door.
Old door - glass, runners, power mech and loom very easy to come out - long as the window is in the right position. This is the same as a power window conversion.
Mech out.
New door with power mech bolted in.
Had to leave this bit of loom in the old door for now - I think it's the heated barrel or central locking microswitch wiring...? The new door has it in place already so it's all sorted for now.
Get the dash in next and the for the first time in over 8 months it will start to look like a car! Also have a very special bit of interior trim coming that will be AWESOME
Last edited by Royalratch on Fri Oct 09, 2009 6:53 pm, edited 1 time in total.
-
robbo86
- E30 Zone Addict
- Posts: 3758
- Joined: Fri Jun 15, 2007 11:00 pm
- Location: planet thanet
Am I seeing things? Ratch and Kos on one thread????
Is this to say you have been allowed access again? Quality thread Ratch, I wish I had the time and cash to devote to mine like you have had to yours!
Is this to say you have been allowed access again? Quality thread Ratch, I wish I had the time and cash to devote to mine like you have had to yours!
Proud member of the PARDON? club!
-
Alex
- Married to the E30 Zone
- Posts: 22666
- Joined: Fri Feb 11, 2005 11:00 pm
- Location: Johannesburg, South Africa
you not seen the post at the top of e30 chat
all banned members are allowed back rob
apart from an armanibellend
looks stop on ratch
all banned members are allowed back rob
apart from an armanibellend
looks stop on ratch
-
robbo86
- E30 Zone Addict
- Posts: 3758
- Joined: Fri Jun 15, 2007 11:00 pm
- Location: planet thanet
I havent been on for about a month. What happened to Armani? I knw he got 3 imprisonments in a short space of time?
Proud member of the PARDON? club!
-
Alex
- Married to the E30 Zone
- Posts: 22666
- Joined: Fri Feb 11, 2005 11:00 pm
- Location: Johannesburg, South Africa
a couple of days ago i remember dave ( i think) saying that he has had his last post