
Skipunda's Tech 1 - update
Moderator: martauto
-
Drowningfool

- E30 Zone Newbie

- Posts: 27
- Joined: Sat Aug 23, 2008 11:00 pm
- Location: Location Location
Nice work. It's so good to see another one of these saved because in the not too distant, these are going to be worth very good money - think Mark 1 Mexico/RS2000. I think they may well be worth more in the future than the Tech 2 if only due to rarity.
Looks like a proper job too - make sure it gets a proper paint job though. A car very worthy of restoration, well done.
Looks like a proper job too - make sure it gets a proper paint job though. A car very worthy of restoration, well done.
-
skipunda
- E30 Zone Team Member

- Posts: 5672
- Joined: Thu Sep 04, 2008 11:00 pm
- Location: Cornwall/Plymouth
Thanks for your comments. 
Somebody asked about progress so just have a couple of new photos to add. Spent lots of time with the scuttle which really isn't very photogenic, but I needed to crack on with the sill anyway so here's the progress on that...
More welding of course. It was fairly difficult to keep such a large piece of metal mated because there really isn't a lot you'd want to clamp to.

Dremel with a 40-grade flippy to run over the joins. I then used a simple sander to ensure the flat bits are still flat. Then take back the rough with grade 120.

The big void before

Here's the semi-completed piece which will definitley need some blending in. All the lines are pointing in the right direction and I'm quite happy with it

Stay tuned
Somebody asked about progress so just have a couple of new photos to add. Spent lots of time with the scuttle which really isn't very photogenic, but I needed to crack on with the sill anyway so here's the progress on that...
More welding of course. It was fairly difficult to keep such a large piece of metal mated because there really isn't a lot you'd want to clamp to.
Dremel with a 40-grade flippy to run over the joins. I then used a simple sander to ensure the flat bits are still flat. Then take back the rough with grade 120.
The big void before
Here's the semi-completed piece which will definitley need some blending in. All the lines are pointing in the right direction and I'm quite happy with it
Stay tuned
Last edited by skipunda on Sun Jul 26, 2009 7:29 pm, edited 1 time in total.
Chris


-
325isporttech1
- E30 Zone Camper

- Posts: 1196
- Joined: Sat Feb 14, 2009 11:00 pm
- Location: Telford, Shropshire
- Contact:
Nice to see another getting fixed up, i thought i would be doing one of these threads for my tech1 but as it turns out im a lucky boy  i still need to do a few bits thow its not quite perfect
-
skipunda
- E30 Zone Team Member
- Posts: 5672
- Joined: Thu Sep 04, 2008 11:00 pm
- Location: Cornwall/Plymouth
I guess this means i'll have to update the thread with something then!! 

Thanks for your comments, really good stuff
Thanks for your comments, really good stuff
Last edited by skipunda on Sun Jul 26, 2009 8:00 pm, edited 2 times in total.
Chris
 [img]http://
-
skipunda
- E30 Zone Team Member
- Posts: 5672
- Joined: Thu Sep 04, 2008 11:00 pm
- Location: Cornwall/Plymouth
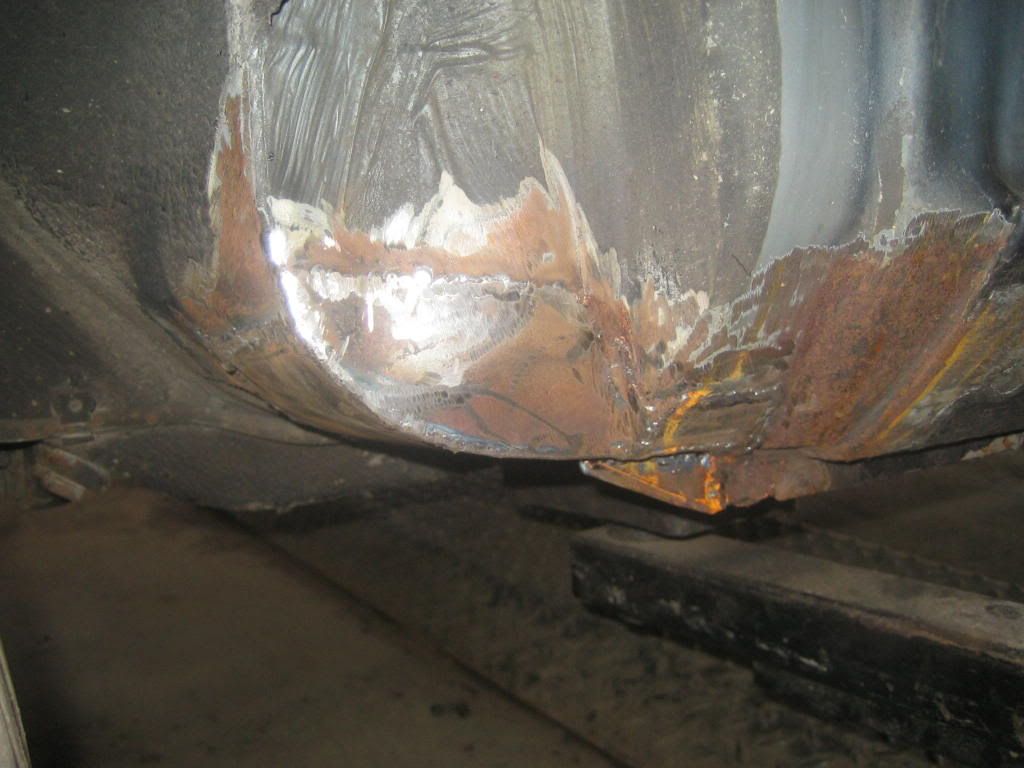
Actually got round to this jacking point today. It looked fine but could put a finger through the side of it. Out it came.

Only one of the skins needed to be removed. Bit of help with a hammer straightend out the worst dents when prising off the jacking point.


Self explanatory pic

Needs a bit of help but hey no more rust

A little tricky but hour-by-hour I cut away the rusted areas.

and here, almost

and finally that problem inner arch from earlier

Ta!
Only one of the skins needed to be removed. Bit of help with a hammer straightend out the worst dents when prising off the jacking point.
Self explanatory pic
Needs a bit of help but hey no more rust
A little tricky but hour-by-hour I cut away the rusted areas.
and here, almost
and finally that problem inner arch from earlier
Ha, yes thanks for the lighting compliment. It was your thread that got me to sort this bulkhead businessBarx325i wrote:good work indeed! that sill looks a bit scary.. I see you spray everything up post-weld, to prevent surface rust until the next stage - which makes good sense & I like the in car lighting
I've got to be honest, I had my first 'off day' today. I think the dash is going to have to come out. I'll remove the heater matrix at the same time but it's a bit disheartening really. Still, I dont want to reshell and I want to do it properly...nickso wrote:ouch thats going to be difficult to repair. i just got away with it on mine but another year or so and it could have looked similar.
you will probably need to remove the loom now as the fuse box wont move far enough away to get good access.
Ta!
Last edited by skipunda on Sun Jul 26, 2009 9:07 pm, edited 2 times in total.
Chris
-
skipunda
- E30 Zone Team Member
- Posts: 5672
- Joined: Thu Sep 04, 2008 11:00 pm
- Location: Cornwall/Plymouth
Hi,
It's a bit tricky scrolling through umpteen pictures on my camera so I thought I'd spend a few mins uploading the sort of things i've been up to.
So I took the dash out quite a while a go as well as the heater matrix - not shown

See above photos for the reason why. Essentially water had managed to get in through a small corrosion well inside the bulkhead. This had destroyed much of the inner wheel arch where your feet go.
So here's the problem:

First I cut away to get at the section
Section made up and put in

Getting a new batch of square plates from an old bmw boot

A bit too small but you can make out the left plate gone in

and bit by bit recreate the inside

It was fairly difficult to just put in one piece so I had to make up several small pieces. This one will sit to the left of where the loom comes in from the engine bay

heres the bit to template from - because of course there was nothing to go on before!

By the way I'm looking for a way of putting a new one back in by splitting it and plastic weld (sort of). Any ideas on how best to do this with rubber??
And more sections made up. The long bit sits inside the wheel arch while the gap immidiatly to the right is in the engine bay.

Final section made to complete the hole. Apologies for the lame chisel and hammer picture 
shouldn't really be using the safety equip as fireguards but you know how it is

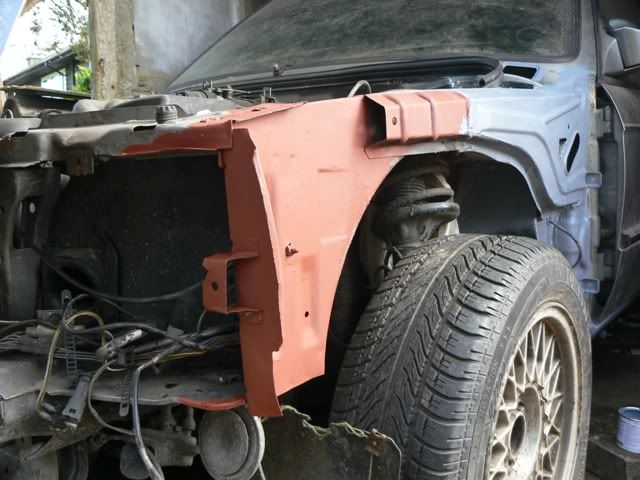
And thought I would spend a day or so reconditioning under the passenger top 'grill' section. Still needs resealing.

and a quick photo of something that should last well providing it's finished properly and water can run where it should do

and again

...and that bit behind the fuse box with primer only

So no more rust in this section!
Thanks for taking a look. I've still to finish it of course but all comments welcome
It's a bit tricky scrolling through umpteen pictures on my camera so I thought I'd spend a few mins uploading the sort of things i've been up to.
So I took the dash out quite a while a go as well as the heater matrix - not shown
See above photos for the reason why. Essentially water had managed to get in through a small corrosion well inside the bulkhead. This had destroyed much of the inner wheel arch where your feet go.
So here's the problem:
First I cut away to get at the section
Section made up and put in
Getting a new batch of square plates from an old bmw boot
A bit too small but you can make out the left plate gone in
and bit by bit recreate the inside
It was fairly difficult to just put in one piece so I had to make up several small pieces. This one will sit to the left of where the loom comes in from the engine bay
heres the bit to template from - because of course there was nothing to go on before!
By the way I'm looking for a way of putting a new one back in by splitting it and plastic weld (sort of). Any ideas on how best to do this with rubber??
And more sections made up. The long bit sits inside the wheel arch while the gap immidiatly to the right is in the engine bay.
Final section made to complete the hole. Apologies for the lame chisel and hammer picture
shouldn't really be using the safety equip as fireguards but you know how it is
And thought I would spend a day or so reconditioning under the passenger top 'grill' section. Still needs resealing.
and a quick photo of something that should last well providing it's finished properly and water can run where it should do
and again
...and that bit behind the fuse box with primer only
So no more rust in this section!
Thanks for taking a look. I've still to finish it of course but all comments welcome
Last edited by skipunda on Tue Sep 15, 2009 9:20 pm, edited 2 times in total.
Chris
-
skipunda
- E30 Zone Team Member
- Posts: 5672
- Joined: Thu Sep 04, 2008 11:00 pm
- Location: Cornwall/Plymouth
Hi all,
More slow progress but progress nonetheless!
Another cut and paste job for the passenger sill. This is normally hidden by the tech 1 skirt and was such a small rust patch at first.

The replacement section unfortunatly needed a 'lip' so as to fit the rest. Hammer out

Test fit

Welded, though I was using the wrong wire at this point so it's a bit crap

Little bit of body filler. I'll leave the rest to the paint guy.

Finished piece

I have absolutley no idea how this section became rusted to the extent it was. The sunroof drain tube (thanks brianmoooore) comes down just behind here. Anyway, it needed fixing.

Needed reinforcing at double thickness. I'll make it a bit larger than it needs be in case I decide to build up the jacking point 'box'

Stopped this section as I needed to sort out a floor section first. This is a bit of trial and error but seemed to work

tidy up

pull up the sunroof tube just in case it gets a bit hot

weld everything up

paint then seam sealer. Pic of the floor also but without the jacking point.

bit sorted in the wheel arch too

floor

Thats all for now
More slow progress but progress nonetheless!
Another cut and paste job for the passenger sill. This is normally hidden by the tech 1 skirt and was such a small rust patch at first.
The replacement section unfortunatly needed a 'lip' so as to fit the rest. Hammer out
Test fit
Welded, though I was using the wrong wire at this point so it's a bit crap
Little bit of body filler. I'll leave the rest to the paint guy.
Finished piece
I have absolutley no idea how this section became rusted to the extent it was. The sunroof drain tube (thanks brianmoooore) comes down just behind here. Anyway, it needed fixing.
Needed reinforcing at double thickness. I'll make it a bit larger than it needs be in case I decide to build up the jacking point 'box'
Stopped this section as I needed to sort out a floor section first. This is a bit of trial and error but seemed to work
tidy up
pull up the sunroof tube just in case it gets a bit hot
weld everything up
paint then seam sealer. Pic of the floor also but without the jacking point.
bit sorted in the wheel arch too
floor
Thats all for now
Chris
-
skipunda
- E30 Zone Team Member
- Posts: 5672
- Joined: Thu Sep 04, 2008 11:00 pm
- Location: Cornwall/Plymouth
thanks guys for your comments. head much bigger
gheko I've almost finished this side of the car so hoping to turn it around at some point in the near future. fed up with finding holes with this thing! I guess while i'm here I might as well pull the glass out, headlining and do a proper job of it but i'm a bit aprehensive of ruining the headlining while i'm at it
will be a fine shell when i've finished with it though I hope
Chris
Skip, a bit late now, but see the curved piece at the front edge of the sill hidden behind the wing? I had the same repaired on mine and this is how he fixed it...

The welder explained how he had done it. He basically put in the side section first but left quite a lot overhanging. Then he bent the underside piece in to place and welded it where the two plates met. Once they were fixed together he cut off the excess.
The welder explained how he had done it. He basically put in the side section first but left quite a lot overhanging. Then he bent the underside piece in to place and welded it where the two plates met. Once they were fixed together he cut off the excess.
-
skipunda
- E30 Zone Team Member
- Posts: 5672
- Joined: Thu Sep 04, 2008 11:00 pm
- Location: Cornwall/Plymouth
that looks very substantial mate. Not sure whether to bother recreating that jacking point. I have a pic of mine welded somewhere. I put a swift steel toe to it as a tester afterwards anyway!
If I remove the headlining will it go back in at the same quality? I'd also have to store it somehow which is a bit of a mystery. Bad enough with 6 foot of carpet
If I remove the headlining will it go back in at the same quality? I'd also have to store it somehow which is a bit of a mystery. Bad enough with 6 foot of carpet
Chris
Don't bother recreating the jacking point. It's not a real one, just where they used to lift the cars during assembly if I'm not mistaken. I didn't with mine.
Re the headlining:
It's a big job requiring the front and rear screen out but having done all of the hard work you have done so far, I think you already know the answer. If the headlining is looking a bit tired why not get a new one? To put it back in will take you a day to get it right. I'm only going off what I have read cos I have never attempted it myself.
-
skipunda
- E30 Zone Team Member
- Posts: 5672
- Joined: Thu Sep 04, 2008 11:00 pm
- Location: Cornwall/Plymouth
ah yes, I've heard about that assembly line thing. It just depends how OEM you want to go. I guess a welded car is no longer original anyway.
My headlining is immaculate which is why it's not already out. The roof will need some light work doing and I had invisaged an ellaborate method of scrubbing and painting the roof. It would be ok if the headlining stretched I guess so that it can be stretched back and glued.
My headlining is immaculate which is why it's not already out. The roof will need some light work doing and I had invisaged an ellaborate method of scrubbing and painting the roof. It would be ok if the headlining stretched I guess so that it can be stretched back and glued.
Chris
-
skipunda
- E30 Zone Team Member
- Posts: 5672
- Joined: Thu Sep 04, 2008 11:00 pm
- Location: Cornwall/Plymouth
Progress is slow, but here's some recent rust removal action...Still waiting on welder to be repaired (read: its cold outside)
Here's the outer sill about a foot and a half from the rear wheel arch. You can just see the inner sill which appears to be where a lot of sill problems stem from(?)

Had to remove quite a bit in the end. It's the only way as you know.

Rear arch, looks a right state. First job is to remove the lip and pull out the inner arch.

Gently pry out the inner arch near the fuel filler cap, ensuring to remove the two bolts holding the filler cap bracket

Inner arch gone

Replacement parts

Floor pan I guess 80% done. Used a different technique (see ghekos post above) but same results in my mind.

Bought an early motorsport cab since the last update, so now there’s two projects on the go

Back to the sport, this is the front driver-side wheel arch. Rather tricky to cut these sections out properly. It may well be due to the battery tray above, which i'm yet to check out.

and with rust gone at least whats visible on this side

Had a look around the scuttle area and all looks pretty impressive untill I spot a bit of rust in the corner

have to get at it somehow...but not quite enough room to work with

The trench was expanded - enthusiasm obviously still fairly rife at this point

Looks ok, but it's not.

In the top right you'll see a small hole where I’ve found some rust. The reason for this is due to a sheet of metal holding the bonnet catch on. Moisture gets in here over time and eats it from the bottom upwards.

So out it all comes. Mark each segment and recreate using either saved cut outs (s'wy I used a dremel here) or get the cardboard out.

Thanks again.
By the way, white tech 1 with hartges or original silver with 15" BBS? See poll...
Here's the outer sill about a foot and a half from the rear wheel arch. You can just see the inner sill which appears to be where a lot of sill problems stem from(?)
Had to remove quite a bit in the end. It's the only way as you know.
Rear arch, looks a right state. First job is to remove the lip and pull out the inner arch.
Gently pry out the inner arch near the fuel filler cap, ensuring to remove the two bolts holding the filler cap bracket
Inner arch gone
Replacement parts
Floor pan I guess 80% done. Used a different technique (see ghekos post above) but same results in my mind.
Bought an early motorsport cab since the last update, so now there’s two projects on the go
Back to the sport, this is the front driver-side wheel arch. Rather tricky to cut these sections out properly. It may well be due to the battery tray above, which i'm yet to check out.
and with rust gone at least whats visible on this side
Had a look around the scuttle area and all looks pretty impressive untill I spot a bit of rust in the corner
have to get at it somehow...but not quite enough room to work with
The trench was expanded - enthusiasm obviously still fairly rife at this point
Looks ok, but it's not.
In the top right you'll see a small hole where I’ve found some rust. The reason for this is due to a sheet of metal holding the bonnet catch on. Moisture gets in here over time and eats it from the bottom upwards.
So out it all comes. Mark each segment and recreate using either saved cut outs (s'wy I used a dremel here) or get the cardboard out.
Thanks again.
By the way, white tech 1 with hartges or original silver with 15" BBS? See poll...
Chris
Regarding the wheels, what have you already got? If you can stretch to staggered 'pinas i'd be tempted to get them.


-
skipunda
- E30 Zone Team Member
- Posts: 5672
- Joined: Thu Sep 04, 2008 11:00 pm
- Location: Cornwall/Plymouth
Thanks, hopefully have an alright Tech 1 one day.gaszman wrote:skip keep going it will be worth it in the end , when you sit in her and take her for your first drive you will keep her.
The respray colour is still a bit tricky but I may have some 16" alpinas coming soon which suit silver well.
So, made some progress with the driver side scuttle today. Needs tidying but all works OK and looks alright too
Recreate the box section and a new plate for it to sit on

Tack everything, then spend the rest of the afternoon setting it all on fire

The bracket that holds the bonnet catch needed recreating to fit with the new metal. Put some heavyweight anti-rust primer and a space heater nearby to speed up the drying.

Seam seal and test

And the other side...

The pieces from earlier are refurbed and then welded back in again

And almost finished...

Last edited by skipunda on Tue Mar 02, 2010 7:53 pm, edited 5 times in total.
Chris
how much for the hartges? ive been looking for new wheels. PM if you want and obviously im local enough to collect and have a ganders
-
skipunda
- E30 Zone Team Member
- Posts: 5672
- Joined: Thu Sep 04, 2008 11:00 pm
- Location: Cornwall/Plymouth
Evening all,
Hartges were sold to Cook318IS so now only the BBS remain. Perhaps i'm getting a little homo with this bit of scrap metal anyway, and some BBS would suit it better.
So continuing on from the last post i've now got most of the engine bay finished. I've still to play with a hole in the inner arch plus where the heater box screws to is corroded too.
Not sure how to describe this first bit, but it's new!

And goes into here. Welded, sealed and watertight and it looks about finished. You'll notice I cover everything in this rather crap looking primer. Most of the time there are in fact two or three different coats but the entire car will be sprayed in the shop anyway, inside and out.

Another fresh bit, this time on the sill. Yet to apply a bit of filler to this.

Finally got round to doing the floor properly. The seam sealer is mixed and heated up to an almost water substance so that it gets into all the cracks. Not neccessary, but I had all the tools to hand.

And the floor from the wheel-side.

The inner sill on the other side was a real pain. Thankfully this side wasn't quite so bad. Cant think what the name of the bracket is right now but it was a b'tch.

so I cheated and cut the bolts off...
Also began to cut away some of the rot

Everthing cut away, here's what we've got:

Begin by carefully welding a new floor to the inner sill. Don't make it any more complicated than it needs to be - no ones going to see it!

Next I had to reinforce/rebuild and redrill one of bracket holes. I'm not sure if this is a load bearing part but better be safe. The important idea here with the sill is to ensure moisture can't get trapped.

A plate was then shaped and welded in.

After the above went in it was time to recreate the side of the sill...well, the circled bit.

I guess the key to this, as an amateur, is to offer a plate of suitable size up, draw around it and then work to achieve a solid line on one side at a time.

And a bit made up to fill the hole

Final piece of the puzzle was this pencil sized chunk needing replacing.

And done! Just a haphazard coating of paint over it for now and will tidy up later on.


So with that done i've got to fit the new arch before lining the outer sill up properly. For that i've got to put the inner arch in and sort the holes deep inside the inner inner first


That's the battery tray on the left. The hole on the right is what i'm concerned about.

more misery

and more...

and have another

Cheers
Chris
Hartges were sold to Cook318IS so now only the BBS remain. Perhaps i'm getting a little homo with this bit of scrap metal anyway, and some BBS would suit it better.
So continuing on from the last post i've now got most of the engine bay finished. I've still to play with a hole in the inner arch plus where the heater box screws to is corroded too.
Not sure how to describe this first bit, but it's new!
And goes into here. Welded, sealed and watertight and it looks about finished. You'll notice I cover everything in this rather crap looking primer. Most of the time there are in fact two or three different coats but the entire car will be sprayed in the shop anyway, inside and out.
Another fresh bit, this time on the sill. Yet to apply a bit of filler to this.
Finally got round to doing the floor properly. The seam sealer is mixed and heated up to an almost water substance so that it gets into all the cracks. Not neccessary, but I had all the tools to hand.
And the floor from the wheel-side.
The inner sill on the other side was a real pain. Thankfully this side wasn't quite so bad. Cant think what the name of the bracket is right now but it was a b'tch.
so I cheated and cut the bolts off...
Also began to cut away some of the rot
Everthing cut away, here's what we've got:
Begin by carefully welding a new floor to the inner sill. Don't make it any more complicated than it needs to be - no ones going to see it!
Next I had to reinforce/rebuild and redrill one of bracket holes. I'm not sure if this is a load bearing part but better be safe. The important idea here with the sill is to ensure moisture can't get trapped.
A plate was then shaped and welded in.
After the above went in it was time to recreate the side of the sill...well, the circled bit.
I guess the key to this, as an amateur, is to offer a plate of suitable size up, draw around it and then work to achieve a solid line on one side at a time.
And a bit made up to fill the hole
Final piece of the puzzle was this pencil sized chunk needing replacing.
And done! Just a haphazard coating of paint over it for now and will tidy up later on.
So with that done i've got to fit the new arch before lining the outer sill up properly. For that i've got to put the inner arch in and sort the holes deep inside the inner inner first
That's the battery tray on the left. The hole on the right is what i'm concerned about.
more misery
and more...
and have another
Cheers
Chris
Last edited by skipunda on Thu Mar 11, 2010 9:12 pm, edited 2 times in total.
Chris
-
Ollie_bwoii
- Married to the E30 Zone

- Posts: 8695
- Joined: Sat May 17, 2008 11:00 pm
- Location: Northampton
Wow thats soem serious amoutn of welding going on there.  Still it's looking absolutely solid.
If you don't mind me asking what rust paint did you use here?
If you don't mind me asking what rust paint did you use here?