Page 1 of 1
Turbo manifold, ( chassis welding)
Posted: Fri Apr 06, 2012 5:37 pm
by jimmyspeed
Heres a set of merge collectors i have been making, am quite pleased with the results and they don't look too bad so though id share
here are the piece's after cutting i used abrasive chop saw, magnetic angle measurer and a jig.

heres the finished products

polished up !

If you want to have a go at making them take a look at this link i followed it closely and its fairly easy to do.
http://honda-tech.com/showthread.php?t=2787713
The only thing i did differently was weld a piece of angle iron onto the end of my pipe, due to having an angle measurer with a flat magnetic base - which worked really well and made changing angles very easy
My biggest mistake was in my jig, it is identical to his but mine was set to far away from the blade. If you look closely at his pictures the jigs's as close as possible to the cutting edge
The problem it caused was the blade begun cutting down the sloped side of the pipe. Allowing the disc which flexed quite easily to slide down and around the smooth pipe, messing up the angle
So if you make a jig ensure it cuts into the top of the pipe
I also think making a merger with a larger angle would make the cutting easier - when using an abrasive saw
hope thats of interest !
Re: My merge collectors
Posted: Fri Apr 06, 2012 5:56 pm
by Cloggy Saint
Nice, what is it?
Re: My merge collectors
Posted: Fri Apr 06, 2012 6:35 pm
by jimmyspeed
its a basically a way of joining 3 pipes into 1, i need it for a turbo exhaust manifold, but they are used on N/A headers as well
Re: My merge collectors
Posted: Fri Apr 06, 2012 11:18 pm
by HairyScreech

That's just saved me a lot of cash, 3/6 cylinder merge collectors are not cheap in the uk and that's a really simple way of putting one together.
What they are is the join of the two pairs of 3 pipes on the 6 branch manifold.
all is explained here.
http://myweb.tiscali.co.uk/a1autos/exhaustdesign.htm
(only skimmed it so info may not be 100% will read properly later.)
edit - actually that doesn't explain very well, new link coming up.
Do the hot tuning etc manifolds have proper merges?
Does the BTB?
if not its free power from both.
Re: My merge collectors
Posted: Sat Apr 07, 2012 3:41 pm
by jimmyspeed
pleased you like it hairy - i too was surprised at the price of merge collectors only found them for sale in australia though
the hotuning and btb do have them already i would imagine the hotuning will be pretty crap
I used stem pipe so they are pretty thick but the metal was only £12 ish a metre, its just the time really and the a bit of learning on the job,
hopefully i will have the manifold mocked up soon so i can remove the engine and tinker with the cylinder head - - - - awaits your valve research !
Re: My merge collectors
Posted: Wed Apr 11, 2012 12:39 am
by HairyScreech
I have an update for that coming, just need to verify a couple of results.
Re: My merge collectors
Posted: Mon Jul 30, 2012 5:58 pm
by jimmyspeed
Have done a bit more work on the manifold as i have just got a a descent pillar drill
exhaust flange for td04hl - will be connected up to a 3inch pipe eventually


manifold inlet flange all ported and trimmed down

fully mocked up, this thing is going to weigh at least 20kg when its done!

Now heres where i need some advice, i know that i need to cater for the manifold expanding and contracting on the turbo manifold to cylinder head flange.
An i was thinking of copying the original cast manifold ? but found there is one very tight stud hole in the manifold shown in the bottom left of the picture. Is this so small just to help alignment. Any tips or advice here will be very welcome before i start drilling.

Also the 1 1/2 inch pipe fits very snuggly inside the turbo inlet and was wondering whether its wise too place the pipe inside the flange like shown? Im thinking expansion might stress it too much?

will hopefully start mocking up the tubing this weekend
Re: My merge collectors
Posted: Mon Jul 30, 2012 9:32 pm
by b12rlw
Weld the pipe inside as you have it pictured expansion/contaction wont be an issue. With regards the mani, you could chop the webbing to allow it to move but std std stylee should work fine.
What thickness is that stuff, 1/2"???
Re: My merge collectors
Posted: Mon Jul 30, 2012 9:34 pm
by b12rlw
Weld the pipe inside as you have it pictured expansion/contaction wont be an issue. With regards the mani, you could chop the webbing to allow it to move but std std stylee should work fine.
What thickness is that stuff, 1/2"???
Re: My merge collectors
Posted: Mon Jul 30, 2012 10:59 pm
by jimmyspeed
thanks for the advice b12 , i will try and get the pipe inside, in the finished product it will be two - 1.1/2 inch pipes merging so i will try to keep it tight
I had planned to make the manifold flanges in two sections each with three ports to help with stress, i think i will mock it that way just to make it easier to mount and adjust and then i might cut it up further like you say. Standard stud pattern sounds good as i can just trace the old one out.
the thickness of the steam pipe is between 3-4 mm so quite chunky- i have the 1.1/2 inches bends and lots of the 1.25 bends for the earlier sections
cheers J
Re: My merge collectors (manifold made)
Posted: Thu Oct 18, 2012 7:56 pm
by jimmyspeed
Update - the manifold is finally airtight and ready for a skim, im pleased with it and just hope it holds out and doesn't crack or split for a while
heres a few work in progress pictures, mocking up on the car

From the other side. You can see the filter housing below, i stupidly cut up the oil pipes because i thought they wouldn't fit They would of fitted in hindsight but the oil cooler itself might have been more difficult as the intercooler is mounted there.

Tacked up ready for welding- i wish i had ground back all the edges that needed welding as i went along because its a real pain disassembling it and it also messes with the pipe angle and gap

other side

Pressure testing, this was time consuming and annoying, as i had to grease it, clamp it, spray it with soapy water, mark it up, take it apart, dry it, weld it and the repeat several times, with the holes gradually getting smaller !!!!!
i used an old bike inner tube to make the seal and a presta tube to get some good pressure inside.
I was suprised to find the metal itself is quite rust proof and has hardly any oxidation on it, compared to the mandrels im using for the exhaust and downpipe which rusted just from me touching it !
The exhaust is finished, it just needs painting, im working on the down pipe which is quite a tricky shape because of the strange turbo outlet , but im slowly getting there

Re: My merge collectors (manifold made)
Posted: Tue Oct 30, 2012 3:59 am
by b12rlw
Just an observation, will your bonnet shut? The turbo flange looks quite high but the mani looks good though. What is the wall thickness of the tube? (Bomb proof;-)) It's likely to be more rust proof due to a high carbon content. It looks pretty similar to the stuff we use as steam/feedwater tubes in our furnace at work.
Re: My merge collectors (manifold made)
Posted: Tue Oct 30, 2012 4:48 pm
by jimmyspeed
The bonnet will shut!!!
I did check, but it will be a tight fit and i will need some heat sheet to stop the paint melting. Obviously it would be better lower down but choices taken earlier in the project such as the merge collectors length, and changes in design along the way have lead to the finished product being no where near what i originally intended to make !
The tube itself is around 4 mm thick and like you mention its steam pipe and very strong it could hold the turbo with just tack welds.
Its at the engineering shop at the moment being skimmed and i just bought some VHT paint so i should be able to get it all bolted on soon
Re: My merge collectors (manifold made)
Posted: Sat Dec 15, 2012 9:20 am
by scotty86d
That's an impressive effort!!
Re: My merge collectors (manifold made)
Posted: Sun Dec 16, 2012 2:18 pm
by jimmyspeed
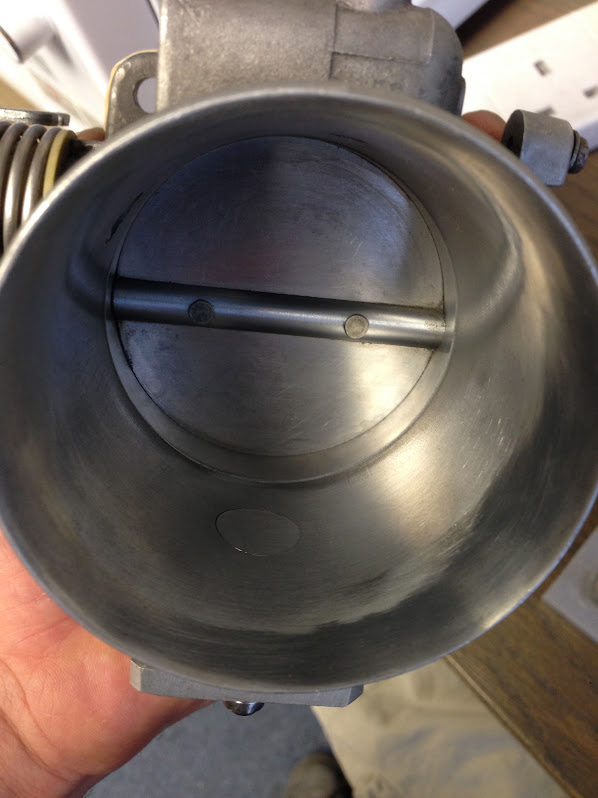
Thanks scotty , it certainly is an effort! but hopefully worth it. Heres a bit of an update to the project mostly shiny metal, firstly i ported and buffed up the exhaust exit as per the subaru forums instructions


i have been making the down pipe for a while, with the td04 exhaust housings shape being awkward it took a while to get the right design and shape. Its a 3 inch pipe with a separate (divorced) section for the wastegate gases to escape through.
Now im a fair way through the project i wish id chosen an external wastegate, but i didn't completely understand its importance, especially as i will be running low boost and will need to vent a large amount of gas.


throttle body knife-edged, i wish steel was so easy to polish out!

will be starting the intercooler piping next week as i have some time off for christmas so hopefully all the plumbing will be done soon.
Re: My merge collectors (manifold made)
Posted: Mon Jan 07, 2013 10:51 pm
by blackE30indy
looks good mate,what sort of power are you aiming for

Re: My merge collectors (manifold made)
Posted: Tue Jan 08, 2013 4:15 pm
by jimmyspeed
cheers, im hoping for 200 bhp +
the turbos from a 2litre subaru that pushes 218bhp stock an a max of about 280 bhp on a heavily modified engine, it should be quite torquey low down which will be good for the m20b20, should be fairly rapid ! as im sure the chromie doesnt weigh as much a s a scubby

a progress update- is charge cooler pipes made and pressure tested, and the engine has been removed for work and chassis welding, im debating getting a later motronic engine so that i can run more boost , being this engine is a 9.8:1 ratio , i would like to use it as i know the history and it runs so well.
i had a go at making an old cylinder head a hemi, but there was only a small increase in cc (1-2) and this removed all the squish band too. any recommendations???? i know turbo brown ran a 9.7 comp with good results
Re: My merge collectors (manifold made)
Posted: Thu Jan 10, 2013 6:36 pm
by Gunni
Why are you attempting to modify the head?
Re: My merge collectors (manifold made)
Posted: Fri Jan 11, 2013 4:29 pm
by jimmyspeed
i was hoping it would be a quick fix to lower the compression ratio as im worried about knock - i think the only real options
are A] skim the lumps of my stock pistons or B] source the later low comp bottom end
Re: My merge collectors (manifold made)
Posted: Fri Jan 11, 2013 5:45 pm
by Gunni
What is your power target and what is your engine combo now?
Re: My merge collectors (manifold made)
Posted: Sat Jan 12, 2013 9:06 am
by jimmyspeed
i'd be happy with 220 bhp, im just after a good street engine really.
engine is stock m20b20 9.8:1
325i inlet and throttle
3 inch exhaust with divorced internal waste gate
2.5 inch intercooler piping
saab 9000 intercooler and blow off
motronic timing wheel / idle valve will be running a a standalone
TD04L bugeye subaru turbo - ported
Rover turbo injectors
oil cooler mocal or asp once ordered
Re: My merge collectors (manifold made)
Posted: Sat Jan 12, 2013 9:38 am
by b12rlw
I'm sure I've got a setrab cooler kicking around somewhere. Its unused but I can't remember the size.
What cu are you going for?
Re: My merge collectors (manifold made)
Posted: Sat Jan 12, 2013 6:44 pm
by Gunni
jimmyspeed wrote:i'd be happy with 220 bhp, im just after a good street engine really.
engine is stock m20b20 9.8:1
325i inlet and throttle
3 inch exhaust with divorced internal waste gate
2.5 inch intercooler piping
saab 9000 intercooler and blow off
motronic timing wheel / idle valve will be running a a standalone
TD04L bugeye subaru turbo - ported
Rover turbo injectors
oil cooler mocal or asp once ordered
You don´t need to drop your compression at all for that kind of power. Just need to be sure on the ignition.
You´ll probably need 10-13psi to reach your goal.
Re: My merge collectors (manifold made)
Posted: Sat Jan 12, 2013 7:48 pm
by jimmyspeed
@ b12rlw - i was going to get a 235 mm core one, with 7 or 10 rows. I found an APS cooler on jjc Motorsport the other day and will probably get that as I need other connections, it's only 30 pounds
Thats good news gunni !! I have 0.5 bar actuator fitted so I can ramp it up with the boost controller
Re: My merge collectors (manifold made)
Posted: Wed Apr 24, 2013 4:52 pm
by jimmyspeed
progress update -
ive been painting and cleaning mainly, gave the starter a clean and paint up, also the pulleys and lower crankshaft pulley

got the sump sorted too with the turbo drain, its just a push fit but should be fine

ive always thought the painted rockers looked good on here so gave it a quick spray and polish aswell, i have painted the block too, with some enamel.
Just slowly accumilating parts for the timing end, oil seals, belts, etc. I got a good deal from ecp for the crankshaft front/rear seals and intermediate shaft all in £20 for elrings, just waiting on the cylinder head to get back from the engineering shop and need a new waterpump and ill be ready to assemble!
im re-using the oil pump as its pretty good inside, i was going to rebuild it with some fresh engine oils, is this right? or do i need to use moly? also should i prime it ?

Re: My merge collectors (Engine 1 Stück)
Posted: Mon May 13, 2013 7:22 pm
by jimmyspeed
the lump is finally in one piece!!!! just hope it will work
rebuilding the cylinder head went okay, just had a mare with the collets, until i found the right the technique. I had a go at porting, lightly cleaning up the bowl by unshrouding the valves. I also gave the exhaust a polish and enlarged the exit up to the manifolds bore size. The head got a light skim and a 3 valve cut too.
the block has all new crank shaft seals which went in fine apart from the front crankshaft which i left slightly proud as recommended. This is mean't to avoid running the seal rim against the old lips groove. This turned out to be a bad idea as when i mock fitted the lower crankshaft pulley the flange wasn't large enough to avoid contact with the seal. So i had to fit a 46mm ish socket and use the pulley crank pulley bolt to push it in, bodged!


i have fitted the new up-rated material o-ring and plug to the oil thermostat to minimise leaks . filter will be mounted as it is - i will eventually make some heat shield to deflect the turbos heat.

just a quick shot of the exhaust port doesn't look to shiny but its is

am waiting on a water pump at the mo but will get it all timed up asap to avoid any issues. Will leave the lump as it is for now and concentrate on the body work.
Re: My merge collectors (Engine 1 Stück)
Posted: Tue May 28, 2013 7:35 pm
by jimmyspeed
The rust hunt has begun, i knew about the major spots of rust which are in all four arches but theres alot more lurking underneath than expected

The first area to be tackled is the worst located in the drivers footwell, i though id start here as the welds wont be visible and are relatively easy, with the idea being i have improved enough for the rear arches.
the first three patches were caused by the rust coming up throught the exhaust heat shield mounts, i renewed them with some zinc plated studs, the chisel has been very useful for seam sealant removal !

the damage below - the large patch on the chassis rail was caused by me resting the car after jacking, also the rust has gone up through the real jacking pad where i have damaged the paint.
I have cut the lot out and will replace in time - i am thinking it might be worth fitting some plastic jacking pads like the e36 has.

how far the rust has run along the sill - the rest of sill is solid and well waxoiled

Re: My merge collectors (Engine 1 Stück)
Posted: Thu Jul 03, 2014 12:26 pm
by jimmyspeed
update- have done alot off work on the front end, fixing up all the rusted areas, sorting the suspension and painting but haven't got any pics yet, have just finished some glass blasting on the mid sections so heres some pic's
rust is everywhere on pretty much every seam as you can see nothing particularly deep apart from the seat securings captive nut bits- which i cut out and repaired then filled the inside with tectyl 506

Blasted down the tunnel - nice and clean


Seat base area cut out and blasted - the whole drivers side is more heavily corroded ?


Welded up

Fixed the jacking point up a bit, i would like to blame some previous owner but I'm pretty sure i did it years ago

I acid etched with a max meyer two part, which is safe for my mask. I highly recommend it way better than the upol version and you get twice as much - then zinc primer and black paint. Will get the polyurethane on today and then fill all the cavities


Re: My merge collectors (Engine 1 Stück)
Posted: Sun Jul 20, 2014 9:25 pm
by jimmyspeed
Removed the sunroof try today, was made easier by the wiki guide and a heat gun makes a massive difference, i wanted the sunroof out initially as i knew it was rusted but after removing the glass and headlining other issues were apparent and i though i have to fix know I've seen it
the tray from below looks okay

The other sides a different story theres the obvious curd section but also a ring that runs the entire way around, this is untreated metal factory fresh in small areas, nicely corroded in the rest

Some roof rot, will patch and sand blast this area

lighter rust only a light blasting an will be fine

Heres my trailing arms i did ages ago, blasted and strengthened, tried to re-fill them with oil but was having difficulty removing the plug. I got a small amount of movement which let out an oily smell so hopefully there solid internally. Will be doing the camber tabs sometime soon am planning on using stainless tabs so the bolts and washers don't scab of the paint and cause rust

Re: My merge collectors (Engine 1 Stück)
Posted: Sun Jul 27, 2014 10:48 pm
by jimmyspeed
done a bit more welding and spraying today - sunroof tray was the panel that need salavging
blasted and de-glued - the tray was hiding alot of minor rust which lifted very easily (mottled area at panel base), the paint on here is pretty crap really and alot scrubbed of with just plain thinners. All four drains had corrosion inside and out but nothing major

heres the repair section - cut out and ready to weld, you can see the rusty section behind it on my glove

welded and flatted down and then blasted clean


after painting - wasn't too fused about the finish but tried to get it well covered, prior to painting i sprayed all the spot weld areas and tabs to be welded with weld through primer and then masked. Hopefully this will do a better job than the bare metal bmw effort


Re: My merge collectors (Engine 1 Stück)
Posted: Sun Aug 03, 2014 8:55 pm
by jimmyspeed
not alot got done this week, just split the sunroof open, the small external problems have now revealed massive internal rust - may be a basket case ! It was really surprisingly easy to take apart , crappy painting again on the inside has caused the problems

camera had a moment

Re: My merge collectors (Engine 1 Stück)
Posted: Sun Aug 10, 2014 2:12 pm
by jimmyspeed
patched the roof yesterday, went fairly well - was really pleased with the patch and it fitted really tight and followed the roof curve nicely as i left the original lip in place, i then proceeded to weld it up but go a bit carried away and got some warpage. not a major disaster as i knocked it back out but it will need a touch of filler on finally prep work
rusty area to be replaced

the high value of a sandblaster

nice and clean rear


the tacked in patch, and glass grit pit


welded an painted, it came out okay considering i painted the colour at about 9 with a head torch, i knew it would piss down today so wanted it all covered up


will try and stick the two sections back together, am planning on polyurethane but will let the paint cure for a couple off weeks first
Re: My merge collectors (Engine 1 Stück)
Posted: Tue Sep 02, 2014 7:29 pm
by jimmyspeed
more pictures and progress - firstly got the roof stuck back in, was a bit a bit awkward and the PU made a mess but its tidy enough around the hatch


next area to patch up is the front off the arch, haven't got any before pictures but the fuel pump holder was finished, rust had begun to penetrate the thicker metal around the jacking point and just the usually e30 corrosion
so i removed the jacking pad, un stitched alot of the layers and blasted where i could. The rust didn't warrant full removal of the sills but was still time consuming
peeled open

i also removed the seam that runs from the sill to the transmission tunnel, the welded patch you can see was in need of repair and i new there'd be more under the rest so it got removed

repaired

inside - bit rough but no rust - note the weld running along the floor this is where the overlap was removed


prior to paint- i made a new bracket from stainless for the fuel pump so should last a bit longer

Re: My merge collectors (Engine 1 Stück)
Posted: Sun Aug 09, 2015 8:49 pm
by jimmyspeed
Nearly a year since my last update, haven't done much in the way of bodywork, bar the last section off arch i sealed up. Have mainly bee accumulating parts, upgrading parts
and procrastinating before more sand blasting.
I hope to do one last push and finish the underneath this year, at least getting it sealed up with epoxy before the winter
anyway last fab work it did on the car

i've also prepped the brakes for fitting - big red seal kit, hel stainless nipples and good ridge hoses

Did some throttle body work, the idle valve has been bunged up as you can't weld it. I made a part on the lathe out off aluminium and also modded a bolt to block the other one - both flushed off internally. Also in the picture is the ali temperature sensor mount for the audi AIT sensor.

As I'm working around the rear i finally got the beam and camber tabs installed (should have been in feburary) I've now begun working at an engineering firm so made made myself some stainless versions - TIG'd on and ready for a heavy bead blasting. The ends have rusted badly as i burnt out the beam bushes last time as i was sick of them.

Other progress has been a new hose cover for the rear arches, i found some offcuts of carbon mat in the workshop so had a go out making a replacement. It turned out OK the biggest mistake i made was getting the slow cure resin and it taking an age to go tacky, i did wait but not long enough. This meant it would hold and adhere to the tight curves and leave that nice gelcoat finish. But you can't see the inside and once painted will be fine. I was surprised at how well it drilled it thought it would be a major ball ache but glided right through.


Also bought a torsen - i flushed the inside out with paraffin and topped up with new oil, new zinc bolts, new gasket and made a nice stainless bracket to hold the speed sensor. I blasted the aluminium rear section and the outputs but not the body as i was worried about the seals - i don't hold out much hope for it staying rust free but it looks good for now


Now i can TIG weld I've decided to remake my down pipe and incorporate an external waste gate and some flexi's. The worry off overboost is the main reason and my old design wouldn't really flow that well from the wastegate also it now looks sh!t to my eyes - all round it should be better and faster!
Also going to re-do the charge pipes in aluminum at some point
Major work is need to the rear and for those of you who can visualise the rear end all the cross braces are heavily rusted and going to come out - can anyone think of any negatives off replacing the sections that brace between the chassis rails being replaced with 2-3mm channel? both the arb mounting one - and the section the seat belt braces bridges too obviously this will stiffen it up but will it change the handling in a negative way?
Re: My merge collectors (Engine 1 Stück)
Posted: Sun Feb 07, 2016 7:06 pm
by jimmyspeed
Still working on the manifold but have found some good rust pic's from last year
More de seaming of the footwells and sill butchery- note the nice wheel arch hole. As a general rule id say theres rust under almost any spot welded seam or bracket - fun

welded and blasted

inner sill


I knew there was rust inside this brace so it had to come out as i'd know it was in there and id like a nearly rust free e30 eventually


I did get some more done on the rear arch but didn't take any pictures. Got the powder coated bits back ages ago, the goose neck, pulleys, headlight brackets and other small stuff i got zinc'd prior to paint
