Page 1 of 6
M3 Touring conversion number 2 - UPDATED 02/08
Posted: Sat May 12, 2007 10:36 pm
by old_skool
Ok, so I figured that my 'other' touring may take a while to complete. Sooooo, I decided to do another one in the meantime.

Here is the donor car. An absolute little stunner, 91, H reg 325i touring in pretty much tip top condition. Full service history throughout and well maintained. It's pretty clear that it has mostly been garaged through it's life too.
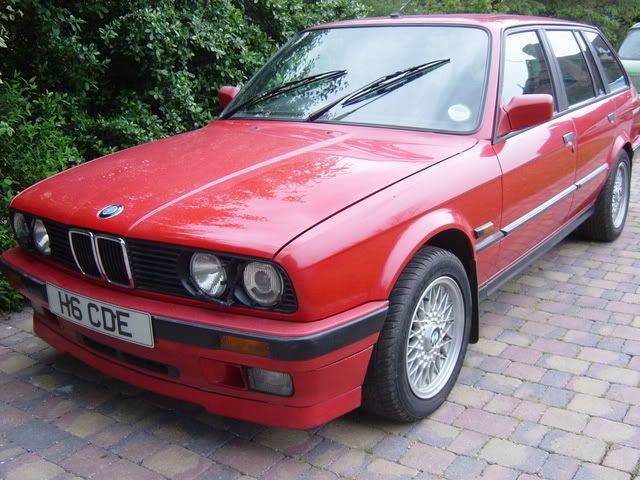

Spec includes the usual stuff, Electric front windows, Electric roof etc. No OBC, but I have one to fit. It does have an iS lip though, which looks nice. The car came to me with a failed head gasket so I whipped the head off yesterday to check it out. The plan was to swap with a known good head, give it a service and run around in it for a few weeks until I had time to do the engine swap.
Well, best laid plans and all that. I took the head off yesterday and to cut a long story short, the engine was beyond help. So I couldn't just look at it could I?
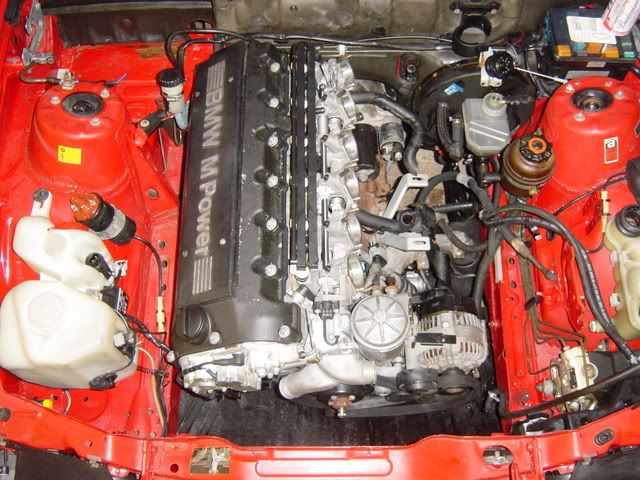
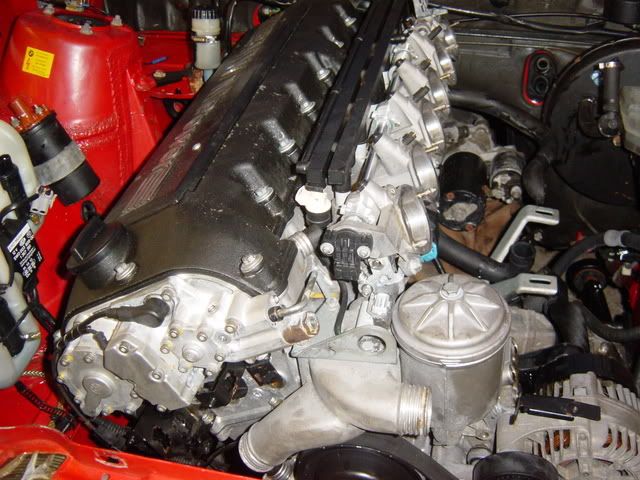
I bought an S50B30 engine and gearbox a couple of weeks ago 'just in case' this moment should arise! The engine came with the gearbox attached and on a pallet. So I whipped the M20 out of the touring this morning, dropped the prop and ancillaries and prepped the S50 for fitting.
I gave the engine bay and the new S0 a serious treat with the steam cleaner first.
I had to remove the S50 sump, fit a new M50 E34 item with E34 pickup, remove the baffles and refit the whole thing. I also removed the oil pickup bracket from No. 3 main cap, removed and welded the oil pump sprocket and tightened the oil pump bolts.
All was going well until I dropped one of the sump bolts into the gearbox

so, off with the gearbox, remove bolt and refit gearbox.
After a lot more prodding and pushing, refitting this and that. This is how it stands tonight:
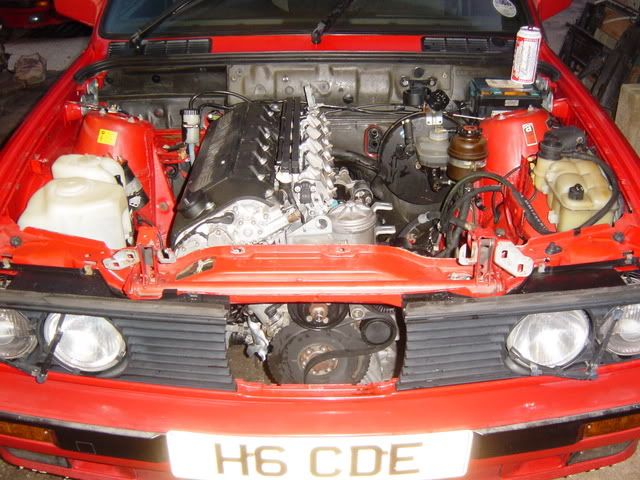
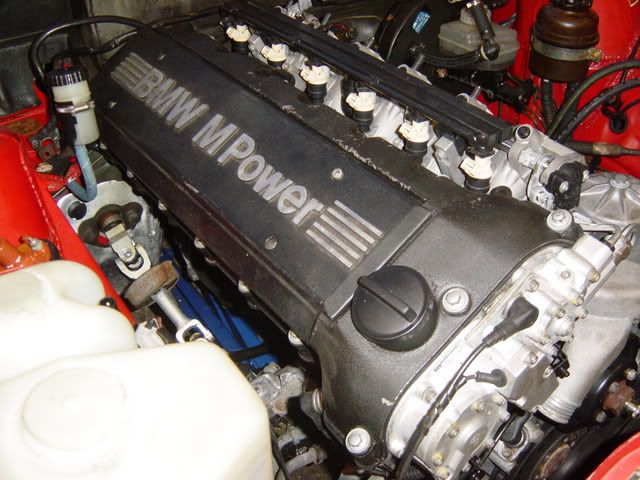
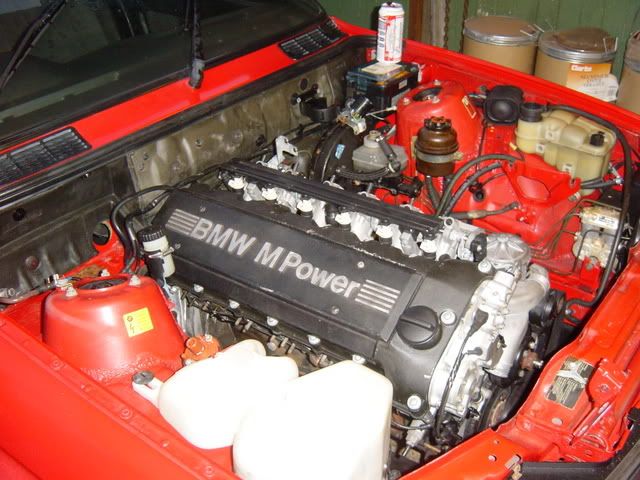
Not bad for twelve hours work eh? My aim is to see just how long and how much an S50 conversion can cost, so I'll be logging all the time spent on it and also the total cost.
The finished project will be as follows: Ireland engineering ARB's front and rear, full Spax suspension kit, full rebush front and back with M3 genuine bushes, modified adjustable rear subframe, Uprated brakes (Tba), standard 15â€a BBS to complete the sleeper look but I may not be able to resist a tiny little M badge

Call it an experiment

Re: M3 Touring conversion number 2
Posted: Sat May 12, 2007 10:41 pm
by maxfield
Re: M3 Touring conversion number 2
Posted: Sat May 12, 2007 10:43 pm
by appletree
hats off to you to get all that done in 12 hours!

nice to see all the pics to, keep them coming
Re: M3 Touring conversion number 2
Posted: Sat May 12, 2007 10:43 pm
by bigun
oh i'll just pop this engine in whats just sitting in the corner
nice one fella top job
Re: M3 Touring conversion number 2
Posted: Sat May 12, 2007 10:47 pm
by bigdek
Your just greedy and showing off LOL !
Re: M3 Touring conversion number 2
Posted: Sat May 12, 2007 10:50 pm
by old_skool
OK, I'll come clean, it took me 2 and a half hours to get the head off last night. Then it took me 12 hours today to do everything else. It will however take me two hours to clear up! I may also not be able to walk tomorrow as I did the whole lot on my own and now all I can do is barely type and keep my eyes open.
Here's the leftovers

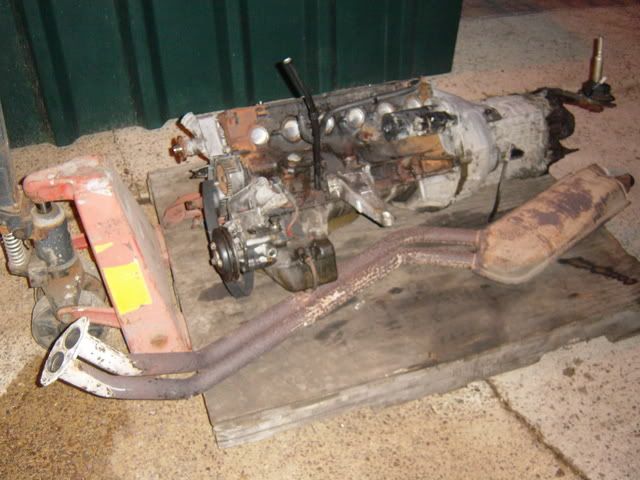
Poor old thing.
My workshop looks like operation desert storm has just passed through

Posted: Sat May 12, 2007 11:01 pm
by DRIFTBOY
Great stuff there! Like it
I get all achey for days after doing stuff like that!

Just out of interest, what's the wiring like to sort out on that conversion ?
Martin.
Re:
Posted: Sat May 12, 2007 11:11 pm
by beardymat
just a bit jealous
again
Re: M3 Touring conversion number 2
Posted: Sat May 12, 2007 11:14 pm
by DanThe
bigdek wrote:Your just greedy and showing off LOL !
+1

Re:
Posted: Sat May 12, 2007 11:15 pm
by schuey
Re:
Posted: Sun May 13, 2007 2:35 am
by gareth
crikey! there's no stopping you now! bitten with the bug or what!!!
there's me with a M30 touring and using a hateful rover 414 as a runabout
Re:
Posted: Sun May 13, 2007 8:22 am
by Jhonno
Nice!! But i dont like you
Re:
Posted: Sun May 13, 2007 8:31 am
by daimlerman
Now the easy bit is done,how long to wire up and sort the cooling/gearchange/fiddley bits?Does look good,though

Re:
Posted: Sun May 13, 2007 11:50 am
by Colonel Sanders
how much did you pic the m3 lump up for?
Re:
Posted: Sun May 13, 2007 11:55 am
by tbmw
what job do you do tht you can afford to buy an s50 just incase a situation arises?
other than that nice work and i'm very jealous of you atm
Re:
Posted: Sun May 13, 2007 12:06 pm
by Eddie25

great work mate. Thats gonna go like s**t down a water slide.
Re:
Posted: Sun May 13, 2007 12:06 pm
by boxclever1753
quality work mate - liking your style!
Re:
Posted: Sun May 13, 2007 12:06 pm
by Toby_Unna
no pissing about eh?
Re:
Posted: Sun May 13, 2007 2:39 pm
by oze30
Will you need to move the booster again? or will it fit?
What mounts do you use?
Re:
Posted: Sun May 13, 2007 4:19 pm
by old_skool
^^ Thank you chaps, Job, well erm...... Let's just say I'm self employed - nothing to do with cars though.
The wiring isn't too bad a job. The actual physical work involved in the wiring is quite a big job and needs to be done right. With the coaching of ian332isport and buster and also Ians wiring charts it's not too bad a job to be honest.
The mounts I used are E28 M5, same as all the other S50B30/32 conversions. The gearbox mount I just put on is the standard E30 item with E36 M3 rubber mounts. Fits straight on. The brakes will probably be the same as my other one, dependant on the time that I have as that is labour intensive. I also plan to keep the ABS so I shall be moving and re wiring the ABS servo and changing all the pipework in the engine bay. This will be a bit of an experiment but should prove itself - if it all works!
Didn't take any pics today but I will take loads and post them up next weekend. Today I started working out and fitting the wiring covers etc. I also refitted the gear linkages and gearstick, made up the reverse light wiring etc.
Next job is to work out all the pipework for the oil cooler

Total time so far 17 hours (includes head scratching time)
Re:
Posted: Sun May 13, 2007 9:57 pm
by BadDave
Jealous.
Thats all I can say.
Re: M3 Touring conversion number 2
Posted: Sun May 13, 2007 11:12 pm
by Morat
old_skool_2002 wrote: I may also not be able to walk tomorrow as I did the whole lot on my own and now all I can do is barely type and keep my eyes ope
Next time give me a shout. I'm cockall use with a spanner but I can lift all sorts. All I ask in payment is that you do the same to my Touring
Posted: Mon May 14, 2007 4:30 pm
by ste
Great work Dameon - you're an inspiration Sir.

Re:
Posted: Mon May 14, 2007 4:45 pm
by Skip
Truly an inspiration, hats off to you!
What are you going to do for an exhaust manifold?
Re:
Posted: Mon May 14, 2007 8:40 pm
by old_skool
Thanks guys,
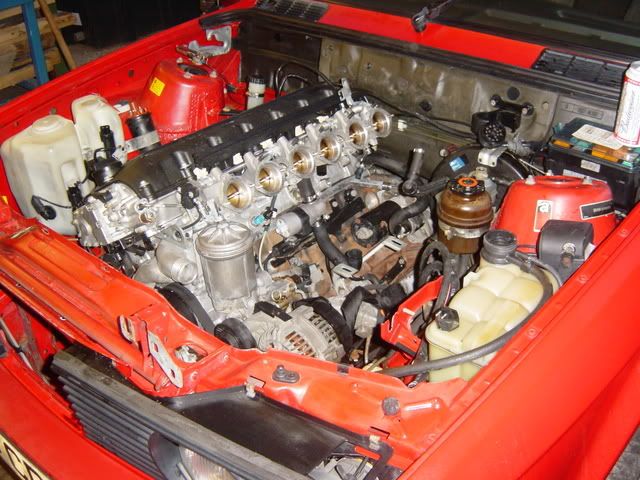
I had a few hours today to sort out the plumbing for the oil cooler. The S50 item is larger than the 325i item but the S50 cooler would have required panel work to fit it in and pipe it correctly. So I cut the unions off the existing 325 cooler and mated them to some 15L unions, then into 1/2" BSP and into 1/2" single braided swaged hydraulic hose.
I kept the E36 pipes where they join to the engine and cut off the Alloy pipes. Then joined in with new fittings, unfortuately I forgot my camera so I'll have to post up more pics at the weekend :doh:!
So another 4 hours to add to the running total, 21 hours overall.
If I can, I'll try to have it finished for Gaydon.
Re:
Posted: Mon May 14, 2007 8:56 pm
by feens
Christ Lad you dont hang about

would be interesting to know the costing's involved in this converson!! Smashin work keep her lit!!!!
Posted: Mon May 14, 2007 9:17 pm
by suzie650
Bah, where's the difficulty, you've already nearly done it....

No, seriously now, it's very impressive! I like the way you describe it as an "experiment". My deepest respect!
BTW, mine now sleeps on the drive... hope I had more time and an engine! oh, and not a broken wrist... Actually, I'm a bit jealous!
Re:
Posted: Thu May 17, 2007 8:51 pm
by old_skool
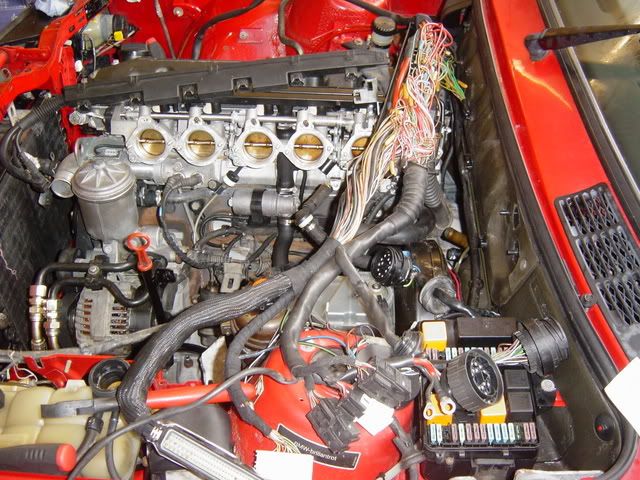
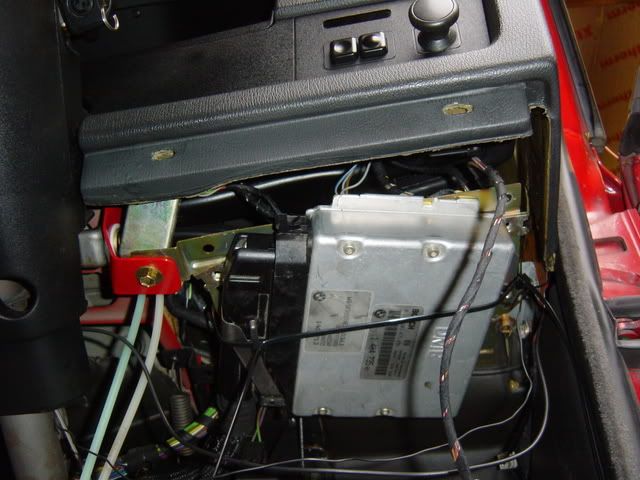
Right then. Tuesday was spent getting the oil cooler pipework finished off and starting the wiring.
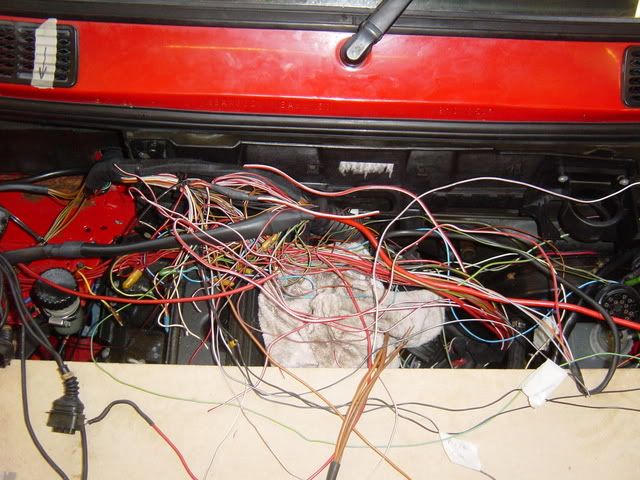
The first wiring job I had to do was to refit the wiring loom to the engine as it had been removed when they took the engine out of the car

Still, it was a chance to explore where everything goes I suppose! If the engine is taken out by anyone "in the know" then the loom is left on and the ECU and the X69 and X20 plugs disconnected.
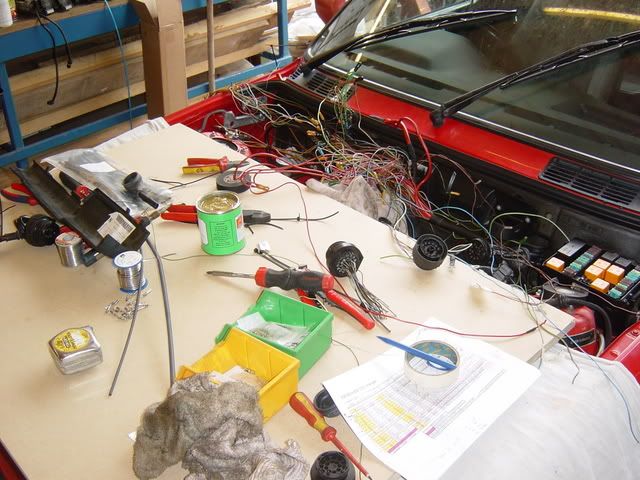
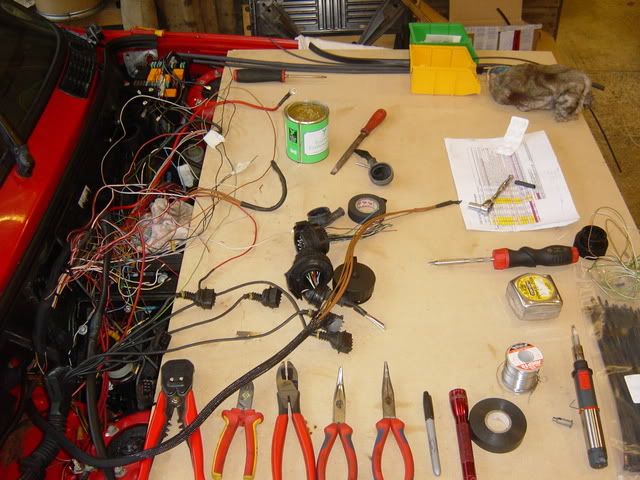
So, the wiring....... Well, where do I start. It's not a five minute job.
I had decided to use the 4 cylinder wiring covers to get my hand in for the main event, my blue restoration project. I can definitely say now after exploring all the options that this is the harder route; or it was for me anyway. If you are afraid of a soldering iron then don't even think about it either way. One thing was for sure, I was desperate to try to keep the ECu and Vanos controller on the drivers side of the car and that meant a bit more work.
I started by picking the loom out of the E36 wiring box and generally getting a feel for where it all goes. When these looms were originally assembled they were done by building the loom in layers; I came to the conclusion that there was a lot of wiring that was redundant by means of duplicate lives and earths so I could save some space there with some careful trimming and soldering.
This is the loom as it comes, still in it's E36 state:
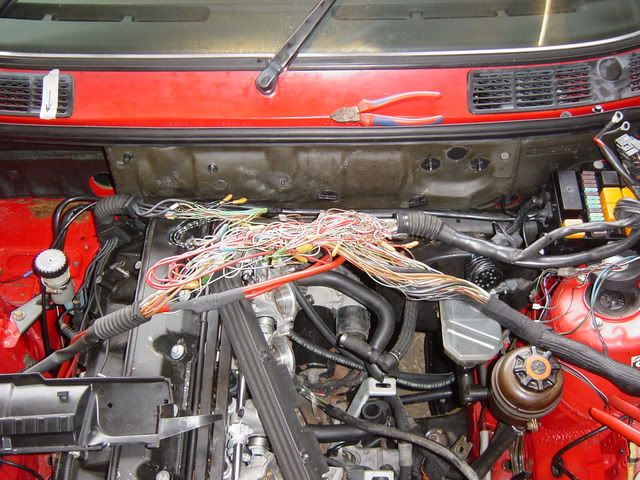
And:
This is how it progressed:
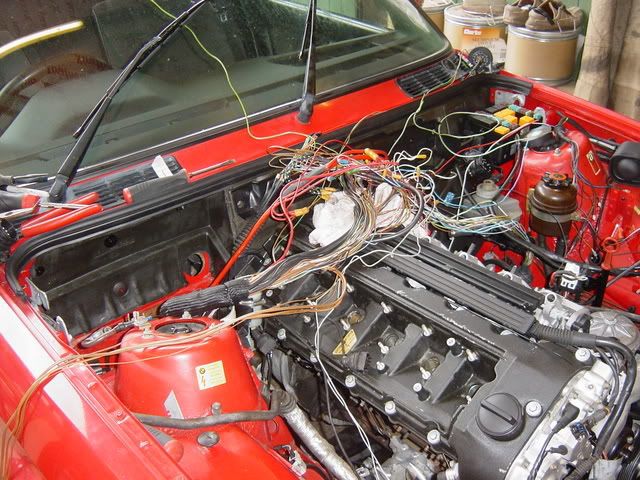
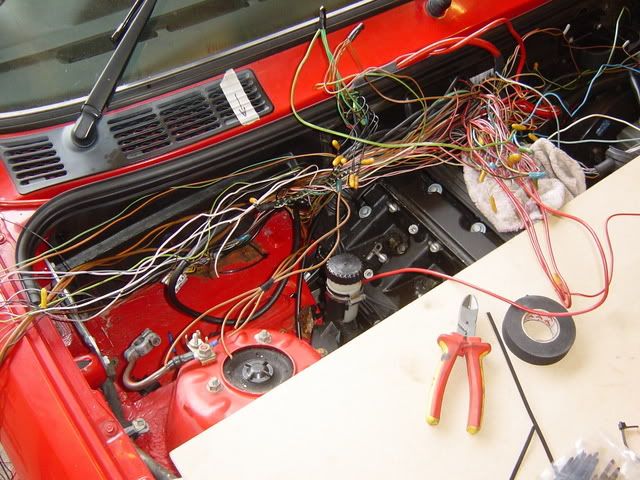
The board over the engine bay was a great idea. It kept all the kit level and was more comfortable to lean on than the engine. It also kept things tidier.
Now here, I was in trouble
I had to cut and rearrange the trigger wiring for the coils to gain the movement to get the ECU into place.
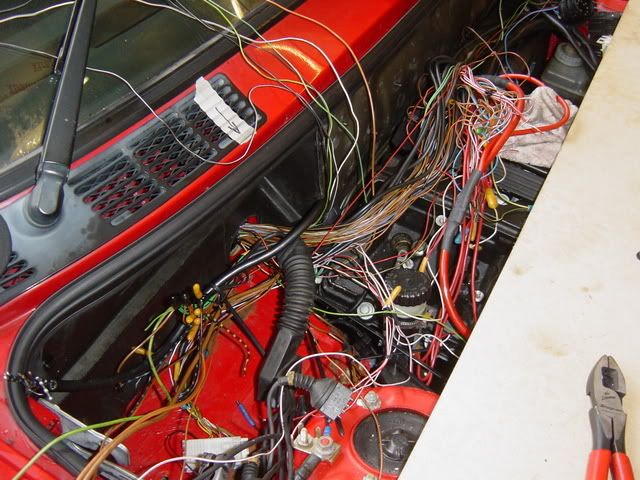
Coil wiring drilled through the back of the 4 Cylinder battery tray/bulkhead cover:
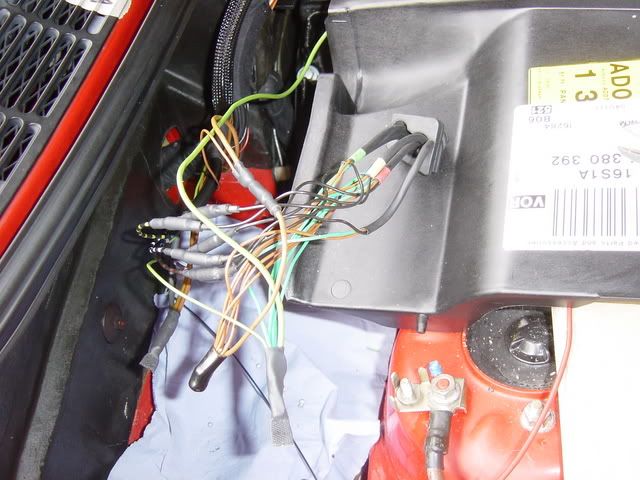

Engine ECU roughly held in place. I have enough slack to pull this around so that the plug is facing forwards with no strain on the wiring. The vanos controller will go in here as well. The EWS module will go elsewhere.
Well. the wiring has driven the job time up. The nect one will take half this amount of time though.
So far I have spent an additional 22 hours on it. Bringing the job total to 47 hours. Hopefully I will completely finish the wiring to the engine plugs etc. tomorrow. The only wiring left then will be the Air Con integration into the ECU that I pray ian332isport is going to advise me on
Ooops, did I mention I've fitted air con as well! I'll post up some pics of this tomorrow, I had completely forgotten until I re read this and I'm not editing it now
So far I have fitted the condenser and fan, pipework and wiring loom.
Re:
Posted: Thu May 17, 2007 9:18 pm
by gareth
a tad more work than plugging a M30 loom in and firing it straight up!
nice work, as per!
Re:
Posted: Thu May 17, 2007 9:25 pm
by DieselMeister
Dameon, if you weren't such a diamond, I could almost hate you
Re:
Posted: Thu May 17, 2007 9:27 pm
by old_skool
DieselMeister wrote:Dameon, if you weren't such a diamond, I could almost hate you

Love you too
Re:
Posted: Thu May 17, 2007 9:30 pm
by DieselMeister
Excellent taste all round then

Re:
Posted: Thu May 17, 2007 9:40 pm
by beardymat
hope you do get this done for gaydon. wouldnt mind a prod round a well excecuted conversion and a lengthy chat about what to avoid etc.
hoping to be driving mine to gaydon but it will be work in progress for sure, might even have a boot full of parts and tools yet lol.
Re:
Posted: Thu May 17, 2007 9:41 pm
by maxfield

Wiring looks complicated.
Re:
Posted: Thu May 17, 2007 9:46 pm
by gareth
maxfield wrote:
Wiring looks complicated.
that's born to brianmoooooooore!
