325i Touring restoration "the wrong way around"

Discuss general engine, turbo and supercharger conversions in this section

Moderator: martauto

Post Reply
old_skool
E30 Zone Team Member
Posts: 3405
Joined: Fri Sep 01, 2006 11:00 pm
Location: Glossersure

Sun Oct 01, 2006 7:21 pm

Hi guys, seeing as I don't get out much 8O I thought I'd take a little time to share what I've got going on with my touring restoration. I'm sorry if this post is in the wrong place!

The plan is to fully rebuild the old girl from the floor up and modify as required. The ultimate aim is to have a well sorted touring with a S50 3.2 conversion. Rather that go for the engine work first, I'm starting the wrong way round and rebuilding the boring stuff before the fun stuff!

The car is a pretty standard spec 325i touring which has been round the world a few times but has no rust, I repeat, NO RUST!!! Hence makes a great base for a project. I bought her recently for a song!

So far, to date I have removed the complete rear end, subframe, trailing arms, brakes etc. and am in the process of renewing and refurbing as I go. Not one single part is safe! Every single nut and bolt is either being grit blasted and re tapped or replaced with new.

Here are some pics of where I'm at as of today:

Back end of car in the air. Unfortunately I don't have a ramp here but am fortunate to have a good size garage where I have access to sand blasting, plasma and welding equipment as well as a selection of large hammers and assorted power tools winkeye

Image
Soon going to be taken out, although it's a shame really as it was replaced 40,000 miles ago - anyone want to buy a cheap m20? :D

Image

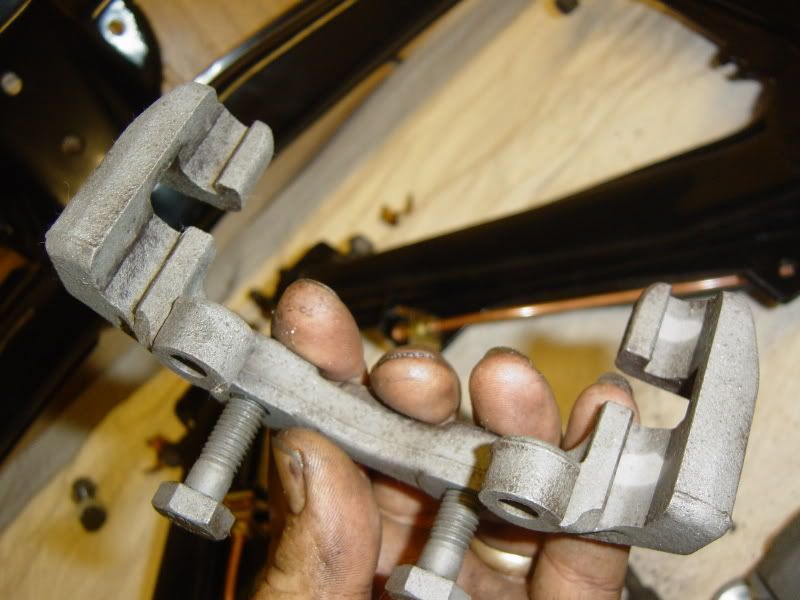
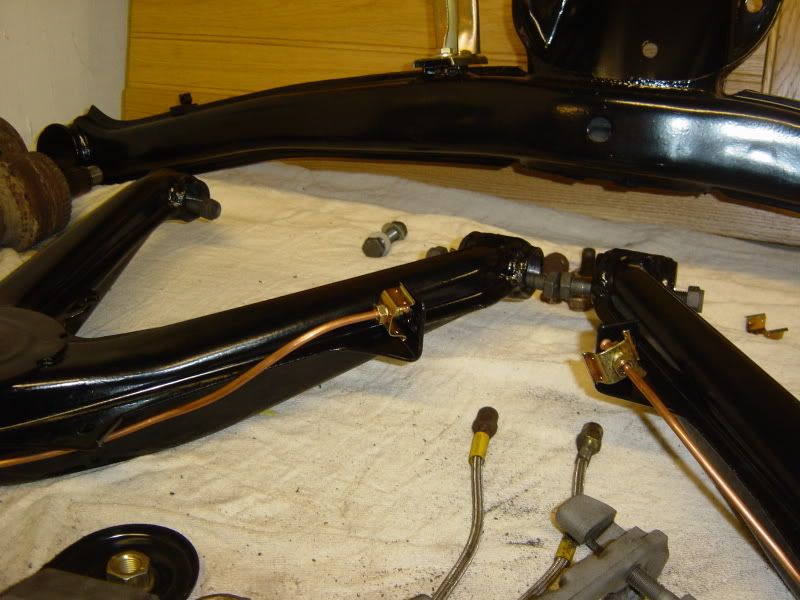
All of the "back end" nearly ready to go back together. trailing arms have been sand blasted and powdercoated in gloss black, new wheel bearings, brake disc back plates, handbrake cables, handbrake shoes, shoe retainer springs, bushes removed and made ready for powerflex. Subframe has been refurbed too. Even the exhaust bracket has been sorted!

Image

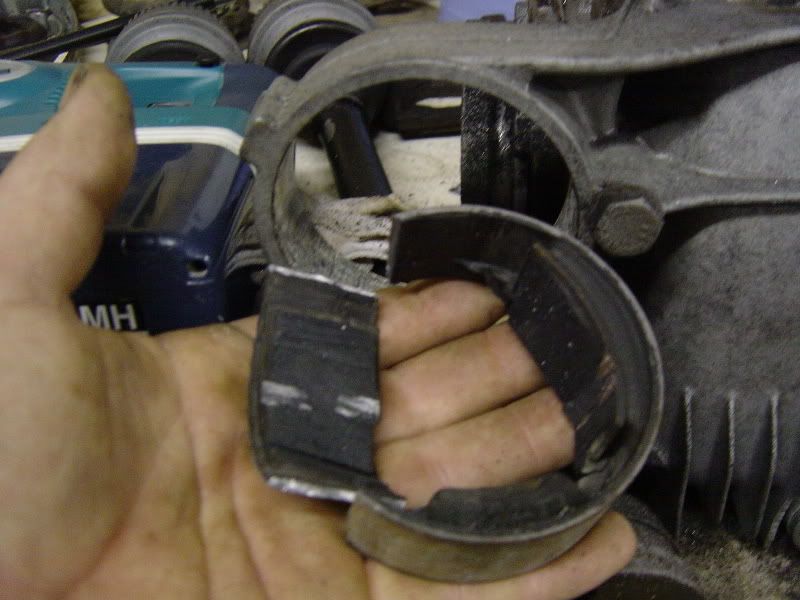
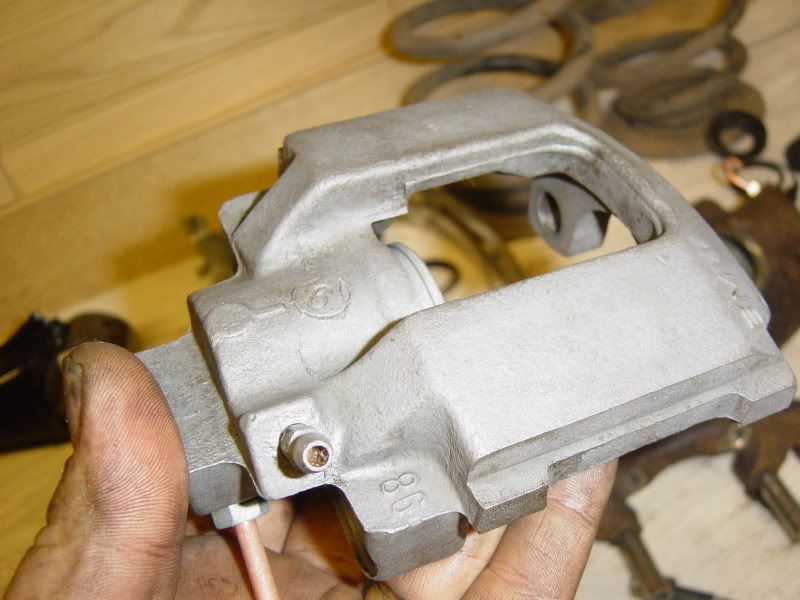
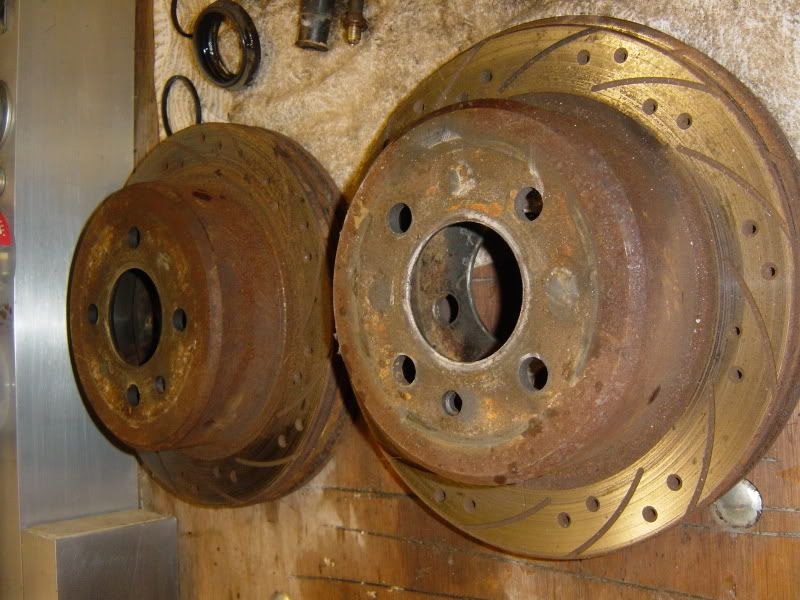
I'm going to re use the existing rear brake set up, albeit with new (second hand) black diamond discs and EBC greens. This is what the existing calipers looked like
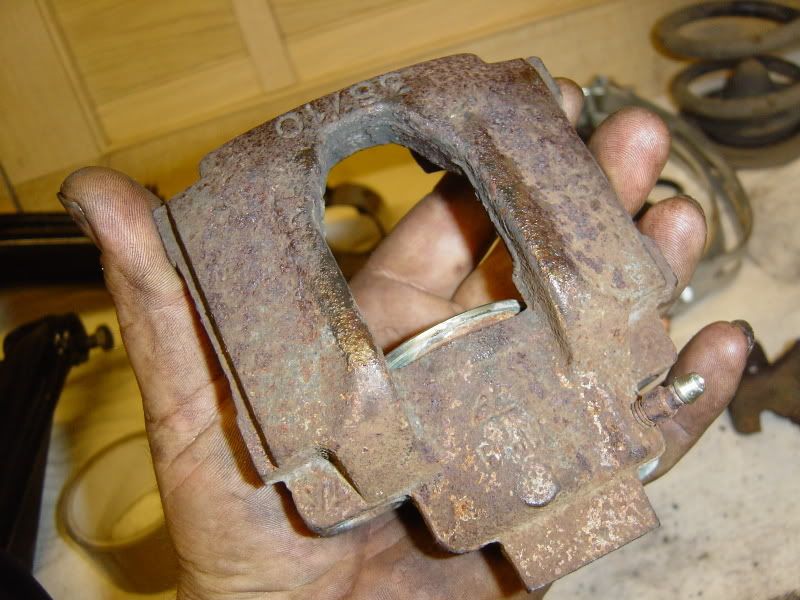
Image

After sandblasting,

Image

Image

Image

Not bad considering I was using pretty much DIY equipment apart from a decent air compressor.

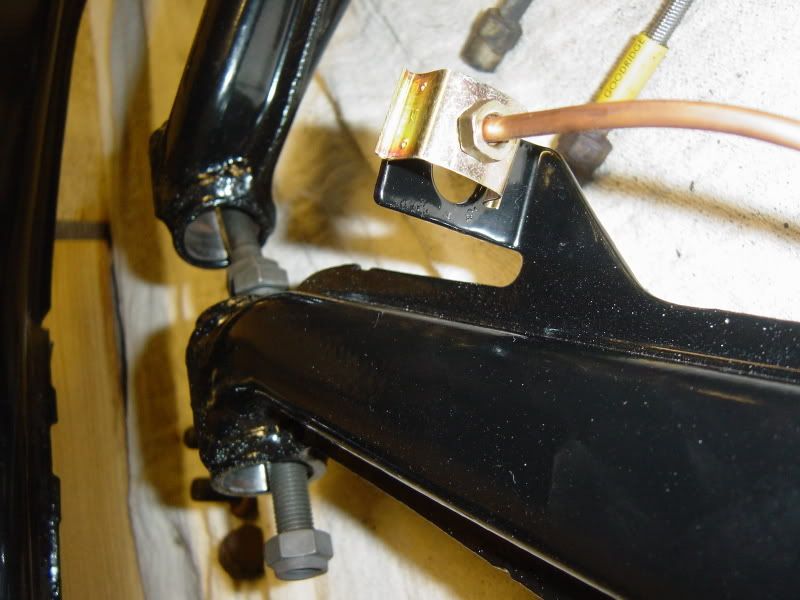
New brake pipes made up and reclipped with new genuine clips and springy things - note the goodridge hoses ready fit :wink:

Image

Image

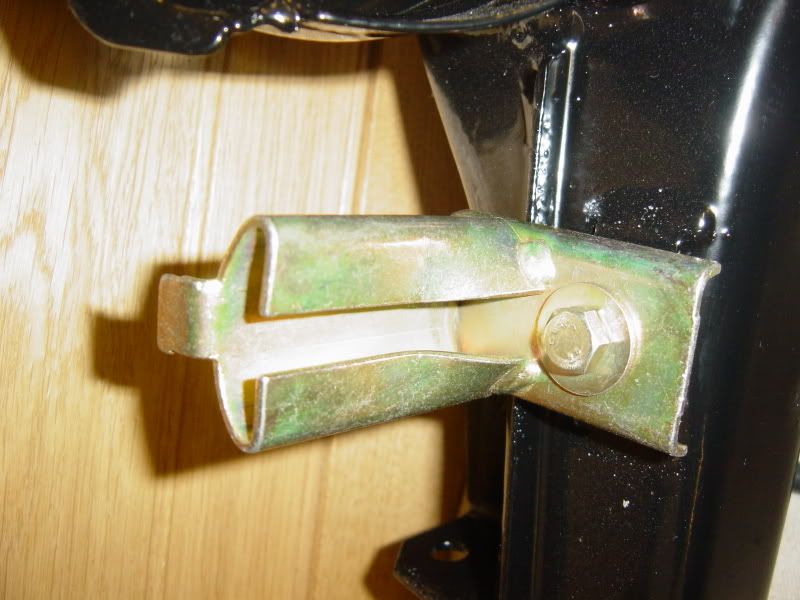
Subframe to exhaust mounting sorted and refixed

Image

These are the black diamond discs I bought, thankfully they have hardly any use. Going to reface them and paint the centres before refitting

Image

Inner brakes rebuilt, hubs refitted and ready to go

Image

Well, that's it so far.

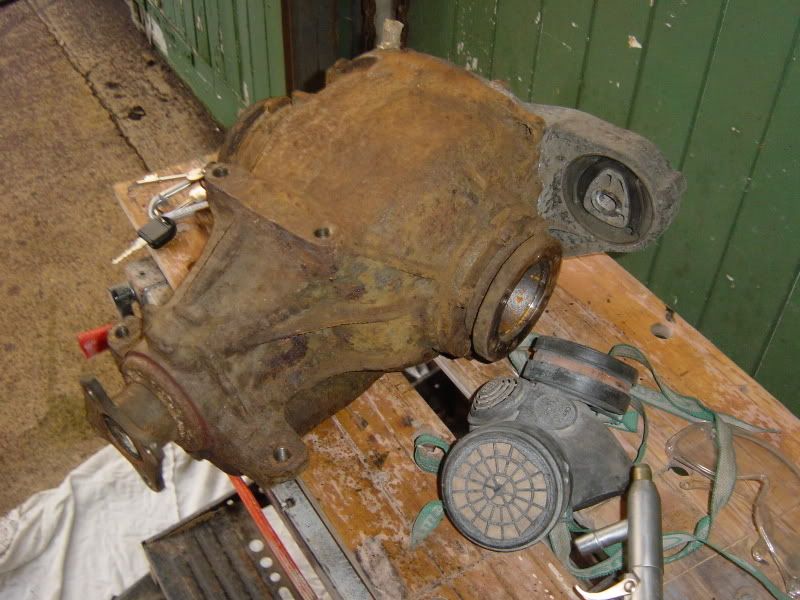
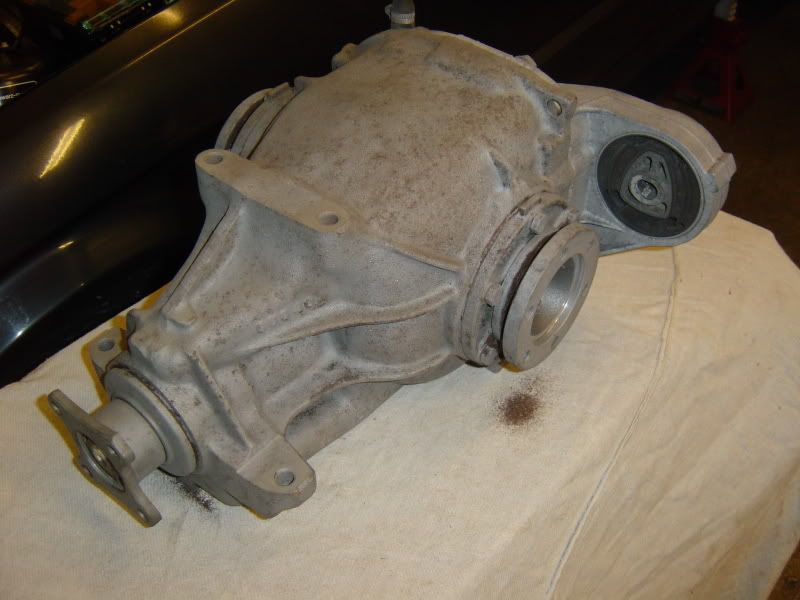
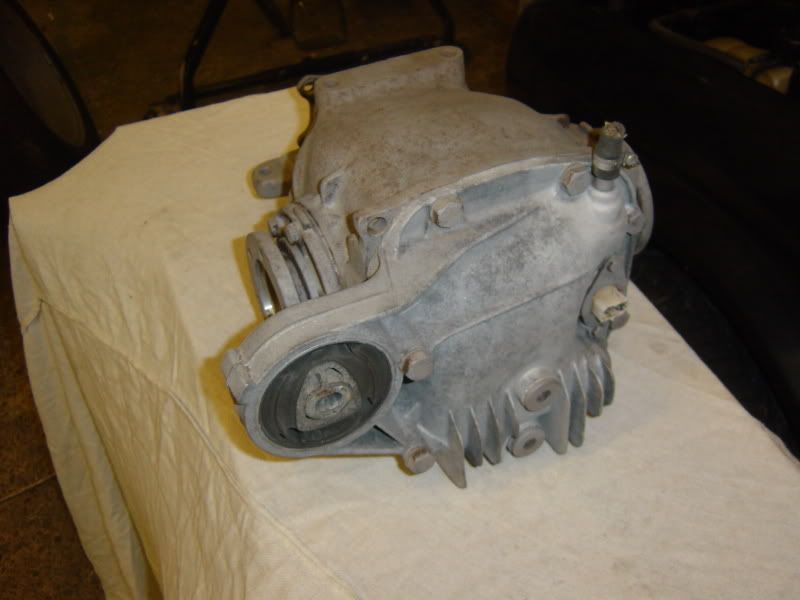
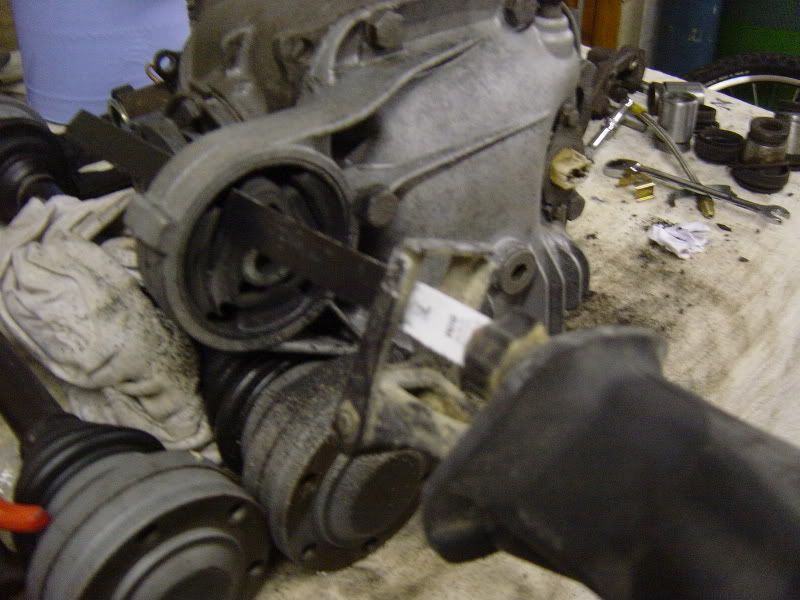
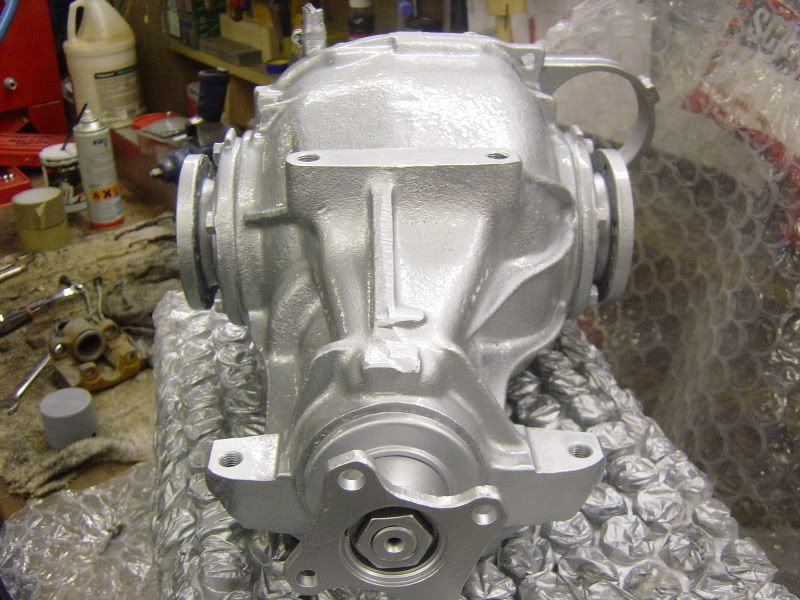
Next job is to strip and rebuild the 3.64 LSD that I have just got my hands on and tidy it up before respraying it. I will take the opportunity to strip the driveshafts and refurb all the joints and respray as well as fit new gaiters etc. Hopefully the powerflex bushes for the diff mount, trailing arms and subframe will be here from the zone shop next week along with the H & R anti roll bar kit and then next weekend I can get on some more. 8)
Last edited by old_skool on Sun Oct 01, 2006 10:16 pm, edited 2 times in total.
Andy335Touring
Married to the E30 Zone
Posts: 7144
Joined: Sun Jan 09, 2005 11:00 pm
Location: Long Eaton,Nottingham
Contact:

Sun Oct 01, 2006 8:32 pm

A very thorough project, good on you ! :cool:
mattG
E30 Zone Camper
E30 Zone Camper
Posts: 1231
Joined: Tue Jul 04, 2006 11:00 pm
Location: Surrey

Sun Oct 01, 2006 8:44 pm

nice work dude, look forward to see furture developments, :D
note to self-must do a write of my touring project!
fuzzy
He who sleeps with "Gingers"
Posts: 14351
Joined: Sat Jun 04, 2005 11:00 pm
Location: melbourne Australia

Sun Oct 01, 2006 8:47 pm

your certainly doing a thorough job with this and its definately the sensible way to do things rather than drop the big engine in then fixing the problem as they arise.its handy having all that equipment at hand as well though.i did a similar 'nut and bolt' restoration on my last project and had aquainted my self with every single bit on that car.much more satifying when you eventually complete it but took me 8 years and cost over Ԛ£28000 as one thing always leads on to another,good luck with it winkeye
ed325i
E30 Zone Addict
E30 Zone Addict
Posts: 4146
Joined: Mon Jan 10, 2005 11:00 pm

Sun Oct 01, 2006 8:50 pm

Did you have to remove the wheel bearings when you had it power coated ? I am thinking about having mine done while its off. Did it cost alot to have done ?

Nice project 8)
ed325i
E30 Zone Addict
E30 Zone Addict
Posts: 4146
Joined: Mon Jan 10, 2005 11:00 pm

Sun Oct 01, 2006 8:52 pm

8 years and cost over Ԛ£28000
What car was that ? :eek:
old_skool
E30 Zone Team Member
Posts: 3405
Joined: Fri Sep 01, 2006 11:00 pm
Location: Glossersure

Sun Oct 01, 2006 8:56 pm

took me 8 years and cost over Ԛ£28000

:drive: Yikes!!!

And i'll bet it was worth every penny :D
jmc330i
Engaged to the E30 Zone
Posts: 6621
Joined: Mon Jan 10, 2005 11:00 pm
Location: Somerset

Sun Oct 01, 2006 8:57 pm

8O Thats going to be one clean E30 8O

Good work so far, nice one 8)
old_skool_2002 wrote:anyone want to buy a cheap m20? :D
Always winkeye
James
'91 325i Sport
'93 318i touring 16v
fuzzy
He who sleeps with "Gingers"
Posts: 14351
Joined: Sat Jun 04, 2005 11:00 pm
Location: melbourne Australia

Sun Oct 01, 2006 9:01 pm

ed325i wrote:
8 years and cost over Ԛ£28000
What car was that ? :eek:
dont laugh but it was actually a rwd 1985 ra61 toyota celica.parts could only be bought from toyota and all the body panels shipped over from japan.front wing Ԛ£150+,door Ԛ£320+,rear boot door Ԛ£340+,Ԛ£600 for 2 front calipers 8O it all adds up and i still have the boxfile with all the receipts.then the cosworth engine conversion cost me Ԛ£5500.i did post some pics in the pub talk under something like 'my other project..cosworth but not e30'
http://www.e30zone.net/modules.php?name ... t=cosworth
Last edited by fuzzy on Sun Oct 01, 2006 9:06 pm, edited 1 time in total.
old_skool
E30 Zone Team Member
Posts: 3405
Joined: Fri Sep 01, 2006 11:00 pm
Location: Glossersure

Sun Oct 01, 2006 9:06 pm

:lol:

Ahhh, you guys...!
Did you have to remove the wheel bearings when you had it power coated ? I am thinking about having mine done while its off.
I did remove the bearings, in fact they were easier to do than I thought. However if I was to do it again I would leave them in if they were ok but I would mask them out myself and not leave it to the processors.
Did it cost alot to have done ?

As far as cost is concerned they cost me Ԛ£45 including the subframe. That was for a thorough sandblasting and new powdercoat.

A word of warning, if i were to do it again i would block up the abs sensor hole, wheel bearing hole (or the wheel bearing if it still fitted) and also the trailing arm bush holes and subframe bush holes. Otherwise you and Mr. Dremel are going to be getting busy afterwards winkeye

Also, the trailing arms are filed with waxoyl - (or similar). Below the hub/wheel bearing mounting there is a rubber grommet about the size of a 5p piece, do not remove it before you send it off otherwise the waxoyl will pour out then they heat them up. Also the grit will get inside during the blasting process.

Hope that makes sense.

All in all it was thoroughly worth it although i usually like to do everything myself as relying on other people is usually a dissapointment!

HTH :cool:
cougar
E30 Zone Newbie
E30 Zone Newbie
Posts: 228
Joined: Sat Mar 26, 2005 11:00 pm
Location: HEATHROW

Fri Oct 06, 2006 2:10 pm

very :cool:
Image

current cars, 4 e30 tourings, 2 e30 cabs, 1 e36 328i sport, 1 e36 328i cab
gcorky
Boost Junkie
Posts: 2009
Joined: Tue Jul 12, 2005 11:00 pm
Location: n.e england

Fri Oct 06, 2006 5:24 pm

nice job there m8,mine will be subjected to a strip over winter,well the underside atleast!
Image

525 sport
User avatar
dan_emaps
E30 Zone Regular
E30 Zone Regular
Posts: 302
Joined: Wed Aug 17, 2005 11:00 pm

Sat Oct 07, 2006 4:54 pm

cracking project dude! how much you after for the lump and where are you based?
Julle
E30 Zone Newbie
E30 Zone Newbie
Posts: 49
Joined: Sun Feb 20, 2005 11:00 pm
Location: Finland

Sat Oct 07, 2006 5:34 pm

Looking very nice! Sandblasting those "rear end" parts are also in my to do list. :) Nice to see that someone else is also doing a e30 restauration in this scale. :)
old_skool
E30 Zone Team Member
Posts: 3405
Joined: Fri Sep 01, 2006 11:00 pm
Location: Glossersure

Sat Oct 07, 2006 8:31 pm

Ok, here's the latest.

This is going to be a bit sketchy as I haven't had much time to prepare but I was itching to post!

Last night I decided that the scabby looking LSD that I was planning to refit had to be cleaned up otherwise it would look crap. Well, I say crap, but who's gonna know? Right? Wrong? I'll know. And I'll bet I would regret fitting it as it is.

So the options were, A. Go crazy with an electric drill and lose most of my fingers with a wire wheel. B. Get the kids to do it with a couple of sheets of sandpaper winkeye C. Get the sandblasting kit out and go for it.

You guessed it. I went for C. (kids said "No way Dad") :(

It is amazing the amount of crud that these accumulate over the years. The crust build up is actually quite astonishing. When you consider that it has been open to all elements of road salt, water, high operating temperatures etc. it's not really surprising.

These are the "before" shots.

Image


Image

As you can see it looks like it's been tied to the anchor of the Marie Rose for three hundred years.

This is what it looks like tonight , after 8 hours of continual blasting with aluminium oxide (sand with shiny bits)

Image

Image

What a difference. You can see in the pictures that i used a piece of fuel tubing and a jubilee clip over the breather to stop it spilling diff oil and also to keep grit out of the diff. I also lashed some nylon bands over the input and output shafts to stop any grit ingress too.

If I had to advise anyone who was going to have a go at this at home then I would say forget it. I would never do this agian although I am chuffed to bits with the results it takes forever and patience is a must.

So, tomorrow I'm going to strip the driveshafts back to bare metal and rebuild them with new packing grease and gaiters and spray the diff.

Only question is, waht colour should I paint the diff? Suggestion please?

Other things going on this week were the arrival of the powerflex bushes and H&R anti roll bars (thanks m5pilot) :D

The anti roll bars are beefy enough to keep a Challenger tank straight and the powerflex busehes are divine :D . I'll post some pics of these tomorrow night when I finish roughing up the drive shafts winkeye

P.s. Like a fool I have stripped and sand blasted the front calipers and got them ready to repaint, which is great but then I remebered I'm using a big brake kit. So if anyone wants a set of perfect rebuilt front calipers and a set of black diamond front discs (sand blasted and repainted hubs of course) in a nice colour then let me know.
Last edited by old_skool on Sat Oct 07, 2006 9:34 pm, edited 1 time in total.
dazleeds
old skool raver
old skool raver
Posts: 12883
Joined: Fri Apr 01, 2005 11:00 pm
Location: Empire Building @

Sat Oct 07, 2006 8:36 pm

excellent project mate

how much you after for the brakes? got any pics??
www.oldskoolfantasy.co.uk
in the shit,the one to blame,yeh its all my fault ;)
maxfield
Old Skooler
Old Skooler
Posts: 15186
Joined: Sat Nov 26, 2005 11:00 pm
Location: Mansfield

Sat Oct 07, 2006 8:38 pm

Paint it black.
Image
old_skool
E30 Zone Team Member
Posts: 3405
Joined: Fri Sep 01, 2006 11:00 pm
Location: Glossersure

Sat Oct 07, 2006 8:49 pm

I'll post some pictures of the front brake rebuild tomorrow night. I have refaced the discs and sandblasted them already. Now the grooved drilled and vented sections look better than new. The calipers are blasted back to bare metal like the ones above and I have got a new seal kit to fit in (the pistons are tip top). Really they just need painting.

I'll paint them up in "M" blue tomorrow and post the results :D

P.s. Seriously, I have a receipt from an engine builder at Silverstone for a "stock" engine rebuild on this car dated in 1999, roughly 39k ago for Ԛ£2690.00. If anyone wants the engine then they can gladly come and set it running and I'll pop it out for them. I would only want reasonable money for it as you guys are great on here and a "favour done is a favour earned" as they say :)

Besides, that'll make me nore determined to find a suitable M3 to dismember........ :cool:
Last edited by old_skool on Sat Oct 07, 2006 9:33 pm, edited 1 time in total.
Simon
E30 Zone Team Member
Posts: 14936
Joined: Sun Jan 09, 2005 11:00 pm
Location: South Wales
Contact:

Sat Oct 07, 2006 9:00 pm

I'd try and paint the diff a silver/metal colour, too much black otherwise.

Even better still, get an M-coupe rear cover on there with the cooling fins, will look real nice from the rear then!

Great project you got going though, and look forward to the progress!
Image
Simon13
The longest resto in the world !
Posts: 22697
Joined: Mon Jan 10, 2005 11:00 pm
Location: Camberley, Surrey don't u know

Sat Oct 07, 2006 9:15 pm

wow! proper man, i wish i had all the tools to stuff like that!
placey
E30 Zone Camper
E30 Zone Camper
Posts: 1170
Joined: Sun Jan 09, 2005 11:00 pm
Location: portsmouth
Contact:

Sat Oct 07, 2006 9:33 pm

i think this is the right way round to do a project. once found, no-one really wants a decent engine sat around for weeks or even months unused - so best to fit it last. it leads to a few nervous moments when dropping it in a clean and painted engine bay - i know from experience.

where's this m20 sitting then? local to me?

paul
i saw a doctor and she gave me some pills....
Image
old_skool
E30 Zone Team Member
Posts: 3405
Joined: Fri Sep 01, 2006 11:00 pm
Location: Glossersure

Sat Oct 07, 2006 9:37 pm

where's this m20 sitting then? local to me?
From Pompey,

A nice little trip up the Newbury bypass, M4, A 419 and on to sunny Gloucestershire my friend :D
A1BMW325iSport
E30 Zone Addict
E30 Zone Addict
Posts: 4239
Joined: Mon Jan 10, 2005 11:00 pm
Location: Mid Wales
Contact:

Mon Oct 09, 2006 12:04 am

fair play dude, thats a proper rear end rebuild
old_skool
E30 Zone Team Member
Posts: 3405
Joined: Fri Sep 01, 2006 11:00 pm
Location: Glossersure

Sat Oct 14, 2006 6:42 pm

Quick update:

Not had much time this week because I've been making brake pipes :wink:

Managed to get the diff up on the bench again and cut the mounting bush out. I tried to take a picture while I was using the sabre saw on it but nearly lost my arm in the process. Note to self: use two hands :thumb:

The bush removal is easy. I just cut the centre out and then sawed out a section of the outer shell.

Image

Sorry the pictures a little blurred, I was still shaking!

Image

So, took the diff outside and steam cleaned the WD40 off it that has been keeping the rust off the bare metal since last weeks sandblasting marathon. I decided to go with silver for the diff (seemed as good as any other).

With the aid of a space heater I fabricated a paint oven and here's the results after the lacquer was applied.

Image

Well, that's pretty much it until tomorrow. The calipers are painted up so I'll post some more pics along with progress reports then winkeye
old_skool
E30 Zone Team Member
Posts: 3405
Joined: Fri Sep 01, 2006 11:00 pm
Location: Glossersure

Sat Oct 14, 2006 6:49 pm

Might have a change of direction with the rear arms. I'm thinking about getting another set and reinforcing them/re welding for uprated ARB mounts etc. If anyone wants to buy these rear arms already built up with new bearings, brake pipes, disc back plates, shoes, retainers etc. then they may be up for grabs soon. 8)
jaistanley
E30 Zone Addict
E30 Zone Addict
Posts: 2517
Joined: Tue Jan 18, 2005 11:00 pm
Location: Coventry and Essex

Sat Oct 14, 2006 8:13 pm

Have you thought about going along the upgrade route? You could fit some E30M3 ones in there and fit the front struts too. Massive handling upgrade, especially the brakes. I did this to my 318is and fitten 15" BBS M3 wheels. Looks factory and handles really well.

I'm fitting MCoupé arms for the 312mm brakes to my project car. They're already reinforced too but you do need E36 offset wheels. You'd need different diff flanges too.

Just a thought.

Jai
Image
User avatar
316vinni
E30 Zone Newbie
E30 Zone Newbie
Posts: 100
Joined: Sat Aug 19, 2006 11:00 pm

Mon Oct 16, 2006 10:21 pm

old skool 2002 that is a bloody good job you are dong there. It is so handy having all the right tools at hand, isnt it lol. I myself have just picked up a D reg 4 door 325i auto which has a Tech 1 kit attached as standerd. Ive got it to do what you are doing to your own. I know its a 4 door and not a 2 and some may ask why do a 4. But the way these lads on here frag 4 door E30,s there will not be many left lol. I do aggree that starting from the bottom up is the way to do it. Im going to keep the 2.5 engine in mine, but remove it and rebuild it after ive finished the hole body and running gear 1st. As for what you are doing, you deserve a pat on the back. Im going to keep an eye on this thread, as i can not wait to see the finished result. Again well done with the work so far :thumb:
Tom944
E30 Zone Newbie
E30 Zone Newbie
Posts: 110
Joined: Wed Feb 15, 2006 11:00 pm
Location: Netherlands
Contact:

Tue Oct 17, 2006 11:04 am

Hey Oldskool2002, love your project, nice way of approaching this. Everything clean and as new, keep it up :D !
E30 M50B25 racer soon-to-be E30 S50B30 racer
old_skool
E30 Zone Team Member
Posts: 3405
Joined: Fri Sep 01, 2006 11:00 pm
Location: Glossersure

Wed Oct 18, 2006 5:59 pm

Thanks Vinni,

So what if it's a four door? Doesn't matter as long as you enjoy the car. The problem with me is that I feel sorry for old BMW's and have to care for them. Good job I'm not a vet otherwise I'd have a house full of sick animals :teehee:

Tom,

It's funny how posting the progress on the zone and sharing everyone elses projects as well, helps to keep things pushing along. This is a great forum and the quality of the contributions is excellent (are you listening mods?) :D
Gravy
E30 Zone Regular
E30 Zone Regular
Posts: 318
Joined: Tue Oct 11, 2005 11:00 pm
Location: Whitchurch, Shropshire

Sat Oct 21, 2006 1:25 pm

Whats the latest? I'm loving this project - my touring has just moved to my "inlaws" where there also happens to be a range of workshop kit and kaboodle - when I go there in a couple weeks I too am going to begin a ground up resto/refurb - still can't choose and engine whihc in a way is good as it "forces" me into doing the project the same way round as your goodself!
Keep posting and showing pics, i'm sure you are inspiring many others on here to approach there projects in a similar manner - top job :thumb:
WillG
E30 Zone Regular
E30 Zone Regular
Posts: 433
Joined: Wed Mar 29, 2006 11:00 pm
Location: Cheltenham
Contact:

Sat Oct 21, 2006 3:24 pm

Where abouts in gloucestershire are you dude, nice project, good engine choice, im building a touring at the moment its having primer and base coat today, im building it up in tewkesbury, I work in quedgeley and live in cheltenham so up and down between junction 9 and 13 everyday
old_skool
E30 Zone Team Member
Posts: 3405
Joined: Fri Sep 01, 2006 11:00 pm
Location: Glossersure

Sat Oct 21, 2006 6:49 pm

Whats the latest? I'm loving this project
:lol: Well, spent all afternoon reassembling bits so I'll upload some photo's and do this weeks report :D later on tonight. Glad your enjoying it too! Hopefully other people will have a go too, and I'm more than pleased to pass on what I have learned so far if it is of any help 8)
old_skool
E30 Zone Team Member
Posts: 3405
Joined: Fri Sep 01, 2006 11:00 pm
Location: Glossersure

Sat Oct 21, 2006 6:58 pm

Hey WillG,

Thanks, I'm between Cheltenham and Tewkesbury. Hope you don't mind if I don't say exactly where winkeye.

Must a pain travelling up to Quedgeley everyday, but I guess the new motorway junction at 13 is a bonus.

Thankfully I'm doing mine at home so I can just nip out and have a go at the weekends. Lucky really, if I get fed up with it I can throw in the towel for the day and lock up behind me and it's all in the same place when I decide to have another go.

Update to follow shortly :D

How did the paintwork go dude?
EThreezero
E30 Zone Camper
E30 Zone Camper
Posts: 1008
Joined: Mon Jun 20, 2005 11:00 pm
Location: Central Caledonia

Sat Oct 21, 2006 7:06 pm

Great project mate, everythings looking fookin smashin so far. Its always good to see someone else doing something you have said your going to do yourself hundreds of times :roll: I would love to be able to do the same in the confort of my own garage and how handy is it having all the gear to hand or at your disposal at least. I am a very jelous bunny :D :D
Image

*******MERC E240 BREAKING..1998...LEATHER...ALL PARTS*******
old_skool
E30 Zone Team Member
Posts: 3405
Joined: Fri Sep 01, 2006 11:00 pm
Location: Glossersure

Sat Oct 21, 2006 7:16 pm

Well, if only you were closer - there's room for another two in here dude winkeye
Post Reply