
you'll find yourself measuring everything you can find before long
Twin Seq. Dry sumping for beginners :D
Moderator: martauto
-
gareth
- E30 Zone Team Member

- Posts: 11009
- Joined: Tue Jan 11, 2005 11:00 pm
- Location: hastings, east sussex
we have a picoscope at work, brilliant things 
you'll find yourself measuring everything you can find before long
you'll find yourself measuring everything you can find before long
Sole founder of Fe2O3-12V it's a lifestyle

LSD rebuilding / modification services provided, PM for details
LSD rebuilding / modification services provided, PM for details
-
GeoffBob
- Forced Induction Specialist
- Posts: 1843
- Joined: Tue Apr 28, 2009 11:00 pm
Errrmm, EVERYTHINGgareth wrote:you'll find yourself measuring everything you can find before long
That's the meanest looking rectal probe I've ever seen!
Great work as always Turbo. You must have the patience of Job to do what you do do so well
Merry Christmas (where's a Xmas Emiticon when you need one?)

"It is amazing how many drivers, even at the Formula-1 level, think that brakes are for slowing the car down." - Mario Andretti
-
gareth
- E30 Zone Team Member
- Posts: 11009
- Joined: Tue Jan 11, 2005 11:00 pm
- Location: hastings, east sussex
GeoffBob wrote:Errrmm, EVERYTHINGgareth wrote:you'll find yourself measuring everything you can find before long??
That's the meanest looking rectal probe I've ever seen!
Sole founder of Fe2O3-12V it's a lifestyle
LSD rebuilding / modification services provided, PM for details
LSD rebuilding / modification services provided, PM for details
-
GeoffBob
- Forced Induction Specialist
- Posts: 1843
- Joined: Tue Apr 28, 2009 11:00 pm
More than you can imagine! Each time the aliens come for me they always have onegareth wrote:GeoffBob wrote:That's the meanest looking rectal probe I've ever seen!
Often depends on the number of turns of the crank required for the ECU to synchronise. They usually never fire the plugs and injectors until they have a lock on the crank position.Turbo-Brown wrote:Brown and my mate's 205 Mi16 both start first time, but only after a little bit of cranking whereas OE systems literally start on the first revolution of the engine.
My Toyota 3SGTE engine, for example, has two synchro pickups and one 24-tooth wheel (every 30' of crank rotation) located on the end of the inlet cam. With this setup the ECU will synchronise to the crank in a maximum of one turn of the crank before the engine fires. Other engines may take a greater number of crank turns (depending on the sync method employed), and thus appear not to fire as soon.
I only mention this as bad tuning while cranking is not always to blame for a slow start.
"It is amazing how many drivers, even at the Formula-1 level, think that brakes are for slowing the car down." - Mario Andretti
-
Turbo-Brown
- Boost Junkie
- Posts: 4705
- Joined: Tue Feb 15, 2005 11:00 pm
- Location: Aldershot, Hants
That's a fair point, I'm guessing that wasted spark and batch injection would require a maximum of one rev to get sync, but we've been looking at maybe 3 or 4 seconds of cranking, and in the case of old Brown, about 10s in really cold weather before it catches.
Contrast that with my little Civic this morning which you hear compress on one cylinder and then it fires.
Similarly, I had a 320i for a while. It sat on the drive for about two months but with a fresh battery it caught within about two compressions.
To be honest, I'm just interested more than anything else, plus I really want my new build to feel as factory as possible.
Was absolutely delighted with the way Brown drove, lovely throttle progression and response but the starting was always a sore point for me
-
Turbo-Brown
- Boost Junkie
- Posts: 4705
- Joined: Tue Feb 15, 2005 11:00 pm
- Location: Aldershot, Hants
More Christmas shopping on Saturday and the extreme cold(!) have slowed progress a bit this weekend....being hungover didn't help either!
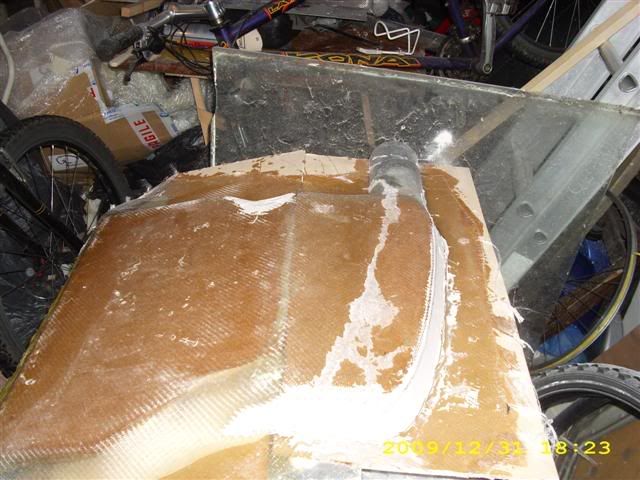
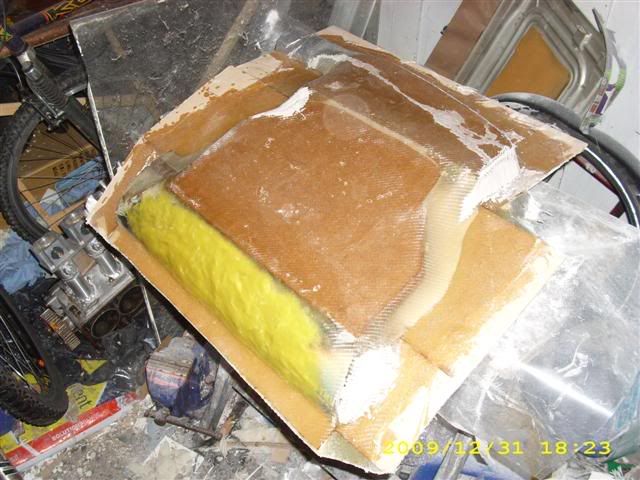
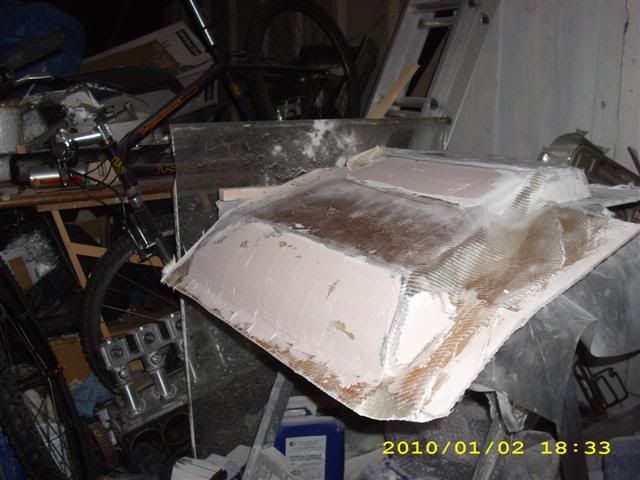
Started today's little bit of work off by finishing off the parting line where the chamber passes the throttles:
Then made up a simple card board former to stop the glass from just hanging from the MDF board at the top:
And after that, it's just a simple case of laying up a couple of plies of woven glassy goodness, letting the drape of the cloth make up the shape of any bits I'd not produced formers for:
-
gareth
- E30 Zone Team Member
- Posts: 11009
- Joined: Tue Jan 11, 2005 11:00 pm
- Location: hastings, east sussex
too much carling?Turbo-Brown wrote:being hungover didn't help either!
Sole founder of Fe2O3-12V it's a lifestyle
LSD rebuilding / modification services provided, PM for details
LSD rebuilding / modification services provided, PM for details
-
Turbo-Brown
- Boost Junkie
- Posts: 4705
- Joined: Tue Feb 15, 2005 11:00 pm
- Location: Aldershot, Hants
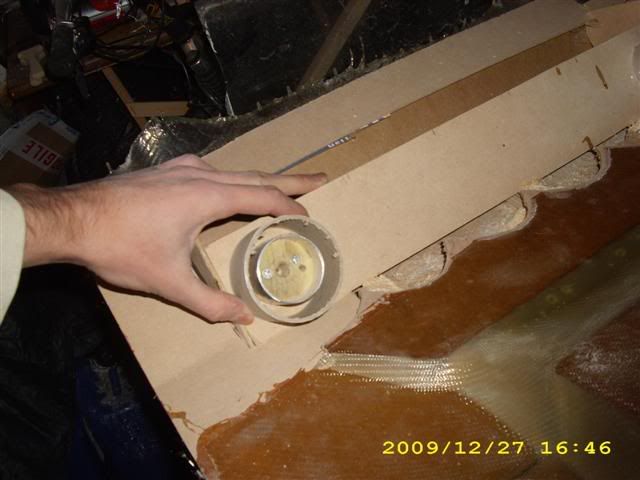
How's about this for an idea:
The dump valve I made was very pretty, and very unreliable! It works at room temperature, seizes up when it's cold and leaks when it's hot!
So, while rummaging in the garage last night, I spotted a 320i throttle body.
I'm wondering if it'd be possible to close it right down so that it's near as dammit sealed and then attach a nice and reliable vacuum actuator to it (I can make them reliably! )
I'm also toying with the idea of making a butterfly style wastegate for reasons of packaging and sparkplug access.
What do people reckon to the dumpvalve idea though, runner or non-starter?
The dump valve I made was very pretty, and very unreliable! It works at room temperature, seizes up when it's cold and leaks when it's hot!
So, while rummaging in the garage last night, I spotted a 320i throttle body.
I'm wondering if it'd be possible to close it right down so that it's near as dammit sealed and then attach a nice and reliable vacuum actuator to it (I can make them reliably!
I'm also toying with the idea of making a butterfly style wastegate for reasons of packaging and sparkplug access.
What do people reckon to the dumpvalve idea though, runner or non-starter?
-
e30_Turbo
- Boost Junkie
- Posts: 3158
- Joined: Mon Jan 10, 2005 11:00 pm
- Location: East Anglia
As long as it don't leak, holds boost, dumps well and works at all temps, why not!
Mine's an ebay special, it gets dirty, losses response etc every few months but a clean, oil up and it's as good as new, makes it barely worth the effort Alex, only cost 50quid.
The top part had the right thread for my airline fittings, which was a nice surprise. Anyway, knock up some drawings so we can all stare at them in awe

-
eta

- E30 Zone Regular

- Posts: 356
- Joined: Fri Oct 26, 2007 11:00 pm
- Location: Glemsford Suffolk
Picoscopes are brilliant. I use one at school when teaching.
-
appletree
- E30 Zone Addict

- Posts: 3482
- Joined: Fri Jan 20, 2006 11:00 pm
- Location: Retford
Yup good idea, eaton use them on the BMW mini superchargers
bit smaller than a 320 TB but in priciple the same thing

http://www.magnusonproducts.com/bypass.htm
bit smaller than a 320 TB but in priciple the same thing
http://www.magnusonproducts.com/bypass.htm

You should never underestimate the predictability of stupidity
M42 Supercharged 285bhp + M3 6speed box
-
Turbo-Brown
- Boost Junkie
- Posts: 4705
- Joined: Tue Feb 15, 2005 11:00 pm
- Location: Aldershot, Hants
Coolio, great big butterfly BOV it is then
Gotta get hold of some more diaphragms before I can do any drawings though.
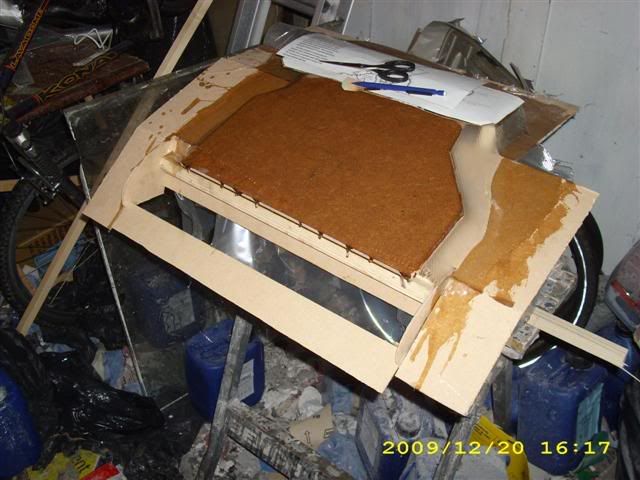
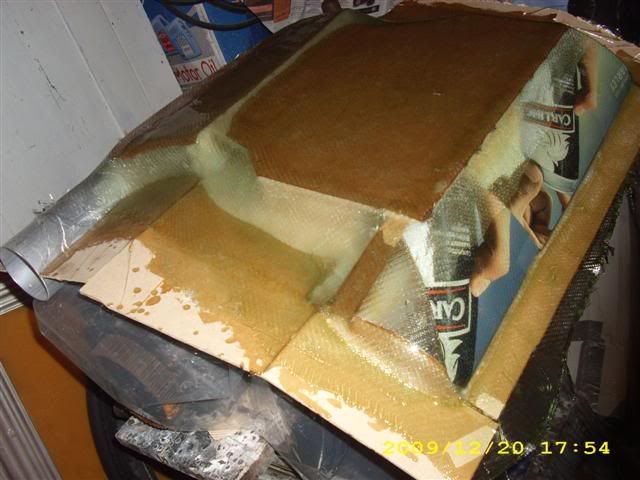
Little bit more progress with the cooler pattern over the last couple of days. Obviously there's lots of festive drinking to be done (we're having a competition at work to see who can gain the most christmas fat!) which has slowed things up a bit, and the chilly temperatures in the garage mean the resin takes about 24 hours to cure instead of just a couple.
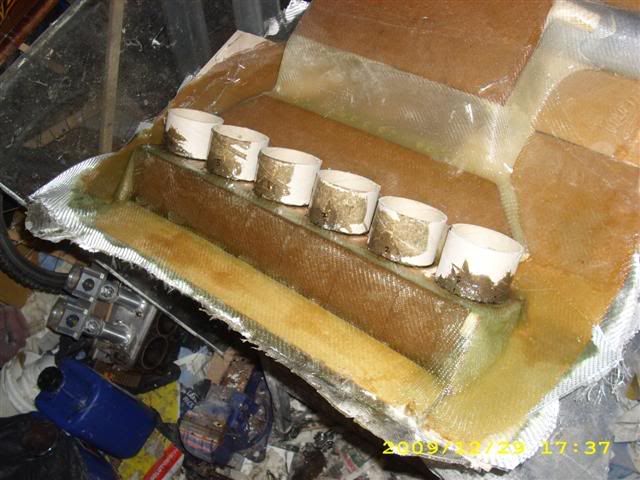
Had a good ol' think about how to seal the cooler to the throttle bodies in a way that'll be easy to remove for maintenance and also which uses off the shelf hose couplers. Here's what I've come up with, essentially there will be a 3" diameter spigot molded onto the each outlet of the cooler and a 3" dia skirt bonded onto each trumpet (the U shaped grey bit in the pic). The trumpets will be bolted to the throttles through the U shaped skirt too:
So next job was to find some 3" diameter stuff to make formers with. One of those giant workshop rolls of paper towels had just the job but this showed up a bit of a problem with the design: With the 3" spigots in place, there's not enough room to get a hose joiner in!
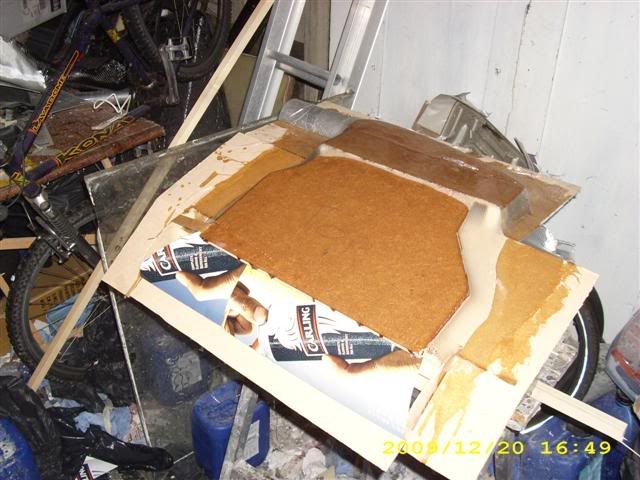
Luckily, a bit of modification to the pattern has solved this. First up was to make a little hand held router to cut away the pattern:
Yep, it's a snapped off drill bit
Then the underside needed to be scalloped to clear the spigots. Chose to scallop it rather than just chop it off straight as the corrugations should serve to stiffen the casing a bit:
And last up is to lay up a couple of plies of glass:
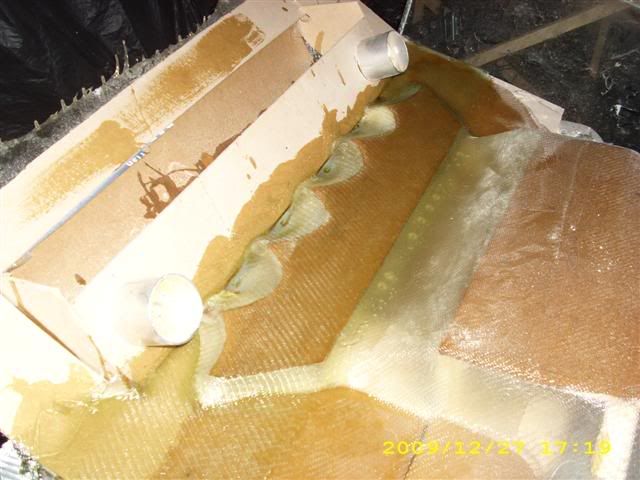
Hangover allowing, should be able to get the spigot formers in place and finish off the tank tomorrow. And if I'm feeling really adventurous, the filling of any bits I'm not happy with can start. Once that's all done, it's polishing time!
Gotta get hold of some more diaphragms before I can do any drawings though.
Little bit more progress with the cooler pattern over the last couple of days. Obviously there's lots of festive drinking to be done (we're having a competition at work to see who can gain the most christmas fat!) which has slowed things up a bit, and the chilly temperatures in the garage mean the resin takes about 24 hours to cure instead of just a couple.
Had a good ol' think about how to seal the cooler to the throttle bodies in a way that'll be easy to remove for maintenance and also which uses off the shelf hose couplers. Here's what I've come up with, essentially there will be a 3" diameter spigot molded onto the each outlet of the cooler and a 3" dia skirt bonded onto each trumpet (the U shaped grey bit in the pic). The trumpets will be bolted to the throttles through the U shaped skirt too:
So next job was to find some 3" diameter stuff to make formers with. One of those giant workshop rolls of paper towels had just the job but this showed up a bit of a problem with the design: With the 3" spigots in place, there's not enough room to get a hose joiner in!
Luckily, a bit of modification to the pattern has solved this. First up was to make a little hand held router to cut away the pattern:
Yep, it's a snapped off drill bit
Then the underside needed to be scalloped to clear the spigots. Chose to scallop it rather than just chop it off straight as the corrugations should serve to stiffen the casing a bit:
And last up is to lay up a couple of plies of glass:
Hangover allowing, should be able to get the spigot formers in place and finish off the tank tomorrow. And if I'm feeling really adventurous, the filling of any bits I'm not happy with can start. Once that's all done, it's polishing time!
-
Turbo-Brown
- Boost Junkie
- Posts: 4705
- Joined: Tue Feb 15, 2005 11:00 pm
- Location: Aldershot, Hants
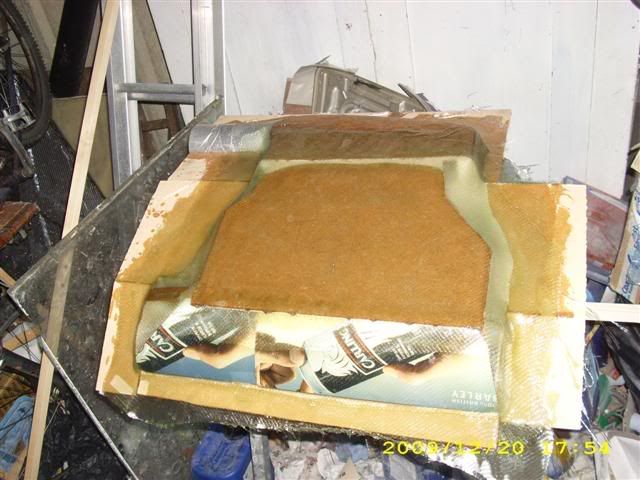
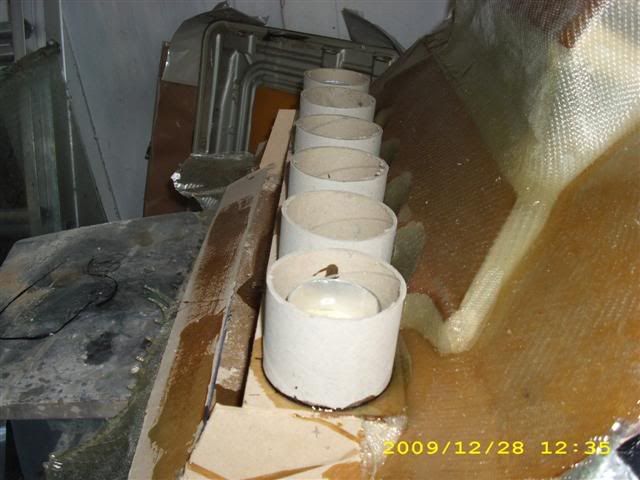
Up at the crack of 10 today to glue the spigots in place
It's another chilly one so they won't be cured for hours and hours I wouldn't have thought.
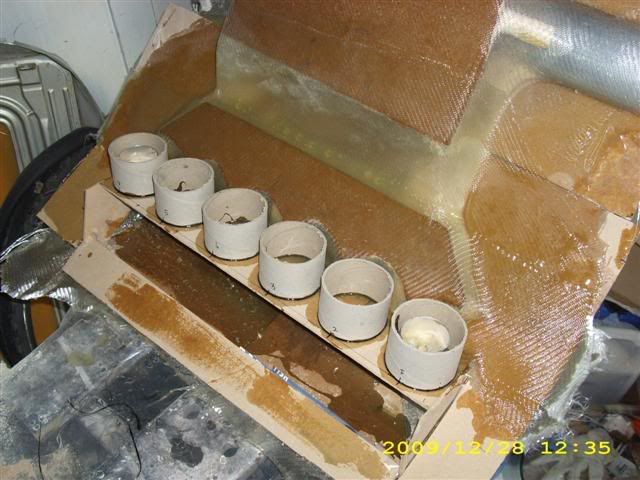
Had a sudden nasty thought that there wouldn't be any draft (release angle) between the spigots and the scalloped bits I made yesterday. Looks like it should be ok, just need to fill in a couple of dips here and there. Phew!
It's another chilly one so they won't be cured for hours and hours I wouldn't have thought.
Had a sudden nasty thought that there wouldn't be any draft (release angle) between the spigots and the scalloped bits I made yesterday. Looks like it should be ok, just need to fill in a couple of dips here and there. Phew!
-
Turbo-Brown
- Boost Junkie
- Posts: 4705
- Joined: Tue Feb 15, 2005 11:00 pm
- Location: Aldershot, Hants
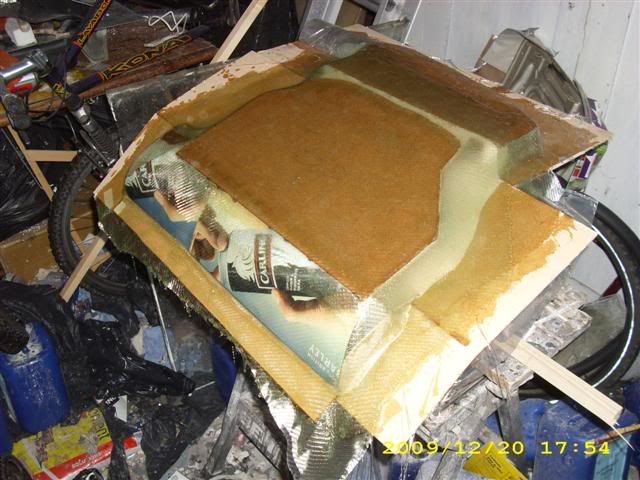
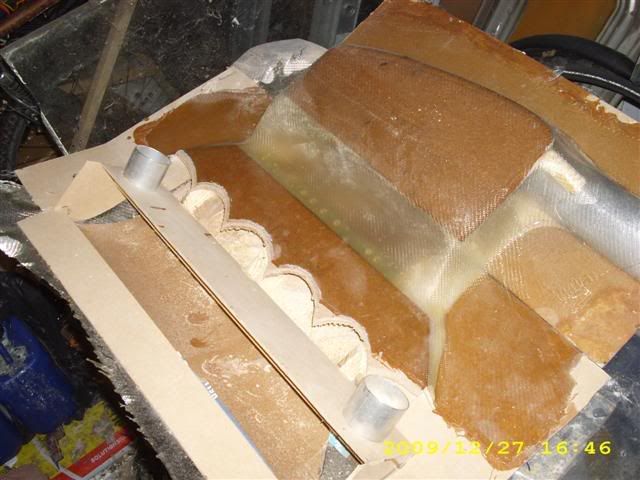
Last little bit of filling in just completed:
Tomorrow starts the task of filling and finishing
Tomorrow starts the task of filling and finishing
-
Turbo-Brown
- Boost Junkie
- Posts: 4705
- Joined: Tue Feb 15, 2005 11:00 pm
- Location: Aldershot, Hants
Last update of the decade!
Just bits of filling where there are some undercuts:
And a massive wodge of filler to to get the line of the plenum part up to where it needs to be. Seems the cardboard had sagged a bit under the weight of the resin and glass. No real biggy, just needed loooots of fibrofil
Happy New Year everybody!
Just bits of filling where there are some undercuts:
And a massive wodge of filler to to get the line of the plenum part up to where it needs to be. Seems the cardboard had sagged a bit under the weight of the resin and glass. No real biggy, just needed loooots of fibrofil
Happy New Year everybody!
-
Turbo-Brown
- Boost Junkie
- Posts: 4705
- Joined: Tue Feb 15, 2005 11:00 pm
- Location: Aldershot, Hants
And a merry new year to all!
First little bit of work for the year was to finish off bulking out the massive dip in the plenum.
Took an awful lot of filler to do this!
Lesson learned, make formers for for draping glass fibre over a little bit sturdier!
First little bit of work for the year was to finish off bulking out the massive dip in the plenum.
Took an awful lot of filler to do this!
Lesson learned, make formers for for draping glass fibre over a little bit sturdier!
-
Turbo-Brown
- Boost Junkie
- Posts: 4705
- Joined: Tue Feb 15, 2005 11:00 pm
- Location: Aldershot, Hants
Hooray! Smoothing and filling all done on both sides now so it's time to start the flow coating and polishing stage.
Hope there's enough wax in this coat to make it set without remaining tacky
Hope there's enough wax in this coat to make it set without remaining tacky
-
Turbo-Brown
- Boost Junkie
- Posts: 4705
- Joined: Tue Feb 15, 2005 11:00 pm
- Location: Aldershot, Hants
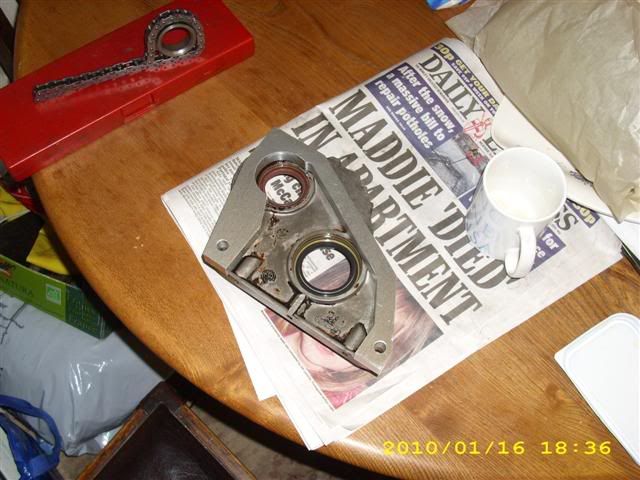
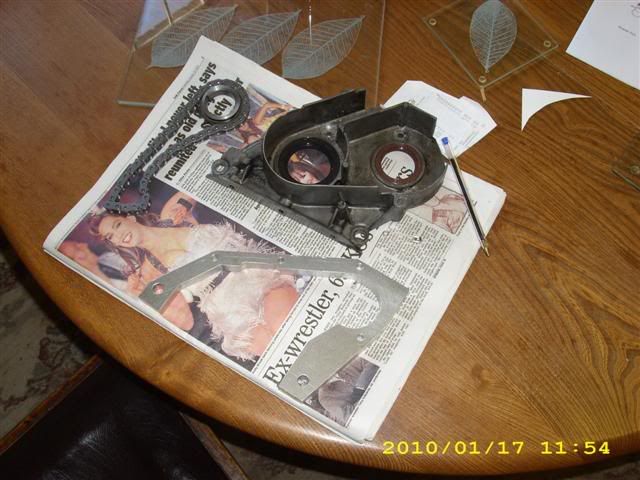
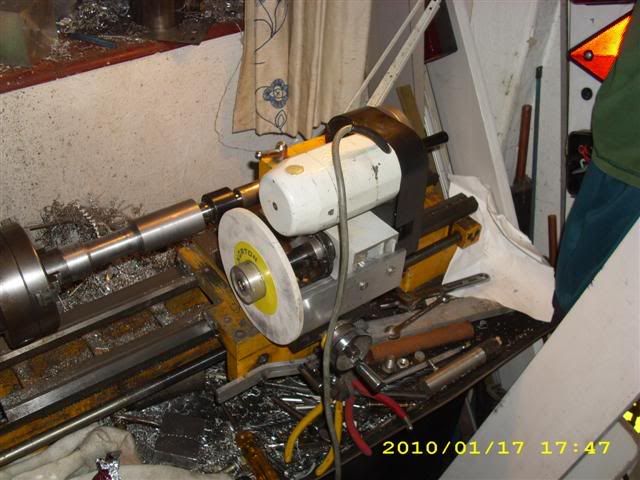
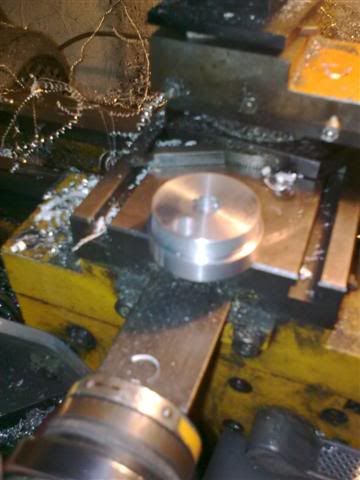
Brrr, still too cold to use the fibreglass at the moment so started spacing the front of the engine forwards today starting with the most complicated part to make, the seal housing spacer.
Started off by veeeeeery carefully boring the two doweled holes. The dowels are there to make sure the seals are concentric with the crank and jack shafts. Even broke out the boring head to make sure I could get the holes exactly the right diameter! Already marked and roughed out the basic external shape of the spacer with a hacksaw by this point.
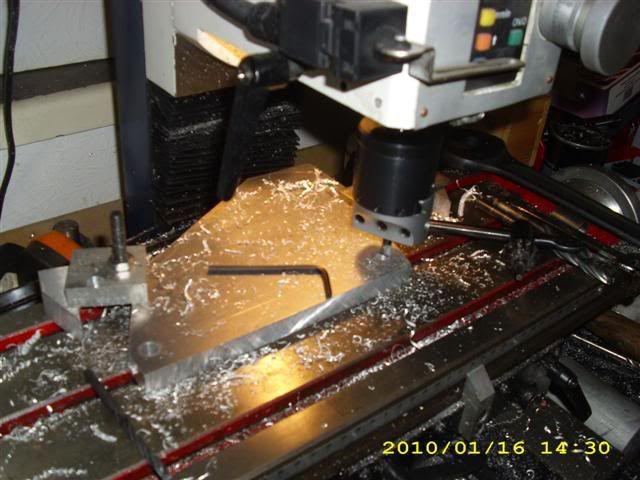
Holes bored, it's time to make sure they're the right size and spacing before getting on with anything else.....luckily they are
And then it's on with cutting the inside of the spacer out with the mill:
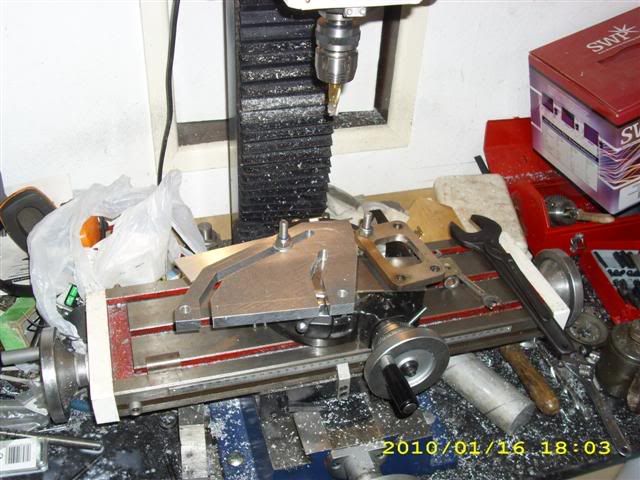
All that needs doing now is to drill the little holes for the M6 bolts and machine off the bottoms of the legs. Left these over sized so I can get them exactly level with the bottom of the block. Also needs a little bit of a releif around the chain area.
Should get that all done tomorrow and can start making the new jack shaft, water pump and cam pulley spacers
Tis a lot of work just to avoid externally mounting an oil pump, but I'm just happier with the pump in the sump where it belongs and being driven by a chain!
Started off by veeeeeery carefully boring the two doweled holes. The dowels are there to make sure the seals are concentric with the crank and jack shafts. Even broke out the boring head to make sure I could get the holes exactly the right diameter! Already marked and roughed out the basic external shape of the spacer with a hacksaw by this point.
Holes bored, it's time to make sure they're the right size and spacing before getting on with anything else.....luckily they are
And then it's on with cutting the inside of the spacer out with the mill:
All that needs doing now is to drill the little holes for the M6 bolts and machine off the bottoms of the legs. Left these over sized so I can get them exactly level with the bottom of the block. Also needs a little bit of a releif around the chain area.
Should get that all done tomorrow and can start making the new jack shaft, water pump and cam pulley spacers
Tis a lot of work just to avoid externally mounting an oil pump, but I'm just happier with the pump in the sump where it belongs and being driven by a chain!
-
Turbo-Brown
- Boost Junkie
- Posts: 4705
- Joined: Tue Feb 15, 2005 11:00 pm
- Location: Aldershot, Hants
Bit of a mixed bag today.
Very pleased to finish off the seal housing spacer complete with a little relief for the oil pump chain and all the holes drilled (do still need to cut the legs back though)
Next up was starting on the jackshaft.
Had decided that making a new one was better than extending the old one....for some reason.
Ordered up some hard material to make it from which doesn't machine all that nicely:

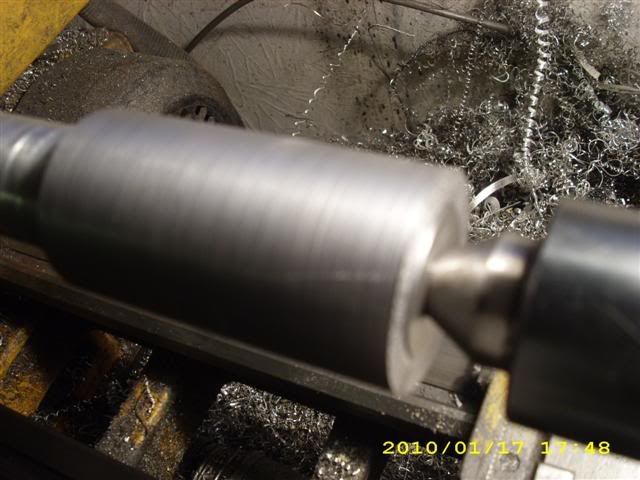
So then spent the rest of the day making a cylindrical grinder:
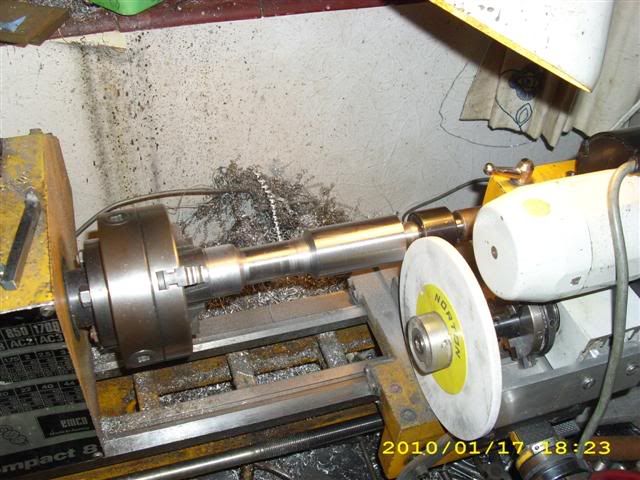
Which has improved things a little....but think I'll just extend the old shaft and be done with it!
Very pleased to finish off the seal housing spacer complete with a little relief for the oil pump chain and all the holes drilled (do still need to cut the legs back though)
Next up was starting on the jackshaft.
Had decided that making a new one was better than extending the old one....for some reason.
Ordered up some hard material to make it from which doesn't machine all that nicely:
So then spent the rest of the day making a cylindrical grinder:
Which has improved things a little....but think I'll just extend the old shaft and be done with it!
-
gareth
- E30 Zone Team Member
- Posts: 11009
- Joined: Tue Jan 11, 2005 11:00 pm
- Location: hastings, east sussex
loving that cylindrical grinder 
we were thinking of doing similar at work to save sub-contracting any grinding we have to do
we were thinking of doing similar at work to save sub-contracting any grinding we have to do
Sole founder of Fe2O3-12V it's a lifestyle
LSD rebuilding / modification services provided, PM for details
LSD rebuilding / modification services provided, PM for details
-
Turbo-Brown
- Boost Junkie
- Posts: 4705
- Joined: Tue Feb 15, 2005 11:00 pm
- Location: Aldershot, Hants
It works reasonably well to be fair (although it was irritating to have to make it!)
Really needs to be a lot more rigid though and I need to get a truing stone too as the wheel's slightly out of round!
Really needs to be a lot more rigid though and I need to get a truing stone too as the wheel's slightly out of round!
-
m_jermyn
- E30 Zone Team Member
- Posts: 4208
- Joined: Sat Mar 14, 2009 11:00 pm
- Location: Sydney Australia Mate
Your like this dude that can make anything lol
-
Turbo-Brown
- Boost Junkie
- Posts: 4705
- Joined: Tue Feb 15, 2005 11:00 pm
- Location: Aldershot, Hants
Aah, that's not worked!
The grinder wasn't really stiff enough so the finish on the shaft ended up being crap and polishing it up would've taken it below size for the bearings.
Thought "okay, I'll make an aluminium extension for the shaft, that'll be easy enough" Got the really accurate bit done.....and then realised that it wouldn't fit as where the extension slots over the original shaft is where the seal and housing goes!
It's literally just occured to me writing this that the next thing to try is to machine a step in the end of the original shaft, make a steel extension which is a press fit on this step so that the diameter remains constant through the seal.
Fingers crossed!
-
Turbo-Brown
- Boost Junkie
- Posts: 4705
- Joined: Tue Feb 15, 2005 11:00 pm
- Location: Aldershot, Hants
This is a bit more like it!
Did a little bit of work on the charge cooler pattern, just gave it a gel coat which will be followed by a flow coat during the week. That can then be flatted back and polished which means we're not too far off taking molds from it
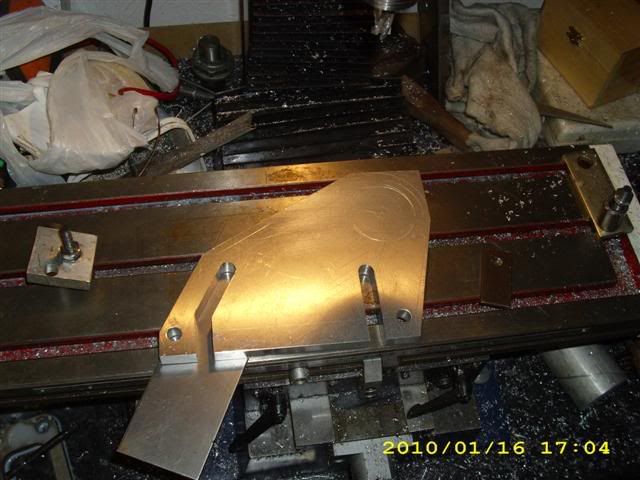
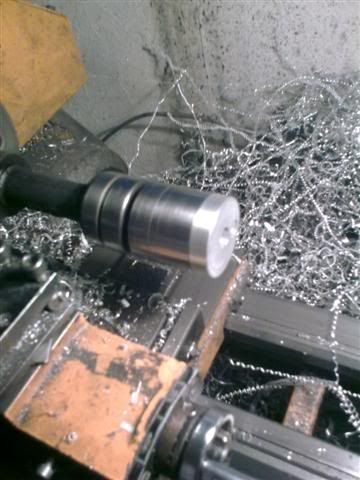
While that was all curing, went to my folks' house to see if I couldn't sort this shaft out once and for all. Discovered I didn't have quite enough steel to make the extension in one hit, so decided to make it in two parts.
First up, turning a step in the shaft:
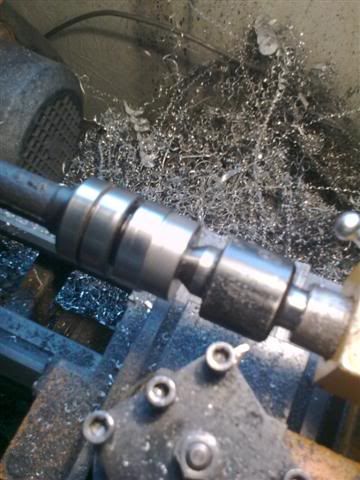
Think the seal needs to run on a steel part rather than aluminium so then made up a sleeve which is a press fit over the step:
Couldn't be bothered today, but last thing to do is make up an aluminium spacer which gets pressed into this sleeve and which has a hole in it to take the dowel for the little pulley. It's probably not strictly necessary, but might as well put it in.
Feel like I've finally made some progress on this shaft now!
Did a little bit of work on the charge cooler pattern, just gave it a gel coat which will be followed by a flow coat during the week. That can then be flatted back and polished which means we're not too far off taking molds from it
While that was all curing, went to my folks' house to see if I couldn't sort this shaft out once and for all. Discovered I didn't have quite enough steel to make the extension in one hit, so decided to make it in two parts.
First up, turning a step in the shaft:
Think the seal needs to run on a steel part rather than aluminium so then made up a sleeve which is a press fit over the step:
Couldn't be bothered today, but last thing to do is make up an aluminium spacer which gets pressed into this sleeve and which has a hole in it to take the dowel for the little pulley. It's probably not strictly necessary, but might as well put it in.
Feel like I've finally made some progress on this shaft now!
-
Turbo-Brown
- Boost Junkie
- Posts: 4705
- Joined: Tue Feb 15, 2005 11:00 pm
- Location: Aldershot, Hants
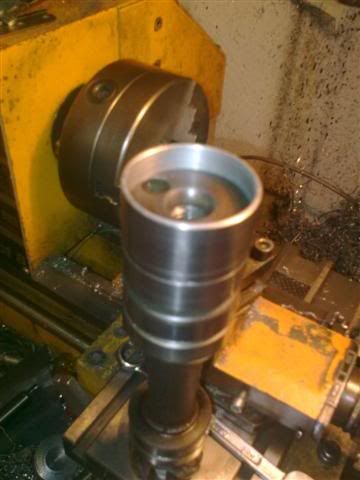
Been working on my last ever private project this weekend and have finally managed to finish it off!
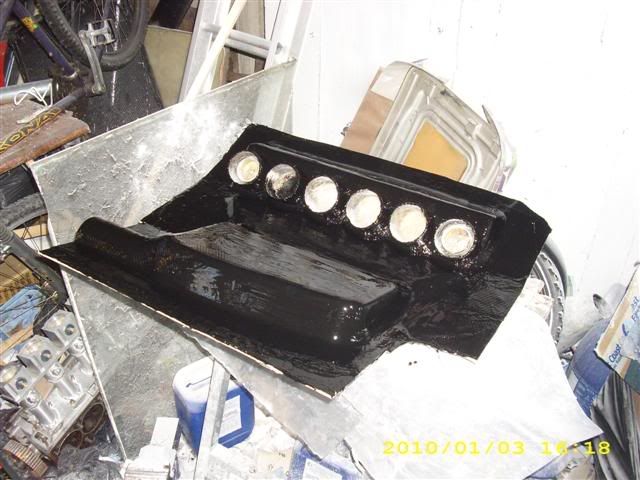
Here it is, in all it's glory:
So with that all done, spent a couple of hours tinkering with the jack shaft (there are a million jokes to be made there!)
All that needed doing really was making a little top hat bit that's got holes in the right place:
And then pressing it into place, making sure that the holes for the dowel line through!
So that's the spacer for the seal housing, crank pulley and jackshaft all done.
Next up is getting the cam pulley spacer made and also coming up with some way of making the cam adjustable
Also on the cards for the near future are getting some molds from the charge cooler pattern (it's a bit cold again at the moment to be using the fibreglass) and also making new vacuum capsules.
Used diaphragms from Stromberg CD175 carbs last time so the capsules ended up being massive, ugly and slow......but powerful. Have revised them to CD150 diaphragms and am planned to machine a die which lets me make some nice and shiny carbon capsules
-
rix313
- E30 Zone Team Member
- Posts: 4967
- Joined: Fri Oct 31, 2008 11:00 pm
- Location: Silverstone
That looks beautiful.
-
appletree
- E30 Zone Addict
- Posts: 3482
- Joined: Fri Jan 20, 2006 11:00 pm
- Location: Retford
SNAPTurbo-Brown wrote:

You should never underestimate the predictability of stupidity
M42 Supercharged 285bhp + M3 6speed box
-
rob_htid
- E30 Zone Regular
- Posts: 492
- Joined: Thu Jun 05, 2008 11:00 pm
- Location: blackpool
plenum looks the nutes mate, best things come to those who wait haha. some amazing work has been carried out in this thread, my hat really is off to you on this! keep it up!
-
Turbo-Brown
- Boost Junkie
- Posts: 4705
- Joined: Tue Feb 15, 2005 11:00 pm
- Location: Aldershot, Hants
Minor update, have been sanding back the charge cooler pattern over the last weekend. It's taking AAAAAGES! LOL
Think it'll need spraying too before I can take molds from it which I'd hoped to be able to avoid doing.
In other news, not content with just getting on with the car as it is, I've started looking into making something else for it......now can anyone guess what?
Think it'll need spraying too before I can take molds from it which I'd hoped to be able to avoid doing.
In other news, not content with just getting on with the car as it is, I've started looking into making something else for it......now can anyone guess what?
-
shalmaneser
- E30 Zone Newbie

- Posts: 23
- Joined: Mon Jul 24, 2006 11:00 pm
Radar controlled cruise control!
Or maybe not.
not complicated enough i guess.
Or maybe not.
not complicated enough i guess.
-
gareth
- E30 Zone Team Member
- Posts: 11009
- Joined: Tue Jan 11, 2005 11:00 pm
- Location: hastings, east sussex
what i saw on the WRC coverage the other day... a carbon fibre snow shovel!Turbo-Brown wrote:In other news, not content with just getting on with the car as it is, I've started looking into making something else for it......now can anyone guess what?
Sole founder of Fe2O3-12V it's a lifestyle
LSD rebuilding / modification services provided, PM for details
LSD rebuilding / modification services provided, PM for details
-
mick_318is
- E30 Zone Regular
- Posts: 584
- Joined: Thu Oct 19, 2006 11:00 pm
- Location: West Berkshire
Carbon Fibre Monocoque
-
baptie0
- E30 Zone Regular
- Posts: 624
- Joined: Tue Sep 25, 2007 11:00 pm
- Location: lochinver,scotland.
Nice work Alex,
why does your inlet get its feed from the nsf? I thought the air was going to flow through the charge cooler from your turbos across the engine.
why does your inlet get its feed from the nsf? I thought the air was going to flow through the charge cooler from your turbos across the engine.
-
Turbo-Brown
- Boost Junkie
- Posts: 4705
- Joined: Tue Feb 15, 2005 11:00 pm
- Location: Aldershot, Hants
However, there'll be castings involved in the production of these new parts
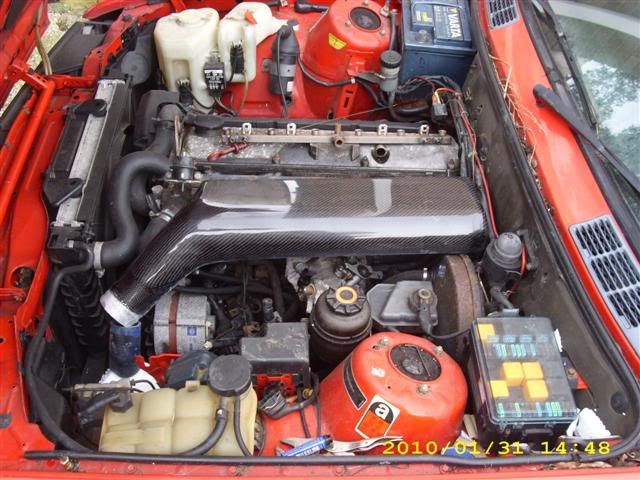
The plenum up there is for someone else, just sorta felt like posting a pic of it as it'd taken so long to make!
-
baptie0
- E30 Zone Regular
- Posts: 624
- Joined: Tue Sep 25, 2007 11:00 pm
- Location: lochinver,scotland.
Turbo-Brown wrote:
However, there'll be castings involved in the production of these new parts
The plenum up there is for someone else, just sorta felt like posting a pic of it as it'd taken so long to make!