Page 1 of 3
318is Rebuild updated 11/10 (Timing Chain Page 3)
Posted: Tue Apr 17, 2007 8:54 pm
by Gwynleym10
After a year of slumming it my £340 IS was starting to wave around a bit. Especially on the slow lane of the motorway where the lorries have worn the road out.. it ment I had to drive on the fast lane all the time (obviously not holding the traffic up)

As every body says, almost to the mile the rear cross member bushes have died at 100 000miles! Those who have seen my car recently also would have notice how low it was at the back, even though it has standard IS springs! The wheels were tucked under the arches!
Don't think I have many pictures of my car before.. here's one though

I started on Easter weekend, by giving the car a bit of a wash / steam on the rear - I also took some "before" pictures.

Er Manky


Re: 318is Rebuild
Posted: Tue Apr 17, 2007 9:09 pm
by Gwynleym10
I then started the dismantling, after "just" fitting it into my parents garage...
For some reason all the bits that are bolted onto to this car are rusty, but the actual structure seems pretty sound. I'm going to restore as much as possible.
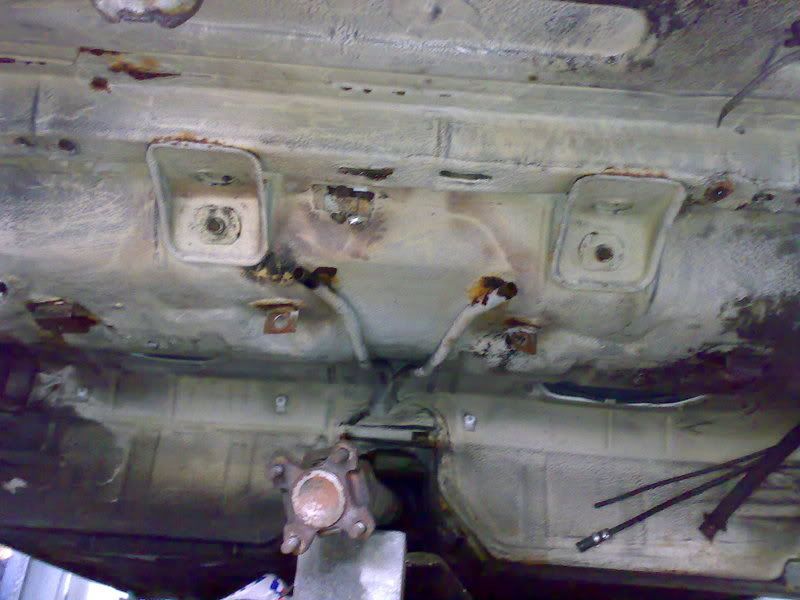
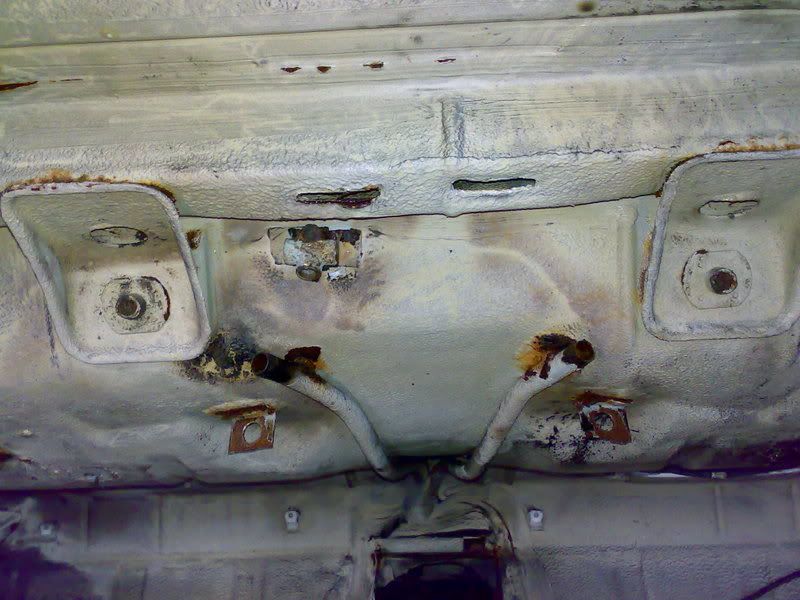
Rear suspension off in a flash! (Well about a day...)

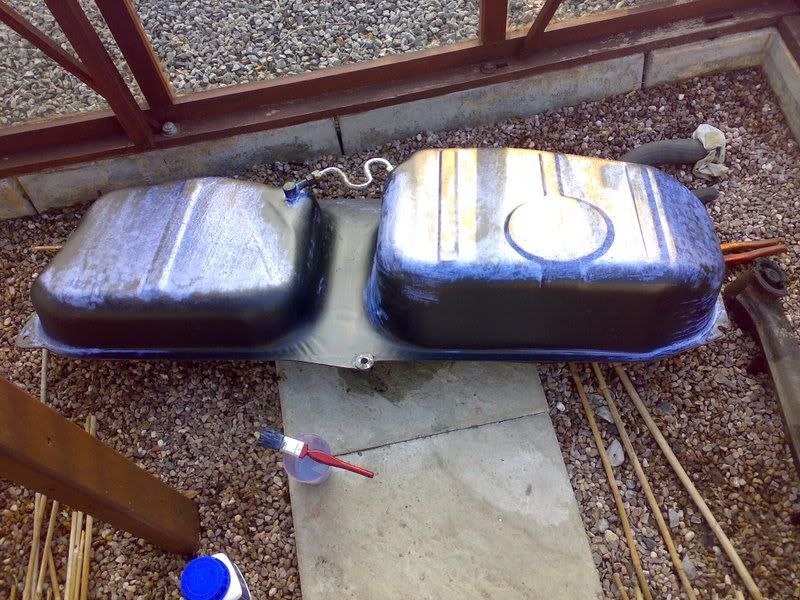
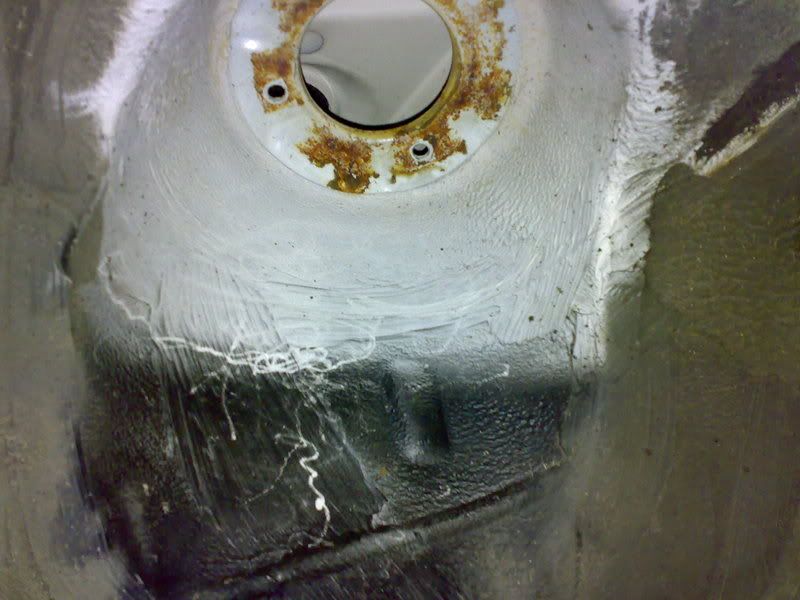
And the fuel tank, which didn't have any big holes (apart from where its supposed to)!

Underneath, not the rust on the lower part of the tank

and no tank. Not to much rust, just a few small patches nothing major. That fuel pipe looks new!


Re: 318is Rebuild
Posted: Sun Apr 29, 2007 7:20 pm
by Gwynleym10
Ok so I have done a fair bit more now..
After trying to burn the bushes out from the wrong side - I finally managed it!
Like everybody says they do burn for a bit, but once you have the metal bit out you can push most of the rubber out.
I then used a exhaust pipe welding sleave to push the other metal bits out.
Old bushes -mostly burnt!

Re: 318is Rebuild
Posted: Sun Apr 29, 2007 7:35 pm
by Gwynleym10
While things where burning I decided it was time to start doing a bit of re-furnishment..
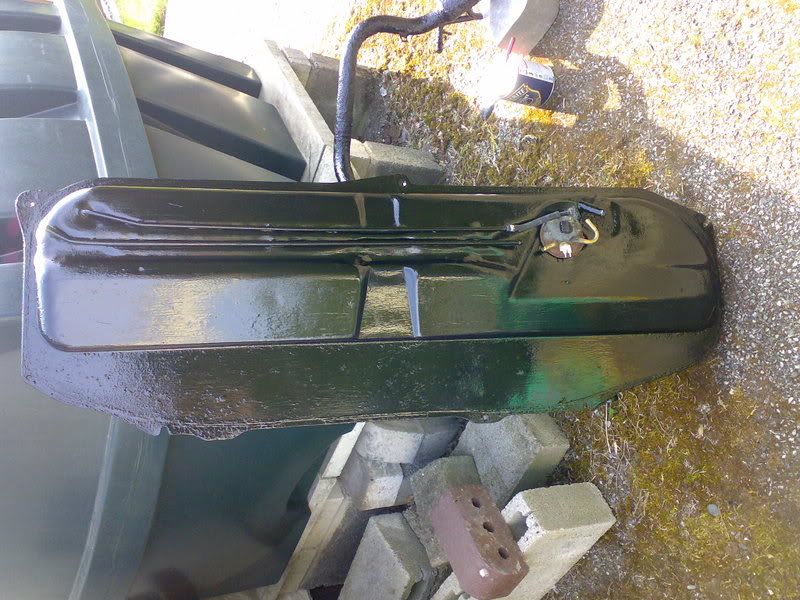
I started by steaming the fuel tank (I love my steamer..) to get rid of any grease.
After recommendation by Ian Hayes in Mr bmw E30 super (anal) rebuild thread.. I visited
http://www.bilthamber.com/
I got a few things from there (fast delivery!) maybe they are a bit expensive but most of their stuff seems to be biodegradable and well recommended - so I though I would give it a wirl!
I decided to Hydrate 80 my fuel tank
http://www.bilthamber.com/hydrate80.html I was a little concern of using any of the rust removers as the metal on the tank it pretty thin. Hydrate 80 converts the rust ready for painting
On the bottle is says "paint on and wait for a dramatic colour change" it doesn't tell you what colour it changes to (it is a light blue to start with) at first I though it was going to turn red (think I must be going colour blind..) but it eventually turned black...THIS IS THE MOST EXCITING PAINT TO WATCH DRY!

Sky blue...

Turning...
Black

This is so much fun! Oh yes it was the steamer that got the connecting pipe all shiney like that!
After two coats of this I left it -
The week end after I painted it with hammerite two coats again.
I also did the fuel filler pipe which turned from this

to this

Pretty pleased by the results

Re: 318is Rebuild
Posted: Sun Apr 29, 2007 7:58 pm
by stuartgallafant
looking good so far fella
i love rebuild projects
Re: 318is Rebuild
Posted: Sun Apr 29, 2007 8:33 pm
by bmwe30mtech
Clearly a lot of work and time going into this. Looking great so far
Re: 318is Rebuild
Posted: Sun Apr 29, 2007 9:03 pm
by Gwynleym10
Cheers guys
Must say its very rewarding stuff - just wish I was able to do it in Central London somewhere as apposed to travelling up to Anglesey North Wales at the weekends. Mr Virgin railway is beginning to do rather well out of me (even though I can get tickets for £15 each way)
Every body should do a rebuild once in their lives!
Re: 318is Rebuild
Posted: Tue May 01, 2007 10:51 pm
by dom-1984-320i
Keep up the good work mate, looking good so far! So is it just the rear suspension you are working on or do you have any other plans for your car?
Re: 318is Rebuild
Posted: Thu May 03, 2007 6:47 pm
by 320Touring
Ideal work sir- I'm hoping to get the touring involved in something like this, jsut need to become landed gentry first though

Re: 318is Rebuild
Posted: Thu May 03, 2007 6:51 pm
by Gwynleym10
I'm doing the front as well Dom - you know how much I like messing around with e30 front suspension!
Neil you MUST do it to the touring at some point - it is a real experience and rewarding!
Will be working on it this weekend (wahoo bank holiday!) will post more up then - including pics
Re: 318is Rebuild
Posted: Thu May 03, 2007 6:53 pm
by 320Touring
Gwynleym10 wrote:
Neil you MUST do it to the touring at some point - it is a real experience and rewarding!
unless you're doing it in the pi$$ing rain outside your flat, then it aint fun at all- I need a nice garage
PS I have some iS stuff kicking about- some trim parts and rear shocks etc. PM me if you want them, and i'll send them off.
Re: 318is Rebuild
Posted: Thu May 03, 2007 6:58 pm
by E30BeemerLad
keep the updates coming, love threads like this.
Did that car come with the ATS cups for £340!
Re: 318is Rebuild
Posted: Thu May 03, 2007 8:01 pm
by Gwynleym10
Sadly the car didn't come with ATS cups for £340, but they only cost about £180 including getting them posted from germany and fitting some rubber...
Sadly my parents garage is pretty small - can only just work on the car! Its not like these super garages that people seem to have on here!
Re: 318is Rebuild
Posted: Thu May 03, 2007 8:18 pm
by R9
Great project - keep the pics coming.
Posted: Fri May 04, 2007 1:30 pm
by hoshy
very interesting.. seem she whole rear axel setup isn't that well secured. Two posts and the shocks in the trailing arms.. is that it?
Posted: Fri May 04, 2007 5:50 pm
by Gwynleym10
hoshy wrote:very interesting.. seem she whole rear axel setup isn't that well secured. Two posts and the shocks in the trailing arms.. is that it?
I think mine was particularly easy to get off, I literally
1)Cut all the brake lines / cables with a saw (i'm replacing them)
2)Undid the rear shocks (at the top mounts)
3)Undid the rear ARB - on the trailing arm
4)Pushes the trailing arms down so the springs came out
5)Inside the car I remove all the putty stuff in the holes that cover the big rear axle bolts
6)All my allen bolts on the cover plates come off fine
7)Undid the the proller shaft to the diff
8)Undid the 2 big bolts and get them a big (a few) whacks with a hammer
9 - try not to let the whole thing fall on my toes!...
I worked pretty quickly and didn't take many pics at that point...Must take more I know!
Re:
Posted: Fri May 04, 2007 10:57 pm
by hoshy
Interesting. quite un undertaking.
are you planning on doing the whole car, restoring to as near concourse as possible ?
Re:
Posted: Fri May 04, 2007 11:03 pm
by Ajay325
nice work man nice 2 see an e30 coming back 2life
Re:
Posted: Thu May 10, 2007 9:03 pm
by Gwynleym10
hoshy wrote:Interesting. quite un undertaking.
are you planning on doing the whole car, restoring to as near concourse as possible ?
I started to do this because I knew the suspension would fail the next MOT. I am now going further than I though I would with it! I doubt this car will ever be concourse!
I'll update what I did last weekend in a min!
Re:
Posted: Thu May 10, 2007 9:30 pm
by Gwynleym10
Last weekend (may bank holiday - I love that extra day!) I did lots of random little bits...
Firstly I took a pick of my old springs - and some new (well they have been on a car for 6 months) genuine bmw m-tech ones!

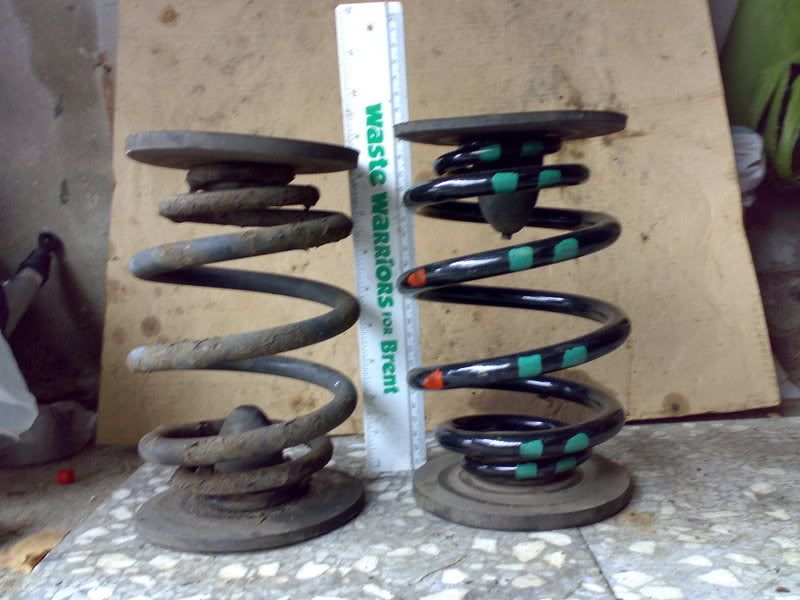
Bit of a difference eh! Maybe this explains my saggy rear end...
Next I did a bit of steaming!
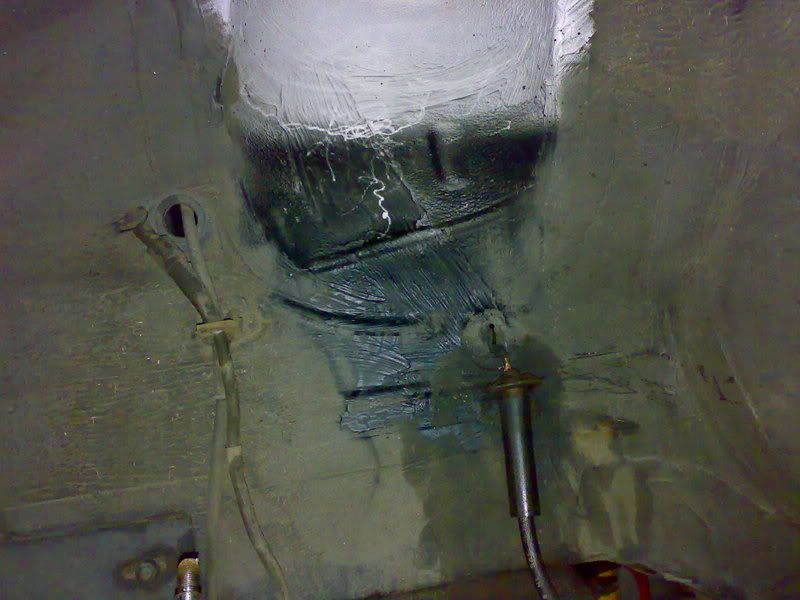
The steaming really shows up the bits of surface rust that I am starting to sort out! After a bit of heat my handbrake cables came out easily with some mole grips - no holes in the floor pan or welding needed - phew.
Then I needed to take the rear hubs out of the trailing arms
Obviously I had forgotten to loosen that highly torqued nut before I removed the axel

No problem - just put the wheel back on...

Then I wacked the flange plate out with a socket. I put a thread through the middle to hold the socket in place to make sure it came out straight. - Sorry no photos!
Then I removed the big circlip


I then used bit of exhaust welding sleave and wacked the main part of the hub out -
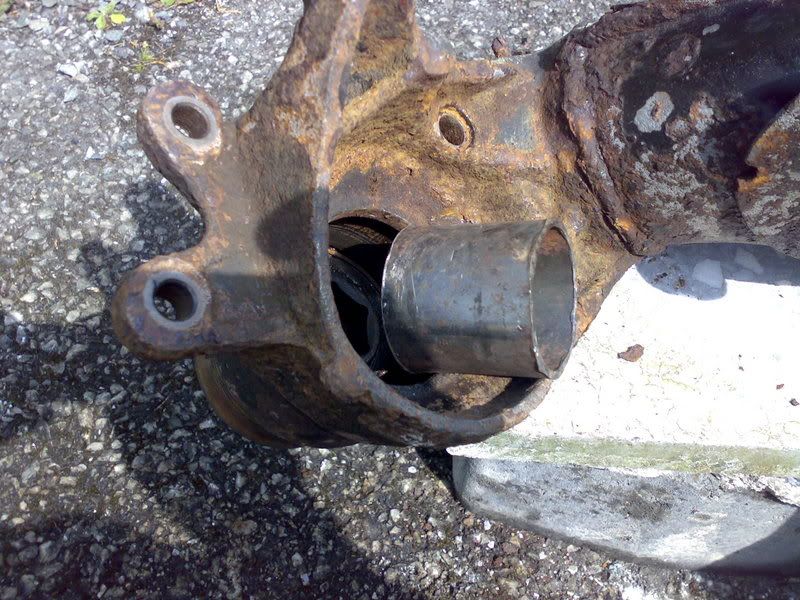

I then realised that my diff bush was a little worn - I literally managed to push it out...


Then used a saw to get the metal ring out..
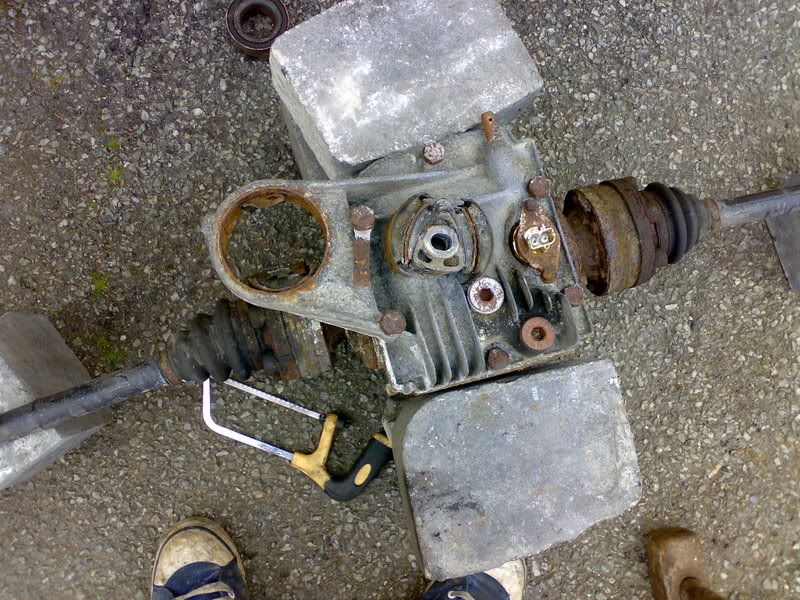
After a bit of a clean and a paint it looks much better!


more to come...
Re:
Posted: Thu May 10, 2007 9:38 pm
by aceraf
damn....this is looking good!!!!

Re:
Posted: Thu May 10, 2007 9:58 pm
by Gwynleym10

Painted some other bits silver as well!
I didn't think the paint on the control arms was very good, even though they were the more expensive ones..
A brake caliper rebuild bit will come up in a few weeks!
Re:
Posted: Thu May 10, 2007 9:58 pm
by dom-1984-320i
Hello Gwyn,
you are doing stirling work there sir, well done mate. so what sort of time scale are you putting on this project?
Re:
Posted: Thu May 10, 2007 10:02 pm
by Gwynleym10
Time scale is I need it done by mid june at the very latest... I'm on the rebuild / re conditioning stage now completely done all the taking apart (thank god..)
I need to start doing it all again with a Land Cruiser in August....

Re:
Posted: Thu May 10, 2007 11:43 pm
by hoshy
great pics. ncie to see what all this looks like laid bare!
Re:
Posted: Mon May 14, 2007 5:40 pm
by hoshy
any updates mate ?
Re:
Posted: Wed May 16, 2007 12:48 am
by dodgem
Really love seeing threads like this - loads of kudos for taking the time to take piccies as you do it
I've never done more than change the oil in my car but given the time, space, and tools to do the job i'm confident i could get down and dirty on my iS. So.... priorities.... pay off all credit cards/debts, get house to saleable state, buy house with garage, buy second car to get about in, start work on the refurb that my beloved 318iS really deserves, open bottle of champagne and celebrate my mastery of mechanical things, zoom off in my pride and joy, get pulled for drinking too much champagne, not drive for a few years!
Seriously though, that looks like a fantastic job you're doing, good luck with getting her back on the road soon, i can just imagine the satisfaction you'll feel at the end of it all
Re:
Posted: Wed May 16, 2007 12:55 am
by old_skool
Nice work
Re:
Posted: Wed May 16, 2007 2:06 pm
by DrBen
Yeah, I love your work. the photos are very much apprecoiated!
Re:
Posted: Wed May 16, 2007 2:53 pm
by gcorky
good work there,will be very satisfying when its assembled.
Re:
Posted: Wed May 16, 2007 6:28 pm
by Gwynleym10
No updates at the moment - went to madrid on a stag weekend last one - still recovering now!

Glad all the photo's are appreciated I will take more this weekend and update next week some time.
Old_skool_2002 you are my inspiration! Would not be going so far with it if I hadn't read your splendid posts!
Re:
Posted: Sat Jun 23, 2007 7:10 pm
by Kedge
Anymore news on this mate?
Mines coming off the road now for an engine rebuild and a few other things. May get round to doing as much as you. Although it's already had a hell of a lot of new stuff fitted in the last couple of months.
Re:
Posted: Thu Jul 12, 2007 9:51 pm
by Gwynleym10
ok - SORRY I haven't updated this recently...
OK brake caliper rebuild...
Caliper Off - and take the long spring off with a screwdriver.
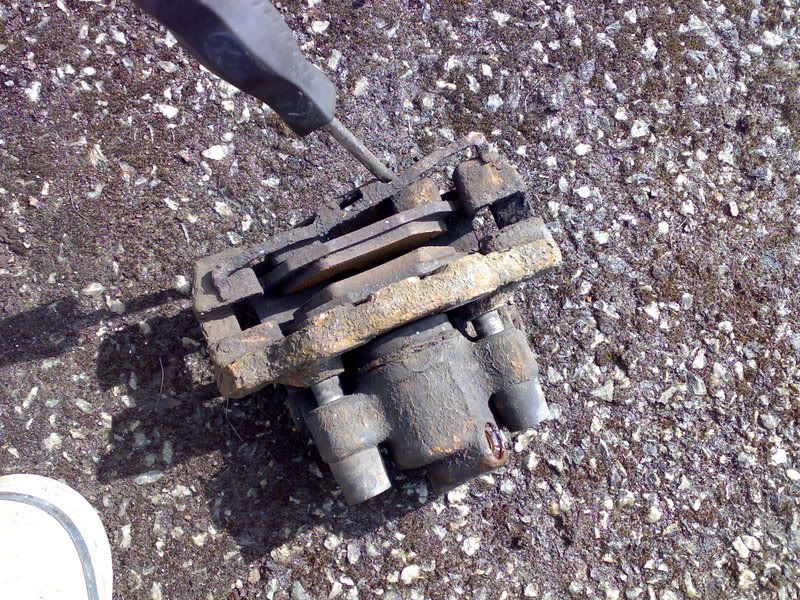
Pads out

Pull out the inner side..
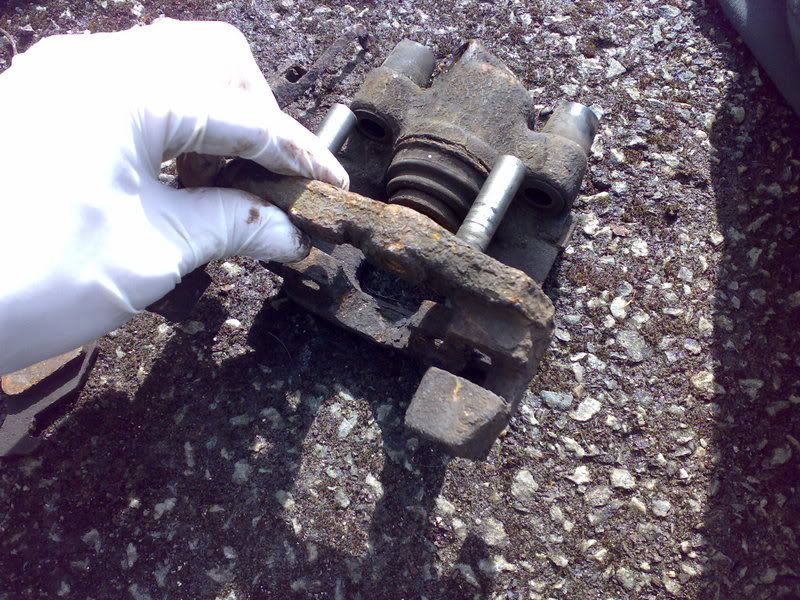
Leaver off the circlip over the rubber cover
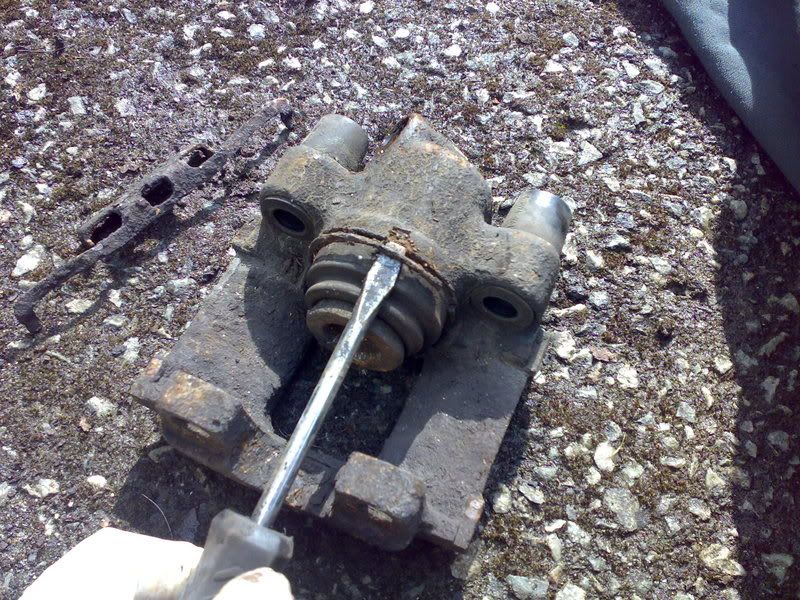
Pull the piston out (be careful not to damage it!)

Carefully take the rubber seal out
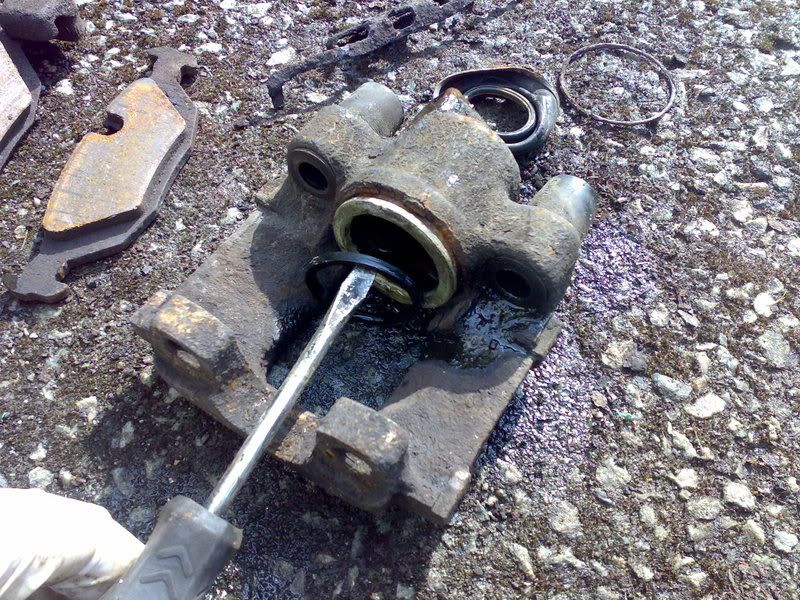
And push the rubber sliders out

All apart!
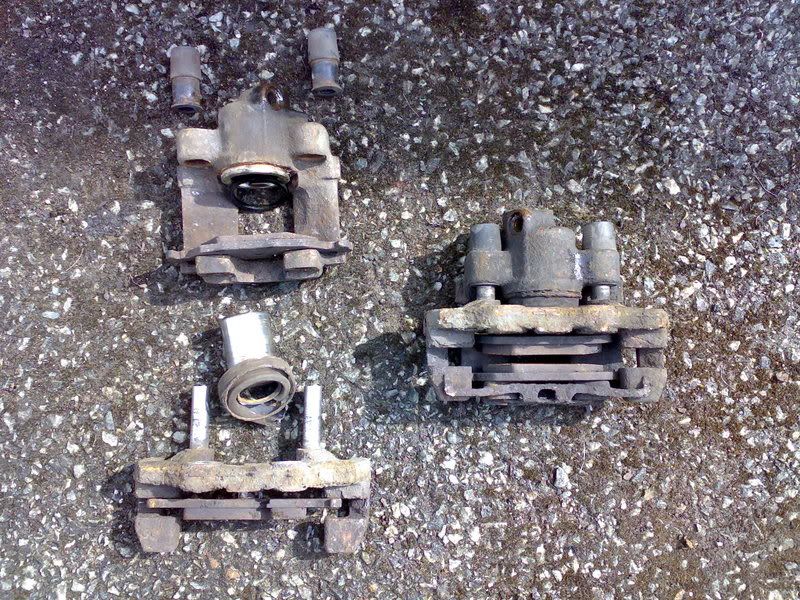
Give the outside surface a bit of a paint..and steam the piston and any part that has movement through it!
Refit is the reverse of removal! Don't try an use the old seals a complete set cost about £18 for each caliper (bit of a rip off for what it is IMO)
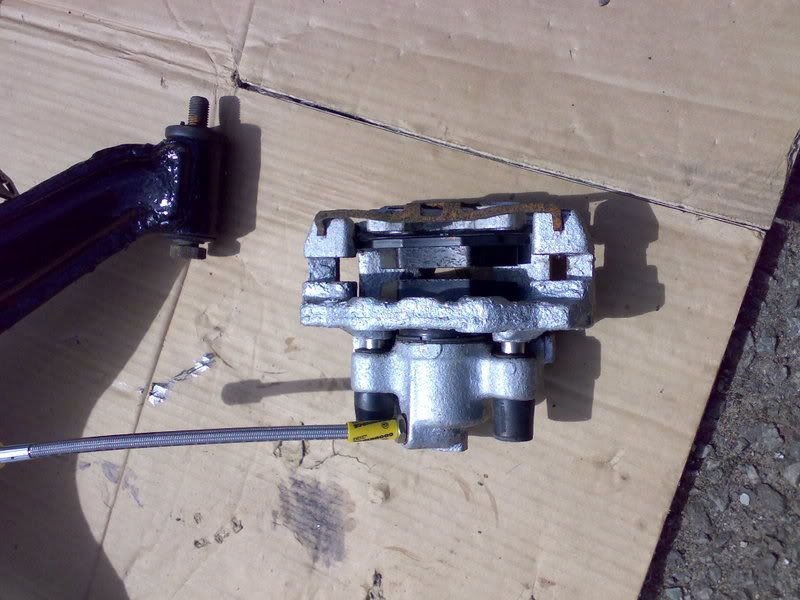
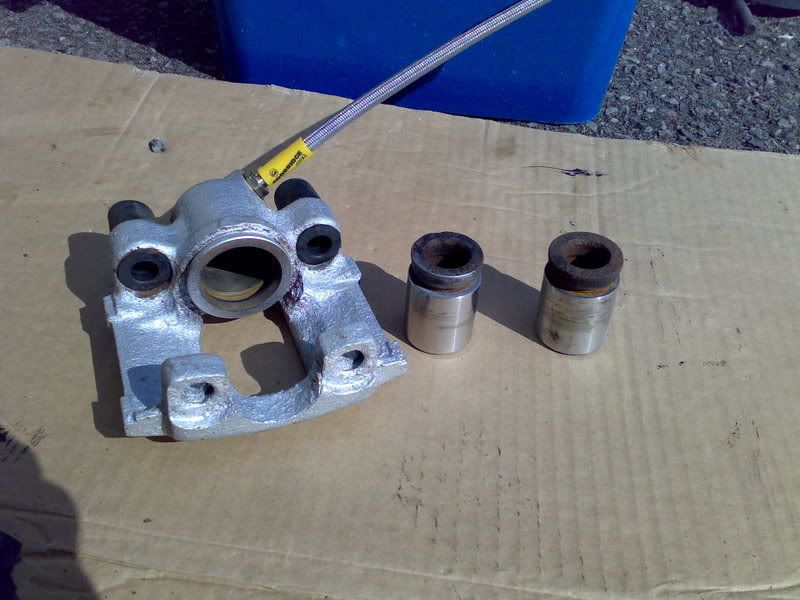
And fit some new goodridge hoses!

It is also a good idea to steam the reservoir check the difference...


Re:
Posted: Thu Jul 12, 2007 9:58 pm
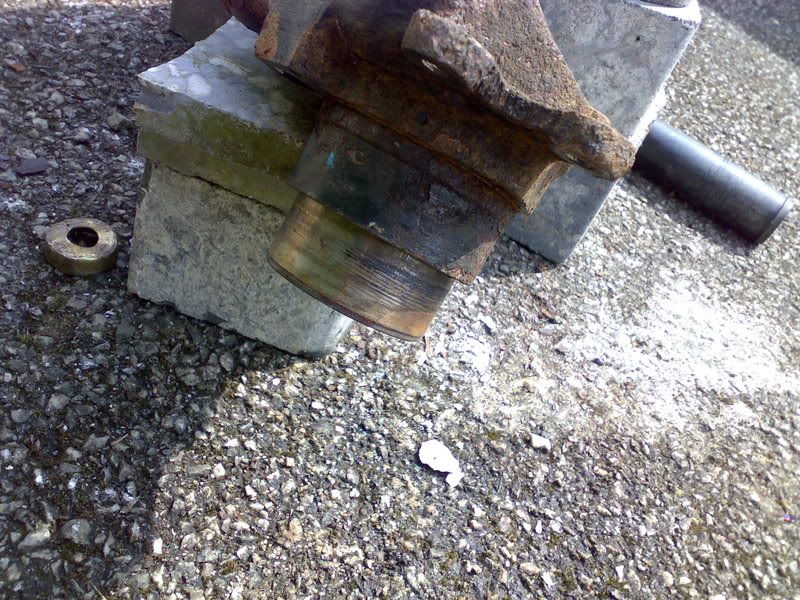
by Gwynleym10
So I needed to put a new diff bush into the cover. I read a while ago Mr Moore saying its a good idea to put the bush in the Freezer...12 hours of Freezing=

Steamed the cover up to warm / expand it up
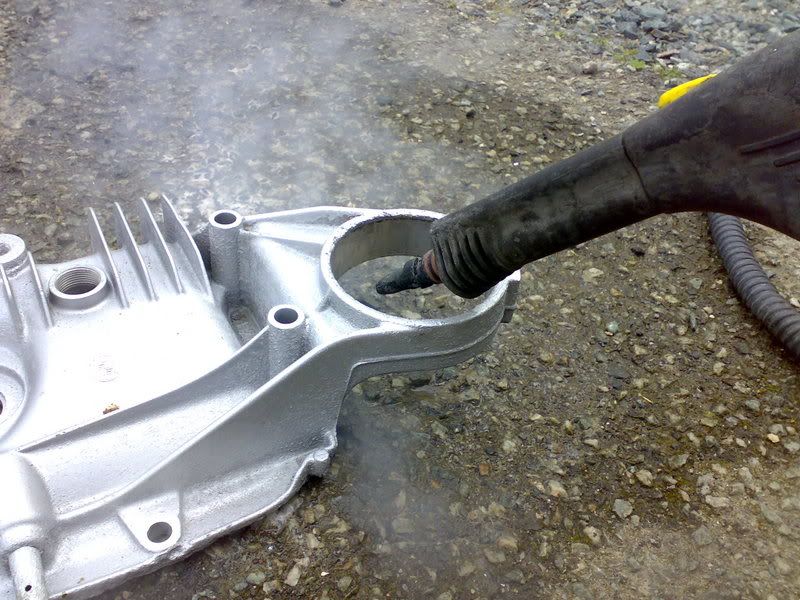
Into the vice - using the old metal to push it in

Turn it around - soooo easy to get in after the freezing!
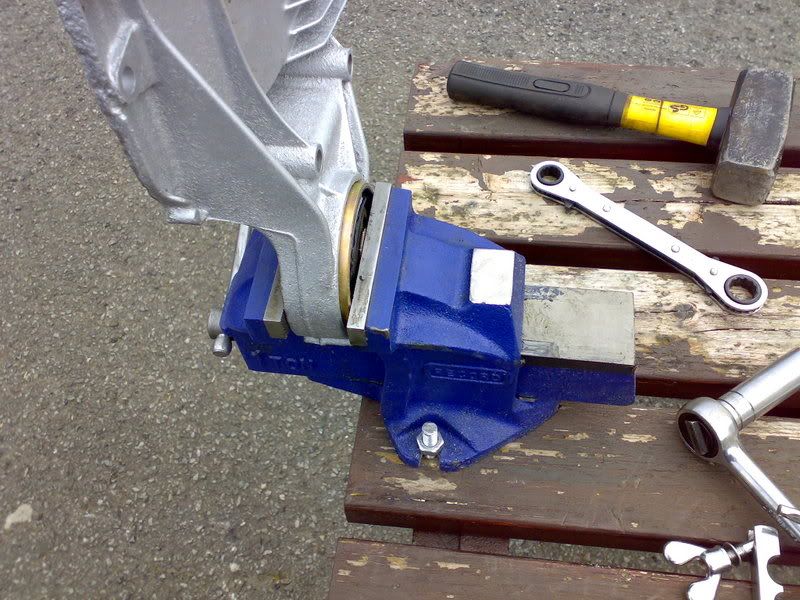

Top tip Brian!
Re:
Posted: Thu Jul 12, 2007 10:00 pm
by Gwynleym10
Check out my shoes! got carried away with the steamer.....