Page 1 of 1
Interior lights relay
Posted: Sun Nov 07, 2010 1:28 pm
by E30_Crazy
Just bought a delay dimmer relay for the interior lights in my 87 tech1. Following the instructions, I dug down to the left front speaker mount. There was supposed to be two screws just below the speaker opening that held a stock relay in place. But there were none, and no sign of a relay down in the bottom of the speaker cavity.
Been search the web for two days now trying to find where this might be, or if I need to splice it in somewhere, but not luck.
Anone who has this know where I need to look, or where to splice this in?
Re: Interior lights relay
Posted: Sun Nov 07, 2010 1:47 pm
by Sanchez
Behind the speaker you will find a central locking module(if fitted with CL).
It is not likeyl that you have a rely fitted.
On the instructions is gives fitting instructions for cars with no rely, follow those like I did, you'll be fine.
Re: Interior lights relay
Posted: Sun Nov 07, 2010 1:50 pm
by jonny323i
i had this dilema but eventually realised there is another plastic trim below the speaker hole pull that out and i found the relay
Re: Interior lights relay
Posted: Sun Nov 07, 2010 1:52 pm
by Brianmoooore
Unless you have a LH drive car, you're digging the wrong side! Who told you LH side?
Re: Interior lights relay
Posted: Sun Nov 07, 2010 1:53 pm
by Sanchez
Re-reading your thread it should be RH speaker.
Too fit the light dimmer you'll need to plug the 3 wires to the connector where the light rely would have been, then the other 2 wires need to go though to the door switch.
Re: Interior lights relay
Posted: Sun Nov 07, 2010 1:56 pm
by jonny323i
i didnt see the lh side bit i just thought he couldnt find it

Re: Interior lights relay
Posted: Sun Nov 07, 2010 2:00 pm
by Brianmoooore
Sanchez wrote:Too fit the light dimmer you'll need to plug the 3 wires to the connector where the light rely would have been, then the other 2 wires need to go though to the door switch.
Unless you're fitting the door handle switch as well, the input on the relay for this switch needs to be linked to the input from the door pin switch.
Re: Interior lights relay
Posted: Sun Nov 07, 2010 2:24 pm
by E30_Crazy
Brianmoooore wrote:Unless you have a LH drive car, you're digging the wrong side! Who told you LH side?
Instructions were from US, and said drivers side (LH) and to take the two bolts out that hold the hood release handle (also LH) so I assumed being in UK that it meant passenger side, not drivers side speaker well. Will go tear apart the REAL (UK) drivers side......
Re: Interior lights relay
Posted: Sun Nov 07, 2010 2:27 pm
by Brianmoooore
Be very wary of US sourced tech. advice! I watch, but rarely post, on the Yahoo forum, and some of the advice on there is horrific!
Posted: Sun Nov 07, 2010 6:46 pm
by E30_Crazy
Yeah, I am getting a list of UK contacts to stay in touch with and/or source parts from, since I will be moving to, and bringing my tech1 with me, to the US in a little over a year.
Figured it out, however. The main point that led me to believe it was the passenger side (Left side) was that the instructions said to remove the steering column underpanel (left side in US spec) and the hood release handle mounting screws (left side of UK spec) so I assumed that the relay was in the left speaker well, regardless of UK or US spec. In the end, it was the RH speaker well it was in. Very simple once I knew where to look. There was a relay already in place (non dimming). Unplugged it, and plugged the wires in where shown, and just had to tidy up all the extra wires in there to fit the larger relay behind the speaker. Tested, all works good, and looks great.
Re:
Posted: Sun Nov 07, 2010 9:04 pm
by Brianmoooore
The complete locking loom is reversible - it can be fitted either way around, depending on where you want the steering wheel.
Re:
Posted: Sat Nov 13, 2010 8:17 am
by gooner1
E30_Crazy, was the Relay plugged into a Black plastic casing

Is so , i have found the correct one, however i am either being a complete tart
and not using enough force, or near 25 years of it being there is making it hard to unplug.
In my defence , i was working with a Torch at night.
Re:
Posted: Sat Nov 13, 2010 10:52 am
by E30_Crazy
The black casting should be the relay itself. Let me try and draw a picture, from memory.
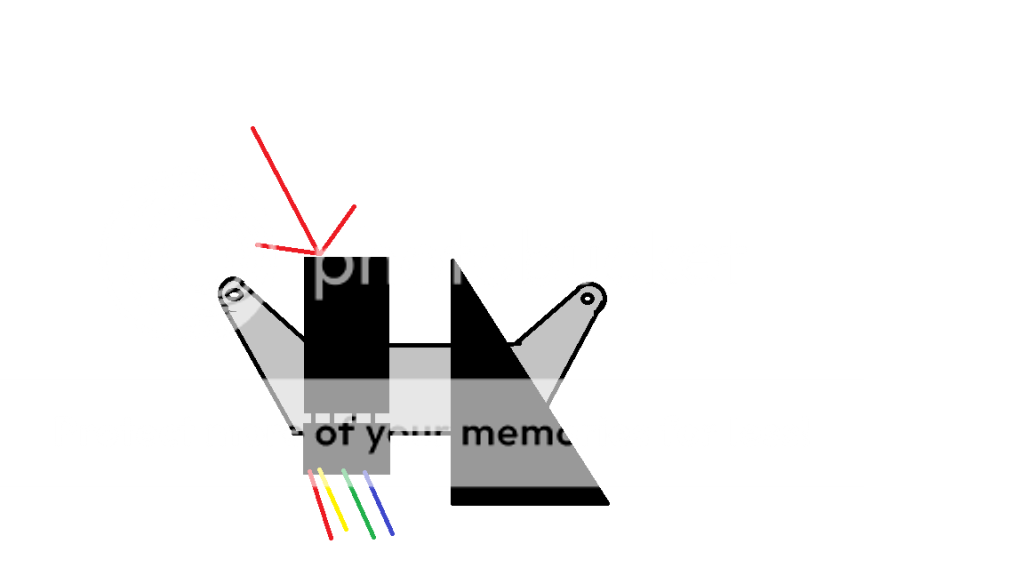
IIRC it was the smaller of the two units attached to the bracket. One was an odd shape, represented here by the triangle. Obviously, I have the relay pointed out. It has a little bracket on it that is clipped into the mounted bracket. You have to get some muscle behind it, and slide it up, and it will release. The little black unit below with the wires coming from it is what the delay relay plugs into. You can use the instructions given to plug in the wire here. Then when putting it all back together, I let the delay unit hang out of the speaker hole until I got the mount bracket screwed back in place, and then found a place for it to sit in the hole, since the new unit does not fit into the small bracket the stock relay used to clip to the mount bracket.
I had a torch at night alo...
Re:
Posted: Sat Nov 13, 2010 12:36 pm
by gooner1
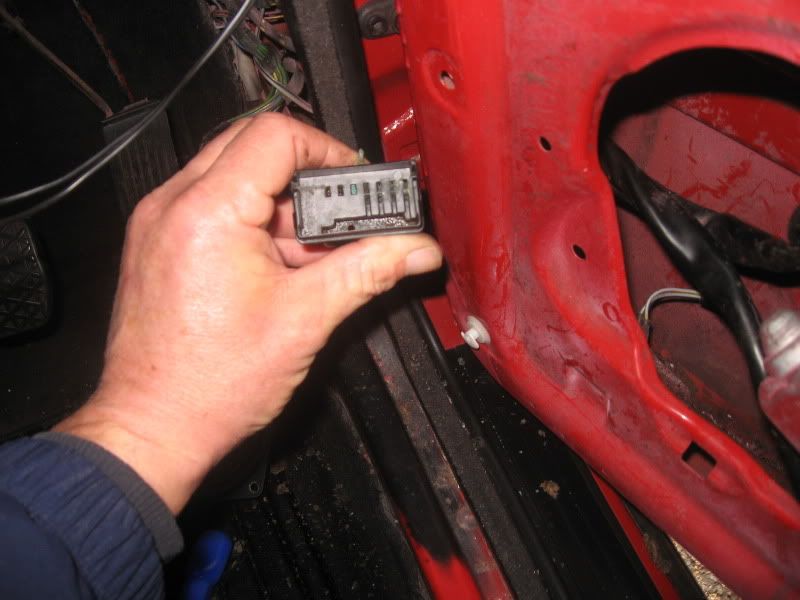
Right, have managed to seperate the casing.
However the relay connections are nothing like the ones shown in the Fitting Instructions
Mine.
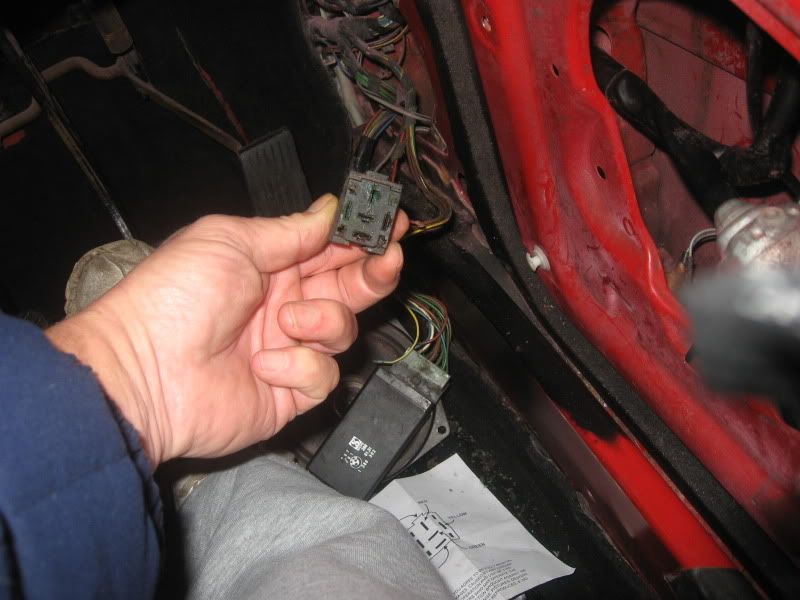
Insructions,

Sorry if i seem a bit obtuse here, but do i now have to
physically cut the Blue,Red, Black wires from the existing relay,
then join to the corresponding wires of the new relay?
Also the Green wire to the Door pin switch and the Yellow wire
to the existing wire that is removed from the door pin switch ?
Thanks btw Crazy, and TIA to all others.
Re:
Posted: Sat Nov 13, 2010 10:52 pm
by george_graves
^That's not the correct socket. Follow the wire off the door pin switch should take you to it.
Re:
Posted: Sat Nov 13, 2010 10:54 pm
by gooner1
Thanks for the very rapid response.
Will check it first thing in AM.
Re:
Posted: Sun Nov 14, 2010 12:46 pm
by gooner1
Have now found the correct socket.
Unfortunately it has succumbed to nearly 25 years of British weather, a certain **** of a
"Paint/bodywork shop" did,nt help much either,and is completly unuseable.

Have got a Wanted post up, in the meantime could i connect the relevant wires
using a Nylon block connector and a copious amount of insulating tape
Re:
Posted: Sun Nov 14, 2010 1:33 pm
by daimlerman
I would use matching connectors to George's relay,and crimp them on.
Other alternate is to chop off the relay connectors and solder/heatshrink the joins.
Re:
Posted: Sun Nov 14, 2010 2:20 pm
by gooner1
Got a connector sorted, so i.ll leave it
and solder/heatshrink it. Thanks anyway.
Re:
Posted: Mon Nov 15, 2010 4:26 am
by george_graves
Mark down the color of the wires. You must have had flooding in the past. That's not normal.
Re:
Posted: Mon Nov 15, 2010 8:55 am
by gooner1
That is a distinct possibilty George.
When i first got the car, nearly 6 years ago, i had to ditch the seats and carpet
as the whole lot stank. The new connector is coming with the wiring cut back
6 inches from it, so should be able to reconnect to my existing wires fairly easily.
Re:
Posted: Mon Nov 15, 2010 12:03 pm
by Sanchez
gooner1 wrote:Have now found the correct socket.
Unfortunately it has succumbed to nearly 25 years of British weather, a certain **** of a
"Paint/bodywork shop" did,nt help much either,and is completly unuseable.
Have got a Wanted post up, in the meantime could i connect the relevant wires
using a Nylon block connector and a copious amount of insulating tape
Mine was looking similar but still had good contact when tested with a meter.
Re:
Posted: Mon Nov 15, 2010 12:07 pm
by gooner1
No good Pete, when i connected the new relay one of the metal connectors, inside the block.
completly disintergrated.
Re:
Posted: Mon Nov 15, 2010 12:11 pm
by Sanchez
You got it working now?
Re:
Posted: Mon Nov 15, 2010 12:12 pm
by gooner1
Waiting on replacement connector.
Re:
Posted: Mon Nov 15, 2010 12:14 pm
by george_graves
Don't miss out on the sale. Unless you want to pay more later.
Re:
Posted: Mon Nov 15, 2010 12:16 pm
by daimlerman
Be worth it in the final,Rob,my light delay units are both now in their second homes and still working well.
Re:
Posted: Mon Nov 15, 2010 12:26 pm
by Sanchez
Can some wiring mods be done to allow the unit to work when other door switches are activate other than the drivers door?
Re:
Posted: Mon Nov 15, 2010 12:31 pm
by george_graves
Yes, see the for sale thread.
Re:
Posted: Mon Nov 15, 2010 12:33 pm
by Sanchez
Just noticed it, cheers Geogre
Re:
Posted: Mon Nov 15, 2010 12:36 pm
by daimlerman
Mine work on both front doors,but not on the rears in the touring.
Posted: Mon Nov 15, 2010 10:35 pm
by M42
If i remember correctly, you can cut the brown/purple wire and brown/yellow wire and join them together, this way your lights will turn off as soon as you shut your door, by-passing the relay.
Posted: Tue Nov 16, 2010 11:02 pm
by Sanchez
M42 wrote:If i remember correctly, you can cut the brown/purple wire and brown/yellow wire and join them together, this way your lights will turn off as soon as you shut your door, by-passing the relay.
But the point is to use the relay thats why I bought one.