
E30 M3 number 2. 04/09/22 Engine build.
Moderator: martauto
-
TurtleDesignTech

- E30 Zone Regular

- Posts: 250
- Joined: Tue Sep 15, 2015 11:00 pm
- Location: Hampshire
I always look forward to updates on this thread. Looking excellent as always.

As usual your workmanship on that car is second to none,its truly amazing well done ! By the way ive i read your article in BMW car on my flight to Munich on Friday to visit BMW classic,your place looks very good and a great article.
Born on the 23 April 1990 320i Alpinweiss ll kabriolett! (SOLD BUT NOT FORGOTTEN !)

I haven't managed to get a copy yet. 
webmaster@e30zone.net
Oh Lord! Your mate Jimbo would be very impressed!!
Apologies for the lack of updates! Its been a hectic few months running BMR but progress has been made.


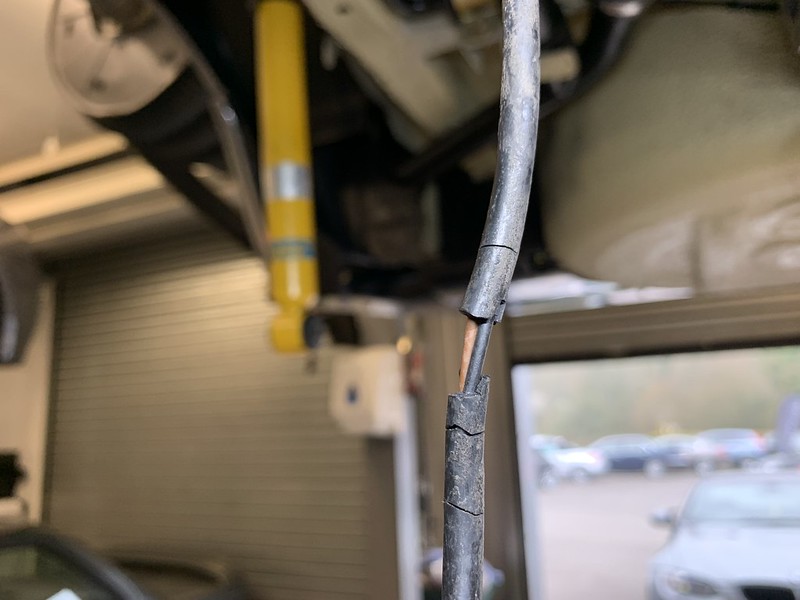
The metal brake and fuel pipes that were fitted to BMW's of this period were an olive green and when you buy new replacements from BMW they are now black.... which wont do.
Using a pipe that hadn't rusted badly, i got a tin of paint colour matched to the original to give the new pipes a coat. Fitted up with new metal clips gave a result im happy with,
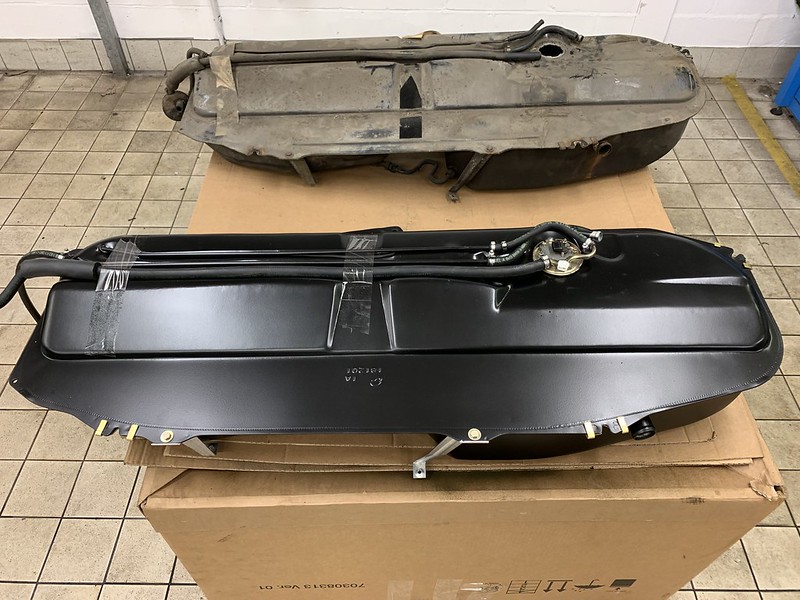


The original 55ltr fuel tank despite being solid and not leaking was not in great shape so a new one was bought and painted in the correct satin black finish, New hoses and fittings were added before mounting with freshly plated bolts.

The original fuel filler neck was blasted and painted in the correct satin black and fitted up with new connecting hoses and clips plus the grommet connecting it to the additional 15ltr tank in the luggage compartment.

The trailing arms rear beam blasted and painted in satin black before.....

being fitted up with all new bushes, bearings and the rebuilt LSD.

Some of the nuts, bolts etc electro plated in the original finish used to refit the rear axle and other parts.
Brake pad sensor wiring for the nearside front and offside rear tends to perish and break up. On some of the Japanese import E30's ive seen this rubber outer insulation has completely broken up and fallen off.

Luckily this section of wiring loom is available new from BMW so both ends replaced.
The metal brake and fuel pipes that were fitted to BMW's of this period were an olive green and when you buy new replacements from BMW they are now black.... which wont do.
Using a pipe that hadn't rusted badly, i got a tin of paint colour matched to the original to give the new pipes a coat. Fitted up with new metal clips gave a result im happy with,
The original 55ltr fuel tank despite being solid and not leaking was not in great shape so a new one was bought and painted in the correct satin black finish, New hoses and fittings were added before mounting with freshly plated bolts.
The original fuel filler neck was blasted and painted in the correct satin black and fitted up with new connecting hoses and clips plus the grommet connecting it to the additional 15ltr tank in the luggage compartment.
The trailing arms rear beam blasted and painted in satin black before.....
being fitted up with all new bushes, bearings and the rebuilt LSD.
Some of the nuts, bolts etc electro plated in the original finish used to refit the rear axle and other parts.
Brake pad sensor wiring for the nearside front and offside rear tends to perish and break up. On some of the Japanese import E30's ive seen this rubber outer insulation has completely broken up and fallen off.
Luckily this section of wiring loom is available new from BMW so both ends replaced.
-
TurtleDesignTech
- E30 Zone Regular
- Posts: 250
- Joined: Tue Sep 15, 2015 11:00 pm
- Location: Hampshire
Super job. Love the attention to detail. 
I will have to pick your brains at some point, when I get around to doing a bit more serious work to my E30.
Your work is definitely I would like to strive for in the future.
I will have to pick your brains at some point, when I get around to doing a bit more serious work to my E30.
Your work is definitely I would like to strive for in the future.
Thanks guys!
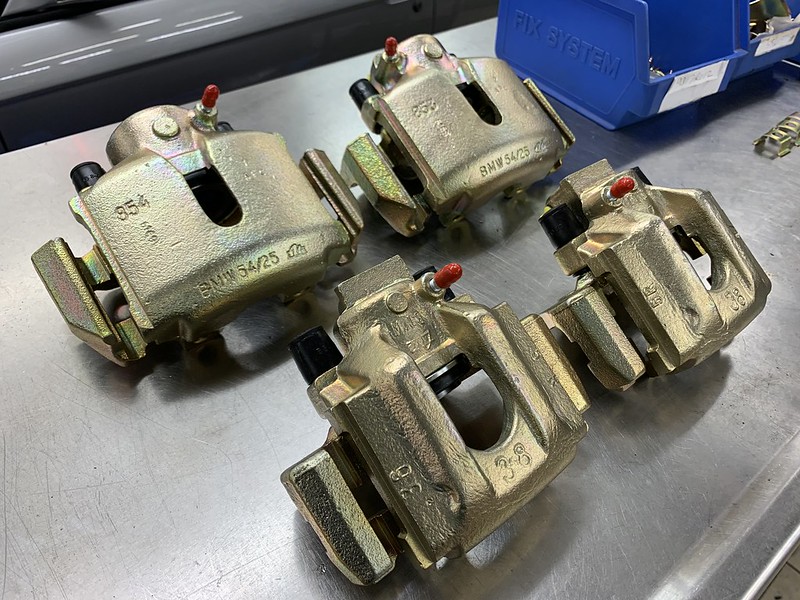
All four brake callipers were sent to www.biggred.co.uk for complete refurbishment in the original finish.


Rears fitted up with new genuine discs and brembo pads and complete parking brake shoes , springs and cables.


A new brake fluid reservoir tops off the 25mm 750i brake master cylinder and repainted brake servo. Also note the various reproduction labels by www.pukardesigns.com
All four brake callipers were sent to www.biggred.co.uk for complete refurbishment in the original finish.
Rears fitted up with new genuine discs and brembo pads and complete parking brake shoes , springs and cables.
A new brake fluid reservoir tops off the 25mm 750i brake master cylinder and repainted brake servo. Also note the various reproduction labels by www.pukardesigns.com
So awesome, how long before it's back on the road?
webmaster@e30zone.net
-
aimlessrock
- E30 Zone Squatter

- Posts: 1821
- Joined: Sun Dec 06, 2009 11:00 pm
- Location: Manchester
this thread is making my mouth moist.....
E30 320i Convertible (1989)
190 Mercedes (1988)
"there is nothing more expensive than a cheap E30"
190 Mercedes (1988)
"there is nothing more expensive than a cheap E30"

Its been a while since ive updated this as ive had a bit of a break from it to spend some time with my family as ive bought another car that ive been spending some money on.


 [
[
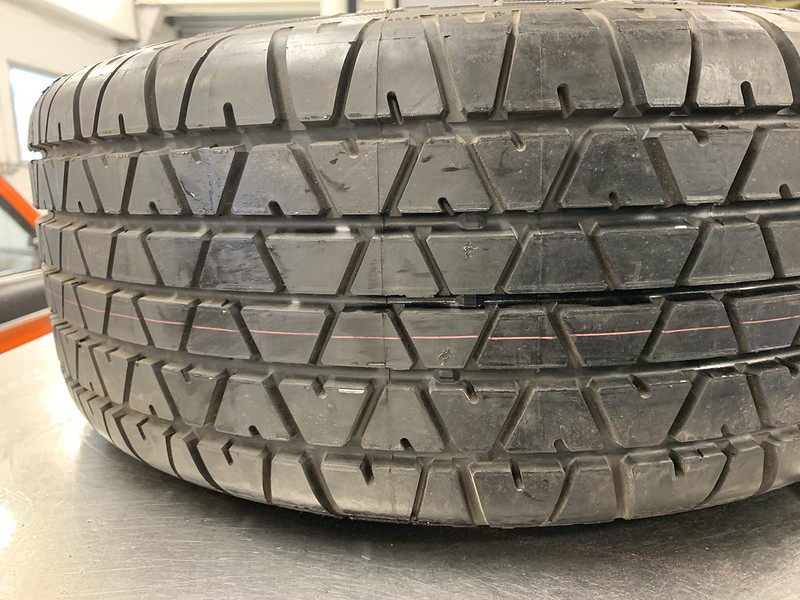
A lucky find was a new old sock Michelin MXX tyre in 225/45/16 to fit for the spare obviously not to be used!

Through some wheeling and dealing i managed to obtain a missing piece boot carpet which is often missing as was the case of my car.


The pic above is the culmination of rebuilding the steering rack with new seals, bushes etc and building up the front subframe with the eibach adjustable roll bar and power flex black series bushes with all hardware electro plated as per OEM. New engine mounts also fitted in preparation for when the engine is mated to the subframe and the complete assembly is installed from underneath.
There will be a few more updates on the cars progress before it goes into storage as i need the space at work and i will be concentrating on the engine build for the time being.
[A lucky find was a new old sock Michelin MXX tyre in 225/45/16 to fit for the spare obviously not to be used!
Through some wheeling and dealing i managed to obtain a missing piece boot carpet which is often missing as was the case of my car.
The pic above is the culmination of rebuilding the steering rack with new seals, bushes etc and building up the front subframe with the eibach adjustable roll bar and power flex black series bushes with all hardware electro plated as per OEM. New engine mounts also fitted in preparation for when the engine is mated to the subframe and the complete assembly is installed from underneath.
There will be a few more updates on the cars progress before it goes into storage as i need the space at work and i will be concentrating on the engine build for the time being.
-
TurtleDesignTech
- E30 Zone Regular
- Posts: 250
- Joined: Tue Sep 15, 2015 11:00 pm
- Location: Hampshire
Hi Barry. I assume you have been very busy at BMR again. I noticed you had a story in last Straight Six August. 
You seem to be pretty on point with the details of your restoration, all the way down to the original colours. I assume this comes from the many years of experience.
I need to refresh/restore the rear suspension over the next few months on my E30 and figured while I have everything apart to put new bushings in I may as well paint most of the parts to protect them.
I would like to paint parts as close as possible to the original colour as the car is in great condition and I would like to do it justice.
I was wondering if you could help me by confirming if the the colour the following parts came painted from the factory for a E30 316i LUX:
Harry
You seem to be pretty on point with the details of your restoration, all the way down to the original colours. I assume this comes from the many years of experience.
I need to refresh/restore the rear suspension over the next few months on my E30 and figured while I have everything apart to put new bushings in I may as well paint most of the parts to protect them.
I would like to paint parts as close as possible to the original colour as the car is in great condition and I would like to do it justice.
I was wondering if you could help me by confirming if the the colour the following parts came painted from the factory for a E30 316i LUX:
- Subframe, driveshaft and trailing arms - Satin Black - Do you have the paint code for this is it just a generic colour?
- Brake and Fuel lines - Did these come the same olive green on non-M3 E30's?
- Underseal - Was this beige on all E30's?
- Wheel arches - Matte Black
Harry
Apologies for the slow replay!TurtleDesignTech wrote: ↑Thu Sep 05, 2019 7:32 pmHi Barry. I assume you have been very busy at BMR again. I noticed you had a story in last Straight Six August.
You seem to be pretty on point with the details of your restoration, all the way down to the original colours. I assume this comes from the many years of experience.
I need to refresh/restore the rear suspension over the next few months on my E30 and figured while I have everything apart to put new bushings in I may as well paint most of the parts to protect them.
I would like to paint parts as close as possible to the original colour as the car is in great condition and I would like to do it justice.
I was wondering if you could help me by confirming if the the colour the following parts came painted from the factory for a E30 316i LUX:
Many thanks
- Subframe, driveshaft and trailing arms - Satin Black - Do you have the paint code for this is it just a generic colour?
- Brake and Fuel lines - Did these come the same olive green on non-M3 E30's?
- Underseal - Was this beige on all E30's?
- Wheel arches - Matte Black
Harry
The sub frames and other part that are black are just satin black, no specific code. There are actually black E- coat which is why they rust as its essentially just a primer.
All BMW's up to E46 era had green brake pipes.
Yes all E30's had beige under seal with body colour over spray in some areas and on cars with lighter coloured paint such as white, red etc had matte black paint in the wheel arches.

At the tail end of July the M3 got put into storage as we needed the workshop space plus its near enough complete minus the engine.


Further back in the thread i posted that the engine was striped to a bare block and head. It sat on a stand for some time before the head was stripped and removed. Some pics of the cams coming out using an old BMW dealer tool for M88 and S14 engines.

Cylinder head and cam bearing housing vapour blasted.

Sump sections and timing cover vapour blasted.

Crankshaft, con rods and pistons removed from the block.
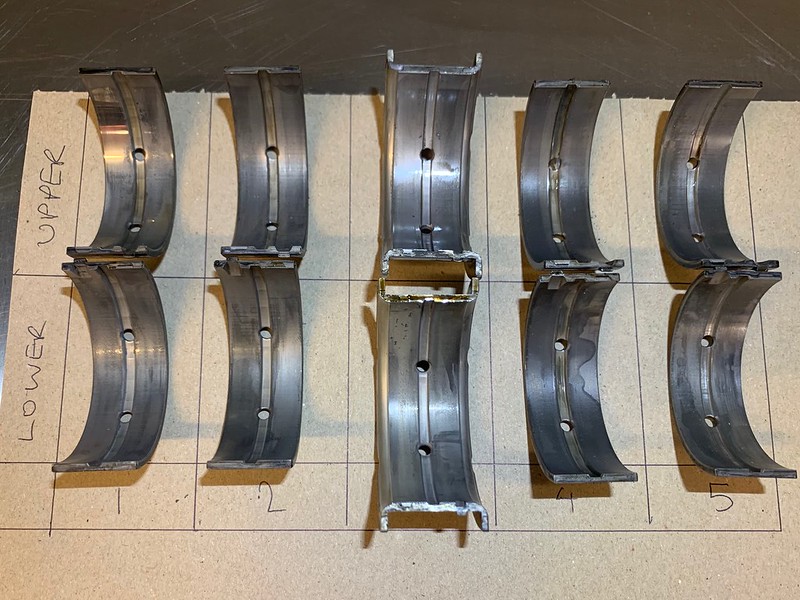
Crank main bearings looked ok.

Con rod bearings not so good.
All main engine parts will be going off to the machine shop to do their thing so any thoughts of a freshen up have turned into a complete rebuild.
-
TurtleDesignTech
- E30 Zone Regular
- Posts: 250
- Joined: Tue Sep 15, 2015 11:00 pm
- Location: Hampshire
Thanks for the response Barry.
Still amazed at the attention to detail. It is no wonder people trust you with their cars.
Still amazed at the attention to detail. It is no wonder people trust you with their cars.
-
bmwe30mtech
- Engaged to the E30 Zone

- Posts: 5288
- Joined: Thu Feb 03, 2005 11:00 pm
Excellent work as always Barry, I'm enjoying following this. Your attention to detail and originality is fantastic.
Paul
Paul
1988 M3 EvoII, Macau Blue/EvoII trim
1989 325i Sport M Tech II, Diamond Black/Black leather
1989 325i Sport M Tech II, Diamond Black/Black leather

Absolutely love this thread. I just did the same with a 1974 Kawasaki and I'm about to start with my E30.
The main fear/question I have for you (or anybody) is, how do you know where to put stuff when you're assembling? On a bike I have meticulous part diagrams with bolt sizes and things. And its a bike so there are less parts overall. Are the diagrams on realOEM detailed enough to rely on for assembly? I'm like Barry, I'll be sending everything out for plating, so how do you know what you've got when you get it back?
The main fear/question I have for you (or anybody) is, how do you know where to put stuff when you're assembling? On a bike I have meticulous part diagrams with bolt sizes and things. And its a bike so there are less parts overall. Are the diagrams on realOEM detailed enough to rely on for assembly? I'm like Barry, I'll be sending everything out for plating, so how do you know what you've got when you get it back?
Thanks for the kind words.T_Dub wrote: ↑Tue Jan 14, 2020 7:43 pmAbsolutely love this thread. I just did the same with a 1974 Kawasaki and I'm about to start with my E30.
The main fear/question I have for you (or anybody) is, how do you know where to put stuff when you're assembling? On a bike I have meticulous part diagrams with bolt sizes and things. And its a bike so there are less parts overall. Are the diagrams on realOEM detailed enough to rely on for assembly? I'm like Barry, I'll be sending everything out for plating, so how do you know what you've got when you get it back?
With regards to knowing where to put things back, over the last 20 years i have owned, broken for spares, restored and worked on countless E30's as its what i do for a living so its all from memory.
The last E30 resto that we completed was delivered to us as a freshly painted shell and lots of boxes of bits that someone else took apart.
Real OEM and BMW parts catalogues do list bolt sizes though if that helps.
Every time I come onto the zone, the very first thing I check is this thread to see if there has been any updates. What a build Barry! Credit to you.
I hoping to swing by the shop at some point this year whilst on my rounds to come and have a snout around.
I hoping to swing by the shop at some point this year whilst on my rounds to come and have a snout around.
Vintage BMWs are an addiction.
Thanks. Makes sense. With my bikes I know where everything goes. Fingers crossed this will be my only E30 build. I've developed a plan including my parts rack and my label maker, should work ok.bss325i wrote: ↑Tue Feb 18, 2020 11:43 pmThanks for the kind words.
With regards to knowing where to put things back, over the last 20 years i have owned, broken for spares, restored and worked on countless E30's as its what i do for a living so its all from memory.
The last E30 resto that we completed was delivered to us as a freshly painted shell and lots of boxes of bits that someone else took apart.
Real OEM and BMW parts catalogues do list bolt sizes though if that helps.
Loved catching up on this - looking stunning and can't wait to see the end result on the road.

-
Royalratch

- E30 Zone Addict
- Posts: 4921
- Joined: Sat Oct 21, 2006 11:00 pm
- Location: London
Epical.
Three years have passed without a real update to this. The rolling shell was put into storage to free up some space at work then life, Covid, other projects have all taken up my time and money until now.
Back in January I started on the engine build.
Near on 8 months have passed and I really should have been updating this but better late than never so here goes!


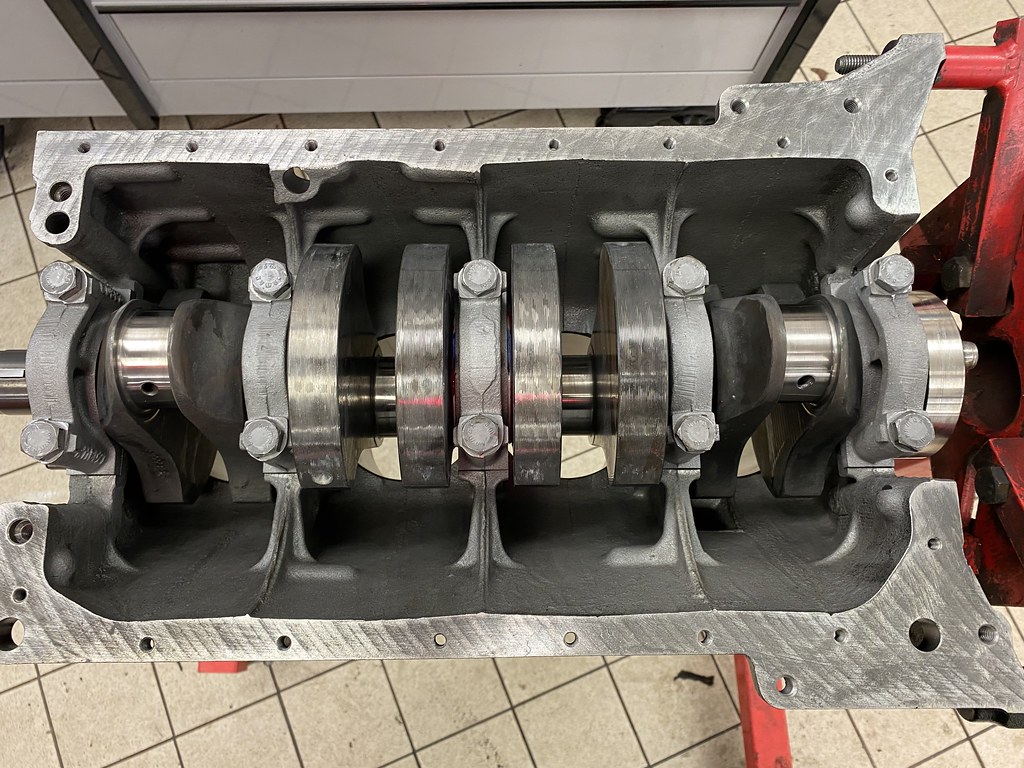
The block along with the bottom end rotating assembly was sent off to the machine shop to be inspected and measured. The cylinders only needed a hone, the block re faced, chemically cleaned, all core and oil plugs replaced with new. The rotating assembly again was measured and all within spec so that was all cleaned, crank journals polished and the whole lot balanced.
That lot was all wrapped up and sat on a shelf for two years until January.


Initial checking of running clearance begun today so a complete set of the correct bearing could be ordered. The running clearance for the main bearings are 0.03mm to 0.07mm and measured with standard size 55.00mm "blue" mains bearing we have a running clearance of 0.05mm so well within spec.

Crankshaft end float checked an in spec.

Pistons and rods all measured and in spec, assembled with new wrist pin clips.

New piston ring sets, new OEM rod bearings an ARP rod bolt set ready to go.

Piston ring gaps checked.

ARP rod bolts torqued to spec measuring stretch.

Bottom end rotating assembly complete.
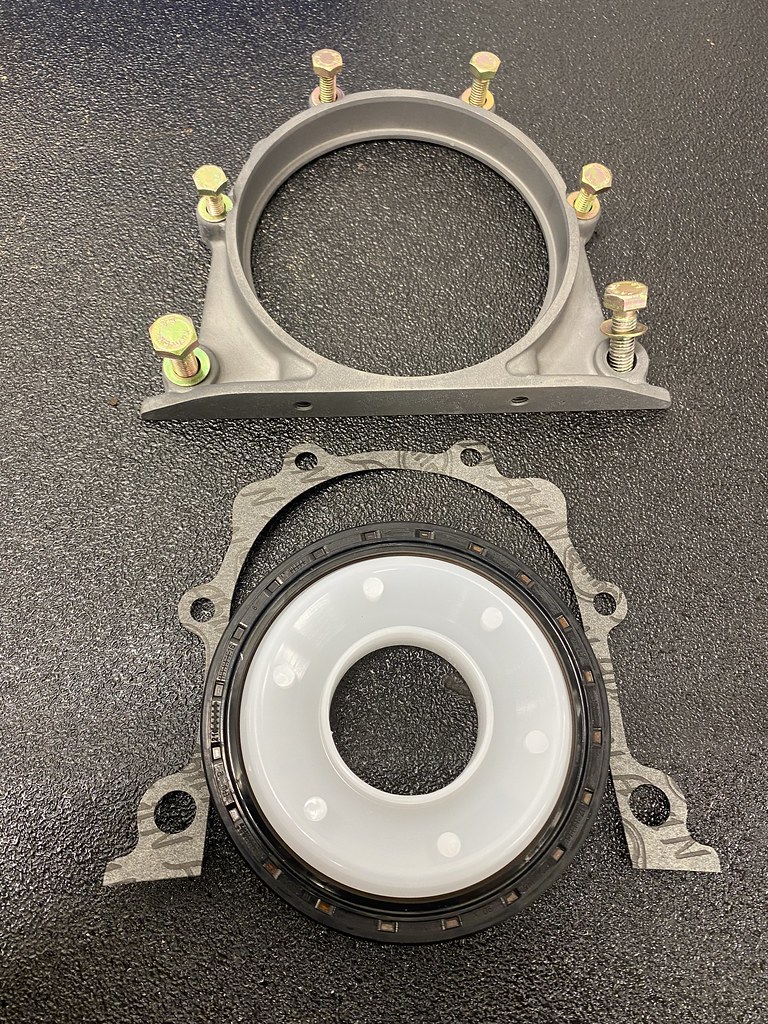
Crankshaft rear main seal assembly laid out.
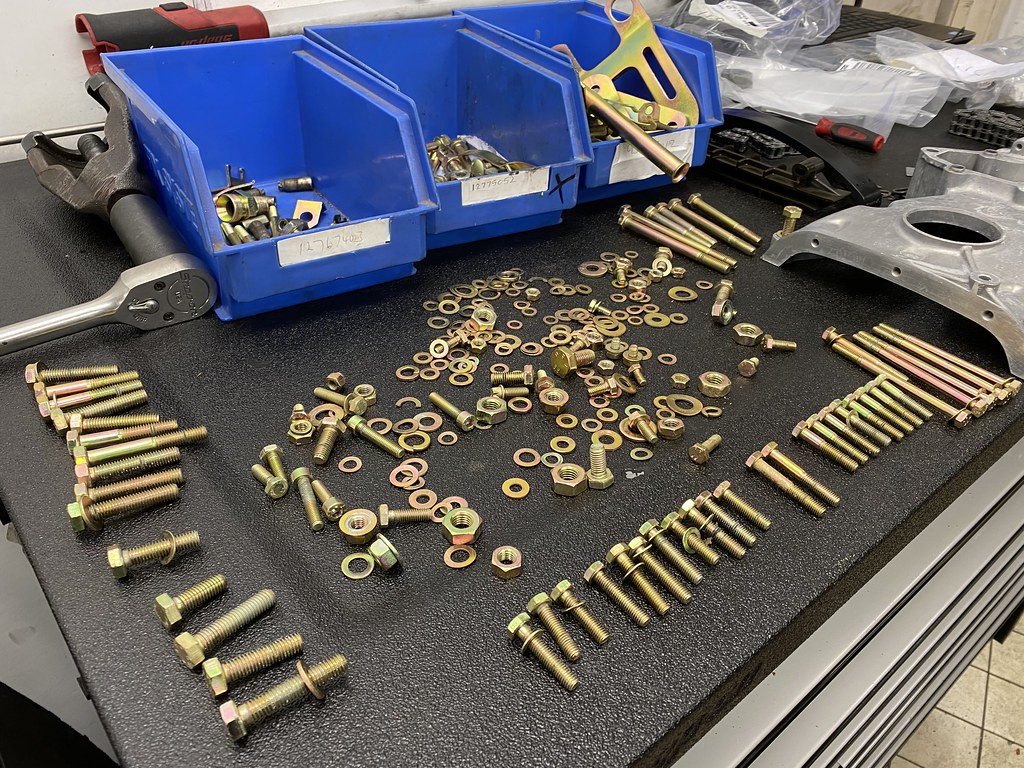
Various fittings electro plated.


The timing chain assembly for the S14 engine laid out and fitted up. Amazingly that little lot cost over £1100! The ///M tax is real with S14's!


Front timing cover and cylinder head bolted down.


Cam bearing housing bolted down and sealed using the correct Würth flange sealant. Buckets and shims fitted and all bearing surfaces coated with engine assembly lube as er the bottom end.
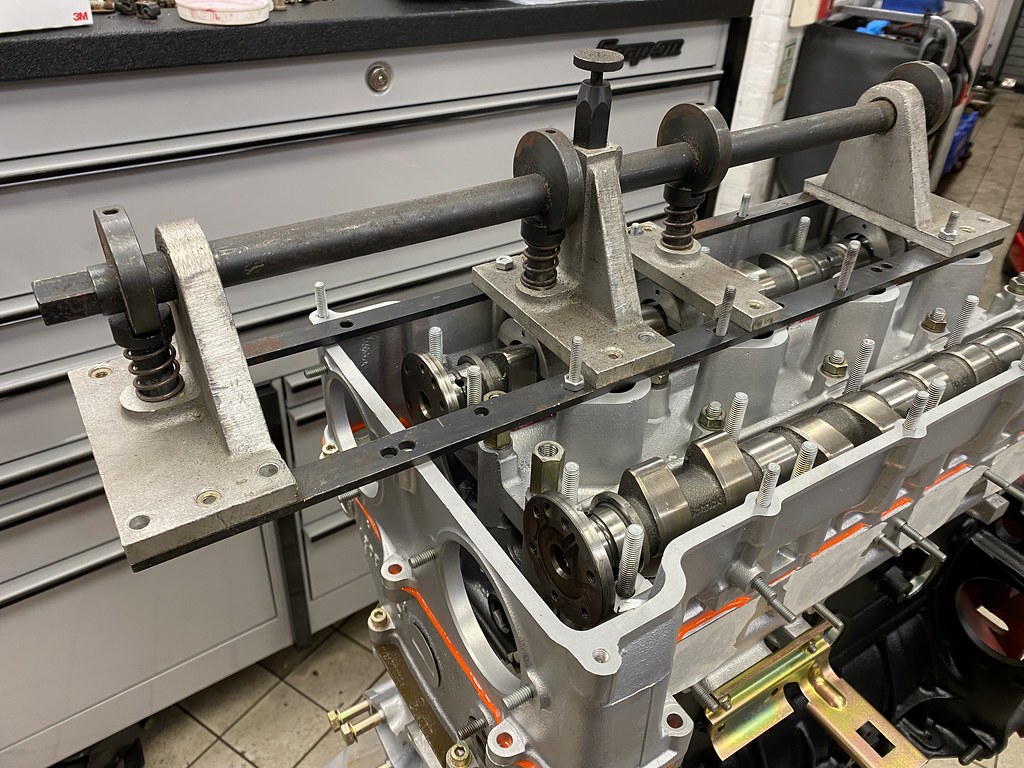

The Shrick cams that were installed over 30 years ago when the engine was rebuilt by Brodie Britain Racing were reused and installed using a 35 year old BMW main dealer special tool for use with M88 and S14 engines that I bought some years ago with a job lot of old dealer tools. All valve clearances set to spec using genuine BMW shims.
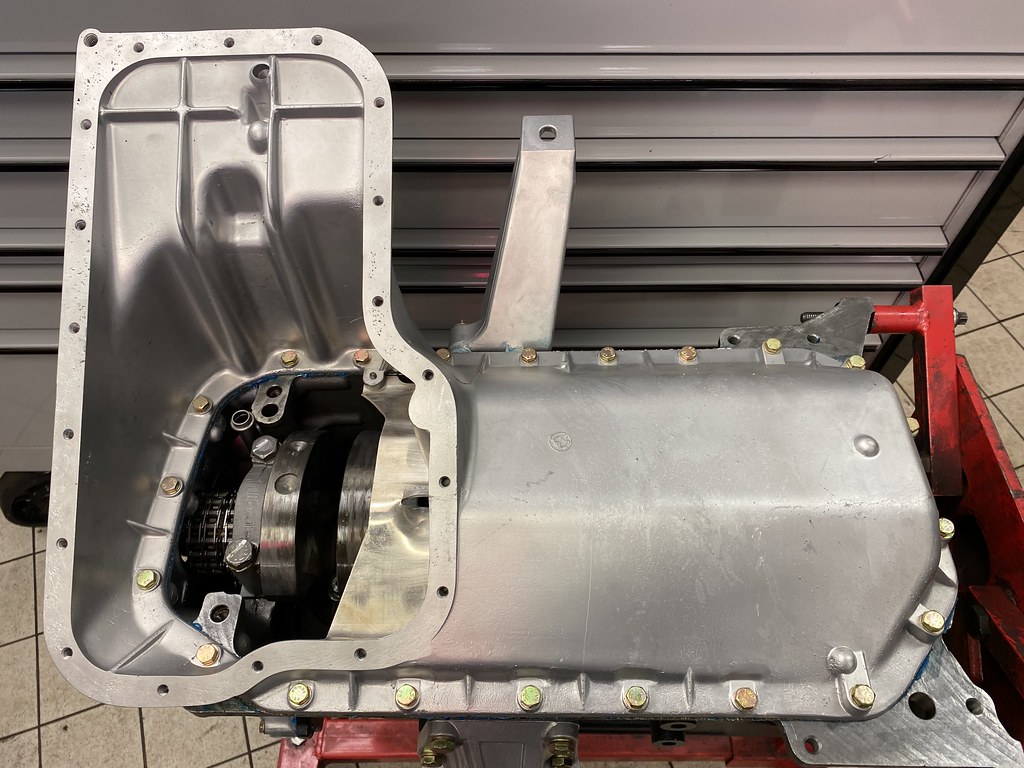
Upper sump section and oil pump fitted after having new a new rotor set installed.

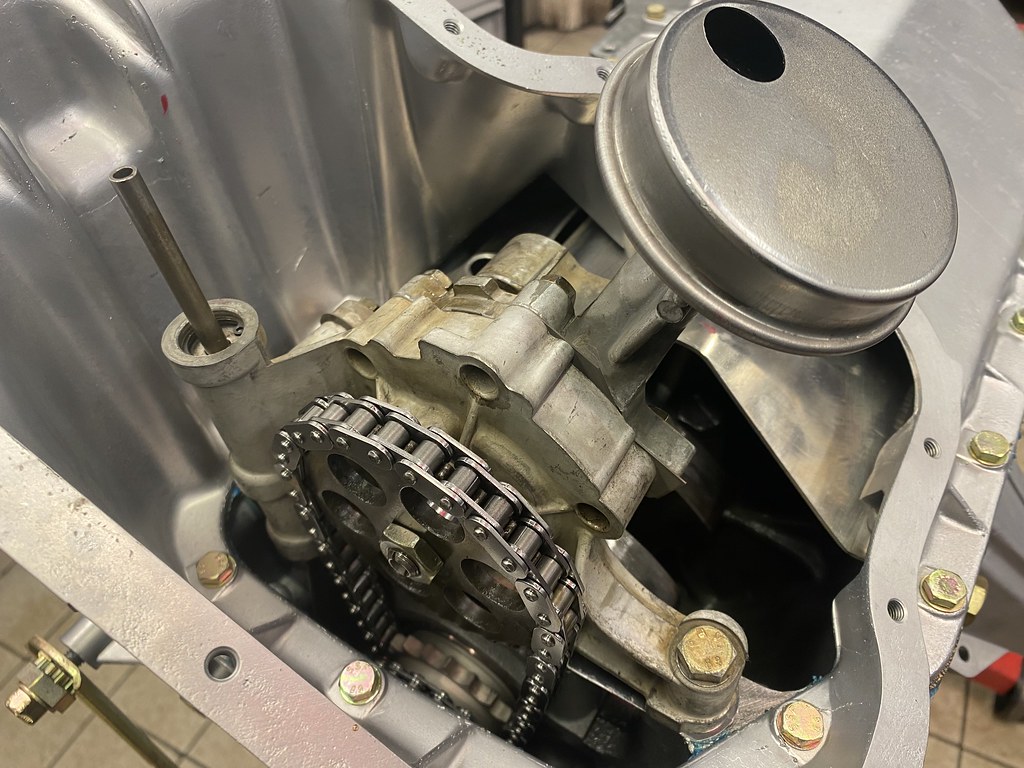
Sprockets and upper guide rail fitted up.


Water pump, coolant rail, various brackets bolted up and cam cover placed on top rounded up the main part of the engine build which took me up to February during my spare time.
Life, a Ring trip and prep for that plus various jobs on my recently sold E46 M3 kept me away from this till June........


Installation time in June saw the engine mated to the already rebuilt Getrag 265/5 dog leg gearbox, vapour blasted bell housing and the billet flywheel and virtually new clutch were reused. Exhaust manifold blasted and painted in high temp paint then bolted up, the engine and box bolted on to the restored front crossmember and rack along with new engine mounts.


Lined up for installation.


The "marriage" is complete. First time the engine and box have been united with the car in nearly four years.
Back in January I started on the engine build.
Near on 8 months have passed and I really should have been updating this but better late than never so here goes!
The block along with the bottom end rotating assembly was sent off to the machine shop to be inspected and measured. The cylinders only needed a hone, the block re faced, chemically cleaned, all core and oil plugs replaced with new. The rotating assembly again was measured and all within spec so that was all cleaned, crank journals polished and the whole lot balanced.
That lot was all wrapped up and sat on a shelf for two years until January.
Initial checking of running clearance begun today so a complete set of the correct bearing could be ordered. The running clearance for the main bearings are 0.03mm to 0.07mm and measured with standard size 55.00mm "blue" mains bearing we have a running clearance of 0.05mm so well within spec.
Crankshaft end float checked an in spec.
Pistons and rods all measured and in spec, assembled with new wrist pin clips.
New piston ring sets, new OEM rod bearings an ARP rod bolt set ready to go.
Piston ring gaps checked.
ARP rod bolts torqued to spec measuring stretch.
Bottom end rotating assembly complete.
Crankshaft rear main seal assembly laid out.
Various fittings electro plated.
The timing chain assembly for the S14 engine laid out and fitted up. Amazingly that little lot cost over £1100! The ///M tax is real with S14's!
Front timing cover and cylinder head bolted down.
Cam bearing housing bolted down and sealed using the correct Würth flange sealant. Buckets and shims fitted and all bearing surfaces coated with engine assembly lube as er the bottom end.
The Shrick cams that were installed over 30 years ago when the engine was rebuilt by Brodie Britain Racing were reused and installed using a 35 year old BMW main dealer special tool for use with M88 and S14 engines that I bought some years ago with a job lot of old dealer tools. All valve clearances set to spec using genuine BMW shims.
Upper sump section and oil pump fitted after having new a new rotor set installed.
Sprockets and upper guide rail fitted up.
Water pump, coolant rail, various brackets bolted up and cam cover placed on top rounded up the main part of the engine build which took me up to February during my spare time.
Life, a Ring trip and prep for that plus various jobs on my recently sold E46 M3 kept me away from this till June........
Installation time in June saw the engine mated to the already rebuilt Getrag 265/5 dog leg gearbox, vapour blasted bell housing and the billet flywheel and virtually new clutch were reused. Exhaust manifold blasted and painted in high temp paint then bolted up, the engine and box bolted on to the restored front crossmember and rack along with new engine mounts.
Lined up for installation.
The "marriage" is complete. First time the engine and box have been united with the car in nearly four years.
Welcome back Barry
-
Tzantushka

- E30 Zone Regular
- Posts: 459
- Joined: Sat Nov 24, 2018 4:18 am
- Location: Melbourne, Australia
Very nice - worth every minute wait.
Good lad